voicefixer
fix bugs
Voicefixer มีจุดมุ่งหมายเพื่อฟื้นฟูคำพูดของมนุษย์โดยไม่คำนึงถึงความเสื่อมโทรมของมัน มันสามารถจัดการกับเสียงรบกวน, reveberation, ความละเอียดต่ำ (2KHz ~ 44.1kHz) และการตัด (0.1-1.0 เกณฑ์) เอฟเฟกต์ภายในรุ่นเดียว
แพ็คเกจนี้ให้:
 @misc { liu2021voicefixer ,
     title = { VoiceFixer: Toward General Speech Restoration With Neural Vocoder } ,
     author = { Haohe Liu and Qiuqiang Kong and Qiao Tian and Yan Zhao and DeLiang Wang and Chuanzeng Huang and Yuxuan Wang } ,
     year = { 2021 } ,
     eprint = { 2109.13731 } ,
     archivePrefix = { arXiv } ,
     primaryClass = { cs.SD }
}กรุณาเยี่ยมชมหน้าสาธิตเพื่อดูว่า VoiceFixer สามารถทำอะไรได้บ้าง
| โหมด | คำอธิบาย |
|---|---|
0 | โมเดลต้นฉบับ (แนะนำโดยค่าเริ่มต้น) |
1 | เพิ่มโมดูลการประมวลผลล่วงหน้า (ลบความถี่ที่สูงขึ้น) |
2 | โหมดรถไฟ (บางครั้งอาจใช้งานได้ในการพูดจริงจริง ๆ ) |
all | เรียกใช้โหมดทั้งหมด - จะส่งออก 1 WAV ไฟล์สำหรับแต่ละโหมดที่รองรับ |
ก่อนอื่นให้ติดตั้ง VoiceFixer ผ่าน PIP:
pip install git+https://github.com/haoheliu/voicefixer.gitประมวลผลไฟล์:
 # Specify the input .wav file. Output file is outfile.wav.
voicefixer --infile test/utterance/original/original.wav
# Or specify a output path
voicefixer --infile test/utterance/original/original.wav --outfile test/utterance/original/original_processed.wav
ประมวลผลไฟล์ในโฟลเดอร์:
voicefixer --infolder /path/to/input --outfolder /path/to/outputโหมดเปลี่ยน (โหมดเริ่มต้นคือ 0):
voicefixer --infile /path/to/input.wav --outfile /path/to/output.wav --mode 1เรียกใช้ทุกโหมด:
 # output file saved to `/path/to/output-modeX.wav`.
voicefixer --infile /path/to/input.wav --outfile /path/to/output.wav --mode all
โหลดน้ำหนักล่วงหน้าโดยไม่มีการประมวลผลจริง:
voicefixer --weight_prepareสำหรับข้อมูลผู้ช่วยเพิ่มเติมโปรดเรียกใช้:
voicefixer -hตัวอย่างบน YouTube (ขอบคุณ @Justin John)
ติดตั้ง VoiceFixer ผ่าน PIP:
pip install voicefixerคุณสามารถทดสอบตัวอย่างเสียงบนเดสก์ท็อปของคุณโดยใช้เว็บไซต์ (ขับเคลื่อนโดย Streamlit)
git clone https://github.com/haoheliu/voicefixer.git
cd voicefixer # Run streamlit
streamlit run test/streamlit.pyหากคุณทำงานเป็นครั้งแรก: หน้าเว็บอาจว่างเปล่าเป็นเวลาหลายนาทีสำหรับการดาวน์โหลดรุ่น คุณสามารถชำระเงินเทอร์มินัลสำหรับการดาวน์โหลดความคืบหน้า
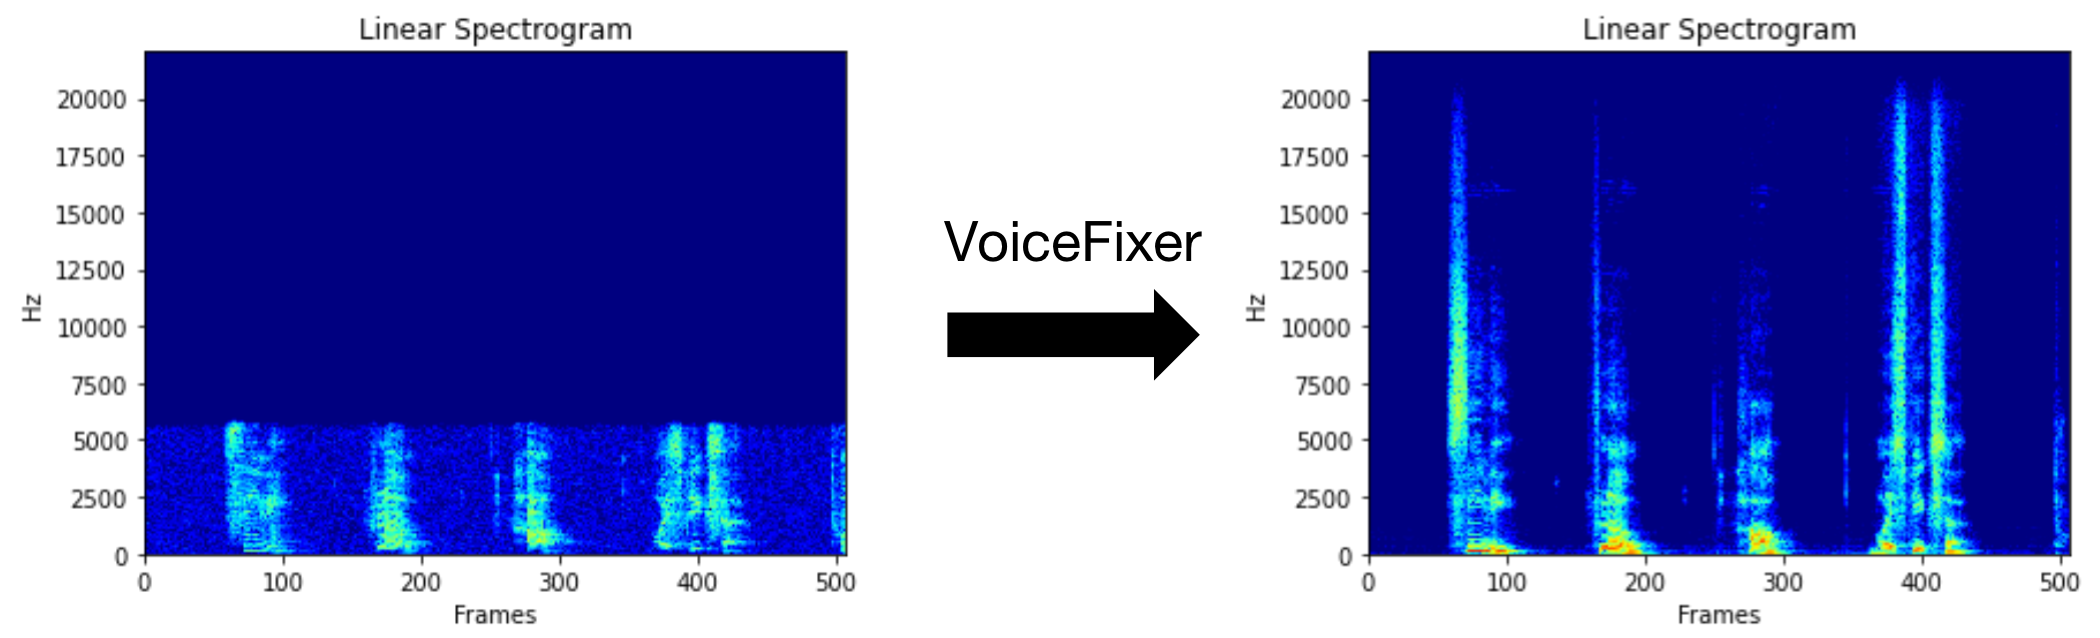
คุณสามารถใช้ไฟล์คำพูดที่มีคุณภาพต่ำนี้ที่เราให้ไว้สำหรับการทดสอบ หน้าหลังจากการประมวลผลจะมีลักษณะดังต่อไปนี้

ก่อนอื่นให้ติดตั้ง VoiceFixer ผ่าน PIP:
pip install voicefixerจากนั้นเรียกใช้สคริปต์ต่อไปนี้เพื่อทำการทดสอบ:
git clone https://github.com/haoheliu/voicefixer.git ; cd voicefixer
python3 test/test.py # test script
เราคาดว่ามันจะให้ผลลัพธ์ต่อไปนี้แก่คุณ:
Initializing VoiceFixer...
Test voicefixer mode 0, Pass
Test voicefixer mode 1, Pass
Test voicefixer mode 2, Pass
Initializing 44.1kHz speech vocoder...
Test vocoder using groundtruth mel spectrogram...
Pass
ทดสอบ/ทดสอบ ส่วนใหญ่มีการทดสอบของ API สองตัวต่อไปนี้:
...

# TEST VOICEFIXER
## Initialize a voicefixer
print ( "Initializing VoiceFixer..." )
voicefixer = VoiceFixer ()
# Mode 0: Original Model (suggested by default)
# Mode 1: Add preprocessing module (remove higher frequency)
# Mode 2: Train mode (might work sometimes on seriously degraded real speech)
for mode in [ 0 , 1 , 2 ]:
    print ( "Testing mode" , mode )
    voicefixer . restore ( input = os . path . join ( git_root , "test/utterance/original/original.flac" ), # low quality .wav/.flac file
                       output = os . path . join ( git_root , "test/utterance/output/output_mode_" + str ( mode ) + ".flac" ), # save file path
                       cuda = False , # GPU acceleration
                       mode = mode )
    if ( mode != 2 ):
        check ( "output_mode_" + str ( mode ) + ".flac" )
    print ( "Pass" )

# TEST VOCODER
## Initialize a vocoder
print ( "Initializing 44.1kHz speech vocoder..." )
vocoder = Vocoder ( sample_rate = 44100 )

### read wave (fpath) -> mel spectrogram -> vocoder -> wave -> save wave (out_path)
print ( "Test vocoder using groundtruth mel spectrogram..." )
vocoder . oracle ( fpath = os . path . join ( git_root , "test/utterance/original/p360_001_mic1.flac" ),
               out_path = os . path . join ( git_root , "test/utterance/output/oracle.flac" ),
               cuda = False ) # GPU acceleration

...
คุณสามารถโคลน repo นี้และพยายามเรียกใช้ test.py ภายในโฟลเดอร์ ทดสอบ
ขณะนี้อิมเมจ Docker ไม่ได้เผยแพร่และจำเป็นต้องสร้างในพื้นที่ แต่วิธีนี้คุณต้องแน่ใจว่าคุณใช้งานด้วยการกำหนดค่าที่คาดหวังทั้งหมด ขนาดภาพที่สร้างขึ้นประมาณ 10GB และส่วนใหญ่เป็นผลมาจากการพึ่งพาที่ใช้ประมาณ 9.8GB ด้วยตัวเอง
อย่างไรก็ตามเลเยอร์ที่มี
voicefixerเป็นเลเยอร์ที่เพิ่มเข้ามาครั้งสุดท้ายทำให้การสร้างใหม่ใด ๆ หากคุณเปลี่ยนแหล่งที่มาค่อนข้างเล็ก (~ 200MB ต่อครั้งเมื่อน้ำหนักได้รับการรีเฟรชในการสร้างภาพ)
Dockerfile สามารถดูได้ที่นี่
หลังจากโคลนนิ่ง repo:
 # To build the image
cd voicefixer
docker build -t voicefixer:cpu .

# To run the image
docker run --rm -v " $( pwd ) /data:/opt/voicefixer/data " voicefixer:cpu < all_other_cli_args_here >

# # Example: docker run --rm -v "$(pwd)/data:/opt/voicefixer/data" voicefixer:cpu --infile data/my-input.wav --outfile data/my-output.mode-all.wav --mode all # To build the image
cd voicefixer
./docker-build-local.sh
# To run the image
./run.sh < all_other_cli_args_here >
# # Example: ./run.sh --infile data/my-input.wav --outfile data/my-output.mode-all.wav --mode allก่อนอื่นคุณต้องเขียนฟังก์ชั่นผู้ช่วยต่อไปนี้ด้วยโมเดลของคุณ คล้ายกับฟังก์ชั่นผู้ช่วยใน repo นี้: https://github.com/haoheliu/voicefixer/blob/main/voicefixer/vocoder/base.py#l35
    def convert_mel_to_wav(mel):
        " " "
        :param non normalized mel spectrogram: [batchsize, 1, t-steps, n_mel]
        :return: [batchsize, 1, samples]
        " " "
        return wav
จากนั้นส่งผ่านฟังก์ชั่นนี้ไปยัง VoiceFixer.restore ตัวอย่างเช่น:
 voicefixer.restore(input="", # input wav file path
                   output="", # output wav file path
                   cuda=False, # whether to use gpu acceleration
                   mode = 0,
                   your_vocoder_func = convert_mel_to_wav)
บันทึก:
ดู Changelog.md


