voicefixer
fix bugs
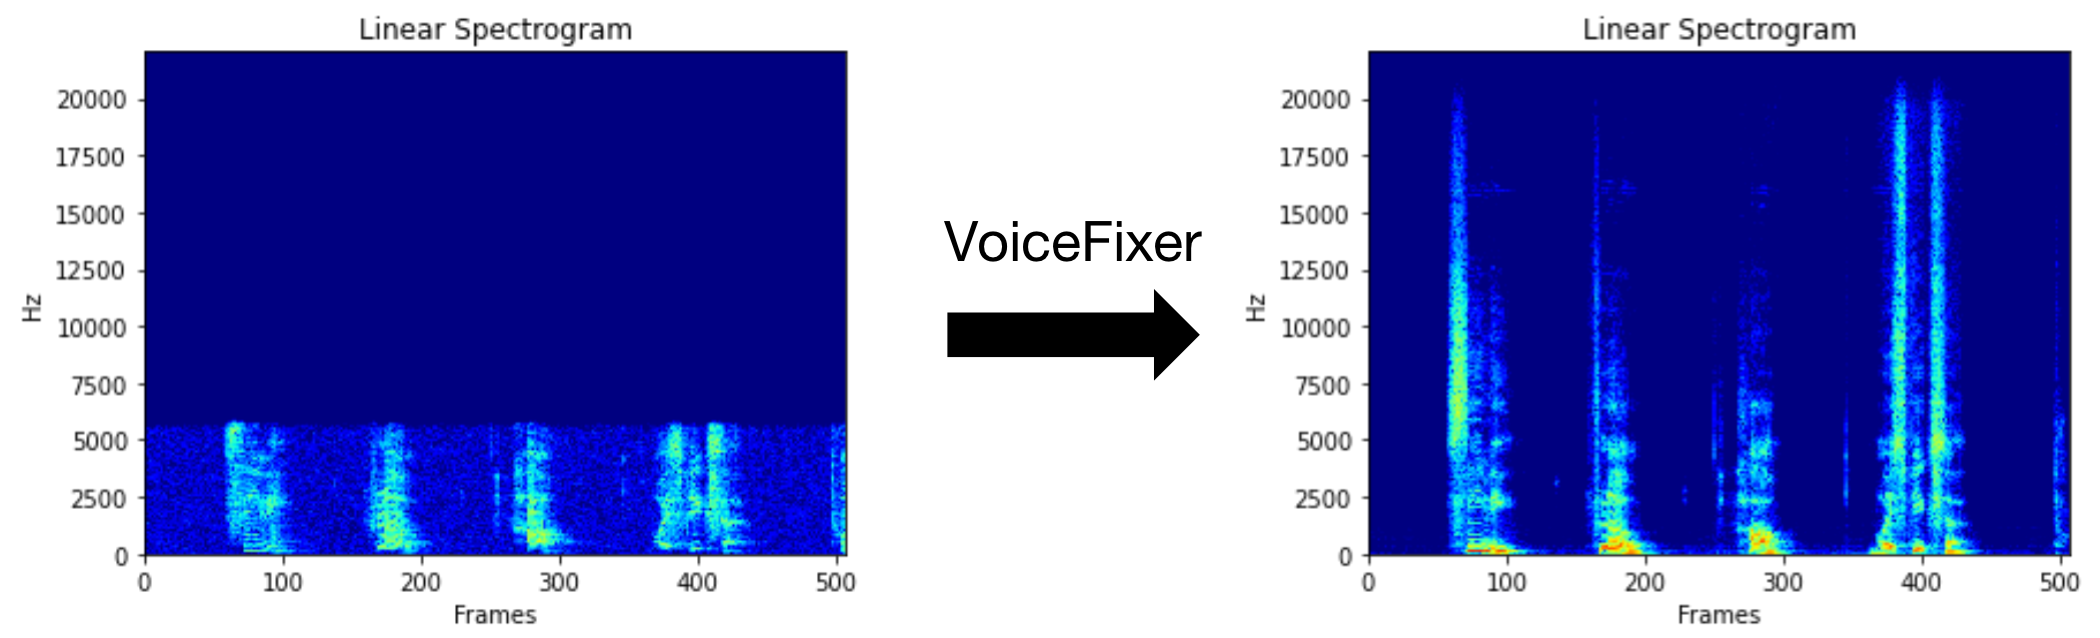
VoiceFixerは、その深刻な劣化に関係なく、人間のスピーチを回復することを目指しています。 1つのモデル内で、ノイズ、リベーベーション、低解像度(2kHz〜44.1kHz)、およびクリッピング(0.1-1.0しきい値)効果を処理できます。
このパッケージは次のとおりです。
 @misc { liu2021voicefixer ,
     title = { VoiceFixer: Toward General Speech Restoration With Neural Vocoder } ,
     author = { Haohe Liu and Qiuqiang Kong and Qiao Tian and Yan Zhao and DeLiang Wang and Chuanzeng Huang and Yuxuan Wang } ,
     year = { 2021 } ,
     eprint = { 2109.13731 } ,
     archivePrefix = { arXiv } ,
     primaryClass = { cs.SD }
}Demoページにアクセスして、VoiceFixerができることを表示してください。
| モード | 説明 |
|---|---|
0 | オリジナルモデル(デフォルトで提案) |
1 | プリプロセシングモジュールを追加します(より高い頻度を削除します) |
2 | トレインモード(真剣に劣化した実際のスピーチで動作する場合があります) |
all | すべてのモードを実行 - サポートされているモードごとに1つのWAVファイルを出力します。 |
まず、PIP経由でVoiceFixerをインストールします。
pip install git+https://github.com/haoheliu/voicefixer.gitファイルを処理します:
 # Specify the input .wav file. Output file is outfile.wav.
voicefixer --infile test/utterance/original/original.wav
# Or specify a output path
voicefixer --infile test/utterance/original/original.wav --outfile test/utterance/original/original_processed.wav
フォルダー内のファイルを処理します。
voicefixer --infolder /path/to/input --outfolder /path/to/output変更モード(デフォルトモードは0):
voicefixer --infile /path/to/input.wav --outfile /path/to/output.wav --mode 1すべてのモードを実行します:
 # output file saved to `/path/to/output-modeX.wav`.
voicefixer --infile /path/to/input.wav --outfile /path/to/output.wav --mode all
実際の処理なしでのみウェイトを事前ロードします。
voicefixer --weight_prepareヘルパー情報については、実行してください。
voicefixer -hYouTubeのデモ(ありがとう@Justin John)
PIP経由でVoiceFixerをインストールします。
pip install voicefixerWebサイトを実行することで、デスクトップでオーディオサンプルをテストできます(streamlitで駆動)
git clone https://github.com/haoheliu/voicefixer.git
cd voicefixer # Run streamlit
streamlit run test/streamlit.py初めて実行する場合:Webページは、モデルをダウンロードするために数分間空白のままになる場合があります。進行状況をダウンロードするために端末をチェックアウトできます。
テスト実行に提供したこの低品質の音声ファイルを使用できます。処理後のページは次のようになります。

まず、PIP経由でVoiceFixerをインストールします。
pip install voicefixer次に、テスト実行のために次のスクリプトを実行します。
git clone https://github.com/haoheliu/voicefixer.git ; cd voicefixer
python3 test/test.py # test script
次の出力が得られると思います。
Initializing VoiceFixer...
Test voicefixer mode 0, Pass
Test voicefixer mode 1, Pass
Test voicefixer mode 2, Pass
Initializing 44.1kHz speech vocoder...
Test vocoder using groundtruth mel spectrogram...
PassTEST/test.pyには、主に次の2つのAPIのテストが含まれています。
...

# TEST VOICEFIXER
## Initialize a voicefixer
print ( "Initializing VoiceFixer..." )
voicefixer = VoiceFixer ()
# Mode 0: Original Model (suggested by default)
# Mode 1: Add preprocessing module (remove higher frequency)
# Mode 2: Train mode (might work sometimes on seriously degraded real speech)
for mode in [ 0 , 1 , 2 ]:
    print ( "Testing mode" , mode )
    voicefixer . restore ( input = os . path . join ( git_root , "test/utterance/original/original.flac" ), # low quality .wav/.flac file
                       output = os . path . join ( git_root , "test/utterance/output/output_mode_" + str ( mode ) + ".flac" ), # save file path
                       cuda = False , # GPU acceleration
                       mode = mode )
    if ( mode != 2 ):
        check ( "output_mode_" + str ( mode ) + ".flac" )
    print ( "Pass" )

# TEST VOCODER
## Initialize a vocoder
print ( "Initializing 44.1kHz speech vocoder..." )
vocoder = Vocoder ( sample_rate = 44100 )

### read wave (fpath) -> mel spectrogram -> vocoder -> wave -> save wave (out_path)
print ( "Test vocoder using groundtruth mel spectrogram..." )
vocoder . oracle ( fpath = os . path . join ( git_root , "test/utterance/original/p360_001_mic1.flac" ),
               out_path = os . path . join ( git_root , "test/utterance/output/oracle.flac" ),
               cuda = False ) # GPU acceleration

...このリポジトリをクローンして、テストフォルダー内でtest.pyを実行してみてください。
現在、Dockerイメージは公開されておらず、ローカルで構築する必要がありますが、これにより、予想されるすべての構成で実行していることを確認します。生成された画像サイズは約10GBであり、これは主に、それ自体で約9.8GBを消費する依存関係によるものです。
ただし、
voicefixerを含むレイヤーは最後の追加レイヤーであり、ソースを比較的小さく変更すると再構築されます(画像ビルドでウェイトが更新されると、一度に〜200MB)。
Dockerfileここで見ることができます。
リポジトリをクローニングした後:
 # To build the image
cd voicefixer
docker build -t voicefixer:cpu .

# To run the image
docker run --rm -v " $( pwd ) /data:/opt/voicefixer/data " voicefixer:cpu < all_other_cli_args_here >

# # Example: docker run --rm -v "$(pwd)/data:/opt/voicefixer/data" voicefixer:cpu --infile data/my-input.wav --outfile data/my-output.mode-all.wav --mode all # To build the image
cd voicefixer
./docker-build-local.sh
# To run the image
./run.sh < all_other_cli_args_here >
# # Example: ./run.sh --infile data/my-input.wav --outfile data/my-output.mode-all.wav --mode allまず、モデルで次のヘルパー機能を記述する必要があります。このレポのヘルパー関数と同様:https://github.com/haoheliu/voicefixer/blob/main/voicefixer/vocoder/base.py#l35
    def convert_mel_to_wav(mel):
        " " "
        :param non normalized mel spectrogram: [batchsize, 1, t-steps, n_mel]
        :return: [batchsize, 1, samples]
        " " "
return wav次に、この関数をvoicefixer.restoreに渡します。
 voicefixer.restore(input="", # input wav file path
                   output="", # output wav file path
                   cuda=False, # whether to use gpu acceleration
                   mode = 0,
                   your_vocoder_func = convert_mel_to_wav)
注記:
changelog.mdを参照してください。


