voicefixer
fix bugs
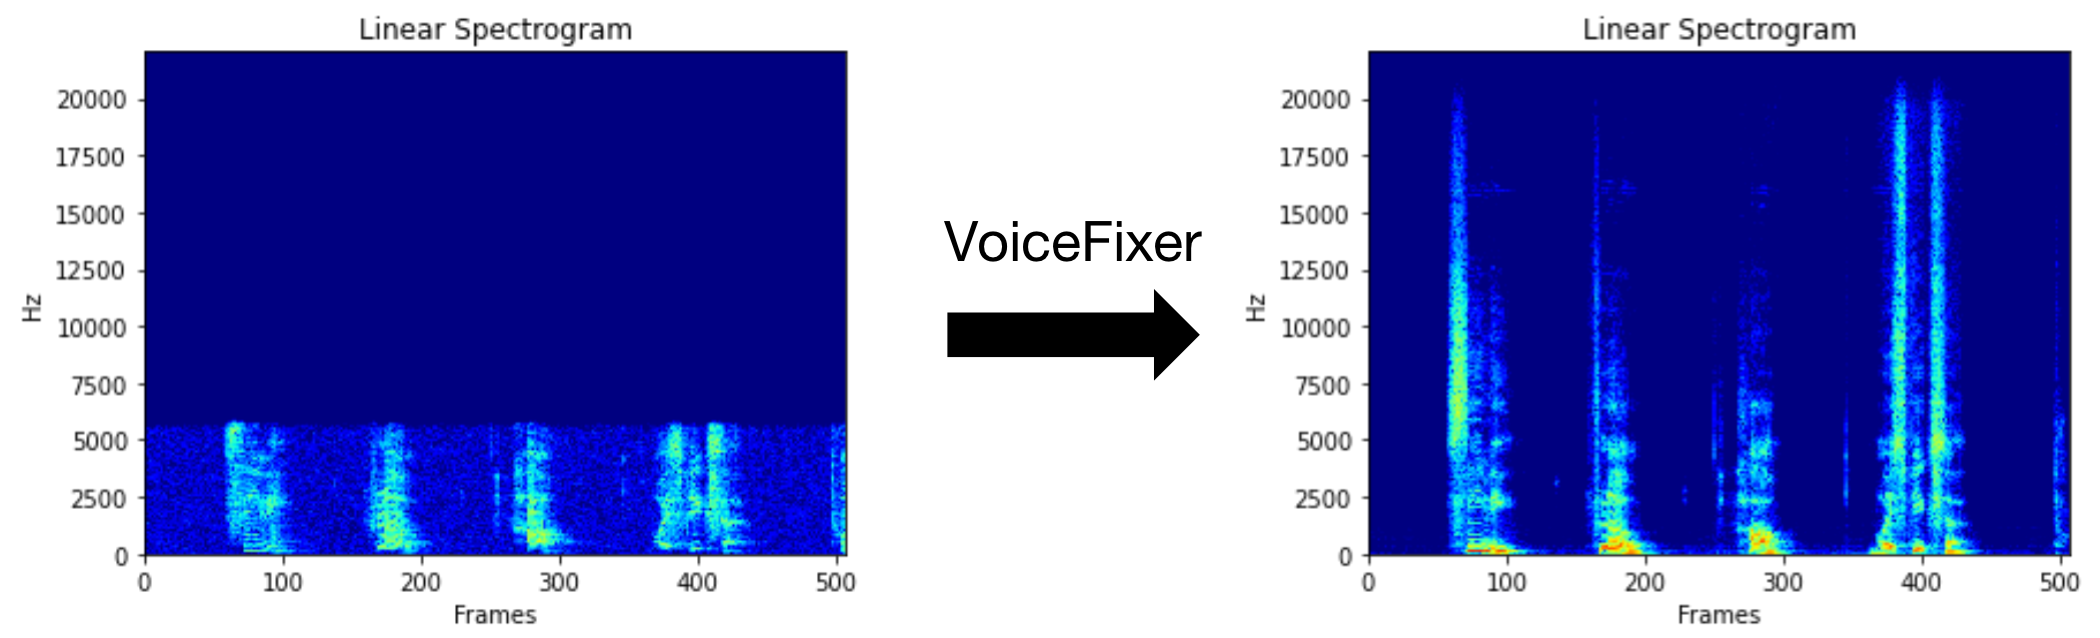
Voicefixer는 얼마나 심각한 지에 관계없이 인간의 말을 회복하는 것을 목표로합니다. 한 모델 내에서 노이즈, 재 탄성, 저해상도 (2kHz ~ 44.1kHz) 및 클리핑 (0.1-1.0 임계 값) 효과를 처리 할 수 있습니다.
이 패키지는 다음을 제공합니다.
 @misc { liu2021voicefixer ,
     title = { VoiceFixer: Toward General Speech Restoration With Neural Vocoder } ,
     author = { Haohe Liu and Qiuqiang Kong and Qiao Tian and Yan Zhao and DeLiang Wang and Chuanzeng Huang and Yuxuan Wang } ,
     year = { 2021 } ,
     eprint = { 2109.13731 } ,
     archivePrefix = { arXiv } ,
     primaryClass = { cs.SD }
}VoiceFixer가 할 수있는 일을 보려면 데모 페이지를 방문하십시오.
| 방법 | 설명 |
|---|---|
0 | 원본 모델 (기본적으로 제안) |
1 | 전처리 모듈 추가 (더 높은 주파수 제거) |
2 | 기차 모드 (때로는 심각하게 저하 된 실제 연설에서 작동 할 수 있음) |
all | 모든 모드를 실행합니다 - 각 지원되는 모드에 대해 1 WAV 파일을 출력합니다. |
먼저 PIP를 통해 VoiceFixer를 설치하십시오.
pip install git+https://github.com/haoheliu/voicefixer.git파일 처리 :
 # Specify the input .wav file. Output file is outfile.wav.
voicefixer --infile test/utterance/original/original.wav
# Or specify a output path
voicefixer --infile test/utterance/original/original.wav --outfile test/utterance/original/original_processed.wav
폴더의 파일 프로세스 :
voicefixer --infolder /path/to/input --outfolder /path/to/output변경 모드 (기본 모드는 0) :
voicefixer --infile /path/to/input.wav --outfile /path/to/output.wav --mode 1모든 모드 실행 :
 # output file saved to `/path/to/output-modeX.wav`.
voicefixer --infile /path/to/input.wav --outfile /path/to/output.wav --mode all
실제 처리 없이만 가중치를 사전로드하십시오.
voicefixer --weight_prepare더 많은 도우미 정보를 보려면 실행하십시오.
voicefixer -hYouTube의 데모 (감사합니다 @Justin John)
PIP를 통해 VoiceFixer 설치 :
pip install voicefixer웹 사이트를 실행하여 데스크탑에서 오디오 샘플을 테스트 할 수 있습니다 (Streamlit에 의해 구동).
git clone https://github.com/haoheliu/voicefixer.git
cd voicefixer # Run streamlit
streamlit run test/streamlit.py처음으로 실행 된 경우 : 웹 페이지는 모델 다운로드를 위해 몇 분 동안 빈 공간을 남겨 둘 수 있습니다. 진행 상황 다운로드를 위해 터미널을 확인할 수 있습니다.
테스트 실행에 제공 한이 저품질 음성 파일을 사용할 수 있습니다. 처리 후 페이지는 다음과 같습니다.

먼저 PIP를 통해 VoiceFixer를 설치하십시오.
pip install voicefixer그런 다음 테스트 실행을 위해 다음 스크립트를 실행하십시오.
git clone https://github.com/haoheliu/voicefixer.git ; cd voicefixer
python3 test/test.py # test script
우리는 그것이 당신에게 다음과 같은 결과를 줄 것으로 기대합니다.
Initializing VoiceFixer...
Test voicefixer mode 0, Pass
Test voicefixer mode 1, Pass
Test voicefixer mode 2, Pass
Initializing 44.1kHz speech vocoder...
Test vocoder using groundtruth mel spectrogram...
Pass
Test/Test.py는 주로 다음 두 API의 테스트를 포함합니다.
...

# TEST VOICEFIXER
## Initialize a voicefixer
print ( "Initializing VoiceFixer..." )
voicefixer = VoiceFixer ()
# Mode 0: Original Model (suggested by default)
# Mode 1: Add preprocessing module (remove higher frequency)
# Mode 2: Train mode (might work sometimes on seriously degraded real speech)
for mode in [ 0 , 1 , 2 ]:
    print ( "Testing mode" , mode )
    voicefixer . restore ( input = os . path . join ( git_root , "test/utterance/original/original.flac" ), # low quality .wav/.flac file
                       output = os . path . join ( git_root , "test/utterance/output/output_mode_" + str ( mode ) + ".flac" ), # save file path
                       cuda = False , # GPU acceleration
                       mode = mode )
    if ( mode != 2 ):
        check ( "output_mode_" + str ( mode ) + ".flac" )
    print ( "Pass" )

# TEST VOCODER
## Initialize a vocoder
print ( "Initializing 44.1kHz speech vocoder..." )
vocoder = Vocoder ( sample_rate = 44100 )

### read wave (fpath) -> mel spectrogram -> vocoder -> wave -> save wave (out_path)
print ( "Test vocoder using groundtruth mel spectrogram..." )
vocoder . oracle ( fpath = os . path . join ( git_root , "test/utterance/original/p360_001_mic1.flac" ),
               out_path = os . path . join ( git_root , "test/utterance/output/oracle.flac" ),
               cuda = False ) # GPU acceleration

...
이 repo를 복제하고 테스트 폴더 내부에서 Test.py를 실행하려고 시도 할 수 있습니다.
현재 The Docker Image는 게시되지 않았으며 로컬로 구축해야하지만이 방법으로 모든 예상 구성으로 실행해야합니다. 생성 된 이미지 크기는 약 10GB이며 주로 자체적으로 약 9.8GB를 소비하는 종속성 때문입니다.
그러나
voicefixer함유 한 레이어는 마지막으로 추가 된 레이어이므로 소스를 비교적 작게 변경하면 재건축됩니다 (이미지 빌드에서 가중치가 새로 고침 될 때 한 번에 ~ 200MB).
Dockerfile 은 여기에서 볼 수 있습니다.
레포를 복제 한 후 :
 # To build the image
cd voicefixer
docker build -t voicefixer:cpu .

# To run the image
docker run --rm -v " $( pwd ) /data:/opt/voicefixer/data " voicefixer:cpu < all_other_cli_args_here >

# # Example: docker run --rm -v "$(pwd)/data:/opt/voicefixer/data" voicefixer:cpu --infile data/my-input.wav --outfile data/my-output.mode-all.wav --mode all # To build the image
cd voicefixer
./docker-build-local.sh
# To run the image
./run.sh < all_other_cli_args_here >
# # Example: ./run.sh --infile data/my-input.wav --outfile data/my-output.mode-all.wav --mode all먼저 모델과 함께 다음 도우미 기능을 작성해야합니다. 이 repo의 도우미 기능과 유사합니다 : https://github.com/haoheliu/voicefixer/blob/main/voicefixer/vocoder/base.py#l35
    def convert_mel_to_wav(mel):
        " " "
        :param non normalized mel spectrogram: [batchsize, 1, t-steps, n_mel]
        :return: [batchsize, 1, samples]
        " " "
        return wav
그런 다음이 기능을 Voyfixer.Restore 로 전달하십시오.
 voicefixer.restore(input="", # input wav file path
                   output="", # output wav file path
                   cuda=False, # whether to use gpu acceleration
                   mode = 0,
                   your_vocoder_func = convert_mel_to_wav)
메모:
changelog.md를 참조하십시오.


