voicefixer
fix bugs
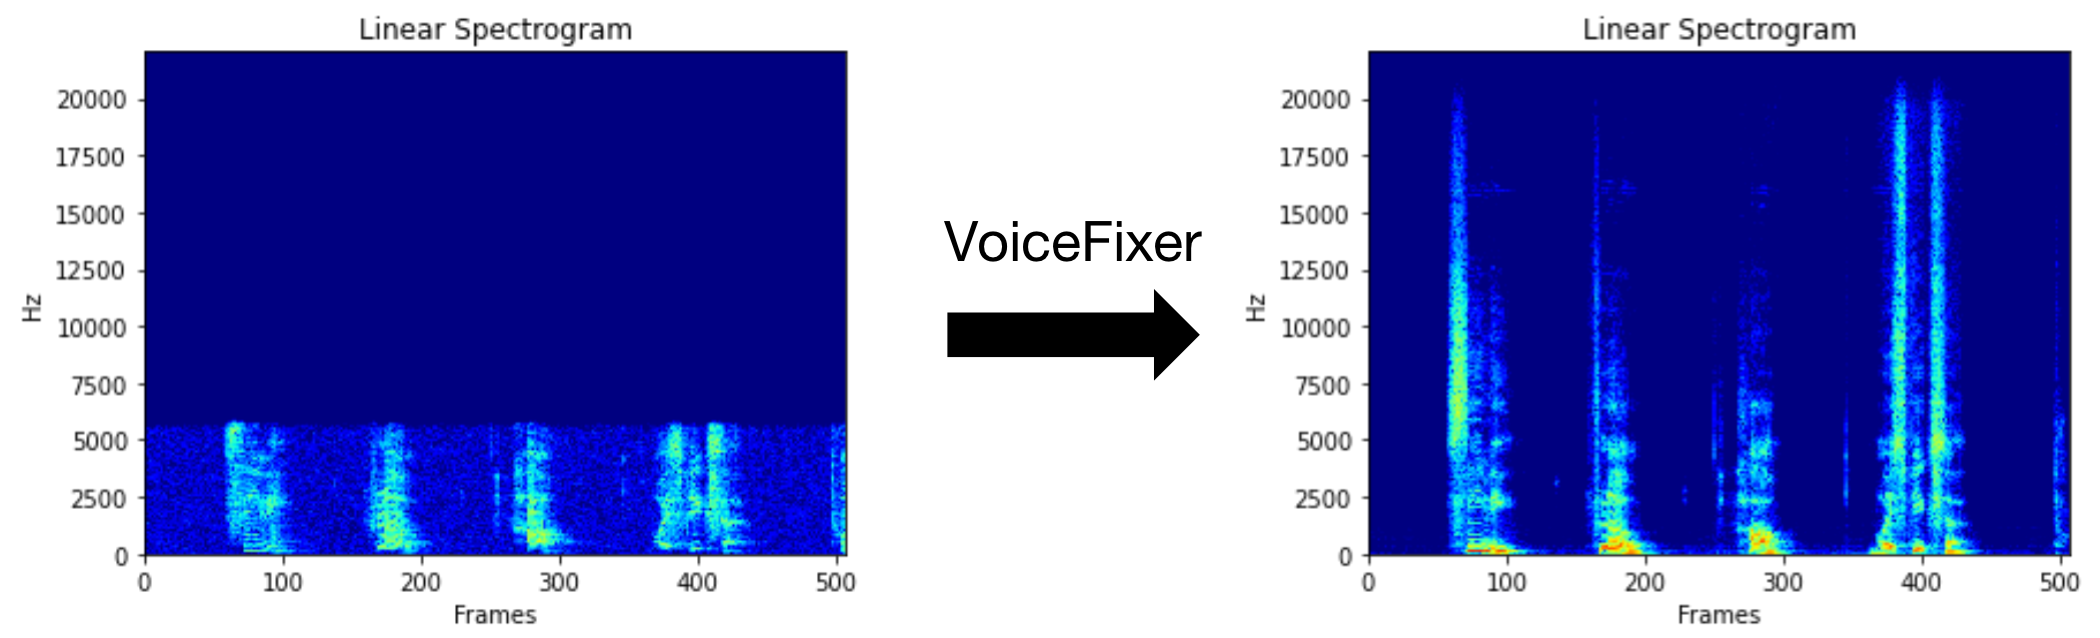
يهدف Voicefixer إلى استعادة الكلام البشري بغض النظر عن مدى خطورة تدهوره. يمكنه التعامل مع الضوضاء ، وإعادة التثبيت ، ودقة منخفضة (2 كيلو هرتز ~ 44.1 كيلو هرتز) وتأثير القطع (0.1-1.0 عتبة) داخل نموذج واحد.
توفر هذه الحزمة:
 @misc { liu2021voicefixer ,
     title = { VoiceFixer: Toward General Speech Restoration With Neural Vocoder } ,
     author = { Haohe Liu and Qiuqiang Kong and Qiao Tian and Yan Zhao and DeLiang Wang and Chuanzeng Huang and Yuxuan Wang } ,
     year = { 2021 } ,
     eprint = { 2109.13731 } ,
     archivePrefix = { arXiv } ,
     primaryClass = { cs.SD }
}يرجى زيارة الصفحة التجريبية لعرض ما يمكن أن يفعله VoiceFixer.
| وضع | وصف |
|---|---|
0 | النموذج الأصلي (المقترح افتراضيًا) |
1 | أضف وحدة المعالجة المسبقة (إزالة التردد الأعلى) |
2 | وضع القطار (قد يعمل أحيانًا على خطاب حقيقي متدهور بشكل خطير) |
all | قم بتشغيل جميع الأوضاع - سيتم إخراج ملف WAV 1 لكل وضع مدعوم. |
أولاً ، قم بتثبيت Voicefixer عبر PIP:
pip install git+https://github.com/haoheliu/voicefixer.gitمعالجة ملف:
 # Specify the input .wav file. Output file is outfile.wav.
voicefixer --infile test/utterance/original/original.wav
# Or specify a output path
voicefixer --infile test/utterance/original/original.wav --outfile test/utterance/original/original_processed.wav
معالجة الملفات في مجلد:
voicefixer --infolder /path/to/input --outfolder /path/to/outputتغيير الوضع (الوضع الافتراضي هو 0):
voicefixer --infile /path/to/input.wav --outfile /path/to/output.wav --mode 1قم بتشغيل جميع الأوضاع:
 # output file saved to `/path/to/output-modeX.wav`.
voicefixer --infile /path/to/input.wav --outfile /path/to/output.wav --mode all
قبل تحميل الأوزان فقط دون أي معالجة فعلية:
voicefixer --weight_prepareلمزيد من معلومات المساعدة ، يرجى التشغيل:
voicefixer -hالعرض التوضيحي على YouTube (شكرًا Justin John)
تثبيت Voicefixer عبر PIP:
pip install voicefixerيمكنك اختبار عينات الصوت على سطح المكتب الخاص بك عن طريق تشغيل موقع الويب (مدعوم من STREMLIT)
git clone https://github.com/haoheliu/voicefixer.git
cd voicefixer # Run streamlit
streamlit run test/streamlit.pyإذا قمت بتشغيل لأول مرة: قد تترك صفحة الويب فارغة لعدة دقائق لتنزيل النماذج. يمكنك الخروج من المحطة لتنزيل التقدم.
يمكنك استخدام ملف الكلام منخفض الجودة الذي قدمناه لتشغيل الاختبار. ستبدو الصفحة بعد المعالجة كما يلي.

أولاً ، قم بتثبيت Voicefixer عبر PIP:
pip install voicefixerثم قم بتشغيل البرامج النصية التالية لتشغيل الاختبار:
git clone https://github.com/haoheliu/voicefixer.git ; cd voicefixer
python3 test/test.py # test script
نتوقع أن يمنحك الإخراج التالي:
Initializing VoiceFixer...
Test voicefixer mode 0, Pass
Test voicefixer mode 1, Pass
Test voicefixer mode 2, Pass
Initializing 44.1kHz speech vocoder...
Test vocoder using groundtruth mel spectrogram...
Pass
يحتوي Test/Test.py بشكل أساسي على اختبار واجهات برمجة التطبيقات التالية:
...

# TEST VOICEFIXER
## Initialize a voicefixer
print ( "Initializing VoiceFixer..." )
voicefixer = VoiceFixer ()
# Mode 0: Original Model (suggested by default)
# Mode 1: Add preprocessing module (remove higher frequency)
# Mode 2: Train mode (might work sometimes on seriously degraded real speech)
for mode in [ 0 , 1 , 2 ]:
    print ( "Testing mode" , mode )
    voicefixer . restore ( input = os . path . join ( git_root , "test/utterance/original/original.flac" ), # low quality .wav/.flac file
                       output = os . path . join ( git_root , "test/utterance/output/output_mode_" + str ( mode ) + ".flac" ), # save file path
                       cuda = False , # GPU acceleration
                       mode = mode )
    if ( mode != 2 ):
        check ( "output_mode_" + str ( mode ) + ".flac" )
    print ( "Pass" )

# TEST VOCODER
## Initialize a vocoder
print ( "Initializing 44.1kHz speech vocoder..." )
vocoder = Vocoder ( sample_rate = 44100 )

### read wave (fpath) -> mel spectrogram -> vocoder -> wave -> save wave (out_path)
print ( "Test vocoder using groundtruth mel spectrogram..." )
vocoder . oracle ( fpath = os . path . join ( git_root , "test/utterance/original/p360_001_mic1.flac" ),
               out_path = os . path . join ( git_root , "test/utterance/output/oracle.flac" ),
               cuda = False ) # GPU acceleration

...
يمكنك استنساخ هذا الريبو ومحاولة تشغيل test.py داخل مجلد الاختبار .
في الوقت الحالي ، لم يتم نشر صورة Docker وتحتاج إلى تصميمها محليًا ، ولكن بهذه الطريقة تتأكد من قيامك بتشغيلها بكل التكوين المتوقع. يبلغ حجم الصورة المولدة حوالي 10 جيجابايت ويرجع ذلك أساسًا إلى التبعيات التي تستهلك حوالي 9.8 جيجابايت بمفردها.
ومع ذلك ، فإن الطبقة التي تحتوي على
voicefixerهي آخر طبقة مضاف ، مما يجعل أي إعادة بناء إذا قمت بتغيير المصادر صغيرة نسبيًا (حوالي 200 ميجابايت في وقت واحد مع تحديث الأوزان على بناء الصورة).
يمكن مشاهدة Dockerfile هنا.
بعد استنساخ الريبو:
 # To build the image
cd voicefixer
docker build -t voicefixer:cpu .

# To run the image
docker run --rm -v " $( pwd ) /data:/opt/voicefixer/data " voicefixer:cpu < all_other_cli_args_here >

# # Example: docker run --rm -v "$(pwd)/data:/opt/voicefixer/data" voicefixer:cpu --infile data/my-input.wav --outfile data/my-output.mode-all.wav --mode all # To build the image
cd voicefixer
./docker-build-local.sh
# To run the image
./run.sh < all_other_cli_args_here >
# # Example: ./run.sh --infile data/my-input.wav --outfile data/my-output.mode-all.wav --mode allتحتاج أولاً إلى كتابة وظيفة المساعد التالية مع النموذج الخاص بك. على غرار وظيفة المساعد في هذا الريبو: https://github.com/haoheliu/voicefixer/blob/main/voicefixer/vocoder/base.py#l35
    def convert_mel_to_wav(mel):
        " " "
        :param non normalized mel spectrogram: [batchsize, 1, t-steps, n_mel]
        :return: [batchsize, 1, samples]
        " " "
        return wav
ثم تمرير هذه الوظيفة إلى VoiceFixer.restore ، على سبيل المثال:
 voicefixer.restore(input="", # input wav file path
                   output="", # output wav file path
                   cuda=False, # whether to use gpu acceleration
                   mode = 0,
                   your_vocoder_func = convert_mel_to_wav)
ملحوظة:
انظر changelog.md.


