voicefixer
fix bugs
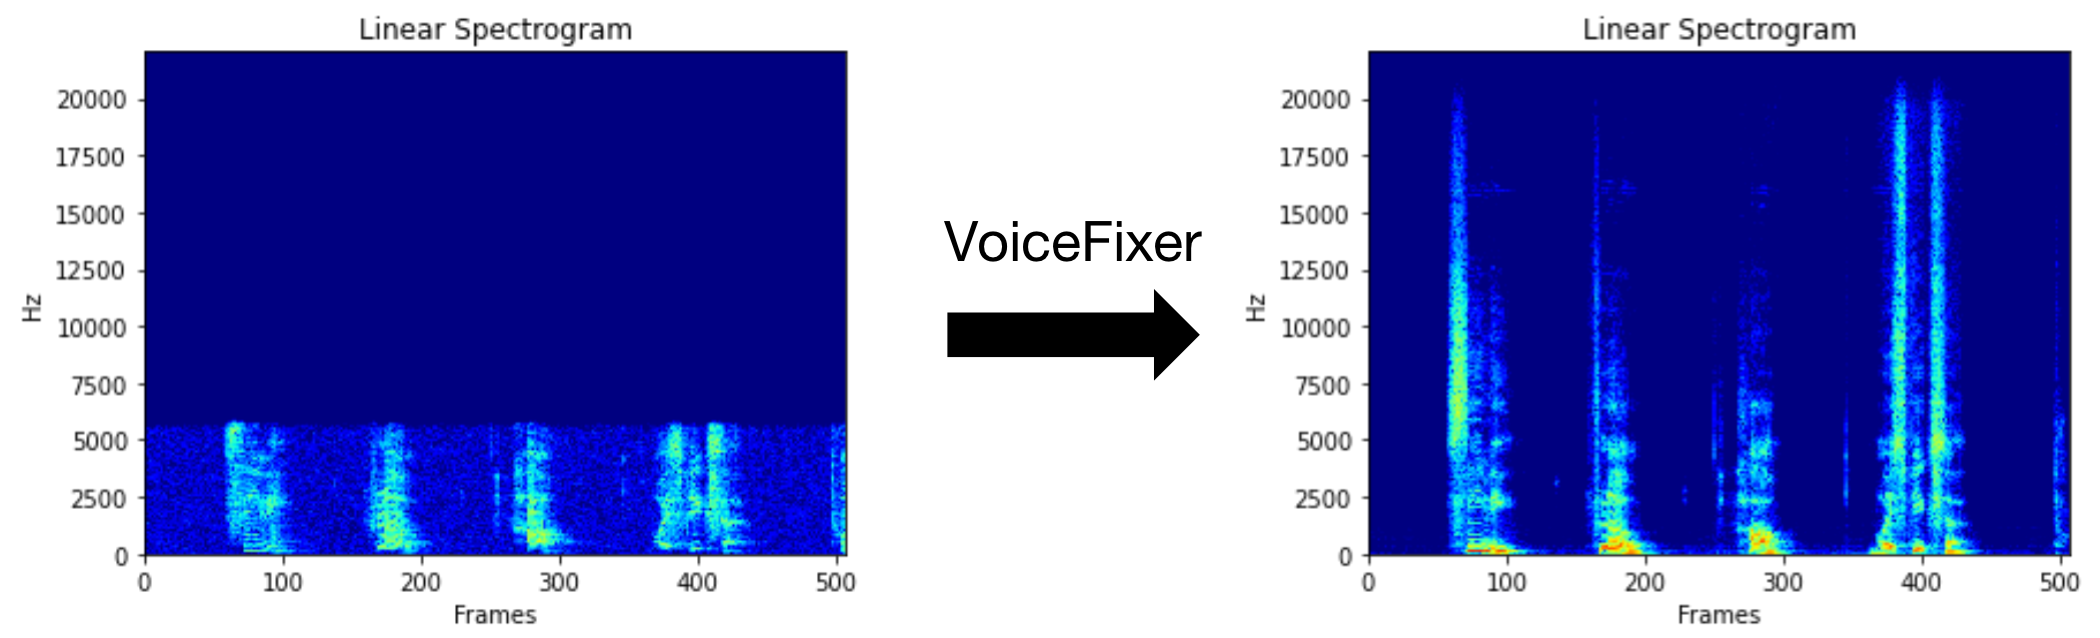
Voicefixer bertujuan untuk memulihkan ucapan manusia terlepas dari seberapa serius itu terdegradasi. Ini dapat menangani kebisingan, reveberiasi, resolusi rendah (2kHz ~ 44.1kHz) dan efek kliping (ambang batas 0,1-1.0) dalam satu model.
Paket ini menyediakan:
 @misc { liu2021voicefixer ,
     title = { VoiceFixer: Toward General Speech Restoration With Neural Vocoder } ,
     author = { Haohe Liu and Qiuqiang Kong and Qiao Tian and Yan Zhao and DeLiang Wang and Chuanzeng Huang and Yuxuan Wang } ,
     year = { 2021 } ,
     eprint = { 2109.13731 } ,
     archivePrefix = { arXiv } ,
     primaryClass = { cs.SD }
}Silakan kunjungi halaman demo untuk melihat apa yang bisa dilakukan voicefixer.
| Mode | Keterangan |
|---|---|
0 | Model asli (disarankan secara default) |
1 | Tambahkan modul preprocessing (lepaskan frekuensi yang lebih tinggi) |
2 | Mode Kereta (mungkin kadang -kadang bekerja pada pidato nyata yang sangat terdegradasi) |
all | Jalankan semua mode - akan mengeluarkan 1 file wav untuk setiap mode yang didukung. |
Pertama, instal voicefixer melalui PIP:
pip install git+https://github.com/haoheliu/voicefixer.gitMemproses file:
 # Specify the input .wav file. Output file is outfile.wav.
voicefixer --infile test/utterance/original/original.wav
# Or specify a output path
voicefixer --infile test/utterance/original/original.wav --outfile test/utterance/original/original_processed.wav
Memproses file dalam folder:
voicefixer --infolder /path/to/input --outfolder /path/to/outputUbah mode (mode default adalah 0):
voicefixer --infile /path/to/input.wav --outfile /path/to/output.wav --mode 1Jalankan semua mode:
 # output file saved to `/path/to/output-modeX.wav`.
voicefixer --infile /path/to/input.wav --outfile /path/to/output.wav --mode all
Pra-memuat bobot hanya tanpa pemrosesan aktual:
voicefixer --weight_prepareUntuk informasi helper lainnya, silakan jalankan:
voicefixer -hDemo di youtube (terima kasih @justin John)
Instal voicefixer melalui PIP:
pip install voicefixerAnda dapat menguji sampel audio di desktop Anda dengan menjalankan situs web (ditenagai oleh streamlit)
git clone https://github.com/haoheliu/voicefixer.git
cd voicefixer # Run streamlit
streamlit run test/streamlit.pyJika Anda berjalan untuk pertama kalinya: Halaman web dapat meninggalkan kosong selama beberapa menit untuk mengunduh model. Anda dapat memeriksa terminal untuk mengunduh kemajuan.
Anda dapat menggunakan file ucapan berkualitas rendah ini yang kami berikan untuk uji coba. Halaman setelah diproses akan terlihat seperti berikut.

Pertama, instal voicefixer melalui PIP:
pip install voicefixerKemudian jalankan skrip berikut untuk menjalankan uji:
git clone https://github.com/haoheliu/voicefixer.git ; cd voicefixer
python3 test/test.py # test script
Kami berharap itu akan memberi Anda output berikut:
Initializing VoiceFixer...
Test voicefixer mode 0, Pass
Test voicefixer mode 1, Pass
Test voicefixer mode 2, Pass
Initializing 44.1kHz speech vocoder...
Test vocoder using groundtruth mel spectrogram...
Pass
test/test.py terutama berisi tes dari dua API berikut:
...

# TEST VOICEFIXER
## Initialize a voicefixer
print ( "Initializing VoiceFixer..." )
voicefixer = VoiceFixer ()
# Mode 0: Original Model (suggested by default)
# Mode 1: Add preprocessing module (remove higher frequency)
# Mode 2: Train mode (might work sometimes on seriously degraded real speech)
for mode in [ 0 , 1 , 2 ]:
    print ( "Testing mode" , mode )
    voicefixer . restore ( input = os . path . join ( git_root , "test/utterance/original/original.flac" ), # low quality .wav/.flac file
                       output = os . path . join ( git_root , "test/utterance/output/output_mode_" + str ( mode ) + ".flac" ), # save file path
                       cuda = False , # GPU acceleration
                       mode = mode )
    if ( mode != 2 ):
        check ( "output_mode_" + str ( mode ) + ".flac" )
    print ( "Pass" )

# TEST VOCODER
## Initialize a vocoder
print ( "Initializing 44.1kHz speech vocoder..." )
vocoder = Vocoder ( sample_rate = 44100 )

### read wave (fpath) -> mel spectrogram -> vocoder -> wave -> save wave (out_path)
print ( "Test vocoder using groundtruth mel spectrogram..." )
vocoder . oracle ( fpath = os . path . join ( git_root , "test/utterance/original/p360_001_mic1.flac" ),
               out_path = os . path . join ( git_root , "test/utterance/output/oracle.flac" ),
               cuda = False ) # GPU acceleration

...
Anda dapat mengkloning repo ini dan mencoba menjalankan test.py di dalam folder tes .
Saat ini gambar Docker tidak dipublikasikan dan perlu dibangun secara lokal, tetapi dengan cara ini Anda memastikan Anda menjalankannya dengan semua konfigurasi yang diharapkan. Ukuran gambar yang dihasilkan adalah sekitar 10GB dan itu terutama karena ketergantungan yang dikonsumsi sekitar 9.8GB sendiri.
Namun, lapisan yang berisi
voicefixeradalah lapisan tambahan yang ditambahkan, melakukan pembangunan kembali jika Anda mengubah sumber yang relatif kecil (~ 200MB sekaligus karena bobotnya disegarkan pada pembuatan gambar).
Dockerfile dapat dilihat di sini.
Setelah mengkloning repo:
 # To build the image
cd voicefixer
docker build -t voicefixer:cpu .

# To run the image
docker run --rm -v " $( pwd ) /data:/opt/voicefixer/data " voicefixer:cpu < all_other_cli_args_here >

# # Example: docker run --rm -v "$(pwd)/data:/opt/voicefixer/data" voicefixer:cpu --infile data/my-input.wav --outfile data/my-output.mode-all.wav --mode all # To build the image
cd voicefixer
./docker-build-local.sh
# To run the image
./run.sh < all_other_cli_args_here >
# # Example: ./run.sh --infile data/my-input.wav --outfile data/my-output.mode-all.wav --mode allPertama, Anda perlu menulis fungsi helper berikut dengan model Anda. Mirip dengan fungsi helper dalam repo ini: https://github.com/haoheliu/voicefixer/blob/main/voicefixer/vocoder/base.py#l35
    def convert_mel_to_wav(mel):
        " " "
        :param non normalized mel spectrogram: [batchsize, 1, t-steps, n_mel]
        :return: [batchsize, 1, samples]
        " " "
        return wav
Kemudian berikan fungsi ini ke voicefixer.restore , misalnya:
 voicefixer.restore(input="", # input wav file path
                   output="", # output wav file path
                   cuda=False, # whether to use gpu acceleration
                   mode = 0,
                   your_vocoder_func = convert_mel_to_wav)
Catatan:
Lihat Changelog.MD.


