voicefixer
fix bugs
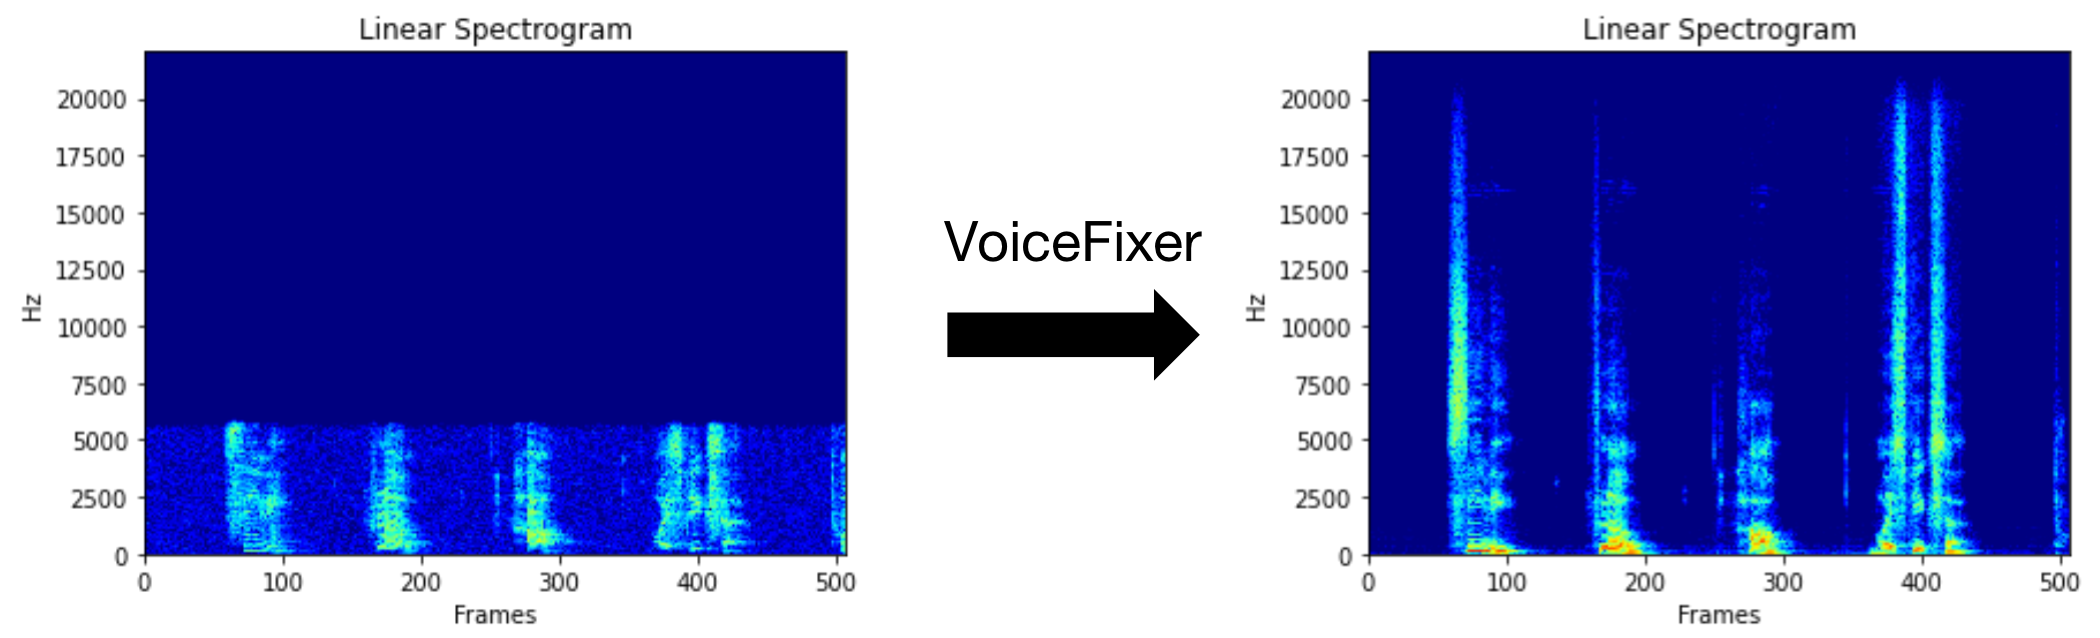
Voicefixer aims to restore human speech regardless how serious its degraded. It can handle noise, reveberation, low resolution (2kHz~44.1kHz) and clipping (0.1-1.0 threshold) effect within one model.
This package provides:
 @misc{liu2021voicefixer,
     title={VoiceFixer: Toward General Speech Restoration With Neural Vocoder},
     author={Haohe Liu and Qiuqiang Kong and Qiao Tian and Yan Zhao and DeLiang Wang and Chuanzeng Huang and Yuxuan Wang},
     year={2021},
     eprint={2109.13731},
     archivePrefix={arXiv},
     primaryClass={cs.SD}
}Please visit demo page to view what voicefixer can do.
| Mode | Description |
|---|---|
0 |
Original Model (suggested by default) |
1 |
Add preprocessing module (remove higher frequency) |
2 |
Train mode (might work sometimes on seriously degraded real speech) |
all |
Run all modes - will output 1 wav file for each supported mode. |
First, install voicefixer via pip:
pip install git+https://github.com/haoheliu/voicefixer.gitProcess a file:
# Specify the input .wav file. Output file is outfile.wav.
voicefixer --infile test/utterance/original/original.wav
# Or specify a output path
voicefixer --infile test/utterance/original/original.wav --outfile test/utterance/original/original_processed.wav
Process files in a folder:
voicefixer --infolder /path/to/input --outfolder /path/to/outputChange mode (The default mode is 0):
voicefixer --infile /path/to/input.wav --outfile /path/to/output.wav --mode 1Run all modes:
# output file saved to `/path/to/output-modeX.wav`.
voicefixer --infile /path/to/input.wav --outfile /path/to/output.wav --mode all
Pre-load the weights only without any actual processing:
voicefixer --weight_prepareFor more helper information please run:
voicefixer -hDemo on Youtube (Thanks @Justin John)
Install voicefixer via pip:
pip install voicefixerYou can test audio samples on your desktop by running website (powered by streamlit)
git clone https://github.com/haoheliu/voicefixer.git
cd voicefixer# Run streamlit
streamlit run test/streamlit.pyIf you run for the first time: the web page may leave blank for several minutes for downloading models. You can checkout the terminal for downloading progresses.
You can use this low quality speech file we provided for a test run. The page after processing will look like the following.

First, install voicefixer via pip:
pip install voicefixerThen run the following scripts for a test run:
git clone https://github.com/haoheliu/voicefixer.git; cd voicefixer
python3 test/test.py # test script
We expect it will give you the following output:
Initializing VoiceFixer...
Test voicefixer mode 0, Pass
Test voicefixer mode 1, Pass
Test voicefixer mode 2, Pass
Initializing 44.1kHz speech vocoder...
Test vocoder using groundtruth mel spectrogram...
Pass
test/test.py mainly contains the test of the following two APIs:
...

# TEST VOICEFIXER
## Initialize a voicefixer
print("Initializing VoiceFixer...")
voicefixer = VoiceFixer()
# Mode 0: Original Model (suggested by default)
# Mode 1: Add preprocessing module (remove higher frequency)
# Mode 2: Train mode (might work sometimes on seriously degraded real speech)
for mode in [0,1,2]:
    print("Testing mode",mode)
    voicefixer.restore(input=os.path.join(git_root,"test/utterance/original/original.flac"), # low quality .wav/.flac file
                       output=os.path.join(git_root,"test/utterance/output/output_mode_"+str(mode)+".flac"), # save file path
                       cuda=False, # GPU acceleration
                       mode=mode)
    if(mode != 2):
        check("output_mode_"+str(mode)+".flac")
    print("Pass")

# TEST VOCODER
## Initialize a vocoder
print("Initializing 44.1kHz speech vocoder...")
vocoder = Vocoder(sample_rate=44100)

### read wave (fpath) -> mel spectrogram -> vocoder -> wave -> save wave (out_path)
print("Test vocoder using groundtruth mel spectrogram...")
vocoder.oracle(fpath=os.path.join(git_root,"test/utterance/original/p360_001_mic1.flac"),
               out_path=os.path.join(git_root,"test/utterance/output/oracle.flac"),
               cuda=False) # GPU acceleration

...
You can clone this repo and try to run test.py inside the test folder.
Currently the the Docker image is not published and needs to be built locally, but this way you make sure you're running it with all the expected configuration. The generated image size is about 10GB and that is mainly due to the dependencies that consume around 9.8GB on their own.
However, the layer containing
voicefixeris the last added layer, making any rebuild if you change sources relatively small (~200MB at a time as the weights get refreshed on image build).
The Dockerfile can be viewed here.
After cloning the repo:
# To build the image
cd voicefixer
docker build -t voicefixer:cpu .

# To run the image
docker run --rm -v "$(pwd)/data:/opt/voicefixer/data" voicefixer:cpu <all_other_cli_args_here>

## Example: docker run --rm -v "$(pwd)/data:/opt/voicefixer/data" voicefixer:cpu --infile data/my-input.wav --outfile data/my-output.mode-all.wav --mode all# To build the image
cd voicefixer
./docker-build-local.sh
# To run the image
./run.sh <all_other_cli_args_here>
## Example: ./run.sh --infile data/my-input.wav --outfile data/my-output.mode-all.wav --mode allFirst you need to write a following helper function with your model. Similar to the helper function in this repo: https://github.com/haoheliu/voicefixer/blob/main/voicefixer/vocoder/base.py#L35
    def convert_mel_to_wav(mel):
        """
        :param non normalized mel spectrogram: [batchsize, 1, t-steps, n_mel]
        :return: [batchsize, 1, samples]
        """
        return wav
Then pass this function to voicefixer.restore, for example:
voicefixer.restore(input="", # input wav file path
                   output="", # output wav file path
                   cuda=False, # whether to use gpu acceleration
                   mode = 0,
                   your_vocoder_func = convert_mel_to_wav)
Note:
See CHANGELOG.md.


