voicefixer
fix bugs
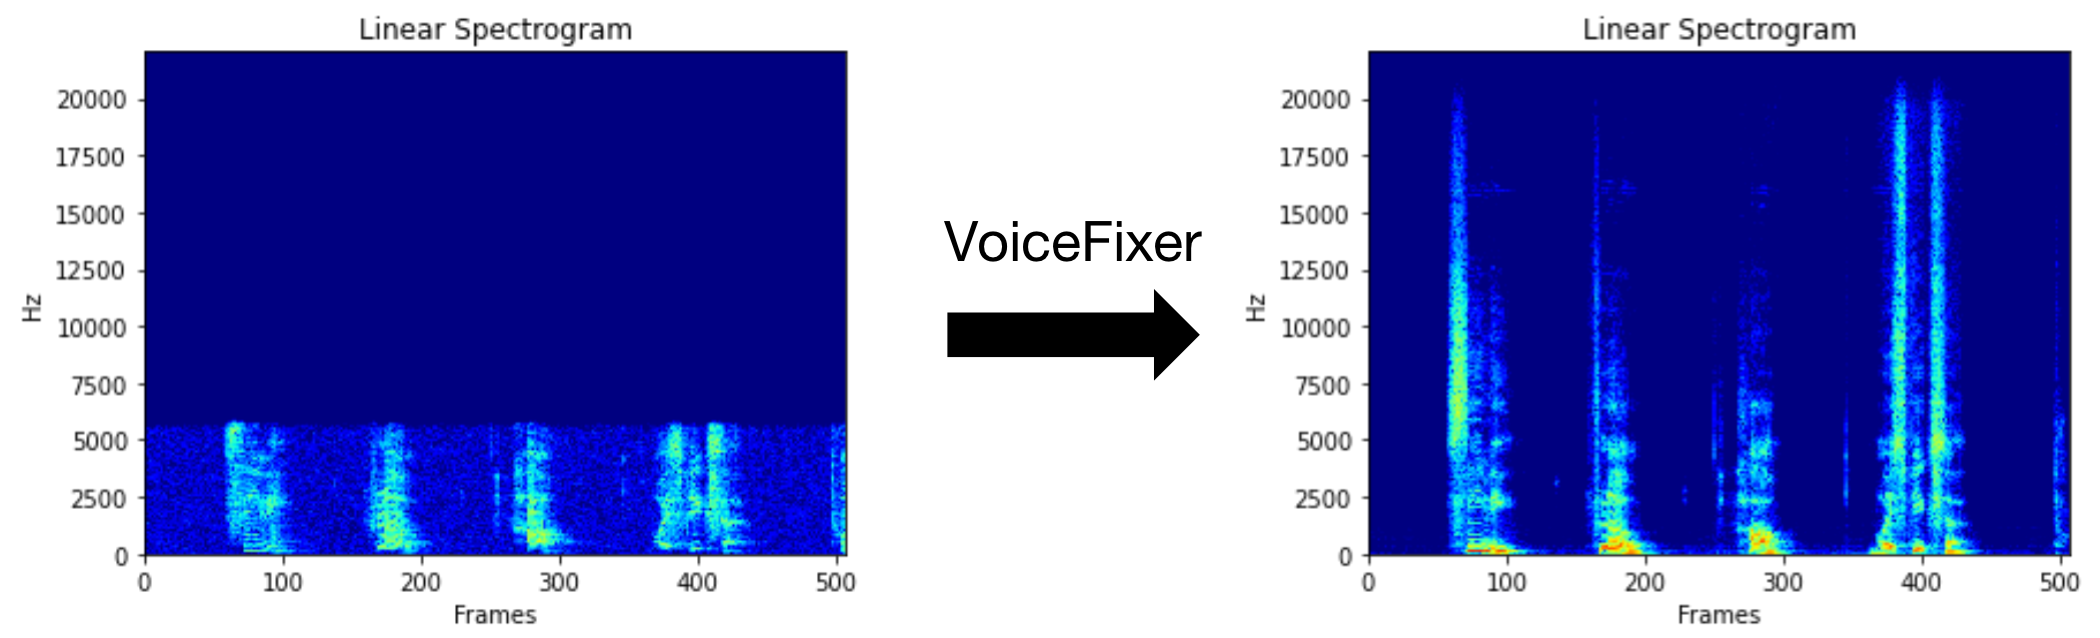
VoiceFixer tiene como objetivo restaurar el discurso humano, independientemente de cuán grave sea de degradado. Puede manejar el ruido, la revebación, la baja resolución (2kHz ~ 44.1kHz) y el efecto de recorte (umbral 0.1-1.0) dentro de un modelo.
Este paquete proporciona:
 @misc { liu2021voicefixer ,
     title = { VoiceFixer: Toward General Speech Restoration With Neural Vocoder } ,
     author = { Haohe Liu and Qiuqiang Kong and Qiao Tian and Yan Zhao and DeLiang Wang and Chuanzeng Huang and Yuxuan Wang } ,
     year = { 2021 } ,
     eprint = { 2109.13731 } ,
     archivePrefix = { arXiv } ,
     primaryClass = { cs.SD }
}Visite la página de demostración para ver qué puede hacer VoiceFixer.
| Modo | Descripción |
|---|---|
0 | Modelo original (sugerido por defecto) |
1 | Agregar módulo de preprocesamiento (eliminar una frecuencia más alta) |
2 | Modo de tren (puede funcionar a veces en un discurso real degradado) |
all | Ejecute todos los modos: emitirá 1 archivo WAV para cada modo compatible. |
Primero, instale VoiceFixer a través de PIP:
pip install git+https://github.com/haoheliu/voicefixer.gitProcesar un archivo:
 # Specify the input .wav file. Output file is outfile.wav.
voicefixer --infile test/utterance/original/original.wav
# Or specify a output path
voicefixer --infile test/utterance/original/original.wav --outfile test/utterance/original/original_processed.wav
Procesar archivos en una carpeta:
voicefixer --infolder /path/to/input --outfolder /path/to/outputModo de cambio (el modo predeterminado es 0):
voicefixer --infile /path/to/input.wav --outfile /path/to/output.wav --mode 1Ejecutar todos los modos:
 # output file saved to `/path/to/output-modeX.wav`.
voicefixer --infile /path/to/input.wav --outfile /path/to/output.wav --mode all
Precarga los pesos solo sin ningún procesamiento real:
voicefixer --weight_preparePara obtener más información a ayuda de ayuda, ejecute:
voicefixer -hDemostración en youtube (gracias @justin John)
Instale VoiceFixer a través de PIP:
pip install voicefixerPuede probar muestras de audio en su escritorio ejecutando el sitio web (alimentado por Streamlit)
git clone https://github.com/haoheliu/voicefixer.git
cd voicefixer # Run streamlit
streamlit run test/streamlit.pySi se ejecuta por primera vez: la página web puede dejar en blanco durante varios minutos para descargar modelos. Puede consultar el terminal para descargar progresos.
Puede usar este archivo de voz de baja calidad que proporcionamos para una prueba de ejecución. La página después del procesamiento se verá como la siguiente.

Primero, instale VoiceFixer a través de PIP:
pip install voicefixerLuego ejecute los siguientes scripts para una ejecución de prueba:
git clone https://github.com/haoheliu/voicefixer.git ; cd voicefixer
python3 test/test.py # test script
Esperamos que le dé la siguiente salida:
Initializing VoiceFixer...
Test voicefixer mode 0, Pass
Test voicefixer mode 1, Pass
Test voicefixer mode 2, Pass
Initializing 44.1kHz speech vocoder...
Test vocoder using groundtruth mel spectrogram...
Pass
test/test.py contiene principalmente la prueba de las siguientes dos API:
...

# TEST VOICEFIXER
## Initialize a voicefixer
print ( "Initializing VoiceFixer..." )
voicefixer = VoiceFixer ()
# Mode 0: Original Model (suggested by default)
# Mode 1: Add preprocessing module (remove higher frequency)
# Mode 2: Train mode (might work sometimes on seriously degraded real speech)
for mode in [ 0 , 1 , 2 ]:
    print ( "Testing mode" , mode )
    voicefixer . restore ( input = os . path . join ( git_root , "test/utterance/original/original.flac" ), # low quality .wav/.flac file
                       output = os . path . join ( git_root , "test/utterance/output/output_mode_" + str ( mode ) + ".flac" ), # save file path
                       cuda = False , # GPU acceleration
                       mode = mode )
    if ( mode != 2 ):
        check ( "output_mode_" + str ( mode ) + ".flac" )
    print ( "Pass" )

# TEST VOCODER
## Initialize a vocoder
print ( "Initializing 44.1kHz speech vocoder..." )
vocoder = Vocoder ( sample_rate = 44100 )

### read wave (fpath) -> mel spectrogram -> vocoder -> wave -> save wave (out_path)
print ( "Test vocoder using groundtruth mel spectrogram..." )
vocoder . oracle ( fpath = os . path . join ( git_root , "test/utterance/original/p360_001_mic1.flac" ),
               out_path = os . path . join ( git_root , "test/utterance/output/oracle.flac" ),
               cuda = False ) # GPU acceleration

...
Puede clonar este repositorio e intentar ejecutar test.py dentro de la carpeta de prueba .
Actualmente, la imagen de Docker no se publica y necesita ser construida localmente, pero de esta manera se asegura de que la ejecute con toda la configuración esperada. El tamaño de la imagen generado es de aproximadamente 10 GB y eso se debe principalmente a las dependencias que consumen alrededor de 9.8GB por su cuenta.
Sin embargo, la capa que contiene
voicefixeres la última capa agregada, lo que hace cualquier reconstrucción si cambia fuentes relativamente pequeñas (~ 200 MB a la vez a medida que los pesos se actualizan en la construcción de la imagen).
El Dockerfile se puede ver aquí.
Después de clonar el repositorio:
 # To build the image
cd voicefixer
docker build -t voicefixer:cpu .

# To run the image
docker run --rm -v " $( pwd ) /data:/opt/voicefixer/data " voicefixer:cpu < all_other_cli_args_here >

# # Example: docker run --rm -v "$(pwd)/data:/opt/voicefixer/data" voicefixer:cpu --infile data/my-input.wav --outfile data/my-output.mode-all.wav --mode all # To build the image
cd voicefixer
./docker-build-local.sh
# To run the image
./run.sh < all_other_cli_args_here >
# # Example: ./run.sh --infile data/my-input.wav --outfile data/my-output.mode-all.wav --mode allPrimero debe escribir una función de ayudante siguiente con su modelo. Similar a la función ayudante en este repositorio: https://github.com/haoheliu/voicefixer/blob/main/voicefixer/vocoder/base.py#l35
    def convert_mel_to_wav(mel):
        " " "
        :param non normalized mel spectrogram: [batchsize, 1, t-steps, n_mel]
        :return: [batchsize, 1, samples]
        " " "
        return wav
Luego pase esta función a VoiceFixer.restore , por ejemplo:
 voicefixer.restore(input="", # input wav file path
                   output="", # output wav file path
                   cuda=False, # whether to use gpu acceleration
                   mode = 0,
                   your_vocoder_func = convert_mel_to_wav)
Nota:
Ver ChangeLog.md.


