automate tech post
1.0.0
該存儲庫的目的是說明如何在總結和將內容從開源博客轉換為生成社交媒體帖子時如何利用兩種技術。
您可以根據llm-automation/blog_to_post.py和llm-automation/utils.py找到此方法的相關代碼。
這種方法假設您有一個OpenAI API密鑰。該存儲庫中的代碼使用GPT-4,但是您可以修改此此內容以使用其他OpenAI模型。該腳本生成的綜合數據由Numpy的Jupyterbook下的博客文章以及相應的鏈接和建議的社交媒體帖子組成。
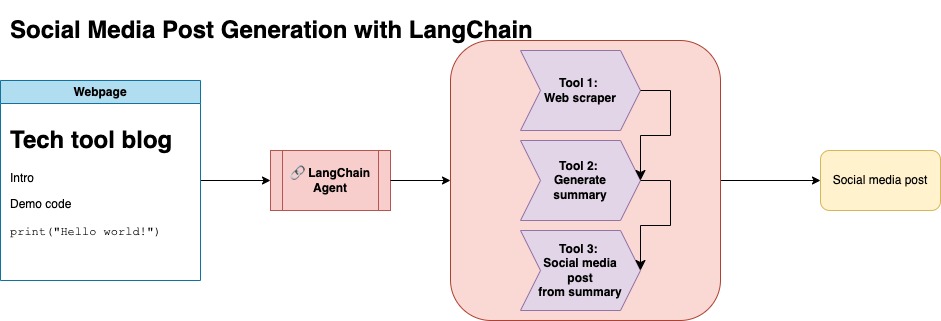
我從Numpy的Jupyterbook中刮了數據,並使用Langchain和OpenAI API生成一個由博客摘要組成的合成數據集,以及建議的社交媒體帖子。
以下是示例數據輸入:
 {
        "id": 1,
        "link": "https://numpy.org/numpy-tutorials/content/tutorial-air-quality-analysis.html",
        "summary": "Summary: Learn to perform air quality analysis using Python and NumPy in this tutorial! Discover how to import necessary libraries, build and process a dataset, calculate Air Quality Index (AQI), and perform paired Student's t-test on AQIs. We'll focus on the change in Delhi's air quality before and during the lockdown from March to June 2020.",
        "social_media_post": "?? Do you know how the lockdown affected Delhi's air quality? ?️? Dive into our latest tutorial exploring air quality analysis using Python ? and NumPy ?! Master the art of importing libraries , building and processing datasets , calculating the Air Quality Index (AQI) ?, and performing the notorious Student's t-test on the AQIs ?. Let's discover the effects of lockdown on Delhi's air quality from March to June 2020 ?. Unravel the truth, and #BreatheEasy! ? #Python #NumPy #AirQuality #DataScience #Tutorial #AQI #Delhi #Lockdown #EnvironmentalAwareness ?"
    }
然後將該數據集上傳到擁抱的臉部。您可以通過模型卡LGFUNDERBUR/NUMPY-DOC找到它
這種方法假設您有一個擁抱的面部帳戶,並且可以讀寫訪問令牌。微調需要GPU和高RAM使用。
這種方法使用步驟1中生成的合成數據。
您可以在notebooks/bloom_tuning.ipynb下找到此方法的相關代碼。
步驟如下:
通過其模型卡bigscience/bloomz-3b從擁抱面下載Bloomz-3b。對於所有Bloom模型,這都是令牌。
然後,我們對8位模型應用後處理來實現訓練,冷凍層並在float32中施放層 - 層以保持穩定性。我們在float32中施放了最後一層的輸出。
加載參數有效的微調(PEFT)模型,並應用低級適配器(LORA)。
通過提示進行預處理合成數據
 def generate_prompt(summary: str, social_media_post: str) -> str:
  prompt = f"### INSTRUCTIONnBelow is a summary of a post
           and its corresponding social media post, please
           write social media post for this blog.
           nn### Summary:n{summary}n### Post:n{social_media_post}n"
  return prompt
然後可以映射數據
mapped_dataset = dataset.map(lambda samples: tokenizer(generate_prompt(samples['summary'], samples['social_media_post'])))
transformers庫的.Trainer方法。 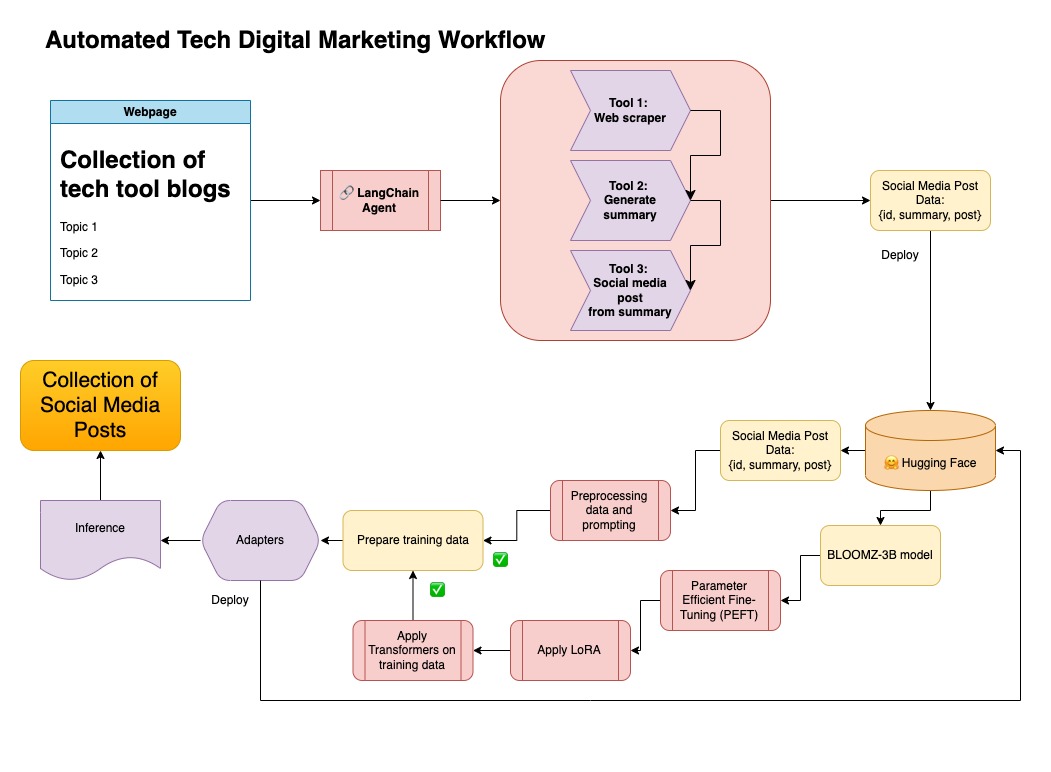
在此存儲庫中,我將兩種方法都結合在一起,以首先策劃合成數據和蘭鏈管道,並使用了所得數據集以及所述的技術來微調模型。
創建虛擬環境
conda create --name postenv python==3.10
啟用設定
conda activate postenv
克隆回購和安裝依賴項
 git clone https://github.com/lfunderburk/automate-tech-post.git
cd automate-tech-post/
pip install -r requirements.txt
創建一個.env文件,您可以在其中存儲OpenAI API鍵。將密鑰設置在.env文件中如下:
OPENAI_API_KEY = <your-keyy>
您可以按照以下方式執行管道:
python llm-automation/blog_to_post.py
如果您希望不使用OpenAI API並微調模型,則可以使用以下COLAB筆記本。
訓練該模型需要GPU和高RAM。如果您的本地計算機不支持這一點,則可以使用COLAB PRO具有以下規格:
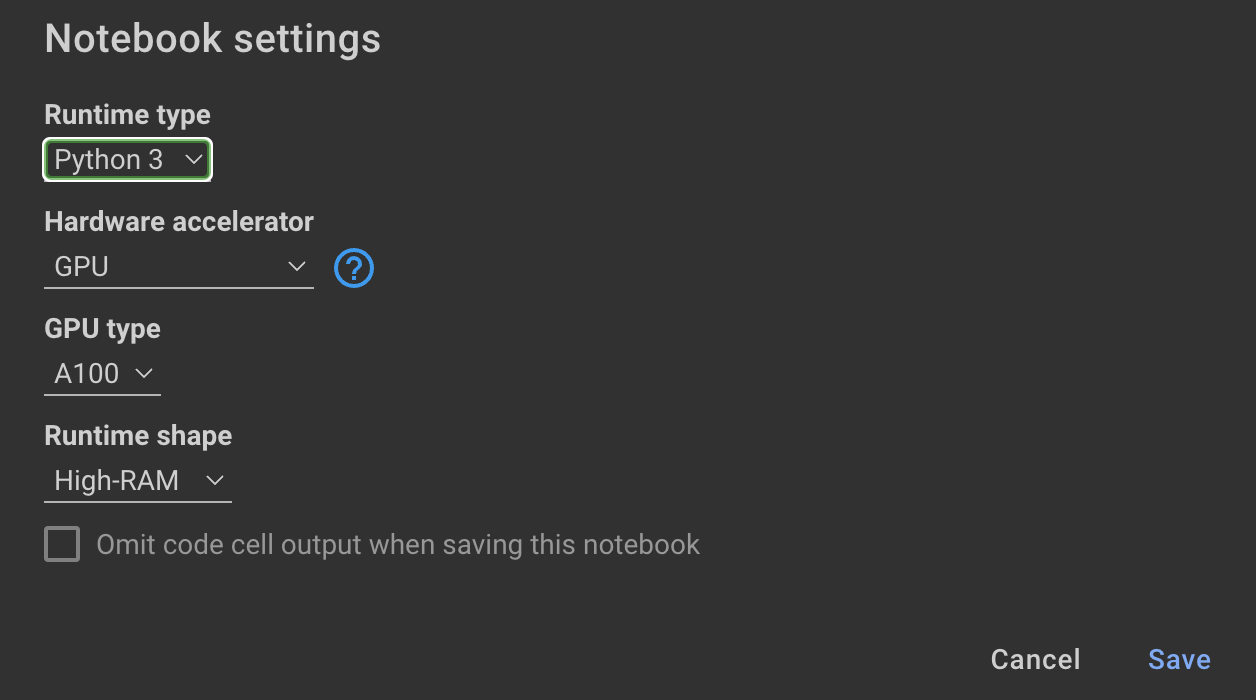
此存儲庫中的以下筆記本可以通過這些步驟引導您: notebooks/bloom_tuning.ipynb 。
如果您只想使用我對合成數據集進行微調的模型,則可以打開筆記本
noebooks/use_fine_tuned_model.ipynb
該主題可以指定如下:
topic = "This blog post is a tutorial about using NumPy to solve static equilibrium problems in three-dimensional space. Readers will learn how to represent points, vectors, and moments with NumPy, find the normal of vectors, and use NumPy for matrix calculations. The tutorial covers the application of Newton's second law to simple examples of force vectors and introduces more complex cases involving reaction forces and moments. The post also discusses the use of NumPy functions in more varied problems, including kinetic problems and different dimensions."
然後, make_inference功能將使用此主題來生成示例社交媒體帖子。


