automate tech post
1.0.0
จุดประสงค์ของที่เก็บนี้คือการแสดงให้เห็นว่าคุณสามารถใช้ประโยชน์สองเทคนิคได้อย่างไรเมื่อสรุปและเปลี่ยนเนื้อหาจากบล็อกโอเพนซอร์สเพื่อสร้างโพสต์โซเชียลมีเดีย
คุณสามารถค้นหารหัสที่เกี่ยวข้องสำหรับวิธีการนี้ภายใต้ llm-automation/blog_to_post.py และ llm-automation/utils.py
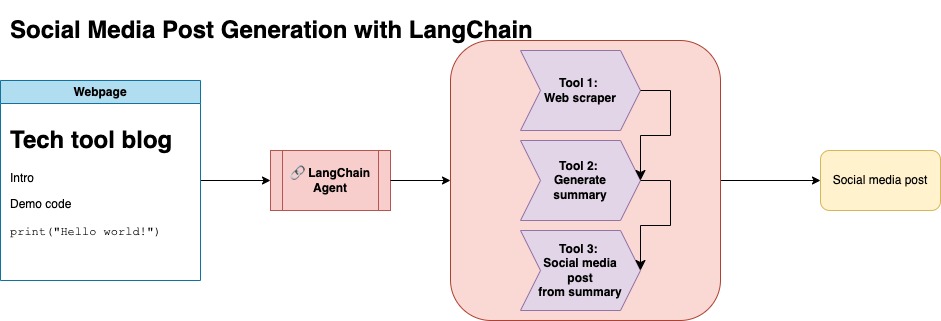
วิธีการนี้จะถือว่าคุณมีคีย์ OpenAI API รหัสในที่เก็บนี้ใช้ GPT-4 แต่คุณสามารถแก้ไขสิ่งนี้เพื่อใช้โมเดล OpenAI อื่น ๆ สคริปต์นี้สร้างข้อมูลสังเคราะห์ซึ่งประกอบด้วยบทสรุปสำหรับโพสต์บล็อกที่พบภายใต้ Jupyterbook ของ Numpy พร้อมกับลิงก์ที่เกี่ยวข้องและโพสต์โซเชียลมีเดียที่แนะนำ
ฉันคัดลอกข้อมูลจาก Jupyterbook ของ Numpy และใช้ Langchain และ Openai API เพื่อสร้างชุดข้อมูลสังเคราะห์ซึ่งประกอบด้วยบทสรุปของบล็อกพร้อมกับโพสต์โซเชียลมีเดียที่แนะนำ
ด้านล่างคือการป้อนข้อมูลตัวอย่าง:
 {
        "id": 1,
        "link": "https://numpy.org/numpy-tutorials/content/tutorial-air-quality-analysis.html",
        "summary": "Summary: Learn to perform air quality analysis using Python and NumPy in this tutorial! Discover how to import necessary libraries, build and process a dataset, calculate Air Quality Index (AQI), and perform paired Student's t-test on AQIs. We'll focus on the change in Delhi's air quality before and during the lockdown from March to June 2020.",
        "social_media_post": "?? Do you know how the lockdown affected Delhi's air quality? ?️? Dive into our latest tutorial exploring air quality analysis using Python ? and NumPy ?! Master the art of importing libraries , building and processing datasets , calculating the Air Quality Index (AQI) ?, and performing the notorious Student's t-test on the AQIs ?. Let's discover the effects of lockdown on Delhi's air quality from March to June 2020 ?. Unravel the truth, and #BreatheEasy! ? #Python #NumPy #AirQuality #DataScience #Tutorial #AQI #Delhi #Lockdown #EnvironmentalAwareness ?"
    }
ชุดข้อมูลนี้ถูกอัปโหลดไปยังกอด คุณสามารถค้นหาได้ผ่าน Model Card Lgfunderburk/numpy-docs
วิธีการนี้จะถือว่าคุณมีบัญชีใบหน้ากอดรวมถึงการอ่านและเขียนโทเค็นการเข้าถึง การปรับแต่งจะต้องใช้ GPU และการใช้ RAM สูง
วิธีนี้ใช้ข้อมูลสังเคราะห์ที่สร้างขึ้นในขั้นตอนที่ 1
คุณสามารถค้นหารหัสที่เกี่ยวข้องสำหรับวิธีการนี้ภายใต้ notebooks/bloom_tuning.ipynb
ขั้นตอนมีดังนี้:
ดาวน์โหลด Bloomz-3B จากการกอดใบหน้าผ่านการ์ดรุ่น bigscience/bloomz-3b นี่คือ Tokenizer สำหรับทุกรุ่น Bloom
จากนั้นเราจะใช้การประมวลผลโพสต์บนโมเดล 8 บิตเพื่อเปิดใช้งานการฝึกอบรมเลเยอร์แช่แข็งและโยนเลเยอร์-สังเกตใน Float32 เพื่อความมั่นคง เราโยนเอาต์พุตของเลเยอร์สุดท้ายใน Float32
โหลดโมเดลการปรับแต่ง (PEFT) ที่มีประสิทธิภาพ (PEFT) และใช้อะแดปเตอร์ระดับต่ำ (LORA)
ข้อมูลสังเคราะห์ล่วงหน้าผ่านพรอมต์
 def generate_prompt(summary: str, social_media_post: str) -> str:
  prompt = f"### INSTRUCTIONnBelow is a summary of a post
           and its corresponding social media post, please
           write social media post for this blog.
           nn### Summary:n{summary}n### Post:n{social_media_post}n"
  return prompt
ข้อมูลสามารถแมปได้
mapped_dataset = dataset.map(lambda samples: tokenizer(generate_prompt(samples['summary'], samples['social_media_post'])))
.Trainer จากไลบรารี transformers บนข้อมูลที่แมป 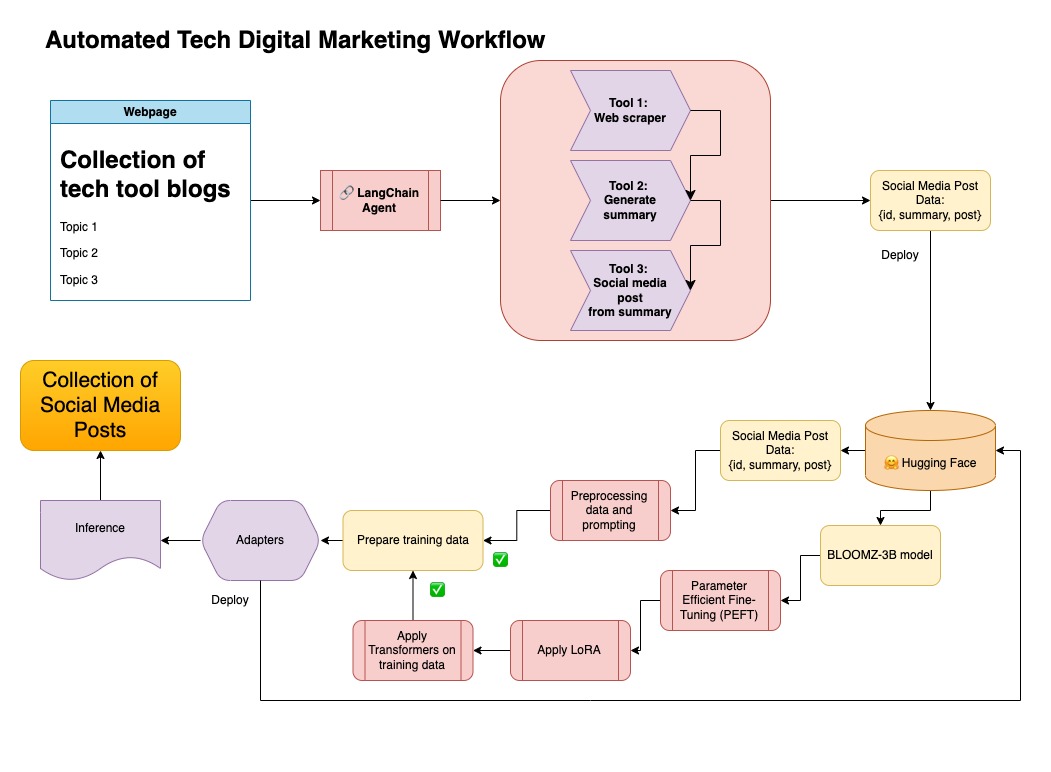
ในพื้นที่เก็บข้อมูลนี้ฉันรวมทั้งสองวิธีในการดูแลข้อมูลสังเคราะห์ครั้งแรกกับท่อ Langchain และใช้ชุดข้อมูลผลลัพธ์พร้อมกับเทคนิคที่กล่าวถึงเพื่อปรับแต่งโมเดล
สร้างสภาพแวดล้อมเสมือนจริง
conda create --name postenv python==3.10
เปิดใช้งาน
conda activate postenv
โคลน repo และติดตั้งการพึ่งพา
 git clone https://github.com/lfunderburk/automate-tech-post.git
cd automate-tech-post/
pip install -r requirements.txt
สร้างไฟล์ .env ที่คุณสามารถจัดเก็บคีย์ OpenAI API ของคุณ ตั้งค่าคีย์ของคุณภายในไฟล์ .env ดังนี้:
OPENAI_API_KEY = <your-keyy>
คุณสามารถดำเนินการไปป์ไลน์ดังนี้:
python llm-automation/blog_to_post.py
หากคุณไม่ต้องการใช้ OpenAI API และปรับแต่งโมเดลแทนคุณสามารถใช้สมุดบันทึก colab ต่อไปนี้
การฝึกอบรมแบบจำลองต้องใช้ GPU และ RAM สูง หากเครื่องในพื้นที่ของคุณไม่รองรับสิ่งนี้คุณสามารถใช้ Colab Pro กับข้อมูลจำเพาะต่อไปนี้:
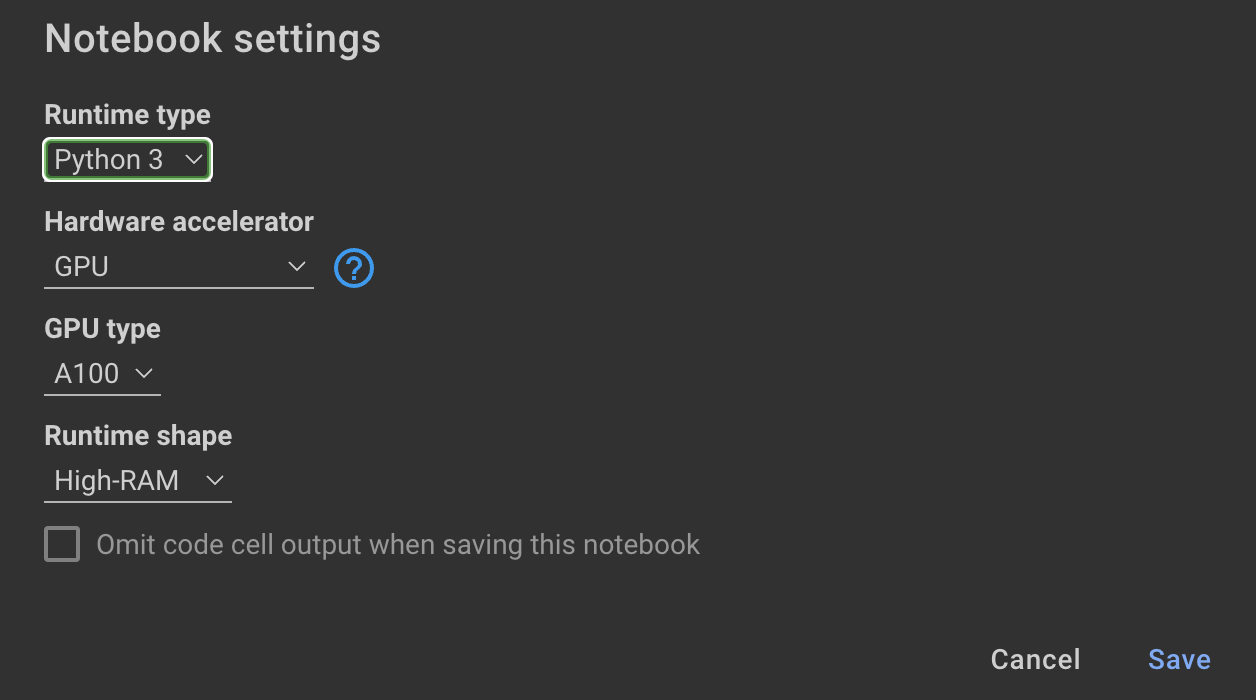
สมุดบันทึกต่อไปนี้ภายในที่เก็บนี้จะแนะนำคุณผ่านขั้นตอน: notebooks/bloom_tuning.ipynb
หากคุณต้องการใช้โมเดลที่ฉันปรับแต่งด้วยชุดข้อมูลสังเคราะห์คุณสามารถเปิดสมุดบันทึก
noebooks/use_fine_tuned_model.ipynb
หัวข้อสามารถระบุได้ดังนี้:
topic = "This blog post is a tutorial about using NumPy to solve static equilibrium problems in three-dimensional space. Readers will learn how to represent points, vectors, and moments with NumPy, find the normal of vectors, and use NumPy for matrix calculations. The tutorial covers the application of Newton's second law to simple examples of force vectors and introduces more complex cases involving reaction forces and moments. The post also discusses the use of NumPy functions in more varied problems, including kinetic problems and different dimensions."
ฟังก์ชั่น make_inference จะใช้หัวข้อนี้เพื่อสร้างโพสต์โซเชียลมีเดียตัวอย่าง


