automate tech post
1.0.0
このリポジトリの目的は、オープンソースブログからコンテンツを要約および変換してソーシャルメディアの投稿を生成する際に、2つの手法を活用する方法を示すことです。
llm-automation/blog_to_post.pyおよびllm-automation/utils.pyの下で、このアプローチに関連するコードを見つけることができます。
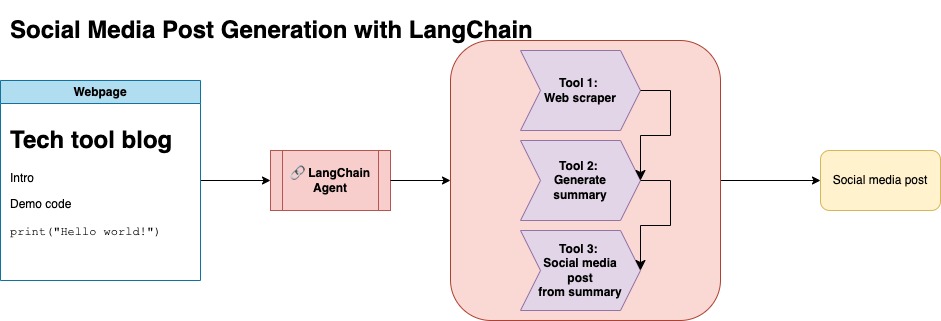
このアプローチでは、OpenAI APIキーがあることを前提としています。このリポジトリのコードはGPT-4を使用しますが、これを変更して他のOpenAIモデルを使用できます。このスクリプトは、NumpyのJupyterbookの下にあるブログ投稿の要約と、対応するリンクと提案されたソーシャルメディア投稿からなる合成データを生成します。
NumpyのJupyterbookのデータを削り、LangchainとOpenai APIを使用して、ブログの要約で構成される合成データセットを生成し、提案されたソーシャルメディアの投稿を生成しました。
以下はサンプルデータ入力です。
 {
        "id": 1,
        "link": "https://numpy.org/numpy-tutorials/content/tutorial-air-quality-analysis.html",
        "summary": "Summary: Learn to perform air quality analysis using Python and NumPy in this tutorial! Discover how to import necessary libraries, build and process a dataset, calculate Air Quality Index (AQI), and perform paired Student's t-test on AQIs. We'll focus on the change in Delhi's air quality before and during the lockdown from March to June 2020.",
        "social_media_post": "?? Do you know how the lockdown affected Delhi's air quality? ?️? Dive into our latest tutorial exploring air quality analysis using Python ? and NumPy ?! Master the art of importing libraries , building and processing datasets , calculating the Air Quality Index (AQI) ?, and performing the notorious Student's t-test on the AQIs ?. Let's discover the effects of lockdown on Delhi's air quality from March to June 2020 ?. Unravel the truth, and #BreatheEasy! ? #Python #NumPy #AirQuality #DataScience #Tutorial #AQI #Delhi #Lockdown #EnvironmentalAwareness ?"
    }
次に、このデータセットをアップロードして顔を抱きしめました。モデルカードlgfunderburk/numpy-docsから見つけることができます
このアプローチでは、抱きしめる顔のアカウントがあり、アクセストークンの読み取りと書き込みがあることを前提としています。微調整にはGPUと高いRAMの使用が必要です。
このアプローチは、ステップ1で生成された合成データを使用しています。
このアプローチの関連コードはnotebooks/bloom_tuning.ipynbで見つけることができます。
手順は次のとおりです。
モデルカードbigscience/bloomz-3bを介して、FaceからFaceからBloomz-3Bをダウンロードします。これは、すべてのブルームモデルのトークン剤です。
次に、8ビットモデルに後処理を適用して、トレーニングを可能にし、層を凍結し、安定性のためにfloat32にレイヤーノームをキャストします。 float32の最後のレイヤーの出力をキャストします。
パラメーター効率の高い微調整(PEFT)モデルをロードし、低ランクアダプター(LORA)を適用します。
プロンプトを介した事前検査合成データ
 def generate_prompt(summary: str, social_media_post: str) -> str:
  prompt = f"### INSTRUCTIONnBelow is a summary of a post
           and its corresponding social media post, please
           write social media post for this blog.
           nn### Summary:n{summary}n### Post:n{social_media_post}n"
  return prompt
その後、データをマッピングできます
mapped_dataset = dataset.map(lambda samples: tokenizer(generate_prompt(samples['summary'], samples['social_media_post'])))
transformersライブラリの.Trainerメソッドを使用しました。 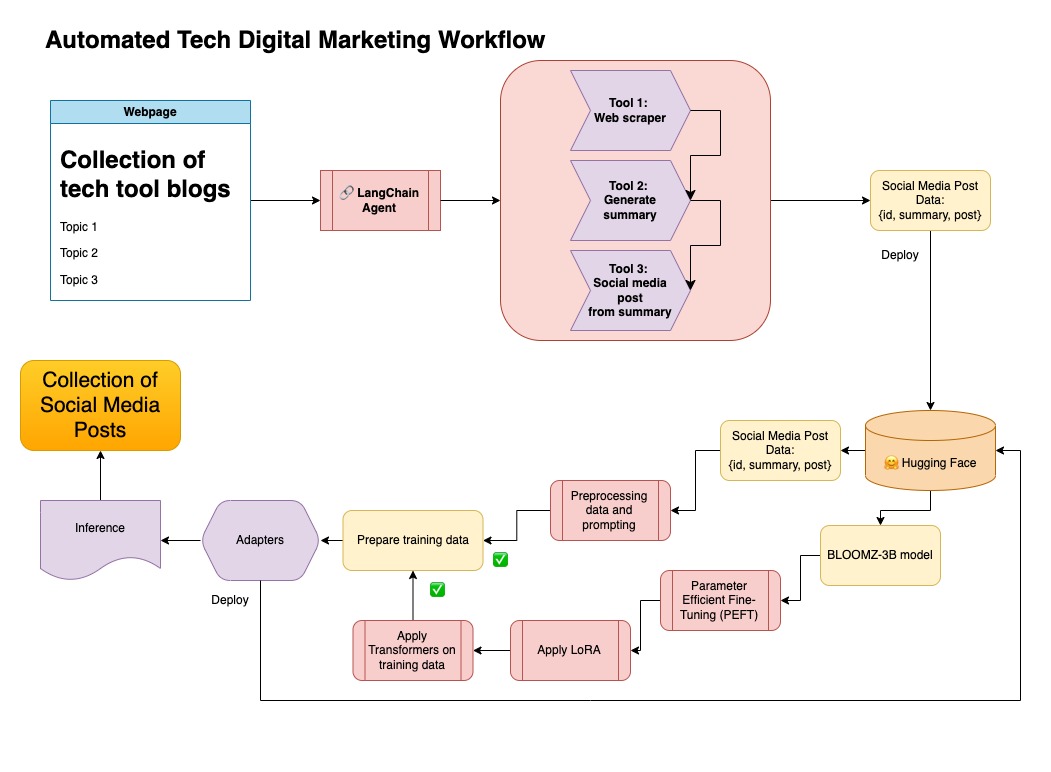
このリポジトリでは、両方のアプローチを組み合わせて、最初に合成データをLangchainパイプラインとキュレートし、結果のデータセットとモデルを微調整するために言及した手法を使用しました。
仮想環境を作成します
conda create --name postenv python==3.10
活性化
conda activate postenv
レポンをクローンし、依存関係をインストールします
 git clone https://github.com/lfunderburk/automate-tech-post.git
cd automate-tech-post/
pip install -r requirements.txt
OpenAI APIキーを保存できる.envファイルを作成します。 .envファイル内のキーを次のように設定します。
OPENAI_API_KEY = <your-keyy>
次のようにパイプラインを実行できます。
python llm-automation/blog_to_post.py
OpenAI APIを使用して、代わりにモデルを微調整したくない場合は、次のColabノートブックを使用できます。
モデルをトレーニングするには、GPUと高RAMが必要です。ローカルマシンがこれをサポートしていない場合は、次の仕様でColab Proを使用できます。
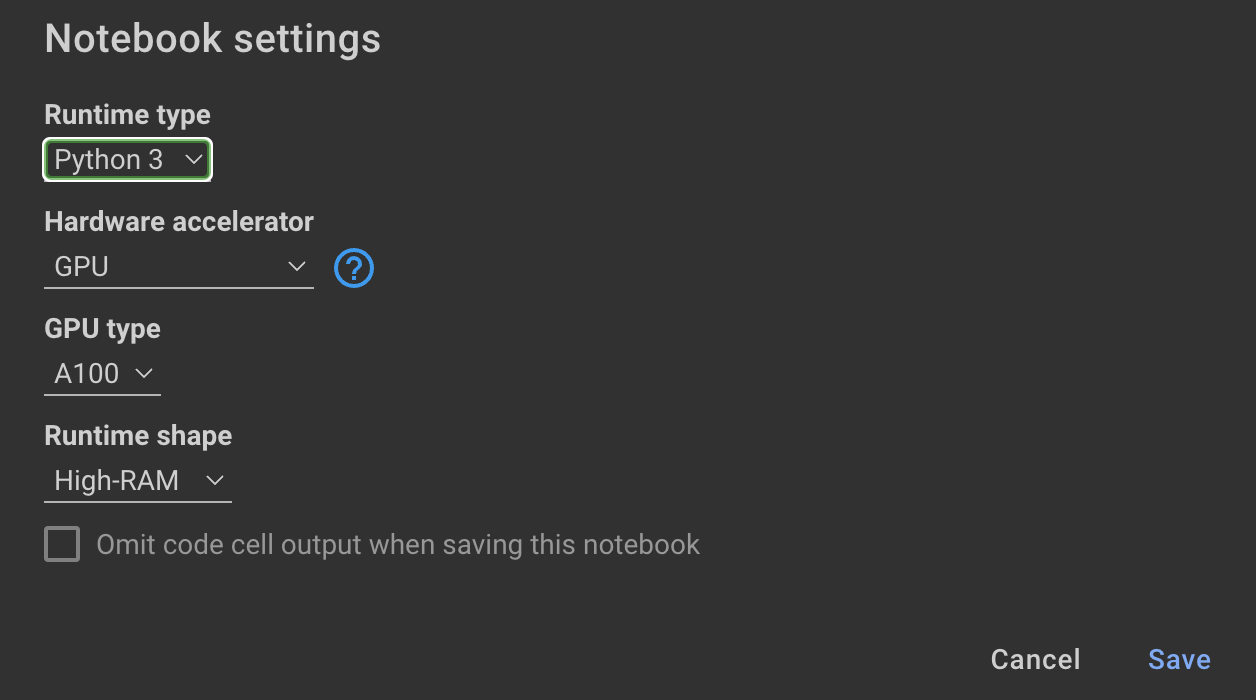
このリポジトリ内の次のノートブックは、ステップをガイドします: notebooks/bloom_tuning.ipynb 。
合成データセットで微調整したモデルを単に使用したい場合は、ノートブックを開くことができます
noebooks/use_fine_tuned_model.ipynb
トピックは次のように指定できます。
topic = "This blog post is a tutorial about using NumPy to solve static equilibrium problems in three-dimensional space. Readers will learn how to represent points, vectors, and moments with NumPy, find the normal of vectors, and use NumPy for matrix calculations. The tutorial covers the application of Newton's second law to simple examples of force vectors and introduces more complex cases involving reaction forces and moments. The post also discusses the use of NumPy functions in more varied problems, including kinetic problems and different dimensions."
make_inference関数は、このトピックを使用して、サンプルソーシャルメディアの投稿を生成します。


