automate tech post
1.0.0
이 저장소의 목적은 오픈 소스 블로그에서 컨텐츠를 요약하고 변환하여 소셜 미디어 게시물을 생성 할 때 두 가지 기술을 활용하는 방법을 보여주는 것입니다.
llm-automation/blog_to_post.py 및 llm-automation/utils.py 에서이 접근법의 관련 코드를 찾을 수 있습니다.
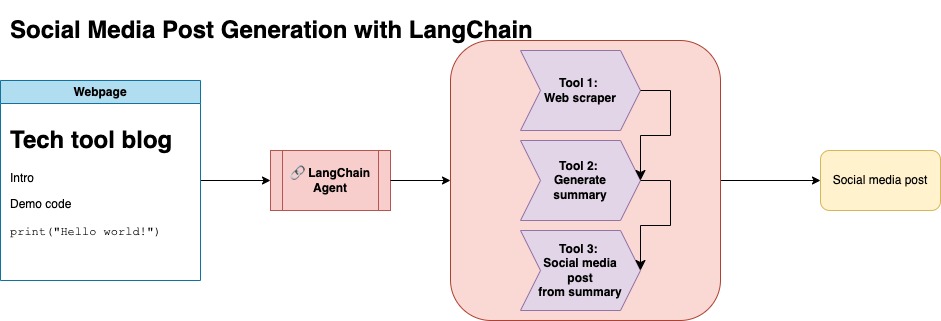
이 접근법은 OpenAI API 키가 있다고 가정합니다. 이 저장소의 코드는 GPT-4를 사용하지만 다른 OpenAI 모델을 사용하도록이를 수정할 수 있습니다. 이 스크립트는 Numpy의 Jupyterbook에서 발견 된 블로그 게시물에 대한 요약으로 구성된 합성 데이터와 해당 링크 및 제안 된 소셜 미디어 게시물을 생성합니다.
나는 Numpy의 Jupyterbook에서 데이터를 긁어 내고 Langchain과 Openai API를 사용하여 블로그 요약으로 구성된 합성 데이터 세트와 제안 된 소셜 미디어 게시물을 생성했습니다.
아래는 샘플 데이터 입력입니다.
 {
        "id": 1,
        "link": "https://numpy.org/numpy-tutorials/content/tutorial-air-quality-analysis.html",
        "summary": "Summary: Learn to perform air quality analysis using Python and NumPy in this tutorial! Discover how to import necessary libraries, build and process a dataset, calculate Air Quality Index (AQI), and perform paired Student's t-test on AQIs. We'll focus on the change in Delhi's air quality before and during the lockdown from March to June 2020.",
        "social_media_post": "?? Do you know how the lockdown affected Delhi's air quality? ?️? Dive into our latest tutorial exploring air quality analysis using Python ? and NumPy ?! Master the art of importing libraries , building and processing datasets , calculating the Air Quality Index (AQI) ?, and performing the notorious Student's t-test on the AQIs ?. Let's discover the effects of lockdown on Delhi's air quality from March to June 2020 ?. Unravel the truth, and #BreatheEasy! ? #Python #NumPy #AirQuality #DataScience #Tutorial #AQI #Delhi #Lockdown #EnvironmentalAwareness ?"
    }
그런 다음이 데이터 세트는 포옹 얼굴에 업로드되었습니다. 모델 카드 lgfunderburk/numpy-docs를 통해 찾을 수 있습니다
이 접근법은 당신이 포옹 페이스 계정을 가지고 있다고 가정하고 액세스 토큰을 읽고 쓰고 쓰고 있다고 가정합니다. 미세 조정에는 GPU와 높은 RAM 사용이 필요합니다.
이 접근법은 1 단계에서 생성 된 합성 데이터를 사용하고 있습니다.
notebooks/bloom_tuning.ipynb 에서이 접근법의 관련 코드를 찾을 수 있습니다.
단계는 다음과 같습니다.
모델 카드 bigscience/bloomz-3b 통해 Hugging Face에서 Bloomz-3B를 다운로드하십시오. 이것은 모든 블룸 모델에 대한 토큰 화기입니다.
그런 다음 8 비트 모델에서 포스트 프로세싱을 적용하여 훈련, 층을 동결시키고 안정성을 위해 Float32에 레이어-르노르를 주조 할 수 있습니다. Float32에서 마지막 층의 출력을 캐스트합니다.
매개 변수 효율적인 미세 조정 (PEFT) 모델을로드하고 저급 어댑터 (LORA)를 적용하십시오.
프롬프트를 통한 합성 데이터 전처리
 def generate_prompt(summary: str, social_media_post: str) -> str:
  prompt = f"### INSTRUCTIONnBelow is a summary of a post
           and its corresponding social media post, please
           write social media post for this blog.
           nn### Summary:n{summary}n### Post:n{social_media_post}n"
  return prompt
그런 다음 데이터를 매핑 할 수 있습니다
mapped_dataset = dataset.map(lambda samples: tokenizer(generate_prompt(samples['summary'], samples['social_media_post'])))
transformers 라이브러리의 .Trainer 메소드를 사용했습니다. 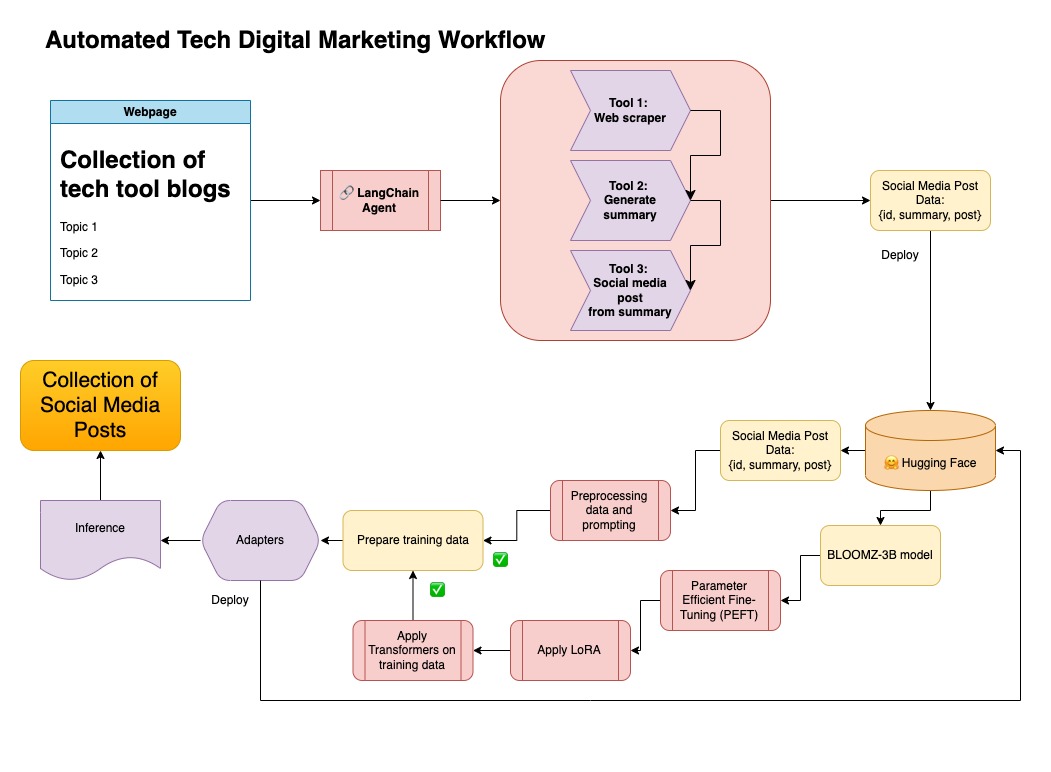
이 저장소에서는 두 가지 접근 방식을 결합하여 합성 데이터를 Langchain 파이프 라인으로 큐 레이트하고 결과 데이터 세트를 모델을 미세 조정하는 기술과 함께 사용했습니다.
가상 환경을 만듭니다
conda create --name postenv python==3.10
활성화
conda activate postenv
복제 레포 및 설치 의존성
 git clone https://github.com/lfunderburk/automate-tech-post.git
cd automate-tech-post/
pip install -r requirements.txt
OpenAI API 키를 저장할 수있는 .env 파일을 만듭니다. 다음과 같이 .env 파일 내에서 키를 설정합니다.
OPENAI_API_KEY = <your-keyy>
다음과 같이 파이프 라인을 실행할 수 있습니다.
python llm-automation/blog_to_post.py
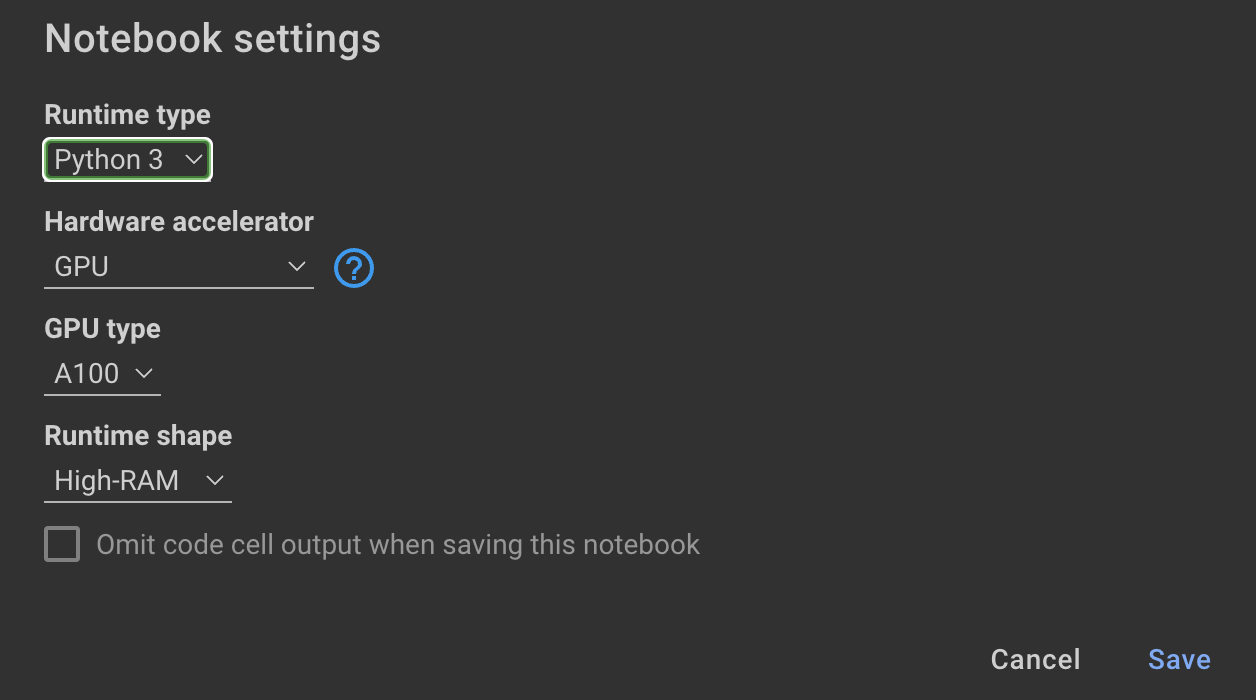
OpenAI API를 사용하지 않고 대신 모델을 미세 조정하지 않으려면 다음 Colab 노트북을 사용할 수 있습니다.
모델을 훈련하려면 GPU와 높은 RAM이 필요합니다. 로컬 컴퓨터가이를 지원하지 않으면 다음 사양과 함께 Colab Pro를 사용할 수 있습니다.
이 저장소 내의 다음 노트북은 notebooks/bloom_tuning.ipynb 단계를 안내합니다.
합성 데이터 세트로 미세 조정 한 모델을 사용하려면 노트북을 열 수 있습니다.
noebooks/use_fine_tuned_model.ipynb
주제는 다음과 같이 지정할 수 있습니다.
topic = "This blog post is a tutorial about using NumPy to solve static equilibrium problems in three-dimensional space. Readers will learn how to represent points, vectors, and moments with NumPy, find the normal of vectors, and use NumPy for matrix calculations. The tutorial covers the application of Newton's second law to simple examples of force vectors and introduces more complex cases involving reaction forces and moments. The post also discusses the use of NumPy functions in more varied problems, including kinetic problems and different dimensions."
그런 다음 make_inference 함수는이 주제를 사용하여 샘플 소셜 미디어 게시물을 생성합니다.


