Open3D ML
v0.18 release
安装|入门|结构|任务和算法|模型动物园|数据集| How-Tos |贡献
Open3D-ML是用于3D机器学习任务的Open3D的扩展。它建立在Open3D Core库的顶部,并使用用于3D数据处理的机器学习工具扩展了它。该存储库的重点是语义点云进行分割等应用,并提供了可以应用于常见任务以及训练管道的验证模型。
Open3D-ML与TensorFlow和Pytorch一起使用,可以轻松地集成到现有项目中,并且还提供了与ML框架(例如数据可视化)无关的一般功能。
Open3D-ML集成在Open3D V0.11+ Python分布中,并且与以下ML框架的以下版本兼容。
GNU/Linux x86_64上,可选)您可以使用Open3D安装
 # make sure you have the latest pip version
pip install --upgrade pip
# install open3d
pip install open3d
要安装Pytorch或TensorFlow的兼容版本,您可以使用各自的要求文件:
 # To install a compatible version of TensorFlow
pip install -r requirements-tensorflow.txt
# To install a compatible version of PyTorch
pip install -r requirements-torch.txt
# To install a compatible version of PyTorch with CUDA on Linux
pip install -r requirements-torch-cuda.txt
测试安装使用
 # with PyTorch
$ python -c " import open3d.ml.torch as ml3d "
# or with TensorFlow
$ python -c " import open3d.ml.tf as ml3d "
如果您需要使用不同版本的ML框架或CUDA,我们建议我们从源构建Open3D或在Docker中构建Open3D。
从Linux上的V0.18开始,PYPI Open3D Wheel由于在Pytorch和TensorFlow之间构建不兼容而没有本机对张量的支持[请参阅Python 3.11支持PR]。如果您想在Linux上使用tensorflow的Open3D,则可以从Docker中的源构建Open3D Wheel,并支持TensorFlow(但不提供Pytorch),为:
 cd docker
# Build open3d and open3d-cpu wheels for Python 3.10 with Tensorflow support
export BUILD_PYTORCH_OPS=OFF BUILD_TENSORFLOW_OPS=ON
./docker_build.sh cuda_wheel_py310数据集名称空间包含用于读取常见数据集的类。在这里,我们读取Semantickitti数据集并对它进行可视化。
 import open3d . ml . torch as ml3d  # or open3d.ml.tf as ml3d

# construct a dataset by specifying dataset_path
dataset = ml3d . datasets . SemanticKITTI ( dataset_path = '/path/to/SemanticKITTI/' )

# get the 'all' split that combines training, validation and test set
all_split = dataset . get_split ( 'all' )

# print the attributes of the first datum
print ( all_split . get_attr ( 0 ))

# print the shape of the first point cloud
print ( all_split . get_data ( 0 )[ 'point' ]. shape )

# show the first 100 frames using the visualizer
vis = ml3d . vis . Visualizer ()
vis . visualize_dataset ( dataset , 'all' , indices = range ( 100 ))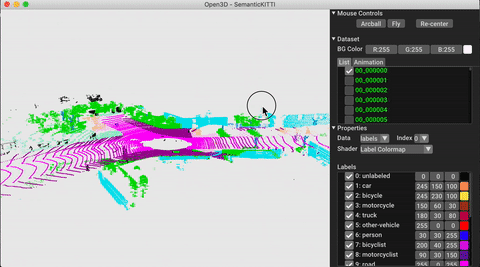
模型,数据集和管道的配置存储在ml3d/configs中。用户还可以构建自己的YAML文件,以保留其自定义配置的记录。这是读取配置文件并从中构建模块的示例。
 import open3d . ml as _ml3d
import open3d . ml . torch as ml3d # or open3d.ml.tf as ml3d

framework = "torch" # or tf
cfg_file = "ml3d/configs/randlanet_semantickitti.yml"
cfg = _ml3d . utils . Config . load_from_file ( cfg_file )

# fetch the classes by the name
Pipeline = _ml3d . utils . get_module ( "pipeline" , cfg . pipeline . name , framework )
Model = _ml3d . utils . get_module ( "model" , cfg . model . name , framework )
Dataset = _ml3d . utils . get_module ( "dataset" , cfg . dataset . name )

# use the arguments in the config file to construct the instances
cfg . dataset [ 'dataset_path' ] = "/path/to/your/dataset"
dataset = Dataset ( cfg . dataset . pop ( 'dataset_path' , None ), ** cfg . dataset )
model = Model ( ** cfg . model )
pipeline = Pipeline ( model , dataset , ** cfg . pipeline )在上一个示例的基础上,我们可以使用验证的模型实例化管道,以进行语义分割,并将其运行在数据集的点云上。有关获取验证模型的权重的,请参见模型动物园。
 import os
import open3d . ml as _ml3d
import open3d . ml . torch as ml3d

cfg_file = "ml3d/configs/randlanet_semantickitti.yml"
cfg = _ml3d . utils . Config . load_from_file ( cfg_file )

model = ml3d . models . RandLANet ( ** cfg . model )
cfg . dataset [ 'dataset_path' ] = "/path/to/your/dataset"
dataset = ml3d . datasets . SemanticKITTI ( cfg . dataset . pop ( 'dataset_path' , None ), ** cfg . dataset )
pipeline = ml3d . pipelines . SemanticSegmentation ( model , dataset = dataset , device = "gpu" , ** cfg . pipeline )

# download the weights.
ckpt_folder = "./logs/"
os . makedirs ( ckpt_folder , exist_ok = True )
ckpt_path = ckpt_folder + "randlanet_semantickitti_202201071330utc.pth"
randlanet_url = "https://storage.googleapis.com/open3d-releases/model-zoo/randlanet_semantickitti_202201071330utc.pth"
if not os . path . exists ( ckpt_path ):
    cmd = "wget {} -O {}" . format ( randlanet_url , ckpt_path )
    os . system ( cmd )

# load the parameters.
pipeline . load_ckpt ( ckpt_path = ckpt_path )

test_split = dataset . get_split ( "test" )
data = test_split . get_data ( 0 )

# run inference on a single example.
# returns dict with 'predict_labels' and 'predict_scores'.
result = pipeline . run_inference ( data )

# evaluate performance on the test set; this will write logs to './logs'.
pipeline . run_test ()
用户还可以使用预定义的脚本来加载预告片的权重和运行测试。
与推理相似,管道提供了用于在数据集上训练模型的接口。
 # use a cache for storing the results of the preprocessing (default path is './logs/cache')
dataset = ml3d . datasets . SemanticKITTI ( dataset_path = '/path/to/SemanticKITTI/' , use_cache = True )

# create the model with random initialization.
model = RandLANet ()

pipeline = SemanticSegmentation ( model = model , dataset = dataset , max_epoch = 100 )

# prints training progress in the console.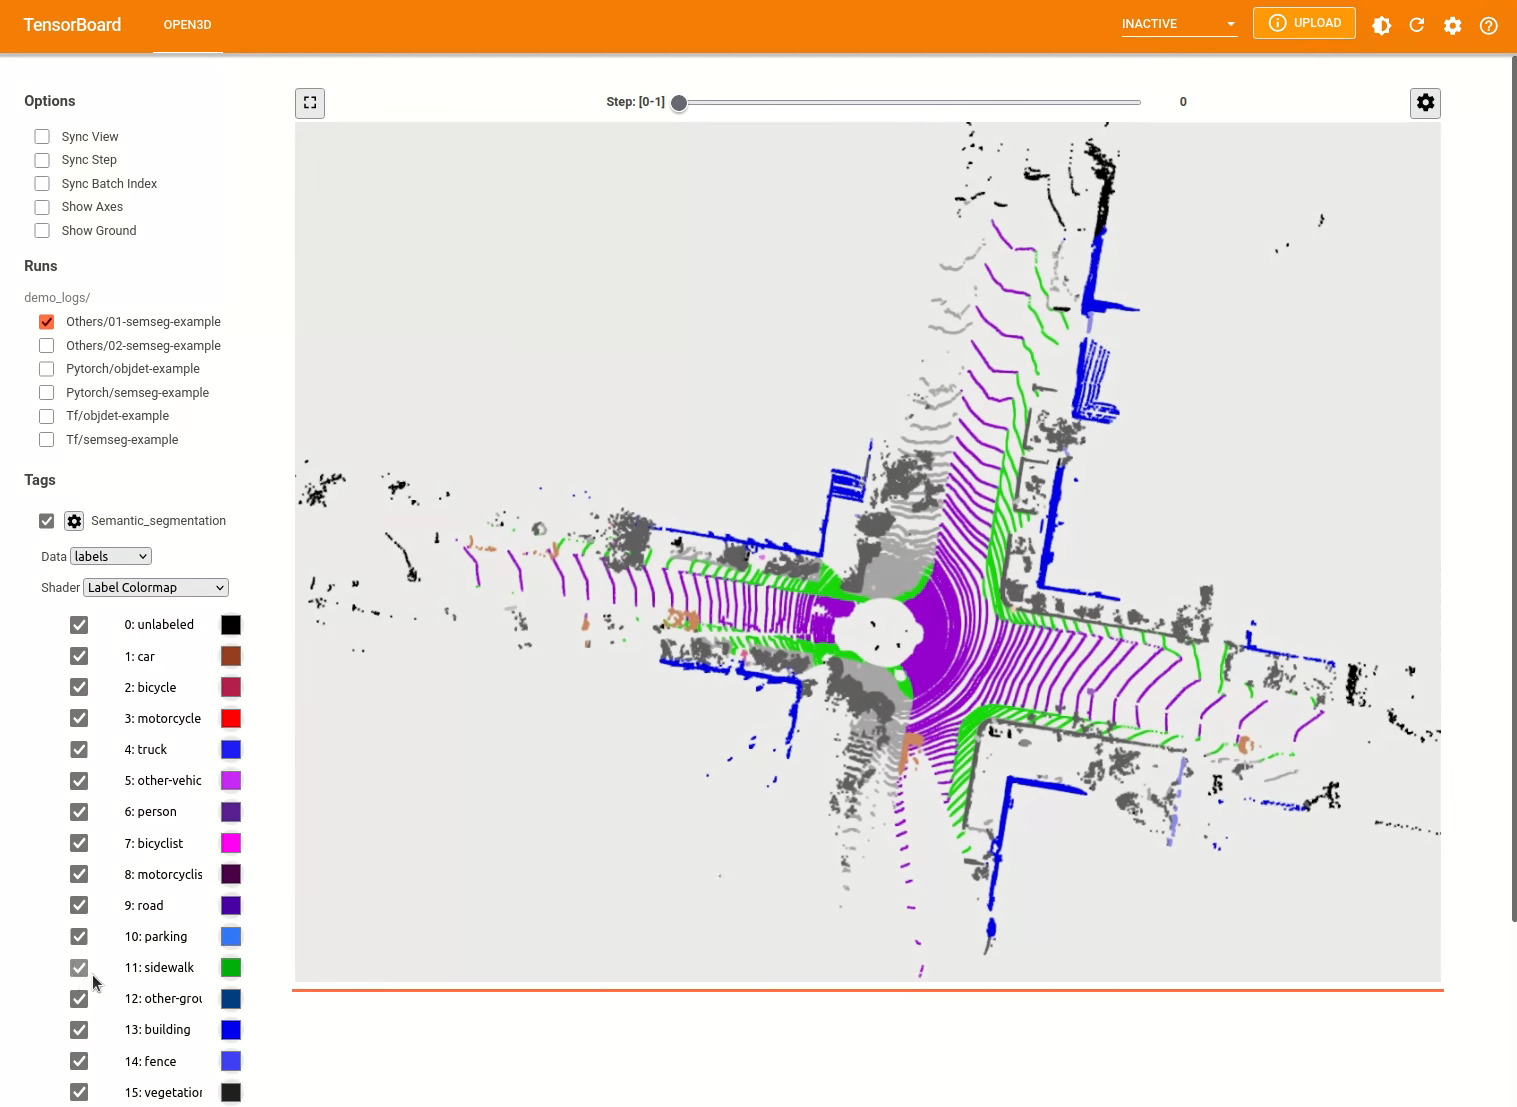
pipeline . run_train ()有关更多示例,请参见examples/和scripts/目录。您还可以在配置文件中启用保存培训摘要,并通过张量板可视化地面真相和结果。有关详细信息,请参见本教程。
3D对象检测模型类似于语义分割模型。我们可以使用验证的模型实例化管道以进行对象检测,并将其运行在数据集的点云上。有关获取验证模型的权重的,请参见模型动物园。
 import os
import open3d . ml as _ml3d
import open3d . ml . torch as ml3d

cfg_file = "ml3d/configs/pointpillars_kitti.yml"
cfg = _ml3d . utils . Config . load_from_file ( cfg_file )

model = ml3d . models . PointPillars ( ** cfg . model )
cfg . dataset [ 'dataset_path' ] = "/path/to/your/dataset"
dataset = ml3d . datasets . KITTI ( cfg . dataset . pop ( 'dataset_path' , None ), ** cfg . dataset )
pipeline = ml3d . pipelines . ObjectDetection ( model , dataset = dataset , device = "gpu" , ** cfg . pipeline )

# download the weights.
ckpt_folder = "./logs/"
os . makedirs ( ckpt_folder , exist_ok = True )
ckpt_path = ckpt_folder + "pointpillars_kitti_202012221652utc.pth"
pointpillar_url = "https://storage.googleapis.com/open3d-releases/model-zoo/pointpillars_kitti_202012221652utc.pth"
if not os . path . exists ( ckpt_path ):
    cmd = "wget {} -O {}" . format ( pointpillar_url , ckpt_path )
    os . system ( cmd )

# load the parameters.
pipeline . load_ckpt ( ckpt_path = ckpt_path )

test_split = dataset . get_split ( "test" )
data = test_split . get_data ( 0 )

# run inference on a single example.
# returns dict with 'predict_labels' and 'predict_scores'.
result = pipeline . run_inference ( data )

# evaluate performance on the test set; this will write logs to './logs'.
pipeline . run_test ()
用户还可以使用预定义的脚本来加载预告片的权重和运行测试。
与推理相似,管道提供了用于在数据集上训练模型的接口。
# use a cache for storing the results of the preprocessing (default path is './logs/cache')
dataset = ml3d . datasets . KITTI ( dataset_path = '/path/to/KITTI/' , use_cache = True )
# create the model with random initialization.
model = PointPillars ()
pipeline = ObjectDetection ( model = model , dataset = dataset , max_epoch = 100 )
# prints training progress in the console.
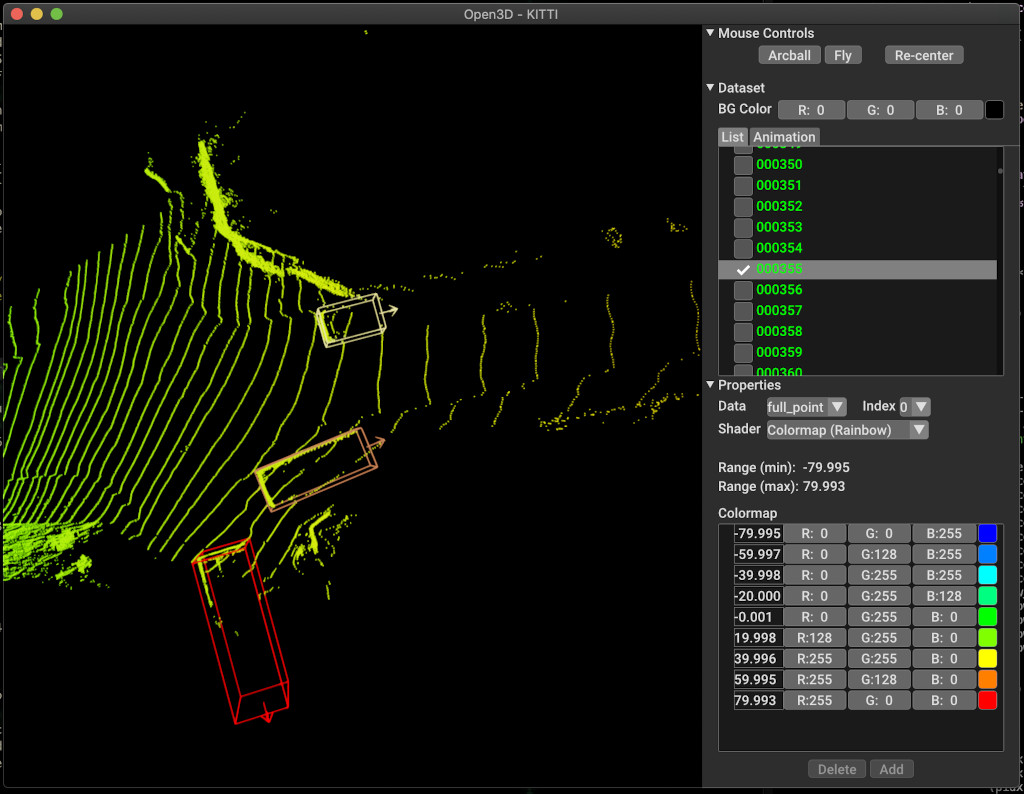
pipeline . run_train ()以下是使用Kitti可视化的示例。该示例显示了对Kitti数据集的边界框的使用。
有关更多示例,请参见examples/和scripts/目录。您还可以在配置文件中启用保存培训摘要,并通过张量板可视化地面真相和结果。有关详细信息,请参见本教程。

scripts/run_pipeline.py提供了一个简单的接口,用于训练和评估数据集上的模型。它节省了定义特定模型并传递精确配置的麻烦。
python scripts/run_pipeline.py {tf/torch} -c <path-to-config> --pipeline {SemanticSegmentation/ObjectDetection} --<extra args>
您可以使用脚本进行语义细分和对象检测。您必须在pipeline参数中指定语义分割或对象进行。请注意, extra args将优先于配置文件中存在的相同参数。因此,在启动脚本时,您可以将与命令行参数相同,而不是更改配置文件中的param。
例如。
 # Launch training for RandLANet on SemanticKITTI with torch.
python scripts/run_pipeline.py torch -c ml3d/configs/randlanet_semantickitti.yml --dataset.dataset_path <path-to-dataset> --pipeline SemanticSegmentation --dataset.use_cache True

# Launch testing for PointPillars on KITTI with torch.
python scripts/run_pipeline.py torch -c ml3d/configs/pointpillars_kitti.yml --split test --dataset.dataset_path <path-to-dataset> --pipeline ObjectDetection --dataset.use_cache True
为了进一步帮助,请运行python scripts/run_pipeline.py --help 。
Open3D-ML的核心部分生活在ml3d文件夹中,该子文件夹在ml名称空间中集成到Open3D中。除了核心部分外,目录examples和scripts还提供了支持脚本,以开始设置培训管道或在数据集上运行网络。
 ├─ docs                   # Markdown and rst files for documentation
├─ examples               # Place for example scripts and notebooks
├─ ml3d                   # Package root dir that is integrated in open3d
     ├─ configs           # Model configuration files
     ├─ datasets          # Generic dataset code; will be integratede as open3d.ml.{tf,torch}.datasets
     ├─ metrics           # Metrics available for evaluating ML models
     ├─ utils             # Framework independent utilities; available as open3d.ml.{tf,torch}.utils
     ├─ vis               # ML specific visualization functions
     ├─ tf                # Directory for TensorFlow specific code. same structure as ml3d/torch.
     │                    # This will be available as open3d.ml.tf
     ├─ torch             # Directory for PyTorch specific code; available as open3d.ml.torch
          ├─ dataloaders  # Framework specific dataset code, e.g. wrappers that can make use of the
          │               # generic dataset code.
          ├─ models       # Code for models
          ├─ modules      # Smaller modules, e.g., metrics and losses
          ├─ pipelines    # Pipelines for tasks like semantic segmentation
          ├─ utils        # Utilities for <>
├─ scripts                # Demo scripts for training and dataset download scripts
对于语义分割的任务,我们使用所有类别的平均交叉点(MIOU)来衡量不同方法的性能。该表显示了用于分割任务和各个分数的可用模型和数据集。每个分数链接到相应的权重文件。
| 模型 /数据集 | Semantickitti | 多伦多3D | S3DIS | smantic3d | 巴黎 - 莱尔3D | 扫描仪 |
|---|---|---|---|---|---|---|
| Randla-Net(TF) | 53.7 | 73.7 | 70.9 | 76.0 | 70.0* | - |
| Randla-Net(火炬) | 52.8 | 74.0 | 70.9 | 76.0 | 70.0* | - |
| KPCONV(TF) | 58.7 | 65.6 | 65.0 | - | 76.7 | - |
| KPCONV(火炬) | 58.0 | 65.6 | 60.0 | - | 76.7 | - |
| sparseconvunet(火炬) | - | - | - | - | - | 68 |
| sparseconvunet(TF) | - | - | - | - | - | 68.2 |
| Point -Transformer(火炬) | - | - | 69.2 | - | - | - |
| Point Transformer(TF) | - | - | 69.2 | - | - | - |
(*)使用原始作者的权重。
对于对象检测的任务,我们使用鸟类视图(BEV)和3D的平均平均精度(MAP)来测量不同方法的性能。该表显示了用于对象检测任务和相应分数的可用模型和数据集。每个分数链接到相应的权重文件。对于评估,根据Kitti的验证标准,使用验证子集评估了模型。这些模型接受了三类培训(汽车,行人和骑自行车的人)。计算值是所有难度级别的所有类图的平均值。对于Waymo数据集,对模型进行了三类培训(行人,车辆,骑自行车的人)。
| 模型 /数据集 | kitti [bev / 3d] @ 0.70 | Waymo(BEV / 3D) @ 0.50 |
|---|---|---|
| 点柱(TF) | 61.6 / 55.2 | - |
| 尖头(火炬) | 61.2 / 52.8 | AVG:61.01 / 48.30 |最佳:61.47 / 57.55 [^wpp-train] |
| Pointrcnn(TF) | 78.2 / 65.9 | - |
| Pointrcnn(火炬) | 78.2 / 65.9 | - |
[^wpp-train]:avg。指标是三组训练跑的平均值,其中4、8、16和32 GPU。训练是在30个时期后停止的训练。模型检查点可用于最佳训练运行。
要使用地面真相采样数据增强进行培训,我们可以生成地面真相数据库如下:
python scripts/collect_bboxes.py --dataset_path <path_to_data_root>
这将生成一个由火车拆分对象组成的数据库。建议将此增强物用于数据集,例如Kitti,其中对象很少。
Pointrcnn的两个阶段进行了分别训练。要使用Pytorch训练Pointrcnn的提案生成阶段,请执行以下命令:
 # Train RPN for 100 epochs.
python scripts/run_pipeline.py torch -c ml3d/configs/pointrcnn_kitti.yml --dataset.dataset_path <path-to-dataset> --mode RPN --epochs 100
在获得了训练有素的RPN网络后,我们可以使用冷冻RPN权重培训RCNN网络。
 # Train RCNN for 70 epochs.
python scripts/run_pipeline.py torch -c ml3d/configs/pointrcnn_kitti.yml --dataset.dataset_path <path-to-dataset> --mode RCNN --model.ckpt_path <path_to_checkpoint> --epochs 100
有关所有权重文件的完整列表,请参见Model_Weights.txt和MD5 checksum文件mode_weights.md5。
以下是我们提供数据集读取器类的数据集列表。
要下载这些数据集,请访问各自的网页,并查看scripts/download_datasets中的脚本。
有很多方法可以为该项目做出贡献。你可以:
请向开发分支提出拉的请求。 Open3D是社区努力。我们欢迎并庆祝社区的贡献!
如果您想分享训练的型号的权重,请连接或链接拉动请求中的权重文件。对于错误和问题,请打开一个问题。还请查看我们的沟通渠道,以与社区联系。
如果您使用Open3D,请引用我们的工作(PDF)。
 @article { Zhou2018 ,
    author    = { Qian-Yi Zhou and Jaesik Park and Vladlen Koltun } ,
    title     = { {Open3D}: {A} Modern Library for {3D} Data Processing } ,
    journal   = { arXiv:1801.09847 } ,
    year      = { 2018 } ,
}

