Open3D ML
v0.18 release
การติดตั้ง เริ่มต้น | โครงสร้าง | งานและอัลกอริทึม | สวนสัตว์รุ่น | ชุดข้อมูล How-tos | มีส่วนช่วย
Open3D-ML เป็นส่วนขยายของ Open3D สำหรับงานการเรียนรู้ของเครื่อง 3D มันสร้างที่ด้านบนของไลบรารี Core Open3D และขยายด้วยเครื่องมือการเรียนรู้ของเครื่องสำหรับการประมวลผลข้อมูล 3 มิติ repo นี้มุ่งเน้นไปที่แอพพลิเคชั่นเช่นการแบ่งส่วนคลาวด์จุด semantic และให้แบบจำลองที่ผ่านการฝึกอบรมซึ่งสามารถนำไปใช้กับงานทั่วไปรวมถึงท่อสำหรับการฝึกอบรม
Open3D-ML ทำงานร่วมกับ TensorFlow และ Pytorch เพื่อรวมเข้ากับโครงการที่มีอยู่ได้อย่างง่ายดายและยังให้ฟังก์ชั่นทั่วไปที่เป็นอิสระจากกรอบ ML เช่นการสร้างภาพข้อมูล
Open3D-ML ถูกรวมเข้าด้วยกันในการแจกแจง Open3D V0.11+ Python และเข้ากันได้กับเฟรมเวิร์ก ML รุ่นต่อไปนี้
GNU/Linux x86_64 , ไม่บังคับ)คุณสามารถติดตั้ง open3d ด้วย
 # make sure you have the latest pip version
pip install --upgrade pip
# install open3d
pip install open3d
ในการติดตั้ง pytorch หรือ tensorflow เวอร์ชันที่เข้ากันได้คุณสามารถใช้ไฟล์ข้อกำหนดที่เกี่ยวข้องได้:
 # To install a compatible version of TensorFlow
pip install -r requirements-tensorflow.txt
# To install a compatible version of PyTorch
pip install -r requirements-torch.txt
# To install a compatible version of PyTorch with CUDA on Linux
pip install -r requirements-torch-cuda.txt
เพื่อทดสอบการใช้งานการติดตั้ง
 # with PyTorch
$ python -c " import open3d.ml.torch as ml3d "
# or with TensorFlow
$ python -c " import open3d.ml.tf as ml3d "
หากคุณต้องการใช้ ML Frameworks หรือ CUDA รุ่นต่าง ๆ เราขอแนะนำให้สร้าง Open3D จากแหล่งที่มาหรือสร้าง Open3D ใน Docker
จาก V0.18 เป็นต้นไปบน Linux Wheel PYPI Open3D ไม่ได้รับการสนับสนุนแบบดั้งเดิมสำหรับ TensorFlow เนื่องจากการสร้างความไม่ลงรอยกันระหว่าง Pytorch และ Tensorflow [ดู Python 3.11 Support PR] สำหรับรายละเอียด หากคุณต้องการใช้ Open3D กับ TensorFlow บน Linux คุณสามารถสร้าง Wheel Open3D จากแหล่งที่มาใน Docker ด้วยการสนับสนุน TensorFlow (แต่ไม่ใช่ Pytorch) เป็น:
 cd docker
# Build open3d and open3d-cpu wheels for Python 3.10 with Tensorflow support
export BUILD_PYTORCH_OPS=OFF BUILD_TENSORFLOW_OPS=ON
./docker_build.sh cuda_wheel_py310Namespace ชุดข้อมูลมีคลาสสำหรับการอ่านชุดข้อมูลทั่วไป ที่นี่เราอ่านชุดข้อมูล semantickitti และแสดงภาพ
 import open3d . ml . torch as ml3d  # or open3d.ml.tf as ml3d

# construct a dataset by specifying dataset_path
dataset = ml3d . datasets . SemanticKITTI ( dataset_path = '/path/to/SemanticKITTI/' )

# get the 'all' split that combines training, validation and test set
all_split = dataset . get_split ( 'all' )

# print the attributes of the first datum
print ( all_split . get_attr ( 0 ))

# print the shape of the first point cloud
print ( all_split . get_data ( 0 )[ 'point' ]. shape )

# show the first 100 frames using the visualizer
vis = ml3d . vis . Visualizer ()
vis . visualize_dataset ( dataset , 'all' , indices = range ( 100 ))
การกำหนดค่าของรุ่นชุดข้อมูลและท่อจะถูกเก็บไว้ใน ml3d/configs ผู้ใช้ยังสามารถสร้างไฟล์ YAML ของตนเองเพื่อเก็บบันทึกการกำหนดค่าที่กำหนดเอง นี่คือตัวอย่างของการอ่านไฟล์กำหนดค่าและการสร้างโมดูลจากมัน
 import open3d . ml as _ml3d
import open3d . ml . torch as ml3d # or open3d.ml.tf as ml3d

framework = "torch" # or tf
cfg_file = "ml3d/configs/randlanet_semantickitti.yml"
cfg = _ml3d . utils . Config . load_from_file ( cfg_file )

# fetch the classes by the name
Pipeline = _ml3d . utils . get_module ( "pipeline" , cfg . pipeline . name , framework )
Model = _ml3d . utils . get_module ( "model" , cfg . model . name , framework )
Dataset = _ml3d . utils . get_module ( "dataset" , cfg . dataset . name )

# use the arguments in the config file to construct the instances
cfg . dataset [ 'dataset_path' ] = "/path/to/your/dataset"
dataset = Dataset ( cfg . dataset . pop ( 'dataset_path' , None ), ** cfg . dataset )
model = Model ( ** cfg . model )
pipeline = Pipeline ( model , dataset , ** cfg . pipeline )การสร้างตัวอย่างก่อนหน้านี้เราสามารถสร้างอินสแตนซ์ไปป์ไลน์ด้วยโมเดลที่ผ่านการฝึกอบรมสำหรับการแบ่งส่วนความหมายและเรียกใช้บนคลาวด์จุดของชุดข้อมูลของเรา ดูสวนสัตว์แบบจำลองเพื่อรับน้ำหนักของแบบจำลองที่ผ่านการฝึกฝน
 import os
import open3d . ml as _ml3d
import open3d . ml . torch as ml3d

cfg_file = "ml3d/configs/randlanet_semantickitti.yml"
cfg = _ml3d . utils . Config . load_from_file ( cfg_file )

model = ml3d . models . RandLANet ( ** cfg . model )
cfg . dataset [ 'dataset_path' ] = "/path/to/your/dataset"
dataset = ml3d . datasets . SemanticKITTI ( cfg . dataset . pop ( 'dataset_path' , None ), ** cfg . dataset )
pipeline = ml3d . pipelines . SemanticSegmentation ( model , dataset = dataset , device = "gpu" , ** cfg . pipeline )

# download the weights.
ckpt_folder = "./logs/"
os . makedirs ( ckpt_folder , exist_ok = True )
ckpt_path = ckpt_folder + "randlanet_semantickitti_202201071330utc.pth"
randlanet_url = "https://storage.googleapis.com/open3d-releases/model-zoo/randlanet_semantickitti_202201071330utc.pth"
if not os . path . exists ( ckpt_path ):
    cmd = "wget {} -O {}" . format ( randlanet_url , ckpt_path )
    os . system ( cmd )

# load the parameters.
pipeline . load_ckpt ( ckpt_path = ckpt_path )

test_split = dataset . get_split ( "test" )
data = test_split . get_data ( 0 )

# run inference on a single example.
# returns dict with 'predict_labels' and 'predict_scores'.
result = pipeline . run_inference ( data )

# evaluate performance on the test set; this will write logs to './logs'.
pipeline . run_test ()
ผู้ใช้ยังสามารถใช้สคริปต์ที่กำหนดไว้ล่วงหน้าเพื่อโหลดน้ำหนักที่ได้รับการฝึกฝนและการทดสอบ
เช่นเดียวกับการอนุมานท่อส่งอินเทอร์เฟซสำหรับการฝึกอบรมโมเดลในชุดข้อมูล
# use a cache for storing the results of the preprocessing (default path is './logs/cache')
dataset = ml3d . datasets . SemanticKITTI ( dataset_path = '/path/to/SemanticKITTI/' , use_cache = True )
# create the model with random initialization.
model = RandLANet ()
pipeline = SemanticSegmentation ( model = model , dataset = dataset , max_epoch = 100 )
# prints training progress in the console.
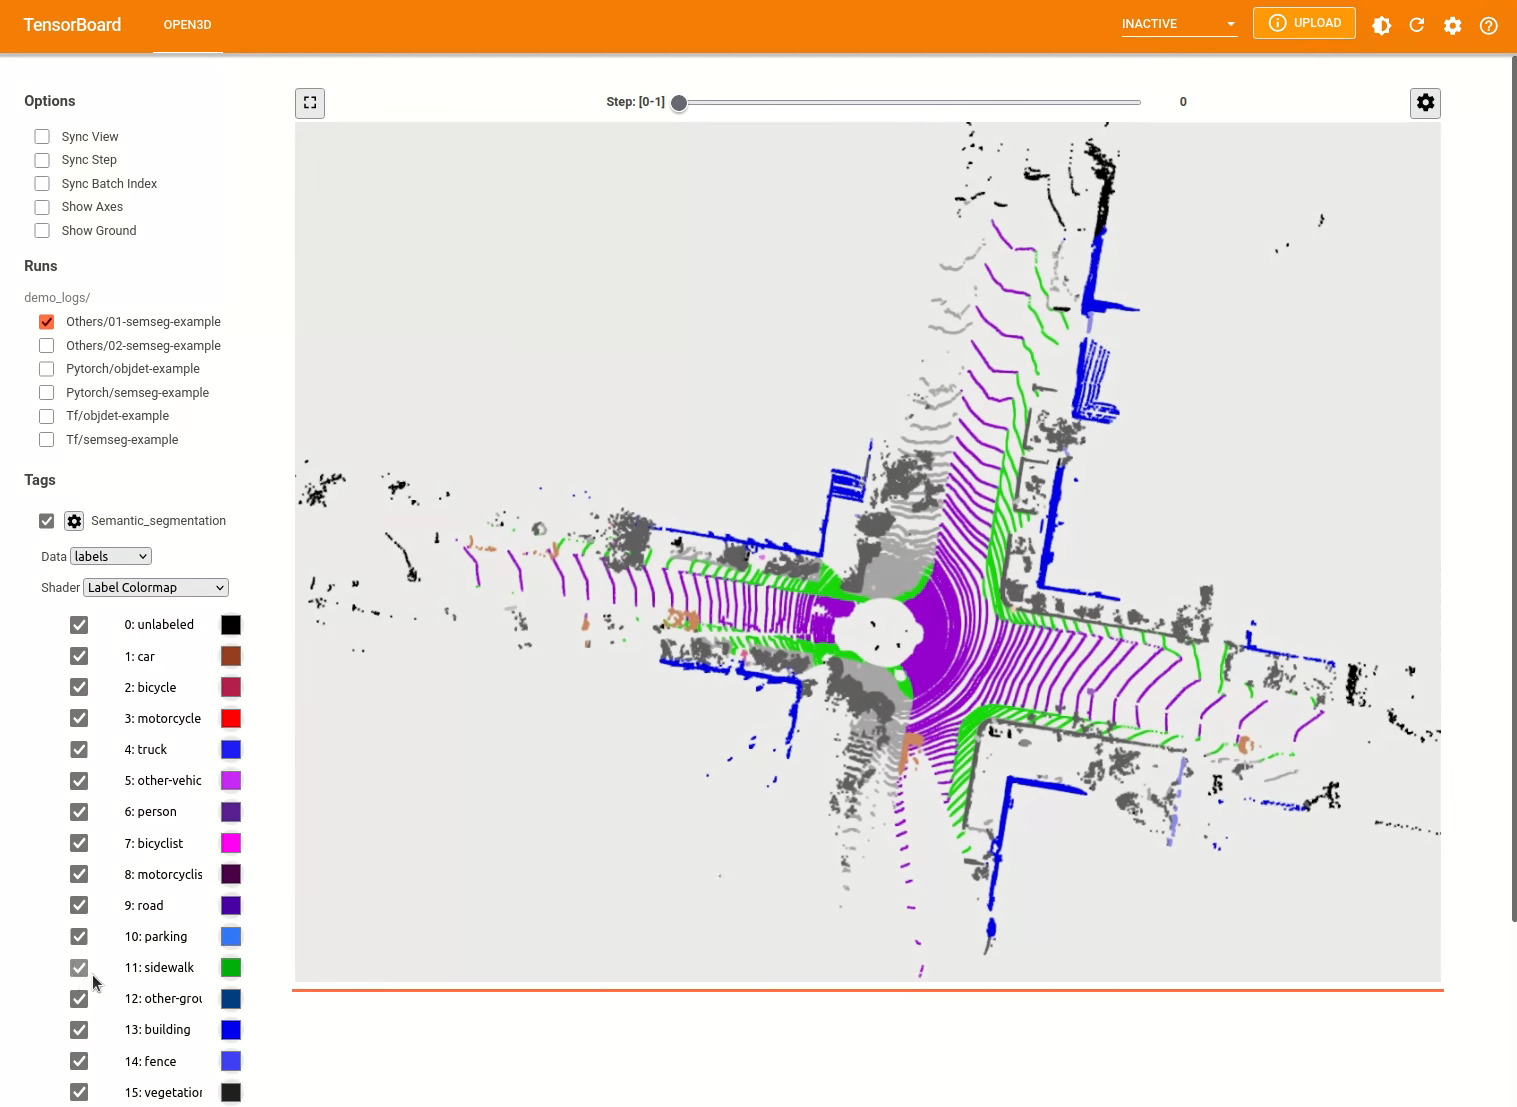
pipeline . run_train () สำหรับตัวอย่างเพิ่มเติมดู examples/ และ scripts/ ไดเรกทอรี นอกจากนี้คุณยังสามารถเปิดใช้งานการบันทึกสรุปการฝึกอบรมในไฟล์กำหนดค่าและแสดงภาพความจริงภาคพื้นดินและผลลัพธ์ด้วย tensorboard ดูรายละเอียดบทช่วยสอนนี้
รูปแบบการตรวจจับวัตถุ 3 มิตินั้นคล้ายกับแบบจำลองการแบ่งส่วนความหมาย เราสามารถสร้างอินสแตนซ์ไปป์ไลน์ด้วยแบบจำลองที่ผ่านการฝึกอบรมสำหรับการตรวจจับวัตถุและเรียกใช้บนคลาวด์จุดของชุดข้อมูลของเรา ดูสวนสัตว์แบบจำลองเพื่อรับน้ำหนักของแบบจำลองที่ผ่านการฝึกฝน
 import os
import open3d . ml as _ml3d
import open3d . ml . torch as ml3d

cfg_file = "ml3d/configs/pointpillars_kitti.yml"
cfg = _ml3d . utils . Config . load_from_file ( cfg_file )

model = ml3d . models . PointPillars ( ** cfg . model )
cfg . dataset [ 'dataset_path' ] = "/path/to/your/dataset"
dataset = ml3d . datasets . KITTI ( cfg . dataset . pop ( 'dataset_path' , None ), ** cfg . dataset )
pipeline = ml3d . pipelines . ObjectDetection ( model , dataset = dataset , device = "gpu" , ** cfg . pipeline )

# download the weights.
ckpt_folder = "./logs/"
os . makedirs ( ckpt_folder , exist_ok = True )
ckpt_path = ckpt_folder + "pointpillars_kitti_202012221652utc.pth"
pointpillar_url = "https://storage.googleapis.com/open3d-releases/model-zoo/pointpillars_kitti_202012221652utc.pth"
if not os . path . exists ( ckpt_path ):
    cmd = "wget {} -O {}" . format ( pointpillar_url , ckpt_path )
    os . system ( cmd )

# load the parameters.
pipeline . load_ckpt ( ckpt_path = ckpt_path )

test_split = dataset . get_split ( "test" )
data = test_split . get_data ( 0 )

# run inference on a single example.
# returns dict with 'predict_labels' and 'predict_scores'.
result = pipeline . run_inference ( data )

# evaluate performance on the test set; this will write logs to './logs'.
pipeline . run_test ()
ผู้ใช้ยังสามารถใช้สคริปต์ที่กำหนดไว้ล่วงหน้าเพื่อโหลดน้ำหนักที่ได้รับการฝึกฝนและการทดสอบ
เช่นเดียวกับการอนุมานท่อส่งอินเทอร์เฟซสำหรับการฝึกอบรมโมเดลในชุดข้อมูล
 # use a cache for storing the results of the preprocessing (default path is './logs/cache')
dataset = ml3d . datasets . KITTI ( dataset_path = '/path/to/KITTI/' , use_cache = True )

# create the model with random initialization.
model = PointPillars ()

pipeline = ObjectDetection ( model = model , dataset = dataset , max_epoch = 100 )

# prints training progress in the console.
pipeline . run_train ()
ด้านล่างเป็นตัวอย่างของการสร้างภาพโดยใช้ Kitti ตัวอย่างแสดงการใช้กล่องขอบเขตสำหรับชุดข้อมูล Kitti
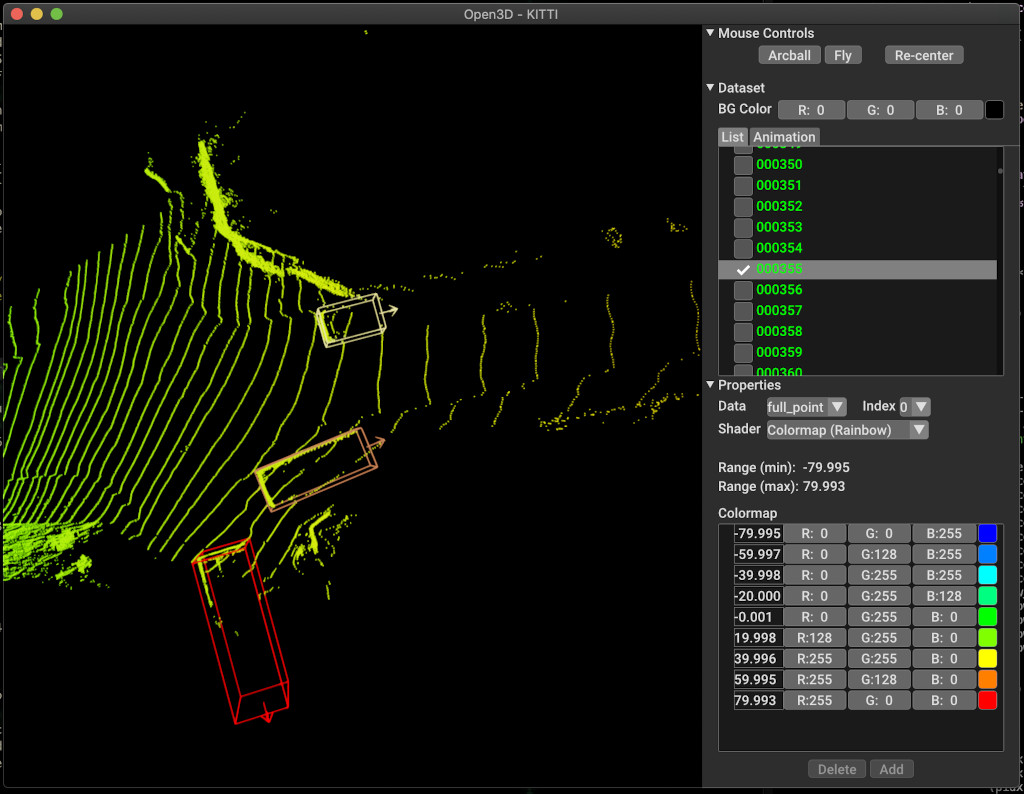
สำหรับตัวอย่างเพิ่มเติมดู examples/ และ scripts/ ไดเรกทอรี นอกจากนี้คุณยังสามารถเปิดใช้งานการบันทึกสรุปการฝึกอบรมในไฟล์กำหนดค่าและแสดงภาพความจริงภาคพื้นดินและผลลัพธ์ด้วย tensorboard ดูรายละเอียดบทช่วยสอนนี้

scripts/run_pipeline.py ให้อินเทอร์เฟซง่าย ๆ สำหรับการฝึกอบรมและการประเมินแบบจำลองบนชุดข้อมูล มันบันทึกปัญหาของการกำหนดโมเดลเฉพาะและผ่านการกำหนดค่าที่แน่นอน
python scripts/run_pipeline.py {tf/torch} -c <path-to-config> --pipeline {SemanticSegmentation/ObjectDetection} --<extra args>
คุณสามารถใช้สคริปต์สำหรับการแบ่งส่วนความหมายและการตรวจจับวัตถุ คุณต้องระบุ semanticsegentation หรือ objectDetection ในพารามิเตอร์ pipeline โปรดทราบว่า extra args จะได้รับการจัดลำดับความสำคัญผ่านพารามิเตอร์เดียวกันที่มีอยู่ในไฟล์กำหนดค่า ดังนั้นแทนที่จะเปลี่ยน param ในไฟล์ config คุณอาจส่งผ่านอาร์กิวเมนต์บรรทัดคำสั่งในขณะที่เรียกใช้สคริปต์
สำหรับเช่น.
 # Launch training for RandLANet on SemanticKITTI with torch.
python scripts/run_pipeline.py torch -c ml3d/configs/randlanet_semantickitti.yml --dataset.dataset_path <path-to-dataset> --pipeline SemanticSegmentation --dataset.use_cache True

# Launch testing for PointPillars on KITTI with torch.
python scripts/run_pipeline.py torch -c ml3d/configs/pointpillars_kitti.yml --split test --dataset.dataset_path <path-to-dataset> --pipeline ObjectDetection --dataset.use_cache True
สำหรับความช่วยเหลือเพิ่มเติมเรียกใช้ python scripts/run_pipeline.py --help
ส่วนหลักของ Open3D-ML อาศัยอยู่ในโฟลเดอร์ย่อย ml3d ซึ่งรวมเข้ากับ Open3D ในเนมสเปซ ml นอกเหนือจากส่วนหลักแล้วไดเรกทอรี examples และ scripts ยังให้สคริปต์สนับสนุนสำหรับการเริ่มต้นด้วยการตั้งค่าไปป์ไลน์การฝึกอบรมหรือเรียกใช้เครือข่ายบนชุดข้อมูล
 ├─ docs                   # Markdown and rst files for documentation
├─ examples               # Place for example scripts and notebooks
├─ ml3d                   # Package root dir that is integrated in open3d
     ├─ configs           # Model configuration files
     ├─ datasets          # Generic dataset code; will be integratede as open3d.ml.{tf,torch}.datasets
     ├─ metrics           # Metrics available for evaluating ML models
     ├─ utils             # Framework independent utilities; available as open3d.ml.{tf,torch}.utils
     ├─ vis               # ML specific visualization functions
     ├─ tf                # Directory for TensorFlow specific code. same structure as ml3d/torch.
     │                    # This will be available as open3d.ml.tf
     ├─ torch             # Directory for PyTorch specific code; available as open3d.ml.torch
          ├─ dataloaders  # Framework specific dataset code, e.g. wrappers that can make use of the
          │               # generic dataset code.
          ├─ models       # Code for models
          ├─ modules      # Smaller modules, e.g., metrics and losses
          ├─ pipelines    # Pipelines for tasks like semantic segmentation
          ├─ utils        # Utilities for <>
├─ scripts                # Demo scripts for training and dataset download scripts
สำหรับงานของการแบ่งส่วนความหมายเราวัดประสิทธิภาพของวิธีการที่แตกต่างกันโดยใช้ค่าเฉลี่ยสี่แยก-Union-Union (MIOU) ในทุกคลาส ตารางแสดงโมเดลและชุดข้อมูลที่มีอยู่สำหรับงานการแบ่งส่วนและคะแนนที่เกี่ยวข้อง แต่ละคะแนนเชื่อมโยงไปยังไฟล์น้ำหนักที่เกี่ยวข้อง
| ชุด / ชุดข้อมูล | semantickitti | โตรอนโต 3D | S3dis | semantic3d | Paris-Lille3d | สแกนเน็ต |
|---|---|---|---|---|---|---|
| Randla-Net (TF) | 53.7 | 73.7 | 70.9 | 76.0 | 70.0* | - |
| Randla-Net (คบเพลิง) | 52.8 | 74.0 | 70.9 | 76.0 | 70.0* | - |
| KPCONV (TF) | 58.7 | 65.6 | 65.0 | - | 76.7 | - |
| KPCONV (คบเพลิง) | 58.0 | 65.6 | 60.0 | - | 76.7 | - |
| SparseConvunet (คบเพลิง) | - | - | - | - | - | 68 |
| SparseConvunet (TF) | - | - | - | - | - | 68.2 |
| PointTransformer (Torch) | - | - | 69.2 | - | - | - |
| PointTransformer (TF) | - | - | 69.2 | - | - | - |
(*) การใช้น้ำหนักจากผู้แต่งดั้งเดิม
สำหรับงานตรวจจับวัตถุเราวัดประสิทธิภาพของวิธีการต่าง ๆ โดยใช้ค่าเฉลี่ยความแม่นยำเฉลี่ย (MAP) สำหรับมุมมองตานก (BEV) และ 3D ตารางแสดงโมเดลและชุดข้อมูลที่มีอยู่สำหรับงานตรวจจับวัตถุและคะแนนที่เกี่ยวข้อง แต่ละคะแนนเชื่อมโยงไปยังไฟล์น้ำหนักที่เกี่ยวข้อง สำหรับการประเมินผลแบบจำลองได้รับการประเมินโดยใช้ชุดย่อยการตรวจสอบความถูกต้องตามเกณฑ์การตรวจสอบความถูกต้องของ Kitti แบบจำลองได้รับการฝึกฝนมาสามชั้น (รถยนต์คนเดินเท้าและนักปั่นจักรยาน) ค่าที่คำนวณได้คือค่าเฉลี่ยเหนือแผนที่ของคลาสทั้งหมดสำหรับทุกระดับความยาก สำหรับชุดข้อมูล Waymo แบบจำลองได้รับการฝึกฝนในสามคลาส (คนเดินเท้ายานพาหนะนักปั่นจักรยาน)
| ชุด / ชุดข้อมูล | Kitti [bev / 3d] @ 0.70 | Waymo (bev / 3d) @ 0.50 |
|---|---|---|
| Pointpillars (TF) | 61.6 / 55.2 | - |
| Pointpillars (คบเพลิง) | 61.2 / 52.8 | AVG: 61.01 / 48.30 | ดีที่สุด: 61.47 / 57.55 [^WPP-Train] |
| pointrcnn (tf) | 78.2 / 65.9 | - |
| Pointrcnn (คบเพลิง) | 78.2 / 65.9 | - |
[^WPP-Train]: AVG ตัวชี้วัดเป็นค่าเฉลี่ยของการฝึกอบรมสามชุดที่มี 4, 8, 16 และ 32 GPU การฝึกอบรมหยุดชะงักหลังจาก 30 ยุค จุดตรวจสอบรุ่นมีให้สำหรับการฝึกอบรมที่ดีที่สุด
ในการใช้การเพิ่มข้อมูลการสุ่มตัวอย่างความจริงสำหรับการฝึกอบรมเราสามารถสร้างฐานข้อมูลความจริงภาคพื้นดินดังนี้:
python scripts/collect_bboxes.py --dataset_path <path_to_data_root>
สิ่งนี้จะสร้างฐานข้อมูลที่ประกอบด้วยวัตถุจากการแยกรถไฟ ขอแนะนำให้ใช้การเพิ่มนี้สำหรับชุดข้อมูลเช่น Kitti ที่วัตถุกระจัดกระจาย
สองขั้นตอนของ pointrcnn ได้รับการฝึกฝนแยกต่างหาก ในการฝึกอบรมขั้นตอนการสร้างข้อเสนอของ Pointrcnn ด้วย Pytorch ให้เรียกใช้คำสั่งต่อไปนี้:
 # Train RPN for 100 epochs.
python scripts/run_pipeline.py torch -c ml3d/configs/pointrcnn_kitti.yml --dataset.dataset_path <path-to-dataset> --mode RPN --epochs 100
หลังจากได้รับเครือข่าย RPN ที่ผ่านการฝึกอบรมมาอย่างดีเราสามารถฝึกอบรมเครือข่าย RCNN ด้วยน้ำหนัก RPN แช่แข็ง
 # Train RCNN for 70 epochs.
python scripts/run_pipeline.py torch -c ml3d/configs/pointrcnn_kitti.yml --dataset.dataset_path <path-to-dataset> --mode RCNN --model.ckpt_path <path_to_checkpoint> --epochs 100
สำหรับรายการทั้งหมดของไฟล์น้ำหนักทั้งหมดโปรดดู model_weights.txt และ MD5 Checksum ไฟล์ model_weights.md5
ต่อไปนี้เป็นรายการชุดข้อมูลที่เราให้บริการคลาสเครื่องอ่านชุดข้อมูล
สำหรับการดาวน์โหลดชุดข้อมูลเหล่านี้ไปที่หน้าเว็บที่เกี่ยวข้องและดูสคริปต์ใน scripts/download_datasets _Datasets
มีหลายวิธีในการมีส่วนร่วมในโครงการนี้ คุณสามารถ:
กรุณา ส่งคำขอดึงของคุณไปที่ สาขา dev Open3D เป็นความพยายามของชุมชน เรายินดีต้อนรับและเฉลิมฉลองการมีส่วนร่วมจากชุมชน!
หากคุณต้องการแบ่งปันน้ำหนักสำหรับรุ่นที่คุณฝึกฝนโปรดแนบหรือเชื่อมโยงไฟล์น้ำหนักในคำขอดึง สำหรับข้อบกพร่องและปัญหาให้เปิดปัญหา โปรดตรวจสอบช่องทางการสื่อสารของเราเพื่อติดต่อกับชุมชน
โปรดอ้างอิงงานของเรา (PDF) หากคุณใช้ Open3D
 @article { Zhou2018 ,
    author    = { Qian-Yi Zhou and Jaesik Park and Vladlen Koltun } ,
    title     = { {Open3D}: {A} Modern Library for {3D} Data Processing } ,
    journal   = { arXiv:1801.09847 } ,
    year      = { 2018 } ,
}

