BRIO
1.0.0
该仓库包含我们纸奶油店的代码,数据和训练有素的模型:将顺序提出抽象性摘要。
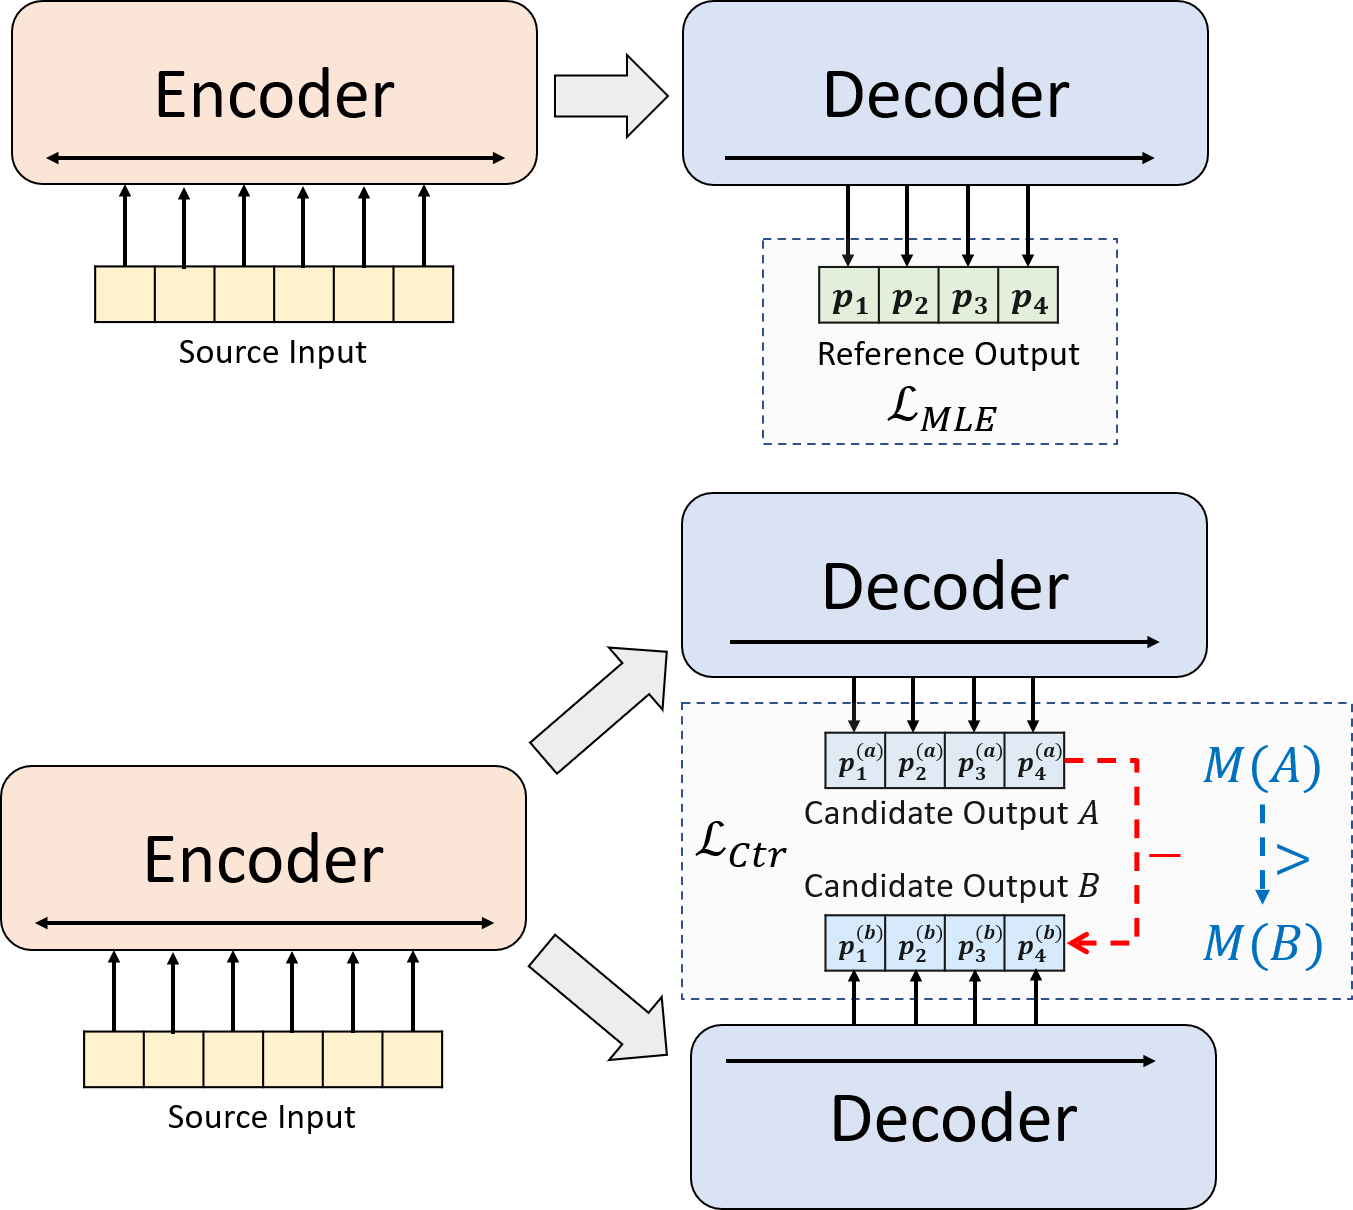
我们提出了一种用于神经抽象摘要的新型培训范式。我们不用单独使用MLE培训,而是引入了对比度学习组件,该组件鼓励抽象模型更准确地估算系统生成的摘要的可能性。
python3.8conda create --name env --file spec-file.txtpip install -r requirements.txt激活Conda Env)compare_mt > https://github.com/neulab/compare-mt git clone https://github.com/neulab/compare-mt.git
cd ./compare-mt
pip install -r requirements.txt
python setup.py install我们的代码基于HuggingFace的Transformers库。
cal_rouge.py >胭脂计算config.py >模型配置data_utils.py > dataloaderlabel_smoothing_loss.py >标签平滑损失main.py >培训和评估程序model.py - >型号modeling_bart.py , modeling_pegasus.py >从变形金刚库修改以支持更有效的训练preprocess.py >数据预处理utils.py >实用程序功能gen_candidate.py >生成候选摘要应为我们的实验创建以下目录。
./cache >存储模型检查点./result result->存储评估结果我们将以下数据集用于实验。
您可以在CNNDM,CNNDM(CASED)和XSUM上下载我们实验的预处理数据。
Donwloading后,您应该在此根目录中解压缩zip文件。
对于NYT,您将需要获得许可证,请关注https://github.com/kedz/summarization-datasets进行预处理。
要从预训练的模型中生成候选摘要,请运行
python gen_candidate.py --gpuid [gpuid] --src_dir [path of the input file (e.g. test.source)] --tgt_dir [path of the output file] --dataset [cnndm/xsum] 对于数据预处理,请运行
python preprocess.py --src_dir [path of the raw data] --tgt_dir [output path] --split [train/val/test] --cand_num [number of candidate summaries] --dataset [cnndm/xsum/nyt] -l [lowercase if the flag is set] src_dir应包含以下文件(以测试拆分为例):
test.sourcetest.source.tokenizedtest.targettest.target.tokenizedtest.outtest.out.tokenized test.out.tokenized文件的每一行应包含一个test.out 。特别是,您应该将一个数据样本的候选摘要放在test.out和test.out.tokenized中的相邻行中。
注意:在数据预处理后,您还应将原始文件test.source , test.target放入创建的数据文件夹(例如./cnndm/diverse/test.source )中。
我们使用Standford Corenlp提供的PTB令牌(在此处下载)。请注意,令牌化文本仅用于评估。为了使文件归为文件,您可以运行(以test.source为例)
 export CLASSPATH=/your_path/stanford-corenlp-3.8.0.jar
cat test.source | java edu.stanford.nlp.process.PTBTokenizer -ioFileList -preserveLines > test.source.tokenized我们已在./examples/raw_data raw_data中提供了示例文件。
预处理过程将将处理后的数据存储为tgt_dir中的单独的JSON文件。
# starting from the root directory

# create folders
mkdir ./cnndm
mkdir ./cnndm/diverse
mkdir ./cnndm/diverse/test

# suppose that the raw files are at ./raw_data, the results will be saved at ./cnndm/diverse/test
# please remember to put the source file and the target file on test set into the folder, e.g. ./cnndm/diverse/test.source

python preprocess.py --src_dir ./raw_data --tgt_dir ./cnndm/diverse --split test --cand_num 16 --dataset cnndm -l
您可以在main.py中指定超参数。我们还提供CNNDM(NYT共享相同设置)和XSUM config.py的特定设置。
python main.py --cuda --gpuid [list of gpuid] --config [name of the config (cnndm/xsum)] -l 检查点和日志将保存在./cache的子文件夹中。
python main.py --cuda --gpuid 0 1 2 3 --config cnndm -l python main.py --cuda --gpuid [list of gpuid] -l --config [name of the config (cnndm/xsum)] --model_pt [model path]模型路径应为./cache目录中的子目录,例如cnndm/model.pt (它不应包含前缀./cache/ )。
对于胭脂计算,我们在论文中使用标准胭脂perl包。在计算胭脂分数之前,我们在较低和令牌化(使用PTB令牌)文本。请注意,该软件包计算出的分数将与评估的训练/间隔阶段中计算/报告的胭脂分数有所不同,因为我们使用纯粹的基于Python的胭脂实现来计算这些分数以提高效率。
如果在设置Rouge Perl软件包时遇到问题(不幸的是,发生了很多:(),则可以考虑使用纯基于Python的Rouge软件包,例如我们从Comparare-Mt软件包中使用的一个。
我们在cal_rouge.py中提供评估脚本。如果您要使用Perl Rouge软件包,请将13行更改为Perl Rouge软件包的路径。
_ROUGE_PATH = '/YOUR-ABSOLUTE-PATH/ROUGE-RELEASE-1.5.5/'要评估模型性能,请首先使用以下命令来生成摘要。
python main.py --cuda --gpuid [single gpu] --config [name of the config (cnndm/xsum)] -e --model_pt [model path] -g [evaluate the model as a generator] -r [evaluate the model as a scorer/reranker]模型路径应为./cache目录中的子目录,例如cnndm/model.pt (它不应包含前缀./cache/ )。输出将保存在具有相同名称的./result点文件夹的子文件夹中。
# write the system-generated files to a file: ./result/cnndm/test.out
python main.py --cuda --gpuid 0 --config cnndm -e --model_pt cnndm/model_generation.bin -g

# tokenize the output file - > ./result/cnndm/test.out.tokenized (you may use other tokenizers)
export CLASSPATH=/your_path/stanford-corenlp-3.8.0.jar
cat ./result/cnndm/test.out | java edu.stanford.nlp.process.PTBTokenizer -ioFileList -preserveLines > ./result/cnndm/test.out.tokenized

# calculate the ROUGE scores using ROUGE Perl Package
python cal_rouge.py --ref ./cnndm/test.target.tokenized --hyp ./result/cnndm/test.out.tokenized -l

# calculate the ROUGE scores using ROUGE Python Implementation
python cal_rouge.py --ref ./cnndm/test.target.tokenized --hyp ./result/cnndm/test.out.tokenized -l -p # rerank the candidate summaries
python main.py --cuda --gpuid 0 --config cnndm -e --model_pt cnndm/model_ranking.bin -r
# calculate the ROUGE scores using ROUGE Perl Package
# ./result/cnndm/reference and ./result/cnndm/candidate are two folders containing files. Each one of those files contain one summary
python cal_rouge.py --ref ./result/cnndm/reference --hyp ./result/cnndm/candidate -l
# calculate the ROUGE scores using ROUGE Python Implementation
# ./result/cnndm/reference and ./result/cnndm/candidate are two folders containing files. Each one of those files contain one summary
python cal_rouge.py --ref ./result/cnndm/reference --hyp ./result/cnndm/candidate -l -p 以下是由标准胭脂perl软件包计算出的胭脂分数。
| Rouge-1 | Rouge-2 | 胭脂-l | |
|---|---|---|---|
| 巴特 | 44.29 | 21.17 | 41.09 |
| Brio-Ctr | 47.28 | 22.93 | 44.15 |
| Brio-mul | 47.78 | 23.55 | 44.57 |
| Brio-mul(壳体) | 48.01 | 23.76 | 44.63 |
| Rouge-1 | Rouge-2 | 胭脂-l | |
|---|---|---|---|
| 飞马 | 47.46 | 24.69 | 39.53 |
| Brio-Ctr | 48.13 | 25.13 | 39.84 |
| Brio-mul | 49.07 | 25.59 | 40.40 |
| Rouge-1 | Rouge-2 | 胭脂-l | |
|---|---|---|---|
| 巴特 | 55.78 | 36.61 | 52.60 |
| Brio-Ctr | 55.98 | 36.54 | 52.51 |
| Brio-mul | 57.75 | 38.64 | 54.54 |
我们在这些数据集上的模型输出可以在./output中找到。
我们总结了下面的输出和模型检查点。您可以使用model.load_state_dict(torch.load(path_to_checkpoint))加载这些检查点。
| 检查点 | 模型输出 | 参考输出 | |
|---|---|---|---|
| CNNDM | model_generation.bin model_ranking.bin | cnndm.test.ours.out | cnndm.test.Reference |
| CNNDM(外壳) | model_generation.bin | cnndm.test.ours.cased.out | cnndm.test.cased.Reference |
| XSUM | model_generation.bin model_ranking.bin | xsum.test.ours.out | xsum.test.Reference |
您可以从拥抱面变压器加载我们的训练有素的型号,以供发电。我们关于CNNDM( Yale-LILY/brio-cnndm-uncased , Yale-LILY/brio-cnndm-cased )的模型检查点是标准的BART模型(即,BartforConditionalgeneration),而我们的XSUM模型检查点是Xsum( Yale-LILY/brio-xsum-cased )的模型检查点,是一种标准的PEGASENDECTION(YALILY/BRIO-XSSUM-cASED)。
 from transformers import BartTokenizer , PegasusTokenizer
from transformers import BartForConditionalGeneration , PegasusForConditionalGeneration

IS_CNNDM = True # whether to use CNNDM dataset or XSum dataset
LOWER = False
ARTICLE_TO_SUMMARIZE = "Manchester United superstar Cristiano Ronaldo scored his 806th career goal in Old Trafford,
 breaking FIFA's all-time record for most goals in competitive matches in men's football history.
 It was the second of three goals the Portuguese attacker scored during the game,
 leading United to a 3-2 victory over Tottenham and finishing the day with 807 total career goals.
 The previous FIFA goal record was held by Josef Bican, with 805 goals."

# Load our model checkpoints
if IS_CNNDM :
    model = BartForConditionalGeneration . from_pretrained ( 'Yale-LILY/brio-cnndm-uncased' )
    tokenizer = BartTokenizer . from_pretrained ( 'Yale-LILY/brio-cnndm-uncased' )
else :
    model = PegasusForConditionalGeneration . from_pretrained ( 'Yale-LILY/brio-xsum-cased' )
    tokenizer = PegasusTokenizer . from_pretrained ( 'Yale-LILY/brio-xsum-cased' )

max_length = 1024 if IS_CNNDM else 512
# generation example
if LOWER :
    article = ARTICLE_TO_SUMMARIZE . lower ()
else :
    article = ARTICLE_TO_SUMMARIZE
inputs = tokenizer ([ article ], max_length = max_length , return_tensors = "pt" , truncation = True )
# Generate Summary
summary_ids = model . generate ( inputs [ "input_ids" ])
print ( tokenizer . batch_decode ( summary_ids , skip_special_tokens = True , clean_up_tokenization_spaces = False )[ 0 ])注意:我们的拥抱面检查点不能直接加载到代码中的Pytorch型号( BRIO )上,因为我们的Pytorch型号是Bart/Pegasus上的包装器,以提高培训效率。但是,您可以使用它来启动我们的pytorch模型,例如
model = BRIO ( 'Yale-LILY/brio-cnndm-uncased' , tok . pad_token_id , is_pegasus = False )

