BRIO
1.0.0
이 repo에는 종이 브리오에 대한 코드, 데이터 및 훈련 된 모델이 포함되어 있습니다. 추상적 요약에 주문을 가져옵니다.
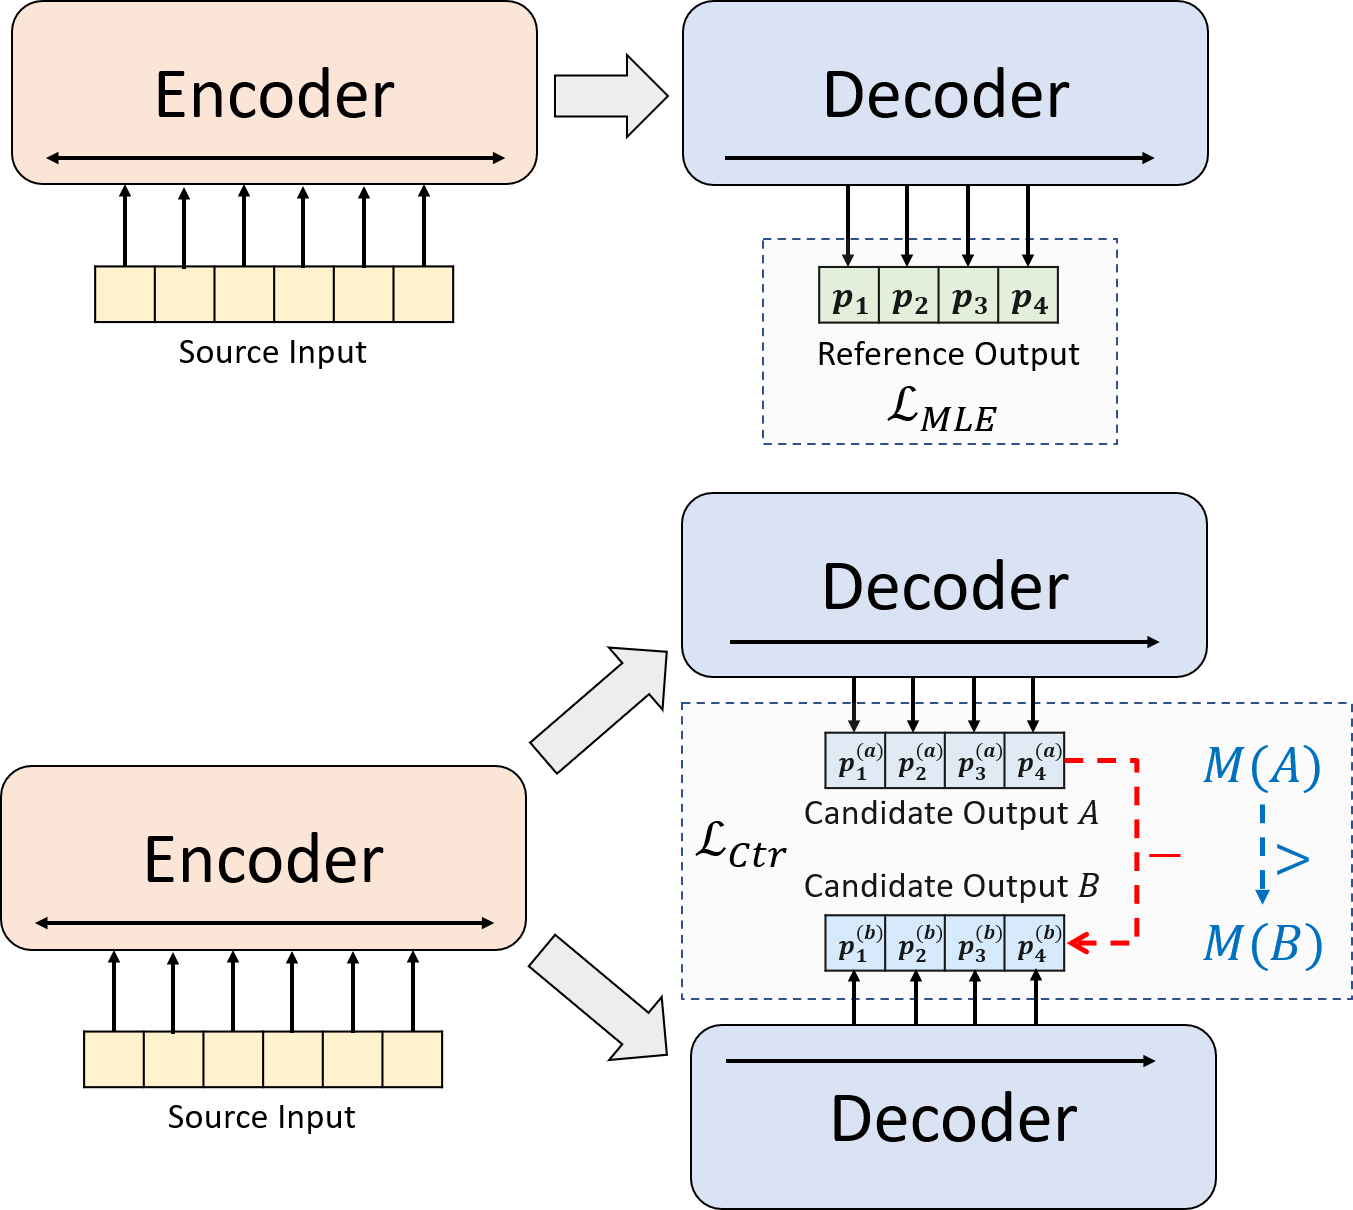
우리는 신경 추상적 요약을위한 새로운 훈련 패러다임을 제시합니다. MLE 교육 만 사용하는 대신 대조적 인 학습 구성 요소를 소개하여 추상 모델이 시스템 생성 요약의 확률을보다 정확하게 추정하도록 장려합니다.
python3.8conda create --name env --file spec-file.txtpip install -r requirements.txtcompare_mt > https://github.com/neulab/compare-mt git clone https://github.com/neulab/compare-mt.git
cd ./compare-mt
pip install -r requirements.txt
python setup.py install우리의 코드는 Huggingface의 Transformers 라이브러리를 기반으로합니다.
cal_rouge.py > rouge 계산config.py > 모델 구성data_utils.py > dataloaderlabel_smoothing_loss.py > 레이블 스무딩 손실main.py > 교육 및 평가 절차model.py > 모델modeling_bart.py , modeling_pegasus.py >보다 효율적인 교육을 지원하기 위해 변압기 라이브러리에서 수정preprocess.py > 데이터 전처리utils.py > 유틸리티 함수gen_candidate.py > 후보 요약을 생성합니다실험을 위해 다음 디렉토리를 만들어야합니다.
./cache > 모델 체크 포인트 저장./result > 평가 결과 저장 실험에 다음 데이터 세트를 사용합니다.
CNNDM, CNNDM (CASED) 및 XSUM에서 실험에 대한 전처리 데이터를 다운로드 할 수 있습니다.
Donwloading 후이 루트 디렉토리에서 zip 파일을 압축해야합니다.
NYT의 경우 라이센스를 가져와야하며 사전 프로세싱을 위해 https://github.com/kedz/summarization-datasets를 따르십시오.
미리 훈련 된 모델에서 후보 요약을 생성하려면 실행하십시오.
python gen_candidate.py --gpuid [gpuid] --src_dir [path of the input file (e.g. test.source)] --tgt_dir [path of the output file] --dataset [cnndm/xsum] 데이터 전처리의 경우 실행하십시오
python preprocess.py --src_dir [path of the raw data] --tgt_dir [output path] --split [train/val/test] --cand_num [number of candidate summaries] --dataset [cnndm/xsum/nyt] -l [lowercase if the flag is set] src_dir 다음 파일을 포함해야합니다 (예로서 테스트 분할 사용) :
test.sourcetest.source.tokenizedtest.targettest.target.tokenizedtest.outtest.out.tokenized 이 파일의 각 라인에는 test.out 및 test.out.tokenized 제외한 샘플이 포함되어야합니다. 특히 test.out 및 test.out.tokenized 의 인접한 라인에 하나의 데이터 샘플에 대한 후보 요약을 배치해야합니다.
참고 : 데이터 전처리 후에는 생성 된 데이터 폴더 (예 : ./cnndm/diverse/test.source )에 원시 파일 test.source , test.target 넣어야합니다.
우리는 Standford Corenlp에서 제공하는 PTB 토큰 화기를 사용합니다 (여기서 다운로드). 토큰 화 된 텍스트는 평가 에만 사용됩니다. 파일을 토큰 화하려면 실행할 수 있습니다 (예 : Test.Source 사용)
 export CLASSPATH=/your_path/stanford-corenlp-3.8.0.jar
cat test.source | java edu.stanford.nlp.process.PTBTokenizer -ioFileList -preserveLines > test.source.tokenized
./examples/raw_data 의 예제 파일을 제공했습니다.
전처리 절차는 처리 된 데이터를 tgt_dir 에서 SEPERATE JSON 파일로 저장합니다.
# starting from the root directory

# create folders
mkdir ./cnndm
mkdir ./cnndm/diverse
mkdir ./cnndm/diverse/test

# suppose that the raw files are at ./raw_data, the results will be saved at ./cnndm/diverse/test
# please remember to put the source file and the target file on test set into the folder, e.g. ./cnndm/diverse/test.source

python preprocess.py --src_dir ./raw_data --tgt_dir ./cnndm/diverse --split test --cand_num 16 --dataset cnndm -l
main.py 에 하이퍼 파라미터를 지정할 수 있습니다. 또한 CNNDM (NYT 공유 동일한 설정 공유) 및 config.py 의 XSUM의 특정 설정도 제공합니다.
python main.py --cuda --gpuid [list of gpuid] --config [name of the config (cnndm/xsum)] -l 체크 포인트와 로그는 ./cache 의 하위 폴더에 저장됩니다.
python main.py --cuda --gpuid 0 1 2 3 --config cnndm -l python main.py --cuda --gpuid [list of gpuid] -l --config [name of the config (cnndm/xsum)] --model_pt [model path] 모델 경로는 ./cache 디렉토리 (예 : cnndm/model.pt 의 하위 디렉토리 여야합니다 (접두사 ./cache/ 포함해서는 안됩니다).
Rouge Calculation을 위해 여기서 논문에서 표준 Rouge Perl 패키지를 사용합니다. Rouge 점수를 계산하기 전에 (PTB 토큰 화기 사용) 텍스트를 낮추고 토큰 화했습니다. 이 패키지에 의해 계산 된 점수는 훈련/intermidiate 평가 단계에서 계산/보고 된 Rouge 점수와 시각적으로 다릅니다 . 우리는 순수한 Python 기반 Rouge 구현을 사용하여 더 나은 효율성을 위해 해당 점수를 계산하기 때문입니다.
Rouge Perl 패키지를 설정할 때 문제가 발생하면 (불행히도 많은 일이 발생합니다 :() Compare-MT 패키지에서 사용한 순수한 파이썬 기반 Rouge 패키지를 사용하는 것이 좋습니다.
cal_rouge.py 에서 평가 스크립트를 제공합니다. Perl Rouge 패키지를 사용하려면 13 행을 Perl Rouge 패키지의 경로로 변경하십시오.
_ROUGE_PATH = '/YOUR-ABSOLUTE-PATH/ROUGE-RELEASE-1.5.5/'모델 성능을 평가하려면 먼저 다음 명령을 사용하여 요약을 생성하십시오.
python main.py --cuda --gpuid [single gpu] --config [name of the config (cnndm/xsum)] -e --model_pt [model path] -g [evaluate the model as a generator] -r [evaluate the model as a scorer/reranker] 모델 경로는 ./cache 디렉토리 (예 : cnndm/model.pt 의 하위 디렉토리 여야합니다 (접두사 ./cache/ 포함해서는 안됩니다). 출력은 Checkpoint 폴더의 이름을 가진 ./result 의 하위 폴더에 저장됩니다.
# write the system-generated files to a file: ./result/cnndm/test.out
python main.py --cuda --gpuid 0 --config cnndm -e --model_pt cnndm/model_generation.bin -g

# tokenize the output file - > ./result/cnndm/test.out.tokenized (you may use other tokenizers)
export CLASSPATH=/your_path/stanford-corenlp-3.8.0.jar
cat ./result/cnndm/test.out | java edu.stanford.nlp.process.PTBTokenizer -ioFileList -preserveLines > ./result/cnndm/test.out.tokenized

# calculate the ROUGE scores using ROUGE Perl Package
python cal_rouge.py --ref ./cnndm/test.target.tokenized --hyp ./result/cnndm/test.out.tokenized -l

# calculate the ROUGE scores using ROUGE Python Implementation
python cal_rouge.py --ref ./cnndm/test.target.tokenized --hyp ./result/cnndm/test.out.tokenized -l -p # rerank the candidate summaries
python main.py --cuda --gpuid 0 --config cnndm -e --model_pt cnndm/model_ranking.bin -r
# calculate the ROUGE scores using ROUGE Perl Package
# ./result/cnndm/reference and ./result/cnndm/candidate are two folders containing files. Each one of those files contain one summary
python cal_rouge.py --ref ./result/cnndm/reference --hyp ./result/cnndm/candidate -l
# calculate the ROUGE scores using ROUGE Python Implementation
# ./result/cnndm/reference and ./result/cnndm/candidate are two folders containing files. Each one of those files contain one summary
python cal_rouge.py --ref ./result/cnndm/reference --hyp ./result/cnndm/candidate -l -p 다음은 표준 Rouge Perl 패키지로 중심 한 Rouge 점수입니다.
| 루즈 -1 | 루즈 -2 | 루즈 -L | |
|---|---|---|---|
| 바트 | 44.29 | 21.17 | 41.09 |
| 브리오 -CTR | 47.28 | 22.93 | 44.15 |
| 브리오 뮬 | 47.78 | 23.55 | 44.57 |
| Brio-Mul (케이스) | 48.01 | 23.76 | 44.63 |
| 루즈 -1 | 루즈 -2 | 루즈 -L | |
|---|---|---|---|
| 페가수스 | 47.46 | 24.69 | 39.53 |
| 브리오 -CTR | 48.13 | 25.13 | 39.84 |
| 브리오 뮬 | 49.07 | 25.59 | 40.40 |
| 루즈 -1 | 루즈 -2 | 루즈 -L | |
|---|---|---|---|
| 바트 | 55.78 | 36.61 | 52.60 |
| 브리오 -CTR | 55.98 | 36.54 | 52.51 |
| 브리오 뮬 | 57.75 | 38.64 | 54.54 |
이 데이터 세트의 모델 출력은 ./output 에서 찾을 수 있습니다.
아래의 출력 및 모델 체크 포인트를 요약합니다. model.load_state_dict(torch.load(path_to_checkpoint)) 사용 하여이 체크 포인트를로드 할 수 있습니다.
| 검문소 | 모델 출력 | 참조 출력 | |
|---|---|---|---|
| CNNDM | model_generation.bin model_ranking.bin | cnndm.test.ours.out | cnndm.test.reference |
| CNNDM (CASED) | model_generation.bin | cnndm.test.ours.cased.out | CNNDM.TEST.CARDIN.Reference |
| xsum | model_generation.bin model_ranking.bin | xsum.test.ours.out | xsum.test.reference |
Huggingface Transformers에서 세대를 위해 숙련 된 모델을로드 할 수 있습니다. CNNDM ( Yale-LILY/brio-cnndm-uncased , Yale-LILY/brio-cnndm-cased )의 모델 검사 점은 표준 BART 모델 (예 : BartForConditionalGeneration)이며 XSUM ( Yale-LILY/brio-xsum-cased )의 모델 체크 포인트는 표준 Pegasus Model (IE, PegasusforConderneration)입니다.
 from transformers import BartTokenizer , PegasusTokenizer
from transformers import BartForConditionalGeneration , PegasusForConditionalGeneration

IS_CNNDM = True # whether to use CNNDM dataset or XSum dataset
LOWER = False
ARTICLE_TO_SUMMARIZE = "Manchester United superstar Cristiano Ronaldo scored his 806th career goal in Old Trafford,
 breaking FIFA's all-time record for most goals in competitive matches in men's football history.
 It was the second of three goals the Portuguese attacker scored during the game,
 leading United to a 3-2 victory over Tottenham and finishing the day with 807 total career goals.
 The previous FIFA goal record was held by Josef Bican, with 805 goals."

# Load our model checkpoints
if IS_CNNDM :
    model = BartForConditionalGeneration . from_pretrained ( 'Yale-LILY/brio-cnndm-uncased' )
    tokenizer = BartTokenizer . from_pretrained ( 'Yale-LILY/brio-cnndm-uncased' )
else :
    model = PegasusForConditionalGeneration . from_pretrained ( 'Yale-LILY/brio-xsum-cased' )
    tokenizer = PegasusTokenizer . from_pretrained ( 'Yale-LILY/brio-xsum-cased' )

max_length = 1024 if IS_CNNDM else 512
# generation example
if LOWER :
    article = ARTICLE_TO_SUMMARIZE . lower ()
else :
    article = ARTICLE_TO_SUMMARIZE
inputs = tokenizer ([ article ], max_length = max_length , return_tensors = "pt" , truncation = True )
# Generate Summary
summary_ids = model . generate ( inputs [ "input_ids" ])
print ( tokenizer . batch_decode ( summary_ids , skip_special_tokens = True , clean_up_tokenization_spaces = False )[ 0 ])
참고 : Pytorch 모델은 BART/PEGASUS의 래퍼이기 때문에 HuggingFace의 체크 포인트는 코드의 Pytorch Model ( BRIO )에 직접로드 할 수 없습니다 . 그러나이를 사용하여 Pytorch 모델을 시작할 수 있습니다.
model = BRIO ( 'Yale-LILY/brio-cnndm-uncased' , tok . pad_token_id , is_pegasus = False )

