BRIO
1.0.0
このレポは、ペーパーブリオのコード、データ、訓練されたモデルが含まれています。抽象的な要約に順序をもたらします。
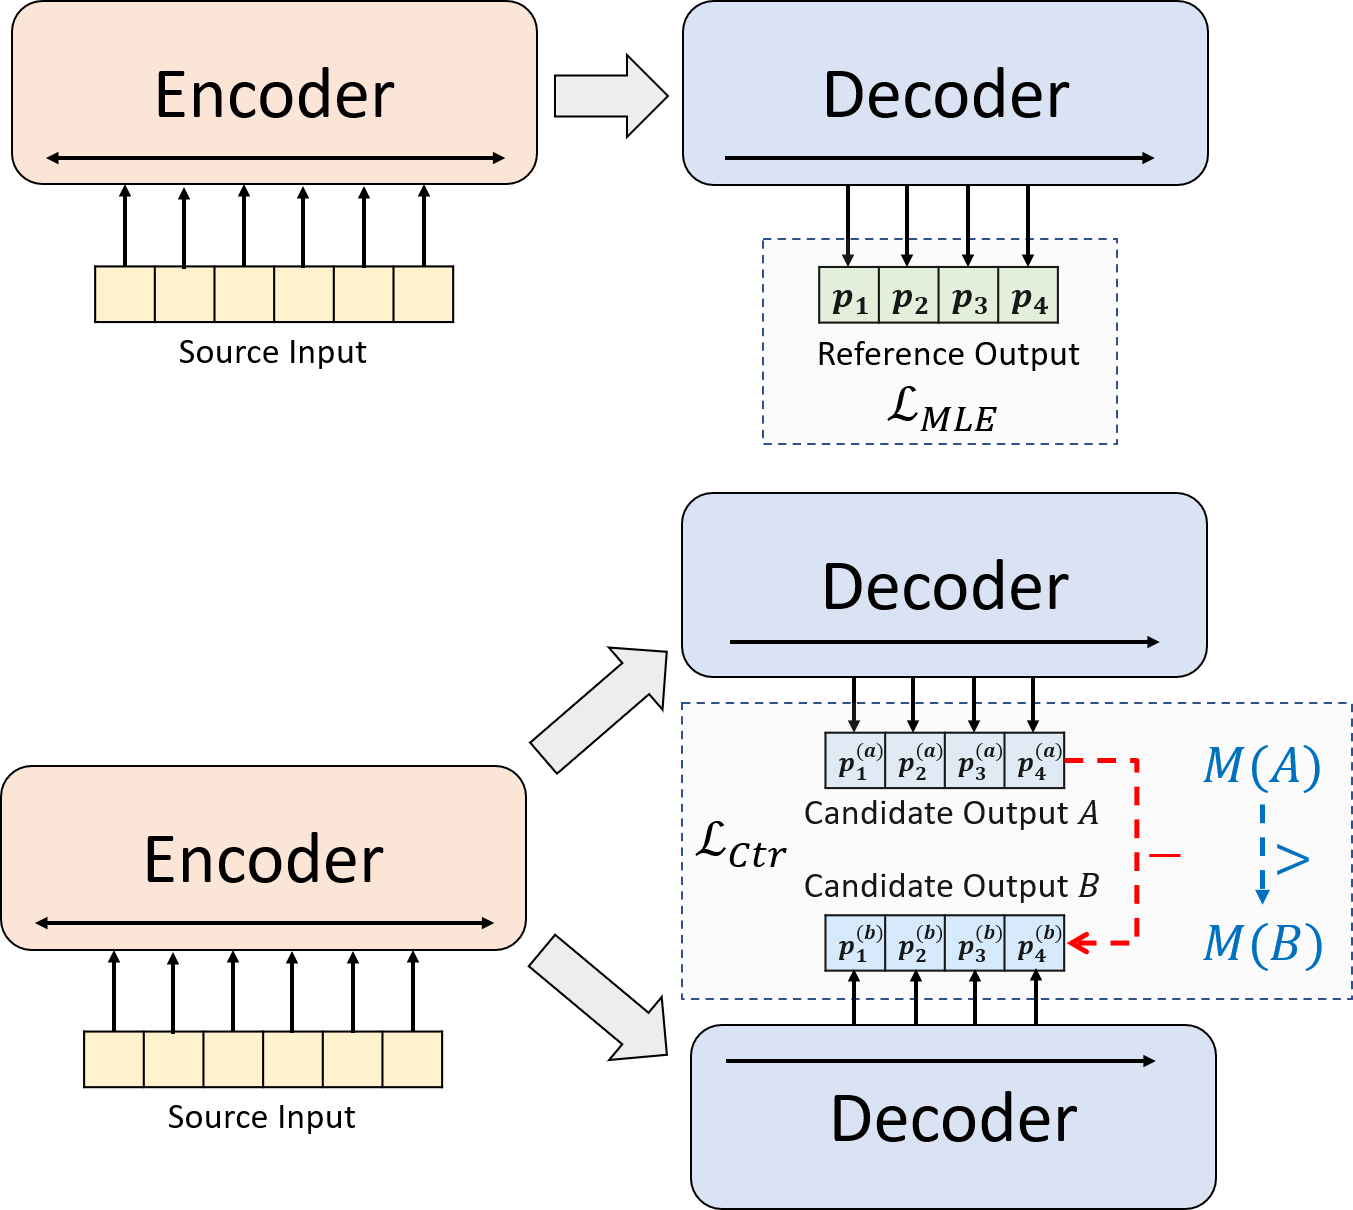
神経抽象的要約のための新しいトレーニングパラダイムを提示します。 MLEトレーニングを単独で使用する代わりに、対照的な学習コンポーネントを導入します。これにより、抽象的モデルがシステム生成された要約の確率をより正確に推定することが促進されます。
python3.8conda create --name env --file spec-file.txtpip install -r requirements.txtcompare_mt > https://github.com/neulab/compare-mt git clone https://github.com/neulab/compare-mt.git
cd ./compare-mt
pip install -r requirements.txt
python setup.py install私たちのコードは、Huggingfaceのトランスフォーマーライブラリに基づいています。
cal_rouge.py >ルージュの計算config.py >モデル構成data_utils.py > dataloaderlabel_smoothing_loss.py >ラベルスムージング損失main.py >トレーニングと評価手順model.py >モデルmodeling_bart.py 、 modeling_pegasus.py >トランスライブラリから変更されて、より効率的なトレーニングをサポートするpreprocess.py >データプリプロセシングutils.py >ユーティリティ関数gen_candidate.py >候補の要約を生成します次のディレクトリを実験用に作成する必要があります。
./cache >モデルチェックポイントの保存./result >評価結果の保存実験には、次のデータセットを使用します。
CNNDM、CNNDM(CASED)、およびXSUMでの実験用の前処理データをダウンロードできます。
DonWloading後、このルートディレクトリのzipファイルを解凍する必要があります。
NYTについては、ライセンスを取得する必要があります。前処理のためにhttps://github.com/kedz/summarization-datasetsに従ってください。
事前に訓練されたモデルから候補の要約を生成するには、実行してください
python gen_candidate.py --gpuid [gpuid] --src_dir [path of the input file (e.g. test.source)] --tgt_dir [path of the output file] --dataset [cnndm/xsum] データの前処理については、実行してください
python preprocess.py --src_dir [path of the raw data] --tgt_dir [output path] --split [train/val/test] --cand_num [number of candidate summaries] --dataset [cnndm/xsum/nyt] -l [lowercase if the flag is set] src_dirは、次のファイルが含まれている必要があります(例としてテスト分割を使用):
test.sourcetest.source.tokenizedtest.targettest.target.tokenizedtest.outtest.out.tokenizedこれらのファイルの各行は、 test.outとtest.out.tokenizedを除き、サンプルを含める必要があります。特に、 test.outおよびtest.out.tokenizedの近隣の行に1つのデータサンプルの候補の要約を配置する必要があります。
注:データの前処理後、Raw File test.source 、 test.target作成したデータフォルダー(例./cnndm/diverse/test.source diverse/test.source)に配置する必要があります。
Standford Corenlpが提供するPTBトークンザーを使用します(こちらからダウンロード)。トークン化されたテキストは評価にのみ使用されることに注意してください。ファイルをトークン化するには、実行することができます(例としてtest.sourceを使用)
 export CLASSPATH=/your_path/stanford-corenlp-3.8.0.jar
cat test.source | java edu.stanford.nlp.process.PTBTokenizer -ioFileList -preserveLines > test.source.tokenized ./examples/raw_dataの例ファイルを提供しました。
プリプロセシング手順では、処理されたデータをtgt_dirでJSONファイルを分離するものとして保存します。
# starting from the root directory

# create folders
mkdir ./cnndm
mkdir ./cnndm/diverse
mkdir ./cnndm/diverse/test

# suppose that the raw files are at ./raw_data, the results will be saved at ./cnndm/diverse/test
# please remember to put the source file and the target file on test set into the folder, e.g. ./cnndm/diverse/test.source

python preprocess.py --src_dir ./raw_data --tgt_dir ./cnndm/diverse --split test --cand_num 16 --dataset cnndm -l
main.pyのハイパーパラメータを指定できます。また、CNNDM(NYT共有同じ設定)とconfig.pyのxsumの特定の設定も提供します。
python main.py --cuda --gpuid [list of gpuid] --config [name of the config (cnndm/xsum)] -l チェックポイントとログは、 ./cacheのサブフォルダーに保存されます。
python main.py --cuda --gpuid 0 1 2 3 --config cnndm -l python main.py --cuda --gpuid [list of gpuid] -l --config [name of the config (cnndm/xsum)] --model_pt [model path]モデルパスは、 cnndm/model.ptなどの./cacheディレクトリのサブディレクトリである必要があります(prefix ./cache/を含めるべきではありません)。
ルージュの計算には、ここから標準のルージュPerlパッケージを使用しています。ルージュスコアを計算する前に、テキストを低くし、トークン化しました(PTBトークネイザーを使用)。このパッケージによって計算されたスコアは、純粋なPythonベースのルージュ実装を使用してそれらのスコアを計算して効率を向上させるため、評価のトレーニング/中程度の段階で計算/報告されたルージュスコアとは視覚的に異なることに注意してください。
Rouge Perlパッケージをセットアップする際に問題が発生した場合(残念ながら、それはたくさん起こります:()、Compare-MTパッケージから使用したような純粋なPythonベースのルージュパッケージの使用を検討することができます。
cal_rouge.pyで評価スクリプトを提供します。 Perl Rougeパッケージを使用する場合は、13行目をPerl Rougeパッケージのパスに変更してください。
_ROUGE_PATH = '/YOUR-ABSOLUTE-PATH/ROUGE-RELEASE-1.5.5/'モデルのパフォーマンスを評価するには、まず次のコマンドを使用して要約を生成してください。
python main.py --cuda --gpuid [single gpu] --config [name of the config (cnndm/xsum)] -e --model_pt [model path] -g [evaluate the model as a generator] -r [evaluate the model as a scorer/reranker]モデルパスは、 cnndm/model.ptなどの./cacheディレクトリのサブディレクトリである必要があります(prefix ./cache/を含めるべきではありません)。出力は、チェックポイントフォルダーと同じ名前を持つ./resultのサブフォルダーに保存されます。
# write the system-generated files to a file: ./result/cnndm/test.out
python main.py --cuda --gpuid 0 --config cnndm -e --model_pt cnndm/model_generation.bin -g

# tokenize the output file - > ./result/cnndm/test.out.tokenized (you may use other tokenizers)
export CLASSPATH=/your_path/stanford-corenlp-3.8.0.jar
cat ./result/cnndm/test.out | java edu.stanford.nlp.process.PTBTokenizer -ioFileList -preserveLines > ./result/cnndm/test.out.tokenized

# calculate the ROUGE scores using ROUGE Perl Package
python cal_rouge.py --ref ./cnndm/test.target.tokenized --hyp ./result/cnndm/test.out.tokenized -l

# calculate the ROUGE scores using ROUGE Python Implementation
python cal_rouge.py --ref ./cnndm/test.target.tokenized --hyp ./result/cnndm/test.out.tokenized -l -p # rerank the candidate summaries
python main.py --cuda --gpuid 0 --config cnndm -e --model_pt cnndm/model_ranking.bin -r
# calculate the ROUGE scores using ROUGE Perl Package
# ./result/cnndm/reference and ./result/cnndm/candidate are two folders containing files. Each one of those files contain one summary
python cal_rouge.py --ref ./result/cnndm/reference --hyp ./result/cnndm/candidate -l
# calculate the ROUGE scores using ROUGE Python Implementation
# ./result/cnndm/reference and ./result/cnndm/candidate are two folders containing files. Each one of those files contain one summary
python cal_rouge.py --ref ./result/cnndm/reference --hyp ./result/cnndm/candidate -l -p 以下は、標準のRouge Perlパッケージによって計算されたルージュスコアです。
| Rouge-1 | ルージュ-2 | ルージュ-l | |
|---|---|---|---|
| バート | 44.29 | 21.17 | 41.09 |
| Brio-Ctr | 47.28 | 22.93 | 44.15 |
| ブリオムル | 47.78 | 23.55 | 44.57 |
| ブリオムル(ケース) | 48.01 | 23.76 | 44.63 |
| Rouge-1 | ルージュ-2 | ルージュ-l | |
|---|---|---|---|
| ペガサス | 47.46 | 24.69 | 39.53 |
| Brio-Ctr | 48.13 | 25.13 | 39.84 |
| ブリオムル | 49.07 | 25.59 | 40.40 |
| Rouge-1 | ルージュ-2 | ルージュ-l | |
|---|---|---|---|
| バート | 55.78 | 36.61 | 52.60 |
| Brio-Ctr | 55.98 | 36.54 | 52.51 |
| ブリオムル | 57.75 | 38.64 | 54.54 |
これらのデータセットのモデル出力は./output Outputで見つけることができます。
以下の出力とモデルのチェックポイントを要約します。 model.load_state_dict(torch.load(path_to_checkpoint))を使用してこれらのチェックポイントをロードできます。
| チェックポイント | モデル出力 | 参照出力 | |
|---|---|---|---|
| cnndm | model_generation.bin model_ranking.bin | cnndm.test.ours.out | cnndm.test.Reference |
| cnndm(ケース) | model_generation.bin | cnndm.test.ours.cased.out | cnndm.test.cased.reference |
| xsum | model_generation.bin model_ranking.bin | xsum.test.ours.out | xsum.test.Reference |
訓練されたモデルは、ハギングフェイストランスから生成用にロードできます。 CNNDMのモデルチェックポイント( Yale-LILY/brio-cnndm-uncased 、 Yale-LILY/brio-cnndm-cased Yale-LILY/brio-xsum-cased標準的なBARTモデル(つまり、BartForConditionAlgeneration)です。
 from transformers import BartTokenizer , PegasusTokenizer
from transformers import BartForConditionalGeneration , PegasusForConditionalGeneration

IS_CNNDM = True # whether to use CNNDM dataset or XSum dataset
LOWER = False
ARTICLE_TO_SUMMARIZE = "Manchester United superstar Cristiano Ronaldo scored his 806th career goal in Old Trafford,
 breaking FIFA's all-time record for most goals in competitive matches in men's football history.
 It was the second of three goals the Portuguese attacker scored during the game,
 leading United to a 3-2 victory over Tottenham and finishing the day with 807 total career goals.
 The previous FIFA goal record was held by Josef Bican, with 805 goals."

# Load our model checkpoints
if IS_CNNDM :
    model = BartForConditionalGeneration . from_pretrained ( 'Yale-LILY/brio-cnndm-uncased' )
    tokenizer = BartTokenizer . from_pretrained ( 'Yale-LILY/brio-cnndm-uncased' )
else :
    model = PegasusForConditionalGeneration . from_pretrained ( 'Yale-LILY/brio-xsum-cased' )
    tokenizer = PegasusTokenizer . from_pretrained ( 'Yale-LILY/brio-xsum-cased' )

max_length = 1024 if IS_CNNDM else 512
# generation example
if LOWER :
    article = ARTICLE_TO_SUMMARIZE . lower ()
else :
    article = ARTICLE_TO_SUMMARIZE
inputs = tokenizer ([ article ], max_length = max_length , return_tensors = "pt" , truncation = True )
# Generate Summary
summary_ids = model . generate ( inputs [ "input_ids" ])
print ( tokenizer . batch_decode ( summary_ids , skip_special_tokens = True , clean_up_tokenization_spaces = False )[ 0 ])注:Huggingfaceのチェックポイントは、コードのPytorchモデル( BRIO )に直接ロードすることはできません。Pytorchモデルは、より良いトレーニング効率のためにBart/Pegasusのラッパーであるためです。ただし、Pytorchモデルを開始するために使用できます。
model = BRIO ( 'Yale-LILY/brio-cnndm-uncased' , tok . pad_token_id , is_pegasus = False )

