BRIO
1.0.0
repo นี้มีรหัสข้อมูลและโมเดลที่ผ่านการฝึกอบรมสำหรับ Brio กระดาษของเรา: นำคำสั่งซื้อมาสู่การสรุปเชิงนามธรรม
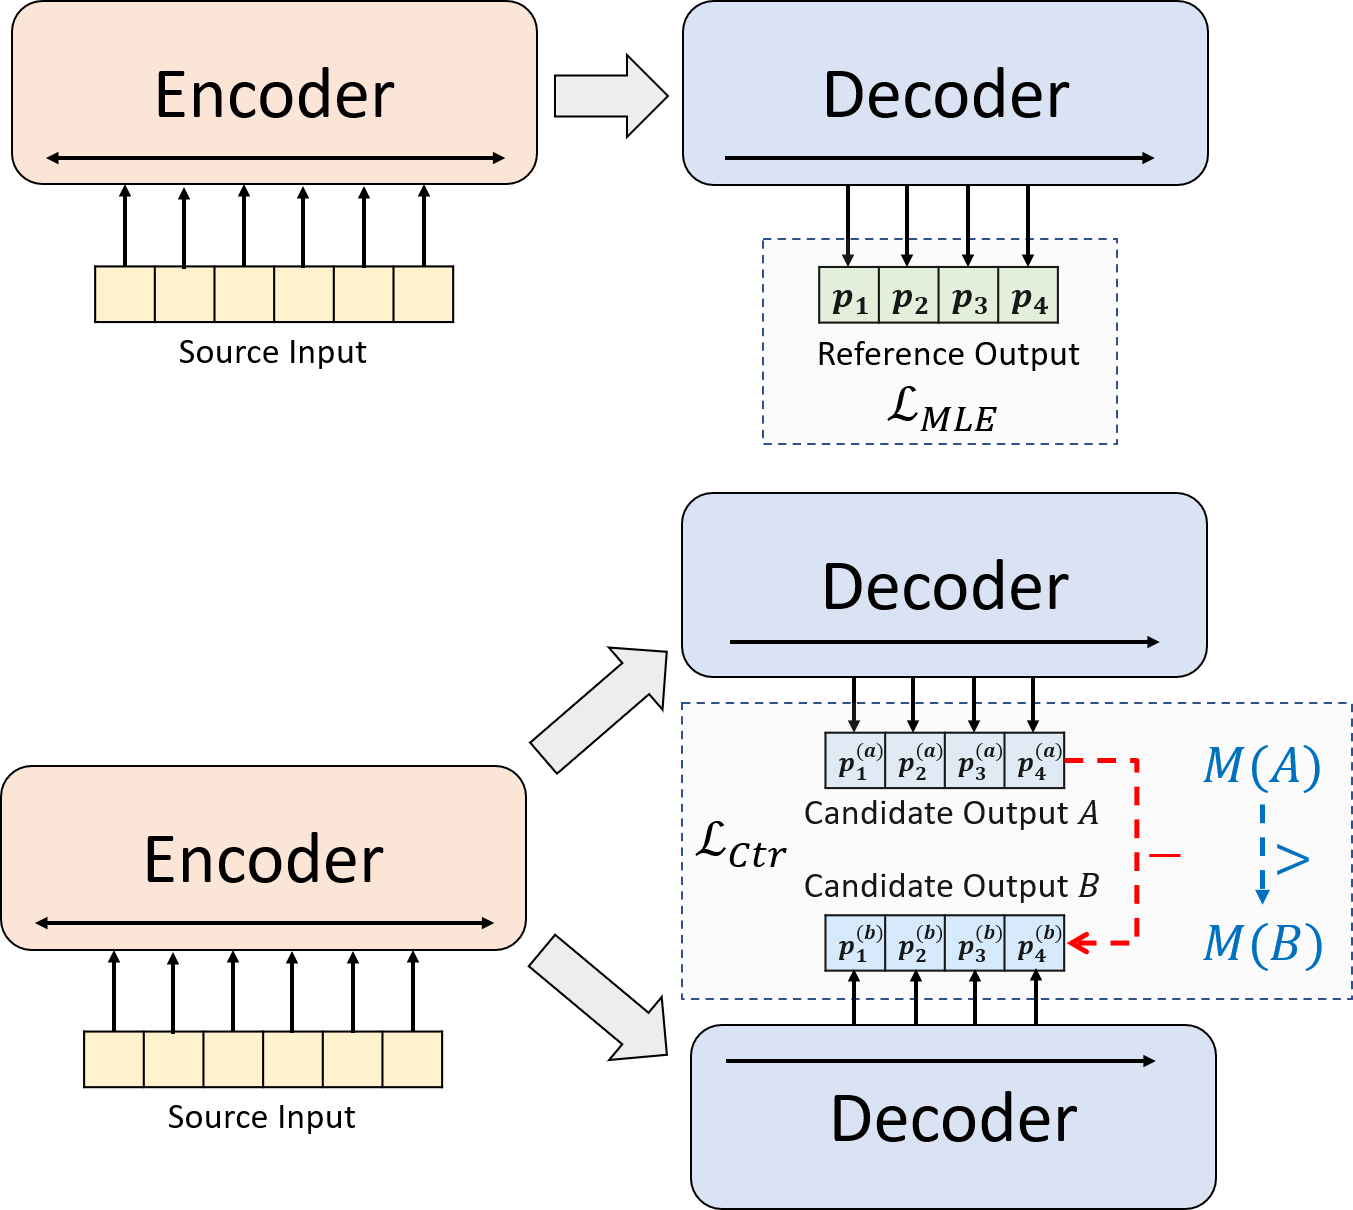
เรานำเสนอกระบวนทัศน์การฝึกอบรมนวนิยายสำหรับการสรุปบทคัดย่อประสาท แทนที่จะใช้การฝึกอบรม MLE เพียงอย่างเดียวเราแนะนำองค์ประกอบการเรียนรู้ที่แตกต่างกันซึ่งกระตุ้นให้โมเดลนามธรรมประเมินความน่าจะเป็นของบทสรุปที่สร้างระบบอย่างแม่นยำยิ่งขึ้น
python3.8conda create --name env --file spec-file.txtpip install -r requirements.txtcompare_mt -> https://github.com/neulab/compare-mt git clone https://github.com/neulab/compare-mt.git
cd ./compare-mt
pip install -r requirements.txt
python setup.py installรหัสของเราขึ้นอยู่กับห้องสมุด Transformers ของ HuggingFace
cal_rouge.py -> การคำนวณรูจconfig.py -> การกำหนดค่าแบบจำลองdata_utils.py -> dataloaderlabel_smoothing_loss.py -> การสูญเสียการปรับให้เรียบของฉลากmain.py -> ขั้นตอนการฝึกอบรมและการประเมินผลmodel.py -> รุ่นmodeling_bart.py , modeling_pegasus.py -> แก้ไขจาก Library Transformers เพื่อรองรับการฝึกอบรมที่มีประสิทธิภาพมากขึ้นpreprocess.py -> การประมวลผลข้อมูลล่วงหน้าutils.py -> ฟังก์ชั่นยูทิลิตี้gen_candidate.py -> สร้างบทสรุปผู้สมัครควรสร้างไดเรกทอรีต่อไปนี้สำหรับการทดลองของเรา
./cache -> การจัดเก็บจุดตรวจสอบรุ่น./result -> การจัดเก็บผลการประเมินผล เราใช้ชุดข้อมูลต่อไปนี้สำหรับการทดลองของเรา
คุณสามารถดาวน์โหลดข้อมูลที่ประมวลผลล่วงหน้าสำหรับการทดลองของเราเกี่ยวกับ CNNDM, CNNDM (cased) และ XSUM
หลังจาก donwloading คุณควรคลายซิปไฟล์ zip ในไดเรกทอรีรูทนี้
สำหรับ NYT คุณจะต้องได้รับใบอนุญาตและโปรดติดตาม https://github.com/kedz/summarization-datasets สำหรับการประมวลผลล่วงหน้า
เพื่อสร้างบทสรุปผู้สมัครจากรุ่นที่ผ่านการฝึกอบรมมาก่อนโปรดเรียกใช้
python gen_candidate.py --gpuid [gpuid] --src_dir [path of the input file (e.g. test.source)] --tgt_dir [path of the output file] --dataset [cnndm/xsum] สำหรับการประมวลผลข้อมูลล่วงหน้าโปรดเรียกใช้
python preprocess.py --src_dir [path of the raw data] --tgt_dir [output path] --split [train/val/test] --cand_num [number of candidate summaries] --dataset [cnndm/xsum/nyt] -l [lowercase if the flag is set] src_dir ควรมีไฟล์ต่อไปนี้ (โดยใช้การทดสอบแยกเป็นตัวอย่าง):
test.sourcetest.source.tokenizedtest.targettest.target.tokenizedtest.outtest.out.tokenized แต่ละบรรทัดของไฟล์เหล่านี้ควรมีตัวอย่างยกเว้นสำหรับ test.out และ test.out.tokenized โดยเฉพาะอย่างยิ่งคุณควรวางบทสรุปผู้สมัครสำหรับตัวอย่างข้อมูลหนึ่งตัวอย่างที่บรรทัดใกล้เคียงใน test.out และ test.out.tokenized
หมายเหตุ : หลังจากการประมวลผลข้อมูลล่วงหน้าคุณควรทำการทดสอบไฟล์ RAW test.source , test.target ลงในโฟลเดอร์ Data ที่สร้างขึ้น (เช่น ./cnndm/diverse/test.source )
เราใช้ PTB tokenizer ที่จัดทำโดย Standford Corenlp (ดาวน์โหลดที่นี่) โปรดทราบว่าตำราที่มีโทเค็นใช้สำหรับการประเมินผล เท่านั้น ในการทำ tokenize ไฟล์คุณอาจเรียกใช้ (โดยใช้ test.source เป็นตัวอย่าง)
 export CLASSPATH=/your_path/stanford-corenlp-3.8.0.jar
cat test.source | java edu.stanford.nlp.process.PTBTokenizer -ioFileList -preserveLines > test.source.tokenized
เราได้ให้ไฟล์ตัวอย่างใน ./examples/raw_data examples/raw_data
ขั้นตอนการประมวลผลล่วงหน้าจะจัดเก็บข้อมูลที่ประมวลผลเป็นไฟล์ Seperate JSON ใน tgt_dir
# starting from the root directory

# create folders
mkdir ./cnndm
mkdir ./cnndm/diverse
mkdir ./cnndm/diverse/test

# suppose that the raw files are at ./raw_data, the results will be saved at ./cnndm/diverse/test
# please remember to put the source file and the target file on test set into the folder, e.g. ./cnndm/diverse/test.source

python preprocess.py --src_dir ./raw_data --tgt_dir ./cnndm/diverse --split test --cand_num 16 --dataset cnndm -l
คุณสามารถระบุพารามิเตอร์ไฮเปอร์ใน main.py นอกจากนี้เรายังให้การตั้งค่าเฉพาะใน CNNDM (NYT แบ่งปันการตั้งค่าเดียวกัน) และ XSUM ใน config.py
python main.py --cuda --gpuid [list of gpuid] --config [name of the config (cnndm/xsum)] -l จุดตรวจและบันทึกจะถูกบันทึกไว้ในโฟลเดอร์ย่อยของ ./cache cache
python main.py --cuda --gpuid 0 1 2 3 --config cnndm -l python main.py --cuda --gpuid [list of gpuid] -l --config [name of the config (cnndm/xsum)] --model_pt [model path] เส้นทางแบบจำลองควรเป็นไดเรกทอรีย่อยในไดเรกทอรี ./cache เช่น cnndm/model.pt (ไม่ควรมีคำนำหน้า ./cache/ cache/)
สำหรับการคำนวณ Rouge เราใช้แพ็คเกจ Rouge Perl มาตรฐานจากที่นี่ในกระดาษของเรา เราลดลงและโทเค็น (โดยใช้ข้อความ PTB tokenizer) ก่อนที่จะคำนวณคะแนนรูจ โปรดทราบว่าคะแนนที่คำนวณโดยแพ็คเกจนี้จะ แตกต่าง จากคะแนน Rouge ที่คำนวณ/รายงานในระหว่างขั้นตอนการฝึกอบรม/intermidiate ของการประเมินเนื่องจากเราใช้การใช้งานรูจที่ใช้ Python บริสุทธิ์เพื่อคำนวณคะแนนเหล่านั้นเพื่อประสิทธิภาพที่ดีขึ้น
หากคุณพบปัญหาเมื่อตั้งค่าแพ็คเกจ Rouge Perl (น่าเสียดายที่มันเกิดขึ้นมากมาย :() คุณอาจพิจารณาใช้แพ็คเกจ Rouge ที่ใช้ Python Python เช่นแพ็คเกจที่เราใช้จากแพ็คเกจ Compare-MT
เราให้สคริปต์การประเมินผลใน cal_rouge.py หากคุณกำลังจะใช้แพ็คเกจ Perl Rouge โปรดเปลี่ยนบรรทัด 13 เป็นเส้นทางของแพ็คเกจ Perl Rouge ของคุณ
_ROUGE_PATH = '/YOUR-ABSOLUTE-PATH/ROUGE-RELEASE-1.5.5/'ในการประเมินประสิทธิภาพของโมเดลโปรดใช้คำสั่งต่อไปนี้เพื่อสร้างบทสรุปก่อน
python main.py --cuda --gpuid [single gpu] --config [name of the config (cnndm/xsum)] -e --model_pt [model path] -g [evaluate the model as a generator] -r [evaluate the model as a scorer/reranker] เส้นทางแบบจำลองควรเป็นไดเรกทอรีย่อยในไดเรกทอรี ./cache เช่น cnndm/model.pt (ไม่ควรมีคำนำหน้า ./cache/ cache/) เอาต์พุตจะถูกบันทึกไว้ในโฟลเดอร์ย่อยของ ./result result มีชื่อเดียวกันของโฟลเดอร์จุดตรวจสอบ
# write the system-generated files to a file: ./result/cnndm/test.out
python main.py --cuda --gpuid 0 --config cnndm -e --model_pt cnndm/model_generation.bin -g

# tokenize the output file - > ./result/cnndm/test.out.tokenized (you may use other tokenizers)
export CLASSPATH=/your_path/stanford-corenlp-3.8.0.jar
cat ./result/cnndm/test.out | java edu.stanford.nlp.process.PTBTokenizer -ioFileList -preserveLines > ./result/cnndm/test.out.tokenized

# calculate the ROUGE scores using ROUGE Perl Package
python cal_rouge.py --ref ./cnndm/test.target.tokenized --hyp ./result/cnndm/test.out.tokenized -l

# calculate the ROUGE scores using ROUGE Python Implementation
python cal_rouge.py --ref ./cnndm/test.target.tokenized --hyp ./result/cnndm/test.out.tokenized -l -p # rerank the candidate summaries
python main.py --cuda --gpuid 0 --config cnndm -e --model_pt cnndm/model_ranking.bin -r
# calculate the ROUGE scores using ROUGE Perl Package
# ./result/cnndm/reference and ./result/cnndm/candidate are two folders containing files. Each one of those files contain one summary
python cal_rouge.py --ref ./result/cnndm/reference --hyp ./result/cnndm/candidate -l
# calculate the ROUGE scores using ROUGE Python Implementation
# ./result/cnndm/reference and ./result/cnndm/candidate are two folders containing files. Each one of those files contain one summary
python cal_rouge.py --ref ./result/cnndm/reference --hyp ./result/cnndm/candidate -l -p ต่อไปนี้เป็นคะแนน Rouge ที่คำนวณโดยแพ็คเกจ Rouge Perl มาตรฐาน
| rouge-1 | Rouge-2 | rouge-l | |
|---|---|---|---|
| บาร์ต | 44.29 | 21.17 | 41.09 |
| brio-ctr | 47.28 | 22.93 | 44.15 |
| Brio-Mul | 47.78 | 23.55 | 44.57 |
| Brio-Mul (cased) | 48.01 | 23.76 | 44.63 |
| rouge-1 | Rouge-2 | rouge-l | |
|---|---|---|---|
| เพกาซัส | 47.46 | 24.69 | 39.53 |
| brio-ctr | 48.13 | 25.13 | 39.84 |
| Brio-Mul | 49.07 | 25.59 | 40.40 |
| rouge-1 | Rouge-2 | rouge-l | |
|---|---|---|---|
| บาร์ต | 55.78 | 36.61 | 52.60 |
| brio-ctr | 55.98 | 36.54 | 52.51 |
| Brio-Mul | 57.75 | 38.64 | 54.54 |
โมเดลของเราเอาต์พุตในชุดข้อมูลเหล่านี้สามารถพบได้ใน ./output OUTPUT
เราสรุปเอาต์พุตและจุดตรวจสอบด้านล่าง คุณสามารถโหลดจุดตรวจเหล่านี้ได้โดยใช้ model.load_state_dict(torch.load(path_to_checkpoint))
| จุดตรวจ | โมเดลเอาต์พุต | เอาต์พุตอ้างอิง | |
|---|---|---|---|
| cnndm | model_generation.bin model_ranking.bin | cnndm.test.ours.out | cnndm.test.reference |
| cnndm (cased) | model_generation.bin | cnndm.test.ours.cased.out | cnndm.test.cased.reference |
| Xsum | model_generation.bin model_ranking.bin | xsum.test.ours.out | xsum.test.reference |
คุณสามารถโหลดโมเดลที่ผ่านการฝึกอบรมของเราสำหรับ รุ่น จาก HuggingFace Transformers จุดตรวจสอบโมเดลของเราบน CNNDM ( Yale-LILY/brio-cnndm-uncased , Yale-LILY/brio-cnndm-cased ) เป็นแบบจำลอง BART มาตรฐาน (เช่น BartforConditionalGeneration) ในขณะที่จุดตรวจของเราบน XSUM ( Yale-LILY/brio-xsum-cased )
 from transformers import BartTokenizer , PegasusTokenizer
from transformers import BartForConditionalGeneration , PegasusForConditionalGeneration

IS_CNNDM = True # whether to use CNNDM dataset or XSum dataset
LOWER = False
ARTICLE_TO_SUMMARIZE = "Manchester United superstar Cristiano Ronaldo scored his 806th career goal in Old Trafford,
 breaking FIFA's all-time record for most goals in competitive matches in men's football history.
 It was the second of three goals the Portuguese attacker scored during the game,
 leading United to a 3-2 victory over Tottenham and finishing the day with 807 total career goals.
 The previous FIFA goal record was held by Josef Bican, with 805 goals."

# Load our model checkpoints
if IS_CNNDM :
    model = BartForConditionalGeneration . from_pretrained ( 'Yale-LILY/brio-cnndm-uncased' )
    tokenizer = BartTokenizer . from_pretrained ( 'Yale-LILY/brio-cnndm-uncased' )
else :
    model = PegasusForConditionalGeneration . from_pretrained ( 'Yale-LILY/brio-xsum-cased' )
    tokenizer = PegasusTokenizer . from_pretrained ( 'Yale-LILY/brio-xsum-cased' )

max_length = 1024 if IS_CNNDM else 512
# generation example
if LOWER :
    article = ARTICLE_TO_SUMMARIZE . lower ()
else :
    article = ARTICLE_TO_SUMMARIZE
inputs = tokenizer ([ article ], max_length = max_length , return_tensors = "pt" , truncation = True )
# Generate Summary
summary_ids = model . generate ( inputs [ "input_ids" ])
print ( tokenizer . batch_decode ( summary_ids , skip_special_tokens = True , clean_up_tokenization_spaces = False )[ 0 ])
หมายเหตุ : จุดตรวจของเราเกี่ยวกับ HuggingFace ไม่สามารถ โหลดได้โดยตรงไปยังโมเดล Pytorch ( BRIO ) ในรหัสของเราเนื่องจากโมเดล Pytorch ของเราเป็น wrapper บน BART/PEGASUS เพื่อประสิทธิภาพการฝึกอบรมที่ดีขึ้น อย่างไรก็ตามคุณสามารถใช้มันเพื่อเริ่มต้นโมเดล Pytorch ของเราเช่น
model = BRIO ( 'Yale-LILY/brio-cnndm-uncased' , tok . pad_token_id , is_pegasus = False )

