RTL to GDSII
1.0.0
Openroad es la aplicación principal de código abierto y fundamental para el diseño digital de semiconductores. El flujo de carretera abierta ofrece un flujo autónomo, sin humano (NHIL), cambio de 24 horas de RTL-GDSII para una exploración de diseño rápido e implementación de diseño físico.
  Title:
  RTL-GDSII flow Using OpenROAD
   ____________________________________________________
  |  ->Synthesis                                       |
  |      : Inputs  [RTL, SDC, .lib, .lef]              |
  |      : Logic Synthesis  (Yosys)                    |
  |      : Output files  [Netlist, SDC]                |
  |  ->Floorplan                                       |
  |      : Floorplan Initialization                    |
  |      : IO placement  (random)                      |
  |      : Timing-driven mixed-size placement          |
  |      : Macro placement                             |
  |      : Tapcell and welltie insertion               |
  |      : PDN generation                              |
  |  ->Placement                                       |
  |      : Global placement without placed IOs         |
  |      : IO placement  (optimized)                   |
  |      : Global placement with placed IOs            |
  |      : Resizing and buffering                      |
  |      : Detailed placement                          |
  |  ->CTS : Clock Tree Synthesis                      |
  |      : Timing optimization                         |
  |      : Filler cell insertion                       |
  |  ->Routing                                         |
  |      : Global Routing                              |
  |      : Detailed Routing                            |
  |  ->Finishing                                       |
  |      : Metal Fill insertion                        |
  |      : Signoff timing report                       |
  |      : Generate GDSII  (KLayout)                   |
  |      : DRC/LVS check (KLayout)                     |
  |____________________________________________________|
 sudo apt-get update
sudo apt - get update
sudo apt - get install gperf
sudo apt - get install autoconf
sudo apt - get install gcc g ++
sudo apt - get install flex
sudo apt - get install bison
 wget https://github.com/steveicarus/iverilog/archive/refs/tags/v12_0.tar.gz

tar -xvzf v12_0.tar.gz

cd iverilog-12_0
sh autoconf.sh
./configure

sudo make
sudo make install
Pruebe la instalación: escriba 'iverilog' en el terminal y presione Entrar la instalación exitosa debe mostrar esta salida: iverilog: sin archivos de origen y sugeriría -c, -y, etc.
sudo apt install gtkwave
Veremos cómo se trazan las señales usando un ejemplo en GTKWave.
 sudo apt update
sudo apt-get install zlib1g-dev
git clone https://git.savannah.gnu.org/git/libiconv.git

sudo apt-get install tcl8.6
sudo apt-get install tcl8.6-dev
sudo apt-get install tk8.6
sudo apt-get install tk8.6-dev
sudo apt-get install doxygen

git clone https://github.com/chiphackers/covered
cd covered
./configure
sudo make
sudo make install
Si 'TCL Interp' no tiene un miembro llamado 'resultado', se produjo un error:
 cd covered
cd src
gedit report.c
En el archivo Report.c, verá una lista de #Clude Commands. Encuentre #include <tcl.h> y agregue el siguiente comando '#define use_interp_result 1' antes de #include <tcl.h>.
Su informe se verá así:
 #ifdef HAVE TCLTK
#define USE_INTERP_RESULT 1
#include <tcl.h>
Guarde el archivo Report.C. Ejecute el comando Make nuevamente y continúe con el proceso de instalación como se muestra arriba.
Código de verilog de origen:
// 4 bit synchronous counter
module Mycounter (CLK, RST , OUT );
 input CLK, RST;
 output [3:0] OUT ;
 reg [3:0] OUT;

 always @( posedge CLK )
 begin
 if (RST == 1'b1 )
    OUT <= 4'b0000 ;
 else
    OUT <=OUT+1;
 end
endmodule
Código de Verilog de TestBench:
// Testbench for a 4 bit synchronous counter
module Testbench ();
reg Clock , Reset ;
wire [3:0] Count ;

// instantiate the DUV and make connections
Mycounter I1(.CLK ( Clock ),. RST ( Reset ),.OUT( Count ) );

// initialize the Testbench
initial begin
$display (" Starting simulation ...");
Clock = 1'b0 ;
Reset = 1'b1 ; // reset the counter at t=0
# 100 Reset = 1'b0 ; // remove reset at t=100
# 2000 Reset = 1'b1 ; // remove reset at t= 2100
# 400 $finish ; // end the simulation after t= 2500
end

// generate stimulus (in this case clock signal )
always #50 Clock =∼Clock ;// clock period =100

// monitor the response and save it in a file

initial begin
$dumpfile ("count.vcd"); // specifies the VCD file
$dumpvars ; // dump all the variables
$monitor ("%d ,%b ,%b ,%d", $time , Clock , Reset , Count );
 end
endmodule
• Inicie la distribución de Linux y haga un directorio $ mkdir icarus_codes
Donde los códigos de ICARUS es el nombre del directorio.
• Cambiar el directorio a los códigos ICARUS. Para la simulación, necesita un código Verilog para la funcionalidad implementada y un banco de prueba en formato .v. Incluya aquellos en el directorio de trabajo. Digamos que mi código Verilog se llama Mycounter.v y el TestBench es Testbench.v . Para simular:
 $ iverilog -o Mycounter Mycounter.v Testbench.v
$ vvp Mycounter
Se crea un archivo de volcado, que he nombrado como count.vcd en el banco de prueba, y también puede ver la salida en el terminal. También puede ver la salida en el gtkwave
$ gtkwave count.vcd Este comando inicia la aplicación GTKWave Analyzer. En el panel izquierdo, expanda el TestBench y haga clic en la subcarpeta. Se expandirá para mostrar el reloj de entrada, el reinicio y la forma de onda de salida [3: 0]. Arrastrelos al panel de señales y analice los resultados.
Para estimar el porcentaje de diseño RTL probado por el banco de pruebas, se utiliza la herramienta de analizador de cobertura de código Verilog cubierta. • Genere el informe de cobertura de código en el mismo directorio, es decir, los códigos ICARUS ejecutando el siguiente comando
$ covered score -t Testbench -v Testbench.v -v Mycounter.v -vcd count.vcd -o Mycounter.cdd
• Para ver el informe de cobertura, ejecute
$ covered report -d v Mycounter.cdd
El informe de cobertura se muestra en la terminal.
Si se encuentra con algún error llamado "falla de segmentación", intente esto:
sudo apt-get install gedit
Abra el archivo VCD generado en GEDIT, busque la línea "$ Comentario Muestre los valores del parámetro. $ End" y elimínelo.
Guarde el archivo VCD y luego agin ejecute el flujo, debería funcionar ahora.
sudo apt-get install -y build-essential clang bison flex libreadline-dev gawk tcl-dev libffi-dev git graphviz xdot pkg-config python3 libboost-system-dev libboost-python-dev libboost-filesystem-dev zlib1g-dev
 git clone https://github.com/YosysHQ/yosys.git
git submodule update --init
cd yosys
sudo make
sudo make install
Después de instalar, intente invocar yosys como: ./yosys La herramienta se inicia, y el símbolo del sistema cambia a yosys>
Aquí le he dado el archivo de la biblioteca llamado Nangate45_typ.lib
Para sintetizar cualquier archivo fuente de Verilog con YOSYS, este archivo de biblioteca debe incluirse en el script de automatización de TCL.
Haga un archivo llamado yosys_commands.tcl y coloque esta línea en el archivo y guarde.
 #Read modules from verilog
read_verilog counter.v

#Elaborate design hierarchy
hierarchy −check −top Mycounter

#Translate Processes to netlist
proc

#mapping to the internal cell library
techmap

#mapping flip-flops to Nangate45_typ.lib
dfflibmap −liberty Nangate45_typ.lib

#mapping logic to Nangate45_typ.lib
abc -liberty Nangate45_typ.lib

#remove unused cells
clean

#write the synthesized design in a verilog file
write_verilog −noattr synth_Mycounter.v
Este script TCL debe ejecutarse, después de que se invoca Yosys. Esto automatizará el proceso de sintetización y escribirá la lista de redes sintetizada desde el archivo de verilog de origen
Inicie la herramienta YOSYS $ yosys Estoy usando un archivo YOSYS_COMMANDS.TCL. yosys> script yosys_commands.tcl
Del mismo modo, ejecute los scripts not_opt.tcl y opt.tcl dados para ver el diagrama de bloques no optimizado y los diagramas de bloques optimizados respectivamente en la ventana GraphViz (XDOT)
 sudo apt-get update
sudo apt-get install build-essential tcl-dev tk-dev cmake git

git clone https://github.com/The-OpenROAD-Project/OpenSTA.git
cd OpenSTA
mkdir build
cd build
cmake ..
Si el error viene como Cmake error at CMakelists.txt entonces muévase al directorio de inicio usando el comando "CD" e instalar
sudo apt-get install libeigen3-dev
Nuevamente muévase al directorio de compilación en OpenSta y configure la compilación ejecutando el siguiente comando:
cmake ..
Si nuevamente algún error de CMake, vuelva a pasar al directorio de inicio e instale Cudd.
 git clone https://github.com/ivmai/cudd.git
sudo apt-get install automake
sudo apt-get install autoconf m4 perl

cd cudd
autoreconf -i
mkdir build
cd build
../configure --prefix=$HOME/cudd
sudo make
sudo make install
Ahora Cudd se instala con éxito. Ahora muévase al directorio de Opensta
 cd OpenSTA
cd build
cmake .. -DUSE_CUDD=ON -DCUDD_DIR=$HOME/cudd
sudo make
sudo make install
Ahora invoque OpenStA desde el terminal simplemente escriba "STA" y presione Entrar, cambió la solicitud a
 sta [~/working_directory]

or,
it will be shown like

%
Después de la instalación exitosa de OpenSta, ejecute el time.tcl para analizar el momento de las entradas y salidas, después de esa ejecución power.tcl para analizar la disipación de potencia por el circuito diseñado.
Para análisis de tiempo utilizando Opensta
% source time.tcl
Para el análisis de potencia utilizando Opensta
% source power.tcl
Descargar OpenRoad Repository
 git clone --recursive https://github.com/The-OpenROAD-Project/OpenROAD.git
cd OpenROAD
Instalar dependencias
sudo ./etc/DependencyInstaller.sh
Construir una carretera abierta
 mkdir build
cd build
cmake ..
sudo make
sudo make install
Si después de ejecutar "CMake" muestra un error como: CMake Error: Could not find CMAKE_ROOT !!! Luego ejecute export PATH=/usr/local/bin/cmake:$PATH y ejecute echo $CMAKE_ROOT , debe reflejar la ruta, luego volver
Si aún se producen algún error:
 sudo apt install swig
sudo apt update
Invocar la herramienta Openroad desde el terminal y debe cambiarse a openroad>
Script utilizado para ejecutar la actividad:
design_nangate45.tcl
 1. RTL Netlist: gcd_nangate45.v
(Location: OpenROAD/test/gcd_nangate45.v)
2. SDC file: gcd_nangate45.sdc
(Location: OpenROAD/test/gcd_nangate45.sdc)
3. Library file: Nangate45_typ.lib
(Location: OpenROAD/test/Nangate45/Nangate45_typ.lib)
4. LEF file
A. Technology Lef: Nangate45_tech.lef
(Location: OpenROAD/test/Nangate45/Nangate45_tech.lef)
B. Standard Cell Lef: Nangate45_stdcell.lef
(Location: OpenROAD/test/Nangate45/Nangate45_stdcell.lef)
escribir design_nangate45.tcl
 source "helpers.tcl"
source "flow_helpers.tcl"
source "Nangate45/Nangate45.vars"
set design "<design name>"
set top_module "<design main module>"
set synth_verilog "synth_design.v"
set sdc_file "top.sdc"
set die_area {0 0 100.13 100.8}
set core_area {10.07 11.2 90.25 91}
source -echo "flow.tcl”
Ahora todos los archivos están listos, algunos archivos específicos deben copiar en la carpeta "Openroad/Test", esta es:
 design.v
synth_design.v
top.sdc
design_nangate45.tcl
Después de copiar estos archivos en la carpeta OpenROAD/test , vaya al mismo directorio e invoque OpenRoad para copiar archivos de un directorio a otro directorio es:
sudo cp -i /path/of/your/directory/<filename> /path/to/directory/to/copy/
entonces
openroad> sudo openroad -gui -log design_logfile.log design_nangate45.tcl
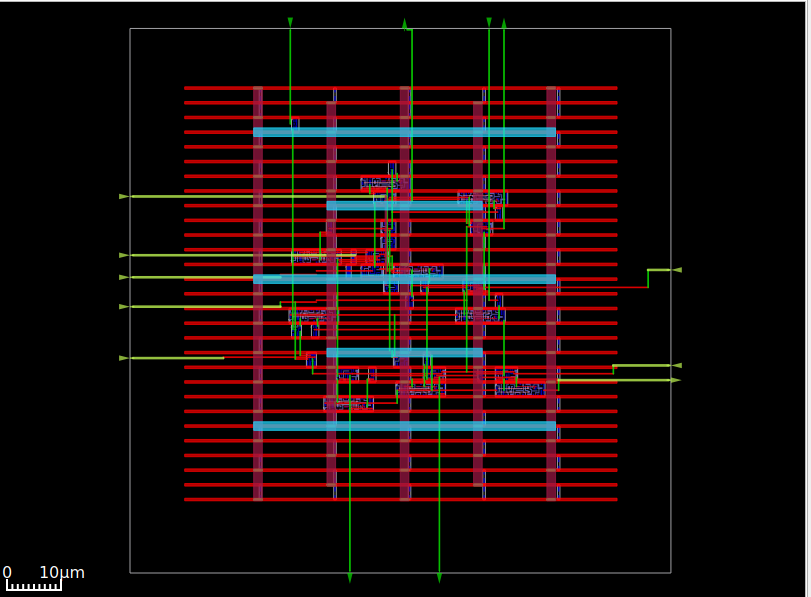
Ejecutando este comando, generará un diseño ASIC que será visible en Open Road GUI ahora para guardarlo como GDSII necesita kLayout.
sudo apt install klayout
Abra KLayout usando este comando
klayout &
Ahora haga clic en el botón Archivo y elija la opción del lector, luego haga clic en la pestaña "Lef/Def", allí "Nangate45.Lef", debe colocarse y desmarcar la casilla de verificación (si está marcado) o permanecer la misma ubicación de "Nangate45.Lef" es
/OpenROAD/test/Nangate45/Nangate45.lef
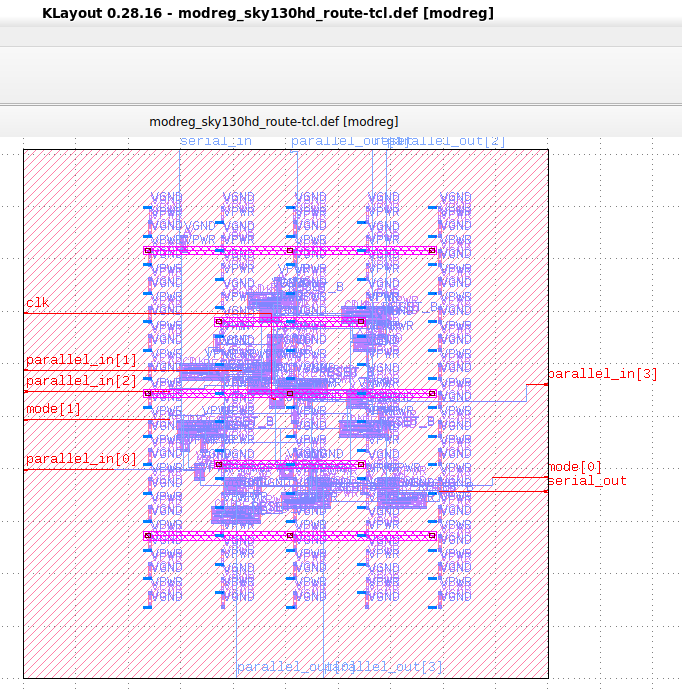
Luego haga clic en Aceptar. Después de eso, haga clic nuevamente en el archivo y elija Abrir, ahora se abrirá un cuadro de diálogo, navegue a
/OpenROAD/test/result
El archivo design.def se ubicará, haga clic en el archivo DEF y haga clic en Aceptar. Ahora se abrirá en modo GDSII y se puede guardar como GDSII.
Ahora el diseño está listo para enviar a Foundry para la fabricación.
 [1] Installation steps for The ICARUS Verilog Compilation System. [Online]. Available:
https://github.com/steveicarus/iverilog

[2] Installation steps for Covered - Verilog Code Coverage Analyzer. [Online]. Available:
https://github.com/chiphackers/covered/blob/master/INSTALL

[3] S. Saurabh, Introduction to VLSI Design Flow. Cambridge: Cambridge University Press,
2023.

[4] Installation steps for Yosys Open SYnthesis Suite. [Online]. Available: https:
//github.com/YosysHQ/yosys

[5] S. Saurabh, Introduction to VLSI Design Flow. Cambridge: Cambridge University Press,
2023.

[6] Yosys: Example Usage. [Online]. Available: https://yosyshq.net/yosys/

[7] Documentation for Yosys Open SYnthesis Suite commands. [Online]. Available:
https://yosyshq.readthedocs.io/projects/yosys/en/manual-rewrite/cmd ref.html

[8] Ajayi, Tutu, Vidya A. Chhabria, Mateus Fogaça, Soheil Hashemi, Abdelrahman Hosny,
Andrew B. Kahng, Minsoo Kim et al. "Toward an open-source digital flow: First learnings
from the openroad project." In Proceedings of the 56th Annual Design Automation
Conference 2019, pp. 1-4. 2019.

[9] Ajayi, Tutu, and David Blaauw. "OpenROAD: Toward a self-driving, open-source digital
layout implementation tool chain." In Proceedings of Government Microcircuit
Applications and Critical Technology Conference. 2019.


