contrastive unpaired translation
1.0.0

我們提供基於貼片對比學習和對抗性學習的未配對圖像到圖像翻譯的Pytorch實施。不使用手工製作的損失和反向網絡。與Cyclegan相比,我們的模型訓練更快,內存較少。此外,我們的方法可以擴展到單個圖像訓練,其中每個“域”只是一個圖像。
對違規圖像到圖像翻譯的對比度學習
Taesung Park,Alexei A. Efros,Richard Zhang,Jun-Yan Zhu
UC Berkeley和Adobe Research
在ECCV 2020中
 import torch
cross_entropy_loss = torch . nn . CrossEntropyLoss ()

# Input: f_q (BxCxS) and sampled features from H(G_enc(x))
# Input: f_k (BxCxS) are sampled features from H(G_enc(G(x))
# Input: tau is the temperature used in PatchNCE loss.
# Output: PatchNCE loss
def PatchNCELoss ( f_q , f_k , tau = 0.07 ):
    # batch size, channel size, and number of sample locations
    B , C , S = f_q . shape

    # calculate v * v+: BxSx1
    l_pos = ( f_k * f_q ). sum ( dim = 1 )[:, :, None ]

    # calculate v * v-: BxSxS
    l_neg = torch . bmm ( f_q . transpose ( 1 , 2 ), f_k )

    # The diagonal entries are not negatives. Remove them.
    identity_matrix = torch . eye ( S )[ None , :, :]
    l_neg . masked_fill_ ( identity_matrix , - float ( 'inf' ))

    # calculate logits: (B)x(S)x(S+1)
    logits = torch . cat (( l_pos , l_neg ), dim = 2 ) / tau

    # return PatchNCE loss
    predictions = logits . flatten ( 0 , 1 )
    targets = torch . zeros ( B * S , dtype = torch . long )
    return cross_entropy_loss ( predictions , targets )
9/12/2020:添加了單圖像翻譯。
git clone https://github.com/taesungp/contrastive-unpaired-translation CUT
cd CUT
安裝pytorch 1.1和其他依賴關係(例如,火炬,見點,統治,gputil)。
對於PIP用戶,請鍵入命令pip install -r requirements.txt 。
對於Conda用戶,您可以使用conda env create -f environment.yml 。
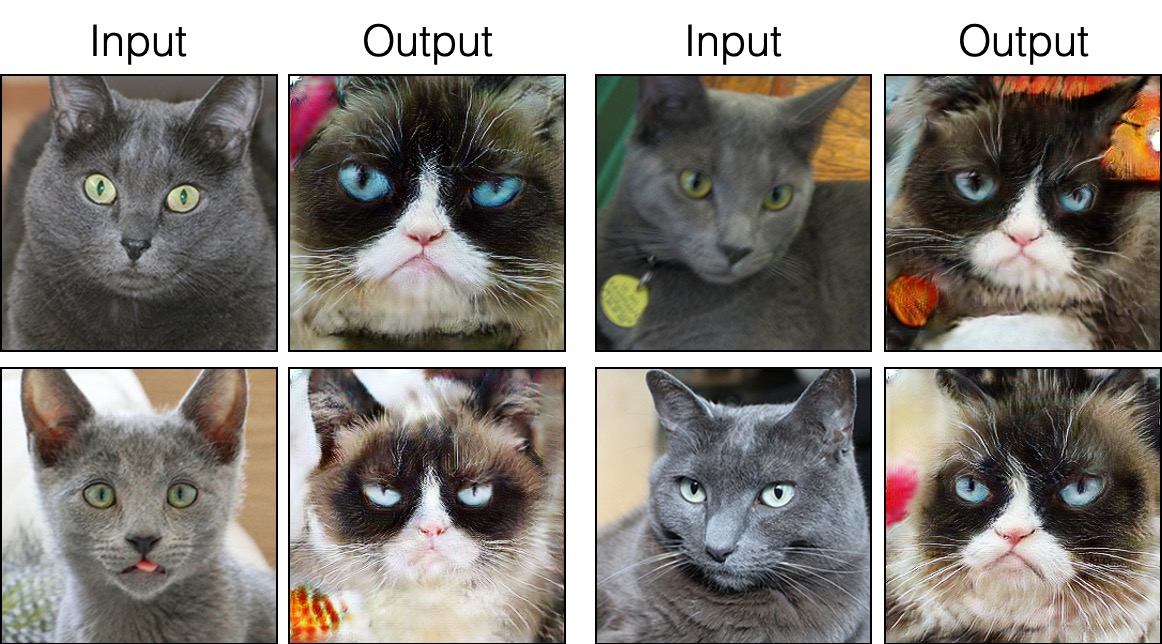
grumpifycat數據集(論文的圖8。俄羅斯藍色 - >脾氣暴躁的貓) bash ./datasets/download_cut_dataset.sh grumpifycat在./datasets/grumpifycat/下載數據集並解壓縮。
要查看培訓結果和損失地塊,請運行python -m visdom.server ,然後單擊URL http:// localhost:8097。
訓練切割模型:
python train.py --dataroot ./datasets/grumpifycat --name grumpycat_CUT --CUT_mode CUT或訓練快速鍵模型
python train.py --dataroot ./datasets/grumpifycat --name grumpycat_FastCUT --CUT_mode FastCUT檢查點將存儲在./checkpoints/grumpycat_*/web中。
python test.py --dataroot ./datasets/grumpifycat --name grumpycat_CUT --CUT_mode CUT --phase train測試結果將在此處保存到HTML文件: ./results/grumpifycat/latest_train/index.html latest_train/index.html。
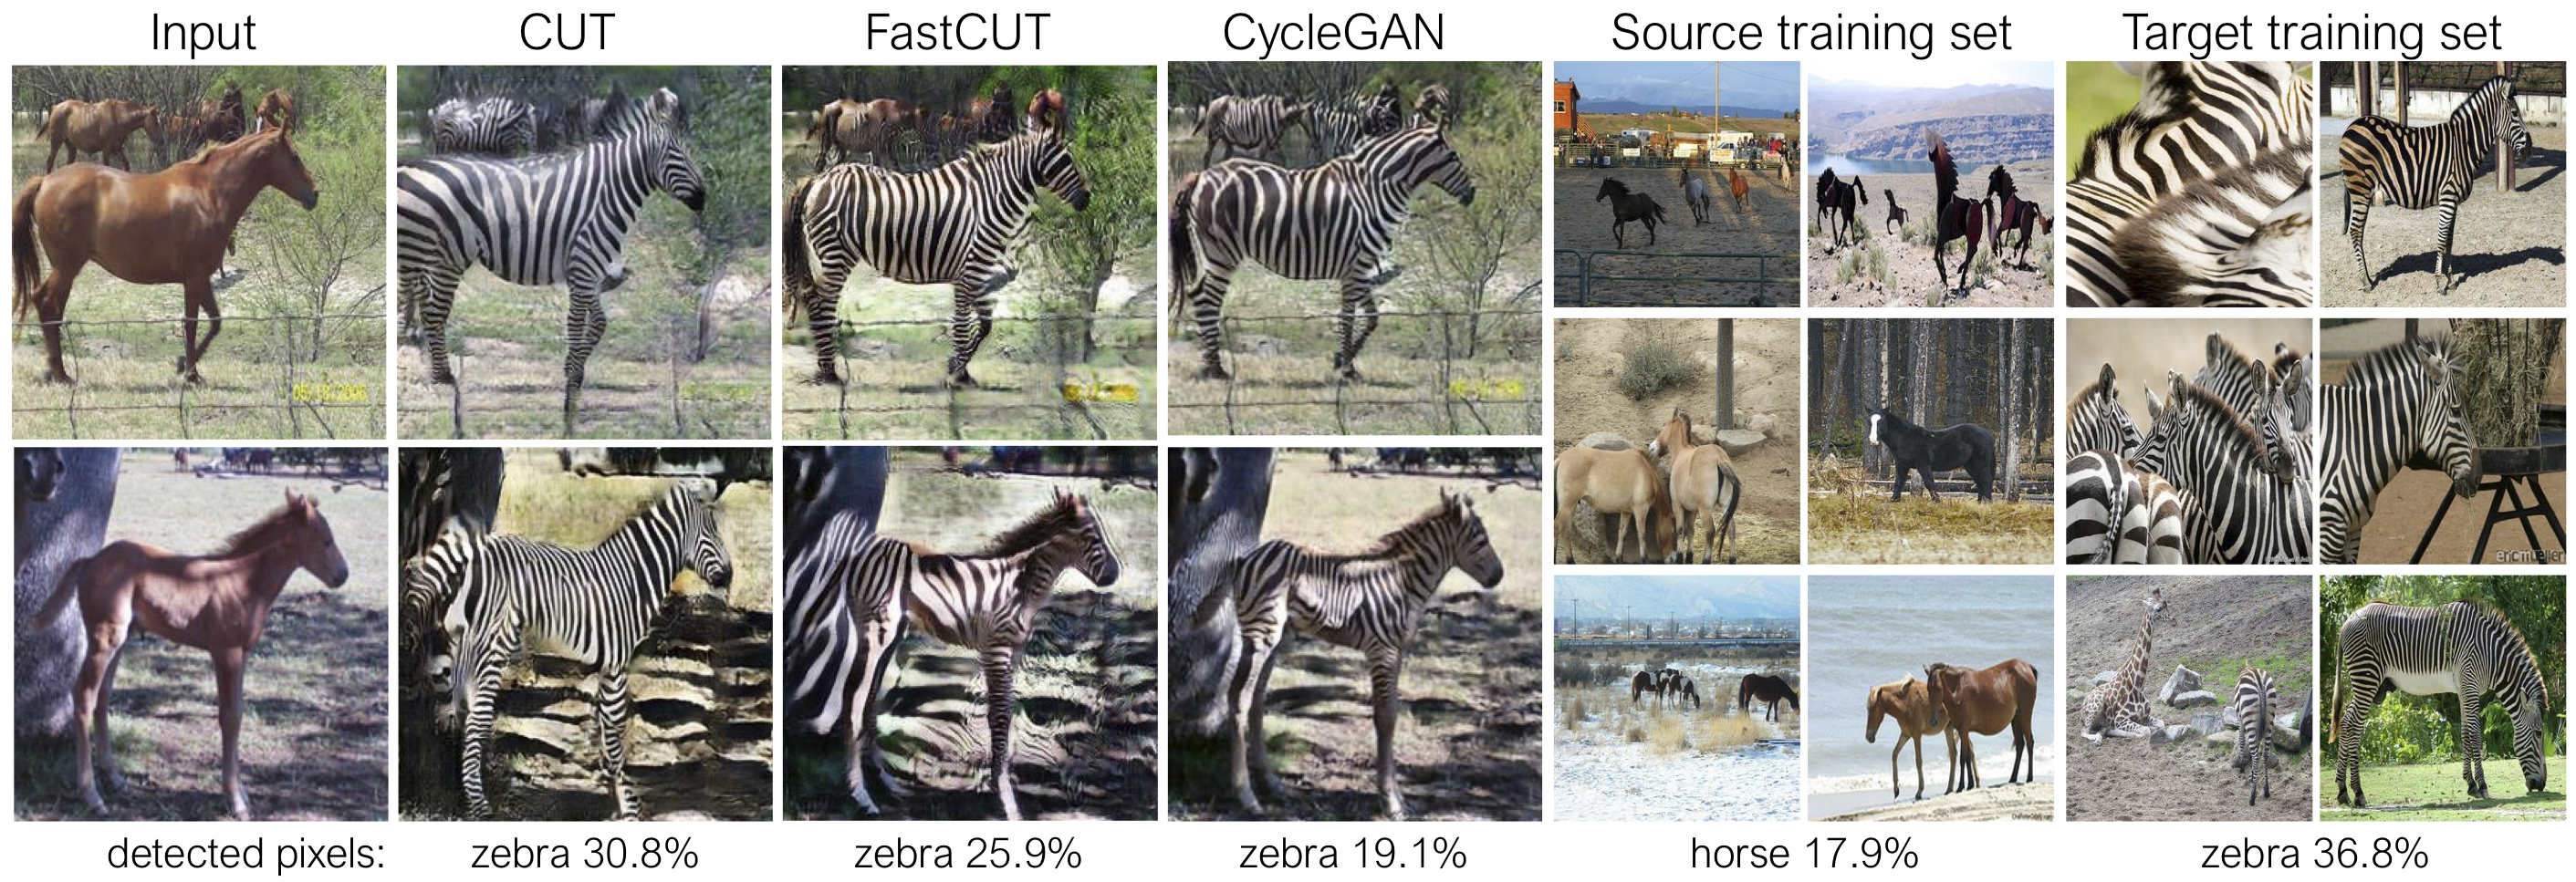
剪切經過身份保存損失和lambda_NCE=1的訓練,而fastcut則在沒有身份損失的情況下進行了訓練,但lambda_NCE=10.0 。與Cyclegan相比,CUT學習執行更強大的分佈匹配,而FastCut的設計為更輕(一半的GPU存儲器,可以符合更大的圖像),並且更快地(更快地訓練)替代了Cyclegan。請參閱本文以獲取更多詳細信息。
在上圖中,我們使用預先訓練的語義分割模型來測量屬於馬/斑馬體的像素的百分比。我們發現馬與斑馬圖像之間的分佈不匹配 - 斑馬通常看起來更大(36.8%比17.9%)。我們的完整方法削減具有擴大馬匹的靈活性,這是比Cyclegan更好地匹配訓練統計數據的手段。快速開口的行為像Cyclegan一樣保守。
請參閱生成上述命令行參數的experiments/grumpifycat_launcher.py 。啟動器腳本可用於配置培訓和測試的相當複雜的命令行參數。
使用啟動器,下面的命令生成了剪切和快速鍵的訓練命令。
python -m experiments grumpifycat train 0   # CUT
python -m experiments grumpifycat train 1   # FastCUT
要使用啟動器進行測試,
python -m experiments grumpifycat test 0   # CUT
python -m experiments grumpifycat test 1 # FastCUT可能的命令是運行,run_test,啟動,關閉等。有關所有命令,請參見experiments/__main__.py 。啟動器易於定義和使用。例如,grumpifycat啟動器在幾行中定義:
 from . tmux_launcher import Options , TmuxLauncher


class Launcher ( TmuxLauncher ):
    def common_options ( self ):
        return [
            Options (    # Command 0
                dataroot = "./datasets/grumpifycat" ,
                name = "grumpifycat_CUT" ,
                CUT_mode = "CUT"
            ),

            Options (    # Command 1
                dataroot = "./datasets/grumpifycat" ,
                name = "grumpifycat_FastCUT" ,
                CUT_mode = "FastCUT" ,
            )
        ]

    def commands ( self ):
        return [ "python train.py " + str ( opt ) for opt in self . common_options ()]

    def test_commands ( self ):
        # Russian Blue -> Grumpy Cats dataset does not have test split.
        # Therefore, let's set the test split to be the "train" set.
return [ "python test.py " + str ( opt . set ( phase = 'train' )) for opt in self . common_options ()]要運行預告片的型號,請運行以下內容。
 # Download and unzip the pretrained models. The weights should be located at
# checkpoints/horse2zebra_cut_pretrained/latest_net_G.pth, for example.
wget http://efrosgans.eecs.berkeley.edu/CUT/pretrained_models.tar
tar -xf pretrained_models.tar

# Generate outputs. The dataset paths might need to be adjusted.
# To do this, modify the lines of experiments/pretrained_launcher.py
# [id] corresponds to the respective commands defined in pretrained_launcher.py
# 0 - CUT on Cityscapes
# 1 - FastCUT on Cityscapes
# 2 - CUT on Horse2Zebra
# 3 - FastCUT on Horse2Zebra
# 4 - CUT on Cat2Dog
# 5 - FastCUT on Cat2Dog
python -m experiments pretrained run_test [id]

# Evaluate FID. To do this, first install pytorch-fid of https://github.com/mseitzer/pytorch-fid
# pip install pytorch-fid
# For example, to evaluate horse2zebra FID of CUT,
# python -m pytorch_fid ./datasets/horse2zebra/testB/ results/horse2zebra_cut_pretrained/test_latest/images/fake_B/
# To evaluate Cityscapes FID of FastCUT,
# python -m pytorch_fid ./datasets/cityscapes/valA/ ~/projects/contrastive-unpaired-translation/results/cityscapes_fastcut_pretrained/test_latest/images/fake_B/
# Note that a special dataset needs to be used for the Cityscapes model. Please read below.
python -m pytorch_fid [path to real test images] [path to generated images]
注意:對The CityScapes預測的模型進行了對原始CityScapes數據集的大小和JPEG壓縮版本進行培訓和評估。要執行評估,請下載此驗證集並執行評估。
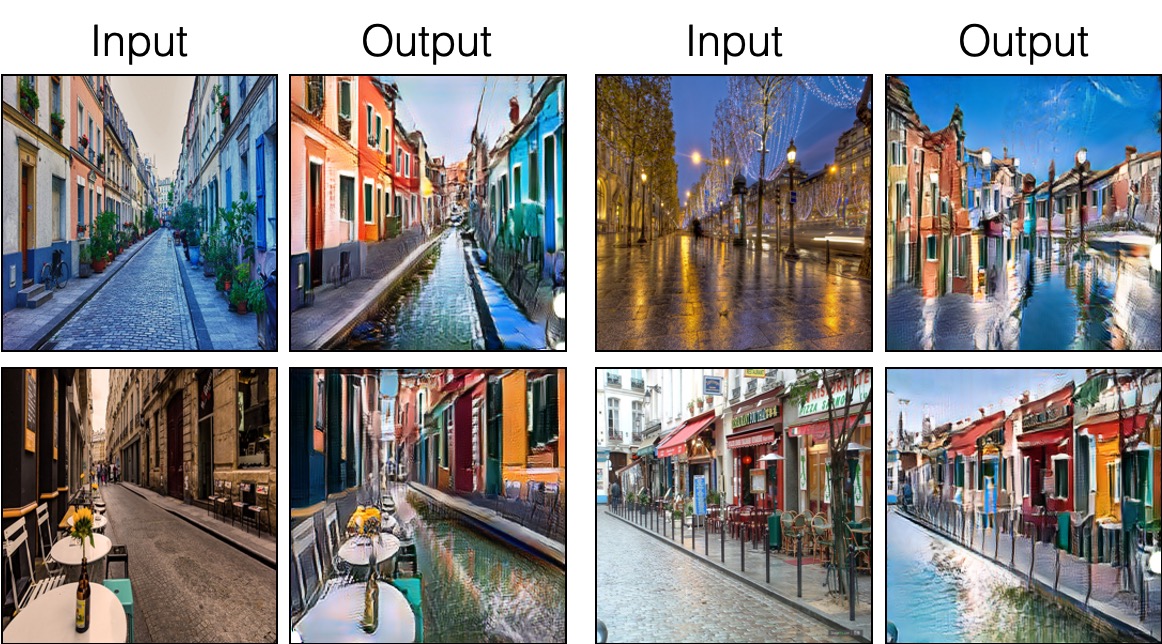
要訓練Sincut(單圖像翻譯,如圖9、13和14所示),您需要
--model選項設置為--model sincut ,該選項在./models/sincut_model.py和./datasets/single_image_monet_etretat/庫中包含的示例數據集。例如,要訓練Etretat Cliff的模型(圖13的第一張圖像),請使用以下命令。
python train.py --model sincut --name singleimage_monet_etretat --dataroot ./datasets/single_image_monet_etretat或使用實驗啟動器腳本,
python -m experiments singleimage run 0對於單圖像翻譯,我們採用了stylegan2的網絡架構組件,以及DTN和Cyclegan中使用的像素身份保存損失。特別是,我們採用了在models/stylegan_networks.py上存在的紅色守則。
培訓需要幾個小時。要使用檢查點生成最終圖像,
python test.py --model sincut --name singleimage_monet_etretat --dataroot ./datasets/single_image_monet_etretat或簡單
python -m experiments singleimage run_test 0下載cut/cyclegan/pix2pix數據集。例如,
bash datasets/download_cut_datasets.sh horse2zebra CAT2DOG數據集是從AFHQ數據集準備的。請訪問https://github.com/clovaai/stargan-v2,然後通過bash download.sh afhq-dataset 。然後按以下方式重組目錄。
mkdir datasets/cat2dog
ln -s datasets/cat2dog/trainA [path_to_afhq]/train/cat
ln -s datasets/cat2dog/trainB [path_to_afhq]/train/dog
ln -s datasets/cat2dog/testA [path_to_afhq]/test/cat
ln -s datasets/cat2dog/testB [path_to_afhq]/test/dog可以從https://cityscapes-dataset.com下載CityScapes數據集。之後,使用腳本./datasets/prepare_cityscapes_dataset.py準備數據集。
輸入圖像的預處理(例如調整大小或隨機裁剪)由選項控制--preprocess , --load_size和--crop_size 。用法遵循Cyclegan/pix2pix repo。
例如,默認設置--preprocess resize_and_crop --load_size 286 --crop_size 256將輸入映像大大為286x286 ,然後將大小256x256的隨機作物作為執行數據增強的方式。可以指定其他預處理選項,並且在base_dataset.py中指定它們。以下是一些示例選項。
--preprocess none :不執行任何預處理。請注意,圖像大小仍然縮放為4的最接近倍數,因為卷積發生器否則無法維持相同的圖像大小。--preprocess scale_width --load_size 768 :縮放圖像的寬度為768。--preprocess scale_shortside_and_crop :縮放圖像保留縱橫比,以使短側是load_size ,然後對窗口尺寸crop_size進行隨機裁剪。通過修改base_dataset.py的get_transform() ,可以添加更多預處理選項。
如果您使用此代碼進行研究,請引用我們的論文。
 @inproceedings{park2020cut,
  title={Contrastive Learning for Unpaired Image-to-Image Translation},
  author={Taesung Park and Alexei A. Efros and Richard Zhang and Jun-Yan Zhu},
  booktitle={European Conference on Computer Vision},
  year={2020}
}
如果您使用此存儲庫中包含的原始Pix2Pix和Cyclegan模型,請引用以下論文
 @inproceedings{CycleGAN2017,
  title={Unpaired Image-to-Image Translation using Cycle-Consistent Adversarial Networks},
  author={Zhu, Jun-Yan and Park, Taesung and Isola, Phillip and Efros, Alexei A},
  booktitle={IEEE International Conference on Computer Vision (ICCV)},
  year={2017}
}


@inproceedings{isola2017image,
  title={Image-to-Image Translation with Conditional Adversarial Networks},
  author={Isola, Phillip and Zhu, Jun-Yan and Zhou, Tinghui and Efros, Alexei A},
  booktitle={IEEE Conference on Computer Vision and Pattern Recognition (CVPR)},
  year={2017}
}
我們感謝艾倫·賈布里(Allan Jabri)和菲利普·索拉(Phillip Isela)的有益的討論和反饋。我們的代碼是基於pytorch-cyclegan and-pix2pix開發的。我們還要感謝Pytorch-FID的FID計算,DRN的MIOU計算以及stylegan2-pytorch,用於我們的單像翻譯設置中使用的stylegan2的pytorch實現。


