mLoRA
1.0.0
Mlora
高效的“工厂”来构建多个洛拉适配器

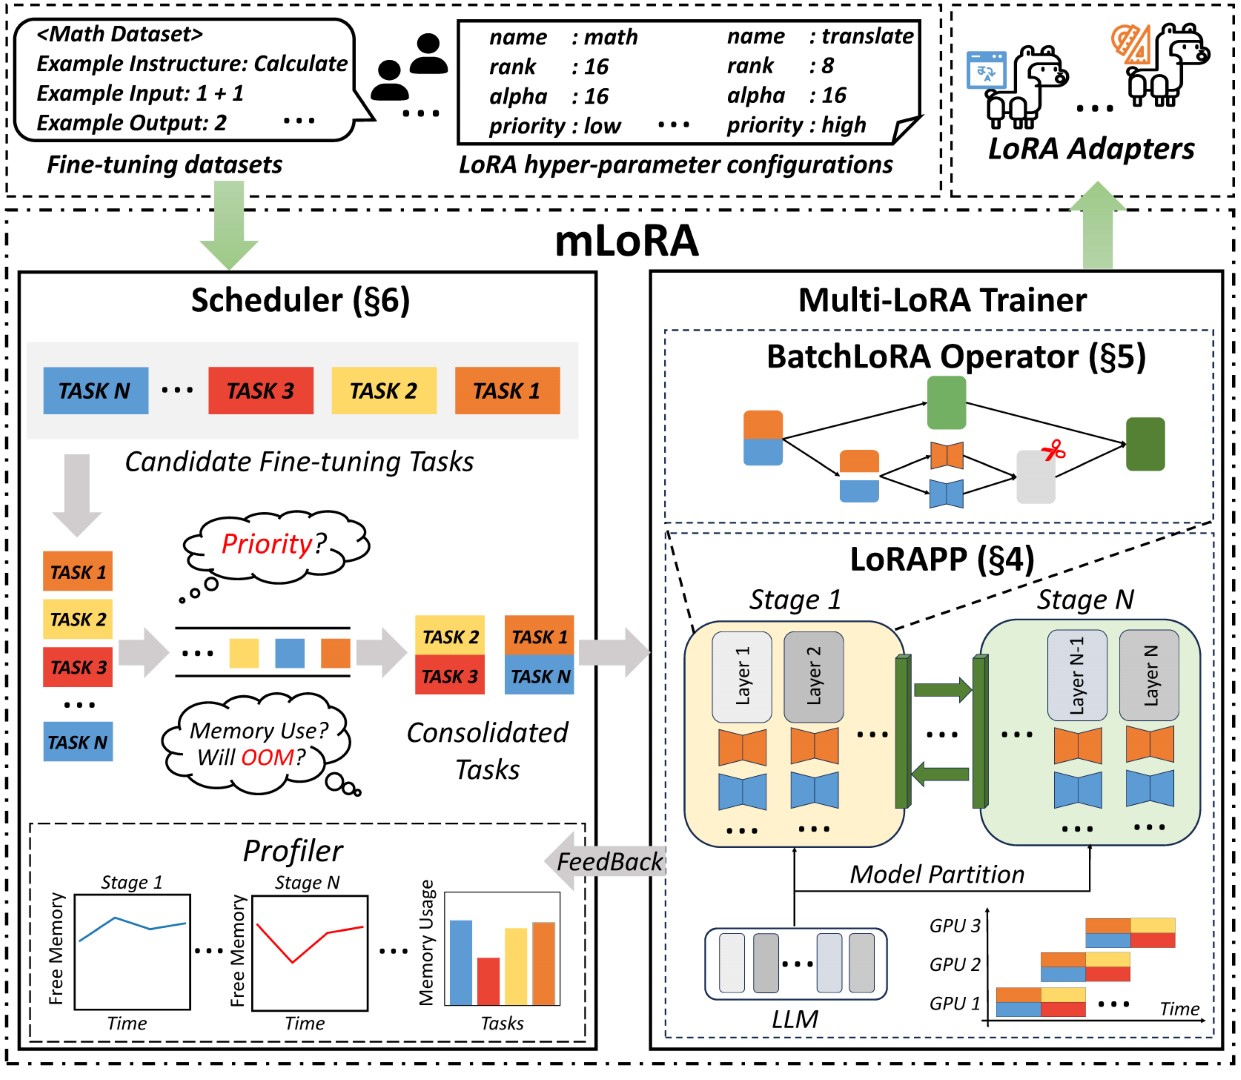
Mlora(又名Multi-Lora微调)是一个开源框架,旨在使用Lora及其变体对多种大型语言模型(LLMS)进行有效的微调。 Mlora的主要特征包括:
多个Lora适配器的同时微调。
多个洛拉适配器之间的共享基本模型。
有效的管道并行算法。
支持多种Lora变体算法和各种基本模型。
支持多种强化学习偏好一致性算法。
Mlora的端到端结构如图所示:
首先,您应该克隆此存储库并安装依赖项(或使用我们的映像):
 # Clone Repository
git clone https://github.com/TUDB-Labs/mLoRA
cd mLoRA
# Install requirements need the Python >= 3.12
pip install . mlora_train.py代码是批次微调洛拉适配器的起点。
python mlora_train.py
  --base_model TinyLlama/TinyLlama-1.1B-Chat-v0.4
  --config demo/lora/lora_case_1.yaml
您可以在演示文件夹中查看适配器的配置,有关使用不同的lora变体和增强学习优先对齐算法的配置。
有关进一步详细的用法信息,请使用--help HELP选项:
python mlora_train.py --help与Quickstart类似,在两个节点环境中启动的命令如下:
注意1:使用环境变量MASTER_ADDR/MASTER_PORT设置主节点。
Note2:设置平衡,指示分配给每个等级的解码器层的数量。
 # in the first node
export MASTER_ADDR=master.svc.cluster.local
export MASTER_PORT=12355
python mlora_pp_train.py
  --base_model TinyLlama/TinyLlama-1.1B-Chat-v0.4
  --config demo/lora/lora_case_1.yaml
  --pipeline
  --device " cuda:0 "
  --rank 0
  --balance 12 13
  --no-recompute
  --precision fp32

# in the second node
export MASTER_ADDR=master.svc.cluster.local
export MASTER_PORT=12355
python mlora_pp_train.py
  --base_model TinyLlama/TinyLlama-1.1B-Chat-v0.4
  --config demo/lora/lora_case_1.yaml
  --pipeline
  --device " cuda:1 "
  --rank 1
  --balance 12 13
  --no-recompute
--precision fp32Mlora提供了官方的Docker图像,可快速启动和开发,该图像可在Dockerhub软件包注册表中获得。
首先,您应该拉出最新图像(该图像也用于开发):
docker pull yezhengmaolove/mlora:latest部署并输入一个容器以运行Mlora:
docker run -itd --runtime nvidia --gpus all
    -v ~ /your_dataset_dir:/dataset
    -v ~ /your_model_dir:/model
    -p < host_port > :22
    --name mlora
    yezhengmaolove/mlora:latest
# when the container started, use the ssh to login
# the default password is mlora@123
ssh root@localhost -p < host_port >
# pull the latest code and run the mlora
cd /mLoRA
git pull
python mlora_train.py
  --base_model TinyLlama/TinyLlama-1.1B-Chat-v0.4
--config demo/lora/lora_case_1.yaml我们可以部署Mloar作为服务,以连续接收用户请求并执行微调任务。
首先,您应该拉最新图像(使用相同的图像进行部署):
docker pull yezhengmaolove/mlora:latest部署我们的Mlora服务器:
docker run -itd --runtime nvidia --gpus all
    -v ~ /your_dataset_cache_dir:/cache
    -v ~ /your_model_dir:/model
    -p < host_port > :8000
    --name mlora_server
    -e " BASE_MODEL=TinyLlama/TinyLlama-1.1B-Chat-v0.4 "
    -e " STORAGE_DIR=/cache "
yezhengmaolove/mlora:latest /bin/bash /opt/deploy.sh部署服务后,安装并使用mlora_cli.py与服务器进行交互。
 # install the client tools
pip install mlora-cli
# use the mlora cli tool to connect to mlora server
mlora_cli
(mLoRA) set port < host_port >
(mLoRA) set host http:// < host_ip >
# and enjoy it!!docker pull yezhengmaolove/mlora:latest
pip install mlora-cli # first, we create a cache dir in host for cache some file
mkdir ~ /cache
# second, we manually download the model weights from Hugging Face.
mkdir ~ /model && cd ~ /model
git clone https://huggingface.co/TinyLlama/TinyLlama-1.1B-Chat-v1.0
# we map port 8000 used by the mlora server to port 1288 on the host machine.
# the BASE_MODEL environment variable indicates the path of the base model used by mlora.
# the STORAGE_DIR environment variable indicates the path where datasets and lora adapters are stored.
# we use the script /opt/deploy.sh in container to start the server.
docker run -itd --runtime nvidia --gpus all
-v ~ /cache:/cache
-v ~ /model:/model
-p 1288:8000
--name mlora_server
-e " BASE_MODEL=/model/TinyLlama-1.1B-Chat-v1.0 "
-e " STORAGE_DIR=/cache "
yezhengmaolove/mlora:latest /bin/bash /opt/deploy.sh我们使用MLORA_CLI链接到服务器http://127.0.0.1:1288(必须使用HTTP ProtoCal)
(mLoRA) set port 1288
(mLoRA) set host http://127.0.0.1我们将斯坦福羊驼数据集用作演示,如下所示:
[{ "instruction" : " " , "input" : " " , "output" : }, { ... }](mLoRA) file upload
? file type: train data
? name: alpaca
? file path: /home/yezhengmao/alpaca-lora/alpaca_data.jsonYAML文件中的模板,然后通过模板语言Jinja2写入,请参见Demo/stript.yaml文件
您上传的数据文件可以视为数组数据,而数组中的元素是字典类型。我们将每个元素视为模板中的数据点。
(mLoRA) file upload
? file type: prompt template
? name: simple_prompt
? file path: /home/yezhengmao/mLoRA/demo/prompt.yaml我们创建一个数据集,数据集由数据,模板和相应的提示器组成。我们可以使用dataset showcase命令来检查提示是否正确生成。
(mLoRA) dataset create
? name: alpaca_dataset
? train data file: alpaca
? prompt template file: simple_prompt
? prompter: instruction
? data preprocessing: default
(mLoRA) dataset showcase
? dataset name: alpaca_dataset现在,我们可以使用adapter create命令来创建用于火车的适配器。
最后,我们可以使用定义的数据集提交任务以训练适配器。注意:您可以连续提交或终端培训任务。使用adapter ls或task ls检查任务的状态
同时训练多个适配器时,使用Mlora可以节省大量的计算和内存资源。
我们使用带有FP32精确度的四张A6000图形卡微调了多个Lora适配器,而无需使用检查点和任何量化技术:
| 模型 | mlora(令牌/s) | 带有FSDP的PEFT-LORA(令牌/s) | 带有TP的PEFT-LORA(令牌/s) |
|---|---|---|---|
| Llama-2-7b(32FP) | 2364 | 1750 | 1500 |
| Llama-2-13b(32FP) | 1280 | oom | 875 |
| 模型 | |
|---|---|
| ✓ | 骆驼 |
| 变体 | |
|---|---|
| ✓ | Qlora,Nips,2023年 |
| ✓ | Lora+,ICML,2024 |
| ✓ | Vera,ICLR,2024 |
| ✓ | Dora,ICML,2024年 |
| 变体 | |
|---|---|
| ✓ | DPO,神经,2024年 |
| ✓ | CPO,ICML,2024 |
| ✓ | CIT,ARXIV,2024年 |
我们欢迎捐款改善此存储库!在提交拉动请求或问题之前,请查看贡献指南。
分叉存储库。为您的功能或修复创建一个新的分支。提交拉动请求,并详细说明您的更改。
您可以使用预先承诺来检查您的代码。
 # Install requirements
pip install .[ci_test]
ln -s ../../.github/workflows/pre-commit .git/hooks/pre-commit
或只需致电脚本检查您的代码
.github/workflows/pre-commit如果您在此存储库中使用代码,请引用回购。
 @misc { m-LoRA ,
  author = { Zhengmao, Yetextsuperscript{*} and Dengchun, Litextsuperscript{*} and Jingqi, Tian and Tingfeng, Lan and Yanbo, Liang and Yexi, Jiang and Jie, Zuo and Hui, Lu and Lei, Duan and Mingjie, Tang } ,
  title = { m-LoRA: Efficient LLM Model Fine-tune and Inference via Multi-Lora Optimization } ,
  year = { 2023 } ,
  publisher = { GitHub } ,
  howpublished = { url{https://github.com/TUDB-Labs/mLoRA} } ,
  note = { textsuperscript{*}: these authors contributed equally to this work. }
}版权所有©2024保留所有权利。
该项目是根据Apache 2.0许可证获得许可的。
 Licensed under the Apache License, Version 2.0 (the "License");
you may not use this file except in compliance with the License.
You may obtain a copy of the License at

     http://www.apache.org/licenses/LICENSE-2.0

Unless required by applicable law or agreed to in writing, software
distributed under the License is distributed on an "AS IS" BASIS,
WITHOUT WARRANTIES OR CONDITIONS OF ANY KIND, either express or implied.
See the License for the specific language governing permissions and
limitations under the License.


