XcodesApp
v2.4.1 - Now with 101% more login

XCodesApp เป็นส่วนหนึ่งของ XcodesOrg - อ่านเพิ่มเติมที่นี่
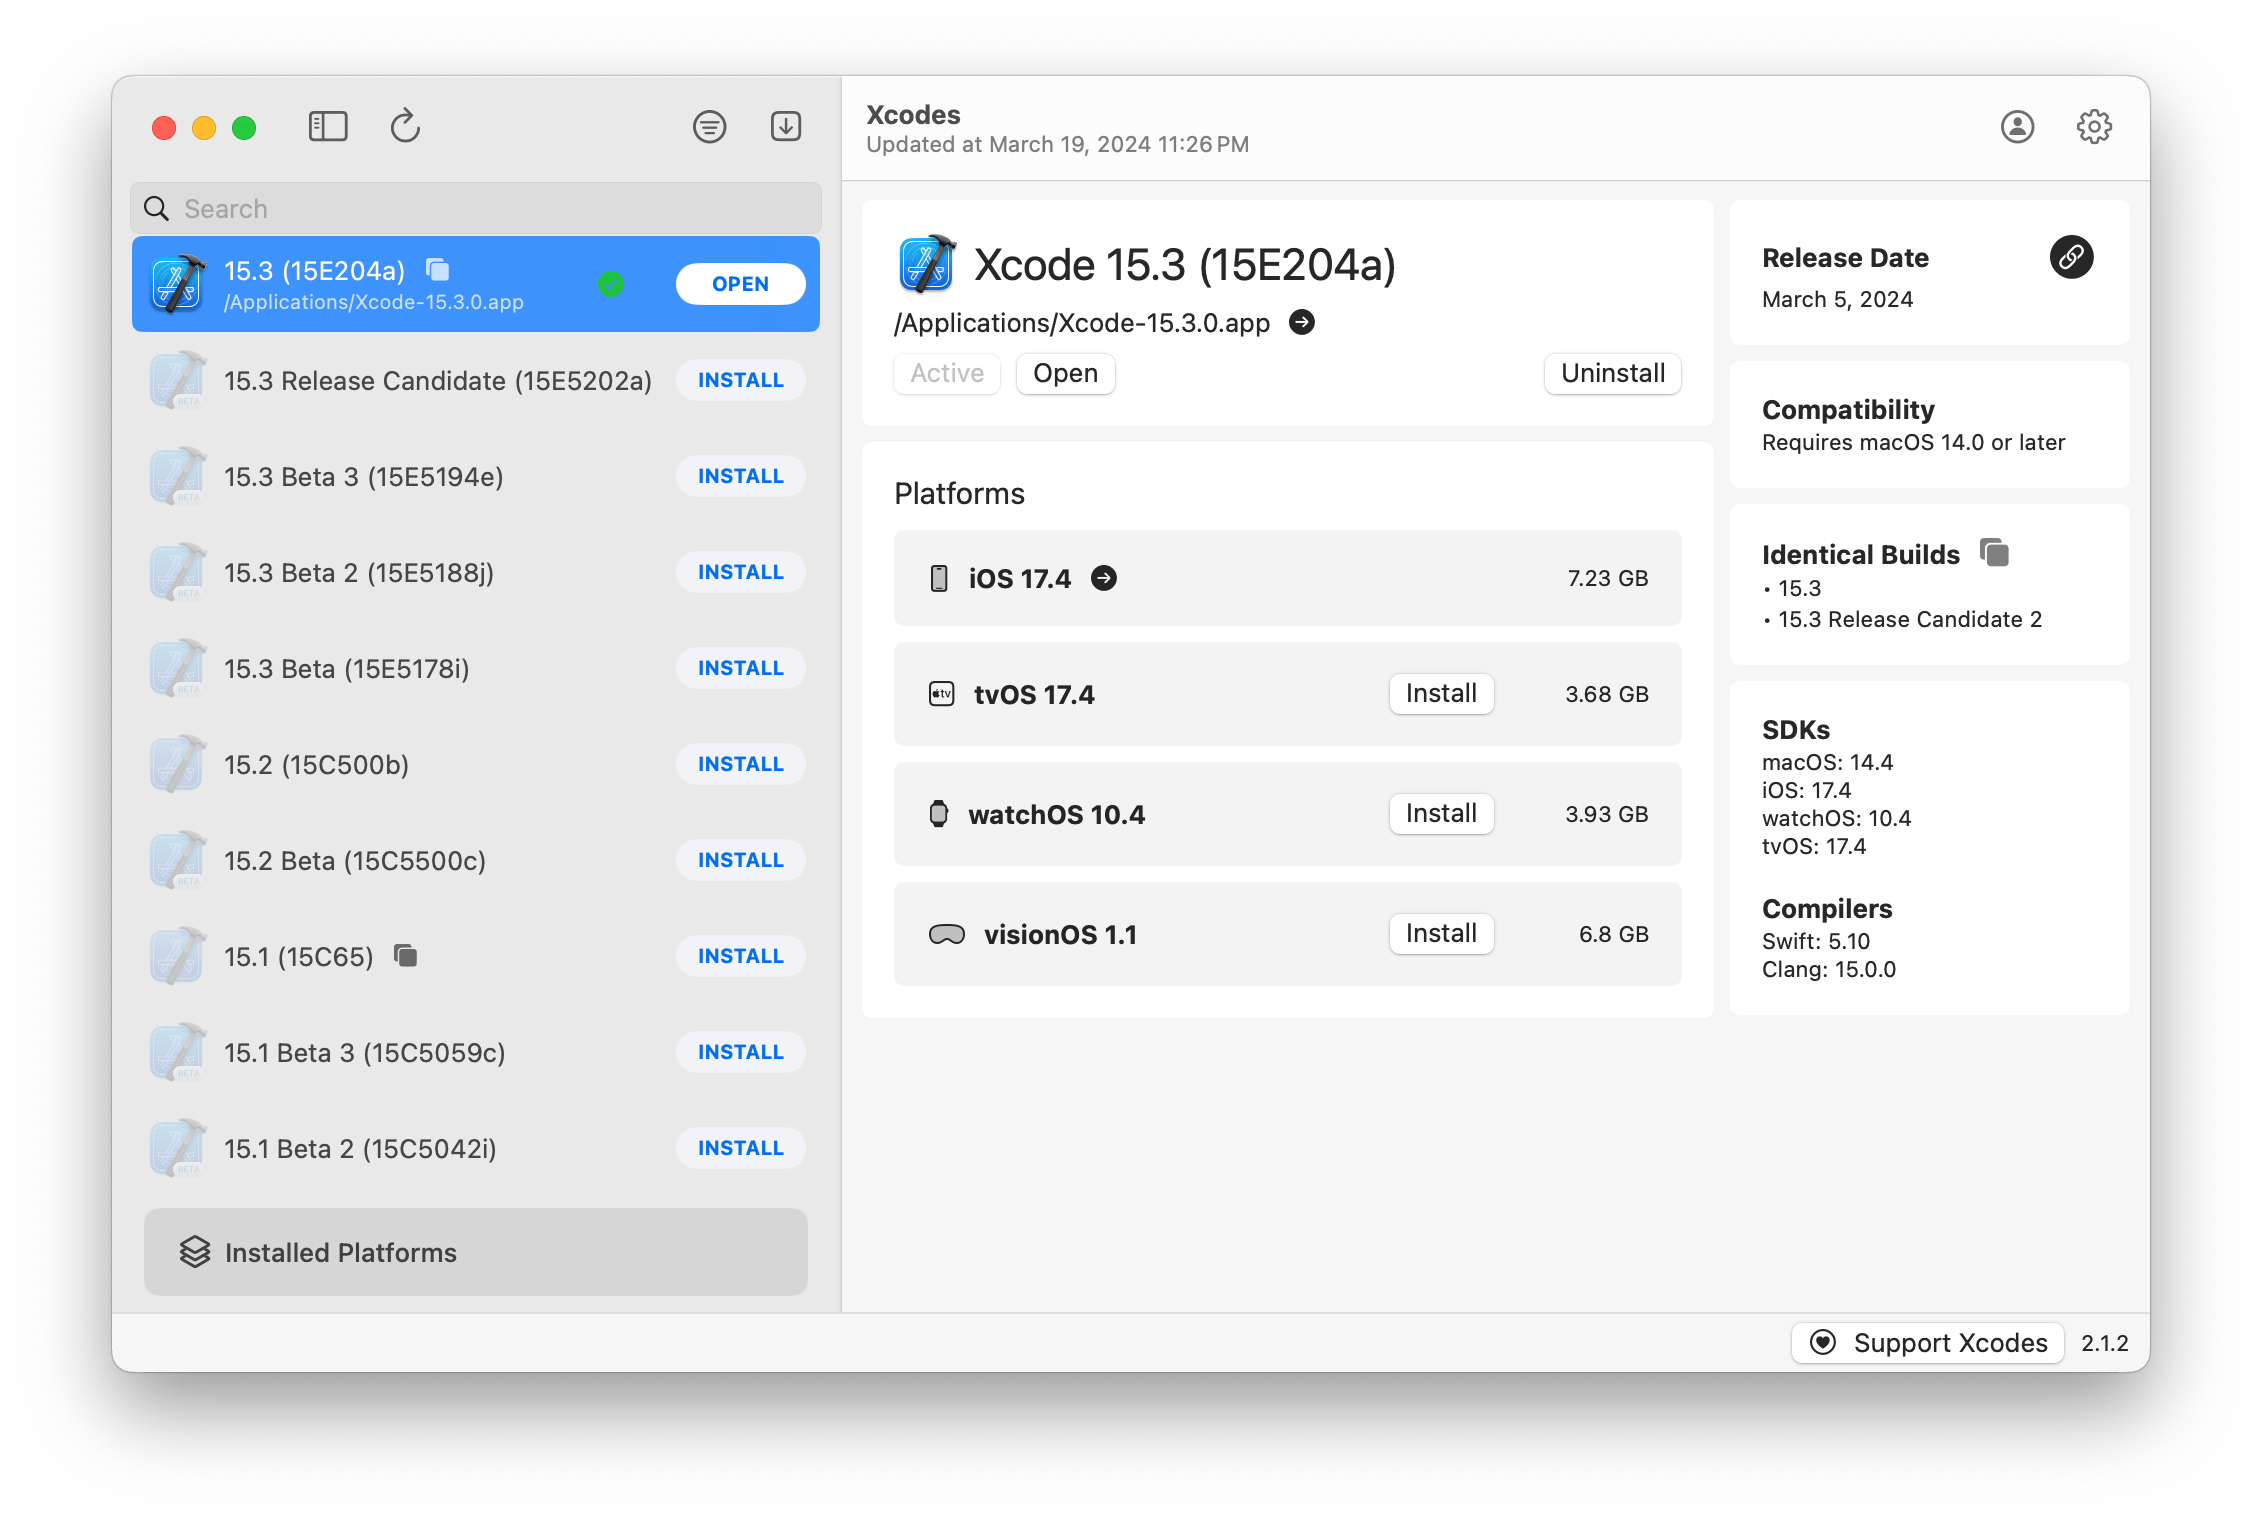
aria2 ซึ่งใช้การเชื่อมต่อมากถึง 16 ครั้งเพื่อดาวน์โหลดเร็วกว่า URLSession 3-5Xxcode-selectหมายเหตุ: iOS 18+, TVOS 18+, Watchos 11+, Visionos 2+ ต้องการให้ติดตั้งและใช้งาน Xcode 16.1 Beta 3+
Xcodes รองรับการแปลในหลายภาษา
สนับสนุนภาษาต่อไปนี้เนื่องจากผู้ใช้ชุมชนต่อไปนี้!
| ภาษาฝรั่งเศส ?? | @dompepin | อิตาลี ?? | Gualtierofrigerio |
| สเปน ??? | @cesartru88 | เกาหลี ?? | @ryan-son |
| รัสเซีย ?? | @alexmazlov | ตุรกี ?? | @egesucu |
| ภาษาฮินดี ?? | @kgurpreet | ภาษาจีนง่าย ?? | @megabitsenmzq |
| ฟินแลนด์ ?? | @marcusziade | จีน-ดั้งเดิม ?? | @itszero |
| ยูเอส ?? | @Gelosi | ญี่ปุ่น ?? | @tatsuz0u |
| เยอรมัน ?? | @drct | ดัตช์ ?? | @jfversluis |
| ชาวบราซิลโปรตุเกส ?? | @brunomunizaf | โปแลนด์ ?? | @jakex7 |
| คาตาลัน | @Ferranabello | กรีก ?? | @อัลลาดิเนีย |
ต้องการเพิ่มภาษาเพิ่มเติมหรือไม่? เพียงสร้าง PR ด้วยไฟล์สตริงที่อัปเดต
v1.x - ต้องการ macOS 11 หรือใหม่กว่า v2.x - ต้องใช้ macOS 13
ผู้พัฒนา ID ลงนามและสร้างการสร้างที่มีอยู่ใน Homebrew สิ่งเหล่านี้ไม่จำเป็นต้องติดตั้ง Xcode เพื่อใช้งาน
brew install --cask xcodesXcodes.app ที่คลายซิปแอปไปยังไดเรกทอรี /Applications ของคุณ Xcodes.app และ CLI ได้รับการปรับปรุงดูแลรักษาด้วยผู้มีส่วนร่วมเช่นตัวคุณเอง แม้แต่ไลบรารีโอเพ่นซอร์สและเครื่องมือก็มีค่าใช้จ่าย หากคุณต้องการสนับสนุน Xcodes หรือบริจาคให้กับการพัฒนาและบำรุงรักษาเครื่องมือมันจะได้รับการชื่นชมอย่างมาก ไม่มีข้อผูกมัดอย่างแน่นอน!
คุณจะต้องมี MacOS 13.5 Ventura และ Xcode 15 เพื่อสร้างและเรียกใช้ Xcodes.app
Unxip และ aria2 จะต้องรวบรวมเป็นไบนารีสากล
 # compile for Intel
 swiftc -parse-as-library -O -target x86_64-apple-macos11 unxip.swift
# compile for M1
 swiftc -parse-as-library -O -target arm64-apple-macos11 unxip.swift

# combine for universal binary
 lipo -create -output unxip unxip_intel unxip_m1
# check it
 lipo -archs unxip
การตัดสินใจออกแบบที่โดดเด่นจะถูกบันทึกไว้ในการตัดสินใจ โฟลว์การรับรองความถูกต้องของ Apple อธิบายไว้ใน Apple.PAW ซึ่งจะช่วยให้คุณเล่นกับจุดสิ้นสุด API ที่เกี่ยวข้องกับการใช้แอพ PAW
xcode-install และ Fastlane/Spaceship ทั้งคู่สมควรได้รับเครดิตสำหรับการหาส่วนที่ยากของสิ่งที่ทำให้สิ่งนี้เป็นไปได้
ทำตามขั้นตอนด้านล่างเพื่อสร้างและปล่อย Xcodes.app เวอร์ชันใหม่ สำหรับขั้นตอนใด ๆ ของ GIT คุณสามารถใช้เครื่องมือที่คุณต้องการได้ แต่โปรดลงชื่อเข้าใช้แท็ก
 # Update the version number in Xcode and commit the change, if necessary

# Question: Did anything in XPCHelper change?
# - com.xcodesorg.xcodesapp.Helper folder and HelperXPCShared
# - if so, bump the version number in com.xcodesorg.xcodesapp.Helper target.
# Note: you do not have to bump the version number if nothing has changed.
# Note2: If you do bump the version, the end user, must re-install the XPCHelper and give permission again.

# Increment the build number
scripts/increment_build_number.sh

# Commit the change
git add Xcodes/Resources/Info.plist
git commit -asm " Increment build number "

# Tag the latest commit
# Replace $VERSION and $BUILD below with the latest real values
git tag -asm " v $VERSIONb$BUILD " " v $VERSIONb$BUILD "

# Push to origin
git push --follow-tags

# Build the app
# Make sure you have the Xcode Selected you want to build with
scripts/package_release.sh

# Notarize the app
# Do this from the Product directory so the app is zipped without being nested inside Product
# Create a app specific password on appleid.apple.com if you haven't already
# xcrun notarytool store-credentials "AC_PASSWORD"
#              --apple-id "[email protected]"
#              --team-id "teamid"
#               --password "app specific password"

pushd Product
../scripts/notarize.sh Xcodes.zip < MYORG >

# Sign the .zip for Sparkle, note the signature in the output for later
# If you're warned about the signing key not being found, see the Xcodes 1Password vault for the key and installation instructions.
../scripts/sign_update Xcodes.zip
popd

# Go to https://github.com/XcodesOrg/XcodesApp/releases
# If there are uncategorized PRs, add the appropriate label and run the Release Drafter action manually
# Edit the latest draft release
# Set its tag to the tag you just pushed
# Set its title to a string with the format "$VERSION ($BUILD)"
# Polish the draft release notes, if necessary
# Add the signature to the bottom of the release notes in a comment, like:
< ! -- sparkle:edSignature= $SIGNATURE -- >
# Attach the zip that was created in the Product directory to the release
# Publish the release

shasum -a 256 xcodes.zip
# Update the [Homebrew Cask](https://github.com/XcodesOrg/homebrew-cask/blob/master/Casks/x/xcodes.rb). Matt Kiazyk - Twitter
Twitter | GitHub | Mastadon


