nexa sdk
v0.0.9.7
기기 모델 허브 | 문서 | 불화 | 블로그 | X (트위터)
NEXA SDK 는 ONNX 및 GGML 모델을위한 로컬 오피스의 추론 프레임 워크로 텍스트 생성, 이미지 생성, VLM (Vision-Language Models), 오디오 언어 모델, ASR (Speech-to-Text) 및 텍스트 음주 (TTS) 기능을 지원합니다. Python 패키지 또는 실행 파일 설치 프로그램을 통해 설치할 수 있습니다.
nexa run omniVLM 및 오디오 언어 모델 (2.9B 매개 변수) : nexa run omniaudionexa run qwen2audio , 우리는 GGML 텐서 라이브러리로 오디오 언어 모델을 지원하는 최초의 오픈 소스 툴킷입니다.nexa embed <model_path> <prompt>nexa run -ms <ms_model_id> -mt COMPUTER_VISION 및 nexa run -hf <hf_model_id> -mt COMPUTER_VISION Huggingfnexa run -hf <hf_model_id> -mt NLP nexa run -ms <ms_model_id> -mt NLP문제를 통해 요청을 제출하는 데 오신 것을 환영합니다. 우리는 매주 배송됩니다.
 MACOS 설치 프로그램
 Windows 설치 프로그램
 Linux 설치 프로그램
curl -fsSL https://public-storage.nexa4ai.com/install.sh | sh 대신 nexa-exe 사용해보십시오.
nexa-exe < command > 인덱스 페이지에서 편리한 설치를 위해 다양한 Python 버전, 플랫폼 및 백엔드 용 미리 제작 된 휠을 출시했습니다.
pip install nexaai --prefer-binary --index-url https://github.nexa.ai/whl/cpu --extra-index-url https://pypi.org/simple --no-cache-dirGPU 버전 지원 금속 (MACOS) 의 경우 :
CMAKE_ARGS= " -DGGML_METAL=ON -DSD_METAL=ON " pip install nexaai --prefer-binary --index-url https://github.nexa.ai/whl/metal --extra-index-url https://pypi.org/simple --no-cache-dir다음 명령을 시도하십시오.
wget https://github.com/conda-forge/miniforge/releases/latest/download/Miniforge3-MacOSX-arm64.sh
bash Miniforge3-MacOSX-arm64.sh
conda create -n nexasdk python=3.10
conda activate nexasdk
CMAKE_ARGS= " -DGGML_METAL=ON -DSD_METAL=ON " pip install nexaai --prefer-binary --index-url https://github.nexa.ai/whl/metal --extra-index-url https://pypi.org/simple --no-cache-dirCUDA 지원으로 설치하려면 CUDA 툴킷이 12.0 이상 설치되어 있는지 확인하십시오.
Linux 용 :
CMAKE_ARGS= " -DGGML_CUDA=ON -DSD_CUBLAS=ON " pip install nexaai --prefer-binary --index-url https://github.nexa.ai/whl/cu124 --extra-index-url https://pypi.org/simple --no-cache-dirWindows PowerShell 의 경우 :
$env :CMAKE_ARGS= " -DGGML_CUDA=ON -DSD_CUBLAS=ON " ; pip install nexaai --prefer-binary --index-url https://github.nexa.ai/whl/cu124 --extra-index-url https://pypi.org/simple --no-cache-dirWindows 명령 프롬프트 의 경우 :
set CMAKE_ARGS= " -DGGML_CUDA=ON -DSD_CUBLAS=ON " & pip install nexaai --prefer-binary --index-url https://github.nexa.ai/whl/cu124 --extra-index-url https://pypi.org/simple --no-cache-dirWindows Git Bash 의 경우 :
CMAKE_ARGS= " -DGGML_CUDA=ON -DSD_CUBLAS=ON " pip install nexaai --prefer-binary --index-url https://github.nexa.ai/whl/cu124 --extra-index-url https://pypi.org/simple --no-cache-dir구축 중에 다음 문제가 발생하면 다음과 같습니다.
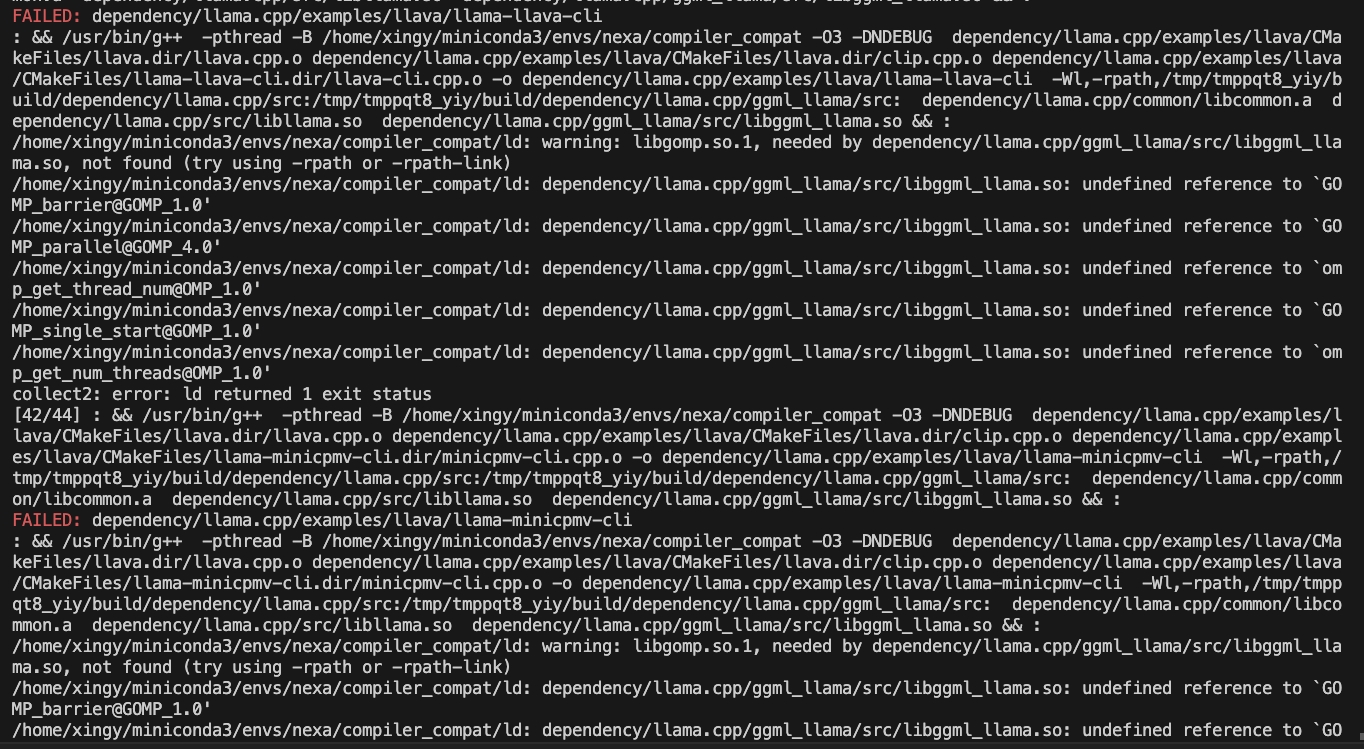
다음 명령을 시도하십시오.
CMAKE_ARGS= " -DCMAKE_CXX_FLAGS=-fopenmp " pip install nexaaiROCM 지원으로 설치하려면 ROCM 6.2.1 이상이 설치되어 있는지 확인하십시오.
Linux 용 :
CMAKE_ARGS= " -DGGML_HIPBLAS=on " pip install nexaai --prefer-binary --index-url https://github.nexa.ai/whl/rocm621 --extra-index-url https://pypi.org/simple --no-cache-dirVulkan 지원으로 설치하려면 Vulkan SDK 1.3.261.1 이상이 설치되어 있는지 확인하십시오.
Windows PowerShell 의 경우 :
$env :CMAKE_ARGS= " -DGGML_VULKAN=on " ; pip install nexaai --prefer-binary --index-url https://github.nexa.ai/whl/vulkan --extra-index-url https://pypi.org/simple --no-cache-dirWindows 명령 프롬프트 의 경우 :
set CMAKE_ARGS= " -DGGML_VULKAN=on " & pip install nexaai --prefer-binary --index-url https://github.nexa.ai/whl/vulkan --extra-index-url https://pypi.org/simple --no-cache-dirWindows Git Bash 의 경우 :
CMAKE_ARGS= " -DGGML_VULKAN=on " pip install nexaai --prefer-binary --index-url https://github.nexa.ai/whl/vulkan --extra-index-url https://pypi.org/simple --no-cache-dir이 저장소를 복제하는 방법
git clone --recursive https://github.com/NexaAI/nexa-sdk 사용하는 것을 잊어 버린 경우 --recursive 아래 명령을 사용하여 하위 모드를 추가 할 수 있습니다.
git submodule update --init --recursive그런 다음 패키지를 빌드하고 설치할 수 있습니다
pip install -e . 아래는 다른 유사한 도구와의 차별화입니다.
| 특징 | Nexa SDK | 올라마 | 최적 | LM 스튜디오 |
|---|---|---|---|---|
| GGML 지원 | ✅ | ✅ | ✅ | |
| Onnx 지원 | ✅ | ✅ | ||
| 텍스트 생성 | ✅ | ✅ | ✅ | ✅ |
| 이미지 생성 | ✅ | |||
| 비전 언어 모델 | ✅ | ✅ | ✅ | ✅ |
| 오디오 언어 모델 | ✅ | |||
| 텍스트 음성 | ✅ | ✅ | ||
| 서버 기능 | ✅ | ✅ | ✅ | ✅ |
| 사용자 인터페이스 | ✅ | ✅ | ||
| 실행 가능한 설치 | ✅ | ✅ | ✅ |
ON-DEVICE 모델 허브는 RAM, 파일 크기, 작업 등을위한 필터가있는 모든 유형의 양자화 된 모델 (텍스트, 이미지, 오디오, 멀티 모달)을 제공하여 UI로 모델을 쉽게 탐색 할 수 있도록 도와줍니다. 오전 기기 모델 허브에서 기기 모델을 탐색하십시오
지원되는 모델 예제 (모델 허브의 전체 목록) :
| 모델 | 유형 | 체재 | 명령 |
|---|---|---|---|
| Omniaudio | 오디 올름 | GGUF | nexa run omniaudio |
| Qwen2audio | 오디 올름 | GGUF | nexa run qwen2audio |
| 낙지 -V2 | 기능 호출 | GGUF | nexa run octopus-v2 |
| Octo-net | 텍스트 | GGUF | nexa run octo-net |
| Omnivlm | 멀티 모달 | GGUF | nexa run omniVLM |
| 나노 라바 | 멀티 모달 | GGUF | nexa run nanollava |
| llava-phi3 | 멀티 모달 | GGUF | nexa run llava-phi3 |
| llava-llama3 | 멀티 모달 | GGUF | nexa run llava-llama3 |
| llava1.6-mistral | 멀티 모달 | GGUF | nexa run llava1.6-mistral |
| llava1.6-Vicuna | 멀티 모달 | GGUF | nexa run llava1.6-vicuna |
| llama3.2 | 텍스트 | GGUF | nexa run llama3.2 |
| llama3-incensored | 텍스트 | GGUF | nexa run llama3-uncensored |
| 젬마 2 | 텍스트 | GGUF | nexa run gemma2 |
| qwen2.5 | 텍스트 | GGUF | nexa run qwen2.5 |
| MathQwen | 텍스트 | GGUF | nexa run mathqwen |
| CodeQwen | 텍스트 | GGUF | nexa run codeqwen |
| 미스트랄 | 텍스트 | GGUF/ONNX | nexa run mistral |
| Deepseek 코더 | 텍스트 | GGUF | nexa run deepseek-coder |
| ph.3.5 | 텍스트 | GGUF | nexa run phi3.5 |
| OpenElm | 텍스트 | GGUF | nexa run openelm |
| 안정된 확산 -V2-1 | 이미지 생성 | GGUF | nexa run sd2-1 |
| 안정적인 분해 -3- 메디움 | 이미지 생성 | GGUF | nexa run sd3 |
| 플럭스 1-Schnell | 이미지 생성 | GGUF | nexa run flux |
| LCM-DREAMSHAPER | 이미지 생성 | GGUF/ONNX | nexa run lcm-dreamshaper |
| Whisper-Large-V3-Turbo | 음성-텍스트 | 큰 상자 | nexa run faster-whisper-large-turbo |
| Whisper-Tiny.en | 음성-텍스트 | onx | nexa run whisper-tiny.en |
| MXBAI- 엠 베드-래지 -V1 | 임베딩 | GGUF | nexa embed mxbai |
| nomic-embed-text-v1.5 | 임베딩 | GGUF | nexa embed nomic |
| 모든 미닐름 L12-V2 | 임베딩 | GGUF | nexa embed all-MiniLM-L12-v2:fp16 |
| 짖는 소리 | 텍스트 음성 | GGUF | nexa run bark-small:fp16 |
NEXA SDK를 사용하여 HF 또는 MS에서 지원되는 텍스트 생성 모델을 당기고 (.gguf)로 변환하고 (.gguf), 양자화 및 실행할 수 있습니다.
nexa run -hf <hf-model-id> 또는 nexa run -ms <ms-model-id> 사용하여 제공된 .gguf 파일과 함께 모델을 실행하십시오.
nexa run -hf Qwen/Qwen2.5-Coder-7B-Instruct-GGUFnexa run -ms Qwen/Qwen2.5-Coder-7B-Instruct-GGUF참고 : 단일 .gguf 파일을 선택하라는 메시지가 표시됩니다. 원하는 양자화 버전에 여러 분할 파일 (FP16-00001-of-00004)이있는 경우 NEXA의 변환 도구 (아래 참조)를 사용하여 모델을 로컬로 변환하고 정량화하십시오.
Nexa Python 패키지를 설치하고 pip install "nexaai[convert]" 사용하여 Nexa 변환 도구를 설치 한 다음 nexa convert <hf-model-id> : HuggingFace에서 모델을 변환하십시오.
nexa convert HuggingFaceTB/SmolLM2-135M-Instruct 또는 nexa convert -ms <ms-model-id> 로 ModelsCope에서 모델을 변환 할 수 있습니다.
nexa convert -ms Qwen/Qwen2.5-7B-Instruct참고 : 주류 언어 모델의 다양한 양자화 된 버전의 성능 벤치 마크와 양자화 옵션에 대해 알아 보려면 리더 보드를 확인하십시오.
? nexa list 으로 다운로드 및 변환 된 모델을 볼 수 있습니다.
메모
pip install nexaai pip install "nexaai[onnx]" 교체하십시오.pip install nexaai pip install "nexaai[eval]" 로 교체하십시오.pip install nexaai pip install "nexaai[convert]" 로 바꾸십시오.--extra-index-url https://pypi.org/simple --extra-index-url https://pypi.tuna.tsinghua.edu.cn/simple insimple insimple insimple insimple insimple insimple insimple insimple insimple insimple insimple insimple insimple insimple insimple In Insimple In Insimple In Insimple In Insimple In Insimple In Insimple In Insimple In Insimple In Insimple In Insimple In Insimple을 대체하는 것이 좋습니다.다음은 주요 CLI 명령에 대한 간단한 개요입니다.
nexa run : GGUF 모델을 사용하여 다양한 작업에 대한 추론을 실행합니다.nexa onnx : ONNX 모델을 사용하여 다양한 작업에 대한 추론을 실행합니다.nexa convert : GGUF 모델로 포옹 페이스 모델을 변환 및 양자화합니다.nexa server : NEXA AI 텍스트 생성 서비스를 실행하십시오.nexa eval : NEXA AI 평가 작업을 실행하십시오.nexa pull : 공식 또는 허브에서 모델을 당기십시오.nexa remove : 로컬 컴퓨터에서 모델을 제거하십시오.nexa clean : 모든 모델 파일을 정리하십시오.nexa list : 로컬 컴퓨터에 모든 모델을 나열하십시오.nexa login : NEXA API에 로그인합니다.nexa whoami : 현재 사용자 정보를 보여줍니다.nexa logout : NEXA API의 로그 아웃.CLI 명령 및 사용에 대한 자세한 정보는 CLI 참조 문서를 참조하십시오.
로컬 컴퓨터에서 모델을 사용하여 로컬 서버를 시작하려면 nexa server 명령을 사용할 수 있습니다. 서버 설정, API 엔드 포인트 및 사용 예제에 대한 자세한 정보는 서버 참조 문서를 참조하십시오.
Swift SDK : Swift 개발자가 프로젝트에서 LLAMA.CPP 모델을 쉽게 통합하고 사용할 수 있도록 Swifty API를 제공합니다.
더 많은 문서
다음 프로젝트에 감사드립니다.


