SHARK Studio
nod.ai SHARK 20240531.1300
고성능 머신 러닝 분포
우리는 현재 터빈을 이용하기 위해 상어를 재건하고 있습니다. 그것이 완전해질 때까지 .exe 릴리스 또는 SHARK-1.0 지점의 체크 아웃을 사용하여 작업 상어를 사용하십시오.
다른 사용자는 여기에서 최신 공급 업체 드라이버 및 vulkan SDK가 있는지 확인하고 Vulkan Check vulkaninfo 터미널 창에서 작동하는지 확인하십시오.
위의 (전제 조건) [https://github.com/nod-ai/shark-studio#install-your-hardware-drivers]에서 드라이버를 설치하십시오
안정적인 릴리스 또는 가장 최근의 Shark 1.0 프리 릴리스를 다운로드하십시오.
.exe를 두 번 클릭하거나 명령 줄에서 실행되면 (권장) 브라우저에 UI가 있어야합니다.
사용자 정의 모델이있는 경우 .Exe가있는 models/ 디렉토리에 넣습니다.
즐기다.
cd )를 .exe 폴더로 변경하십시오. 그런 다음 명령 프롬프트에서 exe를 실행하십시오. 이렇게하면 오류가 발생하면 도움을 요청할 수 있도록 자르고 페이스를 줄 수 있습니다. (항상 오류없이 당신을 위해 작동하는 경우 EXE를 두 번 클릭 할 수 있습니다).--ui=web 명령 인수를 사용하십시오. git clone https://github.com/nod-ai/SHARK.git
cd SHARK 현재 상어는 main 지점에서 터빈으로 재건되고 있습니다. 지금은 재건축 노력을 수행하지 않는 한 main 사용을 강력히 권장하지 않으며 코드가 이미지 생성을위한 작업 응용 프로그램을 생성 할 것으로 기대해서는 안됩니다. 따라서 지금은 SHARK-1.0 지점으로 전환하고 안정적인 코드를 사용해야합니다.
git checkout SHARK-1.0다음 설정 지침은 귀하 가이 지점에 있다고 가정합니다.
set-executionpolicy remotesigned. / setup_venv.ps1 # You can re-run this script to get the latest version./setup_venv.sh
source shark1.venv/bin/activate(shark1.venv) PS C:gshark > cd .appsstable_diffusionweb
(shark1.venv) PS C:gsharkappsstable_diffusionweb > python .index.py(shark1.venv) > cd apps/stable_diffusion/web
(shark1.venv) > python index.py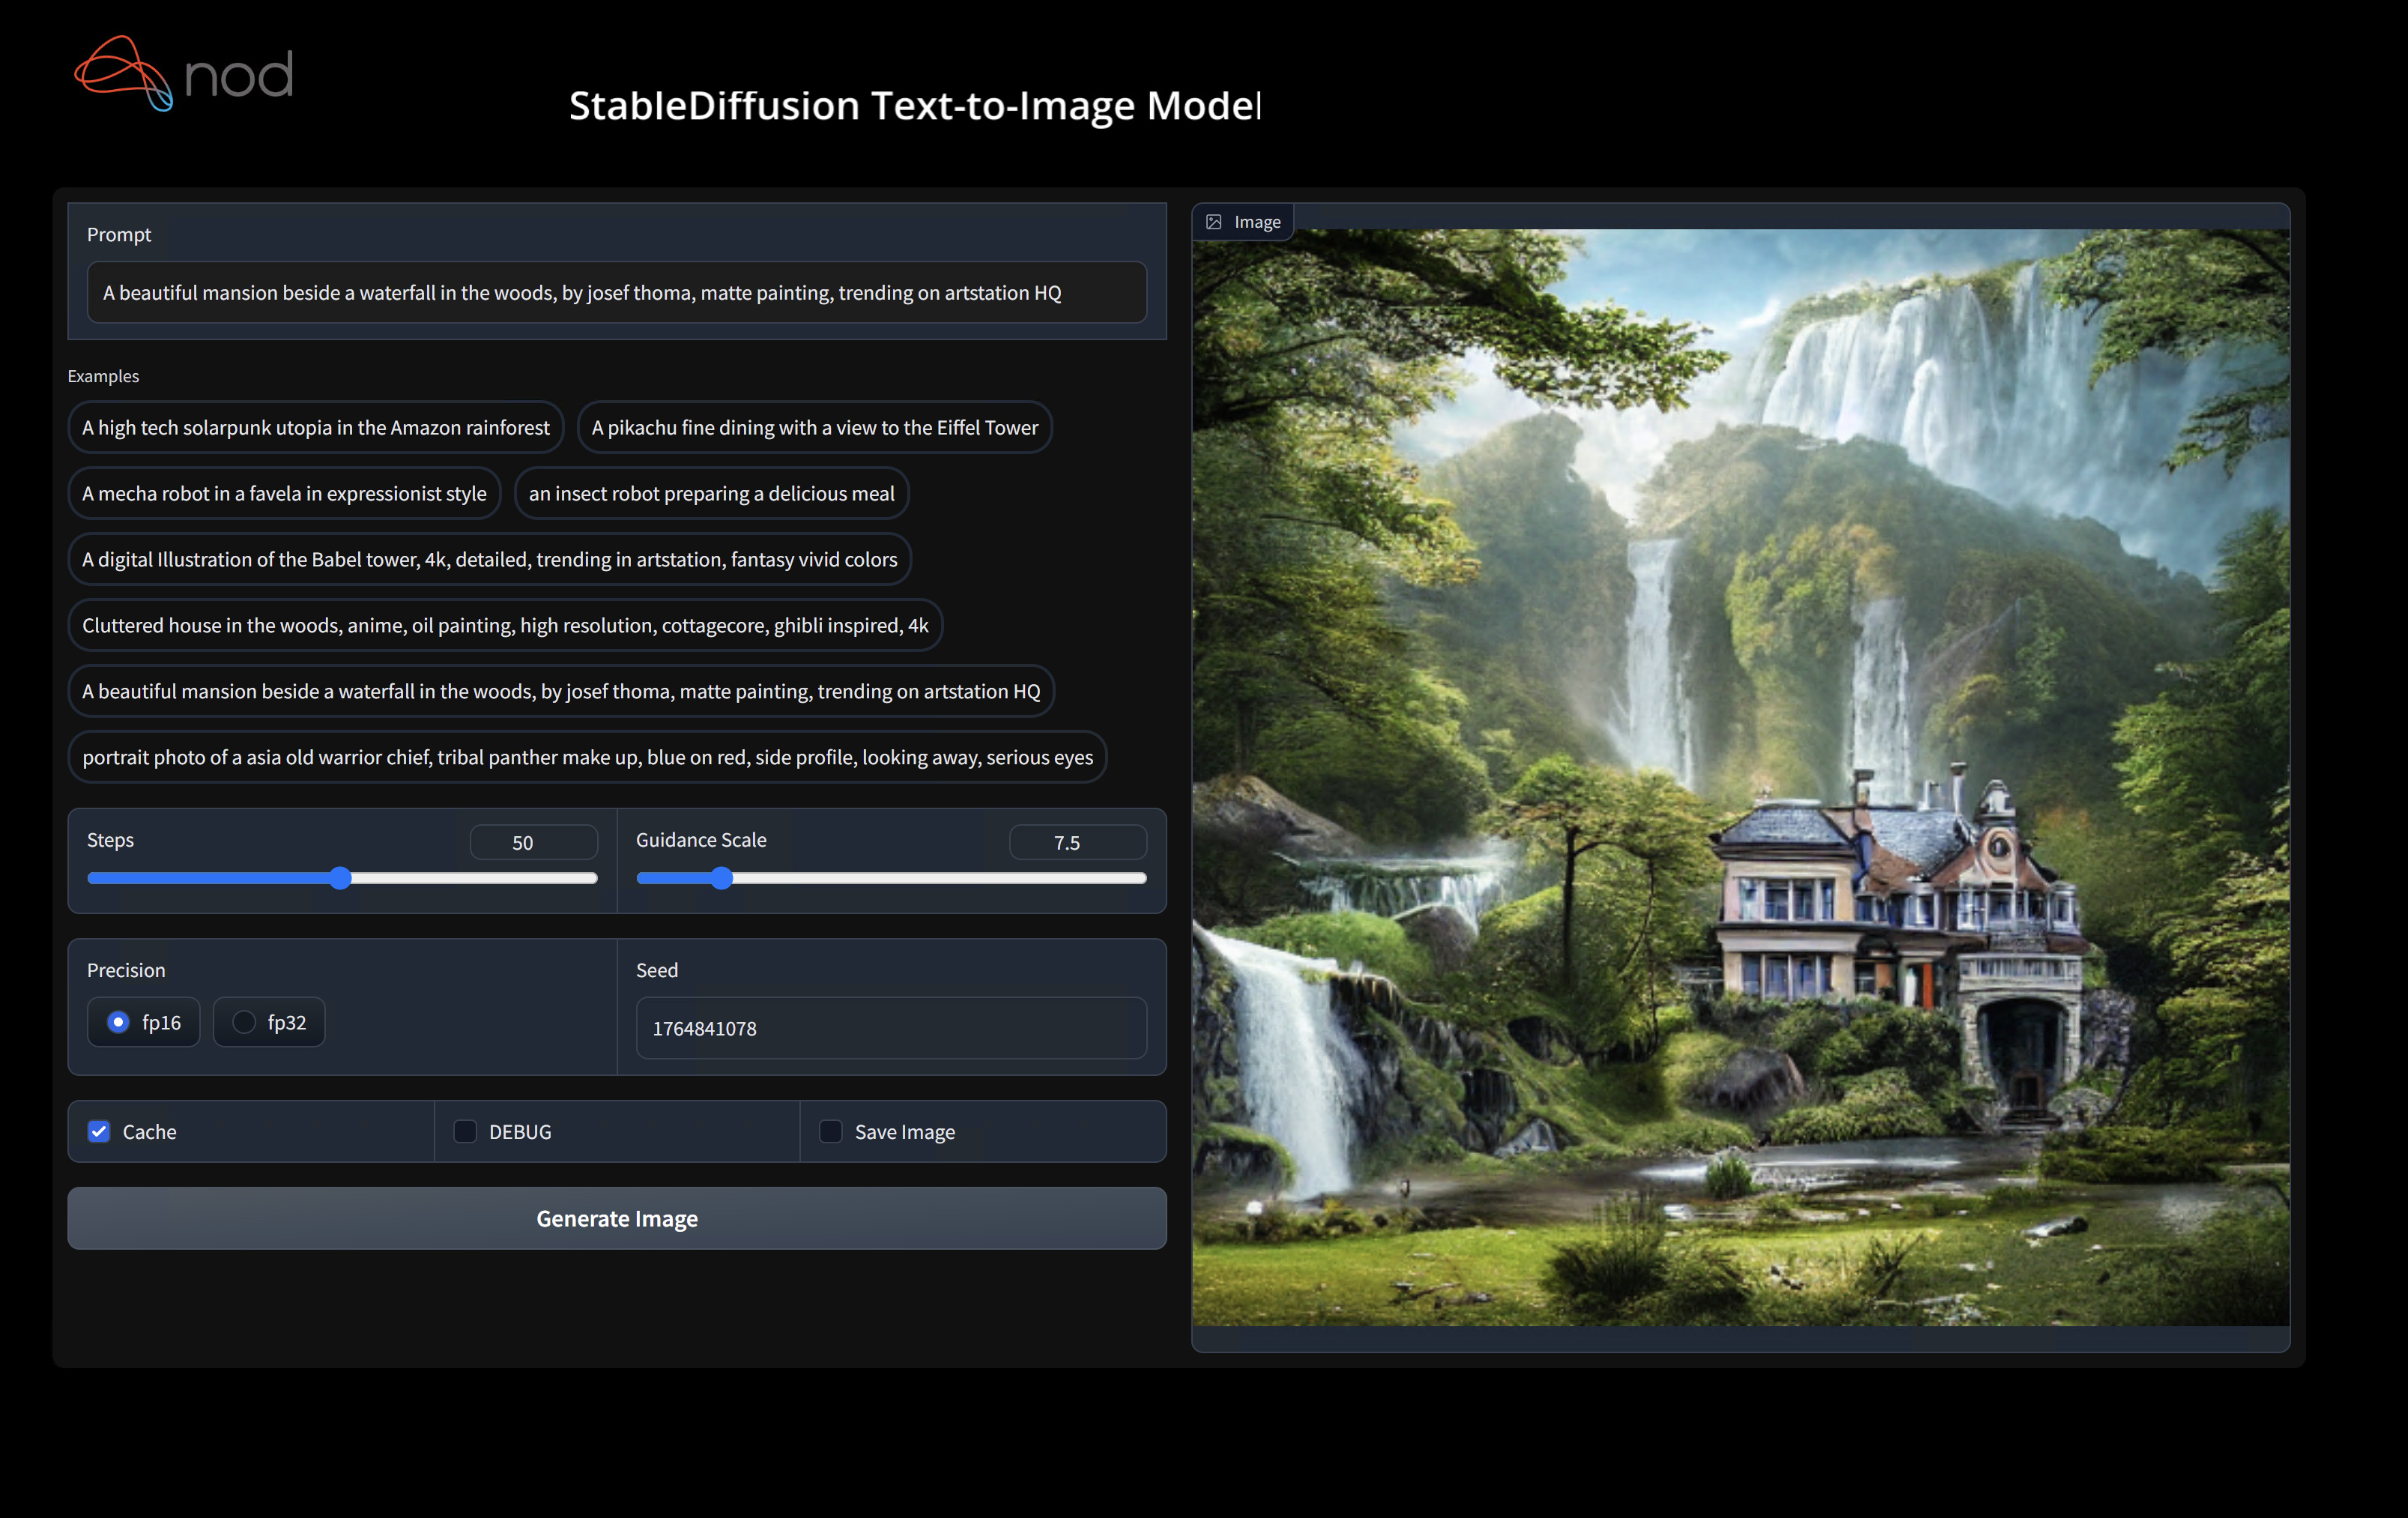
(shark1.venv) PS C:gshark > python .appsstable_diffusionscriptsmain.py -- app = " txt2img " -- precision = " fp16 " -- prompt = " tajmahal, snow, sunflowers, oil on canvas " -- device = " vulkan " python3.11 apps/stable_diffusion/scripts/main.py --app=txt2img --precision=fp16 --device=vulkan --prompt= " tajmahal, oil on canvas, sunflowers, 4k, uhd " vulkan cpu 로 교체하여 CPU에서 실행하거나 cuda 와 함께 CUDA 장치에서 실행할 수 있습니다. 여러 개의 vulkan 장치가있는 경우 --device=vulkan://1 등으로 그들을 해결할 수 있습니다.
AMD 7900XTX의 출력은 다음과 같습니다.
Average step time: 47.19188690185547ms/it
Clip Inference time (ms) = 109.531
VAE Inference time (ms): 78.590

Total image generation time: 2.5788655281066895sec
생성 된 몇 가지 샘플은 다음과 같습니다.

하드웨어에서 실행하는 데 문제가있는 경우 Shark Discord Server에서 우리를 찾으십시오.
이 단계는 Python 용 새로운 VirtualEnV를 설정합니다
python --version # Check you have 3.11 on Linux, macOS or Windows Powershell
python -m venv shark_venv
source shark_venv/bin/activate   # Use shark_venv/Scripts/activate on Windows

# If you are using conda create and activate a new conda env

# Some older pip installs may not be able to handle the recent PyTorch deps
python -m pip install --upgrade pip
MacOS Metal 사용자는 https://sdk.lunarg.com/sdk/download/latest/mac/vulkan-sdk.dmg를 설치하고 "시스템 넓은 설치"를 활성화하십시오.
이 단계 PIP는 Linux Python 3.8, 3.10 및 3.11 및 MacOS / Windows Python 3.11에 상어 및 관련 패키지를 설치합니다.
pip install nodai-shark -f https://nod-ai.github.io/SHARK/package-index/ -f https://llvm.github.io/torch-mlir/package-index/ -f https://nod-ai.github.io/SRT/pip-release-links.html --extra-index-url https://download.pytorch.org/whl/nightly/cpupytest tank/test_models.pyPytest Suite 및 CLI의보다 자세한 연습은 Tank/Readme.md를 참조하십시오.
curl -O https://raw.githubusercontent.com/nod-ai/SHARK/main/shark/examples/shark_inference/resnet50_script.py
# Install deps for test script
pip install --pre torch torchvision torchaudio tqdm pillow gsutil --extra-index-url https://download.pytorch.org/whl/nightly/cpu
python ./resnet50_script.py --device= " cpu " # use cuda or vulkan or metalcurl -O https://raw.githubusercontent.com/nod-ai/SHARK/main/shark/examples/shark_inference/minilm_jit.py
# Install deps for test script
pip install transformers torch --extra-index-url https://download.pytorch.org/whl/nightly/cpu
python ./minilm_jit.py --device= " cpu " # use cuda or vulkan or metal Python3.11을 사용하고 TF 가져 오기 도구를 사용하려면 다음과 같은 환경 변수를 사용할 수 있습니다. set USE_IREE=1 사용하여 업스트림 iRee를 사용하십시오.
# PYTHON=python3.11 VENV_DIR=0617_venv IMPORTER=1 ./setup_venv.sh
python -m  shark.examples.shark_inference.resnet50_script --device= " cpu " # Use gpu | vulkan
# Or a pytest
pytest tank/test_models.py -k " MiniLM " 토치 -mlir 개발자 또는 Iree 개발자 이고 로컬 변경 사항을 테스트하려면 pip uninstall torch-mlir 및 / 또는 pip uninstall iree-compiler iree-runtime 제거하고 Python 바인딩으로 로컬로 구축하고 여기에서 Iree 및 Torch-Mlir의 PythonPath를 설정하여 제공된 패키지를 제거 할 수 있습니다.
상어와 함께 현지에서 제작 된 토치 -mlir를 사용하는 방법 :
1.) Run ` ./setup_venv.sh in SHARK ` and activate ` shark.venv ` virtual env.
2.) Run ` pip uninstall torch-mlir ` .
3.) Go to your local Torch-MLIR directory.
4.) Activate mlir_venv virtual envirnoment.
5.) Run ` pip uninstall -r requirements.txt ` .
6.) Run ` pip install -r requirements.txt ` .
7.) Build Torch-MLIR.
8.) Activate shark.venv virtual environment from the Torch-MLIR directory.
8.) Run ` export PYTHONPATH= ` pwd ` /build/tools/torch-mlir/python_packages/torch_mlir: ` pwd ` /examples ` in the Torch-MLIR directory.
9.) Go to the SHARK directory.
이제 상어는 현지에서 건물 토치 -mlir repo를 사용할 것입니다.
개별 파견의 벤치 마크를 생성하려면 pytest 명령 줄 인수에 --dispatch_benchmarks=All --dispatch_benchmarks_dir=<output_dir> 추가 할 수 있습니다. 특정 디스패치 만 컴파일하려면 "All" 대신 공간 분리 된 문자열로 지정할 수 있습니다. 예를 들어 --dispatch_benchmarks="0 1 2 10"
예를 들어, Cuda에서 Minilm의 파견 벤치 마크를 생성하고 실행합니다.
pytest -k "MiniLM and torch and static and cuda" --benchmark_dispatches=All -s --dispatch_benchmarks_dir=./my_dispatch_benchmarks
주어진 명령은 <dispatch_benchmarks_dir>/<model_name>/ ordered_dispatches.txt 를 사용하여 디스패치 및 대기 시간을 나열하고 주문하고 .mlir, .vmfb 및 해당 디스패치의 벤치 마크 결과를 포함하는 폴더를 나열하고 주문합니다.
대신 이것을 Python 스크립트에 통합하려면 SharkInference 초기화 할 때 dispatch_benchmarks 및 dispatch_benchmarks_dir 명령을 전달할 수 있으며 컴파일 된 경우 벤치 마크가 생성됩니다. 예 : :
 shark_module = SharkInference(
        mlir_model,
        device=args.device,
        mlir_dialect="tm_tensor",
        dispatch_benchmarks="all",
        dispatch_benchmarks_dir="results"
    )
출력은 다음을 포함합니다.
상어 탱크에서 모델 테스트 및 벤치 마크를 실행하는 방법에 대한 추가 지침은 탱크/readme.md를 참조하십시오.
from shark.shark_importer import SharkImporter

# SharkImporter imports mlir file from the torch, tensorflow or tf-lite module.

mlir_importer = SharkImporter(
    torch_module,
    (input),
    frontend="torch",  #tf, #tf-lite
)
torch_mlir, func_name = mlir_importer.import_mlir(tracing_required=True)

# SharkInference accepts mlir in linalg, mhlo, and tosa dialect.

from shark.shark_inference import SharkInference
shark_module = SharkInference(torch_mlir, device="cpu", mlir_dialect="linalg")
shark_module.compile()
result = shark_module.forward((input))
 from shark.shark_inference import SharkInference
import numpy as np

mhlo_ir = r"""builtin.module  {
      func.func @forward(%arg0: tensor<1x4xf32>, %arg1: tensor<4x1xf32>) -> tensor<4x4xf32> {
        %0 = chlo.broadcast_add %arg0, %arg1 : (tensor<1x4xf32>, tensor<4x1xf32>) -> tensor<4x4xf32>
        %1 = "mhlo.abs"(%0) : (tensor<4x4xf32>) -> tensor<4x4xf32>
        return %1 : tensor<4x4xf32>
      }
}"""

arg0 = np.ones((1, 4)).astype(np.float32)
arg1 = np.ones((4, 1)).astype(np.float32)
shark_module = SharkInference(mhlo_ir, device="cpu", mlir_dialect="mhlo")
shark_module.compile()
result = shark_module.forward((arg0, arg1))
상어는 ML 모델의 최신 혁신을 지원하기 위해 유지 관리됩니다.
| TF Huggingface 모델 | 상어 CPU | 상어 쿠다 | 상어 금속 |
|---|---|---|---|
| 버트 | |||
| Distilbert | |||
| GPT2 | |||
| 꽃 | |||
| 안정적인 확산 | |||
| 비전 변압기 | |||
| RESNET50 |
상어에서 지원되는 모델의 전체 목록은 Tank/Readme.md를 참조하십시오.
#torch-mlir 채널 - 이것은 가장 활발한 커뮤니케이션 채널입니다.torch-mlir 섹션NoD.ai Shark는 LLVM 예외가있는 Apache 2.0 라이센스의 조건에 따라 라이센스가 부여됩니다. 자세한 내용은 라이센스를 참조하십시오.


