SHARK Studio
nod.ai SHARK 20240531.1300
高性能機械学習分布
現在、タービンを利用するためにサメを再構築しています。それが完了するまで、作業サメのために、 SHARK-1.0ブランチの.exeリリースまたはチェックアウトを使用してください
他のユーザーは、ここから最新のベンダードライバーとVulkan SDKがあることvulkaninfo確認してください。
(前提条件)[https://github.com/nod-ai/shark-studio#install-your-hardware-drivers]からドライバーをインストールします
安定したリリースまたは最新のShark 1.0 Pre-Releaseをダウンロードします。
.exeをダブルクリックするか、コマンドライン(推奨)から実行すると、ブラウザにUIが必要です。
カスタムモデルがある場合は、.exeがあるmodels/ディレクトリにそれらを配置します。
楽しむ。
cd )を.exeフォルダーに変更します。次に、コマンドプロンプトからexeを実行します。そうすれば、エラーが発生した場合、それをカットアンドペーストして助けを求めることができます。 (それが常にエラーなしであなたのために動作する場合、あなたは単にexeをダブルクリックすることができます)--ui=webコマンド引数を使用します。 git clone https://github.com/nod-ai/SHARK.git
cd SHARK現在、サメはmainブランチのタービンのために再建されています。今のところ、再構築の取り組みに取り組んでいる場合を除き、 mainを使用することを強く落胆させ、そこにコードが画像生成のための作業アプリケーションを作成することを期待すべきではないので、今のところはSHARK-1.0ブランチに切り替えて安定したコードを使用する必要があります。
git checkout SHARK-1.0次のセットアップ手順では、このブランチにいると想定しています。
set-executionpolicy remotesigned. / setup_venv.ps1 # You can re-run this script to get the latest version./setup_venv.sh
source shark1.venv/bin/activate(shark1.venv) PS C:gshark > cd .appsstable_diffusionweb
(shark1.venv) PS C:gsharkappsstable_diffusionweb > python .index.py(shark1.venv) > cd apps/stable_diffusion/web
(shark1.venv) > python index.py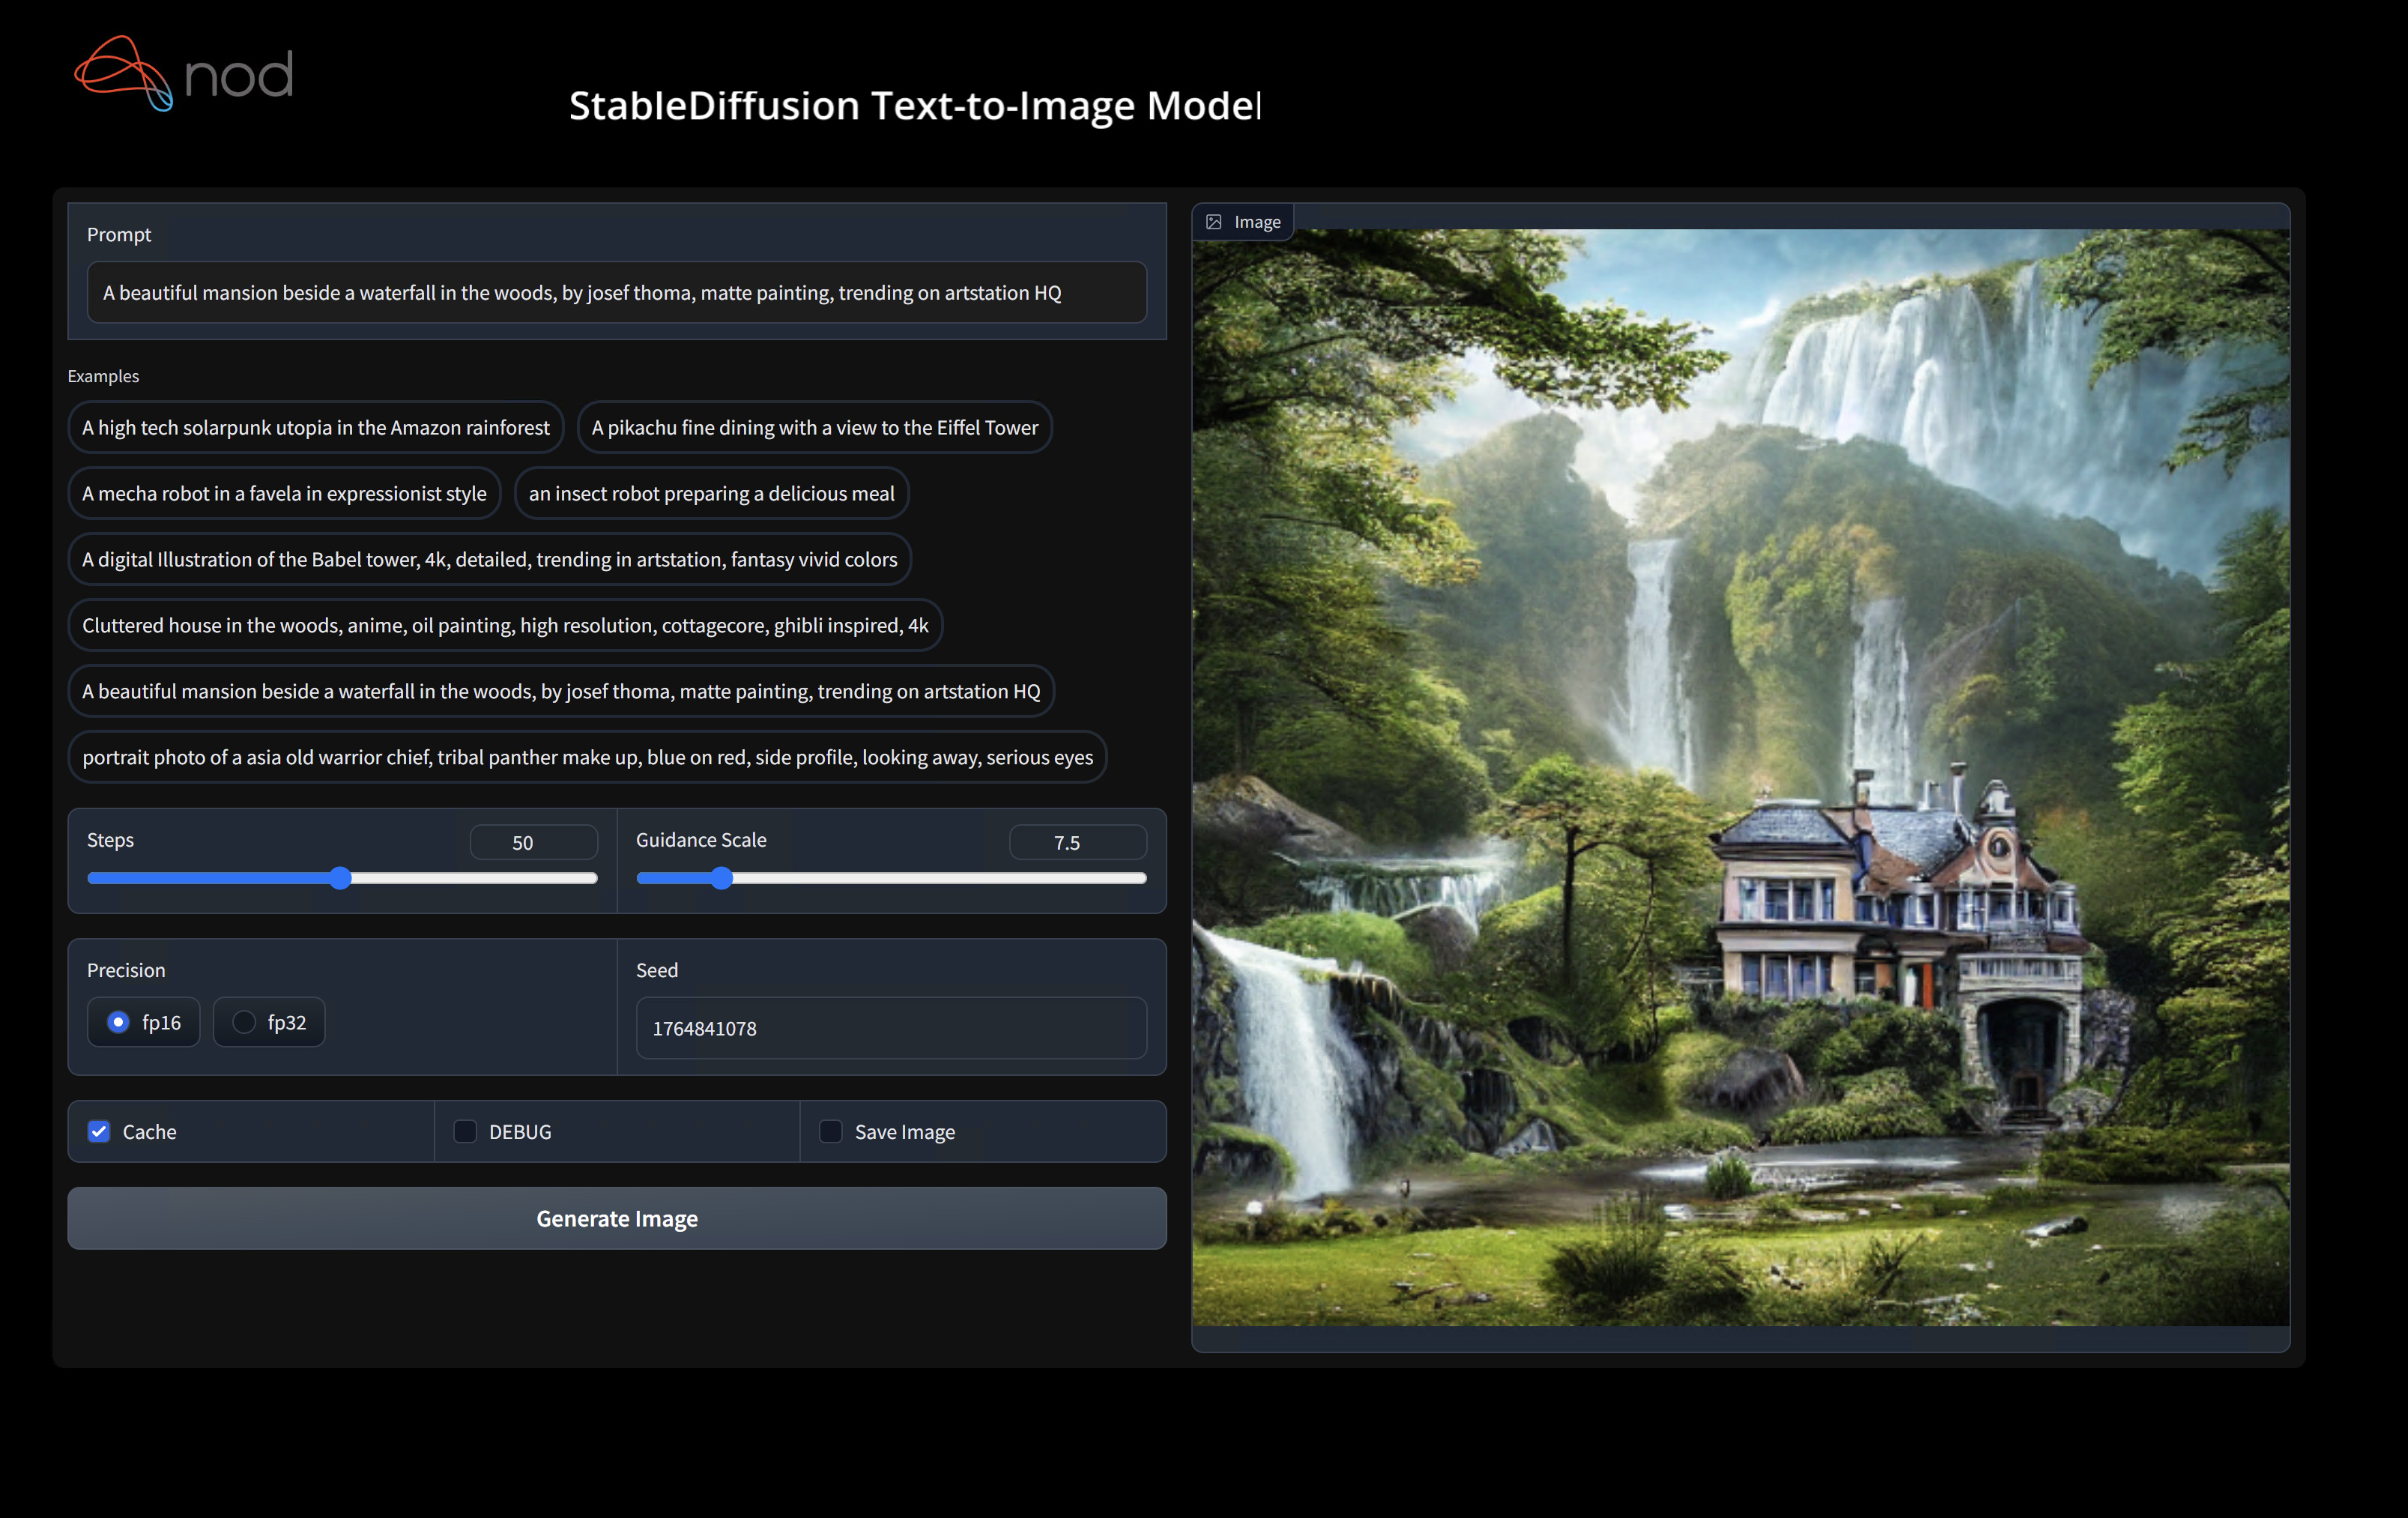
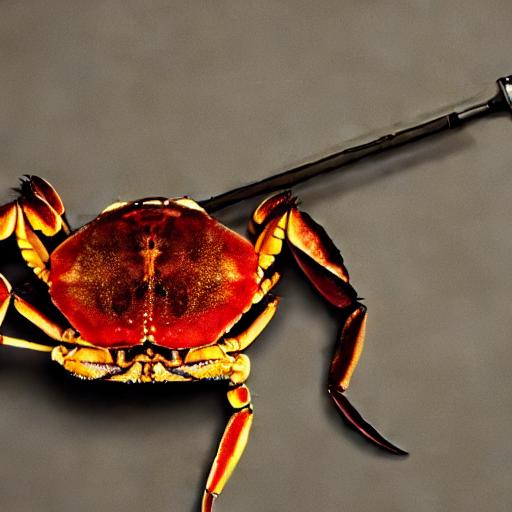
(shark1.venv) PS C:gshark > python .appsstable_diffusionscriptsmain.py -- app = " txt2img " -- precision = " fp16 " -- prompt = " tajmahal, snow, sunflowers, oil on canvas " -- device = " vulkan " python3.11 apps/stable_diffusion/scripts/main.py --app=txt2img --precision=fp16 --device=vulkan --prompt= " tajmahal, oil on canvas, sunflowers, 4k, uhd " vulkan cpuに置き換えて、CPUで実行するか、 cudaを使用してCUDAデバイスで実行できます。複数のVulkanデバイスがある場合は--device=vulkan://1 etcでそれらに対処できます
AMD 7900xtxの出力は次のようになります。
Average step time: 47.19188690185547ms/it
Clip Inference time (ms) = 109.531
VAE Inference time (ms): 78.590

Total image generation time: 2.5788655281066895sec
生成されたサンプルは次のとおりです。

ハードウェアで実行するのに問題がある場合は、Shark Discordサーバーで私たちを見つけてください。
このステップは、Python用の新しいVirtualenvをセットアップします
python --version # Check you have 3.11 on Linux, macOS or Windows Powershell
python -m venv shark_venv
source shark_venv/bin/activate   # Use shark_venv/Scripts/activate on Windows

# If you are using conda create and activate a new conda env

# Some older pip installs may not be able to handle the recent PyTorch deps
python -m pip install --upgrade pipmacosメタルユーザーhttps://sdk.lunarg.com/sdk/download/latest/mac/vulkan-sdk.dmgをインストールし、「システムワイドインストール」を有効にしてください
このステップピップは、Linux Python 3.8、3.10、3.11、およびMacOS / Windows Python 3.11にサメと関連するパッケージをインストールします
pip install nodai-shark -f https://nod-ai.github.io/SHARK/package-index/ -f https://llvm.github.io/torch-mlir/package-index/ -f https://nod-ai.github.io/SRT/pip-release-links.html --extra-index-url https://download.pytorch.org/whl/nightly/cpupytest tank/test_models.pyPytest SuiteとCLIのより詳細なウォークスルーについては、tank/readme.mdを参照してください。
curl -O https://raw.githubusercontent.com/nod-ai/SHARK/main/shark/examples/shark_inference/resnet50_script.py
# Install deps for test script
pip install --pre torch torchvision torchaudio tqdm pillow gsutil --extra-index-url https://download.pytorch.org/whl/nightly/cpu
python ./resnet50_script.py --device= " cpu " # use cuda or vulkan or metalcurl -O https://raw.githubusercontent.com/nod-ai/SHARK/main/shark/examples/shark_inference/minilm_jit.py
# Install deps for test script
pip install transformers torch --extra-index-url https://download.pytorch.org/whl/nightly/cpu
python ./minilm_jit.py --device= " cpu " # use cuda or vulkan or metalPython3.11を使用してTFインポートツールを使用する場合は、次のような環境変数を使用できますUSE_IREE=1上流IREEを使用する
# PYTHON=python3.11 VENV_DIR=0617_venv IMPORTER=1 ./setup_venv.sh
python -m  shark.examples.shark_inference.resnet50_script --device= " cpu " # Use gpu | vulkan
# Or a pytest
pytest tank/test_models.py -k " MiniLM "トーチMLIR開発者またはIREE開発者であり、ローカルの変更をテストしたい場合はpip uninstall torch-mlirをアンインストールし、Python pip uninstall iree-compiler iree-runtime Pythonのバインディングでローカルに構築し、こことTorch-Mlirのためにここに言及したようにPythonPathを設定できます。
地元で構築されたトーチ-Mlirをサメで使用する方法:
1.) Run ` ./setup_venv.sh in SHARK ` and activate ` shark.venv ` virtual env.
2.) Run ` pip uninstall torch-mlir ` .
3.) Go to your local Torch-MLIR directory.
4.) Activate mlir_venv virtual envirnoment.
5.) Run ` pip uninstall -r requirements.txt ` .
6.) Run ` pip install -r requirements.txt ` .
7.) Build Torch-MLIR.
8.) Activate shark.venv virtual environment from the Torch-MLIR directory.
8.) Run ` export PYTHONPATH= ` pwd ` /build/tools/torch-mlir/python_packages/torch_mlir: ` pwd ` /examples ` in the Torch-MLIR directory.
9.) Go to the SHARK directory.
これで、サメはローカルに構築されたトーチ-MLIRリポジトリを使用します。
個々のディスパッチのベンチマークを作成するには、 --dispatch_benchmarks=All --dispatch_benchmarks_dir=<output_dir> pytestコマンドライン引数に追加できます。特定のディスパッチのみをコンパイルする場合は、 "All"ではなくスペース分離文字列で指定できます。例--dispatch_benchmarks="0 1 2 10"
たとえば、CUDAでミニルム用のディスパッチベンチマークを生成して実行するには:
pytest -k "MiniLM and torch and static and cuda" --benchmark_dispatches=All -s --dispatch_benchmarks_dir=./my_dispatch_benchmarks
指定されたコマンドは、ディスパッチとそのレイテンシーを一覧表示および注文するordered_dispatches.txtを、 <dispatch_benchmarks_dir>/<model_name>/に設定します。
代わりにこれをPythonスクリプトに組み込む場合は、 SharkInferenceを初期化するときにdispatch_benchmarksとdispatch_benchmarks_dirコマンドを渡すことができ、コンパイル時にベンチマークが生成されます。例えば:
 shark_module = SharkInference(
        mlir_model,
        device=args.device,
        mlir_dialect="tm_tensor",
        dispatch_benchmarks="all",
        dispatch_benchmarks_dir="results"
    )
出力には以下が含まれます。
サメのタンクからモデルテストとベンチマークを実行する方法についての詳細については、Tank/Readme.mdを参照してください。
from shark.shark_importer import SharkImporter

# SharkImporter imports mlir file from the torch, tensorflow or tf-lite module.

mlir_importer = SharkImporter(
    torch_module,
    (input),
    frontend="torch",  #tf, #tf-lite
)
torch_mlir, func_name = mlir_importer.import_mlir(tracing_required=True)

# SharkInference accepts mlir in linalg, mhlo, and tosa dialect.

from shark.shark_inference import SharkInference
shark_module = SharkInference(torch_mlir, device="cpu", mlir_dialect="linalg")
shark_module.compile()
result = shark_module.forward((input))
 from shark.shark_inference import SharkInference
import numpy as np

mhlo_ir = r"""builtin.module  {
      func.func @forward(%arg0: tensor<1x4xf32>, %arg1: tensor<4x1xf32>) -> tensor<4x4xf32> {
        %0 = chlo.broadcast_add %arg0, %arg1 : (tensor<1x4xf32>, tensor<4x1xf32>) -> tensor<4x4xf32>
        %1 = "mhlo.abs"(%0) : (tensor<4x4xf32>) -> tensor<4x4xf32>
        return %1 : tensor<4x4xf32>
      }
}"""

arg0 = np.ones((1, 4)).astype(np.float32)
arg1 = np.ones((4, 1)).astype(np.float32)
shark_module = SharkInference(mhlo_ir, device="cpu", mlir_dialect="mhlo")
shark_module.compile()
result = shark_module.forward((arg0, arg1))
Sharkは、MLモデルの最新のイノベーションをサポートするために維持されています。
| TF Huggingfaceモデル | Shark-CPU | サメ型 | サメ - メタル |
|---|---|---|---|
| バート | |||
| Distilbert | |||
| GPT2 | |||
| 咲く | |||
| 安定した拡散 | |||
| ビジョントランス | |||
| Resnet50 |
サメでサポートされているモデルの完全なリストについては、Tank/readme.mdを参照してください。
#torch-mlirチャンネル - これは最もアクティブな通信チャネルですtorch-mlirセクションNod.ai Sharkは、LLVMの例外を除き、Apache 2.0ライセンスの条件に基づいてライセンスされています。詳細については、ライセンスを参照してください。


