atari fontmaker
Added support for Mode5 (GR.13)
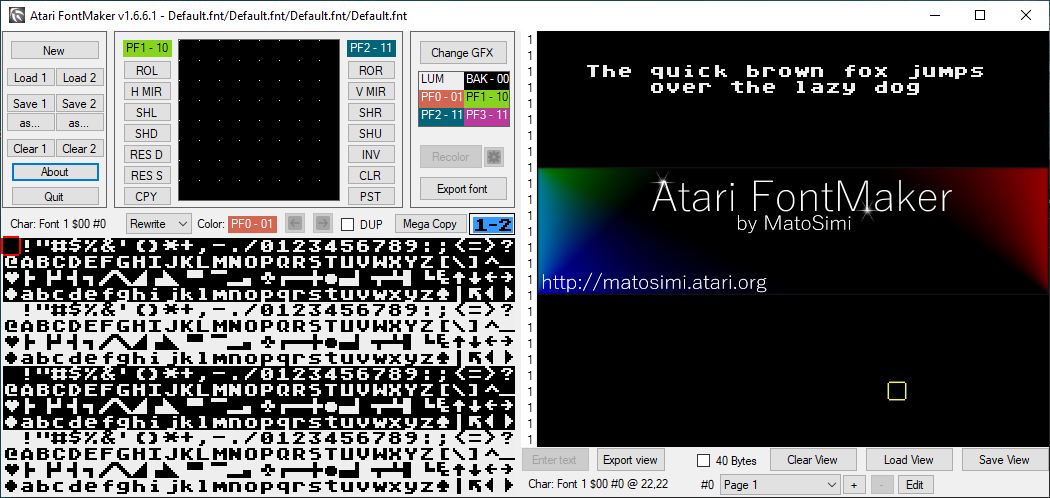
Atari FontMaker is MS Windows tool used for creating and editing Atari XL/XE fonts and font-based graphics. The tool was originally written in Delphi but has been ported to C# and its source code repository can be found here: https://github.com/matosimi/atari-fontmaker. The original Delphi sources are available here: https://sourceforge.net/projects/atari-fontmaker/ and full history of the project is available here: http://matosimi.websupport.sk/atari/atari-fontmaker/.
First version dates back to 2003, since then lot of functionalities were added and lot of refactoring applied, especially in version 1.6 when the code was converted from Delphi to C#.
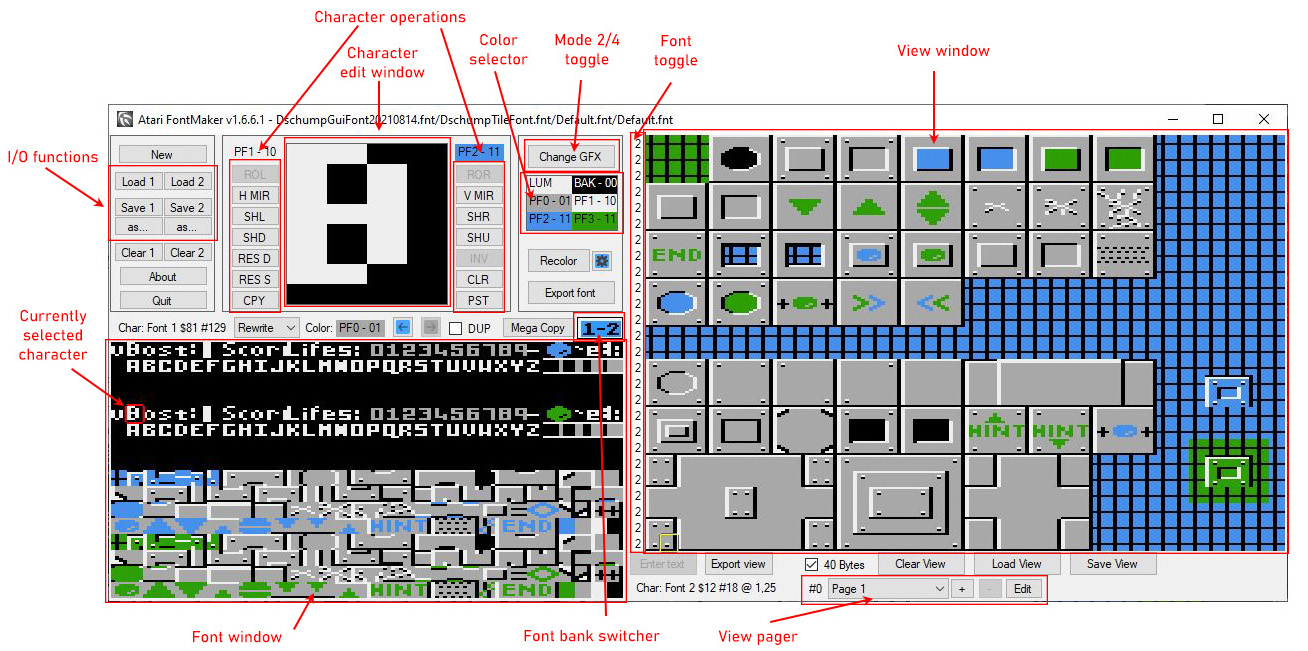
I/O Functions are there to load and safe font files. You can load and edit four fonts at the same time. Filenames are displayed in the window caption. Buttons [Save 1/2/3/4] are there to quickly save the font without a dialog window popping up. Buttons [as...] display a Save as dialog.
Font window displays two fonts at a time, 32 characters per line. You can switch between the 4 available font slots by clicking the [1-2] or [3-4] button to the right and above the font window. Select a character by clicking on it, the currently selected character is marked by a square cursor and it also displayed in the Character edit window. Information about current character is displayed above the Font window area:
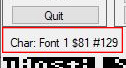
Displays which font the selected character belongs to and its Hexadecimal and Decimal representation
Character operations are groups of small buttons on both sides of the character edit window. You can quickly shift, rotate, mirror, invert or clear a character by pressing the appropriate button. Some functions have keyboard shortcuts that are listed in next section, these are also shown as tooltips when you hover the mouse cursor over each button. There are also some additional functional buttons:
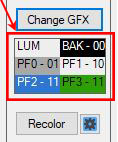
Mode 2/4 toggle [Change GFX] button switches between hi-res 2-color graphics mode (8×8 pixels per character) and low-res 4-color graphics mode (4×8 pixels per character). This change is global so all windows that display font characters are affected by this change.
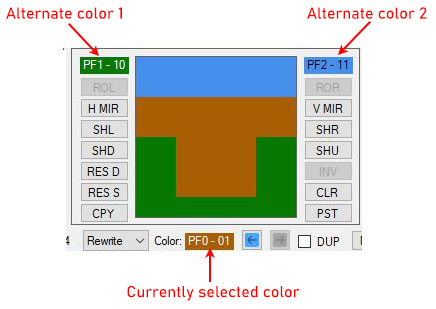
Character edit window displays the currently selected character magnified. You can edit character pixels by single clicking on the character window, or you can click+hold and move the cursor to continuously draw character pixels.
Tip: You can disable continuous pixel drawing by holding CTRL key while editing.
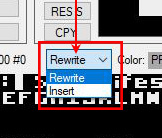
There are two draw modes, that can be switched here:
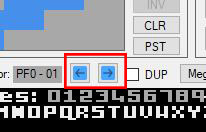
In Mode 4, currently selected color is shown below the character edit window. You can change the actual color:
Every change to characters is logged into an undo buffer, so you can undo (and redo) any change you performed by clicking on the appropriate buttons:
Undo buffer size is 2048, so it should be enough to cover complete charset edit.
Color selector window contains 6 colors that are used in Mode 2 (LUM, BAK) and Mode 4 (BAK,PF0,PF1,PF2,PF3). You can change these colors by clicking on appropriate color and picking new color from Atari color selector:
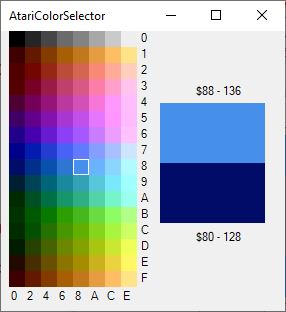
Tip: You can restore default colors by clicking on color selector window while holding SHIFT key.
Recolor feature is useful when you need to swap two colors within a single character. Recolor button has settings button on its side, which displays recolor options:
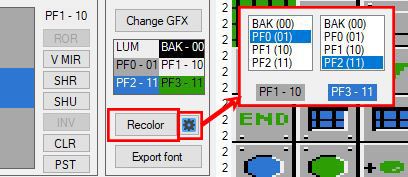
In the recolor options window you define which color is supposed to be swapped with which other color. The swapping itself it triggered by clicking on the [Recolor] button.
Tip: Recolor button can have focus, so its function can be executed by pressing Enter key. In order to quickly recolor multiple characters you can select the first one, click [Recolor], then move to another by pressing the [.] key followed by the [Enter] key. i.e. . Enter . Enter …and so on. This will recolor consecutive characters quickly.
Export font button is useful when you need text representation of the font data as an include to your Basic, Action! or Assembly source, there are several formats to choose from:
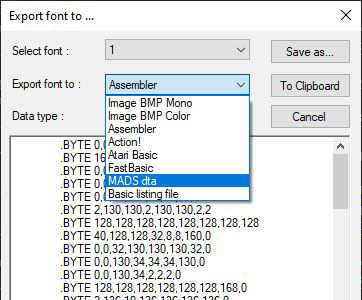
The fonts can also be exported as black+white or 5-color bitmaps.
View window is basically an area where you can test your fonts and graphics by copying characters from the font window. You can paste characters by left clicking in the view window area. Right click on view window selects the character that has been clicked on.
There are several controls below the view window that allows you to switch between 32 and 40 characters per line, clear view window, load and save view window. There were several view formats used throughout history of Atari FontMaker, all of them can be loaded, but saving is only possible in the latest *.atrview format (or RAW data format).
Tip: Raw (*.dat) format can be saved in 32byte line format or 40byte line format depending on the status of 40 Bytes checkbox.
Font toggle column is placed on the left edge of view window and its values defines which font number is used on a particular line of the view window. By default all lines are displayed in font 1, hence all values are set to “1”. You can change values to 2,3 or 4 by left-clicking on the number in font toggle area. Right-clicking on the number cycles through the fonts backwards.
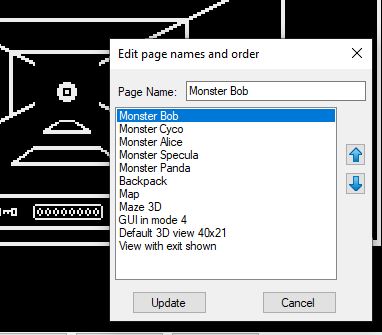
View Pager can be used to manage multiple View windows. Clicking on the [+] button duplicates the current view and adds a new page. You can use the drop-down list in the pager area to select a page, or use the mouse wheel when hovering over the drop-down list to quickly select a new page. The [Edit] button allows you to rename the pages and organise the order of them.
Tip: Drawing an animation over a couple of pages and quickly flipping through them is a quick way to check things out.
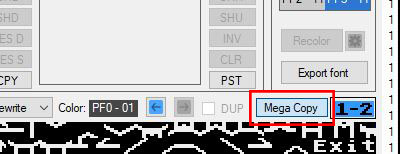
Mega Copy mode Mega Copy mode has been added in version 1.5, it allows you to copy multiple characters from the font window to the view window and vice versa.
You can enter Mega Copy mode by clicking on the [Mega Copy] button, the character edit window is switched out for a preview window, and all character editing functions are disabled:
When in Mega Copy mode you can click and drag a selection frame in the font or view window to select multiple characters at a time; watch the following video to get idea how it works and what could be achieved:
<iframe width="956" height="538" src="https://www.youtube.com/embed/bSo6yRGIE-Y" title="Atari FontMaker - Mega Copy mode" frameborder="0" allow="accelerometer; autoplay; clipboard-write; encrypted-media; gyroscope; picture-in-picture; web-share" allowfullscreen></iframe>As you can see it is possible to copy characters to the view window, but it is also possible to copy character data to the font window, so it requires some hands-on experience to fully understand the options available.
Additional function shown in the video is available after clicking on [Enter text] button. You can type free text which will be copied to clipboard, so you can paste it to view (or font) window.
Tip: Keep in mind that multi-character clipboard is working only in Mega Copy mode, you will not be able to paste bigger clipboard contents when you exit the Mega Copy mode.
You can cancel clipboard paste by pressing ESC key or double-clicking the right mouse button.
** Expanded Mega Copy mode ** From version 1.6.7 of the Atari Font Maker there is a new list of font manipulation commands located just above the font selection section.
The first four buttons allow the font characters to be shifted in bulk. You can either rotate all 128 characters left or right, basically shifting the look of each character. Two buttons allow shifting with hole insertion. This can be used to create a free spot in a font.
Sometimes you need to manipulate the pixels in a character in such a way that the contents from one spills over into the next character. i.e. You have a nice 2x2 tile but want to center it in a 3x2 tile. Until now you would have to redraw the pixels into the 3x2 characters.
The expanded Mega Copy mode makes this shifting simpler. By the way, preparing soft-sprites as characters now also becomes easy.
Steps to follow:
One special feature is the ability to paste the copy area back into the selected font characters. - If all the characters in the selected area are unique (and come from the same font) - then pressing the [Paste in location X] button will paste the working buffer into the original font. i.e. the letters "fox " now become " fox " where the "f" has turned into a " f" and only a portion of the "f" is still in the "f" character, the rest can be found in the "o" character.
DUP Just to the left of the Mega Copy button is the DUP checkbox. Turning it on will cycle through all characters in a font that are identical (duplicates off) to the currently selected character. Very useful to see if you have some duplicates in your character design.
Export View
The view window is a useful canvas area where you can test your creations and see if your fonts work out.
You can export the view window data in various formats. Clicking the [Export View] button opens up the following window:
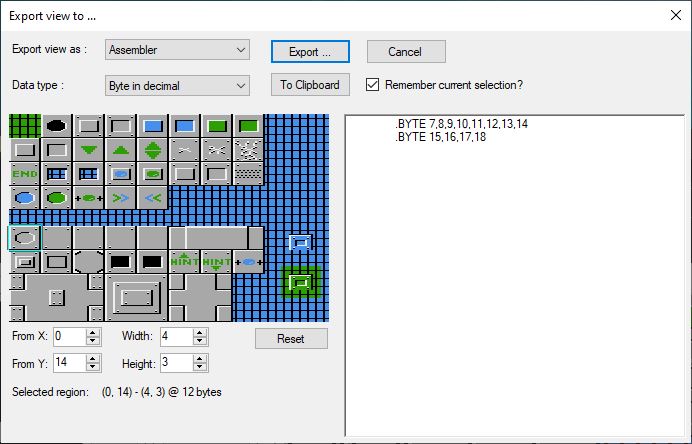
At the top you can select the export format: Binary Data, Assembler, Action!, Atari Basic, FastBasic or MADS dta. Some of these options allow for the data type to be switched between decimal and hex formatting.
The power of the exporter comes from selecting export region. By default the whole view is selected, Top-left to bottom-right (40x26). By clicking and dragging with the left-mouse button held down you can select an export area. If the export format is text then it will be shown in the right hand side window, which you can copy and paste into your source code, or export to disc with the [Export...] button.
Analysis Window Once you've designed your characters and combined them into tiles or used them in the view pages you might want to know if there are any unused characters left, or if you have not used one on a view page yet. This is where the analysis window comes in handy. Click the [Analyse] button to show an all up view of all 4 fonts. Those characters that have not been used in a view page will be marked with a red overlay. You can chage the overlay color and opacity to make sure the highlight does not clash with your color usage. Moving the mouse over the characters will display some quick usage information. Basically how many of them have been used, both from the base and the inverse parts of the font. To find out where you have used the character left-click it and a box with more details will show up. The first line gives information on the character. The subsequent lines list on which pages the character was used. Clicking the character will also select it in the character editor. You can click a text line in the details box to quickly jump to the page where the character was used. Having highlighted a character to get its detailed information you can use the mouse-wheel to move to the previous or next character or hold down the Control key to move by a row at a time.
Since version 1.5 windows clipboard is used by Atari FontMaker. That means you can copy character or set of characters (Mega Copy mode) between multiple instances of Atari FontMaker.
Data is copied to the clipboard as text in JSON format for example:
{"width":"1","height":"1","chars":"12","data":"00A058082490A854"}or
{"width":"2","height":"2","chars":"0B0C2B2C","data":"..."}Width and height are integers, chars and data are hexadecimals.
You can easily store some important clipboard data in text editor for later use.
Main output of Atari Font Maker is Atari font file *.fnt. It is a raw binary file, 1024 bytes long without any header. It can be inserted to your project using MADS pseudoinstruction ins, and in order to display it correctly it has to be aligned with any fourth memory page, code example:
          .align $400
myFont    ins 'myFont.fnt'
Atrview is additional file format that can be created within Atari FontMaker. It is a custom file format that contains contents of view window, data of the four fonts, selected colors and couple more Atari FontMaker settings.
Atrview is not a binary format, it is again JSON (similarly to clipboard data), so it can be read and manipulated (if needed) directly in any text editor.
Note: Upon loading of atrview file, user is prompted if character sets should be loaded from within the file.
JSON format:
{
    "Version": "2023",
    "ColoredGfx": "0",
    "Chars": "2",
    "Lines": "26 hex numbers selecting the font nr to display on a line of the view",
    "Colors": "0E0004080C86",
    "Fontname1": "Default.fnt",
    "Fontname2": "Default.fnt",
    "Fontname3": "Default.fnt",
    "Fontname4": "Default.fnt",
    "Data": "128 characters per font in hex",
    "FortyBytes": "1",
    "Pages": [
        {
            "Nr": 3,
            "Name": "Monster Bob",
            "View": "40 x 26 characters in the view",
            "SelectedFont": "26 hex numbers selecting the font nr to display on a line of the view"
        },
        ....
    ]
}Press the [View Actions] button to open a new window. It contains actions that can be applied to the contents in the View. At the top you find the page selector. Use this to select the page you want to perform an action on.
If you only want to replace the area in a smaller area:
Press the arrow buttons to move the whole view area in the required direction. Or select an area and use the area shift buttons on the right to move its contents.
V1.6.12.1
V1.6.12.0
Switched to .NET 8, since .NET 7 is no longer supported for couple months.
Renamed "Paste in location n" to "Paste to Font n" so fit in the button... and better describe what the button does.
Suppressed warning MSB3825 about BinaryFormatter which is now being obsoleted, but still could be used in .NET 8 winforms.
V1.6.11.0
Added a popup with actions that can be applied to the view area Replace one character with another in the whole view or a selected area. Shift/Move a section or the whole view left/right/up/down
V1.6.10.2
V1.6.10.1
V1.6.10.0
V1.6.9.0
V1.6.8.0
V1.6.7.6
V1.6.7.5
V1.6.7.4
V1.6.7.2
V1.6.7.1
V1.6.7.0
V1.6.6.1
V1.6.6.0
V1.6.5.0
V1.6.4.0
V1.6.0.0 - Switched to C# implementation
V1.5.4.67 – Fixed searching for duplicates of Megacopy exit (wrong behavior causing application hanging), fixed recolor panel refresh
V1.5.3.66 – Added display of character index under mouse cursor in view window; Added DUP checkbox which controls display of duplicate characters in font
V1.5.2.65 – Added new export option: Save as Basic listing *.LST file that can be applied to your existing Basic program by calling ENTER “D:MYFONT.LST”


