pytorch widedeep
mps backend support and more rec models

用於多模式深度學習的靈活軟件包,將表格數據與文本和圖像結合在一起,並使用Pytorch中的寬和深模型
文檔: https://pytorch-widedeep.readthedocs.io
伴侶帖子和教程: Infinitoml
實驗和與LightGBM的比較:Tabulardl與LightGBM
Slack :如果您想貢獻或只想與我們聊天,請加入Slack
本文檔的內容組織如下:
deeptabular分量rec模塊pytorch-widedeep基於Google的寬和深算法,該算法已針對多模式數據集進行了調整。
一般而言, pytorch-widedeep是一個包裝,用於將深度學習與表格數據一起使用。特別是,旨在使用寬和深模型促進文本和圖像與相應的表格數據的組合。考慮到這一點,可以在庫中實現許多架構。這些架構的主要組成部分如下圖所示:
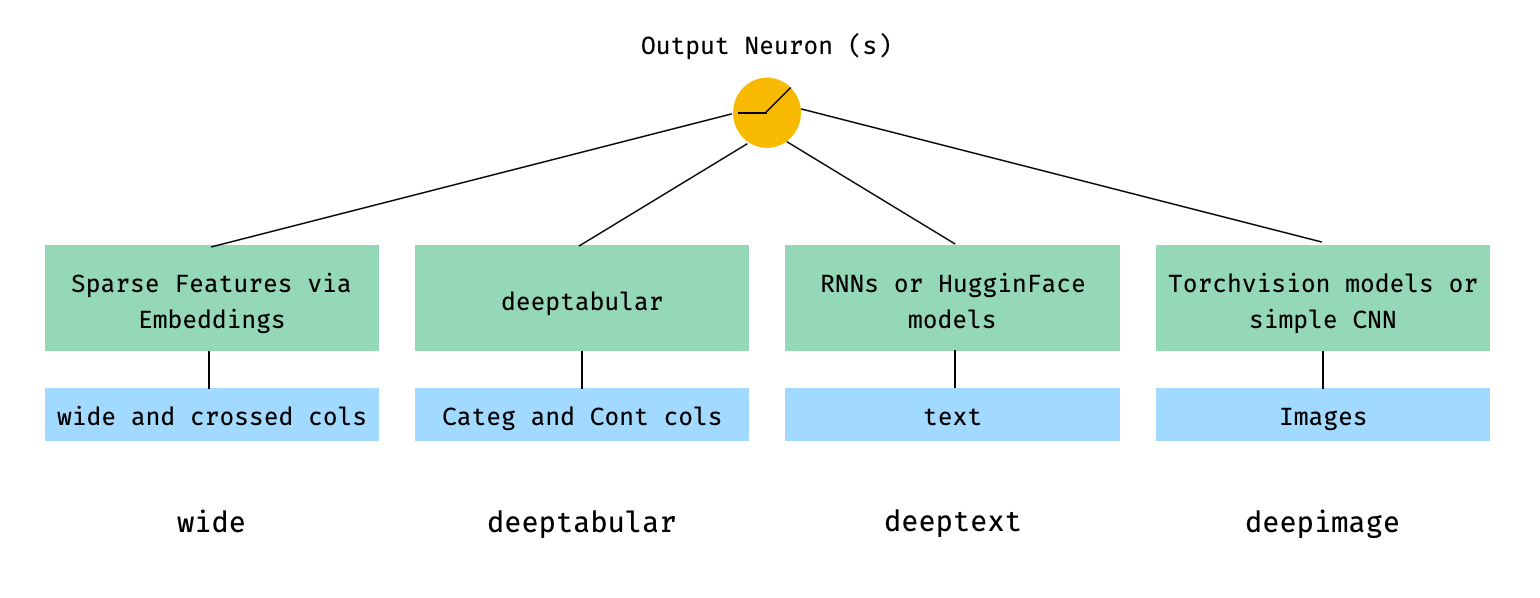
用數學術語和遵循論文中的符號,沒有deephead組件的體系結構的表達方式可以表達為:

其中σ是sigmoid函數, “ w”是應用於寬模型的重量矩陣,並且是深層模型的最終激活, “ a”是這些最終激活,φ(x)是原始特徵'x''的交叉產物變換,以及和'和b'是偏置項。如果您想知道什麼是“跨產品轉換” ,這是直接從論文中獲取的報價: “對於二進制特徵,跨產品轉換(例如,“ and gender = emair = een)”)是1時,僅當構成特徵(“性別= agendy = een”)是1,而“語言= eN”)是1,否則為0。
只要自定義模型具有稱為output_dim的屬性,可以使用自定義模型(不一定是圖書館中的自定義模型(不一定是圖書館中的模型),都具有最後一層激活的大小,以便可以構建WideDeep 。有關如何使用自定義組件的示例可以在示例文件夾和下面的部分中找到。
pytorch-widedeep庫提供了許多不同的架構。在本節中,我們將以其相應的代碼片段以最簡單的形式(即帶有默認參數值)以其最簡單的形式(即具有默認參數值)顯示。請注意,Shoud下面的所有片段在當地運行。有關不同組件及其參數的更詳細說明,請參考文檔。
對於以下示例,我們將使用以下生成的玩具數據集:
 import os
import random

import numpy as np
import pandas as pd
from PIL import Image
from faker import Faker


def create_and_save_random_image ( image_number , size = ( 32 , 32 )):

    if not os . path . exists ( "images" ):
        os . makedirs ( "images" )

    array = np . random . randint ( 0 , 256 , ( size [ 0 ], size [ 1 ], 3 ), dtype = np . uint8 )

    image = Image . fromarray ( array )

    image_name = f"image_ { image_number } .png"
    image . save ( os . path . join ( "images" , image_name ))

    return image_name


fake = Faker ()

cities = [ "New York" , "Los Angeles" , "Chicago" , "Houston" ]
names = [ "Alice" , "Bob" , "Charlie" , "David" , "Eva" ]

data = {
    "city" : [ random . choice ( cities ) for _ in range ( 100 )],
    "name" : [ random . choice ( names ) for _ in range ( 100 )],
    "age" : [ random . uniform ( 18 , 70 ) for _ in range ( 100 )],
    "height" : [ random . uniform ( 150 , 200 ) for _ in range ( 100 )],
    "sentence" : [ fake . sentence () for _ in range ( 100 )],
    "other_sentence" : [ fake . sentence () for _ in range ( 100 )],
    "image_name" : [ create_and_save_random_image ( i ) for i in range ( 100 )],
    "target" : [ random . choice ([ 0 , 1 ]) for _ in range ( 100 )],
}

df = pd . DataFrame ( data )這將在您的本地文件夾中創建100行數據幀和DIR,稱為images ,帶有100個隨機圖像(或具有噪音的圖像)。
也許最簡單的架構將只是一個wide , deeptabular , deeptext或deepimage的組成部分,這也是可能的,但讓我們以標準的寬闊和深度建築開始示例。從那裡,如何構建僅由一個組件組成的模型將很簡單。
請注意,下面顯示的示例使用庫中可用的任何模型幾乎是相同的。例如, TabMlp可以被TabResnet , TabNet , TabTransformer等代替。同樣,可以用AttentiveRNN , StackedAttentiveRNN或HFModel代替BasicRNN ,而HFMODEL則使用其相應的參數和預處理程序來代替。
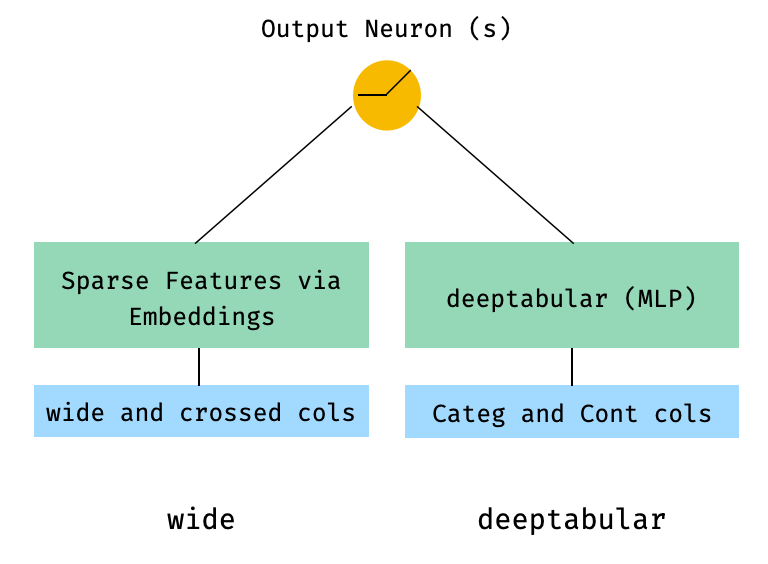
1。寬和表格分量(又稱深鍵)
from pytorch_widedeep . preprocessing import TabPreprocessor , WidePreprocessor
from pytorch_widedeep . models import Wide , TabMlp , WideDeep
from pytorch_widedeep . training import Trainer
# Wide
wide_cols = [ "city" ]
crossed_cols = [( "city" , "name" )]
wide_preprocessor = WidePreprocessor ( wide_cols = wide_cols , crossed_cols = crossed_cols )
X_wide = wide_preprocessor . fit_transform ( df )
wide = Wide ( input_dim = np . unique ( X_wide ). shape [ 0 ])
# Tabular
tab_preprocessor = TabPreprocessor (
embed_cols = [ "city" , "name" ], continuous_cols = [ "age" , "height" ]
)
X_tab = tab_preprocessor . fit_transform ( df )
tab_mlp = TabMlp (
column_idx = tab_preprocessor . column_idx ,
cat_embed_input = tab_preprocessor . cat_embed_input ,
continuous_cols = tab_preprocessor . continuous_cols ,
mlp_hidden_dims = [ 64 , 32 ],
)
# WideDeep
model = WideDeep ( wide = wide , deeptabular = tab_mlp )
# Train
trainer = Trainer ( model , objective = "binary" )
trainer . fit (
X_wide = X_wide ,
X_tab = X_tab ,
target = df [ "target" ]. values ,
n_epochs = 1 ,
batch_size = 32 ,
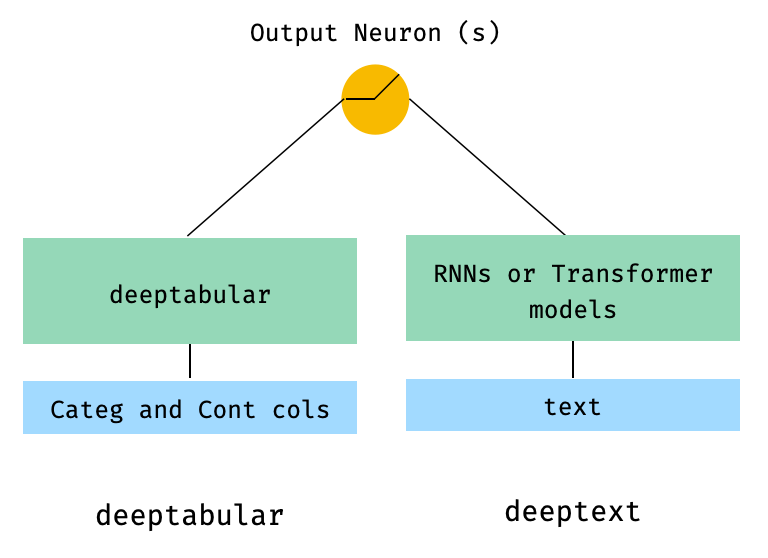
)2。表格和文本數據
 from pytorch_widedeep . preprocessing import TabPreprocessor , TextPreprocessor
from pytorch_widedeep . models import TabMlp , BasicRNN , WideDeep
from pytorch_widedeep . training import Trainer

# Tabular
tab_preprocessor = TabPreprocessor (
    embed_cols = [ "city" , "name" ], continuous_cols = [ "age" , "height" ]
)
X_tab = tab_preprocessor . fit_transform ( df )
tab_mlp = TabMlp (
    column_idx = tab_preprocessor . column_idx ,
    cat_embed_input = tab_preprocessor . cat_embed_input ,
    continuous_cols = tab_preprocessor . continuous_cols ,
    mlp_hidden_dims = [ 64 , 32 ],
)

# Text
text_preprocessor = TextPreprocessor (
    text_col = "sentence" , maxlen = 20 , max_vocab = 100 , n_cpus = 1
)
X_text = text_preprocessor . fit_transform ( df )
rnn = BasicRNN (
    vocab_size = len ( text_preprocessor . vocab . itos ),
    embed_dim = 16 ,
    hidden_dim = 8 ,
    n_layers = 1 ,
)

# WideDeep
model = WideDeep ( deeptabular = tab_mlp , deeptext = rnn )

# Train
trainer = Trainer ( model , objective = "binary" )

trainer . fit (
    X_tab = X_tab ,
    X_text = X_text ,
    target = df [ "target" ]. values ,
    n_epochs = 1 ,
    batch_size = 32 ,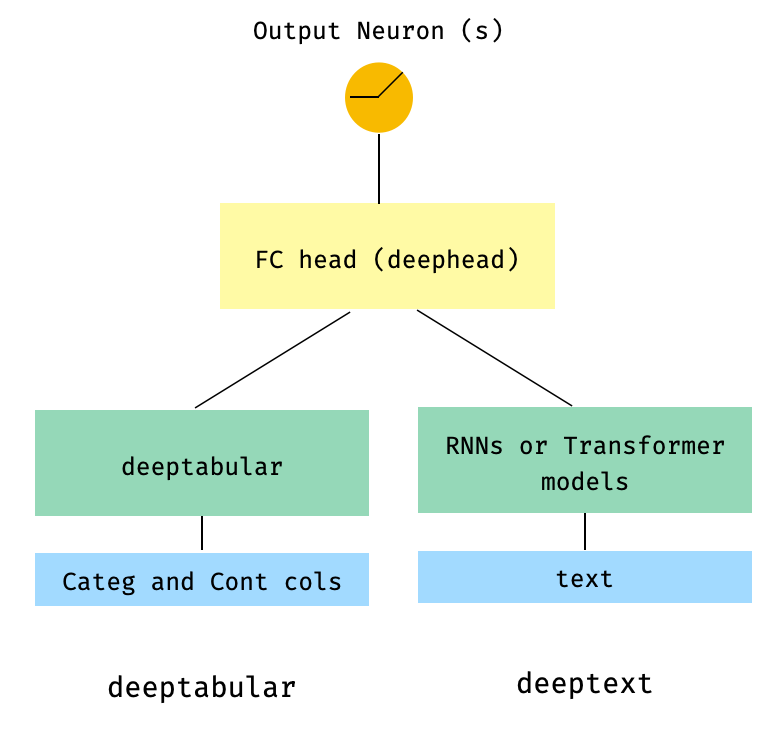
) 3。通過head_hidden_dims param in WideDeep的head_hidden_dims在頂部的表格和文本
 from pytorch_widedeep . preprocessing import TabPreprocessor , TextPreprocessor
from pytorch_widedeep . models import TabMlp , BasicRNN , WideDeep
from pytorch_widedeep . training import Trainer

# Tabular
tab_preprocessor = TabPreprocessor (
    embed_cols = [ "city" , "name" ], continuous_cols = [ "age" , "height" ]
)
X_tab = tab_preprocessor . fit_transform ( df )
tab_mlp = TabMlp (
    column_idx = tab_preprocessor . column_idx ,
    cat_embed_input = tab_preprocessor . cat_embed_input ,
    continuous_cols = tab_preprocessor . continuous_cols ,
    mlp_hidden_dims = [ 64 , 32 ],
)

# Text
text_preprocessor = TextPreprocessor (
    text_col = "sentence" , maxlen = 20 , max_vocab = 100 , n_cpus = 1
)
X_text = text_preprocessor . fit_transform ( df )
rnn = BasicRNN (
    vocab_size = len ( text_preprocessor . vocab . itos ),
    embed_dim = 16 ,
    hidden_dim = 8 ,
    n_layers = 1 ,
)

# WideDeep
model = WideDeep ( deeptabular = tab_mlp , deeptext = rnn , head_hidden_dims = [ 32 , 16 ])

# Train
trainer = Trainer ( model , objective = "binary" )

trainer . fit (
    X_tab = X_tab ,
    X_text = X_text ,
    target = df [ "target" ]. values ,
    n_epochs = 1 ,
    batch_size = 32 ,
) 4。直接傳遞給WideDeep表格和多個文本列
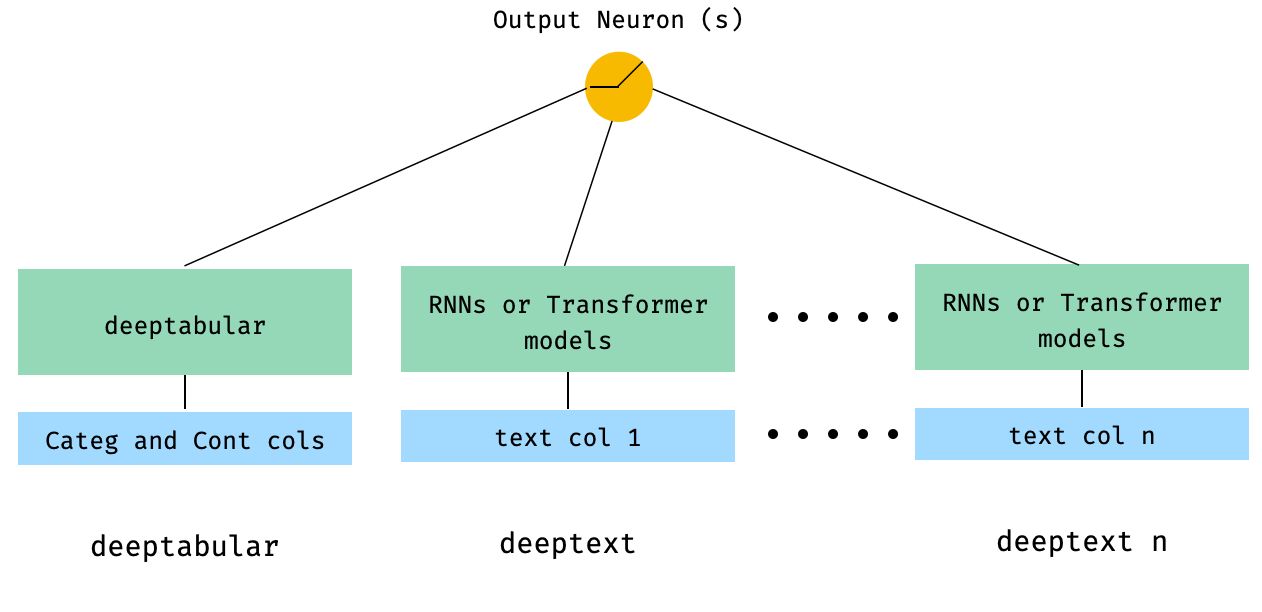
 from pytorch_widedeep . preprocessing import TabPreprocessor , TextPreprocessor
from pytorch_widedeep . models import TabMlp , BasicRNN , WideDeep
from pytorch_widedeep . training import Trainer


# Tabular
tab_preprocessor = TabPreprocessor (
    embed_cols = [ "city" , "name" ], continuous_cols = [ "age" , "height" ]
)
X_tab = tab_preprocessor . fit_transform ( df )
tab_mlp = TabMlp (
    column_idx = tab_preprocessor . column_idx ,
    cat_embed_input = tab_preprocessor . cat_embed_input ,
    continuous_cols = tab_preprocessor . continuous_cols ,
    mlp_hidden_dims = [ 64 , 32 ],
)

# Text
text_preprocessor_1 = TextPreprocessor (
    text_col = "sentence" , maxlen = 20 , max_vocab = 100 , n_cpus = 1
)
X_text_1 = text_preprocessor_1 . fit_transform ( df )
text_preprocessor_2 = TextPreprocessor (
    text_col = "other_sentence" , maxlen = 20 , max_vocab = 100 , n_cpus = 1
)
X_text_2 = text_preprocessor_2 . fit_transform ( df )
rnn_1 = BasicRNN (
    vocab_size = len ( text_preprocessor_1 . vocab . itos ),
    embed_dim = 16 ,
    hidden_dim = 8 ,
    n_layers = 1 ,
)
rnn_2 = BasicRNN (
    vocab_size = len ( text_preprocessor_2 . vocab . itos ),
    embed_dim = 16 ,
    hidden_dim = 8 ,
    n_layers = 1 ,
)

# WideDeep
model = WideDeep ( deeptabular = tab_mlp , deeptext = [ rnn_1 , rnn_2 ])

# Train
trainer = Trainer ( model , objective = "binary" )

trainer . fit (
    X_tab = X_tab ,
    X_text = [ X_text_1 , X_text_2 ],
    target = df [ "target" ]. values ,
    n_epochs = 1 ,
    batch_size = 32 ,
) 5。通過庫的ModelFuser類融合的表格數據和多個文本列
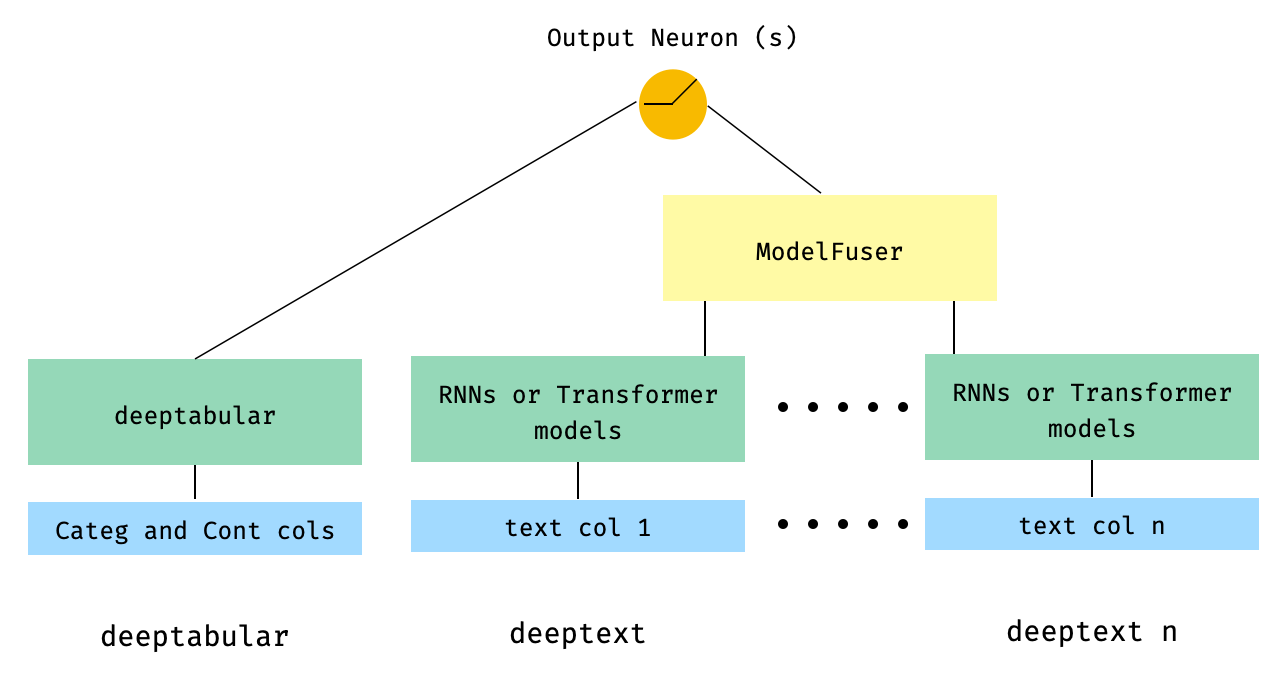
 from pytorch_widedeep . preprocessing import TabPreprocessor , TextPreprocessor
from pytorch_widedeep . models import TabMlp , BasicRNN , WideDeep , ModelFuser
from pytorch_widedeep import Trainer

# Tabular
tab_preprocessor = TabPreprocessor (
    embed_cols = [ "city" , "name" ], continuous_cols = [ "age" , "height" ]
)
X_tab = tab_preprocessor . fit_transform ( df )
tab_mlp = TabMlp (
    column_idx = tab_preprocessor . column_idx ,
    cat_embed_input = tab_preprocessor . cat_embed_input ,
    continuous_cols = tab_preprocessor . continuous_cols ,
    mlp_hidden_dims = [ 64 , 32 ],
)

# Text
text_preprocessor_1 = TextPreprocessor (
    text_col = "sentence" , maxlen = 20 , max_vocab = 100 , n_cpus = 1
)
X_text_1 = text_preprocessor_1 . fit_transform ( df )
text_preprocessor_2 = TextPreprocessor (
    text_col = "other_sentence" , maxlen = 20 , max_vocab = 100 , n_cpus = 1
)
X_text_2 = text_preprocessor_2 . fit_transform ( df )

rnn_1 = BasicRNN (
    vocab_size = len ( text_preprocessor_1 . vocab . itos ),
    embed_dim = 16 ,
    hidden_dim = 8 ,
    n_layers = 1 ,
)
rnn_2 = BasicRNN (
    vocab_size = len ( text_preprocessor_2 . vocab . itos ),
    embed_dim = 16 ,
    hidden_dim = 8 ,
    n_layers = 1 ,
)

models_fuser = ModelFuser ( models = [ rnn_1 , rnn_2 ], fusion_method = "mult" )

# WideDeep
model = WideDeep ( deeptabular = tab_mlp , deeptext = models_fuser )

# Train
trainer = Trainer ( model , objective = "binary" )

trainer . fit (
    X_tab = X_tab ,
    X_text = [ X_text_1 , X_text_2 ],
    target = df [ "target" ]. values ,
    n_epochs = 1 ,
    batch_size = 32 ,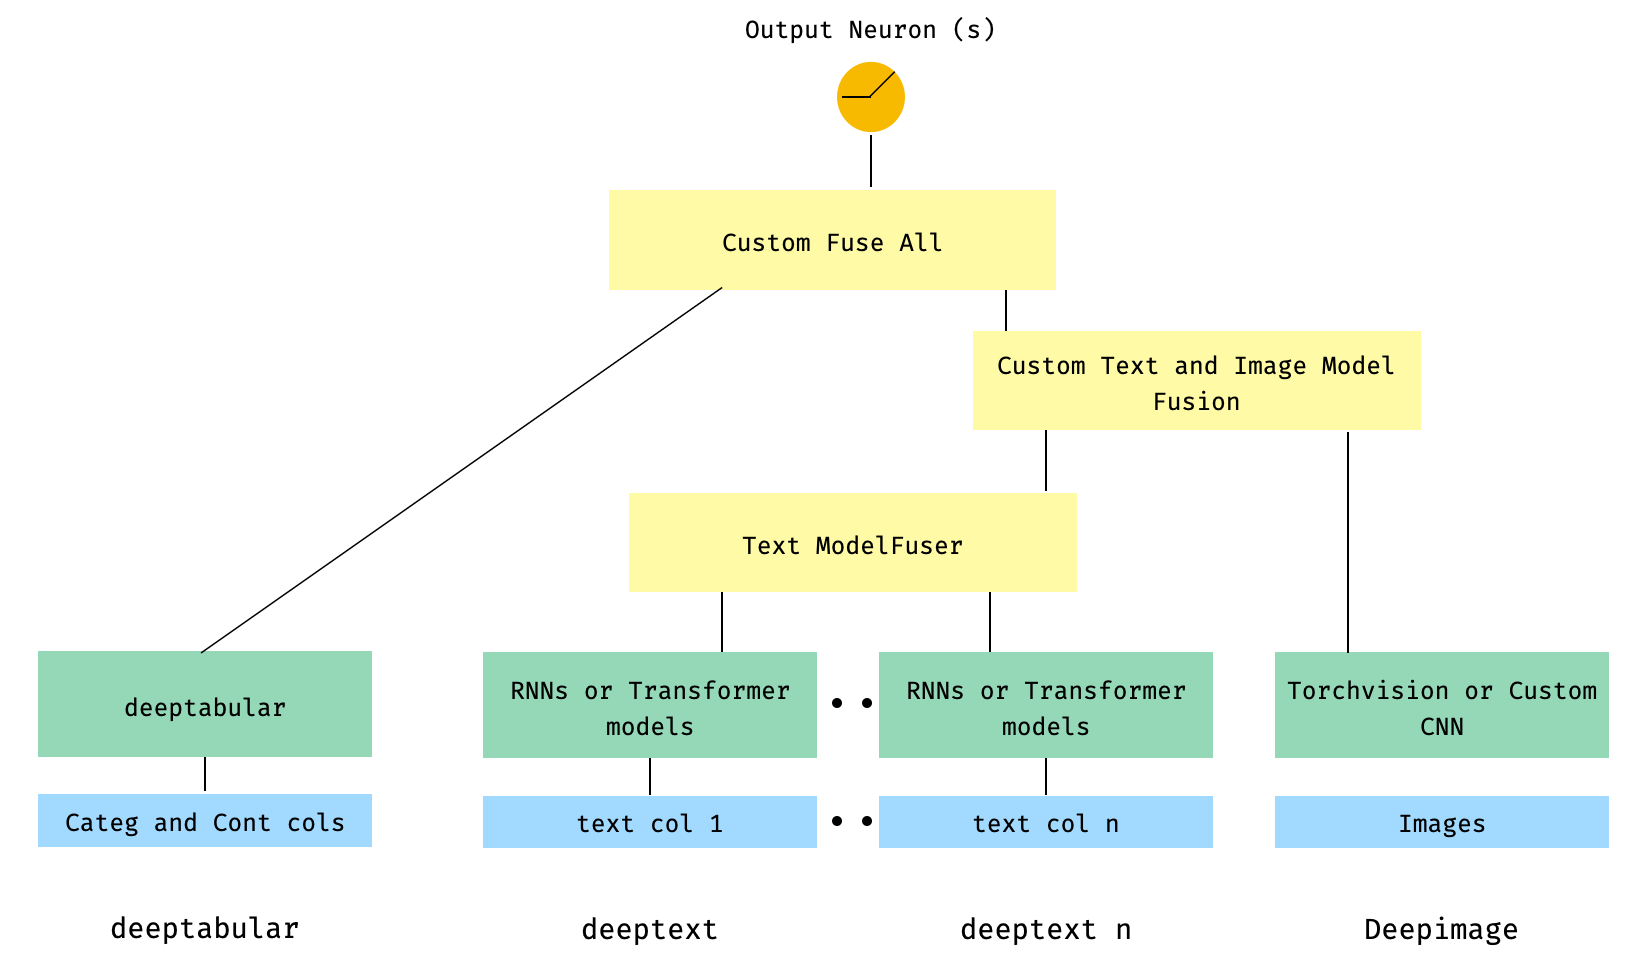
) 6。帶有圖像列的表格和多個文本列。文本列是通過庫的ModelFuser融合的,然後全部通過WideDeep中的Deephead Paramenter融合,這是用戶編碼的自定義ModelFuser
這也許是不太優雅的解決方案,因為它涉及用戶的自定義組件並切片“傳入”張量。將來,我們將包括一個TextAndImageModelFuser ,以使此過程更加簡單。不過,並不是真的很複雜,這是如何在pytorch-widedeep中使用自定義組件的一個很好的例子。
請注意,自定義組件的唯一要求是它具有稱為output_dim的屬性,該屬性返回最後一層激活的大小。換句話說,它不需要從BaseWDModelComponent繼承。該基類簡單地檢查了這種屬性的存在,並避免了內部的一些打字錯誤。
import torch
from pytorch_widedeep . preprocessing import TabPreprocessor , TextPreprocessor , ImagePreprocessor
from pytorch_widedeep . models import TabMlp , BasicRNN , WideDeep , ModelFuser , Vision
from pytorch_widedeep . models . _base_wd_model_component import BaseWDModelComponent
from pytorch_widedeep import Trainer
# Tabular
tab_preprocessor = TabPreprocessor (
embed_cols = [ "city" , "name" ], continuous_cols = [ "age" , "height" ]
)
X_tab = tab_preprocessor . fit_transform ( df )
tab_mlp = TabMlp (
column_idx = tab_preprocessor . column_idx ,
cat_embed_input = tab_preprocessor . cat_embed_input ,
continuous_cols = tab_preprocessor . continuous_cols ,
mlp_hidden_dims = [ 16 , 8 ],
)
# Text
text_preprocessor_1 = TextPreprocessor (
text_col = "sentence" , maxlen = 20 , max_vocab = 100 , n_cpus = 1
)
X_text_1 = text_preprocessor_1 . fit_transform ( df )
text_preprocessor_2 = TextPreprocessor (
text_col = "other_sentence" , maxlen = 20 , max_vocab = 100 , n_cpus = 1
)
X_text_2 = text_preprocessor_2 . fit_transform ( df )
rnn_1 = BasicRNN (
vocab_size = len ( text_preprocessor_1 . vocab . itos ),
embed_dim = 16 ,
hidden_dim = 8 ,
n_layers = 1 ,
)
rnn_2 = BasicRNN (
vocab_size = len ( text_preprocessor_2 . vocab . itos ),
embed_dim = 16 ,
hidden_dim = 8 ,
n_layers = 1 ,
)
models_fuser = ModelFuser (
models = [ rnn_1 , rnn_2 ],
fusion_method = "mult" ,
)
# Image
image_preprocessor = ImagePreprocessor ( img_col = "image_name" , img_path = "images" )
X_img = image_preprocessor . fit_transform ( df )
vision = Vision ( pretrained_model_setup = "resnet18" , head_hidden_dims = [ 16 , 8 ])
# deephead (custom model fuser)
class MyModelFuser ( BaseWDModelComponent ):
"""
Simply a Linear + Relu sequence on top of the text + images followed by a
Linear -> Relu -> Linear for the concatenation of tabular slice of the
tensor and the output of the text and image sequential model
"""
def __init__ (
self ,
tab_incoming_dim : int ,
text_incoming_dim : int ,
image_incoming_dim : int ,
output_units : int ,
):
super ( MyModelFuser , self ). __init__ ()
self . tab_incoming_dim = tab_incoming_dim
self . text_incoming_dim = text_incoming_dim
self . image_incoming_dim = image_incoming_dim
self . output_units = output_units
self . text_and_image_fuser = torch . nn . Sequential (
torch . nn . Linear ( text_incoming_dim + image_incoming_dim , output_units ),
torch . nn . ReLU (),
)
self . out = torch . nn . Sequential (
torch . nn . Linear ( output_units + tab_incoming_dim , output_units * 4 ),
torch . nn . ReLU (),
torch . nn . Linear ( output_units * 4 , output_units ),
)
def forward ( self , X : torch . Tensor ) -> torch . Tensor :
tab_slice = slice ( 0 , self . tab_incoming_dim )
text_slice = slice (
self . tab_incoming_dim , self . tab_incoming_dim + self . text_incoming_dim
)
image_slice = slice (
self . tab_incoming_dim + self . text_incoming_dim ,
self . tab_incoming_dim + self . text_incoming_dim + self . image_incoming_dim ,
)
X_tab = X [:, tab_slice ]
X_text = X [:, text_slice ]
X_img = X [:, image_slice ]
X_text_and_image = self . text_and_image_fuser ( torch . cat ([ X_text , X_img ], dim = 1 ))
return self . out ( torch . cat ([ X_tab , X_text_and_image ], dim = 1 ))
@ property
def output_dim ( self ):
return self . output_units
deephead = MyModelFuser (
tab_incoming_dim = tab_mlp . output_dim ,
text_incoming_dim = models_fuser . output_dim ,
image_incoming_dim = vision . output_dim ,
output_units = 8 ,
)
# WideDeep
model = WideDeep (
deeptabular = tab_mlp ,
deeptext = models_fuser ,
deepimage = vision ,
deephead = deephead ,
)
# Train
trainer = Trainer ( model , objective = "binary" )
trainer . fit (
X_tab = X_tab ,
X_text = [ X_text_1 , X_text_2 ],
X_img = X_img ,
target = df [ "target" ]. values ,
n_epochs = 1 ,
batch_size = 32 ,
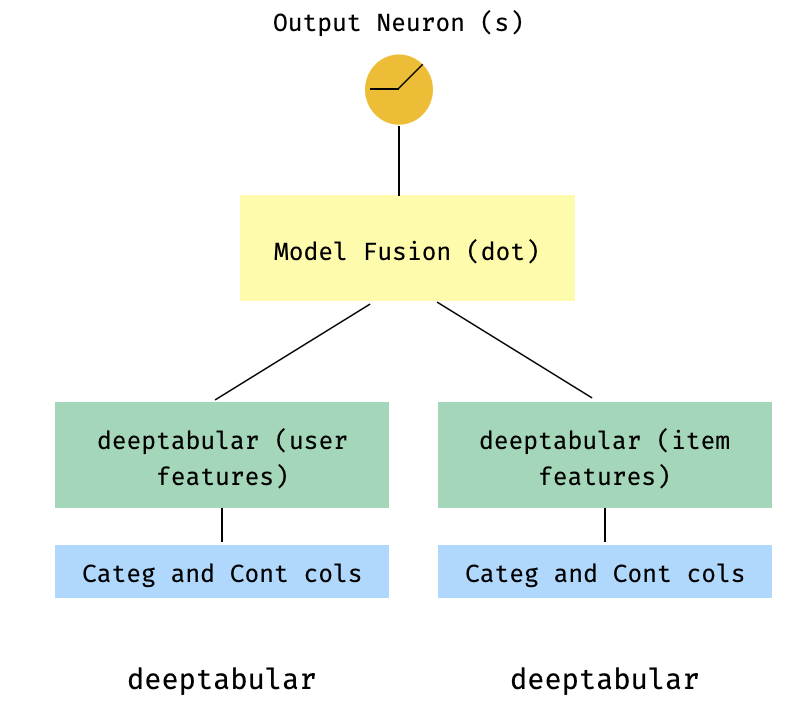
)7。一個兩個較高的型號
這是推薦系統背景下的流行模型。假設我們形成了我的三倍(用戶功能,項目功能,目標)的表格數據集。我們可以創建一個兩個較高的模型,其中用戶和項目功能通過兩個單獨的型號傳遞,然後通過點產品“融合”。
import numpy as np
import pandas as pd
from pytorch_widedeep import Trainer
from pytorch_widedeep . preprocessing import TabPreprocessor
from pytorch_widedeep . models import TabMlp , WideDeep , ModelFuser
# Let's create the interaction dataset
# user_features dataframe
np . random . seed ( 42 )
user_ids = np . arange ( 1 , 101 )
ages = np . random . randint ( 18 , 60 , size = 100 )
genders = np . random . choice ([ "male" , "female" ], size = 100 )
locations = np . random . choice ([ "city_a" , "city_b" , "city_c" , "city_d" ], size = 100 )
user_features = pd . DataFrame (
{ "id" : user_ids , "age" : ages , "gender" : genders , "location" : locations }
)
# item_features dataframe
item_ids = np . arange ( 1 , 101 )
prices = np . random . uniform ( 10 , 500 , size = 100 ). round ( 2 )
colors = np . random . choice ([ "red" , "blue" , "green" , "black" ], size = 100 )
categories = np . random . choice ([ "electronics" , "clothing" , "home" , "toys" ], size = 100 )
item_features = pd . DataFrame (
{ "id" : item_ids , "price" : prices , "color" : colors , "category" : categories }
)
# Interactions dataframe
interaction_user_ids = np . random . choice ( user_ids , size = 1000 )
interaction_item_ids = np . random . choice ( item_ids , size = 1000 )
purchased = np . random . choice ([ 0 , 1 ], size = 1000 , p = [ 0.7 , 0.3 ])
interactions = pd . DataFrame (
{
"user_id" : interaction_user_ids ,
"item_id" : interaction_item_ids ,
"purchased" : purchased ,
}
)
user_item_purchased = interactions . merge (
user_features , left_on = "user_id" , right_on = "id"
). merge ( item_features , left_on = "item_id" , right_on = "id" )
# Users
tab_preprocessor_user = TabPreprocessor (
cat_embed_cols = [ "gender" , "location" ],
continuous_cols = [ "age" ],
)
X_user = tab_preprocessor_user . fit_transform ( user_item_purchased )
tab_mlp_user = TabMlp (
column_idx = tab_preprocessor_user . column_idx ,
cat_embed_input = tab_preprocessor_user . cat_embed_input ,
continuous_cols = [ "age" ],
mlp_hidden_dims = [ 16 , 8 ],
mlp_dropout = [ 0.2 , 0.2 ],
)
# Items
tab_preprocessor_item = TabPreprocessor (
cat_embed_cols = [ "color" , "category" ],
continuous_cols = [ "price" ],
)
X_item = tab_preprocessor_item . fit_transform ( user_item_purchased )
tab_mlp_item = TabMlp (
column_idx = tab_preprocessor_item . column_idx ,
cat_embed_input = tab_preprocessor_item . cat_embed_input ,
continuous_cols = [ "price" ],
mlp_hidden_dims = [ 16 , 8 ],
mlp_dropout = [ 0.2 , 0.2 ],
)
two_tower_model = ModelFuser ([ tab_mlp_user , tab_mlp_item ], fusion_method = "dot" )
model = WideDeep ( deeptabular = two_tower_model )
trainer = Trainer ( model , objective = "binary" )
trainer . fit (
X_tab = [ X_user , X_item ],
target = interactions . purchased . values ,
n_epochs = 1 ,
batch_size = 32 ,
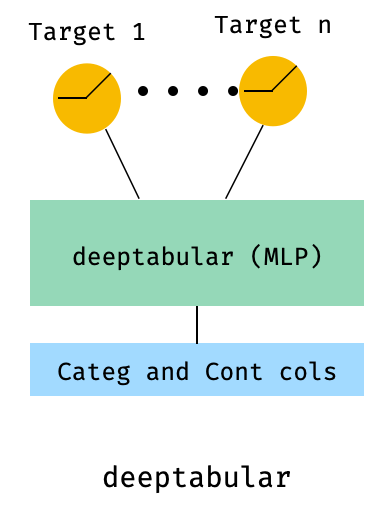
)8。表格和多目標損失
這是一個“獎勵”,以說明使用多目標損失的使用,而不是實際上是一個不同的體系結構。
 from pytorch_widedeep . preprocessing import TabPreprocessor , TextPreprocessor , ImagePreprocessor
from pytorch_widedeep . models import TabMlp , BasicRNN , WideDeep , ModelFuser , Vision
from pytorch_widedeep . losses_multitarget import MultiTargetClassificationLoss
from pytorch_widedeep . models . _base_wd_model_component import BaseWDModelComponent
from pytorch_widedeep import Trainer

# let's add a second target to the dataframe
df [ "target2" ] = [ random . choice ([ 0 , 1 ]) for _ in range ( 100 )]

# Tabular
tab_preprocessor = TabPreprocessor (
    embed_cols = [ "city" , "name" ], continuous_cols = [ "age" , "height" ]
)
X_tab = tab_preprocessor . fit_transform ( df )
tab_mlp = TabMlp (
    column_idx = tab_preprocessor . column_idx ,
    cat_embed_input = tab_preprocessor . cat_embed_input ,
    continuous_cols = tab_preprocessor . continuous_cols ,
    mlp_hidden_dims = [ 64 , 32 ],
)

# 'pred_dim=2' because we have two binary targets. For other types of targets,
#  please, see the documentation
model = WideDeep ( deeptabular = tab_mlp , pred_dim = 2 ).

loss = MultiTargetClassificationLoss ( binary_config = [ 0 , 1 ], reduction = "mean" )

# When a multi-target loss is used, 'custom_loss_function' must not be None.
# See the docs
trainer = Trainer ( model , objective = "multitarget" , custom_loss_function = loss )

trainer . fit (
    X_tab = X_tab ,
    target = df [[ "target" , "target2" ]]. values ,
    n_epochs = 1 ,
    batch_size = 32 ,
)deeptabular分量重要的是要再次強調,可以獨立地和孤立地使用每個單獨的組件, wide , deeptabular , deeptext和deepimage 。例如,一個人只能在線性模型中使用wide 。實際上, pytorch-widedeep中最有趣的功能之一就是使用deeptabular成分,即通常將其稱為“表格數據的深度學習”。當前, pytorch-widedeep為該組件提供以下不同模型:
我們稱之為兩個基於注意力的模型:
Tabformer家族,IE Transformers用於表格數據:
基於神經網絡中的重量不確定性的表格數據的概率DL模型:
Wide模型的概率適應。TabMlp模型的概率適應請注意,儘管有科學出版物針對TabTransFormer,Saint和Ft-Transformer,但Tabfasfformer和Tabceceiver是我們對這些算法數據的算法的適應。
此外,除了TabPerceiver以外,可以將自我監管的預訓練用於所有deeptabular模型。自我監督的預訓練可以通過兩種方法或例程使用,我們稱為:Encoder-Decoder方法和約束構成方法。請有關此功能的詳細信息以及庫中的所有其他選項,請參見文檔和示例。
rec模塊該模塊是作為圖書館中現有組件的擴展而引入的,解決了與建議系統有關的問題和問題。儘管仍在積極開發中,但目前包括許多強大的推薦模型。
值得注意的是,該庫已經支持使用現有組件實施各種建議算法。例如,可以使用圖書館的核心功能來構建諸如寬和深,兩塔或神經協作過濾之類的模型。
rec模塊中的建議算法是:
有關如何使用這些模型的詳細信息,請參見示例。
對於文本組件, deeptext ,庫提供以下模型:
對於圖像組成部分, deepimage ,圖書館支持以下家庭的模型:“ resnet”,“ shufflenet”,“ resnext”,“ wide_resnet”,“ regnet”,“ densenet”,“ mobilenetv3”,“ mobilenetv3”,“ mobilenetv2”,“ mobilenetv2','mobilenetv2','mnasnet''mnasnet'','mnasnet'','''''''''''''''''''''''''''''''''''''''''''''''''''''''這些是通過torchvision提供的,並包裹在Vision課上。
使用PIP安裝:
pip install pytorch-widedeep或直接從github安裝
pip install git+https://github.com/jrzaurin/pytorch-widedeep.git # Clone the repository
git clone https://github.com/jrzaurin/pytorch-widedeep
cd pytorch-widedeep
# Install in dev mode
pip install -e .這是使用Wide和DeepDense設置與成人數據集進行二進制分類的端到端示例。
使用pytorch-widedeep構建寬(線性)和深層模型:
 import numpy as np
import torch
from sklearn . model_selection import train_test_split

from pytorch_widedeep import Trainer
from pytorch_widedeep . preprocessing import WidePreprocessor , TabPreprocessor
from pytorch_widedeep . models import Wide , TabMlp , WideDeep
from pytorch_widedeep . metrics import Accuracy
from pytorch_widedeep . datasets import load_adult


df = load_adult ( as_frame = True )
df [ "income_label" ] = ( df [ "income" ]. apply ( lambda x : ">50K" in x )). astype ( int )
df . drop ( "income" , axis = 1 , inplace = True )
df_train , df_test = train_test_split ( df , test_size = 0.2 , stratify = df . income_label )

# Define the 'column set up'
wide_cols = [
    "education" ,
    "relationship" ,
    "workclass" ,
    "occupation" ,
    "native-country" ,
    "gender" ,
]
crossed_cols = [( "education" , "occupation" ), ( "native-country" , "occupation" )]

cat_embed_cols = [
    "workclass" ,
    "education" ,
    "marital-status" ,
    "occupation" ,
    "relationship" ,
    "race" ,
    "gender" ,
    "capital-gain" ,
    "capital-loss" ,
    "native-country" ,
]
continuous_cols = [ "age" , "hours-per-week" ]
target = "income_label"
target = df_train [ target ]. values

# prepare the data
wide_preprocessor = WidePreprocessor ( wide_cols = wide_cols , crossed_cols = crossed_cols )
X_wide = wide_preprocessor . fit_transform ( df_train )

tab_preprocessor = TabPreprocessor (
    cat_embed_cols = cat_embed_cols , continuous_cols = continuous_cols  # type: ignore[arg-type]
)
X_tab = tab_preprocessor . fit_transform ( df_train )

# build the model
wide = Wide ( input_dim = np . unique ( X_wide ). shape [ 0 ], pred_dim = 1 )
tab_mlp = TabMlp (
    column_idx = tab_preprocessor . column_idx ,
    cat_embed_input = tab_preprocessor . cat_embed_input ,
    continuous_cols = continuous_cols ,
)
model = WideDeep ( wide = wide , deeptabular = tab_mlp )

# train and validate
trainer = Trainer ( model , objective = "binary" , metrics = [ Accuracy ])
trainer . fit (
    X_wide = X_wide ,
    X_tab = X_tab ,
    target = target ,
    n_epochs = 5 ,
    batch_size = 256 ,
)

# predict on test
X_wide_te = wide_preprocessor . transform ( df_test )
X_tab_te = tab_preprocessor . transform ( df_test )
preds = trainer . predict ( X_wide = X_wide_te , X_tab = X_tab_te )

# Save and load

# Option 1: this will also save training history and lr history if the
# LRHistory callback is used
trainer . save ( path = "model_weights" , save_state_dict = True )

# Option 2: save as any other torch model
torch . save ( model . state_dict (), "model_weights/wd_model.pt" )

# From here in advance, Option 1 or 2 are the same. I assume the user has
# prepared the data and defined the new model components:
# 1. Build the model
model_new = WideDeep ( wide = wide , deeptabular = tab_mlp )
model_new . load_state_dict ( torch . load ( "model_weights/wd_model.pt" ))

# 2. Instantiate the trainer
trainer_new = Trainer ( model_new , objective = "binary" )

# 3. Either start the fit or directly predict
preds = trainer_new . predict ( X_wide = X_wide , X_tab = X_tab , batch_size = 32 )當然,一個人可以做更多的事情。請參閱示例文件夾,文檔或伴侶帖子,以更好地理解包裝及其功能的內容。
pytest tests
檢查貢獻頁面。
該庫取自其他一系列庫,因此我認為可以在Readme中在此處提及它們(代碼中還包括特定提及)。
Callbacks和Initializers結構和代碼受torchsample樣品庫的啟發,該庫本身受到Keras的一部分啟發。
該庫中的TextProcessor類使用fastai的Tokenizer和Vocab 。 utils.fastai_transforms上的代碼是其代碼的次要改編,因此在此庫中函數。根據我的經驗,他們的Tokenizer是課堂上最好的。
此庫中的ImageProcessor類使用Adrian Rosebrock的《奇妙的深度學習》(DL4CV)書中的代碼。
這項工作是在Apache 2.0和MIT(或任何以後版本)下進行雙重許可的。如果您使用這項工作,則可以在其中之一之間進行選擇。
SPDX-License-Identifier: Apache-2.0 AND MIT
 @article{Zaurin_pytorch-widedeep_A_flexible_2023,
author = {Zaurin, Javier Rodriguez and Mulinka, Pavol},
doi = {10.21105/joss.05027},
journal = {Journal of Open Source Software},
month = jun,
number = {86},
pages = {5027},
title = {{pytorch-widedeep: A flexible package for multimodal deep learning}},
url = {https://joss.theoj.org/papers/10.21105/joss.05027},
volume = {8},
year = {2023}
}
 Zaurin, J. R., & Mulinka, P. (2023). pytorch-widedeep: A flexible package for
multimodal deep learning. Journal of Open Source Software, 8(86), 5027.
https://doi.org/10.21105/joss.05027


