pytorch widedeep
mps backend support and more rec models

用于多模式深度学习的灵活软件包,将表格数据与文本和图像结合在一起,并使用Pytorch中的宽和深模型
文档: https://pytorch-widedeep.readthedocs.io
伴侣帖子和教程: Infinitoml
实验和与LightGBM的比较:Tabulardl与LightGBM
Slack :如果您想贡献或只想与我们聊天,请加入Slack
本文档的内容组织如下:
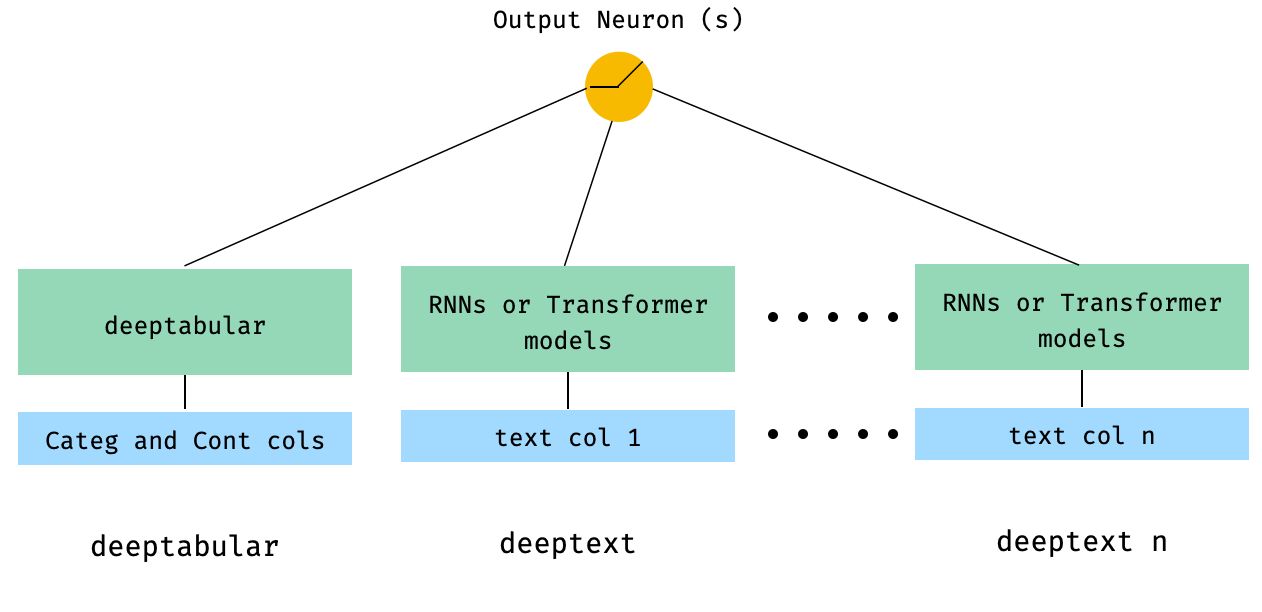
deeptabular分量rec模块pytorch-widedeep基于Google的宽和深算法,该算法已针对多模式数据集进行了调整。
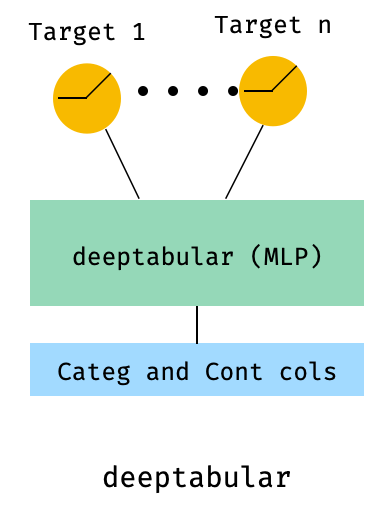
一般而言, pytorch-widedeep是一个包装,用于将深度学习与表格数据一起使用。特别是,旨在使用宽和深模型促进文本和图像与相应的表格数据的组合。考虑到这一点,可以在库中实现许多架构。这些架构的主要组成部分如下图所示:
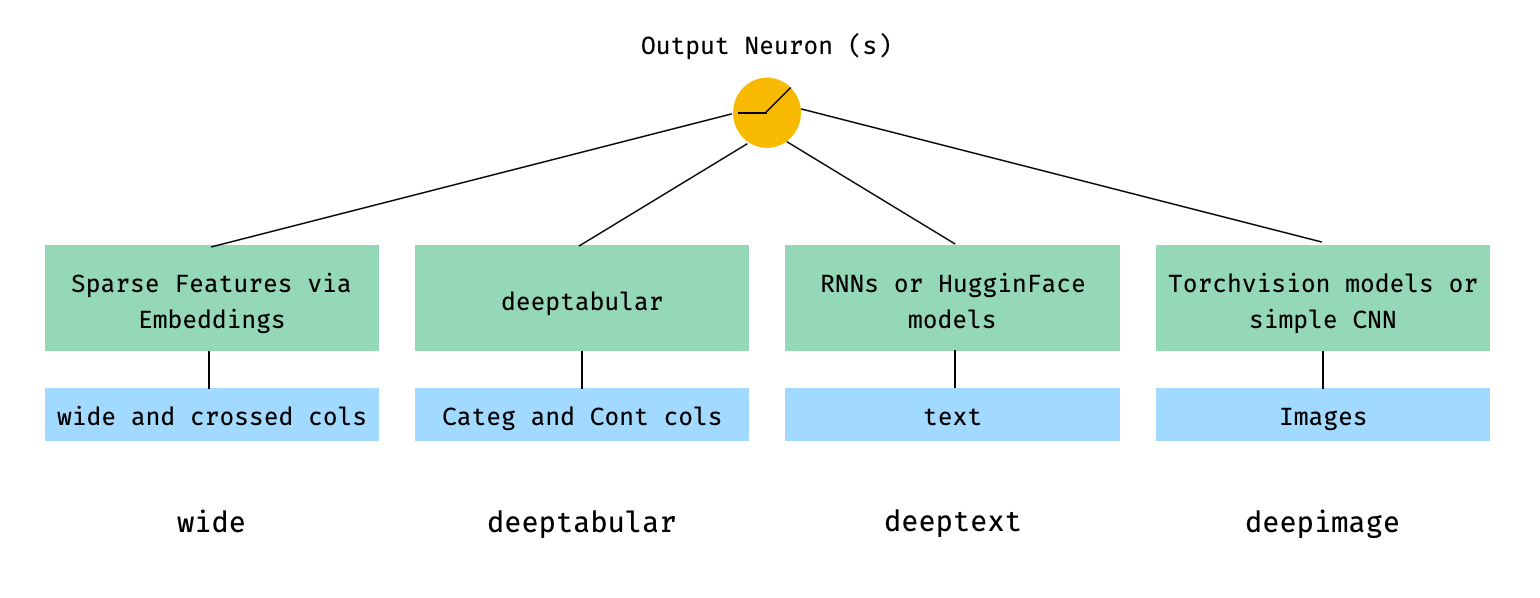
用数学术语和遵循论文中的符号,没有deephead组件的体系结构的表达方式可以表达为:

其中σ是sigmoid函数, “ w”是应用于宽模型的重量矩阵,并且是深层模型的最终激活, “ a”是这些最终激活,φ(x)是原始特征'x''的交叉产物变换,以及和'和b'是偏置项。如果您想知道什么是“跨产品转换” ,这是直接从论文中获取的报价: “对于二进制特征,跨产品转换(例如,“ and gender = emair = een)”)是1时,仅当构成特征(“性别= agendy = een”)是1,而“语言= eN”)是1,否则为0。
只要自定义模型具有称为output_dim的属性,可以使用自定义模型(不一定是图书馆中的自定义模型(不一定是图书馆中的模型),都具有最后一层激活的大小,以便可以构建WideDeep 。有关如何使用自定义组件的示例可以在示例文件夹和下面的部分中找到。
pytorch-widedeep库提供了许多不同的架构。在本节中,我们将以其相应的代码片段以最简单的形式(即带有默认参数值)以其最简单的形式(即具有默认参数值)显示。请注意,Shoud下面的所有片段在当地运行。有关不同组件及其参数的更详细说明,请参考文档。
对于以下示例,我们将使用以下生成的玩具数据集:
 import os
import random

import numpy as np
import pandas as pd
from PIL import Image
from faker import Faker


def create_and_save_random_image ( image_number , size = ( 32 , 32 )):

    if not os . path . exists ( "images" ):
        os . makedirs ( "images" )

    array = np . random . randint ( 0 , 256 , ( size [ 0 ], size [ 1 ], 3 ), dtype = np . uint8 )

    image = Image . fromarray ( array )

    image_name = f"image_ { image_number } .png"
    image . save ( os . path . join ( "images" , image_name ))

    return image_name


fake = Faker ()

cities = [ "New York" , "Los Angeles" , "Chicago" , "Houston" ]
names = [ "Alice" , "Bob" , "Charlie" , "David" , "Eva" ]

data = {
    "city" : [ random . choice ( cities ) for _ in range ( 100 )],
    "name" : [ random . choice ( names ) for _ in range ( 100 )],
    "age" : [ random . uniform ( 18 , 70 ) for _ in range ( 100 )],
    "height" : [ random . uniform ( 150 , 200 ) for _ in range ( 100 )],
    "sentence" : [ fake . sentence () for _ in range ( 100 )],
    "other_sentence" : [ fake . sentence () for _ in range ( 100 )],
    "image_name" : [ create_and_save_random_image ( i ) for i in range ( 100 )],
    "target" : [ random . choice ([ 0 , 1 ]) for _ in range ( 100 )],
}

df = pd . DataFrame ( data )这将在您的本地文件夹中创建100行数据帧和DIR,称为images ,带有100个随机图像(或具有噪音的图像)。
也许最简单的架构将只是一个wide , deeptabular , deeptext或deepimage的组成部分,这也是可能的,但让我们以标准的宽阔和深度建筑开始示例。从那里,如何构建仅由一个组件组成的模型将很简单。
请注意,下面显示的示例使用库中可用的任何模型几乎是相同的。例如, TabMlp可以被TabResnet , TabNet , TabTransformer等代替。同样,可以用AttentiveRNN , StackedAttentiveRNN或HFModel代替BasicRNN ,而HFMODEL则使用其相应的参数和预处理程序来代替。
1。宽和表格分量(又称深键)
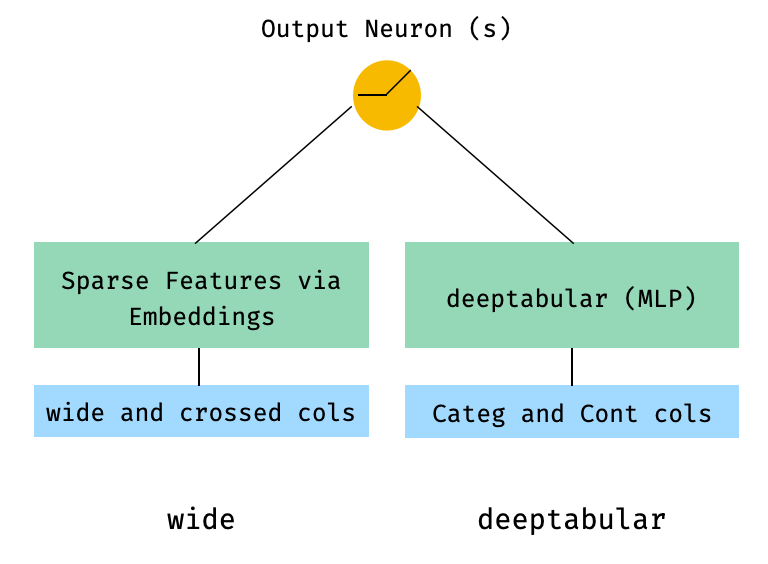
 from pytorch_widedeep . preprocessing import TabPreprocessor , WidePreprocessor
from pytorch_widedeep . models import Wide , TabMlp , WideDeep
from pytorch_widedeep . training import Trainer

# Wide
wide_cols = [ "city" ]
crossed_cols = [( "city" , "name" )]
wide_preprocessor = WidePreprocessor ( wide_cols = wide_cols , crossed_cols = crossed_cols )
X_wide = wide_preprocessor . fit_transform ( df )
wide = Wide ( input_dim = np . unique ( X_wide ). shape [ 0 ])

# Tabular
tab_preprocessor = TabPreprocessor (
    embed_cols = [ "city" , "name" ], continuous_cols = [ "age" , "height" ]
)
X_tab = tab_preprocessor . fit_transform ( df )
tab_mlp = TabMlp (
    column_idx = tab_preprocessor . column_idx ,
    cat_embed_input = tab_preprocessor . cat_embed_input ,
    continuous_cols = tab_preprocessor . continuous_cols ,
    mlp_hidden_dims = [ 64 , 32 ],
)

# WideDeep
model = WideDeep ( wide = wide , deeptabular = tab_mlp )

# Train
trainer = Trainer ( model , objective = "binary" )

trainer . fit (
    X_wide = X_wide ,
    X_tab = X_tab ,
    target = df [ "target" ]. values ,
    n_epochs = 1 ,
    batch_size = 32 ,
)
2。表格和文本数据
 from pytorch_widedeep . preprocessing import TabPreprocessor , TextPreprocessor
from pytorch_widedeep . models import TabMlp , BasicRNN , WideDeep
from pytorch_widedeep . training import Trainer

# Tabular
tab_preprocessor = TabPreprocessor (
    embed_cols = [ "city" , "name" ], continuous_cols = [ "age" , "height" ]
)
X_tab = tab_preprocessor . fit_transform ( df )
tab_mlp = TabMlp (
    column_idx = tab_preprocessor . column_idx ,
    cat_embed_input = tab_preprocessor . cat_embed_input ,
    continuous_cols = tab_preprocessor . continuous_cols ,
    mlp_hidden_dims = [ 64 , 32 ],
)

# Text
text_preprocessor = TextPreprocessor (
    text_col = "sentence" , maxlen = 20 , max_vocab = 100 , n_cpus = 1
)
X_text = text_preprocessor . fit_transform ( df )
rnn = BasicRNN (
    vocab_size = len ( text_preprocessor . vocab . itos ),
    embed_dim = 16 ,
    hidden_dim = 8 ,
    n_layers = 1 ,
)

# WideDeep
model = WideDeep ( deeptabular = tab_mlp , deeptext = rnn )

# Train
trainer = Trainer ( model , objective = "binary" )

trainer . fit (
    X_tab = X_tab ,
    X_text = X_text ,
    target = df [ "target" ]. values ,
    n_epochs = 1 ,
    batch_size = 32 ,
) 3。通过head_hidden_dims param in WideDeep的head_hidden_dims在顶部的表格和文本
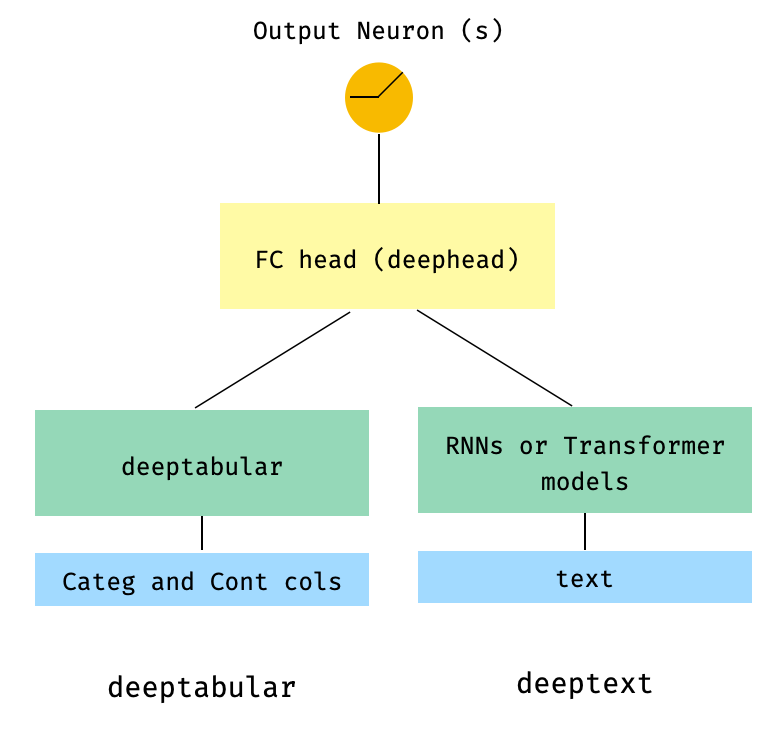
 from pytorch_widedeep . preprocessing import TabPreprocessor , TextPreprocessor
from pytorch_widedeep . models import TabMlp , BasicRNN , WideDeep
from pytorch_widedeep . training import Trainer

# Tabular
tab_preprocessor = TabPreprocessor (
    embed_cols = [ "city" , "name" ], continuous_cols = [ "age" , "height" ]
)
X_tab = tab_preprocessor . fit_transform ( df )
tab_mlp = TabMlp (
    column_idx = tab_preprocessor . column_idx ,
    cat_embed_input = tab_preprocessor . cat_embed_input ,
    continuous_cols = tab_preprocessor . continuous_cols ,
    mlp_hidden_dims = [ 64 , 32 ],
)

# Text
text_preprocessor = TextPreprocessor (
    text_col = "sentence" , maxlen = 20 , max_vocab = 100 , n_cpus = 1
)
X_text = text_preprocessor . fit_transform ( df )
rnn = BasicRNN (
    vocab_size = len ( text_preprocessor . vocab . itos ),
    embed_dim = 16 ,
    hidden_dim = 8 ,
    n_layers = 1 ,
)

# WideDeep
model = WideDeep ( deeptabular = tab_mlp , deeptext = rnn , head_hidden_dims = [ 32 , 16 ])

# Train
trainer = Trainer ( model , objective = "binary" )

trainer . fit (
    X_tab = X_tab ,
    X_text = X_text ,
    target = df [ "target" ]. values ,
    n_epochs = 1 ,
    batch_size = 32 ,
) 4。直接传递给WideDeep表格和多个文本列
 from pytorch_widedeep . preprocessing import TabPreprocessor , TextPreprocessor
from pytorch_widedeep . models import TabMlp , BasicRNN , WideDeep
from pytorch_widedeep . training import Trainer


# Tabular
tab_preprocessor = TabPreprocessor (
    embed_cols = [ "city" , "name" ], continuous_cols = [ "age" , "height" ]
)
X_tab = tab_preprocessor . fit_transform ( df )
tab_mlp = TabMlp (
    column_idx = tab_preprocessor . column_idx ,
    cat_embed_input = tab_preprocessor . cat_embed_input ,
    continuous_cols = tab_preprocessor . continuous_cols ,
    mlp_hidden_dims = [ 64 , 32 ],
)

# Text
text_preprocessor_1 = TextPreprocessor (
    text_col = "sentence" , maxlen = 20 , max_vocab = 100 , n_cpus = 1
)
X_text_1 = text_preprocessor_1 . fit_transform ( df )
text_preprocessor_2 = TextPreprocessor (
    text_col = "other_sentence" , maxlen = 20 , max_vocab = 100 , n_cpus = 1
)
X_text_2 = text_preprocessor_2 . fit_transform ( df )
rnn_1 = BasicRNN (
    vocab_size = len ( text_preprocessor_1 . vocab . itos ),
    embed_dim = 16 ,
    hidden_dim = 8 ,
    n_layers = 1 ,
)
rnn_2 = BasicRNN (
    vocab_size = len ( text_preprocessor_2 . vocab . itos ),
    embed_dim = 16 ,
    hidden_dim = 8 ,
    n_layers = 1 ,
)

# WideDeep
model = WideDeep ( deeptabular = tab_mlp , deeptext = [ rnn_1 , rnn_2 ])

# Train
trainer = Trainer ( model , objective = "binary" )

trainer . fit (
    X_tab = X_tab ,
    X_text = [ X_text_1 , X_text_2 ],
    target = df [ "target" ]. values ,
    n_epochs = 1 ,
    batch_size = 32 ,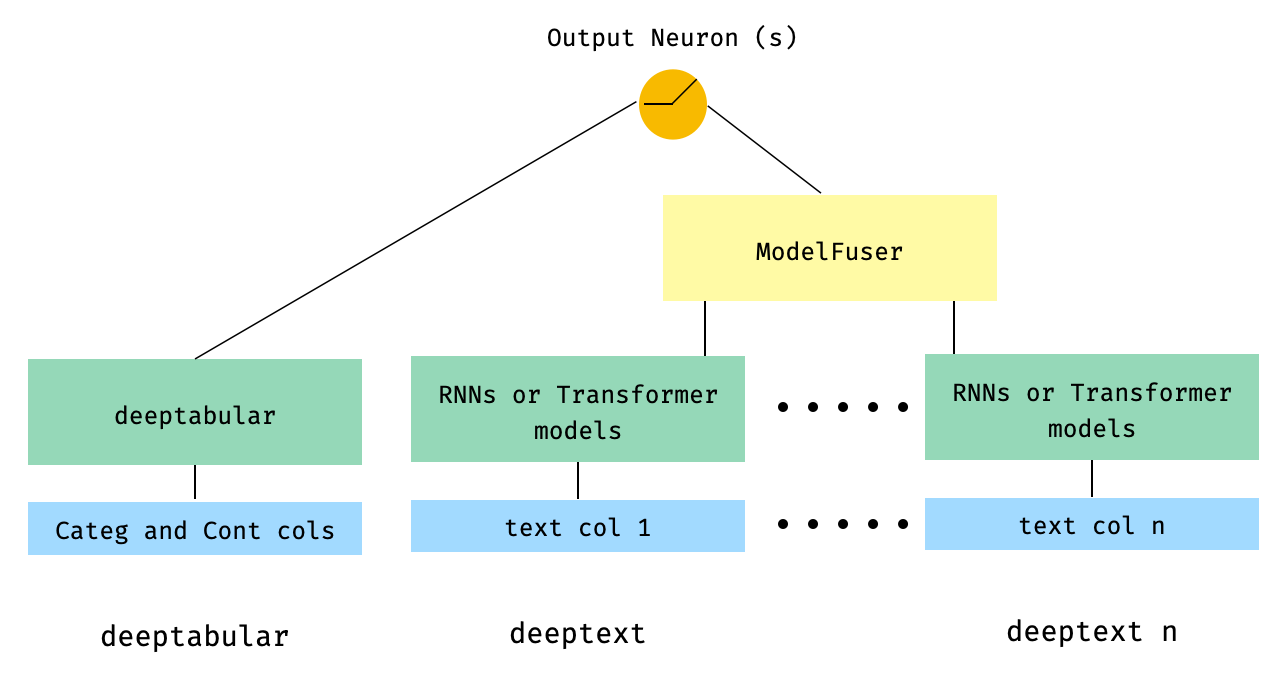
) 5。通过库的ModelFuser类融合的表格数据和多个文本列
 from pytorch_widedeep . preprocessing import TabPreprocessor , TextPreprocessor
from pytorch_widedeep . models import TabMlp , BasicRNN , WideDeep , ModelFuser
from pytorch_widedeep import Trainer

# Tabular
tab_preprocessor = TabPreprocessor (
    embed_cols = [ "city" , "name" ], continuous_cols = [ "age" , "height" ]
)
X_tab = tab_preprocessor . fit_transform ( df )
tab_mlp = TabMlp (
    column_idx = tab_preprocessor . column_idx ,
    cat_embed_input = tab_preprocessor . cat_embed_input ,
    continuous_cols = tab_preprocessor . continuous_cols ,
    mlp_hidden_dims = [ 64 , 32 ],
)

# Text
text_preprocessor_1 = TextPreprocessor (
    text_col = "sentence" , maxlen = 20 , max_vocab = 100 , n_cpus = 1
)
X_text_1 = text_preprocessor_1 . fit_transform ( df )
text_preprocessor_2 = TextPreprocessor (
    text_col = "other_sentence" , maxlen = 20 , max_vocab = 100 , n_cpus = 1
)
X_text_2 = text_preprocessor_2 . fit_transform ( df )

rnn_1 = BasicRNN (
    vocab_size = len ( text_preprocessor_1 . vocab . itos ),
    embed_dim = 16 ,
    hidden_dim = 8 ,
    n_layers = 1 ,
)
rnn_2 = BasicRNN (
    vocab_size = len ( text_preprocessor_2 . vocab . itos ),
    embed_dim = 16 ,
    hidden_dim = 8 ,
    n_layers = 1 ,
)

models_fuser = ModelFuser ( models = [ rnn_1 , rnn_2 ], fusion_method = "mult" )

# WideDeep
model = WideDeep ( deeptabular = tab_mlp , deeptext = models_fuser )

# Train
trainer = Trainer ( model , objective = "binary" )

trainer . fit (
    X_tab = X_tab ,
    X_text = [ X_text_1 , X_text_2 ],
    target = df [ "target" ]. values ,
    n_epochs = 1 ,
    batch_size = 32 ,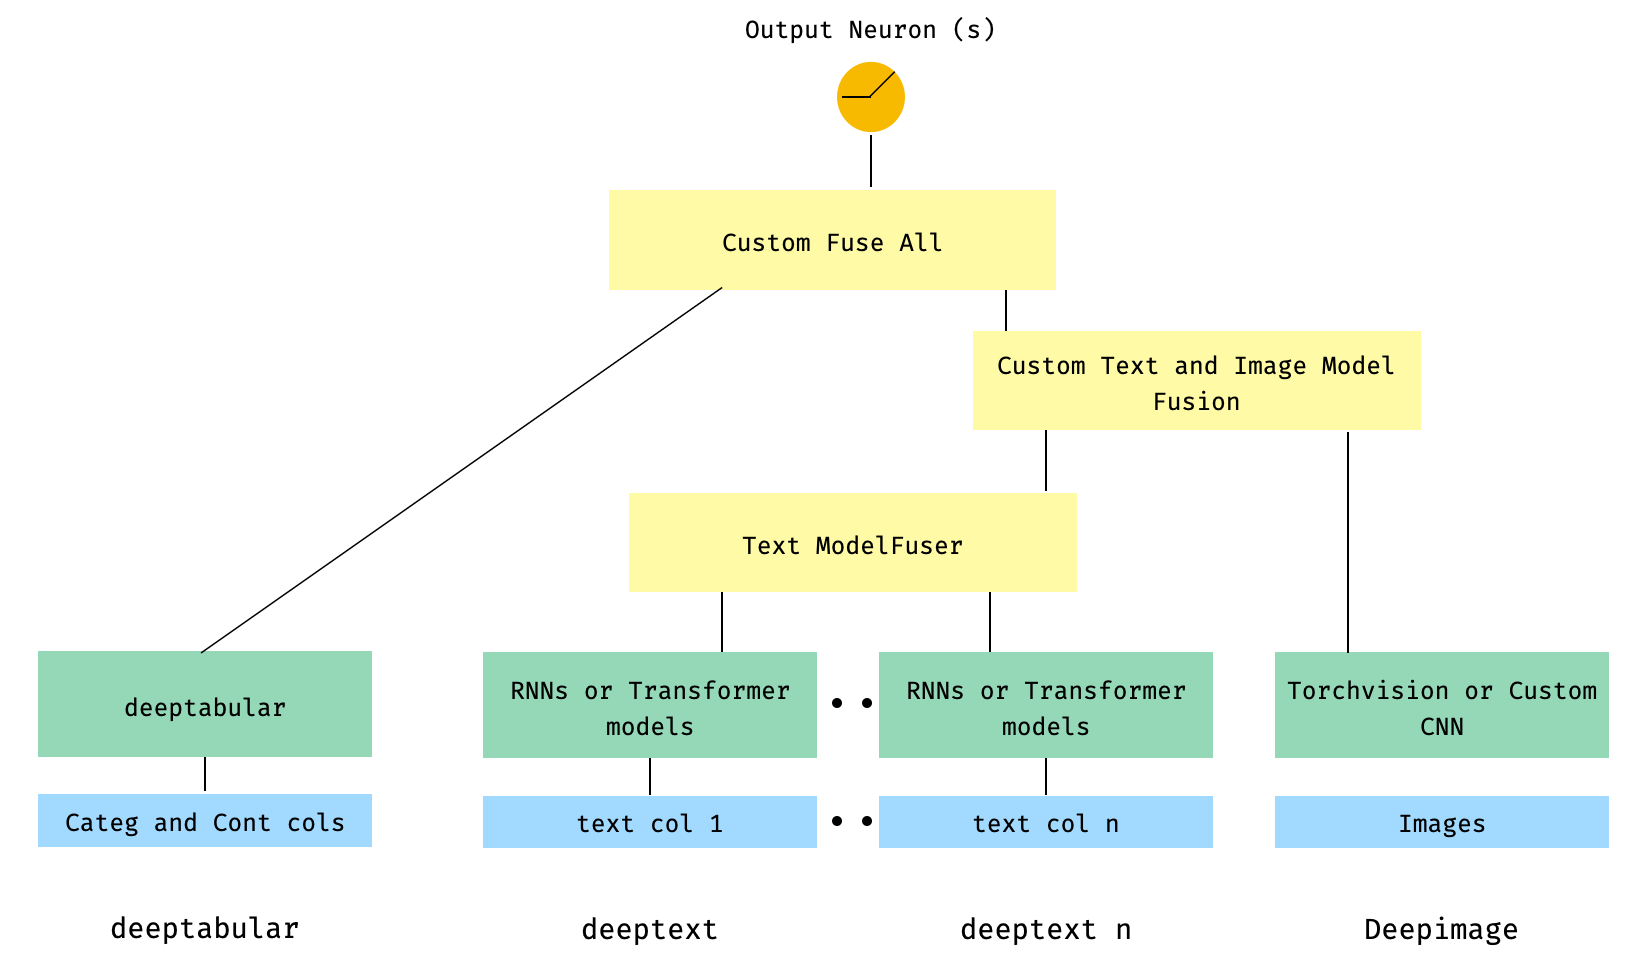
) 6。带有图像列的表格和多个文本列。文本列是通过库的ModelFuser融合的,然后全部通过WideDeep中的Deephead Paramenter融合,这是用户编码的自定义ModelFuser
这也许是不太优雅的解决方案,因为它涉及用户的自定义组件并切片“传入”张量。将来,我们将包括一个TextAndImageModelFuser ,以使此过程更加简单。不过,并不是真的很复杂,这是如何在pytorch-widedeep中使用自定义组件的一个很好的例子。
请注意,自定义组件的唯一要求是它具有称为output_dim的属性,该属性返回最后一层激活的大小。换句话说,它不需要从BaseWDModelComponent继承。该基类简单地检查了这种属性的存在,并避免了内部的一些打字错误。
 import torch

from pytorch_widedeep . preprocessing import TabPreprocessor , TextPreprocessor , ImagePreprocessor
from pytorch_widedeep . models import TabMlp , BasicRNN , WideDeep , ModelFuser , Vision
from pytorch_widedeep . models . _base_wd_model_component import BaseWDModelComponent
from pytorch_widedeep import Trainer

# Tabular
tab_preprocessor = TabPreprocessor (
    embed_cols = [ "city" , "name" ], continuous_cols = [ "age" , "height" ]
)
X_tab = tab_preprocessor . fit_transform ( df )
tab_mlp = TabMlp (
    column_idx = tab_preprocessor . column_idx ,
    cat_embed_input = tab_preprocessor . cat_embed_input ,
    continuous_cols = tab_preprocessor . continuous_cols ,
    mlp_hidden_dims = [ 16 , 8 ],
)

# Text
text_preprocessor_1 = TextPreprocessor (
    text_col = "sentence" , maxlen = 20 , max_vocab = 100 , n_cpus = 1
)
X_text_1 = text_preprocessor_1 . fit_transform ( df )
text_preprocessor_2 = TextPreprocessor (
    text_col = "other_sentence" , maxlen = 20 , max_vocab = 100 , n_cpus = 1
)
X_text_2 = text_preprocessor_2 . fit_transform ( df )
rnn_1 = BasicRNN (
    vocab_size = len ( text_preprocessor_1 . vocab . itos ),
    embed_dim = 16 ,
    hidden_dim = 8 ,
    n_layers = 1 ,
)
rnn_2 = BasicRNN (
    vocab_size = len ( text_preprocessor_2 . vocab . itos ),
    embed_dim = 16 ,
    hidden_dim = 8 ,
    n_layers = 1 ,
)
models_fuser = ModelFuser (
    models = [ rnn_1 , rnn_2 ],
    fusion_method = "mult" ,
)

# Image
image_preprocessor = ImagePreprocessor ( img_col = "image_name" , img_path = "images" )
X_img = image_preprocessor . fit_transform ( df )
vision = Vision ( pretrained_model_setup = "resnet18" , head_hidden_dims = [ 16 , 8 ])

# deephead (custom model fuser)
class MyModelFuser ( BaseWDModelComponent ):
    """
    Simply a Linear + Relu sequence on top of the text + images followed by a
    Linear -> Relu -> Linear for the concatenation of tabular slice of the
    tensor and the output of the text and image sequential model
    """
    def __init__ (
        self ,
        tab_incoming_dim : int ,
        text_incoming_dim : int ,
        image_incoming_dim : int ,
        output_units : int ,
    ):

        super ( MyModelFuser , self ). __init__ ()

        self . tab_incoming_dim = tab_incoming_dim
        self . text_incoming_dim = text_incoming_dim
        self . image_incoming_dim = image_incoming_dim
        self . output_units = output_units
        self . text_and_image_fuser = torch . nn . Sequential (
            torch . nn . Linear ( text_incoming_dim + image_incoming_dim , output_units ),
            torch . nn . ReLU (),
        )
        self . out = torch . nn . Sequential (
            torch . nn . Linear ( output_units + tab_incoming_dim , output_units * 4 ),
            torch . nn . ReLU (),
            torch . nn . Linear ( output_units * 4 , output_units ),
        )

    def forward ( self , X : torch . Tensor ) -> torch . Tensor :
        tab_slice = slice ( 0 , self . tab_incoming_dim )
        text_slice = slice (
            self . tab_incoming_dim , self . tab_incoming_dim + self . text_incoming_dim
        )
        image_slice = slice (
            self . tab_incoming_dim + self . text_incoming_dim ,
            self . tab_incoming_dim + self . text_incoming_dim + self . image_incoming_dim ,
        )
        X_tab = X [:, tab_slice ]
        X_text = X [:, text_slice ]
        X_img = X [:, image_slice ]
        X_text_and_image = self . text_and_image_fuser ( torch . cat ([ X_text , X_img ], dim = 1 ))
        return self . out ( torch . cat ([ X_tab , X_text_and_image ], dim = 1 ))

    @ property
    def output_dim ( self ):
        return self . output_units


deephead = MyModelFuser (
    tab_incoming_dim = tab_mlp . output_dim ,
    text_incoming_dim = models_fuser . output_dim ,
    image_incoming_dim = vision . output_dim ,
    output_units = 8 ,
)

# WideDeep
model = WideDeep (
    deeptabular = tab_mlp ,
    deeptext = models_fuser ,
    deepimage = vision ,
    deephead = deephead ,
)

# Train
trainer = Trainer ( model , objective = "binary" )

trainer . fit (
    X_tab = X_tab ,
    X_text = [ X_text_1 , X_text_2 ],
    X_img = X_img ,
    target = df [ "target" ]. values ,
    n_epochs = 1 ,
    batch_size = 32 ,
)
7。一个两个较高的型号
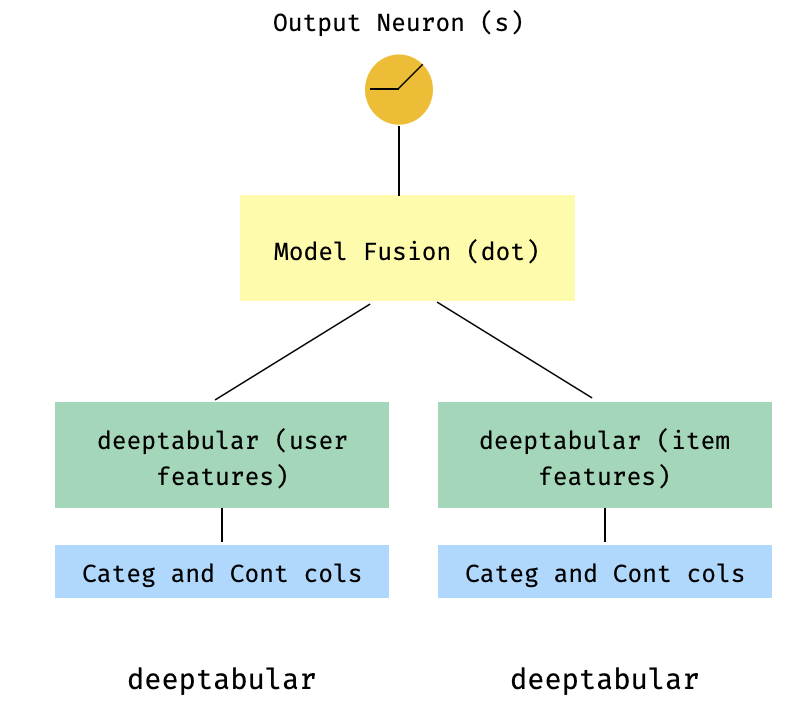
这是推荐系统背景下的流行模型。假设我们形成了我的三倍(用户功能,项目功能,目标)的表格数据集。我们可以创建一个两个较高的模型,其中用户和项目功能通过两个单独的型号传递,然后通过点产品“融合”。
 import numpy as np
import pandas as pd

from pytorch_widedeep import Trainer
from pytorch_widedeep . preprocessing import TabPreprocessor
from pytorch_widedeep . models import TabMlp , WideDeep , ModelFuser

# Let's create the interaction dataset
# user_features dataframe
np . random . seed ( 42 )
user_ids = np . arange ( 1 , 101 )
ages = np . random . randint ( 18 , 60 , size = 100 )
genders = np . random . choice ([ "male" , "female" ], size = 100 )
locations = np . random . choice ([ "city_a" , "city_b" , "city_c" , "city_d" ], size = 100 )
user_features = pd . DataFrame (
    { "id" : user_ids , "age" : ages , "gender" : genders , "location" : locations }
)

# item_features dataframe
item_ids = np . arange ( 1 , 101 )
prices = np . random . uniform ( 10 , 500 , size = 100 ). round ( 2 )
colors = np . random . choice ([ "red" , "blue" , "green" , "black" ], size = 100 )
categories = np . random . choice ([ "electronics" , "clothing" , "home" , "toys" ], size = 100 )

item_features = pd . DataFrame (
    { "id" : item_ids , "price" : prices , "color" : colors , "category" : categories }
)

# Interactions dataframe
interaction_user_ids = np . random . choice ( user_ids , size = 1000 )
interaction_item_ids = np . random . choice ( item_ids , size = 1000 )
purchased = np . random . choice ([ 0 , 1 ], size = 1000 , p = [ 0.7 , 0.3 ])
interactions = pd . DataFrame (
    {
        "user_id" : interaction_user_ids ,
        "item_id" : interaction_item_ids ,
        "purchased" : purchased ,
    }
)
user_item_purchased = interactions . merge (
    user_features , left_on = "user_id" , right_on = "id"
). merge ( item_features , left_on = "item_id" , right_on = "id" )

# Users
tab_preprocessor_user = TabPreprocessor (
    cat_embed_cols = [ "gender" , "location" ],
    continuous_cols = [ "age" ],
)
X_user = tab_preprocessor_user . fit_transform ( user_item_purchased )
tab_mlp_user = TabMlp (
    column_idx = tab_preprocessor_user . column_idx ,
    cat_embed_input = tab_preprocessor_user . cat_embed_input ,
    continuous_cols = [ "age" ],
    mlp_hidden_dims = [ 16 , 8 ],
    mlp_dropout = [ 0.2 , 0.2 ],
)

# Items
tab_preprocessor_item = TabPreprocessor (
    cat_embed_cols = [ "color" , "category" ],
    continuous_cols = [ "price" ],
)
X_item = tab_preprocessor_item . fit_transform ( user_item_purchased )
tab_mlp_item = TabMlp (
    column_idx = tab_preprocessor_item . column_idx ,
    cat_embed_input = tab_preprocessor_item . cat_embed_input ,
    continuous_cols = [ "price" ],
    mlp_hidden_dims = [ 16 , 8 ],
    mlp_dropout = [ 0.2 , 0.2 ],
)

two_tower_model = ModelFuser ([ tab_mlp_user , tab_mlp_item ], fusion_method = "dot" )

model = WideDeep ( deeptabular = two_tower_model )

trainer = Trainer ( model , objective = "binary" )

trainer . fit (
    X_tab = [ X_user , X_item ],
    target = interactions . purchased . values ,
    n_epochs = 1 ,
    batch_size = 32 ,
)
8。表格和多目标损失
这是一个“奖励”,以说明使用多目标损失的使用,而不是实际上是一个不同的体系结构。
 from pytorch_widedeep . preprocessing import TabPreprocessor , TextPreprocessor , ImagePreprocessor
from pytorch_widedeep . models import TabMlp , BasicRNN , WideDeep , ModelFuser , Vision
from pytorch_widedeep . losses_multitarget import MultiTargetClassificationLoss
from pytorch_widedeep . models . _base_wd_model_component import BaseWDModelComponent
from pytorch_widedeep import Trainer

# let's add a second target to the dataframe
df [ "target2" ] = [ random . choice ([ 0 , 1 ]) for _ in range ( 100 )]

# Tabular
tab_preprocessor = TabPreprocessor (
    embed_cols = [ "city" , "name" ], continuous_cols = [ "age" , "height" ]
)
X_tab = tab_preprocessor . fit_transform ( df )
tab_mlp = TabMlp (
    column_idx = tab_preprocessor . column_idx ,
    cat_embed_input = tab_preprocessor . cat_embed_input ,
    continuous_cols = tab_preprocessor . continuous_cols ,
    mlp_hidden_dims = [ 64 , 32 ],
)

# 'pred_dim=2' because we have two binary targets. For other types of targets,
#  please, see the documentation
model = WideDeep ( deeptabular = tab_mlp , pred_dim = 2 ).

loss = MultiTargetClassificationLoss ( binary_config = [ 0 , 1 ], reduction = "mean" )

# When a multi-target loss is used, 'custom_loss_function' must not be None.
# See the docs
trainer = Trainer ( model , objective = "multitarget" , custom_loss_function = loss )

trainer . fit (
    X_tab = X_tab ,
    target = df [[ "target" , "target2" ]]. values ,
    n_epochs = 1 ,
    batch_size = 32 ,
)deeptabular分量重要的是要再次强调,可以独立地和孤立地使用每个单独的组件, wide , deeptabular , deeptext和deepimage 。例如,一个人只能在线性模型中使用wide 。实际上, pytorch-widedeep中最有趣的功能之一就是使用deeptabular成分,即通常将其称为“表格数据的深度学习”。当前, pytorch-widedeep为该组件提供以下不同模型:
我们称之为两个基于注意力的模型:
Tabformer家族,IE Transformers用于表格数据:
基于神经网络中的重量不确定性的表格数据的概率DL模型:
Wide模型的概率适应。TabMlp模型的概率适应请注意,尽管有科学出版物针对TabTransFormer,Saint和Ft-Transformer,但Tabfasfformer和Tabceceiver是我们对这些算法数据的算法的适应。
此外,除了TabPerceiver以外,可以将自我监管的预训练用于所有deeptabular模型。自我监督的预训练可以通过两种方法或例程使用,我们称为:Encoder-Decoder方法和约束构成方法。请有关此功能的详细信息以及库中的所有其他选项,请参见文档和示例。
rec模块该模块是作为图书馆中现有组件的扩展而引入的,解决了与建议系统有关的问题和问题。尽管仍在积极开发中,但目前包括许多强大的推荐模型。
值得注意的是,该库已经支持使用现有组件实施各种建议算法。例如,可以使用图书馆的核心功能来构建诸如宽和深,两塔或神经协作过滤之类的模型。
rec模块中的建议算法是:
有关如何使用这些模型的详细信息,请参见示例。
对于文本组件, deeptext ,库提供以下模型:
对于图像组成部分, deepimage ,图书馆支持以下家庭的模型:“ resnet”,“ shufflenet”,“ resnext”,“ wide_resnet”,“ regnet”,“ densenet”,“ mobilenetv3”,“ mobilenetv3”,“ mobilenetv2”,“ mobilenetv2','mobilenetv2','mnasnet''mnasnet'','mnasnet'','''''''''''''''''''''''''''''''''''''''''''''''''''''''这些是通过torchvision提供的,并包裹在Vision课上。
使用PIP安装:
pip install pytorch-widedeep或直接从github安装
pip install git+https://github.com/jrzaurin/pytorch-widedeep.git # Clone the repository
git clone https://github.com/jrzaurin/pytorch-widedeep
cd pytorch-widedeep
# Install in dev mode
pip install -e .这是使用Wide和DeepDense设置与成人数据集进行二进制分类的端到端示例。
使用pytorch-widedeep构建宽(线性)和深层模型:
 import numpy as np
import torch
from sklearn . model_selection import train_test_split

from pytorch_widedeep import Trainer
from pytorch_widedeep . preprocessing import WidePreprocessor , TabPreprocessor
from pytorch_widedeep . models import Wide , TabMlp , WideDeep
from pytorch_widedeep . metrics import Accuracy
from pytorch_widedeep . datasets import load_adult


df = load_adult ( as_frame = True )
df [ "income_label" ] = ( df [ "income" ]. apply ( lambda x : ">50K" in x )). astype ( int )
df . drop ( "income" , axis = 1 , inplace = True )
df_train , df_test = train_test_split ( df , test_size = 0.2 , stratify = df . income_label )

# Define the 'column set up'
wide_cols = [
    "education" ,
    "relationship" ,
    "workclass" ,
    "occupation" ,
    "native-country" ,
    "gender" ,
]
crossed_cols = [( "education" , "occupation" ), ( "native-country" , "occupation" )]

cat_embed_cols = [
    "workclass" ,
    "education" ,
    "marital-status" ,
    "occupation" ,
    "relationship" ,
    "race" ,
    "gender" ,
    "capital-gain" ,
    "capital-loss" ,
    "native-country" ,
]
continuous_cols = [ "age" , "hours-per-week" ]
target = "income_label"
target = df_train [ target ]. values

# prepare the data
wide_preprocessor = WidePreprocessor ( wide_cols = wide_cols , crossed_cols = crossed_cols )
X_wide = wide_preprocessor . fit_transform ( df_train )

tab_preprocessor = TabPreprocessor (
    cat_embed_cols = cat_embed_cols , continuous_cols = continuous_cols  # type: ignore[arg-type]
)
X_tab = tab_preprocessor . fit_transform ( df_train )

# build the model
wide = Wide ( input_dim = np . unique ( X_wide ). shape [ 0 ], pred_dim = 1 )
tab_mlp = TabMlp (
    column_idx = tab_preprocessor . column_idx ,
    cat_embed_input = tab_preprocessor . cat_embed_input ,
    continuous_cols = continuous_cols ,
)
model = WideDeep ( wide = wide , deeptabular = tab_mlp )

# train and validate
trainer = Trainer ( model , objective = "binary" , metrics = [ Accuracy ])
trainer . fit (
    X_wide = X_wide ,
    X_tab = X_tab ,
    target = target ,
    n_epochs = 5 ,
    batch_size = 256 ,
)

# predict on test
X_wide_te = wide_preprocessor . transform ( df_test )
X_tab_te = tab_preprocessor . transform ( df_test )
preds = trainer . predict ( X_wide = X_wide_te , X_tab = X_tab_te )

# Save and load

# Option 1: this will also save training history and lr history if the
# LRHistory callback is used
trainer . save ( path = "model_weights" , save_state_dict = True )

# Option 2: save as any other torch model
torch . save ( model . state_dict (), "model_weights/wd_model.pt" )

# From here in advance, Option 1 or 2 are the same. I assume the user has
# prepared the data and defined the new model components:
# 1. Build the model
model_new = WideDeep ( wide = wide , deeptabular = tab_mlp )
model_new . load_state_dict ( torch . load ( "model_weights/wd_model.pt" ))

# 2. Instantiate the trainer
trainer_new = Trainer ( model_new , objective = "binary" )

# 3. Either start the fit or directly predict
preds = trainer_new . predict ( X_wide = X_wide , X_tab = X_tab , batch_size = 32 )当然,一个人可以做更多的事情。请参阅示例文件夹,文档或伴侣帖子,以更好地理解包装及其功能的内容。
pytest tests
检查贡献页面。
该库取自其他一系列库,因此我认为可以在Readme中在此处提及它们(代码中还包括特定提及)。
Callbacks和Initializers结构和代码受torchsample样品库的启发,该库本身受到Keras的一部分启发。
该库中的TextProcessor类使用fastai的Tokenizer和Vocab 。 utils.fastai_transforms上的代码是其代码的次要改编,因此在此库中函数。根据我的经验,他们的Tokenizer是课堂上最好的。
此库中的ImageProcessor类使用Adrian Rosebrock的《奇妙的深度学习》(DL4CV)书中的代码。
这项工作是在Apache 2.0和MIT(或任何以后版本)下进行双重许可的。如果您使用这项工作,则可以在其中之一之间进行选择。
SPDX-License-Identifier: Apache-2.0 AND MIT
 @article{Zaurin_pytorch-widedeep_A_flexible_2023,
author = {Zaurin, Javier Rodriguez and Mulinka, Pavol},
doi = {10.21105/joss.05027},
journal = {Journal of Open Source Software},
month = jun,
number = {86},
pages = {5027},
title = {{pytorch-widedeep: A flexible package for multimodal deep learning}},
url = {https://joss.theoj.org/papers/10.21105/joss.05027},
volume = {8},
year = {2023}
}
 Zaurin, J. R., & Mulinka, P. (2023). pytorch-widedeep: A flexible package for
multimodal deep learning. Journal of Open Source Software, 8(86), 5027.
https://doi.org/10.21105/joss.05027


