nx100 remote control
Release - 1.0.3
Yaskawa Motoman NX100 หุ่นยนต์อุตสาหกรรมการควบคุมระยะไกล Python ห้องสมุดนี้ได้รับการพัฒนา แต่เดิมสำหรับโครงการพัฒนาระบบควบคุมการมองเห็นของเครื่อง ดูเพิ่มเติมได้ที่วิดีโอสาธิต YouTube
เอกสารเพื่อการพัฒนา
วิดีโอเหล่านี้เป็นส่วนหนึ่งของเอกสาร
- Do changes with your own risk! in case you brick your robot or your setup is different and it doesn't work. I cannot help. System info -> Security -> Select Management Mode ->
But do not enter Management Mode password but instead Yaskawa emperor password.
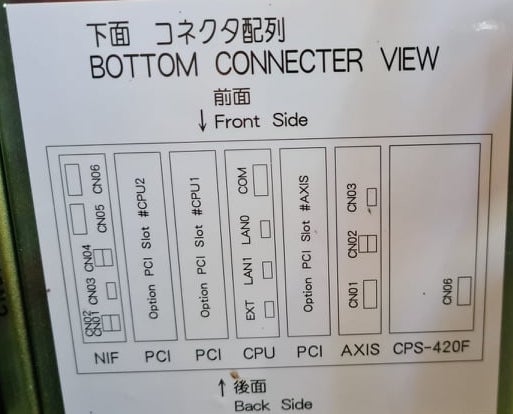
FD078 => bit set to 1 (Ethernet WWW)
LAN0 (next to serial COM port)
 1. Power off NX100 -> press down pendant "MAIN MENU" button while powering on NX100
2. Release "MAIN MENU" after seeing Motoman screen on pendant.
3. Login with Yaskawa emperor password from System -> Security.
4. SYSTEM -> SETUP -> OPTION FUNCTION -> TCP -> "USED"
5. SYSTEM -> SETUP -> OPTION FUNCTION -> NETWORK -> Give details.
6. Under network also find HOST SETUP -> Provide address details.
7. See that your changes have been saved.
8. Reboot NX100 and ping your NX100 ip address.
9. Test out this library.
pip install nx100-remote-control
pip install --upgrade nx100-remote-control import nx100_remote_control
nx100_remote_control . NX100_IP_ADDRESS = '192.168.2.28'
nx100_remote_control . NX100_TCP_PORT = 80
nx100_remote_control . MOCK_RESPONSE = False http://localhost:8080/ ซึ่งมีลักษณะเช่นนี้ในภาพด้านล่าง import nx100_remote_control
from nx100_remote_control . module import WebServer
nx100_remote_control . MOCK_RESPONSE = True
WebServer . run ( addr = "localhost" , port = 8080 )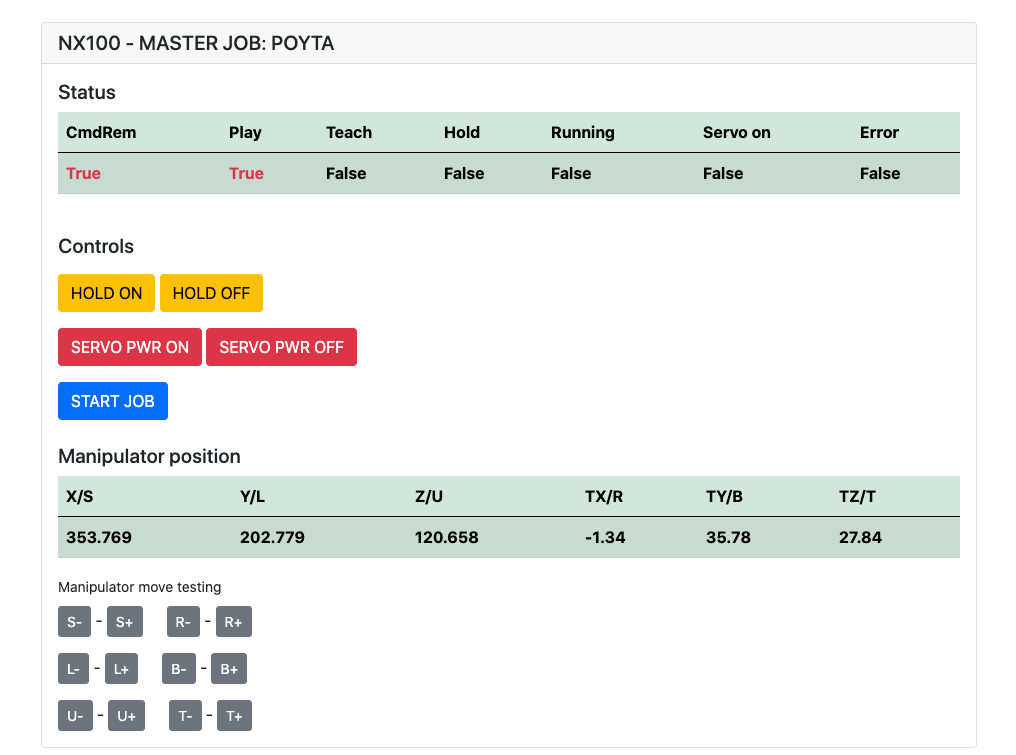
ต้องติดตั้ง: pip install flake8 pytest
ผ้าสำลี: flake8 ./nx100_remote_control --count --select=E9,F63,F7,F82 --show-source --statistics
ทดสอบ: pytest
Build: python -m build
Testing.py => ใช้สำหรับการพัฒนาและทดสอบแต่ละคำสั่ง
XboxController.py => ตามชื่อที่บอกว่าสามารถใช้คอนโทรลเลอร์เพื่อควบคุมหุ่นยนต์เพียงแค่สาธิต โปรดทราบว่าการเคลื่อนไหวนั้นเป็นไปอย่างไม่น่าเชื่อเนื่องจาก NX100 ไม่รองรับการควบคุมแบบเรียลไทม์
ตัวอย่างด่วนสำหรับคำสั่ง MOVL เพื่อทำการเคลื่อนไหวเชิงเส้นด้วยหุ่นยนต์ ดู Movel Object สำหรับรายละเอียดเพิ่มเติมหรืออ่าน Ethernet Server Function Manual
 from nx100_remote_control . module import Commands , Utils
from nx100_remote_control . objects import MoveL

Commands . write_linear_move ( MoveL . MoveL (
    MoveL . MoveL . motion_speed_selection_posture_speed ,
    5 ,
    MoveL . MoveL . coordinate_specification_base_coordinate ,
    353.769 , 202.779 , 120.658 ,
    - 1.34 , 35.78 , 27.84 ,
    Utils . binary_to_decimal ( 0x00000001 ),
    0 , 0 , 0 , 0 , 0 , 0 , 0
))
ใช้วัตถุ movel.movel เพื่อดูตัวเลือกสำหรับ motion_speed_selection_ และสำหรับ coordinate_specification_
จากนั้นรอการย้ายเพื่อให้เสร็จสมบูรณ์คุณสามารถใช้ฟังก์ชั่นการโทรกลับเป็นตัวอย่าง:
 from nx100_remote_control . module import Commands , Utils
from nx100_remote_control . objects import MoveL


def callback_success ():
    print ( 'MoveL position has been reached' )


def callback_failed ():
    print ( 'MoveL error or position not reached on given timeout' )


move_l = MoveL . MoveL (
    MoveL . MoveL . motion_speed_selection_posture_speed ,
    5 ,
    MoveL . MoveL . coordinate_specification_base_coordinate ,
    353.769 , 202.779 , 120.658 ,
    - 1.34 , 35.78 , 27.84 ,
    Utils . binary_to_decimal ( 0x00000001 ),
    0 , 0 , 0 , 0 , 0 , 0 , 0
)

Commands . robot_in_target_point_callback (
    move_l = move_l , timeout = 10 , _callback_success = callback_success , _callback_failed = callback_failed
)
ดังนั้นสิ่งนี้จะดำเนินการ _callback_success หากตำแหน่งถึงการหมดเวลาที่กำหนดหรือเรียกใช้ _callback_failed ถ้าไม่
อีกคลาสผู้บัญชาการ
 from nx100_remote_control . module import LinearMove , Utils
from nx100_remote_control . objects import MoveL

move_l = MoveL . MoveL (
    MoveL . MoveL . motion_speed_selection_posture_speed ,
    5 ,
    MoveL . MoveL . coordinate_specification_base_coordinate ,
    352.769 , 202.779 , 120.658 ,
    - 1.34 , 35.78 , 27.84 ,
    Utils . binary_to_decimal ( 0x00000001 ),
    0 , 0 , 0 , 0 , 0 , 0 , 0
)

linear_move = LinearMove . LinearMove ()
linear_move . go ( move_l = move_l , wait = True , poll_limit_seconds = 10 )
print ( 'finished' ) ตัวอย่างด่วนสำหรับคำสั่ง MOVJ เพื่อทำการเคลื่อนไหวร่วมกับหุ่นยนต์ อ่าน Ethernet Server Function Manual สำหรับรายละเอียดเพิ่มเติมเกี่ยวกับ MOVJ
- !!! BE CAREFUL WITH MOVJ COMMAND AND IT'S SPEED SETTING !!! from nx100_remote_control . module import JointMove , Utils
from nx100_remote_control . objects import MoveJ
move_j = MoveJ . MoveJ (
25 , # speed %
MoveJ . MoveJ . coordinate_specification_base_coordinate ,
352.769 , 202.779 , 120.658 ,
- 1.34 , 35.78 , 27.84 ,
Utils . binary_to_decimal ( 0x00000001 ),
0 , 0 , 0 , 0 , 0 , 0 , 0
)
linear_move = JointMove . JointMove ()
linear_move . go ( move_j = move_j , wait = True , poll_limit_seconds = 10 )
print ( 'finished' )โฟลเดอร์ Arduino มีรหัสและร่างสำหรับกริปเปอร์แบบกำหนดเองรวมสำหรับ NX100 Motoman
NX100 Ladder Config ได้โดยค่าเริ่มต้น GRP หมายถึงสัญญาณที่จัดกลุ่มดังนั้นจึงต้องยกเลิกการจัดกลุ่มเพื่อเข้าถึงรีเลย์เอาต์พุต #30052
แนวคิดที่นี่คือฉันต้องสามารถควบคุมรีเลย์ #30052 ด้วยสต็อก #10022 สัญญาณเอาท์พุทสากล แต่ยังมีสัญญาณอินพุตเครือข่าย #22012 และสิ่งนี้จำเป็นต้องใช้ STR + ไม่สามารถจัดการได้สำหรับทั้งสองกรณี
ทำงานระหว่างดำเนินการกับกริปเปอร์
 from nx100_remote_control . module import Gripper

Gripper . write_gripper_close ()
Gripper . write_gripper_open ()
Gripper . read_gripper_closed_command_register ()
Gripper . read_gripper_acknowledge ()
Gripper . read_gripper_hit ()บิตที่เห็นได้ชัดคืออินพุตหนึ่งอินพุตและเอาต์พุตสองรายการ การตัดสินใจของฮาร์ดแวร์ไม่สำคัญรหัสสามารถเปลี่ยนแปลงได้
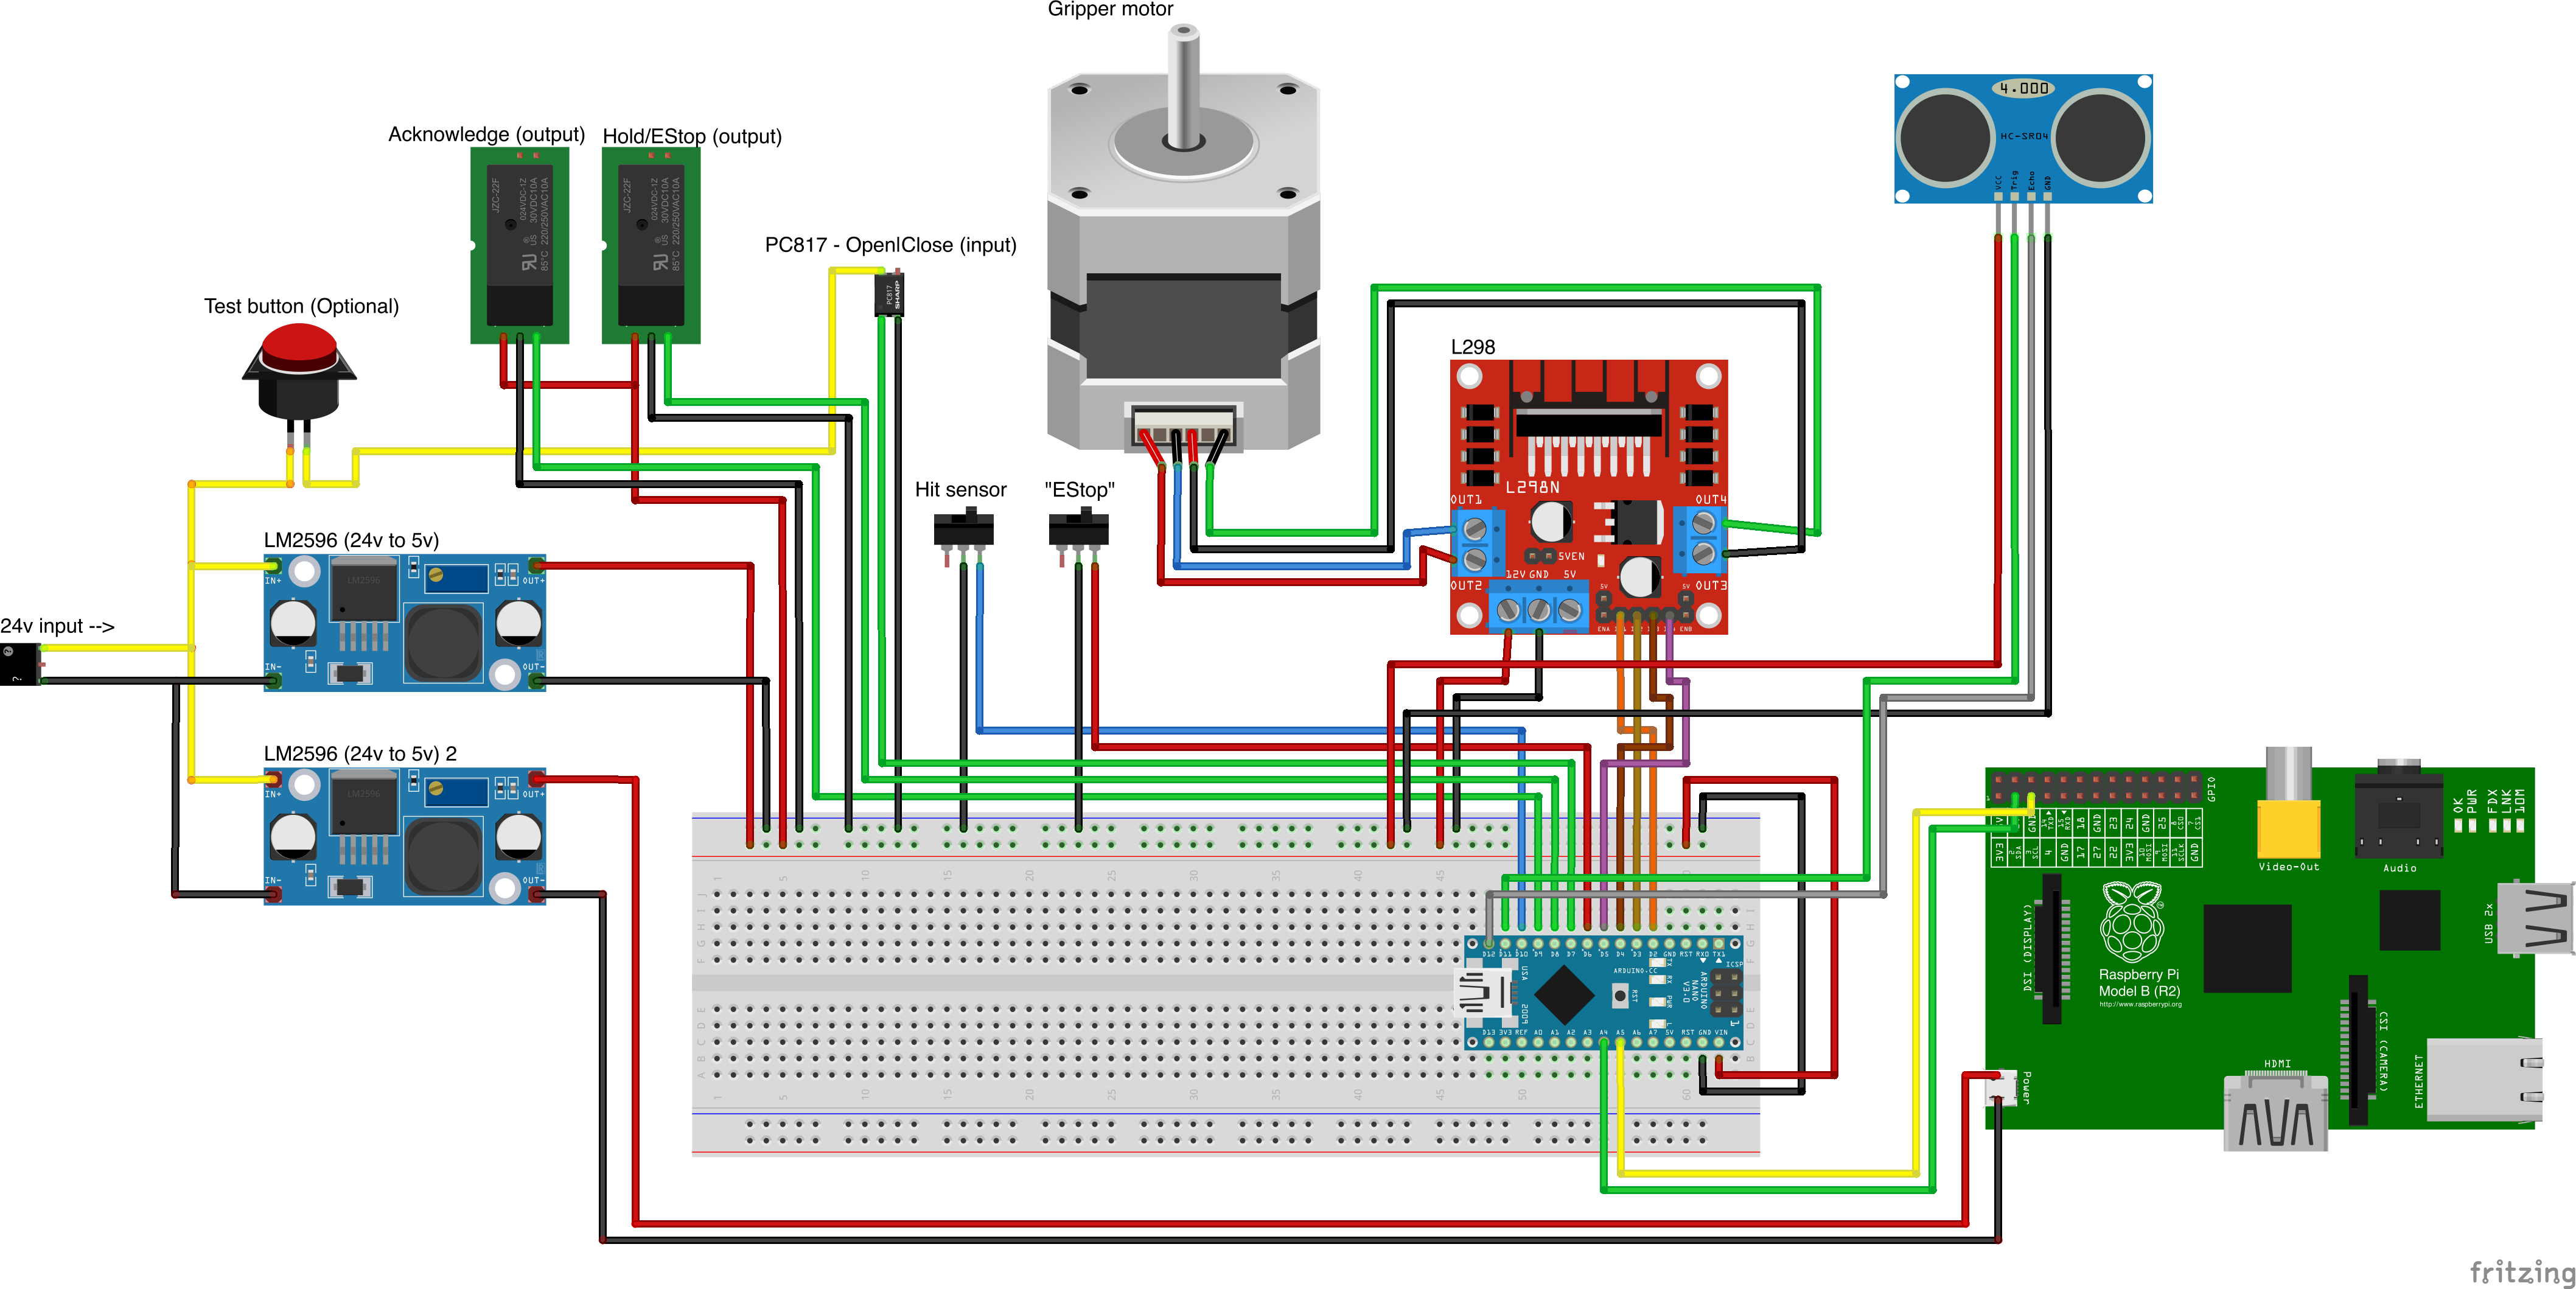
แหล่งที่มาของชิ้นส่วนที่กำหนดเอง
- Remember to increment setup.cfg version before release tag!

