nx100 remote control
Release - 1.0.3
Yaskawa Motoman NX100 industrial robot remote control Python library. This library was originally developed for machine vision control development project. See more at Youtube demo video.
Documents for development
These videos are part of documentation.
- Do changes with your own risk! in case you brick your robot or your setup is different and it doesn't work. I cannot help.System info -> Security -> Select Management Mode ->
But do not enter Management Mode password but instead Yaskawa emperor password.
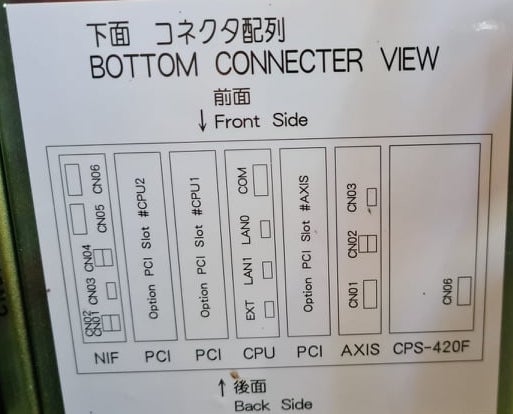
FD078 => bit set to 1 (Ethernet WWW)
LAN0 (next to serial COM port)
1. Power off NX100 -> press down pendant "MAIN MENU" button while powering on NX100
2. Release "MAIN MENU" after seeing Motoman screen on pendant.
3. Login with Yaskawa emperor password from System -> Security.
4. SYSTEM -> SETUP -> OPTION FUNCTION -> TCP -> "USED"
5. SYSTEM -> SETUP -> OPTION FUNCTION -> NETWORK -> Give details.
6. Under network also find HOST SETUP -> Provide address details.
7. See that your changes have been saved.
8. Reboot NX100 and ping your NX100 ip address.
9. Test out this library.
pip install nx100-remote-control
pip install --upgrade nx100-remote-controlimport nx100_remote_control
nx100_remote_control.NX100_IP_ADDRESS = '192.168.2.28'
nx100_remote_control.NX100_TCP_PORT = 80
nx100_remote_control.MOCK_RESPONSE = False http://localhost:8080/ which looks something like this in below image.import nx100_remote_control
from nx100_remote_control.module import WebServer
nx100_remote_control.MOCK_RESPONSE = True
WebServer.run(addr="localhost", port=8080)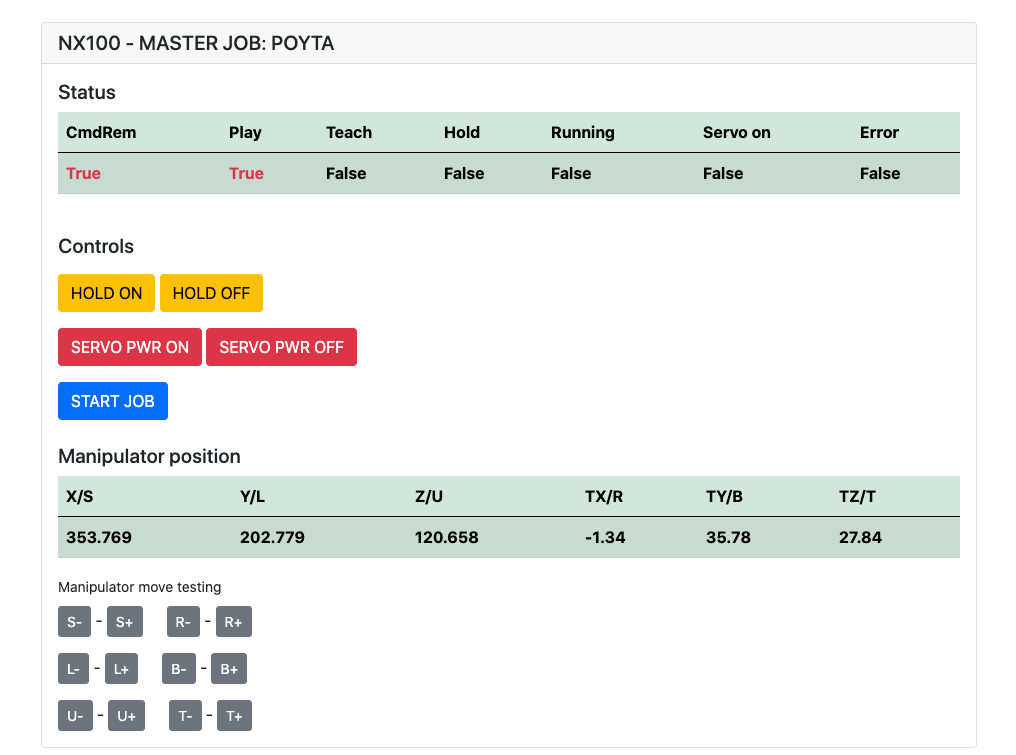
Must have installed: pip install flake8 pytest
Lint: flake8 ./nx100_remote_control --count --select=E9,F63,F7,F82 --show-source --statistics
Test: pytest
Build: python -m build
Testing.py => Used for development and testing individual commands.
XboxController.py => As name says, can use controller to control robot, just demo. Note that movements are clunky
because NX100 does not support real time controlling.
Quick sample for MovL command to do linear movement with robot.
See MoveL object for more details or read Ethernet Server Function Manual.
from nx100_remote_control.module import Commands, Utils
from nx100_remote_control.objects import MoveL

Commands.write_linear_move(MoveL.MoveL(
    MoveL.MoveL.motion_speed_selection_posture_speed,
    5,
    MoveL.MoveL.coordinate_specification_base_coordinate,
    353.769, 202.779, 120.658,
    -1.34, 35.78, 27.84,
    Utils.binary_to_decimal(0x00000001),
    0, 0, 0, 0, 0, 0, 0
))
Use MoveL.MoveL object to see options for motion_speed_selection_ and for coordinate_specification_
Then to wait for move to be completed you can use callback function as example:
from nx100_remote_control.module import Commands, Utils
from nx100_remote_control.objects import MoveL


def callback_success():
    print('MoveL position has been reached')


def callback_failed():
    print('MoveL error or position not reached on given timeout')


move_l = MoveL.MoveL(
    MoveL.MoveL.motion_speed_selection_posture_speed,
    5,
    MoveL.MoveL.coordinate_specification_base_coordinate,
    353.769, 202.779, 120.658,
    -1.34, 35.78, 27.84,
    Utils.binary_to_decimal(0x00000001),
    0, 0, 0, 0, 0, 0, 0
)

Commands.robot_in_target_point_callback(
    move_l=move_l, timeout=10, _callback_success=callback_success, _callback_failed=callback_failed
)
So this will exec _callback_success if position reached in given timeout or run _callback_failed if not.
Another commander class way
from nx100_remote_control.module import LinearMove, Utils
from nx100_remote_control.objects import MoveL

move_l = MoveL.MoveL(
    MoveL.MoveL.motion_speed_selection_posture_speed,
    5,
    MoveL.MoveL.coordinate_specification_base_coordinate,
    352.769, 202.779, 120.658,
    -1.34, 35.78, 27.84,
    Utils.binary_to_decimal(0x00000001),
    0, 0, 0, 0, 0, 0, 0
)

linear_move = LinearMove.LinearMove()
linear_move.go(move_l=move_l, wait=True, poll_limit_seconds=10)
print('finished')Quick sample for MovJ command to do joint motion movement with robot.
Read Ethernet Server Function Manual for more details about MOVJ
- !!! BE CAREFUL WITH MOVJ COMMAND AND IT'S SPEED SETTING !!!from nx100_remote_control.module import JointMove, Utils
from nx100_remote_control.objects import MoveJ
move_j = MoveJ.MoveJ(
25, # speed %
MoveJ.MoveJ.coordinate_specification_base_coordinate,
352.769, 202.779, 120.658,
-1.34, 35.78, 27.84,
Utils.binary_to_decimal(0x00000001),
0, 0, 0, 0, 0, 0, 0
)
linear_move = JointMove.JointMove()
linear_move.go(move_j=move_j, wait=True, poll_limit_seconds=10)
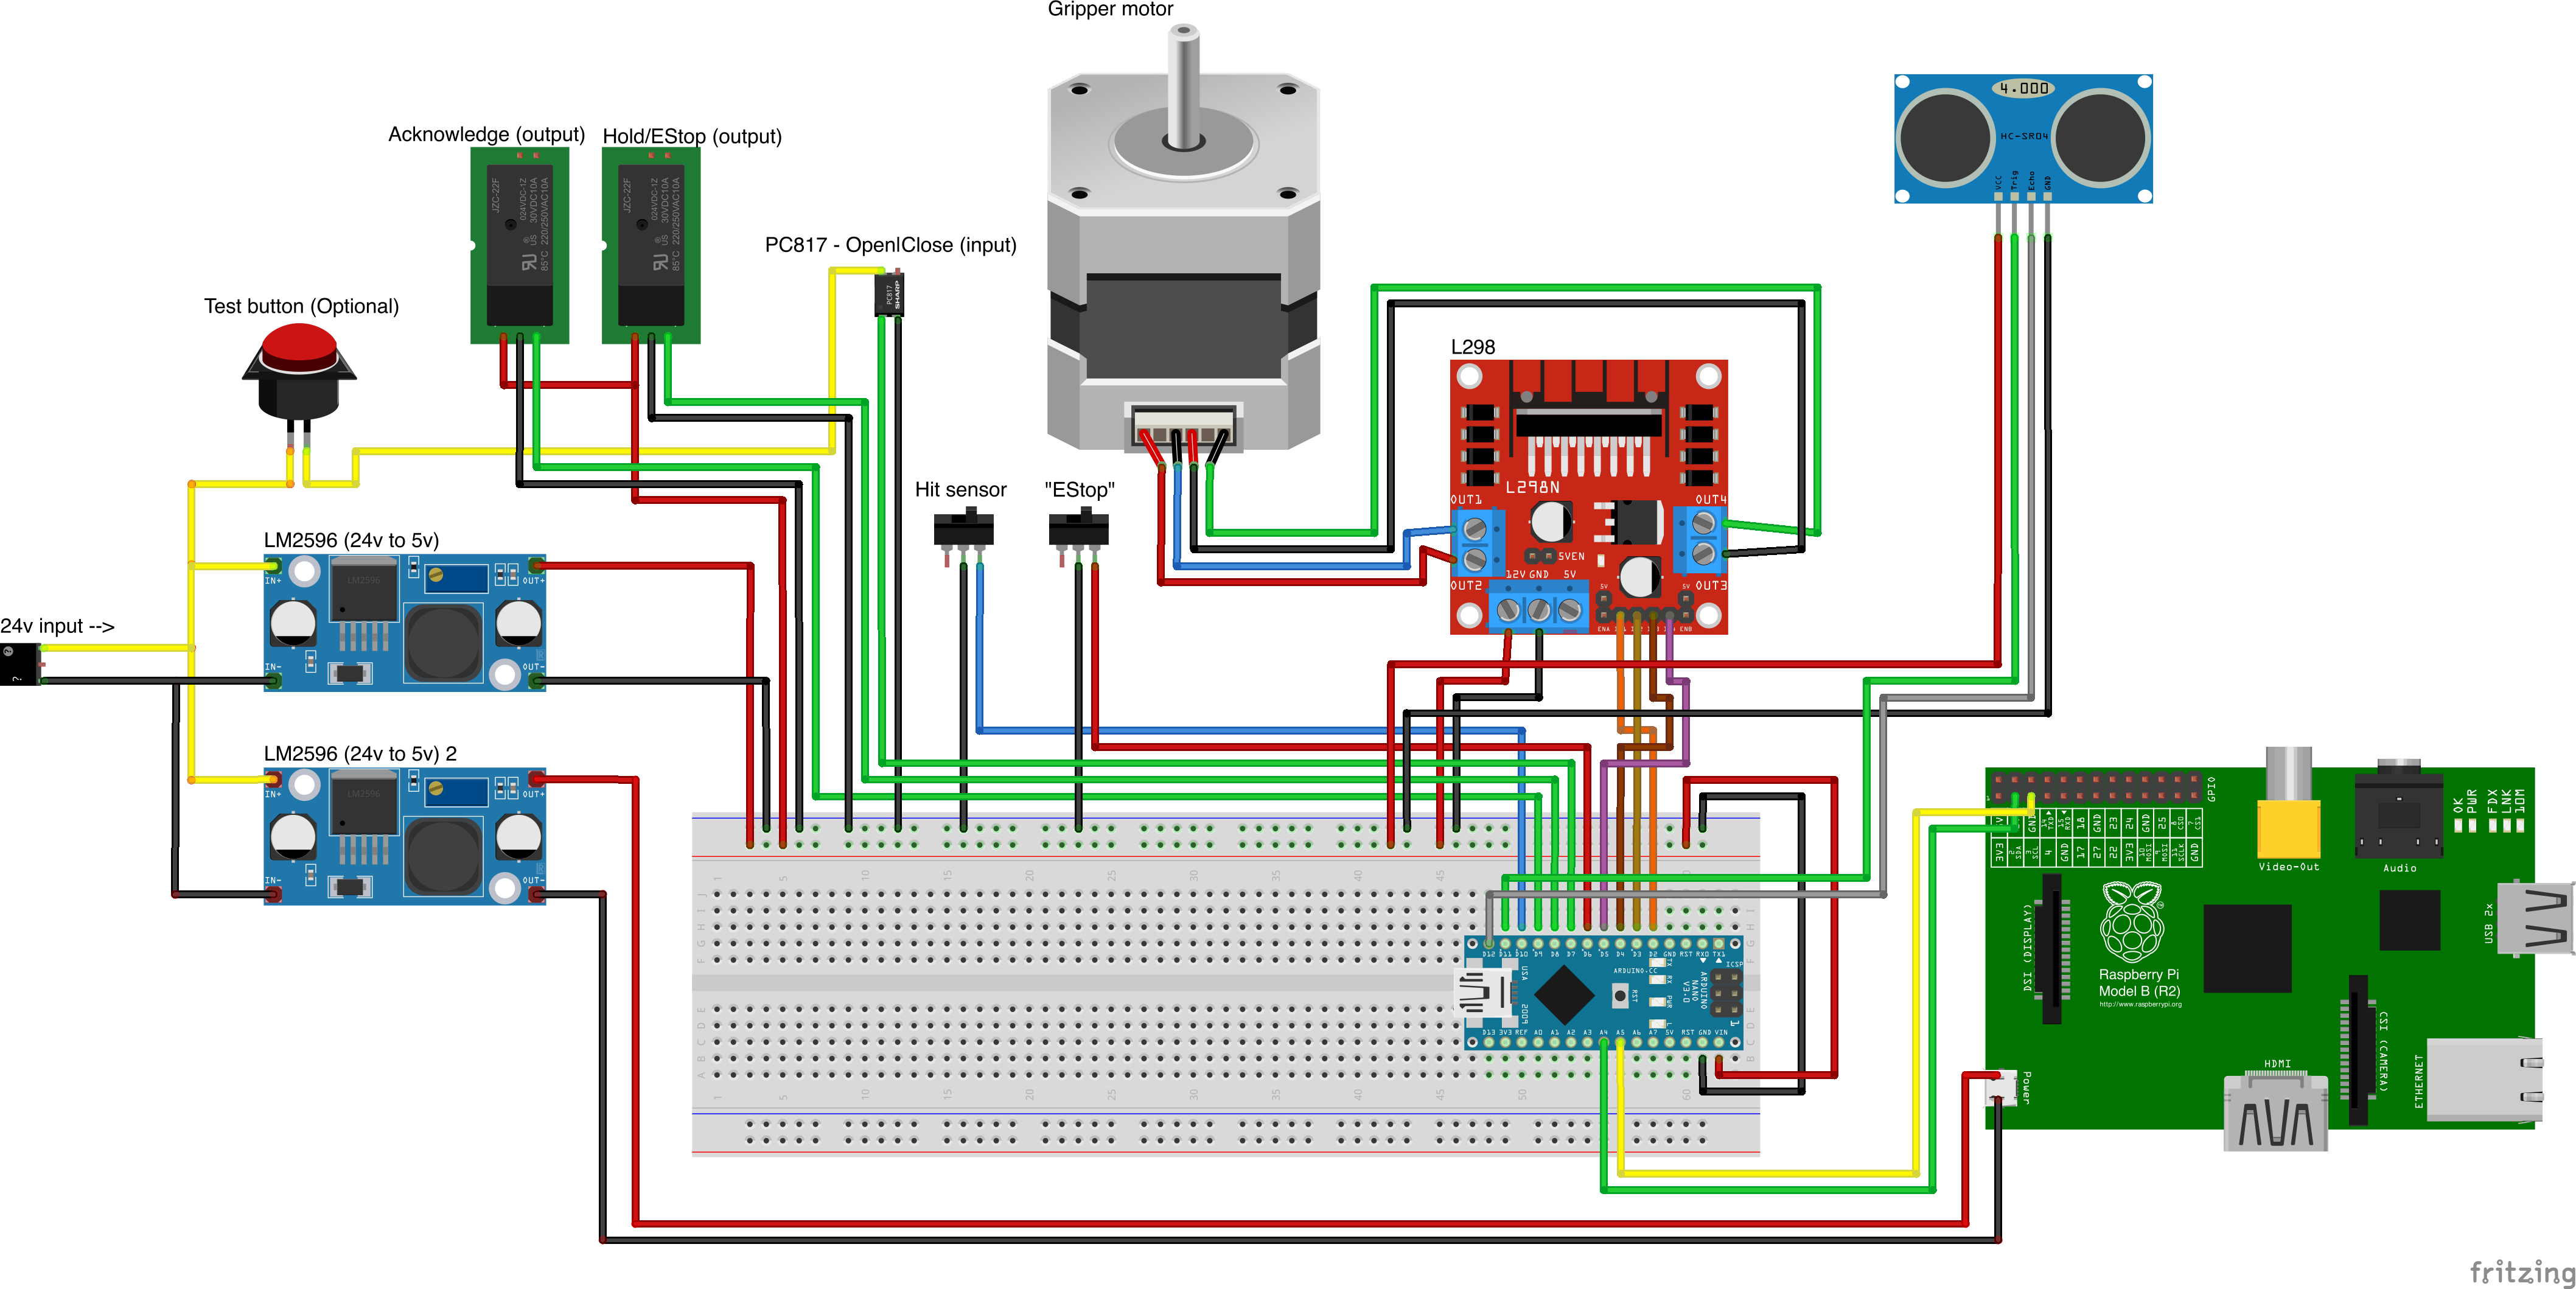
print('finished')Arduino folder contains code and sketch for custom Gripper integrated for NX100 Motoman.
NX100 ladder config had by default GRP meaning grouped signals so had to ungroup them
to gain access to output relay #30052

Idea here was that I needed to be able to control relay #30052 with stock #10022 universal output signal but also with network input #22012 signal and this needed STR + NOT handling for both cases (see image ladder line 0359)
Work in progress with gripper.
from nx100_remote_control.module import Gripper

Gripper.write_gripper_close()
Gripper.write_gripper_open()
Gripper.read_gripper_closed_command_register()
Gripper.read_gripper_acknowledge()
Gripper.read_gripper_hit()Obvious bits are one input and two outputs. Hardware decisions don't matter, code can be changed accordingly.
Custom part sources
- Remember to increment setup.cfg version before release tag!

