nx100 remote control
Release - 1.0.3
Yaskawa Motoman NX100 산업 로봇 원격 제어 파이썬 라이브러리. 이 라이브러리는 원래 Machine Vision Control Development 프로젝트를 위해 개발되었습니다. YouTube 데모 비디오에서 자세한 내용을보십시오.
개발 문서
이 비디오는 문서화의 일부입니다.
- Do changes with your own risk! in case you brick your robot or your setup is different and it doesn't work. I cannot help. System info -> Security -> Select Management Mode ->
But do not enter Management Mode password but instead Yaskawa emperor password.
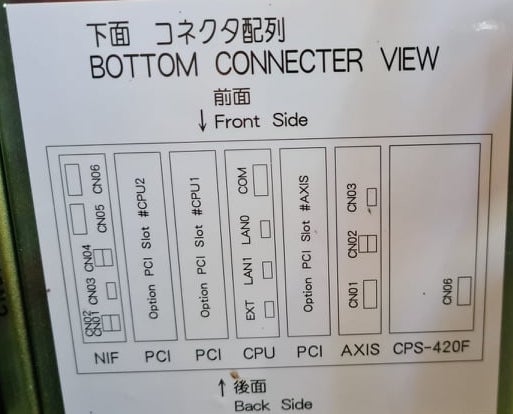
FD078 => bit set to 1 (Ethernet WWW)
LAN0 (next to serial COM port)
 1. Power off NX100 -> press down pendant "MAIN MENU" button while powering on NX100
2. Release "MAIN MENU" after seeing Motoman screen on pendant.
3. Login with Yaskawa emperor password from System -> Security.
4. SYSTEM -> SETUP -> OPTION FUNCTION -> TCP -> "USED"
5. SYSTEM -> SETUP -> OPTION FUNCTION -> NETWORK -> Give details.
6. Under network also find HOST SETUP -> Provide address details.
7. See that your changes have been saved.
8. Reboot NX100 and ping your NX100 ip address.
9. Test out this library.
pip install nx100-remote-control
pip install --upgrade nx100-remote-control import nx100_remote_control
nx100_remote_control . NX100_IP_ADDRESS = '192.168.2.28'
nx100_remote_control . NX100_TCP_PORT = 80
nx100_remote_control . MOCK_RESPONSE = False http://localhost:8080/ 에서 열립니다. import nx100_remote_control
from nx100_remote_control . module import WebServer
nx100_remote_control . MOCK_RESPONSE = True
WebServer . run ( addr = "localhost" , port = 8080 )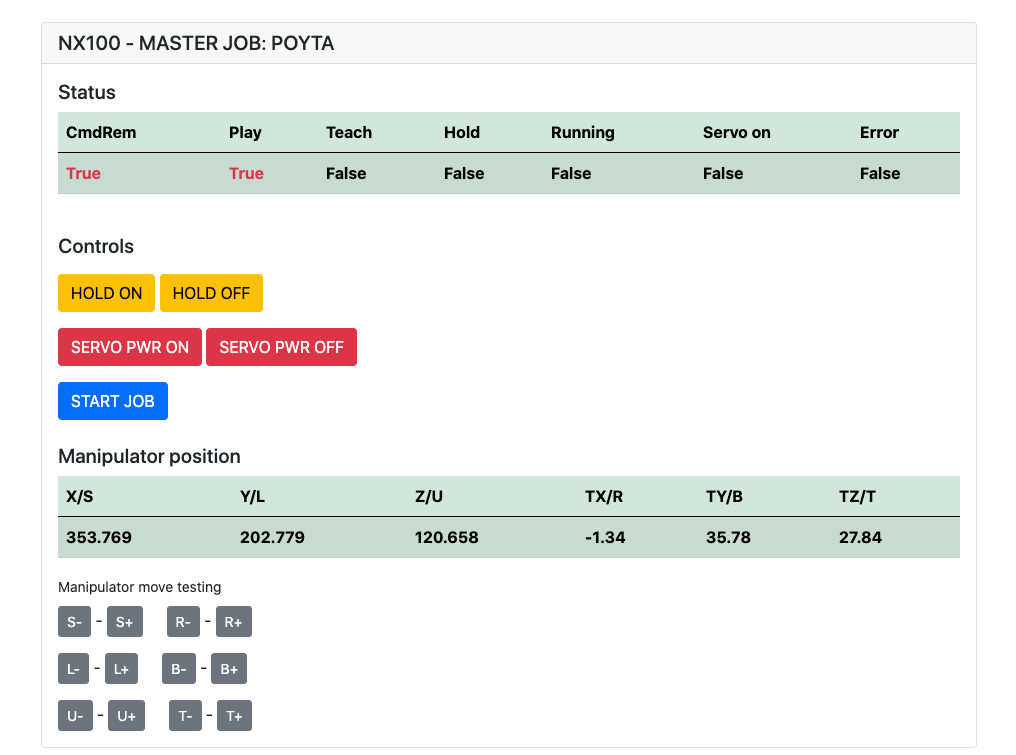
설치해야합니다 : pip install flake8 pytest
LINT : flake8 ./nx100_remote_control --count --select=E9,F63,F7,F82 --show-source --statistics
테스트 : pytest
빌드 : python -m build
Testing.py => 개별 명령 개발 및 테스트에 사용됩니다.
XboxController.py => 이름이 말한 것처럼 컨트롤러를 사용하여 로봇을 제어 할 수 있습니다. NX100은 실시간 제어를 지원하지 않기 때문에 움직임은 클라크입니다.
로봇으로 선형 이동을 수행하기 위해 Movl 명령의 빠른 샘플. 자세한 내용은 Movel 객체를 참조하거나 Ethernet Server Function Manual 읽으십시오.
 from nx100_remote_control . module import Commands , Utils
from nx100_remote_control . objects import MoveL

Commands . write_linear_move ( MoveL . MoveL (
    MoveL . MoveL . motion_speed_selection_posture_speed ,
    5 ,
    MoveL . MoveL . coordinate_specification_base_coordinate ,
    353.769 , 202.779 , 120.658 ,
    - 1.34 , 35.78 , 27.84 ,
    Utils . binary_to_decimal ( 0x00000001 ),
    0 , 0 , 0 , 0 , 0 , 0 , 0
))
MoveL.Movel 객체를 사용하여 motion_speed_selection_ 및 coordinate_specification_ 의 옵션을 확인하십시오.
그런 다음 이동이 완료되기를 기다리려면 콜백 기능을 예로 사용할 수 있습니다.
 from nx100_remote_control . module import Commands , Utils
from nx100_remote_control . objects import MoveL


def callback_success ():
    print ( 'MoveL position has been reached' )


def callback_failed ():
    print ( 'MoveL error or position not reached on given timeout' )


move_l = MoveL . MoveL (
    MoveL . MoveL . motion_speed_selection_posture_speed ,
    5 ,
    MoveL . MoveL . coordinate_specification_base_coordinate ,
    353.769 , 202.779 , 120.658 ,
    - 1.34 , 35.78 , 27.84 ,
    Utils . binary_to_decimal ( 0x00000001 ),
    0 , 0 , 0 , 0 , 0 , 0 , 0
)

Commands . robot_in_target_point_callback (
    move_l = move_l , timeout = 10 , _callback_success = callback_success , _callback_failed = callback_failed
)
따라서 주어진 타임 아웃에서 위치에 도달하거나 _callback_failed 가 아닌 경우 _callback_success 실행합니다.
또 다른 사령관 수업 방식
 from nx100_remote_control . module import LinearMove , Utils
from nx100_remote_control . objects import MoveL

move_l = MoveL . MoveL (
    MoveL . MoveL . motion_speed_selection_posture_speed ,
    5 ,
    MoveL . MoveL . coordinate_specification_base_coordinate ,
    352.769 , 202.779 , 120.658 ,
    - 1.34 , 35.78 , 27.84 ,
    Utils . binary_to_decimal ( 0x00000001 ),
    0 , 0 , 0 , 0 , 0 , 0 , 0
)

linear_move = LinearMove . LinearMove ()
linear_move . go ( move_l = move_l , wait = True , poll_limit_seconds = 10 )
print ( 'finished' ) Movj 명령에 대한 빠른 샘플 로봇으로 공동 모션 움직임을 수행합니다. MOVJ에 대한 자세한 내용은 Ethernet Server Function Manual 읽으십시오.
- !!! BE CAREFUL WITH MOVJ COMMAND AND IT'S SPEED SETTING !!! from nx100_remote_control . module import JointMove , Utils
from nx100_remote_control . objects import MoveJ
move_j = MoveJ . MoveJ (
25 , # speed %
MoveJ . MoveJ . coordinate_specification_base_coordinate ,
352.769 , 202.779 , 120.658 ,
- 1.34 , 35.78 , 27.84 ,
Utils . binary_to_decimal ( 0x00000001 ),
0 , 0 , 0 , 0 , 0 , 0 , 0
)
linear_move = JointMove . JointMove ()
linear_move . go ( move_j = move_j , wait = True , poll_limit_seconds = 10 )
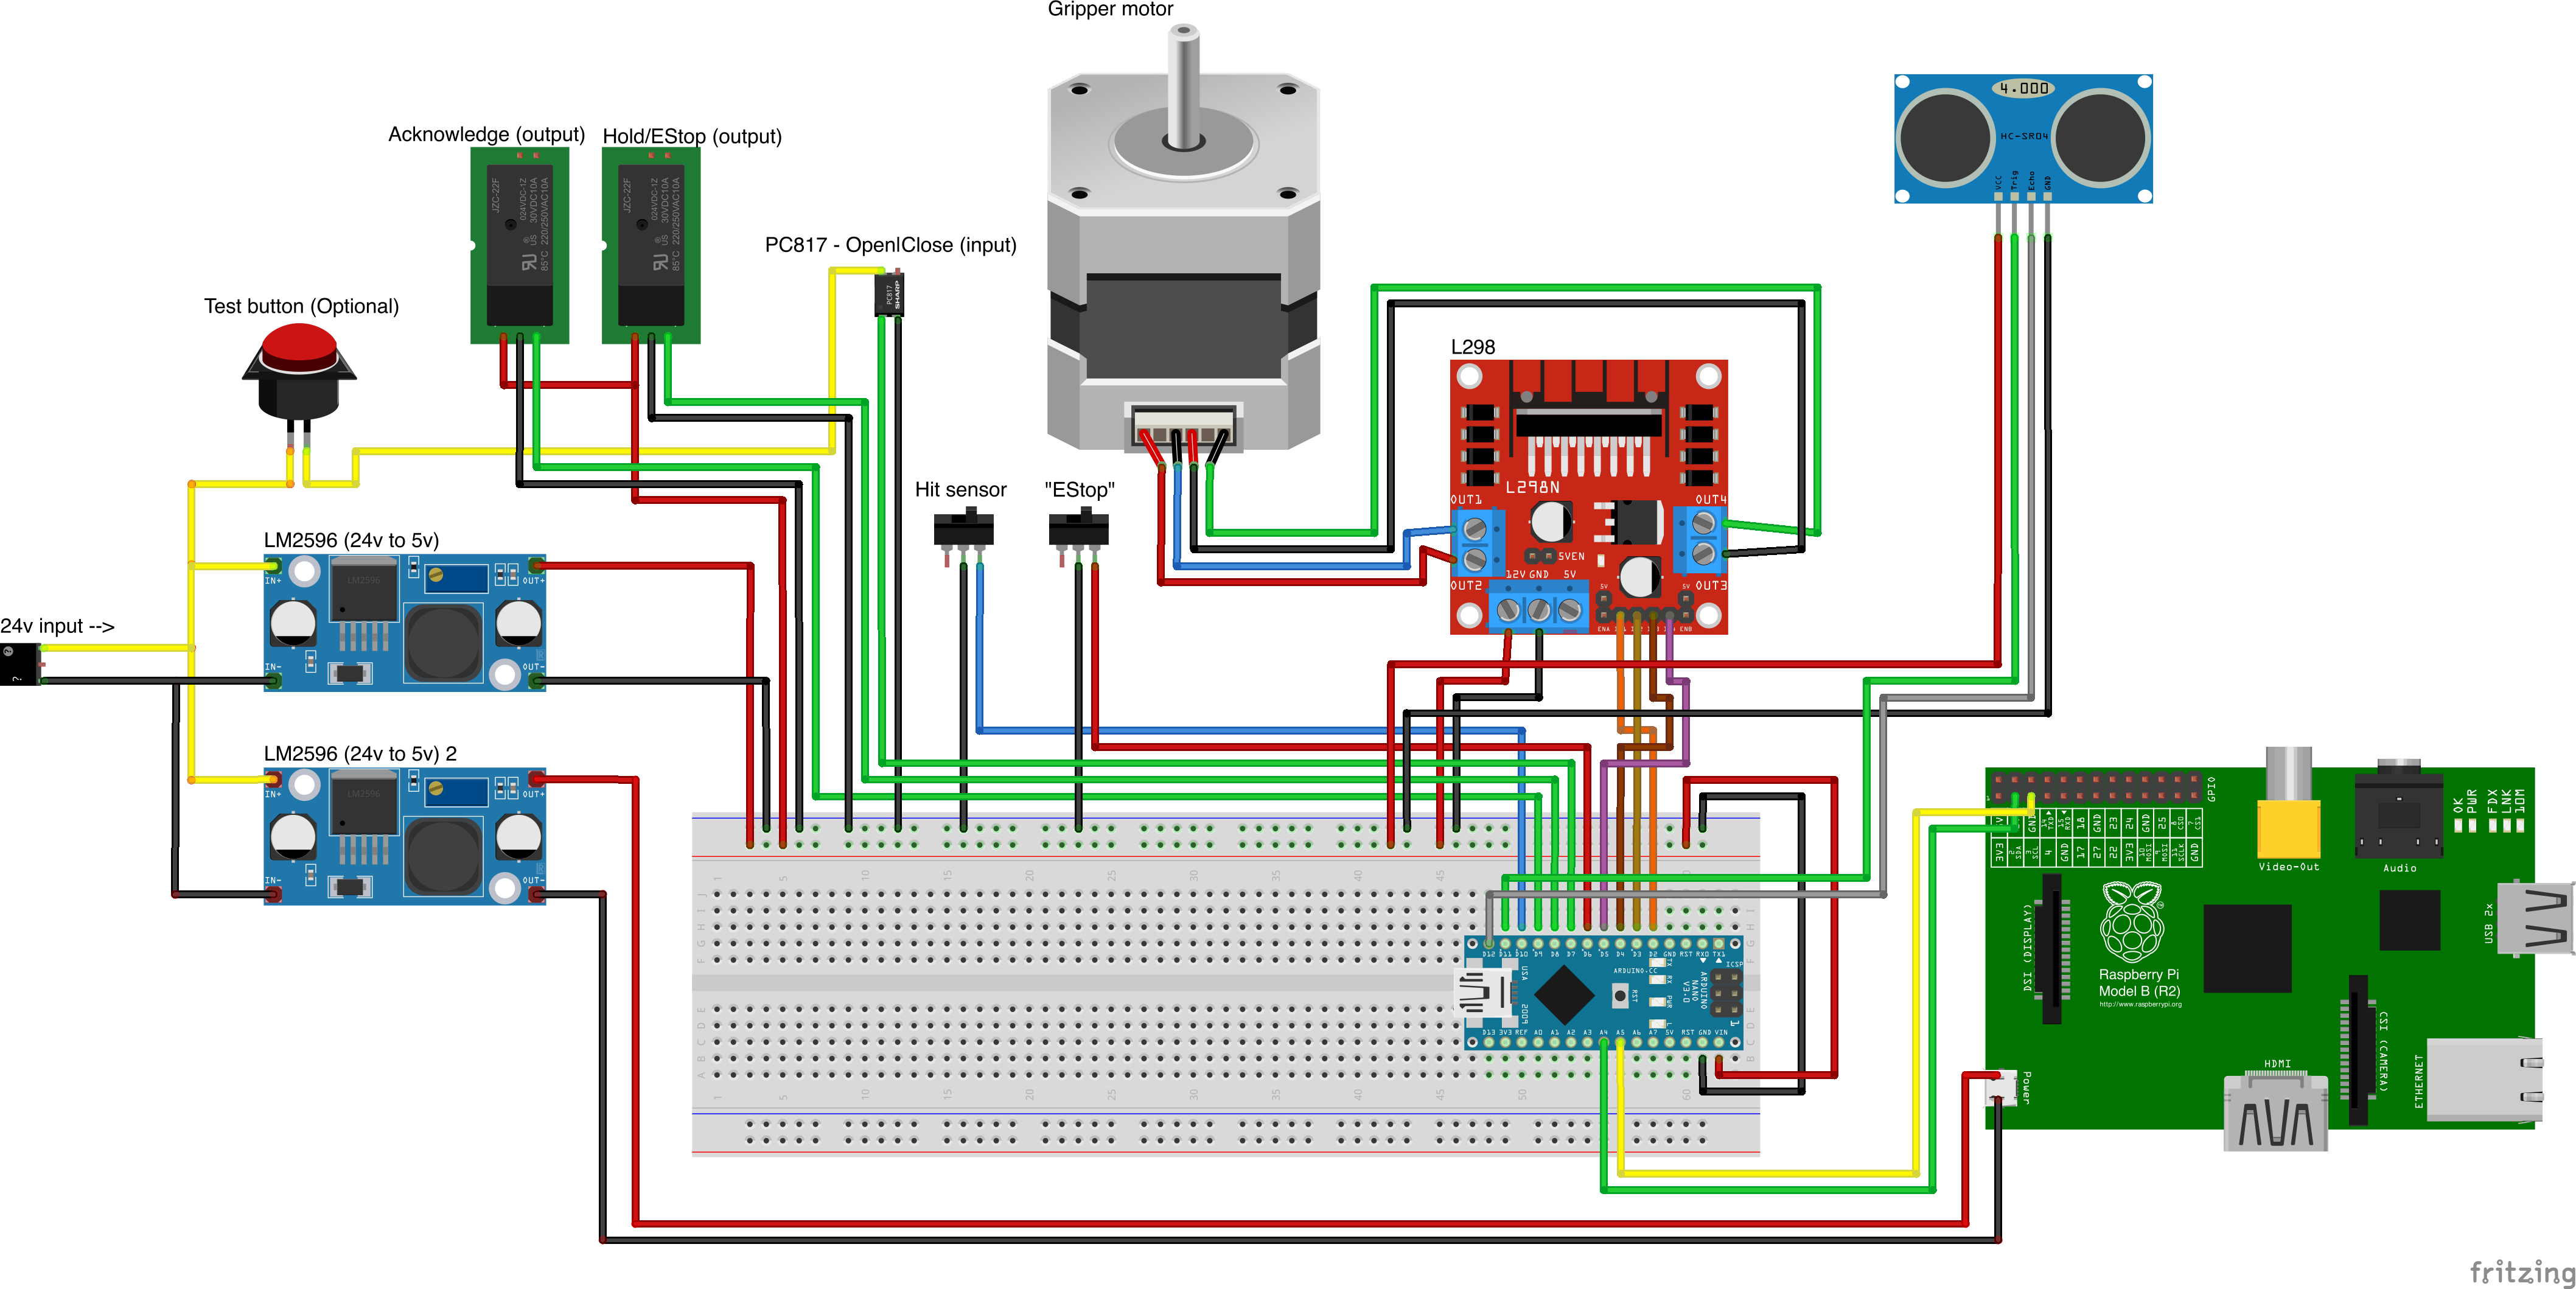
print ( 'finished' )Arduino 폴더에는 NX100 Motoman 용으로 통합 된 사용자 정의 그리퍼 용 코드 및 스케치가 포함되어 있습니다.
NX100 사다리 구성은 기본적으로 GRP를 의미하여 그룹화 된 신호를 의미 했으므로 출력 릴레이에 액세스하기 위해 그룹화를 해제해야했습니다 #30052 
여기서 아이디어는 스톡 #10022 범용 출력 신호와 네트워크 입력 #22012 신호로 릴레이 #30052를 제어 할 수 있어야한다는 것이었고 두 경우 모두에 대해 STR +가 필요하지 않은 경우 (이미지 사다리 줄 0359 참조)
그립퍼와 함께 진행하십시오.
 from nx100_remote_control . module import Gripper

Gripper . write_gripper_close ()
Gripper . write_gripper_open ()
Gripper . read_gripper_closed_command_register ()
Gripper . read_gripper_acknowledge ()
Gripper . read_gripper_hit ()명백한 비트는 하나의 입력과 두 개의 출력입니다. 하드웨어 결정은 중요하지 않으며 그에 따라 코드를 변경할 수 있습니다.
사용자 정의 부분 소스
- Remember to increment setup.cfg version before release tag!

