nx100 remote control
Release - 1.0.3
Yaskawa Motoman NX100 Industrial Robot Remote Control Python Library。このライブラリは、もともとマシンビジョン制御開発プロジェクト向けに開発されました。 YouTubeデモビデオをご覧ください。
開発のための文書
これらのビデオはドキュメントの一部です。
- Do changes with your own risk! in case you brick your robot or your setup is different and it doesn't work. I cannot help. System info -> Security -> Select Management Mode ->
But do not enter Management Mode password but instead Yaskawa emperor password.
FD078 => bit set to 1 (Ethernet WWW)
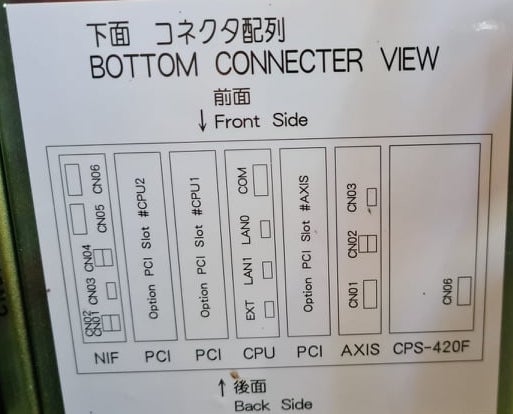
LAN0 (next to serial COM port)
 1. Power off NX100 -> press down pendant "MAIN MENU" button while powering on NX100
2. Release "MAIN MENU" after seeing Motoman screen on pendant.
3. Login with Yaskawa emperor password from System -> Security.
4. SYSTEM -> SETUP -> OPTION FUNCTION -> TCP -> "USED"
5. SYSTEM -> SETUP -> OPTION FUNCTION -> NETWORK -> Give details.
6. Under network also find HOST SETUP -> Provide address details.
7. See that your changes have been saved.
8. Reboot NX100 and ping your NX100 ip address.
9. Test out this library.
pip install nx100-remote-control
pip install --upgrade nx100-remote-control import nx100_remote_control
nx100_remote_control . NX100_IP_ADDRESS = '192.168.2.28'
nx100_remote_control . NX100_TCP_PORT = 80
nx100_remote_control . MOCK_RESPONSE = False http://localhost:8080/から開きます。 import nx100_remote_control
from nx100_remote_control . module import WebServer
nx100_remote_control . MOCK_RESPONSE = True
WebServer . run ( addr = "localhost" , port = 8080 )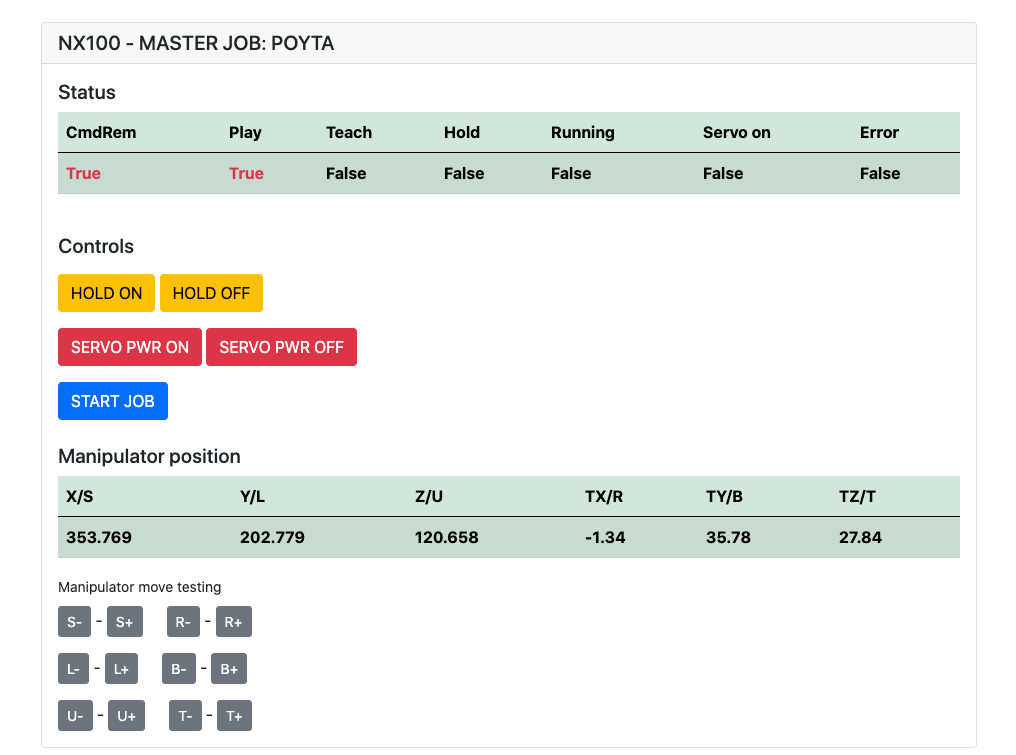
インストールしている必要があります: pip install flake8 pytest
LINT: flake8 ./nx100_remote_control --count --select=E9,F63,F7,F82 --show-source --statistics
テスト: pytest
ビルド: python -m build
Testing.py =>個々のコマンドの開発とテストに使用されます。
XboxController.py =>名前が示すように、コントローラーを使用してロボットを制御できます。 NX100はリアルタイムの制御をサポートしていないため、動きは不格好です。
Movlコマンドのクイックサンプルは、ロボットを使用して線形ムーブメントを行います。詳細については、Movel Objectを参照するか、 Ethernet Server Function Manualをお読みください。
 from nx100_remote_control . module import Commands , Utils
from nx100_remote_control . objects import MoveL

Commands . write_linear_move ( MoveL . MoveL (
    MoveL . MoveL . motion_speed_selection_posture_speed ,
    5 ,
    MoveL . MoveL . coordinate_specification_base_coordinate ,
    353.769 , 202.779 , 120.658 ,
    - 1.34 , 35.78 , 27.84 ,
    Utils . binary_to_decimal ( 0x00000001 ),
    0 , 0 , 0 , 0 , 0 , 0 , 0
))
movel.movelオブジェクトを使用して、 motion_speed_selection_およびcoordinate_specification_のオプションを表示します
その後、移動が完了するのを待つには、例としてコールバック関数を使用できます。
 from nx100_remote_control . module import Commands , Utils
from nx100_remote_control . objects import MoveL


def callback_success ():
    print ( 'MoveL position has been reached' )


def callback_failed ():
    print ( 'MoveL error or position not reached on given timeout' )


move_l = MoveL . MoveL (
    MoveL . MoveL . motion_speed_selection_posture_speed ,
    5 ,
    MoveL . MoveL . coordinate_specification_base_coordinate ,
    353.769 , 202.779 , 120.658 ,
    - 1.34 , 35.78 , 27.84 ,
    Utils . binary_to_decimal ( 0x00000001 ),
    0 , 0 , 0 , 0 , 0 , 0 , 0
)

Commands . robot_in_target_point_callback (
    move_l = move_l , timeout = 10 , _callback_success = callback_success , _callback_failed = callback_failed
)
したがって、これは、指定されたタイムアウトで位置に到達した場合、 _callback_successを実行するか、そうでない場合は_callback_failed実行します。
別の司令官クラスの方法
 from nx100_remote_control . module import LinearMove , Utils
from nx100_remote_control . objects import MoveL

move_l = MoveL . MoveL (
    MoveL . MoveL . motion_speed_selection_posture_speed ,
    5 ,
    MoveL . MoveL . coordinate_specification_base_coordinate ,
    352.769 , 202.779 , 120.658 ,
    - 1.34 , 35.78 , 27.84 ,
    Utils . binary_to_decimal ( 0x00000001 ),
    0 , 0 , 0 , 0 , 0 , 0 , 0
)

linear_move = LinearMove . LinearMove ()
linear_move . go ( move_l = move_l , wait = True , poll_limit_seconds = 10 )
print ( 'finished' ) Movjコマンドのクイックサンプルは、ロボットと共同動きの動きを行います。 movjの詳細については、 Ethernet Server Function Manualを読む
- !!! BE CAREFUL WITH MOVJ COMMAND AND IT'S SPEED SETTING !!! from nx100_remote_control . module import JointMove , Utils
from nx100_remote_control . objects import MoveJ
move_j = MoveJ . MoveJ (
25 , # speed %
MoveJ . MoveJ . coordinate_specification_base_coordinate ,
352.769 , 202.779 , 120.658 ,
- 1.34 , 35.78 , 27.84 ,
Utils . binary_to_decimal ( 0x00000001 ),
0 , 0 , 0 , 0 , 0 , 0 , 0
)
linear_move = JointMove . JointMove ()
linear_move . go ( move_j = move_j , wait = True , poll_limit_seconds = 10 )
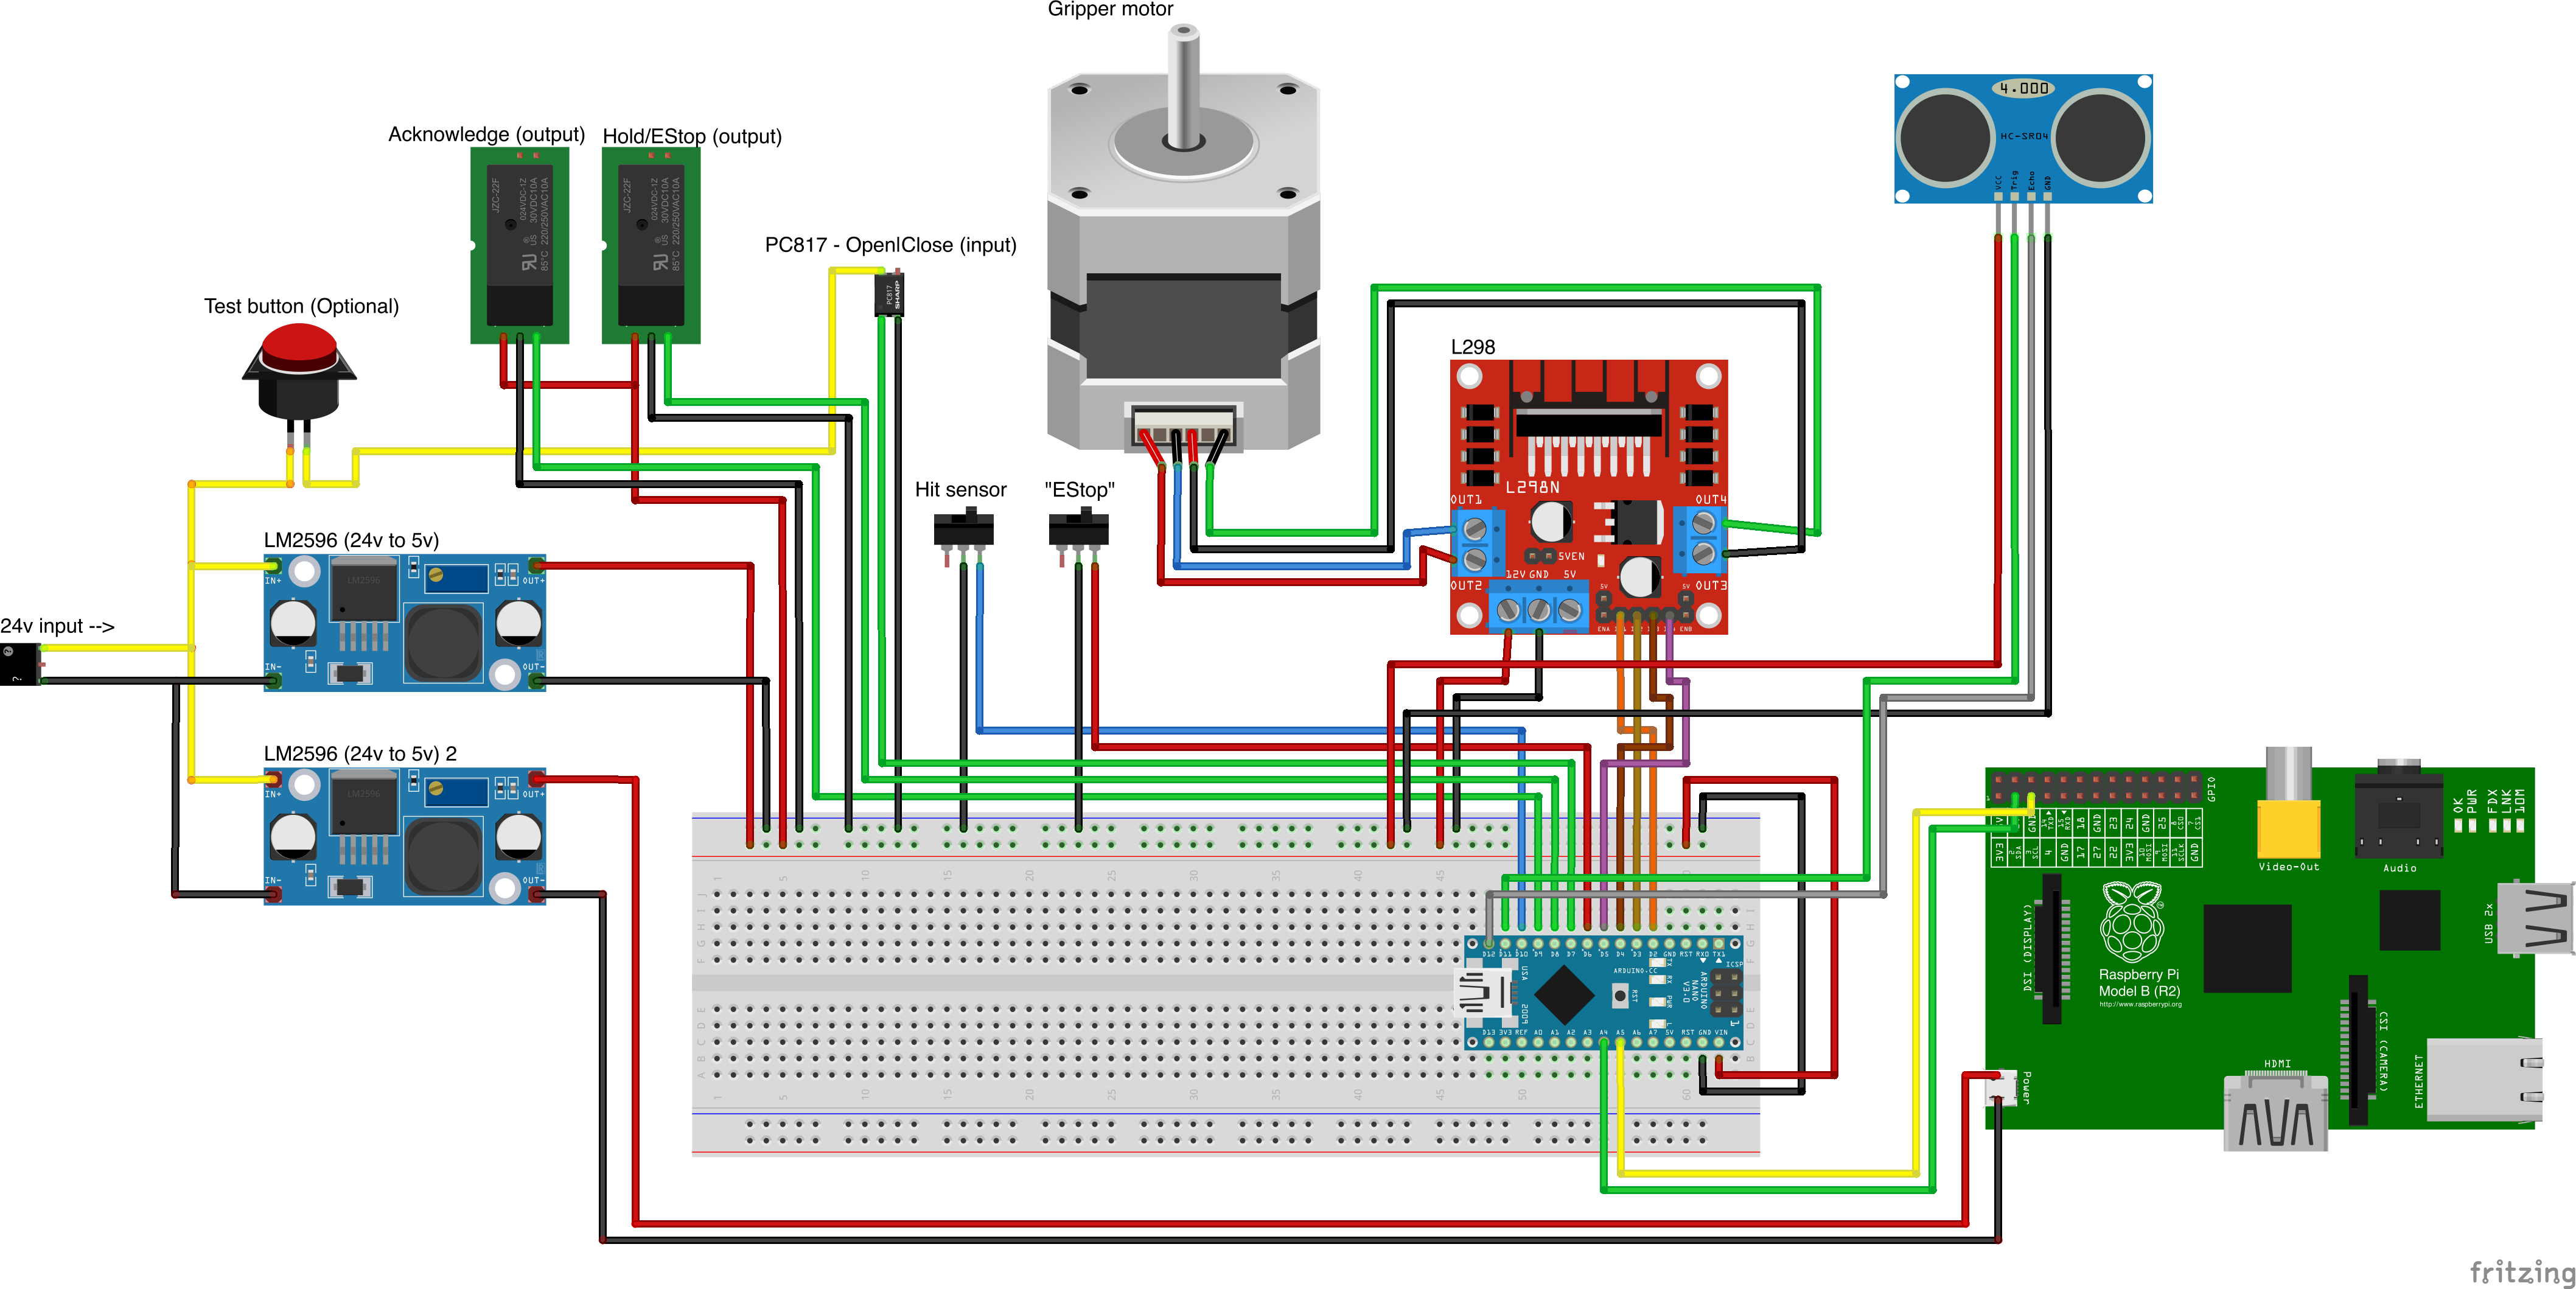
print ( 'finished' )Arduinoフォルダーには、NX100 Motoman用に統合されたカスタムグリッパー用のコードとスケッチが含まれています。
NX100はしご構成はデフォルトでGRPを意味してグループ化された信号を意味していたので、出力リレー#30052にアクセスするためにそれらを解除する必要がありました
ここでのアイデアは、ストック#10022ユニバーサル出力信号だけでなく、ネットワーク入力#22012信号でもリレー#30052を制御できる必要があるということでした。
グリッパーで進行中の作業。
 from nx100_remote_control . module import Gripper

Gripper . write_gripper_close ()
Gripper . write_gripper_open ()
Gripper . read_gripper_closed_command_register ()
Gripper . read_gripper_acknowledge ()
Gripper . read_gripper_hit ()明らかなビットは、1つの入力と2つの出力です。ハードウェアの決定は重要ではありません。それに応じてコードを変更できます。
カスタムパーツソース
- Remember to increment setup.cfg version before release tag!

