nx100 remote control
Release - 1.0.3
Yaskawa Motoman NX100 Industrial Robot Remote Control Python Library. Esta biblioteca foi originalmente desenvolvida para o projeto de desenvolvimento de controle da visão de máquina. Veja mais no vídeo da demonstração do YouTube.
Documentos para desenvolvimento
Esses vídeos fazem parte da documentação.
- Do changes with your own risk! in case you brick your robot or your setup is different and it doesn't work. I cannot help. System info -> Security -> Select Management Mode ->
But do not enter Management Mode password but instead Yaskawa emperor password.
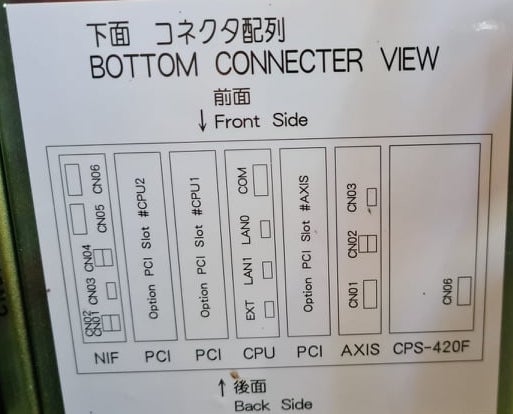
FD078 => bit set to 1 (Ethernet WWW)
LAN0 (next to serial COM port)
 1. Power off NX100 -> press down pendant "MAIN MENU" button while powering on NX100
2. Release "MAIN MENU" after seeing Motoman screen on pendant.
3. Login with Yaskawa emperor password from System -> Security.
4. SYSTEM -> SETUP -> OPTION FUNCTION -> TCP -> "USED"
5. SYSTEM -> SETUP -> OPTION FUNCTION -> NETWORK -> Give details.
6. Under network also find HOST SETUP -> Provide address details.
7. See that your changes have been saved.
8. Reboot NX100 and ping your NX100 ip address.
9. Test out this library.
pip install nx100-remote-control
pip install --upgrade nx100-remote-control import nx100_remote_control
nx100_remote_control . NX100_IP_ADDRESS = '192.168.2.28'
nx100_remote_control . NX100_TCP_PORT = 80
nx100_remote_control . MOCK_RESPONSE = False http://localhost:8080/ que se parece com essa imagem abaixo. import nx100_remote_control
from nx100_remote_control . module import WebServer
nx100_remote_control . MOCK_RESPONSE = True
WebServer . run ( addr = "localhost" , port = 8080 )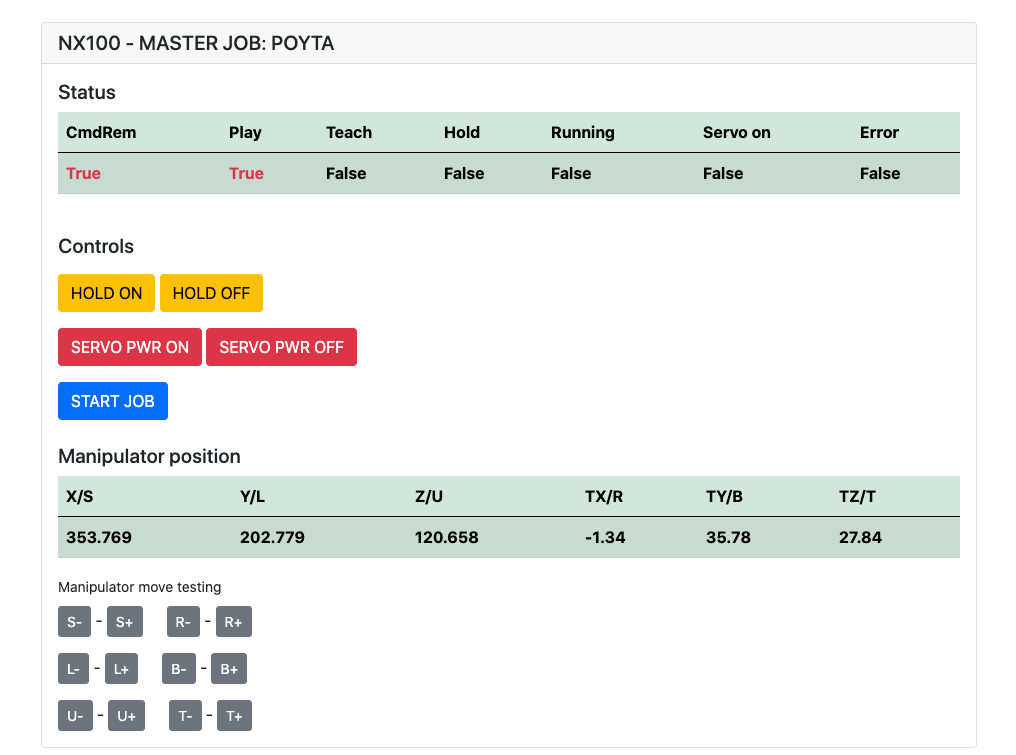
Deve ter instalado: pip install flake8 pytest
Lint: flake8 ./nx100_remote_control --count --select=E9,F63,F7,F82 --show-source --statistics
Teste: pytest
Construição: python -m build
Testing.py => usado para desenvolvimento e teste comandos individuais.
XboxController.py => Como o nome diz, pode usar o controlador para controlar o robô, apenas demonstração. Observe que os movimentos são desajeitados porque o NX100 não suporta o controle em tempo real.
Amostra rápida para o comando movl para fazer movimento linear com robô. Consulte o MOVEL Object para obter mais detalhes ou leia Ethernet Server Function Manual .
 from nx100_remote_control . module import Commands , Utils
from nx100_remote_control . objects import MoveL

Commands . write_linear_move ( MoveL . MoveL (
    MoveL . MoveL . motion_speed_selection_posture_speed ,
    5 ,
    MoveL . MoveL . coordinate_specification_base_coordinate ,
    353.769 , 202.779 , 120.658 ,
    - 1.34 , 35.78 , 27.84 ,
    Utils . binary_to_decimal ( 0x00000001 ),
    0 , 0 , 0 , 0 , 0 , 0 , 0
))
Use o objeto Monel.movel para ver as opções para motion_speed_selection_ e para coordinate_specification_
Então, para aguardar a conclusão da movimentação, você pode usar a função de retorno de chamada como exemplo:
 from nx100_remote_control . module import Commands , Utils
from nx100_remote_control . objects import MoveL


def callback_success ():
    print ( 'MoveL position has been reached' )


def callback_failed ():
    print ( 'MoveL error or position not reached on given timeout' )


move_l = MoveL . MoveL (
    MoveL . MoveL . motion_speed_selection_posture_speed ,
    5 ,
    MoveL . MoveL . coordinate_specification_base_coordinate ,
    353.769 , 202.779 , 120.658 ,
    - 1.34 , 35.78 , 27.84 ,
    Utils . binary_to_decimal ( 0x00000001 ),
    0 , 0 , 0 , 0 , 0 , 0 , 0
)

Commands . robot_in_target_point_callback (
    move_l = move_l , timeout = 10 , _callback_success = callback_success , _callback_failed = callback_failed
)
Portanto, isso será executado _callback_success se a posição alcançada em determinado tempo limite ou executar _callback_failed se não.
Outra maneira de classe comandante
 from nx100_remote_control . module import LinearMove , Utils
from nx100_remote_control . objects import MoveL

move_l = MoveL . MoveL (
    MoveL . MoveL . motion_speed_selection_posture_speed ,
    5 ,
    MoveL . MoveL . coordinate_specification_base_coordinate ,
    352.769 , 202.779 , 120.658 ,
    - 1.34 , 35.78 , 27.84 ,
    Utils . binary_to_decimal ( 0x00000001 ),
    0 , 0 , 0 , 0 , 0 , 0 , 0
)

linear_move = LinearMove . LinearMove ()
linear_move . go ( move_l = move_l , wait = True , poll_limit_seconds = 10 )
print ( 'finished' ) Amostra rápida para o comando movj para fazer movimento de movimento conjunto com o robô. Leia Ethernet Server Function Manual para obter mais detalhes sobre o MOVJ
- !!! BE CAREFUL WITH MOVJ COMMAND AND IT'S SPEED SETTING !!! from nx100_remote_control . module import JointMove , Utils
from nx100_remote_control . objects import MoveJ
move_j = MoveJ . MoveJ (
25 , # speed %
MoveJ . MoveJ . coordinate_specification_base_coordinate ,
352.769 , 202.779 , 120.658 ,
- 1.34 , 35.78 , 27.84 ,
Utils . binary_to_decimal ( 0x00000001 ),
0 , 0 , 0 , 0 , 0 , 0 , 0
)
linear_move = JointMove . JointMove ()
linear_move . go ( move_j = move_j , wait = True , poll_limit_seconds = 10 )
print ( 'finished' )A pasta Arduino contém código e esboço para pipas personalizadas integradas para o NX100 Motoman.
A configuração NX100 Ladder tinha por padrão GRP, que significa sinais agrupados, então teve que destacá -los para obter acesso ao relé de saída #30052 
A idéia aqui era que eu precisava ser capaz de controlar o relé #30052 com o estoque #10022 Signal de saída universal, mas também com a entrada de rede nº 22012 e isso necessário STR + não lidando para os dois casos (consulte a linha da escada de imagem 0359)
Trabalhe em andamento com Gripper.
 from nx100_remote_control . module import Gripper

Gripper . write_gripper_close ()
Gripper . write_gripper_open ()
Gripper . read_gripper_closed_command_register ()
Gripper . read_gripper_acknowledge ()
Gripper . read_gripper_hit ()Bits óbvios são uma entrada e duas saídas. As decisões de hardware não importam, o código pode ser alterado de acordo.
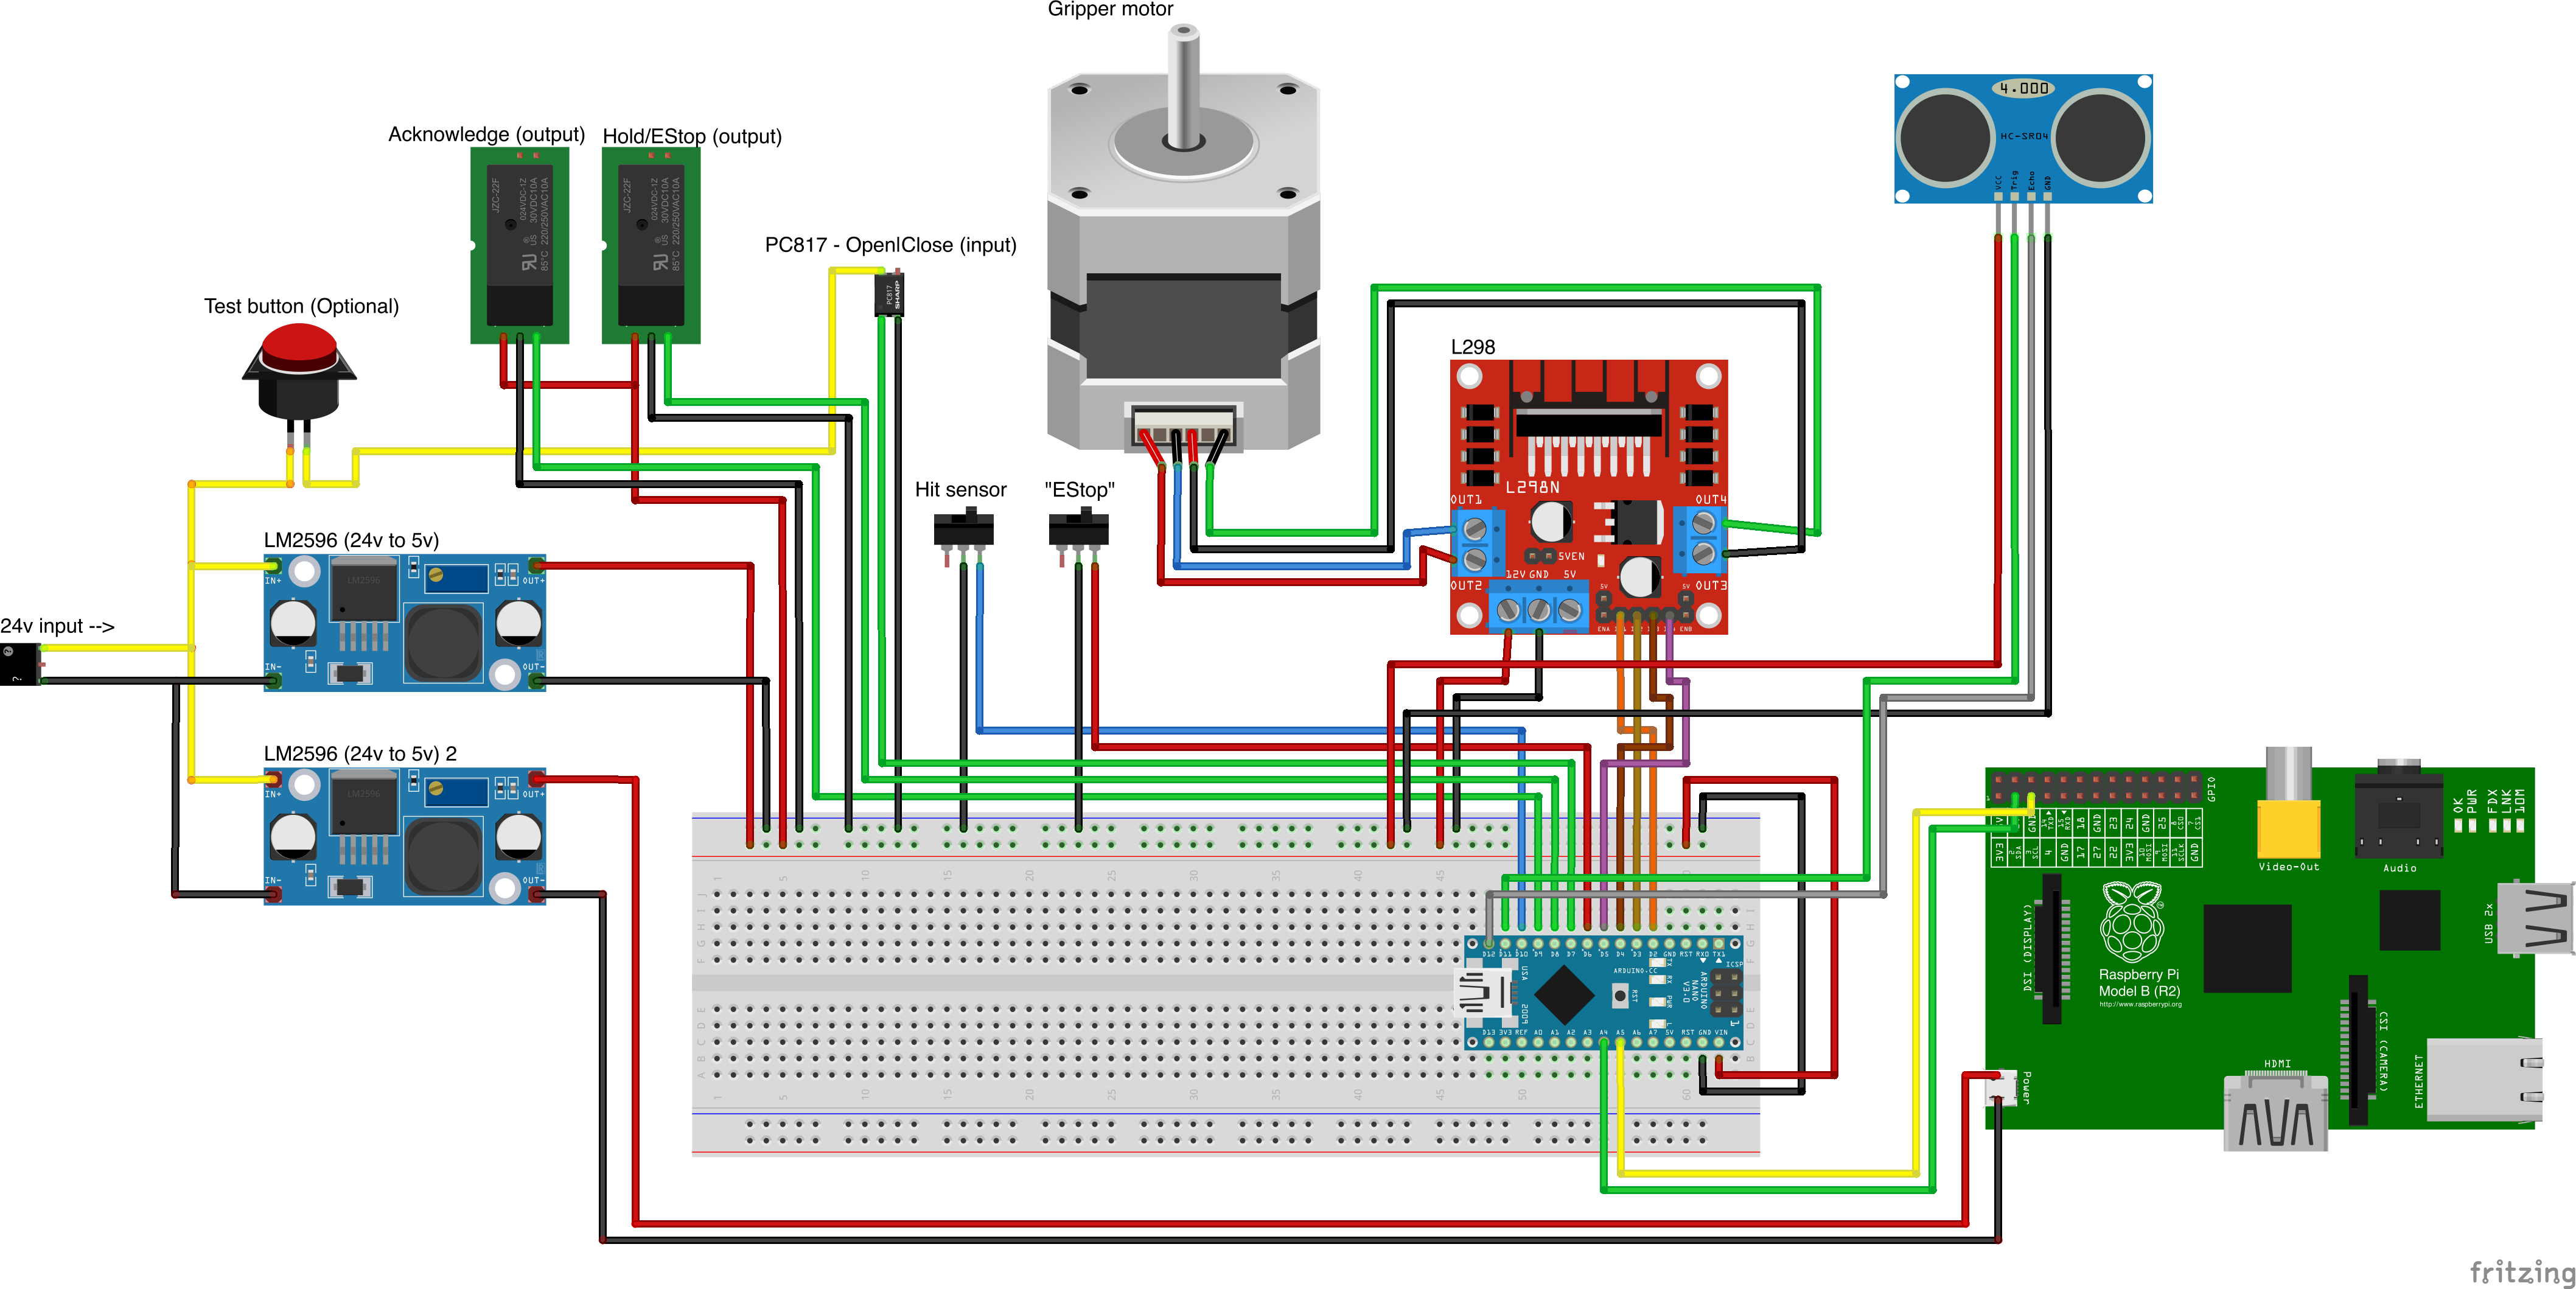
Fontes de peça personalizadas
- Remember to increment setup.cfg version before release tag!

