nx100 remote control
Release - 1.0.3
Yaskawa Motoman NX100 Robot industriel Remote Control Python Library. Cette bibliothèque a été initialement développée pour le projet de développement de contrôle de la vision machine. Voir plus sur la vidéo de démonstration YouTube.
Documents de développement
Ces vidéos font partie de la documentation.
- Do changes with your own risk! in case you brick your robot or your setup is different and it doesn't work. I cannot help. System info -> Security -> Select Management Mode ->
But do not enter Management Mode password but instead Yaskawa emperor password.
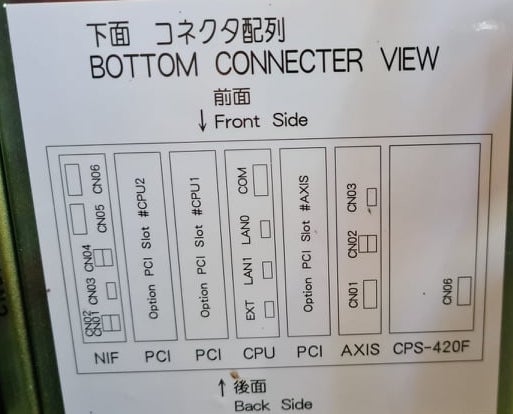
FD078 => bit set to 1 (Ethernet WWW)
LAN0 (next to serial COM port)
 1. Power off NX100 -> press down pendant "MAIN MENU" button while powering on NX100
2. Release "MAIN MENU" after seeing Motoman screen on pendant.
3. Login with Yaskawa emperor password from System -> Security.
4. SYSTEM -> SETUP -> OPTION FUNCTION -> TCP -> "USED"
5. SYSTEM -> SETUP -> OPTION FUNCTION -> NETWORK -> Give details.
6. Under network also find HOST SETUP -> Provide address details.
7. See that your changes have been saved.
8. Reboot NX100 and ping your NX100 ip address.
9. Test out this library.
pip install nx100-remote-control
pip install --upgrade nx100-remote-control import nx100_remote_control
nx100_remote_control . NX100_IP_ADDRESS = '192.168.2.28'
nx100_remote_control . NX100_TCP_PORT = 80
nx100_remote_control . MOCK_RESPONSE = False http://localhost:8080/ qui ressemble à ceci dans l'image ci-dessous. import nx100_remote_control
from nx100_remote_control . module import WebServer
nx100_remote_control . MOCK_RESPONSE = True
WebServer . run ( addr = "localhost" , port = 8080 )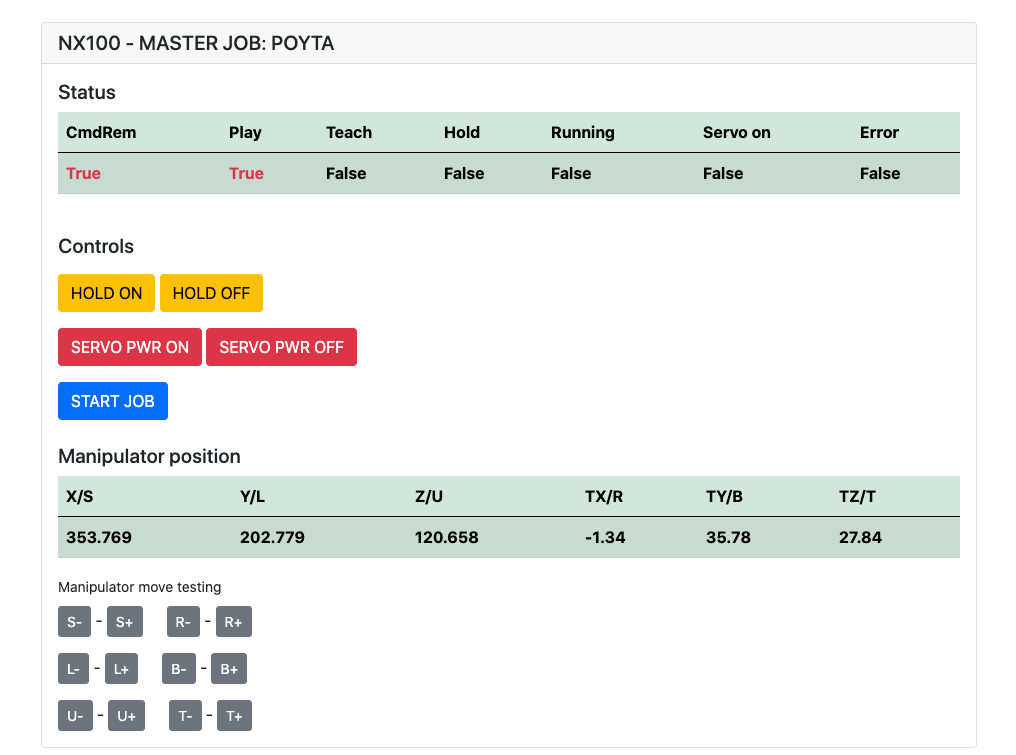
Doit avoir installé: pip install flake8 pytest
Lint: flake8 ./nx100_remote_control --count --select=E9,F63,F7,F82 --show-source --statistics
Test: pytest
Build: python -m build
Testing.py => utilisé pour le développement et le test des commandes individuelles.
XboxController.py => Comme le nom indique, peut utiliser le contrôleur pour contrôler le robot, juste une démo. Notez que les mouvements sont maladroits car NX100 ne prend pas en charge le contrôle en temps réel.
Échantillon rapide pour la commande movl pour effectuer un mouvement linéaire avec le robot. Voir l'objet Movel pour plus de détails ou lire Ethernet Server Function Manual .
 from nx100_remote_control . module import Commands , Utils
from nx100_remote_control . objects import MoveL

Commands . write_linear_move ( MoveL . MoveL (
    MoveL . MoveL . motion_speed_selection_posture_speed ,
    5 ,
    MoveL . MoveL . coordinate_specification_base_coordinate ,
    353.769 , 202.779 , 120.658 ,
    - 1.34 , 35.78 , 27.84 ,
    Utils . binary_to_decimal ( 0x00000001 ),
    0 , 0 , 0 , 0 , 0 , 0 , 0
))
Utilisez l'objet movel.movel pour voir les options pour motion_speed_selection_ et pour coordinate_specification_
Ensuite, pour attendre que Move soit terminé, vous pouvez utiliser la fonction de rappel comme exemple:
 from nx100_remote_control . module import Commands , Utils
from nx100_remote_control . objects import MoveL


def callback_success ():
    print ( 'MoveL position has been reached' )


def callback_failed ():
    print ( 'MoveL error or position not reached on given timeout' )


move_l = MoveL . MoveL (
    MoveL . MoveL . motion_speed_selection_posture_speed ,
    5 ,
    MoveL . MoveL . coordinate_specification_base_coordinate ,
    353.769 , 202.779 , 120.658 ,
    - 1.34 , 35.78 , 27.84 ,
    Utils . binary_to_decimal ( 0x00000001 ),
    0 , 0 , 0 , 0 , 0 , 0 , 0
)

Commands . robot_in_target_point_callback (
    move_l = move_l , timeout = 10 , _callback_success = callback_success , _callback_failed = callback_failed
)
Donc, cela exécutera _callback_success si la position atteint dans un délai d'expiration ou l'exécution _callback_failed sinon.
Une autre voie de classe de commandant
 from nx100_remote_control . module import LinearMove , Utils
from nx100_remote_control . objects import MoveL

move_l = MoveL . MoveL (
    MoveL . MoveL . motion_speed_selection_posture_speed ,
    5 ,
    MoveL . MoveL . coordinate_specification_base_coordinate ,
    352.769 , 202.779 , 120.658 ,
    - 1.34 , 35.78 , 27.84 ,
    Utils . binary_to_decimal ( 0x00000001 ),
    0 , 0 , 0 , 0 , 0 , 0 , 0
)

linear_move = LinearMove . LinearMove ()
linear_move . go ( move_l = move_l , wait = True , poll_limit_seconds = 10 )
print ( 'finished' ) Échantillon rapide pour la commande movj pour effectuer un mouvement de mouvement conjoint avec le robot. Lire Ethernet Server Function Manual pour plus de détails sur MOVJ
- !!! BE CAREFUL WITH MOVJ COMMAND AND IT'S SPEED SETTING !!! from nx100_remote_control . module import JointMove , Utils
from nx100_remote_control . objects import MoveJ
move_j = MoveJ . MoveJ (
25 , # speed %
MoveJ . MoveJ . coordinate_specification_base_coordinate ,
352.769 , 202.779 , 120.658 ,
- 1.34 , 35.78 , 27.84 ,
Utils . binary_to_decimal ( 0x00000001 ),
0 , 0 , 0 , 0 , 0 , 0 , 0
)
linear_move = JointMove . JointMove ()
linear_move . go ( move_j = move_j , wait = True , poll_limit_seconds = 10 )
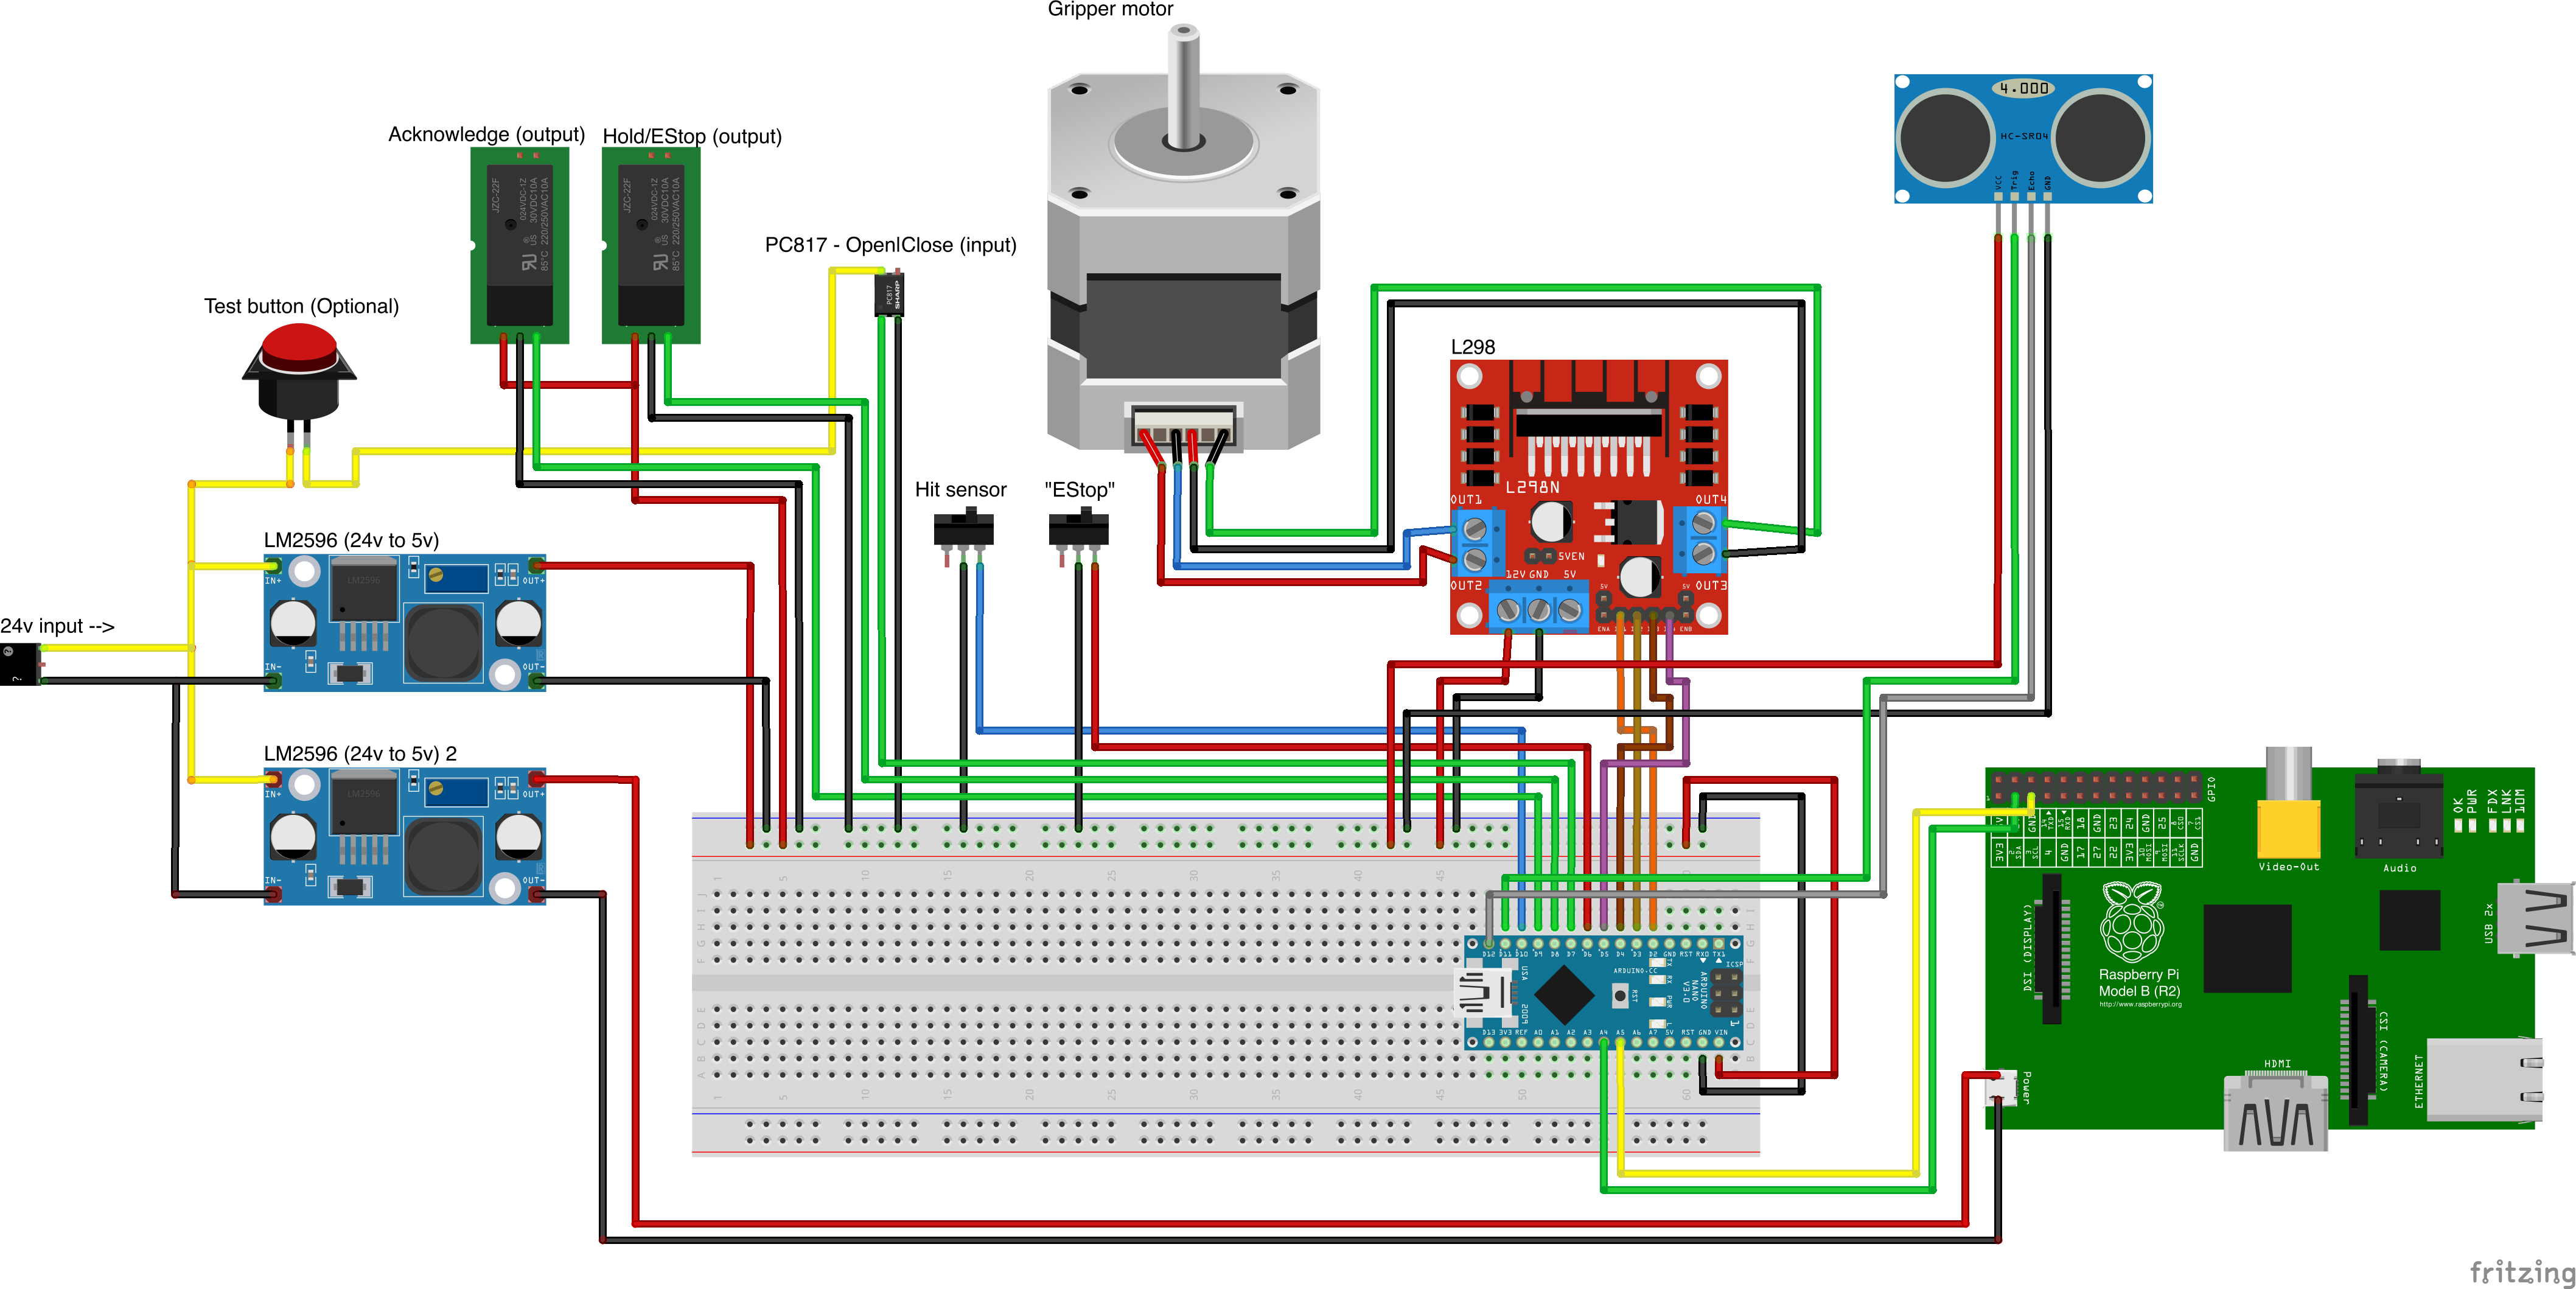
print ( 'finished' )Le dossier Arduino contient du code et des croquis pour Custom Gripper intégrés pour NX100 Motoman.
La configuration de l'échelle NX100 avait par défaut des signaux groupés de signification, il a donc dû les déshabiller pour accéder au relais de sortie # 30052 
L'idée ici était que je devais être en mesure de contrôler le relais # 30052 avec le signal de sortie Universal Stock # 10022 mais également avec l'entrée du réseau # 22012 et cela a besoin que STR + ne s'occupait pas des deux cas (voir la ligne d'échelle d'image 0359)
Travail en cours avec Gripper.
 from nx100_remote_control . module import Gripper

Gripper . write_gripper_close ()
Gripper . write_gripper_open ()
Gripper . read_gripper_closed_command_register ()
Gripper . read_gripper_acknowledge ()
Gripper . read_gripper_hit ()Les bits évidents sont une entrée et deux sorties. Les décisions matérielles n'ont pas d'importance, le code peut être modifié en conséquence.
Sources de pièces personnalisées
- Remember to increment setup.cfg version before release tag!

