nx100 remote control
Release - 1.0.3
Yaskawa Motoman NX100 Robot industrial Control remoto Biblioteca Python. Esta biblioteca se desarrolló originalmente para el Proyecto de Desarrollo de Control de Visión Máquica. Vea más en el video de demostración de YouTube.
Documentos para el desarrollo
Estos videos son parte de la documentación.
- Do changes with your own risk! in case you brick your robot or your setup is different and it doesn't work. I cannot help. System info -> Security -> Select Management Mode ->
But do not enter Management Mode password but instead Yaskawa emperor password.
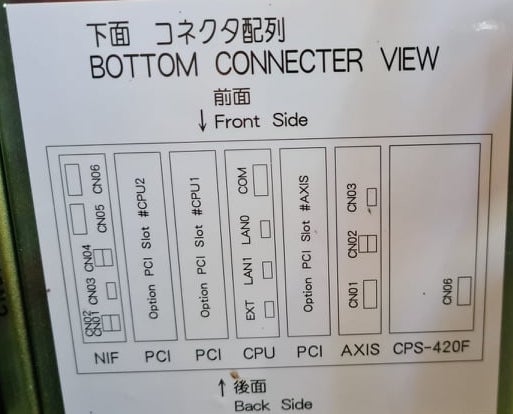
FD078 => bit set to 1 (Ethernet WWW)
LAN0 (next to serial COM port)
 1. Power off NX100 -> press down pendant "MAIN MENU" button while powering on NX100
2. Release "MAIN MENU" after seeing Motoman screen on pendant.
3. Login with Yaskawa emperor password from System -> Security.
4. SYSTEM -> SETUP -> OPTION FUNCTION -> TCP -> "USED"
5. SYSTEM -> SETUP -> OPTION FUNCTION -> NETWORK -> Give details.
6. Under network also find HOST SETUP -> Provide address details.
7. See that your changes have been saved.
8. Reboot NX100 and ping your NX100 ip address.
9. Test out this library.
pip install nx100-remote-control
pip install --upgrade nx100-remote-control import nx100_remote_control
nx100_remote_control . NX100_IP_ADDRESS = '192.168.2.28'
nx100_remote_control . NX100_TCP_PORT = 80
nx100_remote_control . MOCK_RESPONSE = False http://localhost:8080/ que se parece a esto en la imagen a continuación. import nx100_remote_control
from nx100_remote_control . module import WebServer
nx100_remote_control . MOCK_RESPONSE = True
WebServer . run ( addr = "localhost" , port = 8080 )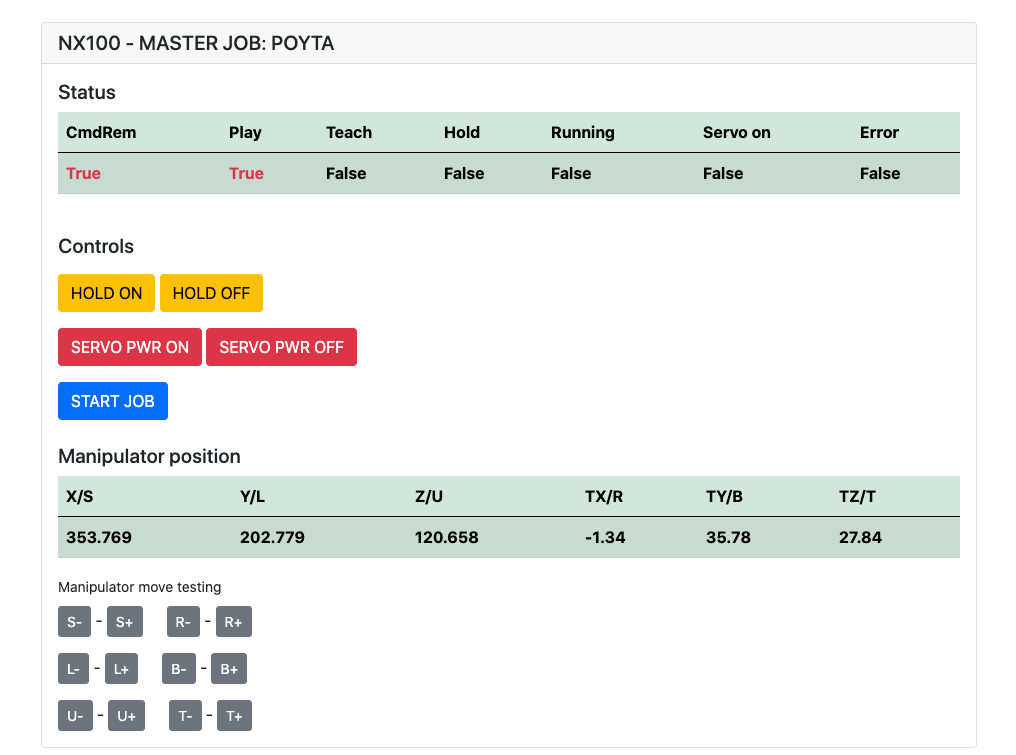
Debe haber instalado: pip install flake8 pytest
Lint: flake8 ./nx100_remote_control --count --select=E9,F63,F7,F82 --show-source --statistics
Prueba: pytest
Build: python -m build
Testing.py => utilizado para el desarrollo y la prueba de comandos individuales.
XboxController.py => Como se dice, puede usar el controlador para controlar el robot, solo demo. Tenga en cuenta que los movimientos son torpes porque NX100 no admite el control en tiempo real.
Muestra rápida para el comando MOVL para hacer un movimiento lineal con robot. Consulte el objeto Movel para obtener más detalles o leer Ethernet Server Function Manual .
 from nx100_remote_control . module import Commands , Utils
from nx100_remote_control . objects import MoveL

Commands . write_linear_move ( MoveL . MoveL (
    MoveL . MoveL . motion_speed_selection_posture_speed ,
    5 ,
    MoveL . MoveL . coordinate_specification_base_coordinate ,
    353.769 , 202.779 , 120.658 ,
    - 1.34 , 35.78 , 27.84 ,
    Utils . binary_to_decimal ( 0x00000001 ),
    0 , 0 , 0 , 0 , 0 , 0 , 0
))
Use el objeto Movel.movel para ver opciones para motion_speed_selection_ y para coordinate_specification_
Luego, para esperar a que se complete el movimiento, puede usar la función de devolución de llamada como ejemplo:
 from nx100_remote_control . module import Commands , Utils
from nx100_remote_control . objects import MoveL


def callback_success ():
    print ( 'MoveL position has been reached' )


def callback_failed ():
    print ( 'MoveL error or position not reached on given timeout' )


move_l = MoveL . MoveL (
    MoveL . MoveL . motion_speed_selection_posture_speed ,
    5 ,
    MoveL . MoveL . coordinate_specification_base_coordinate ,
    353.769 , 202.779 , 120.658 ,
    - 1.34 , 35.78 , 27.84 ,
    Utils . binary_to_decimal ( 0x00000001 ),
    0 , 0 , 0 , 0 , 0 , 0 , 0
)

Commands . robot_in_target_point_callback (
    move_l = move_l , timeout = 10 , _callback_success = callback_success , _callback_failed = callback_failed
)
Por lo tanto, esto se ejecutará _callback_success si se alcanza la posición en un tiempo de espera o ejecutarse _callback_failed si no.
Otra forma de clase de comandante
 from nx100_remote_control . module import LinearMove , Utils
from nx100_remote_control . objects import MoveL

move_l = MoveL . MoveL (
    MoveL . MoveL . motion_speed_selection_posture_speed ,
    5 ,
    MoveL . MoveL . coordinate_specification_base_coordinate ,
    352.769 , 202.779 , 120.658 ,
    - 1.34 , 35.78 , 27.84 ,
    Utils . binary_to_decimal ( 0x00000001 ),
    0 , 0 , 0 , 0 , 0 , 0 , 0
)

linear_move = LinearMove . LinearMove ()
linear_move . go ( move_l = move_l , wait = True , poll_limit_seconds = 10 )
print ( 'finished' ) Muestra rápida para el comando Movj para hacer movimiento de movimiento conjunto con robot. Lea Ethernet Server Function Manual para obtener más detalles sobre MoVJ
- !!! BE CAREFUL WITH MOVJ COMMAND AND IT'S SPEED SETTING !!! from nx100_remote_control . module import JointMove , Utils
from nx100_remote_control . objects import MoveJ
move_j = MoveJ . MoveJ (
25 , # speed %
MoveJ . MoveJ . coordinate_specification_base_coordinate ,
352.769 , 202.779 , 120.658 ,
- 1.34 , 35.78 , 27.84 ,
Utils . binary_to_decimal ( 0x00000001 ),
0 , 0 , 0 , 0 , 0 , 0 , 0
)
linear_move = JointMove . JointMove ()
linear_move . go ( move_j = move_j , wait = True , poll_limit_seconds = 10 )
print ( 'finished' )La carpeta Arduino contiene código y bosquejo para la pinza personalizada integrada para NX100 Motoman.
La configuración de escalera NX100 tenía, por defecto, GRP, significaba señales agrupadas, por lo que tuvo que desagruparse para obtener acceso al relé de salida #30052 
La idea aquí era que necesitaba poder controlar el relé #30052 con la señal de salida universal de stock #10022, pero también con la señal de entrada de red #22012 y esto necesitaba STR + no manejar para ambos casos (consulte la línea de escalera de imagen 0359)
Trabajo en progreso con la pinza.
 from nx100_remote_control . module import Gripper

Gripper . write_gripper_close ()
Gripper . write_gripper_open ()
Gripper . read_gripper_closed_command_register ()
Gripper . read_gripper_acknowledge ()
Gripper . read_gripper_hit ()Los bits obvios son una entrada y dos salidas. Las decisiones de hardware no importan, el código se puede cambiar en consecuencia.
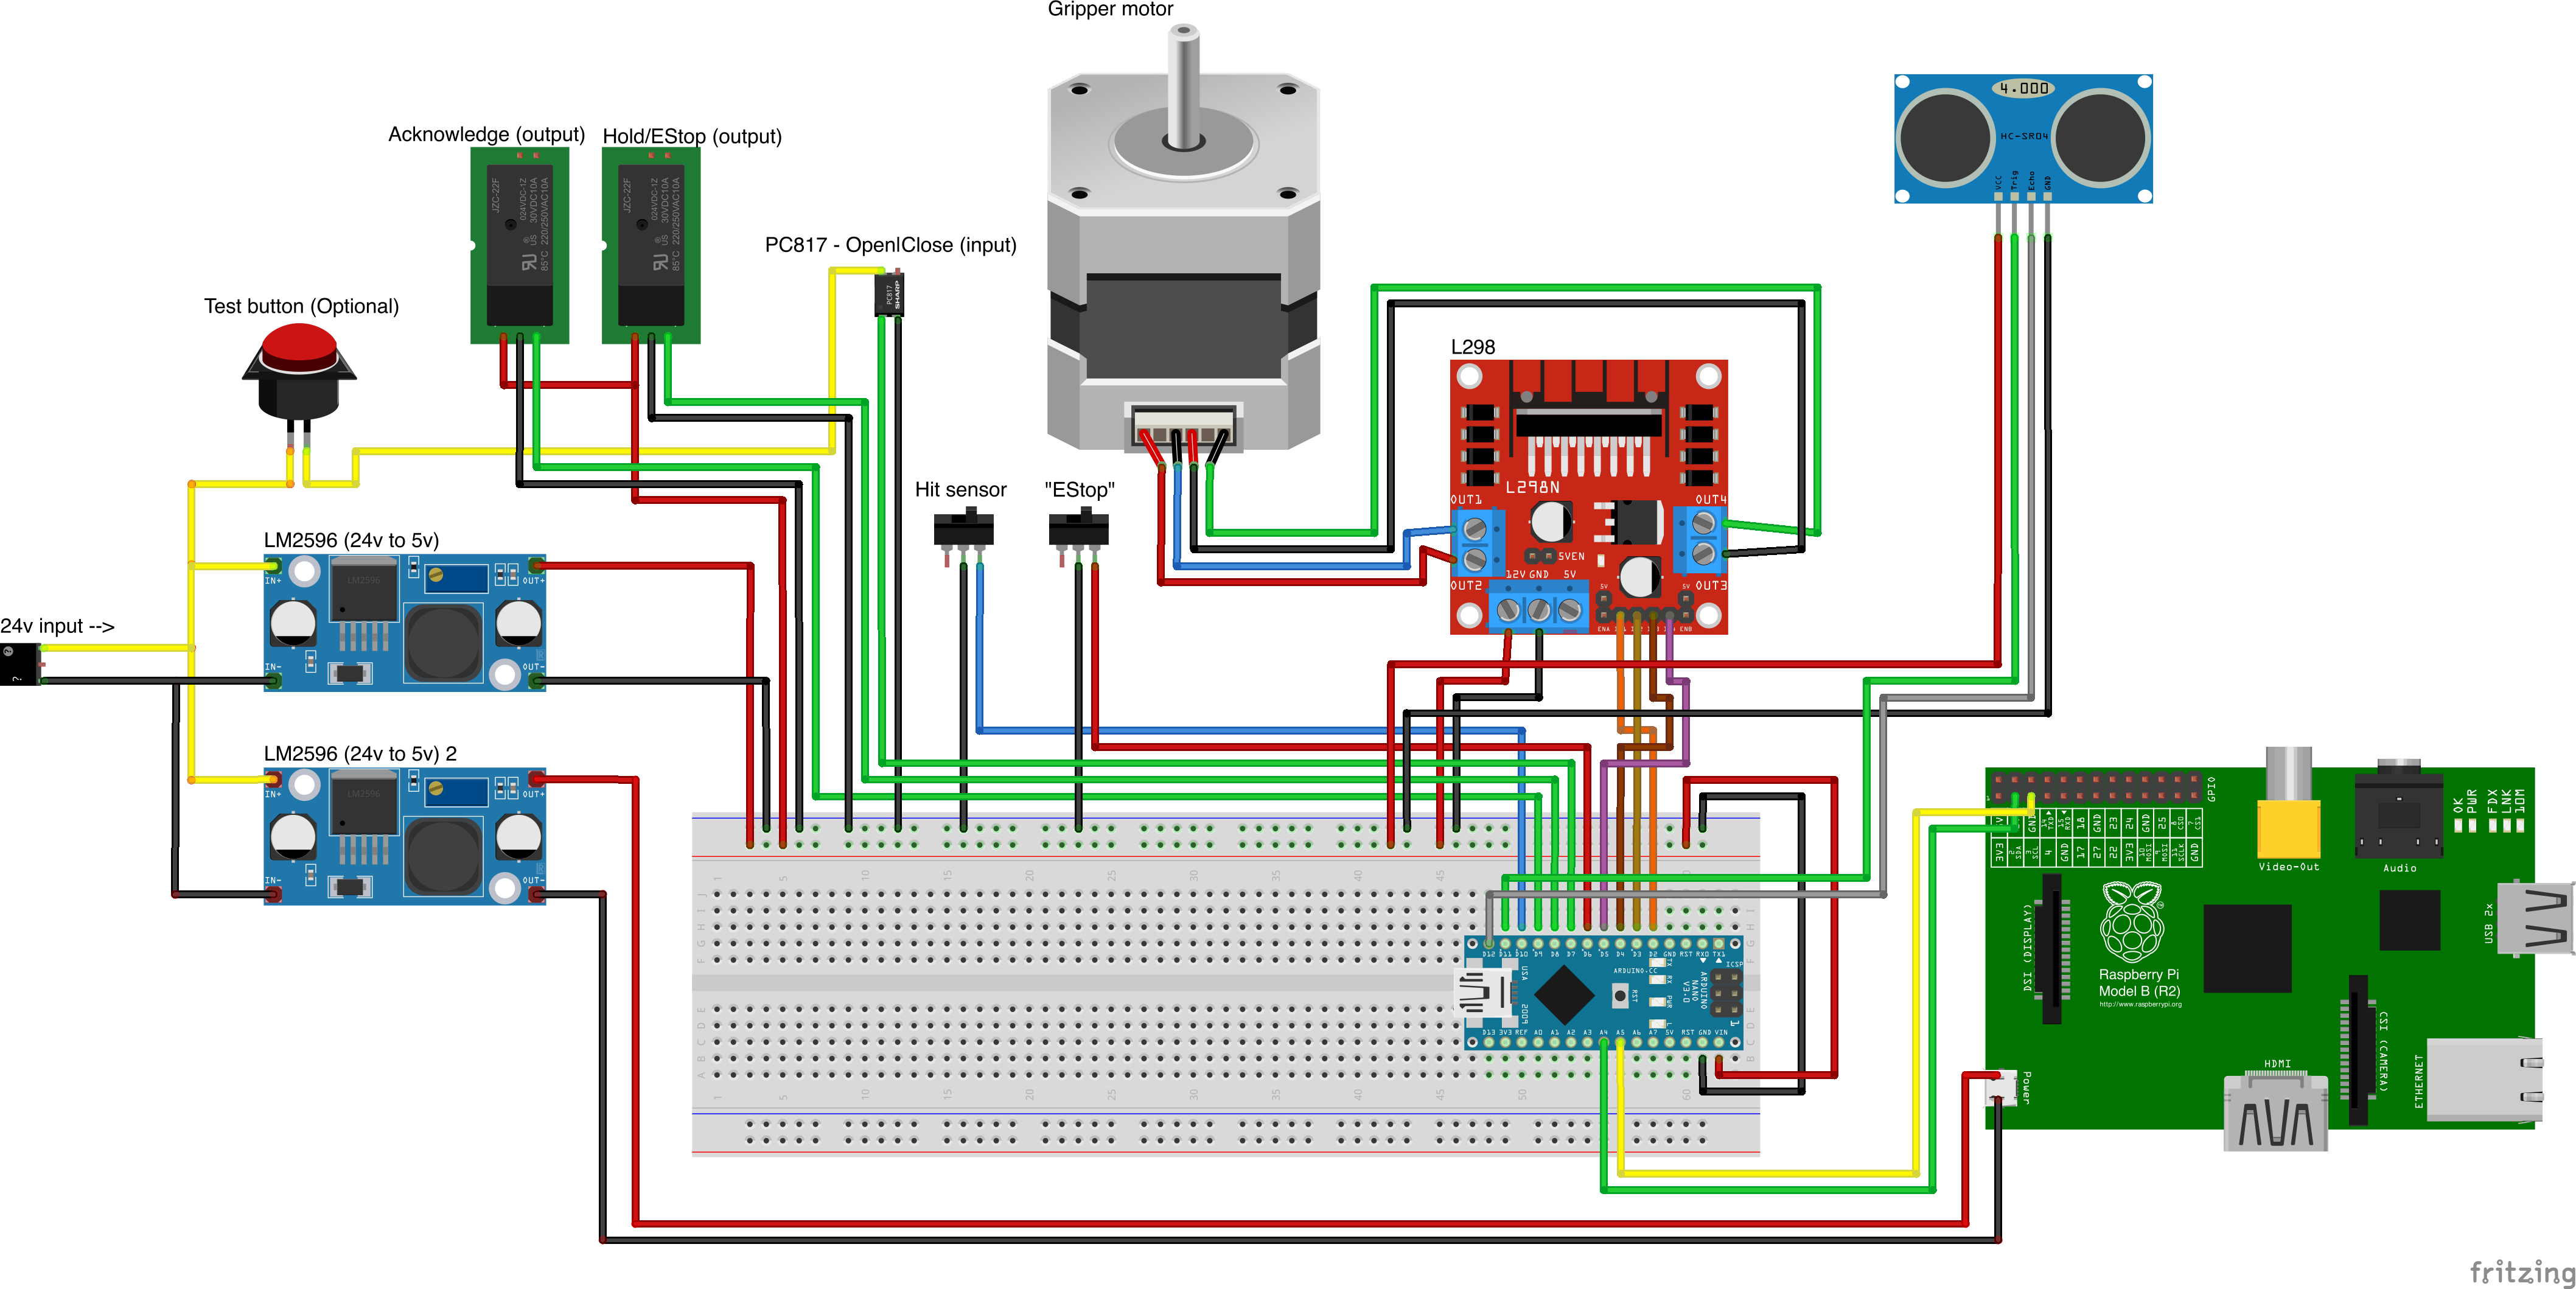
Fuentes de piezas personalizadas
- Remember to increment setup.cfg version before release tag!

