nx100 remote control
Release - 1.0.3
Yaskawa Motoman NX100 ROBOT Industrial Robot Control Control Python Library. تم تطوير هذه المكتبة في الأصل لمشروع تطوير رؤية الآلات. شاهد المزيد في فيديو YouTube التجريبي.
وثائق للتنمية
مقاطع الفيديو هذه هي جزء من الوثائق.
- Do changes with your own risk! in case you brick your robot or your setup is different and it doesn't work. I cannot help. System info -> Security -> Select Management Mode ->
But do not enter Management Mode password but instead Yaskawa emperor password.
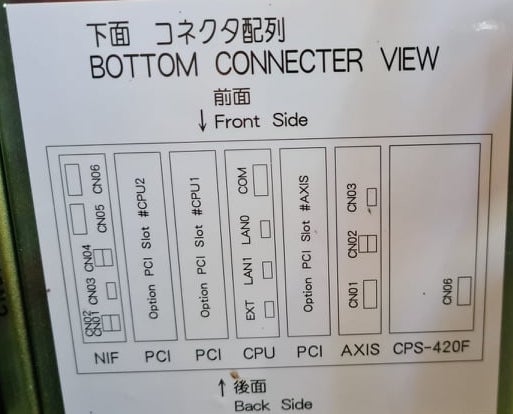
FD078 => bit set to 1 (Ethernet WWW)
LAN0 (next to serial COM port)
 1. Power off NX100 -> press down pendant "MAIN MENU" button while powering on NX100
2. Release "MAIN MENU" after seeing Motoman screen on pendant.
3. Login with Yaskawa emperor password from System -> Security.
4. SYSTEM -> SETUP -> OPTION FUNCTION -> TCP -> "USED"
5. SYSTEM -> SETUP -> OPTION FUNCTION -> NETWORK -> Give details.
6. Under network also find HOST SETUP -> Provide address details.
7. See that your changes have been saved.
8. Reboot NX100 and ping your NX100 ip address.
9. Test out this library.
pip install nx100-remote-control
pip install --upgrade nx100-remote-control import nx100_remote_control
nx100_remote_control . NX100_IP_ADDRESS = '192.168.2.28'
nx100_remote_control . NX100_TCP_PORT = 80
nx100_remote_control . MOCK_RESPONSE = False http://localhost:8080/ التي تبدو مثل هذا في الصورة أدناه. import nx100_remote_control
from nx100_remote_control . module import WebServer
nx100_remote_control . MOCK_RESPONSE = True
WebServer . run ( addr = "localhost" , port = 8080 )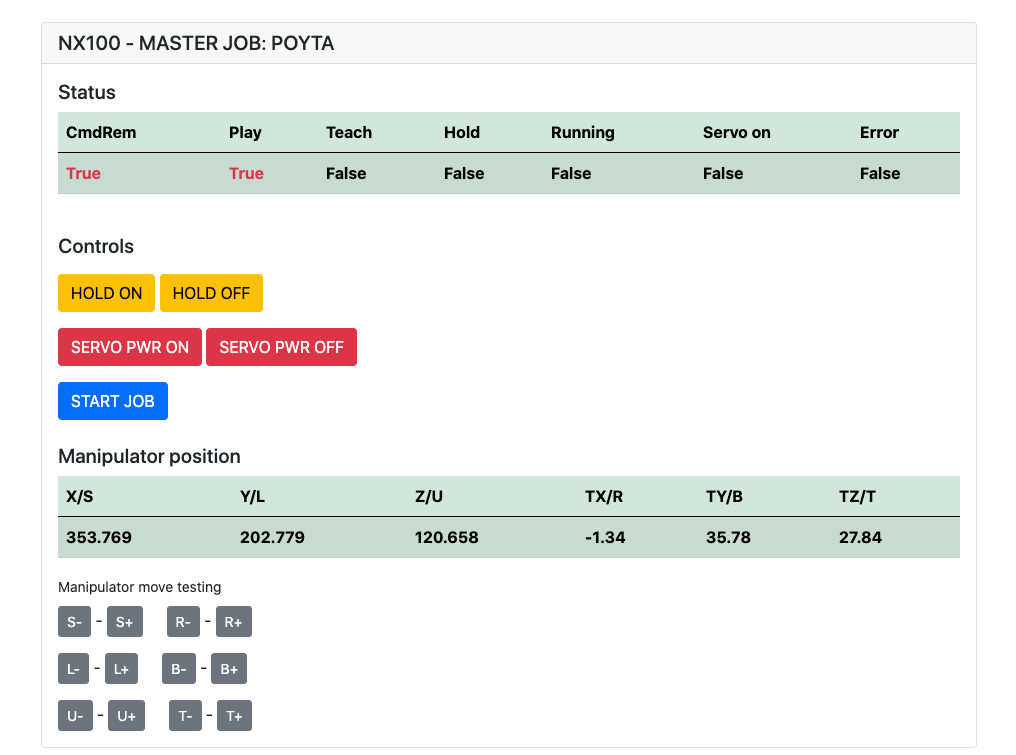
يجب أن يكون مثبتًا: pip install flake8 pytest
LINT: flake8 ./nx100_remote_control --count --select=E9,F63,F7,F82 --show-source --statistics
الاختبار: pytest
الإنشاء: python -m build
Testing.py => يستخدم للتطوير واختبار الأوامر الفردية.
XboxController.py => كما يقول الاسم ، يمكن استخدام وحدة التحكم للتحكم في Robot ، فقط العرض التوضيحي. لاحظ أن الحركات صاخبة لأن NX100 لا يدعم التحكم في الوقت الفعلي.
عينة سريعة لأمر MOVL للقيام بحركة خطية مع الروبوت. انظر كائن Movel لمزيد من التفاصيل أو اقرأ Ethernet Server Function Manual .
 from nx100_remote_control . module import Commands , Utils
from nx100_remote_control . objects import MoveL

Commands . write_linear_move ( MoveL . MoveL (
    MoveL . MoveL . motion_speed_selection_posture_speed ,
    5 ,
    MoveL . MoveL . coordinate_specification_base_coordinate ,
    353.769 , 202.779 , 120.658 ,
    - 1.34 , 35.78 , 27.84 ,
    Utils . binary_to_decimal ( 0x00000001 ),
    0 , 0 , 0 , 0 , 0 , 0 , 0
))
استخدم كائن movel.movel لمعرفة خيارات motion_speed_selection_ وللإحداثي_ coordinate_specification_
ثم للانتظار حتى يتم الانتهاء من الانتهاء ، يمكنك استخدام وظيفة رد الاتصال على سبيل المثال:
 from nx100_remote_control . module import Commands , Utils
from nx100_remote_control . objects import MoveL


def callback_success ():
    print ( 'MoveL position has been reached' )


def callback_failed ():
    print ( 'MoveL error or position not reached on given timeout' )


move_l = MoveL . MoveL (
    MoveL . MoveL . motion_speed_selection_posture_speed ,
    5 ,
    MoveL . MoveL . coordinate_specification_base_coordinate ,
    353.769 , 202.779 , 120.658 ,
    - 1.34 , 35.78 , 27.84 ,
    Utils . binary_to_decimal ( 0x00000001 ),
    0 , 0 , 0 , 0 , 0 , 0 , 0
)

Commands . robot_in_target_point_callback (
    move_l = move_l , timeout = 10 , _callback_success = callback_success , _callback_failed = callback_failed
)
لذلك سيؤدي ذلك إلى Exec _callback_success إذا تم الوصول إلى الموقف في مهلة معينة أو تشغيل _callback_failed إذا لم يكن الأمر كذلك.
طريقة فئة قائد أخرى
 from nx100_remote_control . module import LinearMove , Utils
from nx100_remote_control . objects import MoveL

move_l = MoveL . MoveL (
    MoveL . MoveL . motion_speed_selection_posture_speed ,
    5 ,
    MoveL . MoveL . coordinate_specification_base_coordinate ,
    352.769 , 202.779 , 120.658 ,
    - 1.34 , 35.78 , 27.84 ,
    Utils . binary_to_decimal ( 0x00000001 ),
    0 , 0 , 0 , 0 , 0 , 0 , 0
)

linear_move = LinearMove . LinearMove ()
linear_move . go ( move_l = move_l , wait = True , poll_limit_seconds = 10 )
print ( 'finished' ) عينة سريعة لأمر MOVJ للقيام بحركة الحركة المشتركة مع الروبوت. اقرأ Ethernet Server Function Manual لمزيد من التفاصيل حول MovJ
- !!! BE CAREFUL WITH MOVJ COMMAND AND IT'S SPEED SETTING !!! from nx100_remote_control . module import JointMove , Utils
from nx100_remote_control . objects import MoveJ
move_j = MoveJ . MoveJ (
25 , # speed %
MoveJ . MoveJ . coordinate_specification_base_coordinate ,
352.769 , 202.779 , 120.658 ,
- 1.34 , 35.78 , 27.84 ,
Utils . binary_to_decimal ( 0x00000001 ),
0 , 0 , 0 , 0 , 0 , 0 , 0
)
linear_move = JointMove . JointMove ()
linear_move . go ( move_j = move_j , wait = True , poll_limit_seconds = 10 )
print ( 'finished' )يحتوي مجلد Arduino على رمز ورسم للقابض المخصص المدمج لـ NX100 Motoman.
كان تكوين سلم NX100 بشكل افتراضي يعني الإشارات المجمعة ، لذا اضطررت إلى إلغاء تجميعها للوصول إلى ترحيل الإخراج #30052 
كانت الفكرة هنا هي أنني بحاجة إلى أن أكون قادرًا على التحكم في الترحيل رقم 30052 باستخدام إشارة الإخراج العالمية رقم 10022 ، وأيضًا مع إشارة إدخال الشبكة #22012 وهذا لا يحتاج إلى معالجة STR + في كلتا الحالتين (انظر خط سلم الصورة 0359)
العمل قيد التقدم مع القابض.
 from nx100_remote_control . module import Gripper

Gripper . write_gripper_close ()
Gripper . write_gripper_open ()
Gripper . read_gripper_closed_command_register ()
Gripper . read_gripper_acknowledge ()
Gripper . read_gripper_hit ()البتات الواضحة هي إدخال واحد ومخرجتين. قرارات الأجهزة لا تهم ، يمكن تغيير الكود وفقًا لذلك.
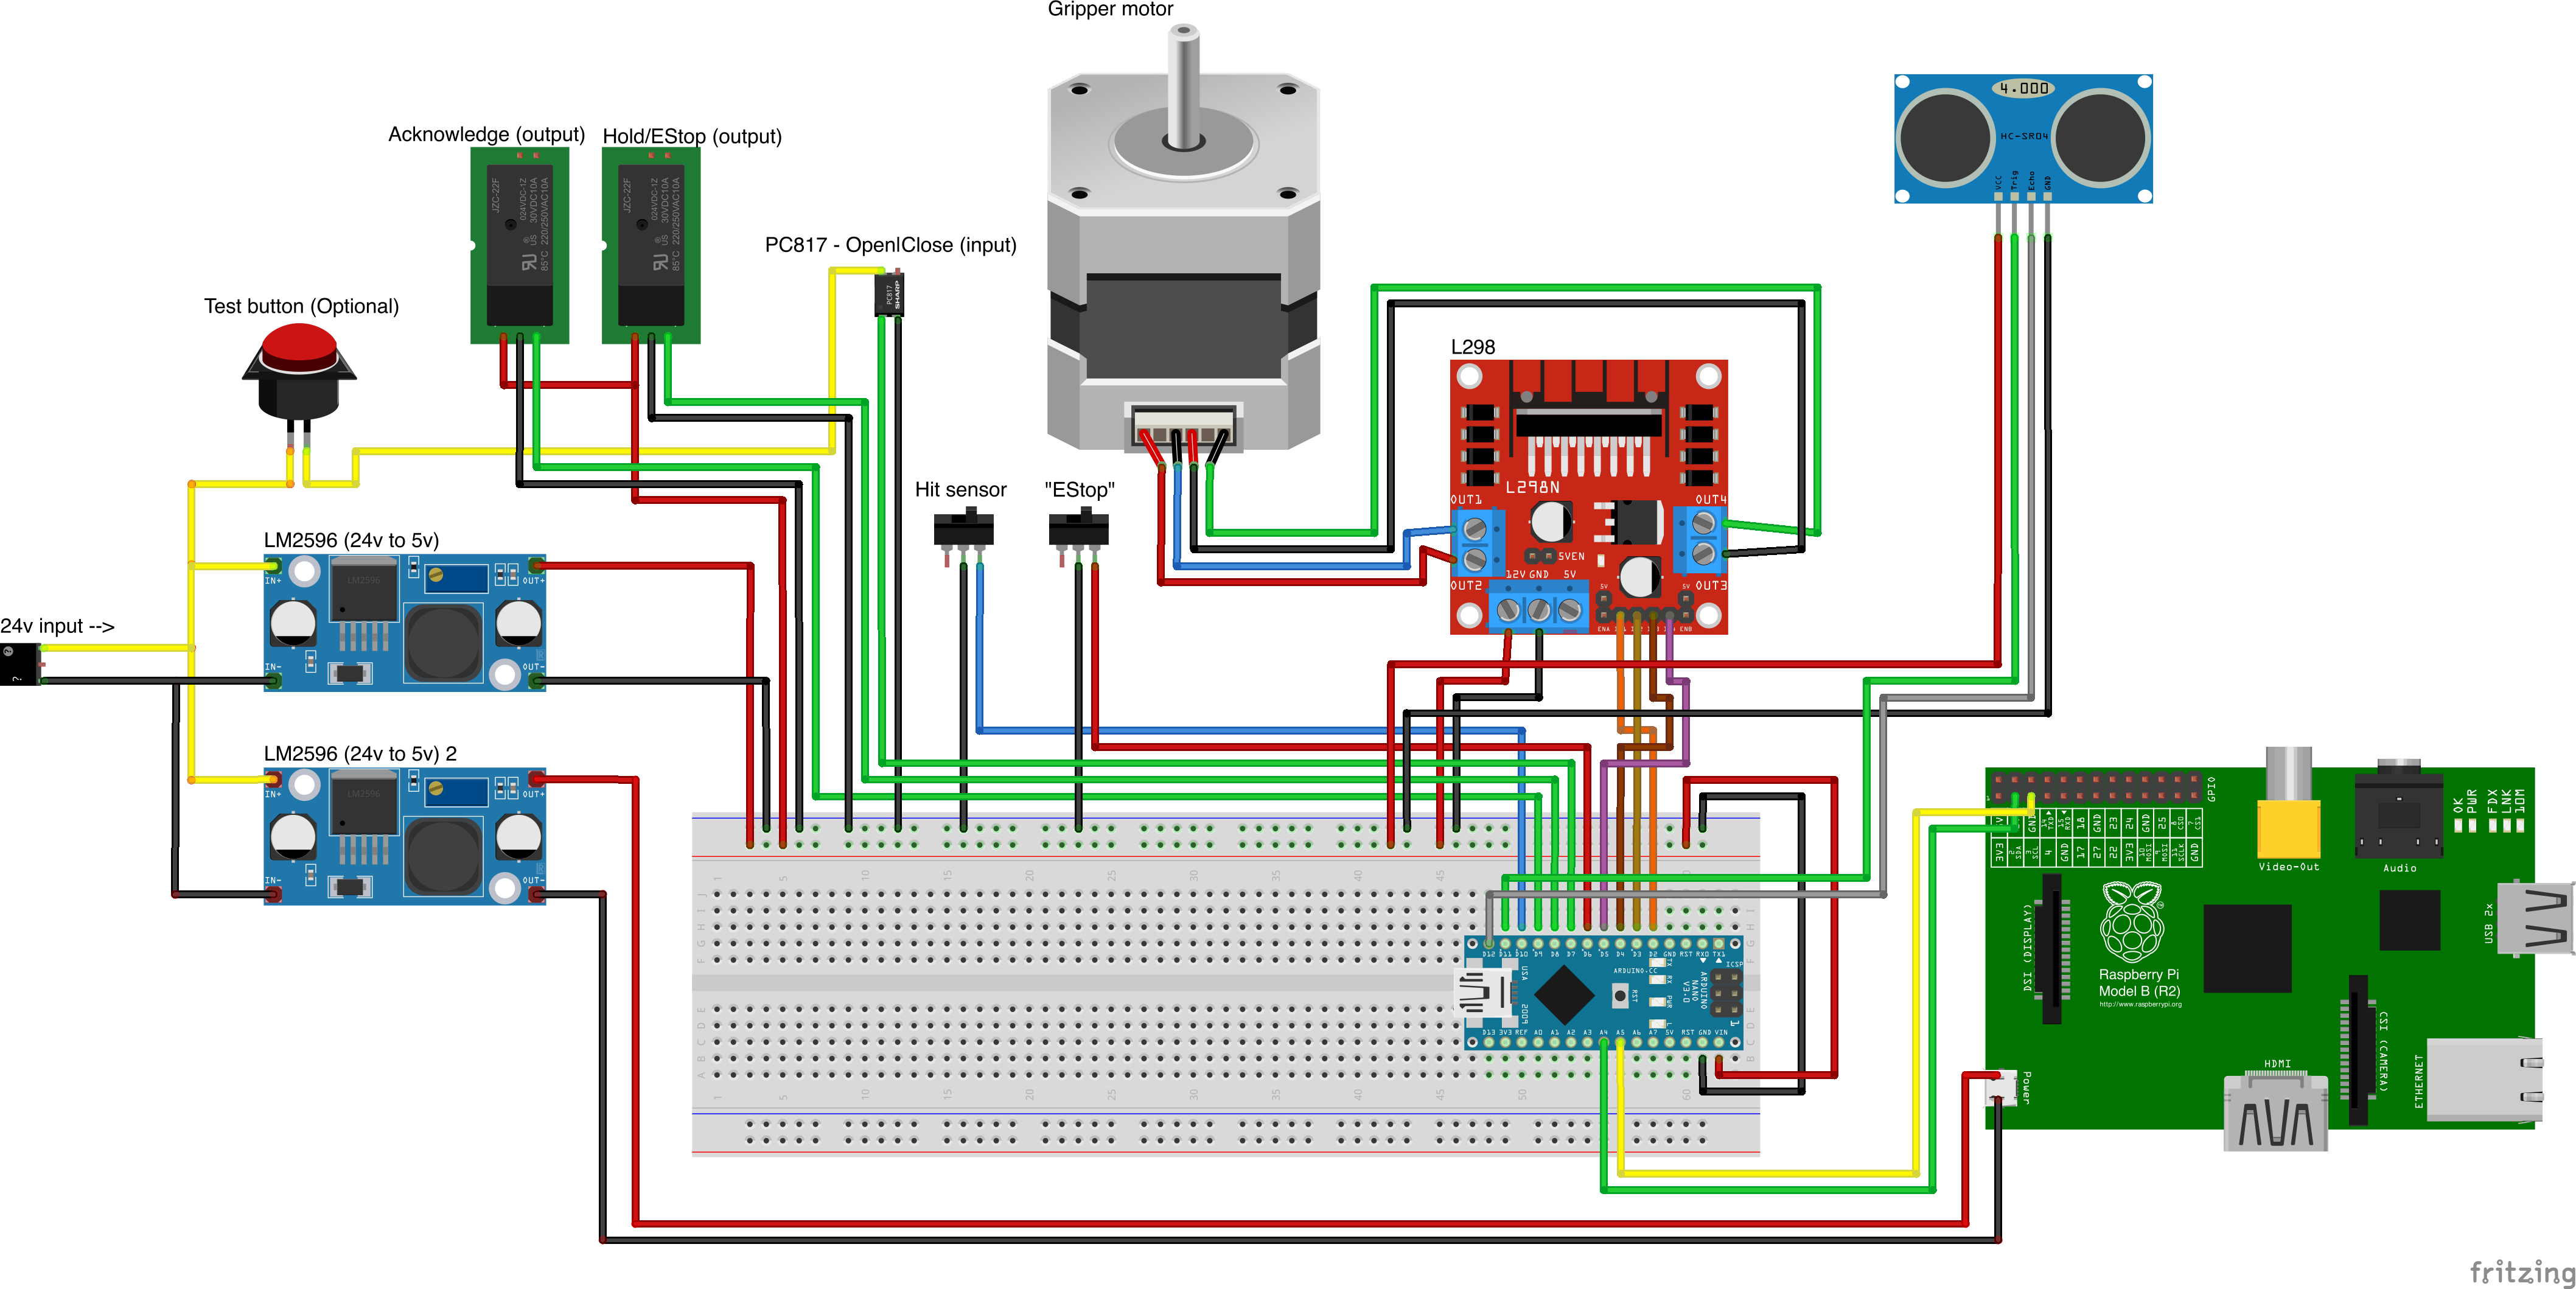
مصادر الأجزاء المخصصة
- Remember to increment setup.cfg version before release tag!

