nx100 remote control
Release - 1.0.3
Yaskawa Motoman NX100 Industrial Roboter Fernbedienung Python Library. Diese Bibliothek wurde ursprünglich für das Projekt zur Entwicklung von Maschinenvisionen entwickelt. Weitere Informationen finden Sie bei YouTube Demo Video.
Dokumente für die Entwicklung
Diese Videos sind Teil der Dokumentation.
- Do changes with your own risk! in case you brick your robot or your setup is different and it doesn't work. I cannot help. System info -> Security -> Select Management Mode ->
But do not enter Management Mode password but instead Yaskawa emperor password.
FD078 => bit set to 1 (Ethernet WWW)
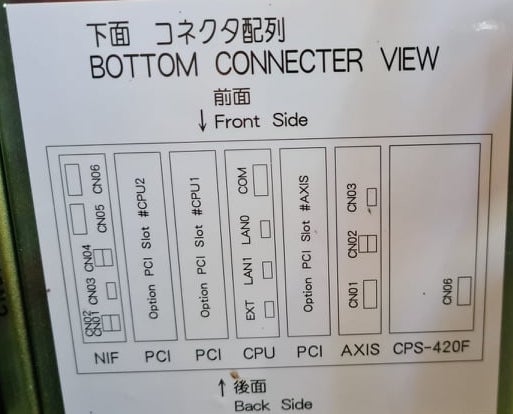
LAN0 (next to serial COM port)
 1. Power off NX100 -> press down pendant "MAIN MENU" button while powering on NX100
2. Release "MAIN MENU" after seeing Motoman screen on pendant.
3. Login with Yaskawa emperor password from System -> Security.
4. SYSTEM -> SETUP -> OPTION FUNCTION -> TCP -> "USED"
5. SYSTEM -> SETUP -> OPTION FUNCTION -> NETWORK -> Give details.
6. Under network also find HOST SETUP -> Provide address details.
7. See that your changes have been saved.
8. Reboot NX100 and ping your NX100 ip address.
9. Test out this library.
pip install nx100-remote-control
pip install --upgrade nx100-remote-control import nx100_remote_control
nx100_remote_control . NX100_IP_ADDRESS = '192.168.2.28'
nx100_remote_control . NX100_TCP_PORT = 80
nx100_remote_control . MOCK_RESPONSE = False http://localhost:8080/ das im folgenden Bild so aussieht. import nx100_remote_control
from nx100_remote_control . module import WebServer
nx100_remote_control . MOCK_RESPONSE = True
WebServer . run ( addr = "localhost" , port = 8080 )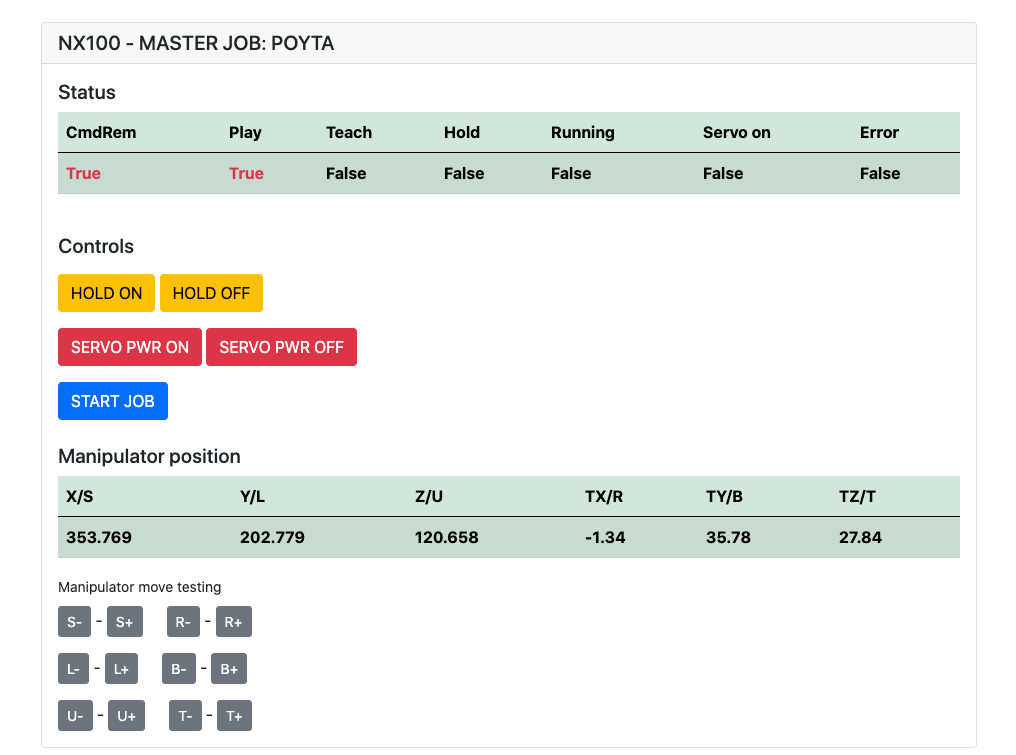
Muss installiert sein: pip install flake8 pytest
Lint: flake8 ./nx100_remote_control --count --select=E9,F63,F7,F82 --show-source --statistics
Test: pytest
Build: python -m build
Testing.py => wird für die Entwicklung und das Testen einzelner Befehle verwendet.
XboxController.py => Wie Name sagt, kann Controller zum Steuerungsroboter verwenden, nur Demo. Beachten Sie, dass Bewegungen klobig sind, da NX100 keine Echtzeitsteuerung unterstützt.
Schnelles Beispiel für MOVL -Befehl, um lineare Bewegungen mit Roboter durchzuführen. Weitere Informationen finden Sie unter dem Movel -Objekt oder lesen Sie Ethernet Server Function Manual .
 from nx100_remote_control . module import Commands , Utils
from nx100_remote_control . objects import MoveL

Commands . write_linear_move ( MoveL . MoveL (
    MoveL . MoveL . motion_speed_selection_posture_speed ,
    5 ,
    MoveL . MoveL . coordinate_specification_base_coordinate ,
    353.769 , 202.779 , 120.658 ,
    - 1.34 , 35.78 , 27.84 ,
    Utils . binary_to_decimal ( 0x00000001 ),
    0 , 0 , 0 , 0 , 0 , 0 , 0
))
Verwenden Sie Movel.Movel -Objekt, um Optionen für motion_speed_selection_ und für coordinate_specification_ anzuzeigen
Um zu warten, bis die Bewegung abgeschlossen ist, können Sie die Callback -Funktion als Beispiel verwenden:
 from nx100_remote_control . module import Commands , Utils
from nx100_remote_control . objects import MoveL


def callback_success ():
    print ( 'MoveL position has been reached' )


def callback_failed ():
    print ( 'MoveL error or position not reached on given timeout' )


move_l = MoveL . MoveL (
    MoveL . MoveL . motion_speed_selection_posture_speed ,
    5 ,
    MoveL . MoveL . coordinate_specification_base_coordinate ,
    353.769 , 202.779 , 120.658 ,
    - 1.34 , 35.78 , 27.84 ,
    Utils . binary_to_decimal ( 0x00000001 ),
    0 , 0 , 0 , 0 , 0 , 0 , 0
)

Commands . robot_in_target_point_callback (
    move_l = move_l , timeout = 10 , _callback_success = callback_success , _callback_failed = callback_failed
)
Dies wird also _callback_success ausgeführt, wenn die Position in gegebener Zeitüberschreitung erreicht oder _callback_failed ausgeführt wird, wenn nicht.
Ein weiterer Befehlshaberunterricht
 from nx100_remote_control . module import LinearMove , Utils
from nx100_remote_control . objects import MoveL

move_l = MoveL . MoveL (
    MoveL . MoveL . motion_speed_selection_posture_speed ,
    5 ,
    MoveL . MoveL . coordinate_specification_base_coordinate ,
    352.769 , 202.779 , 120.658 ,
    - 1.34 , 35.78 , 27.84 ,
    Utils . binary_to_decimal ( 0x00000001 ),
    0 , 0 , 0 , 0 , 0 , 0 , 0
)

linear_move = LinearMove . LinearMove ()
linear_move . go ( move_l = move_l , wait = True , poll_limit_seconds = 10 )
print ( 'finished' ) Schnelle Probe für MOVJ -Befehl zum gemeinsamen Bewegungsbewegungen mit Roboter. Lesen Sie Ethernet Server Function Manual für weitere Informationen zu MOVJ
- !!! BE CAREFUL WITH MOVJ COMMAND AND IT'S SPEED SETTING !!! from nx100_remote_control . module import JointMove , Utils
from nx100_remote_control . objects import MoveJ
move_j = MoveJ . MoveJ (
25 , # speed %
MoveJ . MoveJ . coordinate_specification_base_coordinate ,
352.769 , 202.779 , 120.658 ,
- 1.34 , 35.78 , 27.84 ,
Utils . binary_to_decimal ( 0x00000001 ),
0 , 0 , 0 , 0 , 0 , 0 , 0
)
linear_move = JointMove . JointMove ()
linear_move . go ( move_j = move_j , wait = True , poll_limit_seconds = 10 )
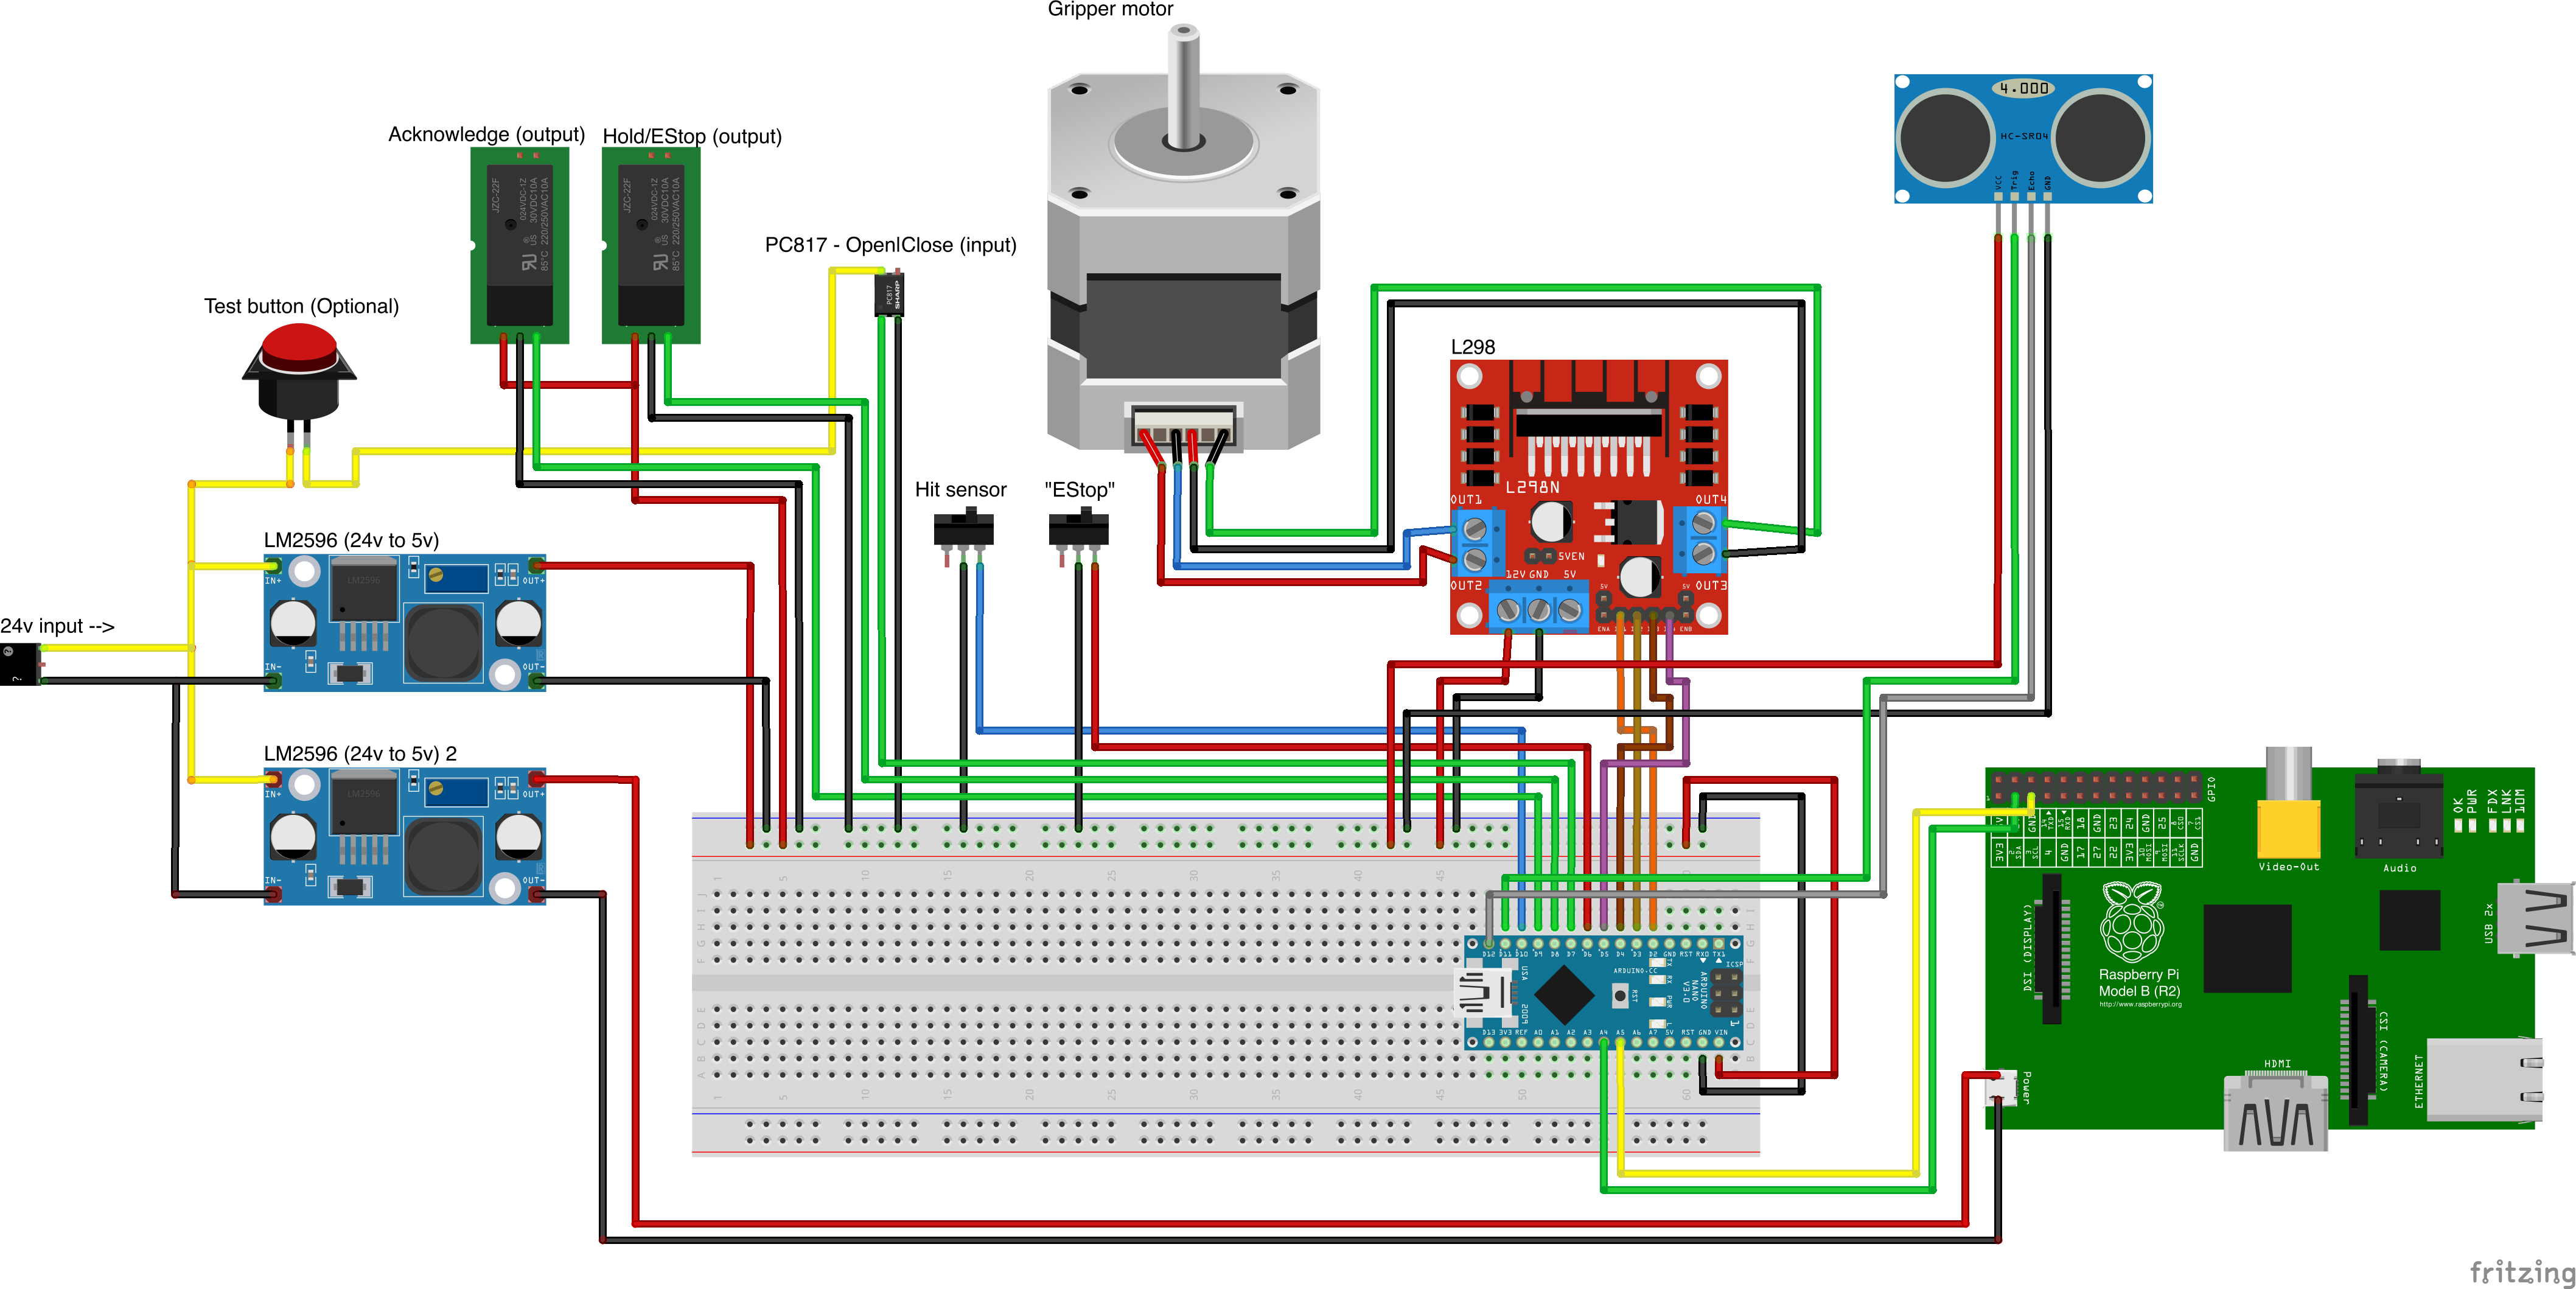
print ( 'finished' )Der Arduino -Ordner enthält Code und Skizze für benutzerdefinierte Gripper, die für NX100 Motoman integriert sind.
NX100 Ladder Config hatte standardmäßig GRP -Bedeutung gruppierter Signale und gruppieren sie, um Zugriff auf das Ausgangsrelais #30052 zu erhalten 
Die Idee hier war, dass ich in der Lage sein musste, das Relais #30052 mit Aktien Nr. 10022 Universal Output Signal, aber auch mit Netzwerkeingang Nr. 22012 Signal zu steuern und für beide Fälle nicht zu handhaben (siehe Bildleiterlinie 0359)
Arbeiten in Arbeit mit Gripper.
 from nx100_remote_control . module import Gripper

Gripper . write_gripper_close ()
Gripper . write_gripper_open ()
Gripper . read_gripper_closed_command_register ()
Gripper . read_gripper_acknowledge ()
Gripper . read_gripper_hit ()Offensichtliche Bits sind ein Eingang und zwei Ausgänge. Hardwareentscheidungen spielen keine Rolle, Code kann entsprechend geändert werden.
Benutzerdefinierte Teilquellen
- Remember to increment setup.cfg version before release tag!

