torch ngp
1.0.0
ที่เก็บนี้มี:
ข่าว : เวอร์ชันที่สะอาดและได้รับการปรับปรุงโดยมุ่งเน้นไปที่การสร้างฉากแบบดั้งเดิมของฉากที่เป็นจริงได้ถูกแยกออกเป็น nerf_template เนื่องจากที่เก็บนี้ยากที่จะรักษา
การฝึกอบรม/การแสดงผลแบบอินเทอร์แอคทีฟแบบทันทีบนเลโก้:
นอกจากนี้ยังมีการใช้งานที่ผิดรูปแบบอินเตอร์แอคทีฟครั้งแรก:
ngp_pl: pytorch+cuda ฝึกอบรมด้วย pytorch-lightning
JNERF: เกณฑ์มาตรฐานของ NERF ขึ้นอยู่กับ Jittor
Hashnerf-Pytorch: การใช้งาน Pytorch บริสุทธิ์
Dreamfields-Torch: การใช้งาน Pytorch+CUDA ของ การสร้างวัตถุที่นำด้วยข้อความแบบไม่มีการยิงด้วยฟิลด์ Dream ตามที่เก็บนี้
git clone --recursive https://github.com/ashawkey/torch-ngp.git
cd torch-ngppip install -r requirements.txt
# (optional) install the tcnn backbone
pip install git+https://github.com/NVlabs/tiny-cuda-nn/ # subdirectory=bindings/torchconda env create -f environment.yml
conda activate torch-ngp โดยค่าเริ่มต้นเราใช้ load เพื่อสร้างส่วนขยายที่รันไทม์ อย่างไรก็ตามบางครั้งอาจไม่สะดวก ดังนั้นเรายังให้ setup.py เพื่อสร้างแต่ละส่วนขยาย:
 # install all extension modules
bash scripts/install_ext.sh

# if you want to install manually, here is an example:
cd raymarching
python setup.py build_ext --inplace # build ext only, do not install (only can be used in the parent directory)
pip install . # install to python path (you still need the raymarching/ folder, since this only install the built extension.) ขณะนี้ --ff รองรับ GPUs ด้วยสถาปัตยกรรม CUDA เท่านั้น >= 70 สำหรับ GPU ที่มีสถาปัตยกรรมที่ต่ำกว่า --tcnn ยังคงสามารถใช้งานได้ แต่ความเร็วจะช้าลงเมื่อเทียบกับ GPU ล่าสุด
เราใช้รูปแบบข้อมูลเดียวกันกับ Instant-NGP, EG, Armadillo และ Fox โปรดดาวน์โหลดและวางไว้ใต้ ./data
นอกจากนี้เรายังสนับสนุนชุดข้อมูลที่จับด้วยตนเองและแปลงรูปแบบอื่น ๆ (เช่น LLFF, Tanks & Temples, MIP-NENF 360) เป็นรูปแบบที่เข้ากันได้กับ NERF พร้อมรายละเอียดในบล็อกรหัสต่อไปนี้
nerf_synthetic
Tanks & Temples: [สคริปต์แปลง]
llff: [สคริปต์แปลง]
MIP-NENF 360: [สคริปต์แปลง]
(ไดนามิก) d-nerf
(Dynamic) Hyper-Nerf: [Script Inversion]
การวิ่งครั้งแรกจะใช้เวลาพอสมควรในการรวบรวมส่วนขยายของ CUDA
 # ## Instant-ngp NeRF
# train with different backbones (with slower pytorch ray marching)
# for the colmap dataset, the default dataset setting `--bound 2 --scale 0.33` is used.
python main_nerf.py data/fox --workspace trial_nerf # fp32 mode
python main_nerf.py data/fox --workspace trial_nerf --fp16 # fp16 mode (pytorch amp)
python main_nerf.py data/fox --workspace trial_nerf --fp16 --ff # fp16 mode + FFMLP (this repo's implementation)
python main_nerf.py data/fox --workspace trial_nerf --fp16 --tcnn # fp16 mode + official tinycudann's encoder & MLP

# use CUDA to accelerate ray marching (much more faster!)
python main_nerf.py data/fox --workspace trial_nerf --fp16 --cuda_ray # fp16 mode + cuda raymarching

# preload data into GPU, accelerate training but use more GPU memory.
python main_nerf.py data/fox --workspace trial_nerf --fp16 --preload

# one for all: -O means --fp16 --cuda_ray --preload, which usually gives the best results balanced on speed & performance.
python main_nerf.py data/fox --workspace trial_nerf -O

# test mode
python main_nerf.py data/fox --workspace trial_nerf -O --test

# construct an error_map for each image, and sample rays based on the training error (slow down training but get better performance with the same number of training steps)
python main_nerf.py data/fox --workspace trial_nerf -O --error_map

# use a background model (e.g., a sphere with radius = 32), can supress noises for real-world 360 dataset
python main_nerf.py data/firekeeper --workspace trial_nerf -O --bg_radius 32

# start a GUI for NeRF training & visualization
# always use with `--fp16 --cuda_ray` for an acceptable framerate!
python main_nerf.py data/fox --workspace trial_nerf -O --gui

# test mode for GUI
python main_nerf.py data/fox --workspace trial_nerf -O --gui --test

# for the blender dataset, you should add `--bound 1.0 --scale 0.8 --dt_gamma 0`
# --bound means the scene is assumed to be inside box[-bound, bound]
# --scale adjusts the camera locaction to make sure it falls inside the above bounding box.
# --dt_gamma controls the adaptive ray marching speed, set to 0 turns it off.
python main_nerf.py data/nerf_synthetic/lego --workspace trial_nerf -O --bound 1.0 --scale 0.8 --dt_gamma 0
python main_nerf.py data/nerf_synthetic/lego --workspace trial_nerf -O --bound 1.0 --scale 0.8 --dt_gamma 0 --gui

# for the LLFF dataset, you should first convert it to nerf-compatible format:
python scripts/llff2nerf.py data/nerf_llff_data/fern # by default it use full-resolution images, and write `transforms.json` to the folder
python scripts/llff2nerf.py data/nerf_llff_data/fern --images images_4 --downscale 4 # if you prefer to use the low-resolution images
# then you can train as a colmap dataset (you'll need to tune the scale & bound if necessary):
python main_nerf.py data/nerf_llff_data/fern --workspace trial_nerf -O
python main_nerf.py data/nerf_llff_data/fern --workspace trial_nerf -O --gui

# for the Tanks&Temples dataset, you should first convert it to nerf-compatible format:
python scripts/tanks2nerf.py data/TanksAndTemple/Family # write `trainsforms_{split}.json` for [train, val, test]
# then you can train as a blender dataset (you'll need to tune the scale & bound if necessary)
python main_nerf.py data/TanksAndTemple/Family --workspace trial_nerf_family -O --bound 1.0 --scale 0.33 --dt_gamma 0
python main_nerf.py data/TanksAndTemple/Family --workspace trial_nerf_family -O --bound 1.0 --scale 0.33 --dt_gamma 0 --gui

# for custom dataset, you should:
# 1. take a video / many photos from different views
# 2. put the video under a path like ./data/custom/video.mp4 or the images under ./data/custom/images/*.jpg.
# 3. call the preprocess code: (should install ffmpeg and colmap first! refer to the file for more options)
python scripts/colmap2nerf.py --video ./data/custom/video.mp4 --run_colmap # if use video
python scripts/colmap2nerf.py --images ./data/custom/images/ --run_colmap # if use images
python scripts/colmap2nerf.py --video ./data/custom/video.mp4 --run_colmap --dynamic # if the scene is dynamic (for D-NeRF settings), add the time for each frame.
# 4. it should create the transform.json, and you can train with: (you'll need to try with different scale & bound & dt_gamma to make the object correctly located in the bounding box and render fluently.)
python main_nerf.py data/custom --workspace trial_nerf_custom -O --gui --scale 2.0 --bound 1.0 --dt_gamma 0.02

# ## Instant-ngp SDF
python main_sdf.py data/armadillo.obj --workspace trial_sdf
python main_sdf.py data/armadillo.obj --workspace trial_sdf --fp16
python main_sdf.py data/armadillo.obj --workspace trial_sdf --fp16 --ff
python main_sdf.py data/armadillo.obj --workspace trial_sdf --fp16 --tcnn

python main_sdf.py data/armadillo.obj --workspace trial_sdf --fp16 --test

# ## TensoRF
# almost the same as Instant-ngp NeRF, just replace the main script.
python main_tensoRF.py data/fox --workspace trial_tensoRF -O
python main_tensoRF.py data/nerf_synthetic/lego --workspace trial_tensoRF -O --bound 1.0 --scale 0.8 --dt_gamma 0

# ## CCNeRF
# training on single objects, turn on --error_map for better quality.
python main_CCNeRF.py data/nerf_synthetic/chair --workspace trial_cc_chair -O --bound 1.0 --scale 0.67 --dt_gamma 0 --error_map
python main_CCNeRF.py data/nerf_synthetic/ficus --workspace trial_cc_ficus -O --bound 1.0 --scale 0.67 --dt_gamma 0 --error_map
python main_CCNeRF.py data/nerf_synthetic/hotdog --workspace trial_cc_hotdog -O --bound 1.0 --scale 0.67 --dt_gamma 0 --error_map
# compose, use a larger bound and more samples per ray for better quality.
python main_CCNeRF.py data/nerf_synthetic/hotdog --workspace trial_cc_hotdog -O --bound 2.0 --scale 0.67 --dt_gamma 0 --max_steps 2048 --test --compose
# compose + gui, only about 1 FPS without dynamic resolution... just for quick verification of composition results.
python main_CCNeRF.py data/nerf_synthetic/hotdog --workspace trial_cc_hotdog -O --bound 2.0 --scale 0.67 --dt_gamma 0 --test --compose --gui

# ## D-NeRF
# almost the same as Instant-ngp NeRF, just replace the main script.
# use deformation to model dynamic scene
python main_dnerf.py data/dnerf/jumpingjacks --workspace trial_dnerf_jumpingjacks -O --bound 1.0 --scale 0.8 --dt_gamma 0
python main_dnerf.py data/dnerf/jumpingjacks --workspace trial_dnerf_jumpingjacks -O --bound 1.0 --scale 0.8 --dt_gamma 0 --gui
# use temporal basis to model dynamic scene
python main_dnerf.py data/dnerf/jumpingjacks --workspace trial_dnerf_basis_jumpingjacks -O --bound 1.0 --scale 0.8 --dt_gamma 0 --basis
python main_dnerf.py data/dnerf/jumpingjacks --workspace trial_dnerf_basis_jumpingjacks -O --bound 1.0 --scale 0.8 --dt_gamma 0 --basis --gui
# for the hypernerf dataset, first convert it into nerf-compatible format:
python scripts/hyper2nerf.py data/split-cookie --downscale 2 # will generate transforms*.json
python main_dnerf.py data/split-cookie/ --workspace trial_dnerf_cookies -O --bound 1 --scale 0.3 --dt_gamma 0
ตรวจสอบไดเรกทอรี scripts สำหรับตัวอย่างเพิ่มเติม
ทดสอบด้วยการตั้งค่าเริ่มต้นบนชุดข้อมูล LEGO ที่นี่ความเร็วหมายถึง iterations per second ใน V100
| แบบอย่าง | แยก | PSNR | ความเร็วรถไฟ | ความเร็วในการทดสอบ |
|---|---|---|---|---|
| ทันที NGP (กระดาษ) | Trainval? | 36.39 | - | - |
ทันที NGP ( -O ) | รถไฟ (ขั้นตอน 30k) | 34.15 | 97 | 7.8 |
ทันที NGP ( -O --error_map ) | รถไฟ (ขั้นตอน 30k) | 34.88 | 50 | 7.8 |
ทันที NGP ( -O ) | Trainval (ขั้นตอน 40k) | 35.22 | 97 | 7.8 |
ทันที NGP ( -O --error_map ) | Trainval (ขั้นตอน 40k) | 36.00 | 50 | 7.8 |
| Tensorf (กระดาษ) | รถไฟ (ขั้นตอน 30k) | 36.46 | - | - |
Tensorf ( -O ) | รถไฟ (ขั้นตอน 30k) | 35.05 | 51 | 2.8 |
tensorf ( -O --error_map ) | รถไฟ (ขั้นตอน 30k) | 35.84 | 14 | 2.8 |
ถาม : วิธีเลือก Backbone เครือข่ายได้อย่างไร?
ตอบ : ธง -O ที่ใช้ความแม่นยำผสมพื้นเมืองของ Pytorch เหมาะสำหรับกรณีส่วนใหญ่ ฉันไม่พบการปรับปรุงที่สำคัญมากสำหรับ --tcnn และ --ff และพวกเขาต้องการอาคารเพิ่มเติม นอกจากนี้คุณสมบัติใหม่บางอย่างอาจพร้อมใช้งานสำหรับโหมด -O เริ่มต้นเท่านั้น
ถาม : Cuda ออกจากหน่วยความจำสำหรับชุดข้อมูลของฉัน
ตอบ : คุณสามารถลองปิด --preload ที่โหลดภาพทั้งหมดใน GPU เพื่อเร่งความเร็ว (ถ้าใช้ -O เปลี่ยนเป็น --fp16 --cuda_ray ) ทางออกอีกทางหนึ่งคือการตั้ง downscale ด้วยตนเองใน NeRFDataset เพื่อลดความละเอียดของภาพ
ถาม : จะปรับ bound และ scale ได้อย่างไร?
ตอบ : คุณสามารถเริ่มต้นด้วย bound ขนาดใหญ่ (เช่น 16) หรือ scale เล็ก (เช่น 0.3) เพื่อให้แน่ใจว่าวัตถุตกอยู่ในกล่องขอบเขต โหมด GUI สามารถใช้ในการลดขนาด bound ลงเพื่อค้นหาค่าที่เหมาะสม การไม่ลงรอยกันบรรทัดนี้จะเห็นภาพของกล้องโพสท่าและตัวอย่างที่ดีบางอย่างสามารถพบได้ในปัญหานี้
ถาม : มุมมองนวนิยายที่มีเสียงดังสำหรับชุดข้อมูลที่สมจริง
ตอบ : คุณสามารถลองตั้ง bg_radius ให้มีค่ามากเช่น 32. มันฝึกแผนที่สภาพแวดล้อมพิเศษเพื่อสร้างแบบจำลองพื้นหลังในภาพถ่ายที่สมจริง bound ที่ใหญ่กว่าจะช่วยได้เช่นกัน ตัวอย่างสำหรับ bg_radius ในชุดข้อมูล Firekeeper: 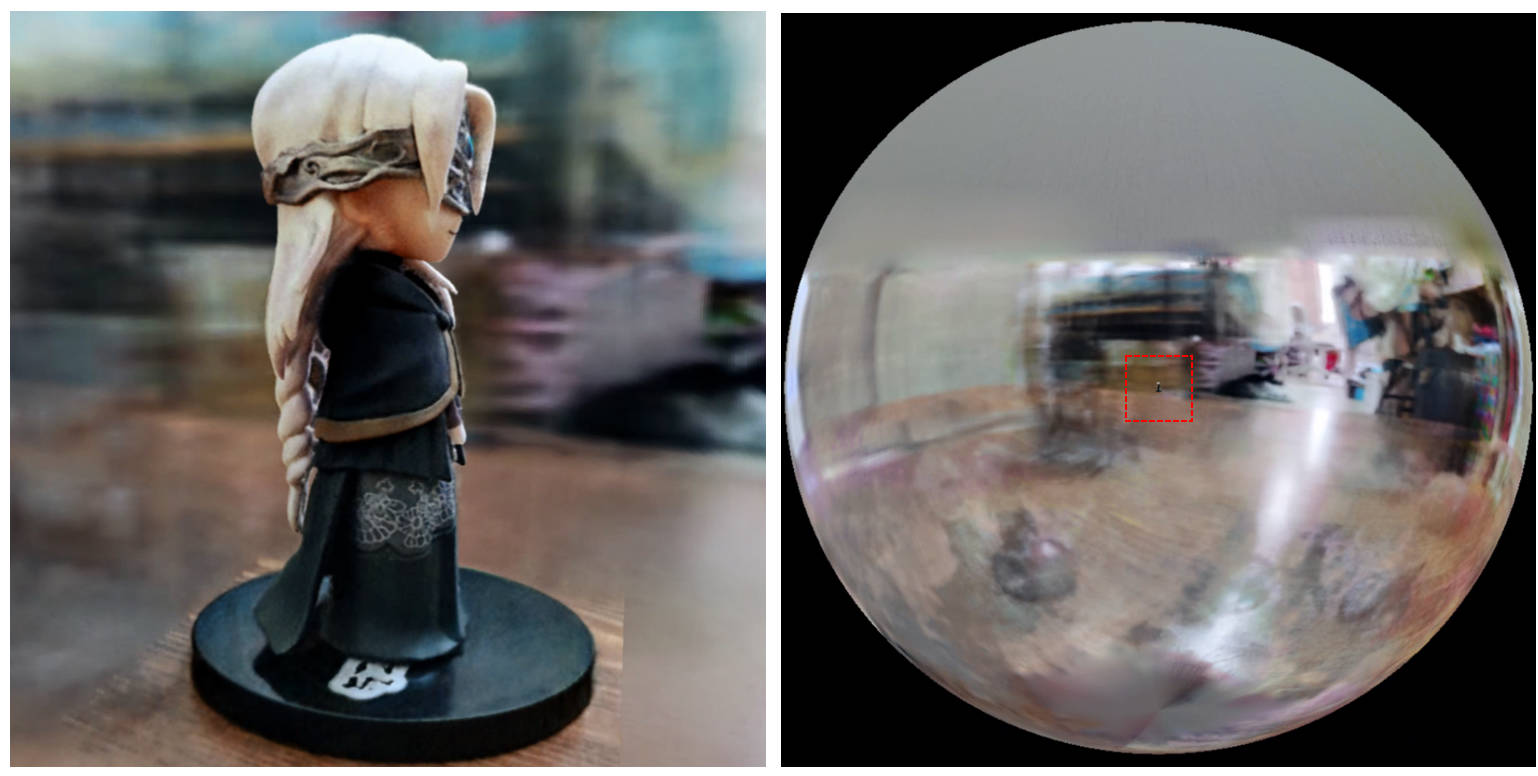
[0, 1] และอยู่กึ่งกลางที่ (0.5, 0.5, 0.5) , repo นี้ถือว่า ฉากถูกล้อมรอบในกล่อง [-bound, bound] และอยู่ตรงกลางที่ (0, 0, 0) ดังนั้นการทำงานของ aabb_scale จะถูกแทนที่ด้วย bound ที่นี่trunc_exp เป็นการเปิดใช้งานความหนาแน่นแทน softplus การตัดแต่งกิ่งหน้ากากอัลฟ่าจะถูกแทนที่ด้วยตัวอย่างกริดความหนาแน่นจาก Instant-NGP ซึ่งใช้ตรรกะเดียวกันสำหรับการเร่งความเร็วหากคุณพบว่างานนี้มีประโยชน์การอ้างอิงจะได้รับการชื่นชมผ่าน:
 @misc{torch-ngp,
    Author = {Jiaxiang Tang},
    Year = {2022},
    Note = {https://github.com/ashawkey/torch-ngp},
    Title = {Torch-ngp: a PyTorch implementation of instant-ngp}
}

@article{tang2022compressible,
    title = {Compressible-composable NeRF via Rank-residual Decomposition},
    author = {Tang, Jiaxiang and Chen, Xiaokang and Wang, Jingbo and Zeng, Gang},
    journal = {arXiv preprint arXiv:2205.14870},
    year = {2022}
}
เครดิตกับ Thomas Müllerสำหรับ Tiny-Cuda-NN ที่น่าทึ่งและ Instant-NGP:
 @misc{tiny-cuda-nn,
    Author = {Thomas M"uller},
    Year = {2021},
    Note = {https://github.com/nvlabs/tiny-cuda-nn},
    Title = {Tiny {CUDA} Neural Network Framework}
}

@article{mueller2022instant,
    title = {Instant Neural Graphics Primitives with a Multiresolution Hash Encoding},
    author = {Thomas M"uller and Alex Evans and Christoph Schied and Alexander Keller},
    journal = {arXiv:2201.05989},
    year = {2022},
    month = jan
}
เฟรมเวิร์กของ NERF ถูกดัดแปลงจาก nerf_pl:
 @misc{queianchen_nerf,
    author = {Quei-An, Chen},
    title = {Nerf_pl: a pytorch-lightning implementation of NeRF},
    url = {https://github.com/kwea123/nerf_pl/},
    year = {2020},
}
การใช้งาน Tensorf อย่างเป็นทางการ:
 @article{TensoRF,
  title={TensoRF: Tensorial Radiance Fields},
  author={Chen, Anpei and Xu, Zexiang and Geiger, Andreas and Yu, Jingyi and Su, Hao},
  journal={arXiv preprint arXiv:2203.09517},
  year={2022}
}
Nerf GUI ได้รับการพัฒนาด้วย dearpygui


