torch ngp
1.0.0
이 저장소에는 다음이 포함됩니다.
뉴스 : 현실적인 장면의 정적 NERF 재구성에 중점을 둔 깨끗하고 개선 된 버전은이 저장소가 유지하기가 어렵 기 때문에 NERF_TEMPLATE으로 분리되었습니다.
Instant-NGP 대화 형 교육/레고 렌더링 :
또한 첫 번째 대화 형 변형 가능 -nerf 구현 :
ngp_pl : pytorch+cuda는 pytorch-lightning으로 훈련했습니다.
Jnerf : Jittor를 기반으로 한 NERF 벤치 마크.
Hashnerf-Pytorch : 순수한 Pytorch 구현.
DreamFields-Torch : Pytorch+Cuda이 저장소를 기반으로 Dream Fields를 사용하여 제로 샷 텍스트 유도 객체 생성 의 구현.
git clone --recursive https://github.com/ashawkey/torch-ngp.git
cd torch-ngppip install -r requirements.txt
# (optional) install the tcnn backbone
pip install git+https://github.com/NVlabs/tiny-cuda-nn/ # subdirectory=bindings/torchconda env create -f environment.yml
conda activate torch-ngp 기본적으로 load 사용하여 런타임에 확장을 구축합니다. 그러나 이것은 때때로 불편할 수 있습니다. 따라서 각 확장자를 빌드 할 수있는 setup.py 도 제공합니다.
 # install all extension modules
bash scripts/install_ext.sh

# if you want to install manually, here is an example:
cd raymarching
python setup.py build_ext --inplace # build ext only, do not install (only can be used in the parent directory)
pip install . # install to python path (you still need the raymarching/ folder, since this only install the built extension.) 현재 --ff CUDA 아키텍처 >= 70 으로 GPU 만 지원합니다. 아키텍처가 낮은 GPU의 경우 --tcnn 여전히 사용할 수 있지만 최신 GPU에 비해 속도가 느려집니다.
우리는 Instant-NGP (예 : Armadillo 및 Fox)와 동일한 데이터 형식을 사용합니다. 다운로드하여 ./data 아래에 넣으십시오.
또한 셀프 캡처 된 데이터 세트를 지원하고 다른 형식 (예 : LLFF, Tanks & Temples, MIP-NERF 360)을 NERF 호환 형식으로 변환하며 다음 코드 블록의 세부 사항이 있습니다.
nerf_synthetic
탱크 및 사원 : [변환 스크립트]
LLFF : [변환 스크립트]
MIP-NERF 360 : [변환 스크립트]
(동적) d-nerf
(동적) Hyper-rerf : [변환 스크립트]
처음 실행은 CUDA 확장을 컴파일하는 데 약간의 시간이 걸립니다.
 # ## Instant-ngp NeRF
# train with different backbones (with slower pytorch ray marching)
# for the colmap dataset, the default dataset setting `--bound 2 --scale 0.33` is used.
python main_nerf.py data/fox --workspace trial_nerf # fp32 mode
python main_nerf.py data/fox --workspace trial_nerf --fp16 # fp16 mode (pytorch amp)
python main_nerf.py data/fox --workspace trial_nerf --fp16 --ff # fp16 mode + FFMLP (this repo's implementation)
python main_nerf.py data/fox --workspace trial_nerf --fp16 --tcnn # fp16 mode + official tinycudann's encoder & MLP

# use CUDA to accelerate ray marching (much more faster!)
python main_nerf.py data/fox --workspace trial_nerf --fp16 --cuda_ray # fp16 mode + cuda raymarching

# preload data into GPU, accelerate training but use more GPU memory.
python main_nerf.py data/fox --workspace trial_nerf --fp16 --preload

# one for all: -O means --fp16 --cuda_ray --preload, which usually gives the best results balanced on speed & performance.
python main_nerf.py data/fox --workspace trial_nerf -O

# test mode
python main_nerf.py data/fox --workspace trial_nerf -O --test

# construct an error_map for each image, and sample rays based on the training error (slow down training but get better performance with the same number of training steps)
python main_nerf.py data/fox --workspace trial_nerf -O --error_map

# use a background model (e.g., a sphere with radius = 32), can supress noises for real-world 360 dataset
python main_nerf.py data/firekeeper --workspace trial_nerf -O --bg_radius 32

# start a GUI for NeRF training & visualization
# always use with `--fp16 --cuda_ray` for an acceptable framerate!
python main_nerf.py data/fox --workspace trial_nerf -O --gui

# test mode for GUI
python main_nerf.py data/fox --workspace trial_nerf -O --gui --test

# for the blender dataset, you should add `--bound 1.0 --scale 0.8 --dt_gamma 0`
# --bound means the scene is assumed to be inside box[-bound, bound]
# --scale adjusts the camera locaction to make sure it falls inside the above bounding box.
# --dt_gamma controls the adaptive ray marching speed, set to 0 turns it off.
python main_nerf.py data/nerf_synthetic/lego --workspace trial_nerf -O --bound 1.0 --scale 0.8 --dt_gamma 0
python main_nerf.py data/nerf_synthetic/lego --workspace trial_nerf -O --bound 1.0 --scale 0.8 --dt_gamma 0 --gui

# for the LLFF dataset, you should first convert it to nerf-compatible format:
python scripts/llff2nerf.py data/nerf_llff_data/fern # by default it use full-resolution images, and write `transforms.json` to the folder
python scripts/llff2nerf.py data/nerf_llff_data/fern --images images_4 --downscale 4 # if you prefer to use the low-resolution images
# then you can train as a colmap dataset (you'll need to tune the scale & bound if necessary):
python main_nerf.py data/nerf_llff_data/fern --workspace trial_nerf -O
python main_nerf.py data/nerf_llff_data/fern --workspace trial_nerf -O --gui

# for the Tanks&Temples dataset, you should first convert it to nerf-compatible format:
python scripts/tanks2nerf.py data/TanksAndTemple/Family # write `trainsforms_{split}.json` for [train, val, test]
# then you can train as a blender dataset (you'll need to tune the scale & bound if necessary)
python main_nerf.py data/TanksAndTemple/Family --workspace trial_nerf_family -O --bound 1.0 --scale 0.33 --dt_gamma 0
python main_nerf.py data/TanksAndTemple/Family --workspace trial_nerf_family -O --bound 1.0 --scale 0.33 --dt_gamma 0 --gui

# for custom dataset, you should:
# 1. take a video / many photos from different views
# 2. put the video under a path like ./data/custom/video.mp4 or the images under ./data/custom/images/*.jpg.
# 3. call the preprocess code: (should install ffmpeg and colmap first! refer to the file for more options)
python scripts/colmap2nerf.py --video ./data/custom/video.mp4 --run_colmap # if use video
python scripts/colmap2nerf.py --images ./data/custom/images/ --run_colmap # if use images
python scripts/colmap2nerf.py --video ./data/custom/video.mp4 --run_colmap --dynamic # if the scene is dynamic (for D-NeRF settings), add the time for each frame.
# 4. it should create the transform.json, and you can train with: (you'll need to try with different scale & bound & dt_gamma to make the object correctly located in the bounding box and render fluently.)
python main_nerf.py data/custom --workspace trial_nerf_custom -O --gui --scale 2.0 --bound 1.0 --dt_gamma 0.02

# ## Instant-ngp SDF
python main_sdf.py data/armadillo.obj --workspace trial_sdf
python main_sdf.py data/armadillo.obj --workspace trial_sdf --fp16
python main_sdf.py data/armadillo.obj --workspace trial_sdf --fp16 --ff
python main_sdf.py data/armadillo.obj --workspace trial_sdf --fp16 --tcnn

python main_sdf.py data/armadillo.obj --workspace trial_sdf --fp16 --test

# ## TensoRF
# almost the same as Instant-ngp NeRF, just replace the main script.
python main_tensoRF.py data/fox --workspace trial_tensoRF -O
python main_tensoRF.py data/nerf_synthetic/lego --workspace trial_tensoRF -O --bound 1.0 --scale 0.8 --dt_gamma 0

# ## CCNeRF
# training on single objects, turn on --error_map for better quality.
python main_CCNeRF.py data/nerf_synthetic/chair --workspace trial_cc_chair -O --bound 1.0 --scale 0.67 --dt_gamma 0 --error_map
python main_CCNeRF.py data/nerf_synthetic/ficus --workspace trial_cc_ficus -O --bound 1.0 --scale 0.67 --dt_gamma 0 --error_map
python main_CCNeRF.py data/nerf_synthetic/hotdog --workspace trial_cc_hotdog -O --bound 1.0 --scale 0.67 --dt_gamma 0 --error_map
# compose, use a larger bound and more samples per ray for better quality.
python main_CCNeRF.py data/nerf_synthetic/hotdog --workspace trial_cc_hotdog -O --bound 2.0 --scale 0.67 --dt_gamma 0 --max_steps 2048 --test --compose
# compose + gui, only about 1 FPS without dynamic resolution... just for quick verification of composition results.
python main_CCNeRF.py data/nerf_synthetic/hotdog --workspace trial_cc_hotdog -O --bound 2.0 --scale 0.67 --dt_gamma 0 --test --compose --gui

# ## D-NeRF
# almost the same as Instant-ngp NeRF, just replace the main script.
# use deformation to model dynamic scene
python main_dnerf.py data/dnerf/jumpingjacks --workspace trial_dnerf_jumpingjacks -O --bound 1.0 --scale 0.8 --dt_gamma 0
python main_dnerf.py data/dnerf/jumpingjacks --workspace trial_dnerf_jumpingjacks -O --bound 1.0 --scale 0.8 --dt_gamma 0 --gui
# use temporal basis to model dynamic scene
python main_dnerf.py data/dnerf/jumpingjacks --workspace trial_dnerf_basis_jumpingjacks -O --bound 1.0 --scale 0.8 --dt_gamma 0 --basis
python main_dnerf.py data/dnerf/jumpingjacks --workspace trial_dnerf_basis_jumpingjacks -O --bound 1.0 --scale 0.8 --dt_gamma 0 --basis --gui
# for the hypernerf dataset, first convert it into nerf-compatible format:
python scripts/hyper2nerf.py data/split-cookie --downscale 2 # will generate transforms*.json
python main_dnerf.py data/split-cookie/ --workspace trial_dnerf_cookies -O --bound 1 --scale 0.3 --dt_gamma 0
제공된 예제는 scripts 디렉토리를 확인하십시오.
레고 데이터 세트의 기본 설정으로 테스트했습니다. 여기서 속도는 V100의 iterations per second 을 나타냅니다.
| 모델 | 나뉘다 | PSNR | 기차 속도 | 테스트 속도 |
|---|---|---|---|---|
| 인스턴트 NGP (종이) | Trainval? | 36.39 | - | - |
Instant -NGP ( -O ) | 기차 (30k 단계) | 34.15 | 97 | 7.8 |
instant -ngp ( -O --error_map ) | 기차 (30k 단계) | 34.88 | 50 | 7.8 |
Instant -NGP ( -O ) | Trainval (40K 단계) | 35.22 | 97 | 7.8 |
instant -ngp ( -O --error_map ) | Trainval (40K 단계) | 36.00 | 50 | 7.8 |
| 텐소프 (종이) | 기차 (30k 단계) | 36.46 | - | - |
텐소프 ( -O ) | 기차 (30k 단계) | 35.05 | 51 | 2.8 |
Tensorf ( -O --error_map ) | 기차 (30k 단계) | 35.84 | 14 | 2.8 |
Q : 네트워크 백본을 선택하는 방법은 무엇입니까?
A : Pytorch의 기본 혼합 정밀도를 사용하는 -O 플래그는 대부분의 경우에 적합합니다. --tcnn 및 --ff 에 대해서는 크게 개선되지 않았으며 추가 건물이 필요합니다. 또한 일부 새로운 기능은 기본 -O 모드에서만 사용할 수 있습니다.
Q : 내 데이터 세트의 메모리가없는 Cuda.
A : 가속을 위해 모든 이미지를 GPU에로드하는 --preload 끄십시오 ( -O 사용하는 경우 --fp16 --cuda_ray 로 변경). 또 다른 솔루션은 NeRFDataset 에서 수동으로 downscale 설정하여 이미지 해상도를 낮추는 것입니다.
Q : bound 및 scale 조정하는 방법?
A : 큰 bound (예 : 16) 또는 scale (예 : 0.3)로 시작하여 객체가 경계 상자에 속하는지 확인할 수 있습니다. GUI 모드는 bound 대화식으로 축소하여 적절한 값을 찾을 수 있습니다. 이 라인을 사용하지 않으면 카메라 포즈가 시각화 되며이 문제에서는 몇 가지 좋은 예를 찾을 수 있습니다.
Q : 현실적인 데이터 세트에 대한 시끄러운 소설보기.
A : bg_radius 큰 가치로 설정할 수 있습니다 (예 : 32). 현실적인 사진의 배경을 모델링하기 위해 추가 환경 맵을 훈련시킵니다. 더 큰 bound 도 도움이 될 것입니다. Firekeeper 데이터 세트에서 bg_radius 의 예 : 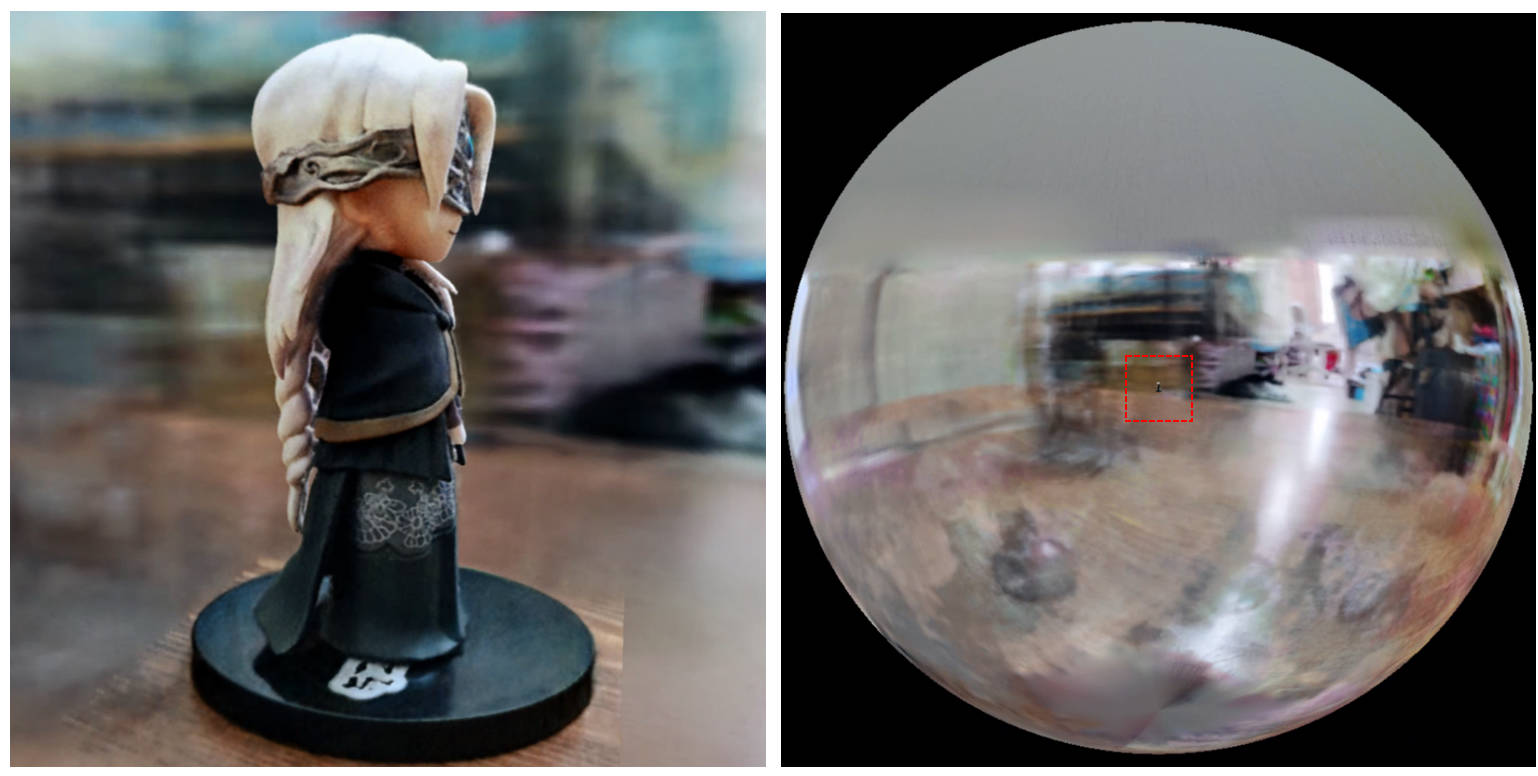
[0, 1] 에 제한되어 있고 (0.5, 0.5, 0.5) 에 중앙에 있다고 가정하는 대신,이 repo는 장면이 상자 [-bound, bound] 에 제한되어 있고 (0, 0, 0) 중심으로 가정합니다. 따라서 aabb_scale 의 기능은 여기에서 bound 로 대체됩니다.softplus 대신 밀도 활성화로 trunc_exp 사용하십시오. 알파 마스크 가지 치기는 Instant-NGP의 밀도 그리드 샘플러로 대체되며, 이는 가속도와 동일한 논리를 공유합니다.이 작업이 유용하다고 생각하면 다음을 통해 인용이 감사합니다.
 @misc{torch-ngp,
    Author = {Jiaxiang Tang},
    Year = {2022},
    Note = {https://github.com/ashawkey/torch-ngp},
    Title = {Torch-ngp: a PyTorch implementation of instant-ngp}
}

@article{tang2022compressible,
    title = {Compressible-composable NeRF via Rank-residual Decomposition},
    author = {Tang, Jiaxiang and Chen, Xiaokang and Wang, Jingbo and Zeng, Gang},
    journal = {arXiv preprint arXiv:2205.14870},
    year = {2022}
}
놀라운 Tiny-Cuda-NN 및 Instant-NGP에 대한 Thomas Müller에게 크레딧 :
 @misc{tiny-cuda-nn,
    Author = {Thomas M"uller},
    Year = {2021},
    Note = {https://github.com/nvlabs/tiny-cuda-nn},
    Title = {Tiny {CUDA} Neural Network Framework}
}

@article{mueller2022instant,
    title = {Instant Neural Graphics Primitives with a Multiresolution Hash Encoding},
    author = {Thomas M"uller and Alex Evans and Christoph Schied and Alexander Keller},
    journal = {arXiv:2201.05989},
    year = {2022},
    month = jan
}
NERF의 프레임 워크는 nerf_pl에서 조정됩니다.
 @misc{queianchen_nerf,
    author = {Quei-An, Chen},
    title = {Nerf_pl: a pytorch-lightning implementation of NeRF},
    url = {https://github.com/kwea123/nerf_pl/},
    year = {2020},
}
공식 Tensorf 구현 :
 @article{TensoRF,
  title={TensoRF: Tensorial Radiance Fields},
  author={Chen, Anpei and Xu, Zexiang and Geiger, Andreas and Yu, Jingyi and Su, Hao},
  journal={arXiv preprint arXiv:2203.09517},
  year={2022}
}
Nerf Gui는 Dearpygui와 함께 개발되었습니다.


