torch ngp
1.0.0
يحتوي هذا المستودع على:
الأخبار : تم فصل نسخة نظيفة ومحسّنة تركز على إعادة بناء NERF الثابتة للمشاهد الواقعية إلى Nerf_Template ، حيث كان من الصعب الحفاظ على هذا المستودع.
التدريب التفاعلي الفوري NGP/التقديم على LEGO:
أيضا أول تطبيق تفاعلي لا يمكن تشويهه:
NGP_PL: تدرب Pytorch+CUDA مع Lightning Pytorch.
JNERF: معيار NERF يعتمد على Jittor.
Hashnerf-Pytorch: تطبيق Pytorch نقي.
Dreamfields-Torch: Pytorch+CUDA تنفيذ توليد الكائنات الموجهة نصية صفرية مع حقول الأحلام بناءً على هذا المستودع.
git clone --recursive https://github.com/ashawkey/torch-ngp.git
cd torch-ngppip install -r requirements.txt
# (optional) install the tcnn backbone
pip install git+https://github.com/NVlabs/tiny-cuda-nn/ # subdirectory=bindings/torchconda env create -f environment.yml
conda activate torch-ngp بشكل افتراضي ، نستخدم load لبناء الامتداد في وقت التشغيل. ومع ذلك ، قد يكون هذا غير مريح في بعض الأحيان. لذلك ، نقدم أيضًا setup.py لبناء كل امتداد:
 # install all extension modules
bash scripts/install_ext.sh

# if you want to install manually, here is an example:
cd raymarching
python setup.py build_ext --inplace # build ext only, do not install (only can be used in the parent directory)
pip install . # install to python path (you still need the raymarching/ folder, since this only install the built extension.) حاليًا ، --ff وحدات معالجة الرسومات فقط مع العمارة CUDA >= 70 . بالنسبة إلى وحدات معالجة الرسومات مع انخفاض العمارة ، لا يزال من الممكن استخدام --tcnn ، ولكن السرعة ستكون أبطأ مقارنة مع وحدات معالجة الرسومات الأكثر حداثة.
نستخدم نفس تنسيق البيانات مثل NGP الفوري ، مثل Armadillo و Fox. يرجى تنزيلها ووضعها تحت ./data .
نحن ندعم أيضًا مجموعة البيانات التي تتكيف معها وتحويل تنسيقات أخرى (على سبيل المثال ، LLFF ، الدبابات والمعابد ، MIP-NERF 360) إلى التنسيق المتوافق مع NERF ، مع تفاصيل في كتلة الكود التالية.
nerf_synthetic
الدبابات والمعابد: [نص التحويل]
LLFF: [نص التحويل]
MIP-NERF 360: [برنامج التحويل]
(ديناميكي) D-NERF
(ديناميكي) Hyper-Nerf: [برنامج التحويل]
سيستغرق التشغيل لأول مرة بعض الوقت لتجميع ملحقات CUDA.
 # ## Instant-ngp NeRF
# train with different backbones (with slower pytorch ray marching)
# for the colmap dataset, the default dataset setting `--bound 2 --scale 0.33` is used.
python main_nerf.py data/fox --workspace trial_nerf # fp32 mode
python main_nerf.py data/fox --workspace trial_nerf --fp16 # fp16 mode (pytorch amp)
python main_nerf.py data/fox --workspace trial_nerf --fp16 --ff # fp16 mode + FFMLP (this repo's implementation)
python main_nerf.py data/fox --workspace trial_nerf --fp16 --tcnn # fp16 mode + official tinycudann's encoder & MLP

# use CUDA to accelerate ray marching (much more faster!)
python main_nerf.py data/fox --workspace trial_nerf --fp16 --cuda_ray # fp16 mode + cuda raymarching

# preload data into GPU, accelerate training but use more GPU memory.
python main_nerf.py data/fox --workspace trial_nerf --fp16 --preload

# one for all: -O means --fp16 --cuda_ray --preload, which usually gives the best results balanced on speed & performance.
python main_nerf.py data/fox --workspace trial_nerf -O

# test mode
python main_nerf.py data/fox --workspace trial_nerf -O --test

# construct an error_map for each image, and sample rays based on the training error (slow down training but get better performance with the same number of training steps)
python main_nerf.py data/fox --workspace trial_nerf -O --error_map

# use a background model (e.g., a sphere with radius = 32), can supress noises for real-world 360 dataset
python main_nerf.py data/firekeeper --workspace trial_nerf -O --bg_radius 32

# start a GUI for NeRF training & visualization
# always use with `--fp16 --cuda_ray` for an acceptable framerate!
python main_nerf.py data/fox --workspace trial_nerf -O --gui

# test mode for GUI
python main_nerf.py data/fox --workspace trial_nerf -O --gui --test

# for the blender dataset, you should add `--bound 1.0 --scale 0.8 --dt_gamma 0`
# --bound means the scene is assumed to be inside box[-bound, bound]
# --scale adjusts the camera locaction to make sure it falls inside the above bounding box.
# --dt_gamma controls the adaptive ray marching speed, set to 0 turns it off.
python main_nerf.py data/nerf_synthetic/lego --workspace trial_nerf -O --bound 1.0 --scale 0.8 --dt_gamma 0
python main_nerf.py data/nerf_synthetic/lego --workspace trial_nerf -O --bound 1.0 --scale 0.8 --dt_gamma 0 --gui

# for the LLFF dataset, you should first convert it to nerf-compatible format:
python scripts/llff2nerf.py data/nerf_llff_data/fern # by default it use full-resolution images, and write `transforms.json` to the folder
python scripts/llff2nerf.py data/nerf_llff_data/fern --images images_4 --downscale 4 # if you prefer to use the low-resolution images
# then you can train as a colmap dataset (you'll need to tune the scale & bound if necessary):
python main_nerf.py data/nerf_llff_data/fern --workspace trial_nerf -O
python main_nerf.py data/nerf_llff_data/fern --workspace trial_nerf -O --gui

# for the Tanks&Temples dataset, you should first convert it to nerf-compatible format:
python scripts/tanks2nerf.py data/TanksAndTemple/Family # write `trainsforms_{split}.json` for [train, val, test]
# then you can train as a blender dataset (you'll need to tune the scale & bound if necessary)
python main_nerf.py data/TanksAndTemple/Family --workspace trial_nerf_family -O --bound 1.0 --scale 0.33 --dt_gamma 0
python main_nerf.py data/TanksAndTemple/Family --workspace trial_nerf_family -O --bound 1.0 --scale 0.33 --dt_gamma 0 --gui

# for custom dataset, you should:
# 1. take a video / many photos from different views
# 2. put the video under a path like ./data/custom/video.mp4 or the images under ./data/custom/images/*.jpg.
# 3. call the preprocess code: (should install ffmpeg and colmap first! refer to the file for more options)
python scripts/colmap2nerf.py --video ./data/custom/video.mp4 --run_colmap # if use video
python scripts/colmap2nerf.py --images ./data/custom/images/ --run_colmap # if use images
python scripts/colmap2nerf.py --video ./data/custom/video.mp4 --run_colmap --dynamic # if the scene is dynamic (for D-NeRF settings), add the time for each frame.
# 4. it should create the transform.json, and you can train with: (you'll need to try with different scale & bound & dt_gamma to make the object correctly located in the bounding box and render fluently.)
python main_nerf.py data/custom --workspace trial_nerf_custom -O --gui --scale 2.0 --bound 1.0 --dt_gamma 0.02

# ## Instant-ngp SDF
python main_sdf.py data/armadillo.obj --workspace trial_sdf
python main_sdf.py data/armadillo.obj --workspace trial_sdf --fp16
python main_sdf.py data/armadillo.obj --workspace trial_sdf --fp16 --ff
python main_sdf.py data/armadillo.obj --workspace trial_sdf --fp16 --tcnn

python main_sdf.py data/armadillo.obj --workspace trial_sdf --fp16 --test

# ## TensoRF
# almost the same as Instant-ngp NeRF, just replace the main script.
python main_tensoRF.py data/fox --workspace trial_tensoRF -O
python main_tensoRF.py data/nerf_synthetic/lego --workspace trial_tensoRF -O --bound 1.0 --scale 0.8 --dt_gamma 0

# ## CCNeRF
# training on single objects, turn on --error_map for better quality.
python main_CCNeRF.py data/nerf_synthetic/chair --workspace trial_cc_chair -O --bound 1.0 --scale 0.67 --dt_gamma 0 --error_map
python main_CCNeRF.py data/nerf_synthetic/ficus --workspace trial_cc_ficus -O --bound 1.0 --scale 0.67 --dt_gamma 0 --error_map
python main_CCNeRF.py data/nerf_synthetic/hotdog --workspace trial_cc_hotdog -O --bound 1.0 --scale 0.67 --dt_gamma 0 --error_map
# compose, use a larger bound and more samples per ray for better quality.
python main_CCNeRF.py data/nerf_synthetic/hotdog --workspace trial_cc_hotdog -O --bound 2.0 --scale 0.67 --dt_gamma 0 --max_steps 2048 --test --compose
# compose + gui, only about 1 FPS without dynamic resolution... just for quick verification of composition results.
python main_CCNeRF.py data/nerf_synthetic/hotdog --workspace trial_cc_hotdog -O --bound 2.0 --scale 0.67 --dt_gamma 0 --test --compose --gui

# ## D-NeRF
# almost the same as Instant-ngp NeRF, just replace the main script.
# use deformation to model dynamic scene
python main_dnerf.py data/dnerf/jumpingjacks --workspace trial_dnerf_jumpingjacks -O --bound 1.0 --scale 0.8 --dt_gamma 0
python main_dnerf.py data/dnerf/jumpingjacks --workspace trial_dnerf_jumpingjacks -O --bound 1.0 --scale 0.8 --dt_gamma 0 --gui
# use temporal basis to model dynamic scene
python main_dnerf.py data/dnerf/jumpingjacks --workspace trial_dnerf_basis_jumpingjacks -O --bound 1.0 --scale 0.8 --dt_gamma 0 --basis
python main_dnerf.py data/dnerf/jumpingjacks --workspace trial_dnerf_basis_jumpingjacks -O --bound 1.0 --scale 0.8 --dt_gamma 0 --basis --gui
# for the hypernerf dataset, first convert it into nerf-compatible format:
python scripts/hyper2nerf.py data/split-cookie --downscale 2 # will generate transforms*.json
python main_dnerf.py data/split-cookie/ --workspace trial_dnerf_cookies -O --bound 1 --scale 0.3 --dt_gamma 0
تحقق من دليل scripts لمزيد من الأمثلة المقدمة.
تم اختباره مع الإعدادات الافتراضية على مجموعة بيانات LEGO. هنا تشير السرعة إلى iterations per second على V100.
| نموذج | ينقسم | PSNR | سرعة القطار | سرعة الاختبار |
|---|---|---|---|---|
| الفوري NGP (ورقة) | Trainval؟ | 36.39 | - | - |
الفوري NGP ( -O ) | قطار (30 ألف خطوة) | 34.15 | 97 | 7.8 |
الفوري NGP ( -O --error_map ) | قطار (30 ألف خطوة) | 34.88 | 50 | 7.8 |
الفوري NGP ( -O ) | Trainval (40k خطوة) | 35.22 | 97 | 7.8 |
الفوري NGP ( -O --error_map ) | Trainval (40k خطوة) | 36.00 | 50 | 7.8 |
| Tensorf (ورقة) | قطار (30 ألف خطوة) | 36.46 | - | - |
Tensorf ( -O ) | قطار (30 ألف خطوة) | 35.05 | 51 | 2.8 |
Tensorf ( -O --error_map ) | قطار (30 ألف خطوة) | 35.84 | 14 | 2.8 |
س : كيف تختار العمود الفقري للشبكة؟
A : علامة -O التي تستخدم دقة Pytorch المختلطة الأصلية مناسبة لمعظم الحالات. لا أجد تحسنًا كبيرًا جدًا --tcnn و --ff ، ويتطلبون بناءًا إضافيًا. أيضًا ، قد تكون بعض الميزات الجديدة متاحة فقط لوضع -O الافتراضي.
س : CUDA خارج الذاكرة لمجموعة البيانات الخاصة بي.
ج : يمكنك محاولة إيقاف تشغيل --preload الذي يحمل جميع الصور في GPU للتسارع (إذا استخدم -O ، قم بتغييره إلى --fp16 --cuda_ray ). حل آخر هو تعيين downscale في NeRFDataset يدويًا لخفض دقة الصورة.
س : كيف تتكيف bound scale ؟
ج : يمكنك أن تبدأ bound كبير (على سبيل المثال ، 16) أو scale صغير (على سبيل المثال ، 0.3) للتأكد من أن الكائن يقع في المربع المحيط. يمكن استخدام وضع واجهة المستخدم الرسومية لتقليص bound بشكل تفاعلي للعثور على القيمة المناسبة. إن عدم التغلب على هذا الخط سيتصور الكاميرا التي يطرحها ، ويمكن العثور على بعض الأمثلة الجيدة في هذه المشكلة.
س : وجهات نظر رواية صاخبة لمجموعات البيانات الواقعية.
ج : يمكنك محاولة ضبط bg_radius على قيمة كبيرة ، على سبيل المثال ، 32. يدرب خريطة بيئة إضافية لتصميم الخلفية في الصور الواقعية. bound أكبر سوف تساعد أيضا. مثال على bg_radius في مجموعة بيانات Firekeeper: 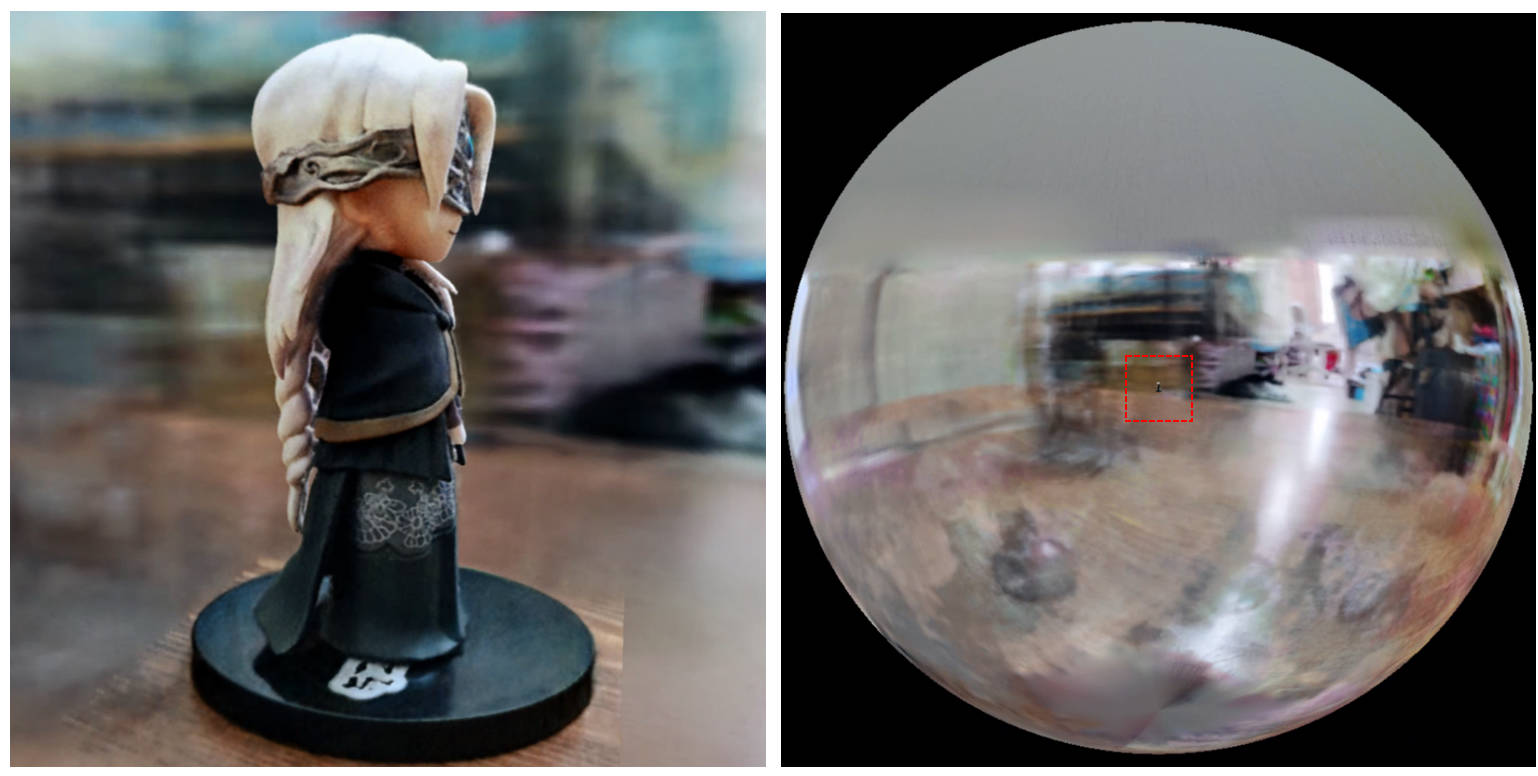
[0, 1] ويتركز عند (0.5, 0.5, 0.5) ، يفترض هذا الريبو أن المشهد محدود في المربع [-bound, bound] ، ويتركز على (0, 0, 0) . لذلك ، يتم استبدال وظيفة aabb_scale bound هنا.trunc_exp كتنشيط الكثافة بدلاً من softplus . يتم استبدال تقليم قناع Alpha بأخذ عينات من شبكة الكثافة من NGP الفوري ، الذي يشارك نفس المنطق للتسارع.إذا وجدت هذا العمل مفيدًا ، فسيتم تقدير الاقتباس عبر:
 @misc{torch-ngp,
    Author = {Jiaxiang Tang},
    Year = {2022},
    Note = {https://github.com/ashawkey/torch-ngp},
    Title = {Torch-ngp: a PyTorch implementation of instant-ngp}
}

@article{tang2022compressible,
    title = {Compressible-composable NeRF via Rank-residual Decomposition},
    author = {Tang, Jiaxiang and Chen, Xiaokang and Wang, Jingbo and Zeng, Gang},
    journal = {arXiv preprint arXiv:2205.14870},
    year = {2022}
}
اعتمادات لتوماس مولر للحصول على صغار cuda-nn و NGP الفوري:
 @misc{tiny-cuda-nn,
    Author = {Thomas M"uller},
    Year = {2021},
    Note = {https://github.com/nvlabs/tiny-cuda-nn},
    Title = {Tiny {CUDA} Neural Network Framework}
}

@article{mueller2022instant,
    title = {Instant Neural Graphics Primitives with a Multiresolution Hash Encoding},
    author = {Thomas M"uller and Alex Evans and Christoph Schied and Alexander Keller},
    journal = {arXiv:2201.05989},
    year = {2022},
    month = jan
}
يتم تكييف إطار NERF من NERF_PL:
 @misc{queianchen_nerf,
    author = {Quei-An, Chen},
    title = {Nerf_pl: a pytorch-lightning implementation of NeRF},
    url = {https://github.com/kwea123/nerf_pl/},
    year = {2020},
}
تنفيذ Tensorf الرسمي:
 @article{TensoRF,
  title={TensoRF: Tensorial Radiance Fields},
  author={Chen, Anpei and Xu, Zexiang and Geiger, Andreas and Yu, Jingyi and Su, Hao},
  journal={arXiv preprint arXiv:2203.09517},
  year={2022}
}
تم تطوير NERF GUI مع Dearpygui.


