mqtt panel
1.0.0
MQTT 용 자체 호스팅 웹 앱 패널
이 프로젝트는 MQTT 브로커에 연결하고 YAML을 통해 완전히 구성 할 수있는 프로그레시브 웹 앱 패널을 제공하는 자체 호스팅 가능한 서비스를 제공합니다. MQTT 주제와의 사용자 상호 작용을 제공하는 간단한 패널이되는 것을 목표로합니다. 독립형 또는 MQTT 마이크로 서비스 배포에 적합하며 홈 자동화 솔루션과 함께 배포 할 수 있습니다. 자동화, 통합 또는 스케줄링과 같은 더 높은 레벨 기능을 제공하지 않습니다.
달리다
docker run -it --rm -p 8080:8080 sourcesimian/mqtt-panel:latest
http : // localhost : 8080을 찾아 볼 수 있습니다.
미리 빌드 된 컨테이너 이미지는 Docker Hub에서 사용할 수 있습니다.
달리다
 mkdir -p $HOME/.cache/mqtt-panel

docker run -n mqtt-panel -d -it --rm -p 8080:8080
    --volume my-config.yaml:/config.yaml:ro
    --volume $HOME/.cache/mqtt-panel:/data/cache:rw
    sourcesimian/mqtt-panel:latest
위의 Docker 구성에 충분하도록 배포를 구성하십시오. 또한 구성된 HTTP 포트에서 /api/health 에 라이벌 엔드 포인트를 추가 할 수 있습니다. SSL 엔드 포인트 종단을 수행하려면 K3S와 함께 제공되는 Traefik과 같은 Ingress 컨트롤러를 추가 할 수 있습니다.
일반적인 배포에는 다음이 포함될 수 있습니다.
      volumes:
      - name: config
        configMap:
          name: mqtt-panel-config
      - name: data
        hostPath:
          path: /mnt/mqtt-panel/data
          type: DirectoryOrCreate
      containers:
      - name: mqtt-panel
        image: sourcesimian/mqtt-panel:latest
        ports:
        - containerPort: 8080
        volumeMounts:
        - name: config
          mountPath: /config.yaml
          subPath: config.yaml
        - name: data
          mountPath: /data
        livenessProbe:
          initialDelaySeconds: 30
          periodSeconds: 30
          httpGet:
            path: /api/health
            port: 8080
Kubernetes를 사용하면 구성 파일을 다양한 방식으로 제공 할 수 있습니다. configmap 사용 다음 명령은 YAML에서 직접 공급하고 업데이트하는 수의사 방법입니다.
 kubectl -n "$NAMESPACE" delete configmap mqtt-panel-config &>/dev/null || true
kubectl -n "$NAMESPACE" create configmap mqtt-panel-config
        --from-file=config.yaml=./config-my.yaml
kubectl -n "$NAMESPACE" rollout restart deploy mqtt-panel
MQTT-Panel 을 설치하려면 연결하려면 MQTT 브로커가 필요합니다. 사용 가능한 많은 가능성이 있습니다. 데모 EMQ X에서는 무료 오픈 소스, 클라우드 네이티브 브로커가 사용됩니다. 좋아하는 MQTT 뷰어와 함께 sourcesimian/mqtt-panel/demo/# 를 구독 할 수 있습니다. Eclipse Mosquitto는 Docker Hub의 사전 제작 된 컨테이너를 포함하여 많은 설치 방법을 갖춘 훌륭한 자체 호스팅 옵션입니다.
MQTT 인프라를 칭찬하려면 다음 다른 마이크로 서비스를 고려할 수 있습니다.
| 서비스 | 설명 |
|---|---|
| mqtt-gpio | MQTT 주제를 GPIO 핀에 연결합니다. |
| mqtt-ical | Ical 캘린더의 이벤트를 기반으로 MQTT 주제에 값을 게시합니다. |
| MQTT-KUBE | MAP KUBERNETES 객체 값은 MQTT의 주제를 오가는 것입니다. |
| 노드 | MQTT 통합 및 기타 이용 가능한 기기가 내장 된 장치를 함께 배선하기위한 흐름 기반 시각적 프로그래밍 도구. 더 높은 수준의 동작을 추가하는 데 쉽게 사용할 수 있습니다. |
mqtt-panel 단일 YAML 파일을 소비합니다. 시작하려면 config-basic.yaml을 복사 할 수 있습니다
다음은 Yaml 구성에 사용되는 규칙입니다.
| 목 | 설명 |
|---|---|
<string> | Yaml이 다른 방식으로 해석하는 것을 피하기 위해 "인용 된"문자의 문자열. |
<icon> | 이들은 Google Fonts 라이브러리의 material-icons 입니다. |
<color> | html 스타일 색상 (예 : red , "#F04040" , rgb(240, 64, 64) 등. "따옴표"를 사용하여 # 이 주석으로 해석되지 않도록하십시오. |
<topic> | MQTT 주제, 예를 들어 fizz/buzz/status . 구독은 * 및 # 와일드 카드도 허용 할 수 있습니다. "따옴표"를 사용하여 # 이 주석으로 해석되지 않도록하십시오. |
<identifier> | 알파 숫자 문자열, _ |
 mqtt:
  host: <host>                  # optional: MQTT broker host, default: 127.0.0.1
  port: <port>                  # optional: MQTT broker port, default 1883
  client-id: mqtt-panel         # MQTT client identifier, often brokers require this to be unique
  topic-prefix: <topic prefix>  # optional: Scopes the MQTT topic prefix
  auth:                         # optional: Defines the authentication used to connect to the MQTT broker
    type: <type>                # Auth type: none|basic|mtls, default: none
    ... (<type> specific options)
    type: basic
    username: <string>          # MQTT broker username
    password: <string>          # MQTT broker password
    type: mtls
    cafile: <file>              # CA file used to verify the server
    certfile: <file>            # Certificate presented by this client
    keyfile: <file>             # Private key presented by this client
    keyfile_password: <string>  # optional: Password used to decrypt the `keyfile`
    protocols:
      - <string>                # optional: list of ALPN protocols to add to the SSL connection
 http:
  bind: <bind>                  # optional: Interface on which web server will listen, default 0.0.0.0
  port: <port>                  # Port on which web server will listen, default 8080
  max-connections: <integer>    # optional: Limit the number of concurrent connections, default 100
  logging-level: <level>        # optional: Select logging level of HTTP requests, default: INFO
 auth:                           # User Auth
  users:                        # optional: User/password auth
  - username: <string>
    password: <string>
 cache:                          # Configure cache
  root: <path>                  # optional root path, default ./cache
 logging:                        # Logging settings
  level: INFO                   # optional: Logging level, default DEBUG
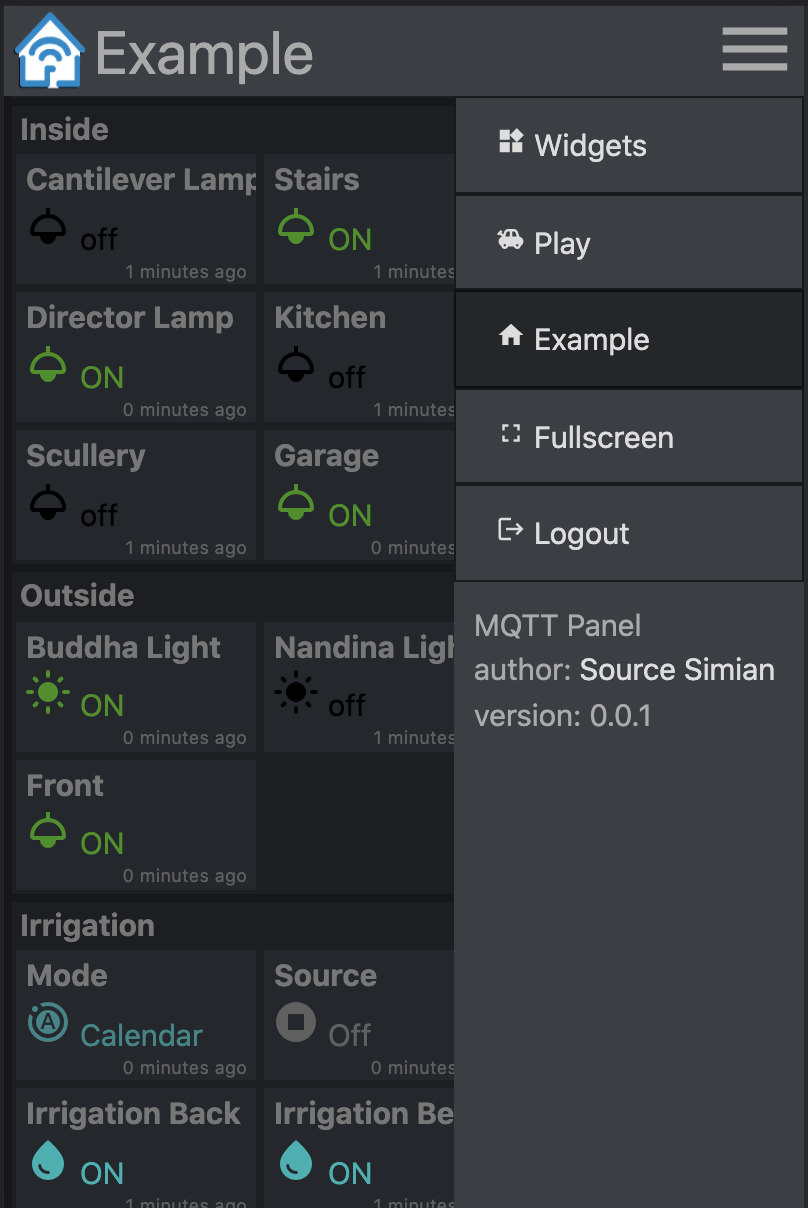
mqtt-panel 패널로 나뉘며, 한 패널은 한 번에 표시되며 각 패널은 그룹 모음입니다.
 panels:
  - title: <string>             # Panel title text
    icon: <icon>                # Icon shown on the menu bar
    groups:                     # list of group identifiers
      - <identifier>            # e.g. "group_one"
  ... (repeat)
그룹은 박스형 위젯 컬렉션입니다. 여러 패널에서 재사용 할 수 있습니다.
 groups:
  - title: <string>             # Title text
    name: <identifier>          # Identifier, e.g. "group_one"
    widgets:                    # List of widgets in ths group
    ... (widgets)
  ... (repeat)
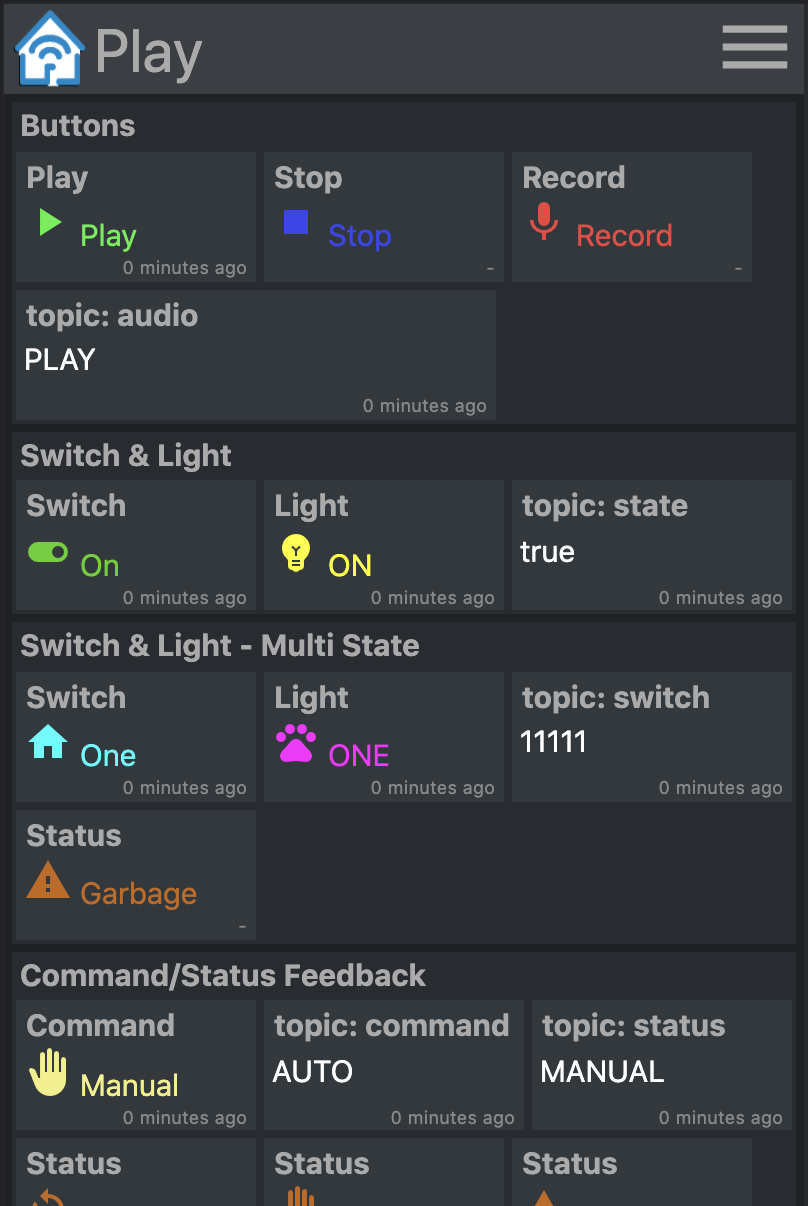
위젯은 MQTT 주제를 게시 및/또는 구독하고 일부 페이로드를 표시 및/또는 입력하는 데 사용되는 기능 요소입니다.
모든 위젯에는 다음과 같은 일반적인 속성이 있습니다. :
    - title: <string>           # Title text
      type: <type>              # Widget type
      qos: [0 | 1 | 2]          # optional: MQTT QoS to use, default: 1
      retain: [False | True]    # optional: Publish with MQTT retain flag, default: False
      cache: [False | True]     # optional: Cache last seen payloads, default: False
      ref: <widget reference>   # optional: Identifier string for widget reuse.
retain 페이로드를 MQTT에 게시 할 때 설정된 깃발입니다. 메시지가 중개인에서 유지되면 클라이언트는 다시 연결할 때 해당 페이로드를 다시 수용합니다. 이것이 항상 원하는 행동을주는 것은 아닙니다.
시작시 구독 된 MQTT 주제의 페이로드가 수신 될 때까지 일부 위젯이 "알 수 없음"을 표시합니다. MQTT 패널 cache: True 위젯에 대한 마지막으로 보이는 페이로드를 보존합니다. 이를 통해 서버는 재시작 후 마지막으로 알려진 상태를 즉시 표시 할 수 있으며, retain: False 사용하는 MQTT 주제를 사용하더라도.
위젯을 재사용하려면 ref 속성을 추가 한 다음 위젯을 다른 그룹에 다음과 같이 추가하십시오.
- ref: <widget reference> # Identifier of widget to reuse
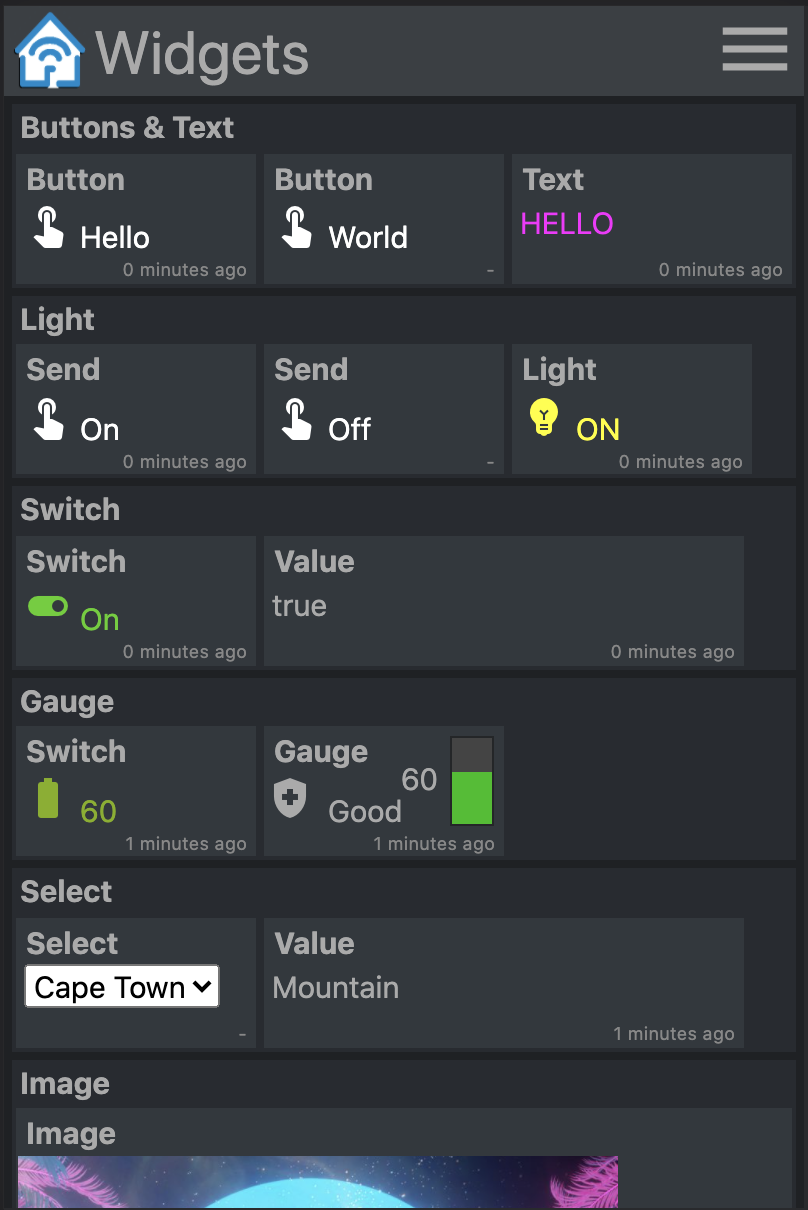
구독 된 MQTT 주제의 페이로드를 표시하기 만하면됩니다.
    - title: <string>       # Title text
      type: text            # Widget type
      subscribe: <topic>    # MQTT topic to listen on
      color: <color>        # optional: Color of the text
예:
    - title: My Text
      type: text
      subscribe: text/content
      color: "#123456"
정의 된 페이로드가 구독 주제에서 수신 될 때 텍스트, 아이콘 및 색상을 표시합니다.
    - title: <string>       # Title text
      type: light           # Widget type
      subscribe: <topic>    # MQTT topic to listen on
      values:
      - payload: <string>     # Payload to match for this value
        text: <string>        # optional: Text shown
        icon: <icon>          # optional: Icon shown
        color: <color>        # optional: Color of icon and text
      ... (repeat)
예:
    - title: My Light
      type: light
      subscribe: light/state
      values:
      - payload: "false"
        text: OFF
        color: black
        icon: light
      - payload: "true"
        text: ON
        color: yellow
        icon: light
MQTT 주제에 일정한 가치를 게시하십시오.
    - title: <string>       # Title text
      type: button          # Widget type
      text: <string>        # optional: Text to show on widget
      publish: <topic>      # MQTT topic to write to
      payload: <string>     # MQTT payload to publish
예:
    - title: My Button
      type: button
      text: Push Me
      publish: button/command
      payload: PRESSED
다음 페이로드를 값 목록에 주제에 게시하십시오. 페이로드가 가입 된 주제를 반환 할 때 텍스트, 아이콘 및 색상으로 디스플레이를 업데이트하십시오.
    - title: <string>       # Title text
      type: switch          # Widget type
      publish: <topic>      # MQTT topic to write to
      subscribe: <topic>    # MQTT topic to listen on
      values:
      - payload: <string>     # Payload to match for this value
        text: <string>        # optional: Text shown
        icon: <icon>          # optional: Icon shown
        color: <color>        # optional: Color of icon and text
      ... (repeat)
예:
    - title: My Switch
      type: switch
      publish: widget/switch/command
      subscribe: widget/switch/state
      values:
      - text: "Off"
        payload: "false"
      - text: "On"
        payload: "true"
텍스트, 아이콘 및 색상이 가입 된 페이로드의 값에 따라 변경되는 수신 값 및 수직 막대 게이지를 표시하십시오.
    - title: <string>       # Title text
      type: gauge           # Widget type
      subscribe: <topic>    # MQTT topic to listen on
      text: <string>        # optional: The default text when not given with range
      color: <color>        # optional: The default color when not given with range
      icon: <icon>          # optional: The default icon when not given with range
      ranges:
      - range: [<int>, <int>] # Value for start and end of range
        text: <string>        # optional: Text shown when value in range
        color: <color>        # optional: Color shown when value in range
        icon: <icon>          # optional: Icon shown when value in range
      ... (repeat)
                            # max and min value will be determined from starts and ends
예:
    - title: Sound
      type: gauge
      subscribe: example/volume
      ranges:
      - range: [0, 10]
        text: "Quiet"
        icon: volume_off
        color: "#00c000"
      - range: [10, 30]
        text: "Gentle"
        icon: volume_mute
        color: "#02b002"
      - range: [30, 70]
        text: "Medium"
        icon: volume_down
        color: "#82b002"
      - range: [70, 90]
        text: "Noisy"
        icon: volume_up
        color: "#b08a02"
      - range: [90, 100]
        text: "Loud"
        icon: volume_up
        color: "#b03c02"
텍스트, 아이콘 및 색상이 가입 된 페이로드의 값에 따라 변경되는 수신 값 및 수직 막대 게이지를 표시하십시오. 또한 탭하면 최대 값과 최소 값 사이의 값을 입력하고 게시하는 데 사용할 수있는 슬라이더를 표시하십시오.
    - title: <string>       # Title text
      type: slider          # Widget type
      live: [False | True]  # optional: Realtime publishing. Default: False
      ... (same as gauge)
live: True 슬라이더의 현재 값이 변경됨에 따라 게시됩니다. 기본 동작은 슬라이더가 릴리스 될 때 최종 선택한 값 만 게시하는 것입니다.
정의 된 페이로드가 구독 주제에서 수신 될 때 텍스트, 아이콘 및 색상을 표시합니다. 탭하면 게시 할 수있는 다른 값의 목록이 표시됩니다.
    - title: <string>       # Title text
      type: select          # Widget type
      publish: <topic>      # MQTT topic to write to
      subscribe: <topic>    # optional: MQTT topic to listen on
      values:
      - payload: <string>     # Payload to send and match
        text: <string>        # optional: Text shown
        icon: <icon>          # optional: Icon shown
        color: <color>        # optional: Color of icon and text
      ... (repeat)
예:
    - title: My Select
      type: select
      publish: widget/select/command
      subscribe: widget/select/state
      values:
      - text: "Venice"
        payload: "Gondola"
        icon: rowing
        color: cyan
      - text: "Cape Town"
        payload: "Mountain"
        icon: landscape
        color: green
<iframe> 에 콘텐츠를 표시합니다. src 속성은 MQTT 주제에 바인딩 될 수 있습니다.
    - title: <string>       # Title text
      type: iframe          # Widget type
      subscribe: <topic>    # optional: MQTT topic to listen on, bound to iframe 'src'
      refresh: <seconds>    # optional: Interval at which to refresh the iframe
      attr:                 # Attributes to be set on the iframe
        src: <url>            # optional: Can be set as a default vaule for 'src'
        ...                   # additional attributes
예:
    - title: Iframe
      type: iframe
      subscribe: iframe/src
      attr:
        src: https://www.youtube.com/embed/dQw4w9WgXcQ
        width: 480px
        height: 315px
        title: YouTube video player
        allow: accelerometer; autoplay; clipboard-write; encrypted-media; gyroscope; picture-in-picture
        allowfullscreen:
네, 물론! 그리고 제발. 나는 자체 호스팅 및 서버 측정 가능한 "완전한 날아가는 HA에 전념 할 준비가되지 않았다"솔루션을 찾을 수 없었기 때문에 MQTT-PANEL을 구축했습니다. 나는 현대 HTML, CSS 및 TypeScript에 대해 많이 알지 못하므로 더 많이 아는 사람들의 조언을 기꺼이 받아 들일 것입니다. 나는 그것이 빠르고 쉽게 일어나기 쉬운 프로젝트가되기를 원하며, 누구에게나 MQTT를 열 수 있도록 도와줍니다. changelog.md
PR을 추진하기 전에 단위 테스트 추가를 고려하고 make check 하고 make test 깨끗하게하는지 확인하십시오.
virtualenv 설정 :
 python3 -m venv virtualenv
. ./virtualenv/bin/activate
python3 ./setup.py develop
서버 실행 :
mqtt-panel ./config-demo.yaml
매사추세츠 기술 연구소 (Massachusetts Institute of Technology)의 테크 모델 철도 클럽 해커의 정신으로 우리 모두와 함께 놀아주었습니다. 라이센스는 MIT입니다.


