mqtt panel
1.0.0
MQTT用のセルフホストWebアプリパネル
このプロジェクトは、MQTTブローカーに接続する自己ホスト可能なサービスを提供し、YAMLを介して完全に構成できるプログレッシブWebアプリパネルを提供します。これは、MQTTトピックとのユーザーの対話性を提供するシンプルなパネルになることを目指しています。スタンドアロンまたはMQTTマイクロサービスの展開に適しており、ホームオートメーションソリューションと一緒に展開できます。自動化、統合、スケジューリングなど、より高いレベルの機能を提供しません。
走る
docker run -it --rm -p 8080:8080 sourcesimian/mqtt-panel:latest
http:// localhost:8080を参照してください。
事前に構築されたコンテナ画像は、Docker Hubで入手できます。
走る
 mkdir -p $HOME/.cache/mqtt-panel

docker run -n mqtt-panel -d -it --rm -p 8080:8080
    --volume my-config.yaml:/config.yaml:ro
    --volume $HOME/.cache/mqtt-panel:/data/cache:rw
    sourcesimian/mqtt-panel:latest
上記のDocker構成で十分に展開を構成します。さらに、構成されたHTTPポートに/api/healthでLivension Endpointを追加できます。 SSLエンドポイント終了を実行するには、K3Sに標準装備されているTraefikなどのイングレスコントローラーを追加できます。
典型的な展開には次のものが含まれます。
      volumes:
      - name: config
        configMap:
          name: mqtt-panel-config
      - name: data
        hostPath:
          path: /mnt/mqtt-panel/data
          type: DirectoryOrCreate
      containers:
      - name: mqtt-panel
        image: sourcesimian/mqtt-panel:latest
        ports:
        - containerPort: 8080
        volumeMounts:
        - name: config
          mountPath: /config.yaml
          subPath: config.yaml
        - name: data
          mountPath: /data
        livenessProbe:
          initialDelaySeconds: 30
          periodSeconds: 30
          httpGet:
            path: /api/health
            port: 8080
Kubernetesでは、構成ファイルをさまざまな方法で提供できます。 configMapの使用次のコマンドは、YAMLから直接供給および更新するための説得力のある方法です。
 kubectl -n "$NAMESPACE" delete configmap mqtt-panel-config &>/dev/null || true
kubectl -n "$NAMESPACE" create configmap mqtt-panel-config
        --from-file=config.yaml=./config-my.yaml
kubectl -n "$NAMESPACE" rollout restart deploy mqtt-panel
MQTTパネルのインストールには、接続するにはMQTTブローカーが必要です。利用可能な多くの可能性があります。デモEMQ Xでは、無料のオープンソースであるクラウドネイティブブローカーが使用されています。お気に入りのMQTTビューアーでsourcesimian/mqtt-panel/demo/#を購読できます。 Eclipse Mosquittoは、Docker Hubに事前に構築されたコンテナを含む多くのインストール方法を備えた素晴らしい自己ホストのオプションです。
MQTTインフラストラクチャを補完するには、次の他のマイクロサービスを検討できます。
| サービス | 説明 |
|---|---|
| mqtt-gpio | MQTTトピックをGPIOピンに接続します。 |
| mqtt-ical | ICALカレンダーのイベントに基づいて、MQTTトピックに値を公開します。 |
| mqtt-kube | MQTTのトピックとのkubernetesオブジェクト値をマップします。 |
| 節点 | MQTT統合を組み込んだものや他の多くのものを組み合わせたデバイスを一緒に配線するためのフローベースの視覚プログラミングツール。より高いレベルの動作を追加するために簡単に使用できます。 |
mqtt-panel単一のYAMLファイルを消費します。開始するには、config-basic.yamlをコピーできます
以下は、YAML構成で使用される規則です。
| アイテム | 説明 |
|---|---|
<string> | yamlが別の方法で解釈するのを避けるために、好ましくは「引用された」文字列。 |
<icon> | これらは、Google Fontsライブラリのmaterial-iconsです。 |
<color> | HTMLスタイルの色、たとえばred 、 "#F04040" 、 rgb(240, 64, 64)などを使用して、 #がコメントとして解釈されないことを確認します。 |
<topic> | MQTTトピック、 fizz/buzz/status 。サブスクリプションは、 *および#ワイルドカードも受け入れることができます。 「引用」を使用して、 #がコメントとして解釈されないことを確認します。 |
<identifier> | アルファ数の文字列、 _ |
 mqtt:
  host: <host>                  # optional: MQTT broker host, default: 127.0.0.1
  port: <port>                  # optional: MQTT broker port, default 1883
  client-id: mqtt-panel         # MQTT client identifier, often brokers require this to be unique
  topic-prefix: <topic prefix>  # optional: Scopes the MQTT topic prefix
  auth:                         # optional: Defines the authentication used to connect to the MQTT broker
    type: <type>                # Auth type: none|basic|mtls, default: none
    ... (<type> specific options)
    type: basic
    username: <string>          # MQTT broker username
    password: <string>          # MQTT broker password
    type: mtls
    cafile: <file>              # CA file used to verify the server
    certfile: <file>            # Certificate presented by this client
    keyfile: <file>             # Private key presented by this client
    keyfile_password: <string>  # optional: Password used to decrypt the `keyfile`
    protocols:
      - <string>                # optional: list of ALPN protocols to add to the SSL connection
 http:
  bind: <bind>                  # optional: Interface on which web server will listen, default 0.0.0.0
  port: <port>                  # Port on which web server will listen, default 8080
  max-connections: <integer>    # optional: Limit the number of concurrent connections, default 100
  logging-level: <level>        # optional: Select logging level of HTTP requests, default: INFO
 auth:                           # User Auth
  users:                        # optional: User/password auth
  - username: <string>
    password: <string>
 cache:                          # Configure cache
  root: <path>                  # optional root path, default ./cache
 logging:                        # Logging settings
  level: INFO                   # optional: Logging level, default DEBUG
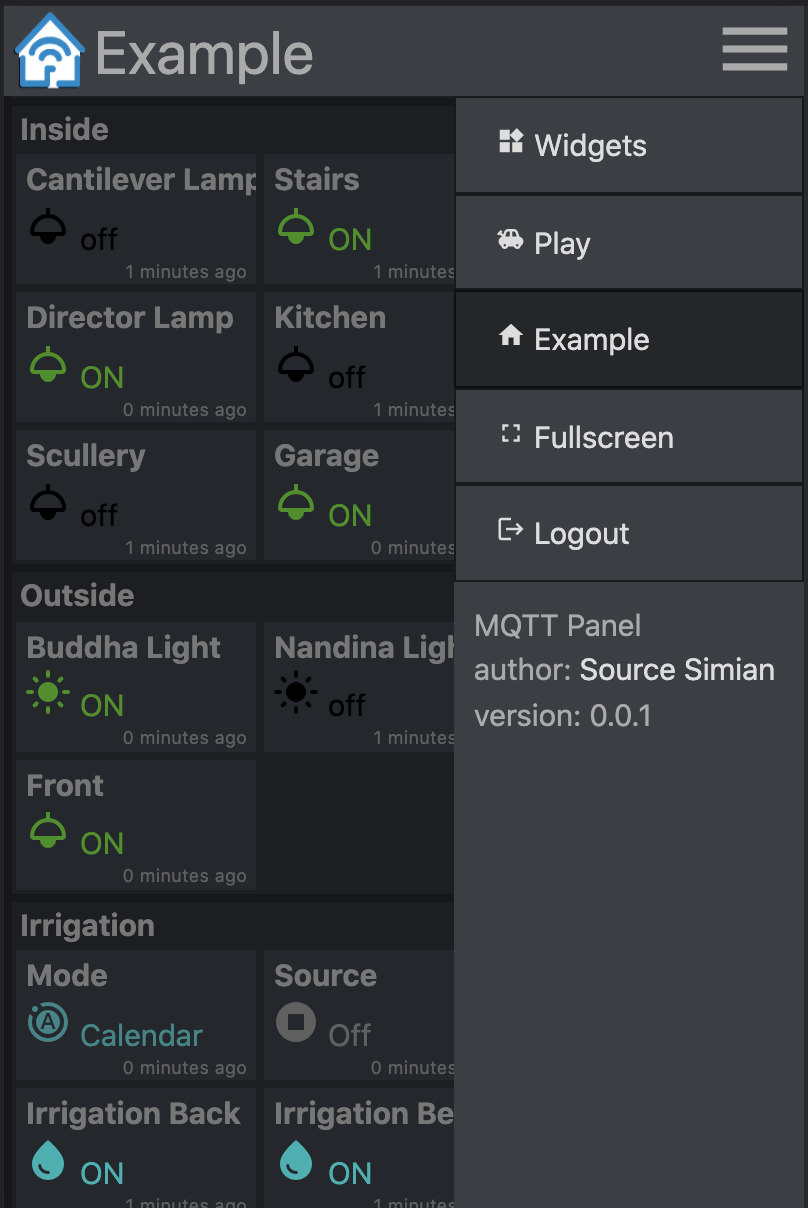
mqtt-panelはパネルに分割され、1つのパネルは一度に表示され、各パネルはグループのコレクションです。
 panels:
  - title: <string>             # Panel title text
    icon: <icon>                # Icon shown on the menu bar
    groups:                     # list of group identifiers
      - <identifier>            # e.g. "group_one"
  ... (repeat)
グループは、ウィジェットの箱入りコレクションです。複数のパネルで再利用できます。
 groups:
  - title: <string>             # Title text
    name: <identifier>          # Identifier, e.g. "group_one"
    widgets:                    # List of widgets in ths group
    ... (widgets)
  ... (repeat)
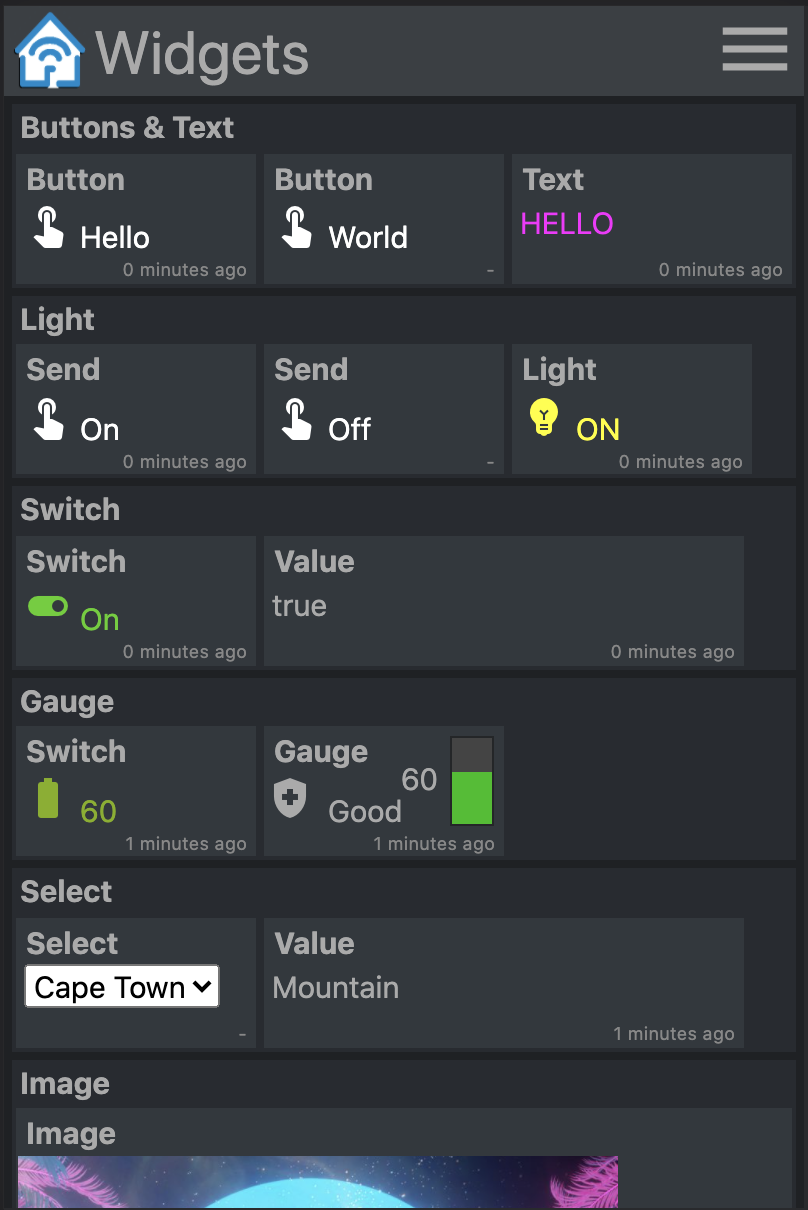
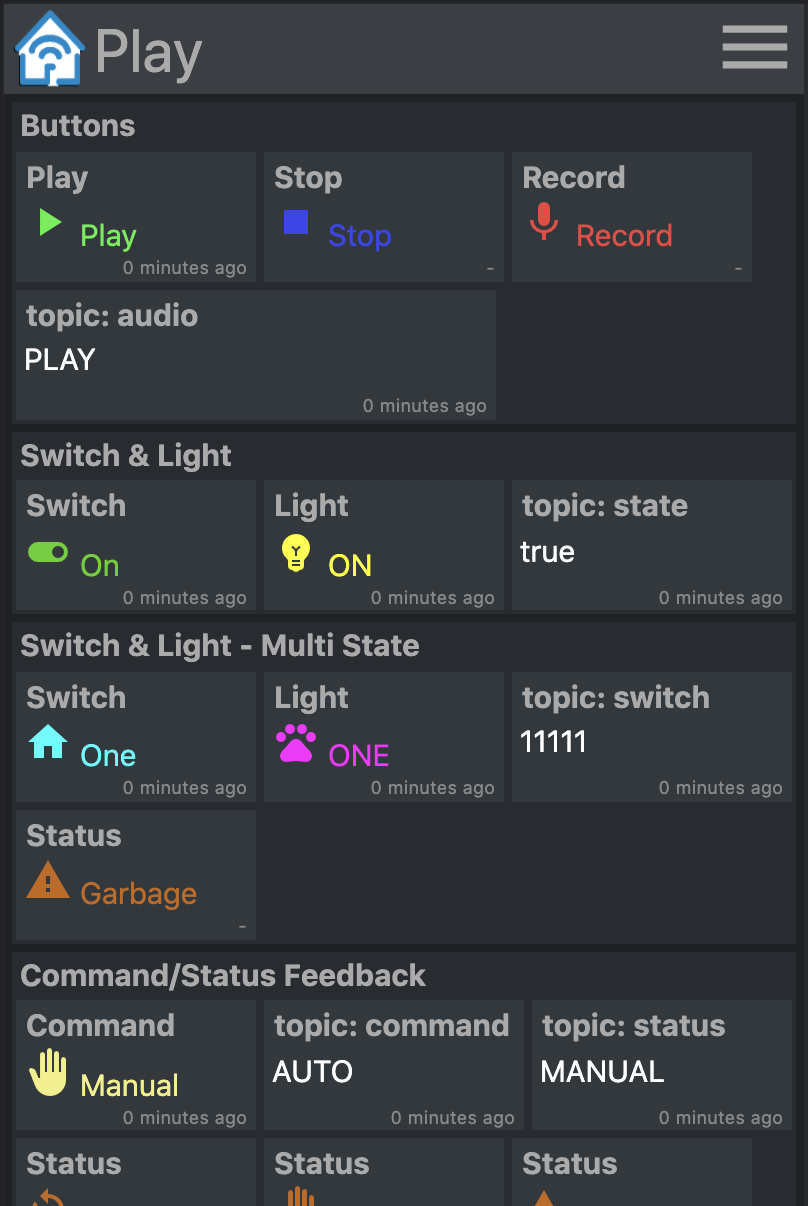
ウィジェットは機能要素であり、MQTTトピックを公開および/または購読し、ペイロードを表示および/または入力するために使用されます。
すべてのウィジェットには、次の共通属性があります。
    - title: <string>           # Title text
      type: <type>              # Widget type
      qos: [0 | 1 | 2]          # optional: MQTT QoS to use, default: 1
      retain: [False | True]    # optional: Publish with MQTT retain flag, default: False
      cache: [False | True]     # optional: Cache last seen payloads, default: False
      ref: <widget reference>   # optional: Identifier string for widget reuse.
retain 、MQTTへのペイロードを公開するときに設定されたフラグです。ブローカーにメッセージが持続する場合、クライアントは再接続するときにそのペイロードを再受信します。これは常に望ましい動作を与えるとは限りません。
スタートアップでは、サブスクライブされたMQTTトピックのペイロードが受信されるまで、一部のウィジェットが「不明」を表示することに注意してください。 MQTTパネルcache: True 、ウィジェットの最後の見返りを保持します。これによりretain: Falseサーバーは再起動後に最後の既知の状態をすぐに表示できます。
ウィジェットを再利用するには、 ref属性を追加し、次のようにウィジェットを他のグループに追加します。
- ref: <widget reference> # Identifier of widget to reuse
サブスクライブされたMQTTトピックのペイロードを表示するだけです。
    - title: <string>       # Title text
      type: text            # Widget type
      subscribe: <topic>    # MQTT topic to listen on
      color: <color>        # optional: Color of the text
例:
    - title: My Text
      type: text
      subscribe: text/content
      color: "#123456"
定義されたペイロードが購読されたトピックから受信されたときに、いくつかのテキスト、アイコン、色を表示します。
    - title: <string>       # Title text
      type: light           # Widget type
      subscribe: <topic>    # MQTT topic to listen on
      values:
      - payload: <string>     # Payload to match for this value
        text: <string>        # optional: Text shown
        icon: <icon>          # optional: Icon shown
        color: <color>        # optional: Color of icon and text
      ... (repeat)
例:
    - title: My Light
      type: light
      subscribe: light/state
      values:
      - payload: "false"
        text: OFF
        color: black
        icon: light
      - payload: "true"
        text: ON
        color: yellow
        icon: light
MQTTトピックに一定の値を公開します。
    - title: <string>       # Title text
      type: button          # Widget type
      text: <string>        # optional: Text to show on widget
      publish: <topic>      # MQTT topic to write to
      payload: <string>     # MQTT payload to publish
例:
    - title: My Button
      type: button
      text: Push Me
      publish: button/command
      payload: PRESSED
値のリストに次のペイロードをトピックに公開します。サブスクライブされたトピックでペイロードが返されるときに、テキスト、アイコン、色でディスプレイを更新します。
    - title: <string>       # Title text
      type: switch          # Widget type
      publish: <topic>      # MQTT topic to write to
      subscribe: <topic>    # MQTT topic to listen on
      values:
      - payload: <string>     # Payload to match for this value
        text: <string>        # optional: Text shown
        icon: <icon>          # optional: Icon shown
        color: <color>        # optional: Color of icon and text
      ... (repeat)
例:
    - title: My Switch
      type: switch
      publish: widget/switch/command
      subscribe: widget/switch/state
      values:
      - text: "Off"
        payload: "false"
      - text: "On"
        payload: "true"
受信された値と、サブスクライブされたペイロードの値に基づいてテキスト、アイコン、色が変更される垂直バーゲージを表示します。
    - title: <string>       # Title text
      type: gauge           # Widget type
      subscribe: <topic>    # MQTT topic to listen on
      text: <string>        # optional: The default text when not given with range
      color: <color>        # optional: The default color when not given with range
      icon: <icon>          # optional: The default icon when not given with range
      ranges:
      - range: [<int>, <int>] # Value for start and end of range
        text: <string>        # optional: Text shown when value in range
        color: <color>        # optional: Color shown when value in range
        icon: <icon>          # optional: Icon shown when value in range
      ... (repeat)
                            # max and min value will be determined from starts and ends
例:
    - title: Sound
      type: gauge
      subscribe: example/volume
      ranges:
      - range: [0, 10]
        text: "Quiet"
        icon: volume_off
        color: "#00c000"
      - range: [10, 30]
        text: "Gentle"
        icon: volume_mute
        color: "#02b002"
      - range: [30, 70]
        text: "Medium"
        icon: volume_down
        color: "#82b002"
      - range: [70, 90]
        text: "Noisy"
        icon: volume_up
        color: "#b08a02"
      - range: [90, 100]
        text: "Loud"
        icon: volume_up
        color: "#b03c02"
受信された値と、サブスクライブされたペイロードの値に基づいてテキスト、アイコン、色が変更される垂直バーゲージを表示します。さらに、タップされたときに、最大値と最小値の間に値を入力および公開するために使用できるスライダーを表示します。
    - title: <string>       # Title text
      type: slider          # Widget type
      live: [False | True]  # optional: Realtime publishing. Default: False
      ... (same as gauge)
live: Trueスライダーの現在の値は、変更されると公開されます。デフォルトの動作は、スライダーがリリースされたときに最終選択された値のみを公開することです。
定義されたペイロードが購読されたトピックから受信されたときに、いくつかのテキスト、アイコン、色を表示します。タップされたら、公開できる他の値のリストを表示します。
    - title: <string>       # Title text
      type: select          # Widget type
      publish: <topic>      # MQTT topic to write to
      subscribe: <topic>    # optional: MQTT topic to listen on
      values:
      - payload: <string>     # Payload to send and match
        text: <string>        # optional: Text shown
        icon: <icon>          # optional: Icon shown
        color: <color>        # optional: Color of icon and text
      ... (repeat)
例:
    - title: My Select
      type: select
      publish: widget/select/command
      subscribe: widget/select/state
      values:
      - text: "Venice"
        payload: "Gondola"
        icon: rowing
        color: cyan
      - text: "Cape Town"
        payload: "Mountain"
        icon: landscape
        color: green
<iframe>にコンテンツを表示します。 src属性は、MQTTトピックにバインドできます。
    - title: <string>       # Title text
      type: iframe          # Widget type
      subscribe: <topic>    # optional: MQTT topic to listen on, bound to iframe 'src'
      refresh: <seconds>    # optional: Interval at which to refresh the iframe
      attr:                 # Attributes to be set on the iframe
        src: <url>            # optional: Can be set as a default vaule for 'src'
        ...                   # additional attributes
例:
    - title: Iframe
      type: iframe
      subscribe: iframe/src
      attr:
        src: https://www.youtube.com/embed/dQw4w9WgXcQ
        width: 480px
        height: 315px
        title: YouTube video player
        allow: accelerometer; autoplay; clipboard-write; encrypted-media; gyroscope; picture-in-picture
        allowfullscreen:
はい、確かに!そしてお願いします。自己ホストとサーバー側の構成可能な「完全に吹き飛ばされたHAまだコミットする準備ができていない」ソリューションを見つけることができなかったため、MQTT-PANELを構築しました。現代のHTML、CSS、TypeScriptについてはあまり知らないので、もっと知っている人からアドバイスを喜んで受け入れます。私はそれが迅速かつ簡単に立ち上がって実行することができ、誰にでもMQTTを開くのに役立つプロジェクトにしたいと思います。 changelog.md
PRをプッシュする前に、ユニットテストの追加を検討し、 make checkとmake testがきれいであることを確認してください。
virtualenvをセットアップします:
 python3 -m venv virtualenv
. ./virtualenv/bin/activate
python3 ./setup.py develop
サーバーを実行します:
mqtt-panel ./config-demo.yaml
マサチューセッツ工科大学のTech Model Railroad Clubのハッカーの精神で、私たちにとても遊ぶことができました。ライセンスはMITです。


