mqtt panel
1.0.0
แผงเว็บแอปที่โฮสต์ด้วยตนเองสำหรับ MQTT
โครงการนี้ให้บริการที่โฮสต์ด้วยตนเองที่เชื่อมต่อกับนายหน้า MQTT และให้บริการแผงแอปพลิเคชันเว็บแบบก้าวหน้าซึ่งสามารถกำหนดค่าได้อย่างสมบูรณ์ผ่าน YAML มันมีจุดมุ่งหมายที่จะเป็นพาเนลอย่างง่ายที่ให้การโต้ตอบของผู้ใช้กับหัวข้อ MQTT เหมาะสำหรับการปรับใช้ microservice แบบสแตนด์อโลนหรือ MQTT และสามารถปรับใช้ควบคู่ไปกับโซลูชั่นระบบอัตโนมัติในบ้าน มันไม่ได้ให้ความสามารถในระดับที่สูงขึ้นเช่นระบบอัตโนมัติการรวมหรือการกำหนดเวลา
วิ่ง
docker run -it --rm -p 8080:8080 sourcesimian/mqtt-panel:latest
และเรียกดู http: // localhost: 8080 ซึ่งจะปรากฏเป็น:
ภาพคอนเทนเนอร์ที่สร้างไว้ล่วงหน้ามีอยู่ใน Docker Hub
วิ่ง
 mkdir -p $HOME/.cache/mqtt-panel

docker run -n mqtt-panel -d -it --rm -p 8080:8080
    --volume my-config.yaml:/config.yaml:ro
    --volume $HOME/.cache/mqtt-panel:/data/cache:rw
    sourcesimian/mqtt-panel:latest
กำหนดค่าการปรับใช้ของคุณให้พอเพียงการกำหนดค่า Docker ด้านบน นอกจากนี้คุณสามารถเพิ่มจุดสิ้นสุดของ Liveny AT /api/health บนพอร์ต HTTP ที่กำหนดค่าไว้ ในการดำเนินการยุติจุดสิ้นสุด SSL คุณสามารถเพิ่มคอนโทรลเลอร์ Ingress เช่น Traefik ซึ่งมาพร้อมกับ K3S
การปรับใช้ทั่วไปอาจรวมถึง:
      volumes:
      - name: config
        configMap:
          name: mqtt-panel-config
      - name: data
        hostPath:
          path: /mnt/mqtt-panel/data
          type: DirectoryOrCreate
      containers:
      - name: mqtt-panel
        image: sourcesimian/mqtt-panel:latest
        ports:
        - containerPort: 8080
        volumeMounts:
        - name: config
          mountPath: /config.yaml
          subPath: config.yaml
        - name: data
          mountPath: /data
        livenessProbe:
          initialDelaySeconds: 30
          periodSeconds: 30
          httpGet:
            path: /api/health
            port: 8080
Kubernetes อนุญาตให้จัดหาไฟล์กำหนดค่าได้หลายวิธี การใช้ configmap คำสั่งต่อไปนี้เป็นวิธีที่สะดวกในการจัดหาและอัปเดตโดยตรงจาก Yaml ของคุณ:
 kubectl -n "$NAMESPACE" delete configmap mqtt-panel-config &>/dev/null || true
kubectl -n "$NAMESPACE" create configmap mqtt-panel-config
        --from-file=config.yaml=./config-my.yaml
kubectl -n "$NAMESPACE" rollout restart deploy mqtt-panel
การติดตั้ง MQTT-Panel จะต้องมีนายหน้า MQTT เพื่อเชื่อมต่อ มีความเป็นไปได้มากมาย ในการสาธิต EMQ X จะใช้โบรกเกอร์โอเพนโอเพนซอร์สฟรี คุณสามารถสมัครสมาชิก sourcesimian/mqtt-panel/demo/# ด้วย MQTT Viewer ที่คุณชื่นชอบ Eclipse Mosquitto เป็นตัวเลือกที่โฮสต์ด้วยตนเองที่ยอดเยี่ยมด้วยวิธีการติดตั้งมากมายรวมถึงคอนเทนเนอร์ที่สร้างไว้ล่วงหน้าบน Docker Hub
ในการชมเชยโครงสร้างพื้นฐาน MQTT ของคุณคุณอาจพิจารณาไมโครบริการอื่น ๆ ดังต่อไปนี้:
| บริการ | คำอธิบาย |
|---|---|
| MQTT-GPIO | เชื่อมต่อหัวข้อ MQTT กับพิน GPIO |
| mqtt-icle | เผยแพร่ค่าให้กับหัวข้อ MQTT ตามเหตุการณ์ในปฏิทิน ICAL |
| mqtt-kube | แผนที่ค่าวัตถุ Kubernetes ไปและจากหัวข้อใน MQTT |
| ที่ได้พอดีคำ | เครื่องมือการเขียนโปรแกรมด้วยภาพที่ใช้การไหลสำหรับการเดินสายอุปกรณ์ร่วมกันพร้อมกับการรวม MQTT ในตัวและอื่น ๆ อีกมากมายที่มีอยู่ สามารถใช้เพื่อเพิ่มพฤติกรรมระดับที่สูงขึ้นได้อย่างง่ายดาย |
mqtt-panel ใช้ไฟล์ YAML เดียว ในการเริ่มต้นคุณสามารถคัดลอก config-basic.yaml
ต่อไปนี้เป็นอนุสัญญาที่ใช้ในการกำหนดค่า YAML:
| รายการ | คำอธิบาย |
|---|---|
<string> | สตริงของอักขระใด ๆ โดยเฉพาะอย่างยิ่ง "ยกมา" เพื่อหลีกเลี่ยง Yaml จากการตีความในวิธีที่แตกต่างกัน |
<icon> | สิ่งเหล่านี้คือ material-icons จากห้องสมุด Google Fonts |
<color> | คือสีสไตล์ HTML ใด ๆ เช่น red "#F04040" , rgb(240, 64, 64) ฯลฯ ใช้ "คำพูด" เพื่อให้แน่ใจว่า # ไม่ได้ตีความว่าเป็นความคิดเห็น |
<topic> | หัวข้อ MQTT เช่น fizz/buzz/status การสมัครสมาชิกยังสามารถยอมรับ WildCards * และ # ใช้ "คำพูด" เพื่อให้แน่ใจว่า # ไม่ได้ตีความว่าเป็นความคิดเห็น |
<identifier> | สตริงของอักขระอัลฟ่าและ _ |
 mqtt:
  host: <host>                  # optional: MQTT broker host, default: 127.0.0.1
  port: <port>                  # optional: MQTT broker port, default 1883
  client-id: mqtt-panel         # MQTT client identifier, often brokers require this to be unique
  topic-prefix: <topic prefix>  # optional: Scopes the MQTT topic prefix
  auth:                         # optional: Defines the authentication used to connect to the MQTT broker
    type: <type>                # Auth type: none|basic|mtls, default: none
    ... (<type> specific options)
    type: basic
    username: <string>          # MQTT broker username
    password: <string>          # MQTT broker password
    type: mtls
    cafile: <file>              # CA file used to verify the server
    certfile: <file>            # Certificate presented by this client
    keyfile: <file>             # Private key presented by this client
    keyfile_password: <string>  # optional: Password used to decrypt the `keyfile`
    protocols:
      - <string>                # optional: list of ALPN protocols to add to the SSL connection
 http:
  bind: <bind>                  # optional: Interface on which web server will listen, default 0.0.0.0
  port: <port>                  # Port on which web server will listen, default 8080
  max-connections: <integer>    # optional: Limit the number of concurrent connections, default 100
  logging-level: <level>        # optional: Select logging level of HTTP requests, default: INFO
 auth:                           # User Auth
  users:                        # optional: User/password auth
  - username: <string>
    password: <string>
 cache:                          # Configure cache
  root: <path>                  # optional root path, default ./cache
 logging:                        # Logging settings
  level: INFO                   # optional: Logging level, default DEBUG
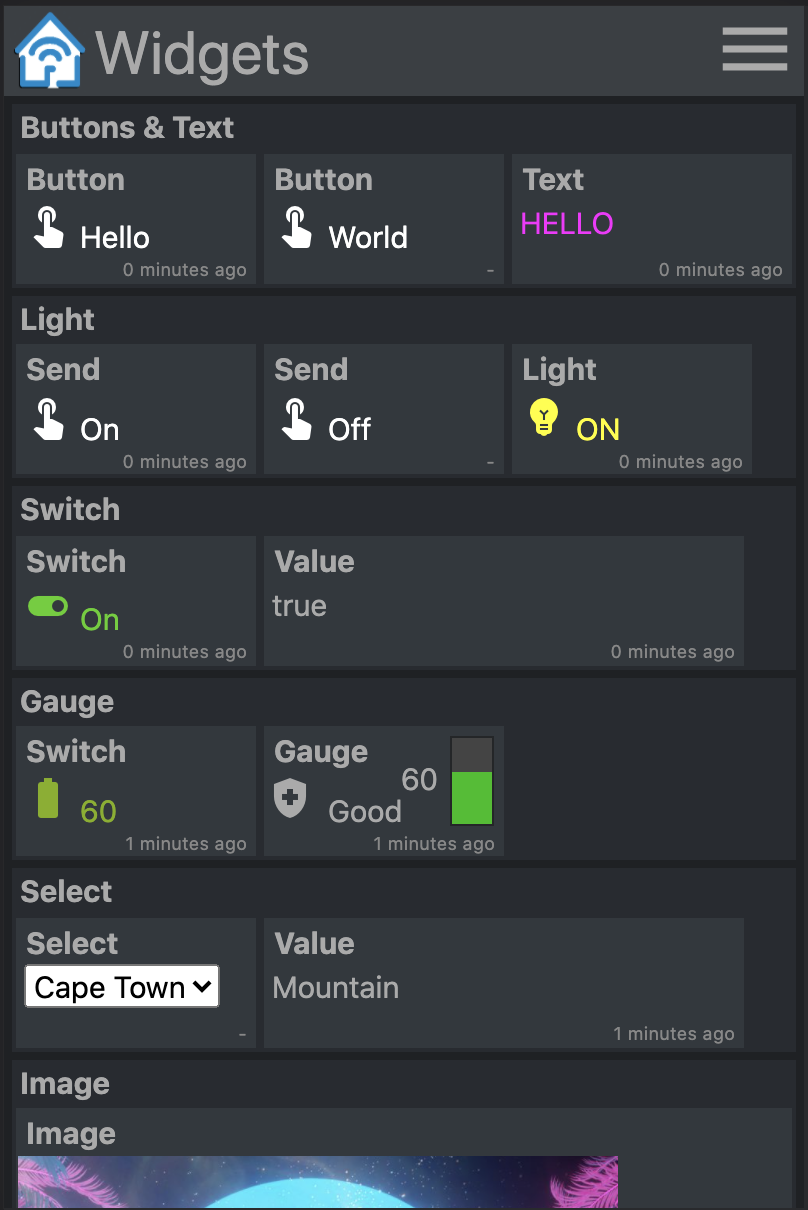
mqtt-panel แบ่งออกเป็นพาเนลหนึ่งแผงจะแสดงครั้งละหนึ่งแผงเป็นชุดของกลุ่ม
 panels:
  - title: <string>             # Panel title text
    icon: <icon>                # Icon shown on the menu bar
    groups:                     # list of group identifiers
      - <identifier>            # e.g. "group_one"
  ... (repeat)
กลุ่มเป็นคอลเล็กชั่นวิดเจ็ตที่บรรจุกล่อง พวกเขาสามารถนำกลับมาใช้ใหม่ได้หลายแผง
 groups:
  - title: <string>             # Title text
    name: <identifier>          # Identifier, e.g. "group_one"
    widgets:                    # List of widgets in ths group
    ... (widgets)
  ... (repeat)
วิดเจ็ตเป็นองค์ประกอบที่ใช้งานได้ซึ่งใช้ในการเผยแพร่และ/หรือสมัครสมาชิกหัวข้อ MQTT และแสดงผลและ/หรือป้อนข้อมูลบางส่วน
วิดเจ็ตทั้งหมดมีคุณลักษณะทั่วไปดังต่อไปนี้:
    - title: <string>           # Title text
      type: <type>              # Widget type
      qos: [0 | 1 | 2]          # optional: MQTT QoS to use, default: 1
      retain: [False | True]    # optional: Publish with MQTT retain flag, default: False
      cache: [False | True]     # optional: Cache last seen payloads, default: False
      ref: <widget reference>   # optional: Identifier string for widget reuse.
retain เป็นธงที่ตั้งค่าเมื่อเผยแพร่น้ำหนักบรรทุกไปยัง MQTT หากตั้งค่าข้อความจะยังคงอยู่ในโบรกเกอร์ลูกค้าจะได้รับการรับน้ำหนักอีกครั้งเมื่อทำการเชื่อมต่ออีกครั้ง สิ่งนี้ไม่ได้ให้พฤติกรรมที่ต้องการเสมอไป
คุณจะทราบว่าเมื่อเริ่มต้นวิดเจ็ตบางตัวแสดง "ไม่ทราบ" จนกว่าจะมีการรับน้ำหนักในหัวข้อ MQTT ที่สมัครรับ เพื่อปรับปรุงประสบการณ์ผู้ใช้ของ cache: True จะรักษาน้ำหนักบรรทุกที่เห็นครั้งสุดท้ายสำหรับวิดเจ็ต สิ่งนี้ช่วยให้เซิร์ฟเวอร์สามารถแสดงสถานะล่าสุดที่รู้จักได้ทันทีหลังจากรีสตาร์ทแม้จะมีหัวข้อ MQTT โดยใช้ retain: False
เพื่อนำวิดเจ็ตกลับมาใช้ใหม่เพิ่มแอตทริบิวต์ ref แล้วเพิ่มวิดเจ็ตลงในกลุ่มอื่นเป็น:
- ref: <widget reference> # Identifier of widget to reuse
เพียงแสดงเพย์โหลดของหัวข้อ MQTT ที่สมัครสมาชิก
    - title: <string>       # Title text
      type: text            # Widget type
      subscribe: <topic>    # MQTT topic to listen on
      color: <color>        # optional: Color of the text
ตัวอย่าง:
    - title: My Text
      type: text
      subscribe: text/content
      color: "#123456"
แสดงข้อความไอคอนและสีเมื่อได้รับ payloads ที่กำหนดจากหัวข้อที่สมัครรับ
    - title: <string>       # Title text
      type: light           # Widget type
      subscribe: <topic>    # MQTT topic to listen on
      values:
      - payload: <string>     # Payload to match for this value
        text: <string>        # optional: Text shown
        icon: <icon>          # optional: Icon shown
        color: <color>        # optional: Color of icon and text
      ... (repeat)
ตัวอย่าง:
    - title: My Light
      type: light
      subscribe: light/state
      values:
      - payload: "false"
        text: OFF
        color: black
        icon: light
      - payload: "true"
        text: ON
        color: yellow
        icon: light
เผยแพร่ค่าคงที่ไปยังหัวข้อ MQTT
    - title: <string>       # Title text
      type: button          # Widget type
      text: <string>        # optional: Text to show on widget
      publish: <topic>      # MQTT topic to write to
      payload: <string>     # MQTT payload to publish
ตัวอย่าง:
    - title: My Button
      type: button
      text: Push Me
      publish: button/command
      payload: PRESSED
เผยแพร่เพย์โหลดถัดไปในรายการค่าไปยังหัวข้อ อัปเดตการแสดงผลด้วยข้อความไอคอนและสีเมื่อเพย์โหลดส่งคืนในหัวข้อที่สมัครรับ
    - title: <string>       # Title text
      type: switch          # Widget type
      publish: <topic>      # MQTT topic to write to
      subscribe: <topic>    # MQTT topic to listen on
      values:
      - payload: <string>     # Payload to match for this value
        text: <string>        # optional: Text shown
        icon: <icon>          # optional: Icon shown
        color: <color>        # optional: Color of icon and text
      ... (repeat)
ตัวอย่าง:
    - title: My Switch
      type: switch
      publish: widget/switch/command
      subscribe: widget/switch/state
      values:
      - text: "Off"
        payload: "false"
      - text: "On"
        payload: "true"
แสดงค่าที่ได้รับและมาตรวัดแถบแนวตั้งที่ข้อความไอคอนและสีจะเปลี่ยนไปตามค่าของน้ำหนักบรรทุกที่สมัครสมาชิก
    - title: <string>       # Title text
      type: gauge           # Widget type
      subscribe: <topic>    # MQTT topic to listen on
      text: <string>        # optional: The default text when not given with range
      color: <color>        # optional: The default color when not given with range
      icon: <icon>          # optional: The default icon when not given with range
      ranges:
      - range: [<int>, <int>] # Value for start and end of range
        text: <string>        # optional: Text shown when value in range
        color: <color>        # optional: Color shown when value in range
        icon: <icon>          # optional: Icon shown when value in range
      ... (repeat)
                            # max and min value will be determined from starts and ends
ตัวอย่าง:
    - title: Sound
      type: gauge
      subscribe: example/volume
      ranges:
      - range: [0, 10]
        text: "Quiet"
        icon: volume_off
        color: "#00c000"
      - range: [10, 30]
        text: "Gentle"
        icon: volume_mute
        color: "#02b002"
      - range: [30, 70]
        text: "Medium"
        icon: volume_down
        color: "#82b002"
      - range: [70, 90]
        text: "Noisy"
        icon: volume_up
        color: "#b08a02"
      - range: [90, 100]
        text: "Loud"
        icon: volume_up
        color: "#b03c02"
แสดงค่าที่ได้รับและมาตรวัดแถบแนวตั้งที่ข้อความไอคอนและสีจะเปลี่ยนไปตามค่าของน้ำหนักบรรทุกที่สมัครสมาชิก นอกจากนี้เมื่อเคาะแสดงตัวเลื่อนซึ่งสามารถใช้ในการป้อนข้อมูลและเผยแพร่ค่าระหว่างค่าสูงสุดและค่าต่ำสุด
    - title: <string>       # Title text
      type: slider          # Widget type
      live: [False | True]  # optional: Realtime publishing. Default: False
      ... (same as gauge)
การตั้ง live: True ค่าปัจจุบันของตัวเลื่อนจะถูกเผยแพร่เมื่อมันเปลี่ยนไป พฤติกรรมเริ่มต้นคือการเผยแพร่เฉพาะค่าสุดท้ายที่เลือกเมื่อตัวเลื่อนถูกปล่อยออกมา
แสดงข้อความไอคอนและสีเมื่อได้รับ payloads ที่กำหนดจากหัวข้อที่สมัครรับ เมื่อแตะแสดงรายการของค่าอื่น ๆ ที่สามารถเผยแพร่ได้
    - title: <string>       # Title text
      type: select          # Widget type
      publish: <topic>      # MQTT topic to write to
      subscribe: <topic>    # optional: MQTT topic to listen on
      values:
      - payload: <string>     # Payload to send and match
        text: <string>        # optional: Text shown
        icon: <icon>          # optional: Icon shown
        color: <color>        # optional: Color of icon and text
      ... (repeat)
ตัวอย่าง:
    - title: My Select
      type: select
      publish: widget/select/command
      subscribe: widget/select/state
      values:
      - text: "Venice"
        payload: "Gondola"
        icon: rowing
        color: cyan
      - text: "Cape Town"
        payload: "Mountain"
        icon: landscape
        color: green
แสดงเนื้อหาใน <iframe> แอตทริบิวต์ src สามารถผูกพันกับหัวข้อ MQTT
    - title: <string>       # Title text
      type: iframe          # Widget type
      subscribe: <topic>    # optional: MQTT topic to listen on, bound to iframe 'src'
      refresh: <seconds>    # optional: Interval at which to refresh the iframe
      attr:                 # Attributes to be set on the iframe
        src: <url>            # optional: Can be set as a default vaule for 'src'
        ...                   # additional attributes
ตัวอย่าง:
    - title: Iframe
      type: iframe
      subscribe: iframe/src
      attr:
        src: https://www.youtube.com/embed/dQw4w9WgXcQ
        width: 480px
        height: 315px
        title: YouTube video player
        allow: accelerometer; autoplay; clipboard-write; encrypted-media; gyroscope; picture-in-picture
        allowfullscreen:
ใช่แน่นอน! และได้โปรด ฉันสร้าง MQTT-PANEL เพราะฉันไม่พบ "ฉันยังไม่พร้อมที่จะตอบโต้การปลิวไปยัง HA" ซึ่งเป็นวิธีการโฮสต์ด้วยตนเองและสามารถกำหนดค่าเซิร์ฟเวอร์ได้ ฉันไม่รู้มากเกี่ยวกับ HTML ร่วมสมัย CSS และ TypeScript ดังนั้นฉันยินดีรับคำแนะนำจากผู้ที่รู้มากขึ้น ฉันต้องการให้มันเป็นโครงการที่รวดเร็วและรวดเร็วในการวิ่งและช่วยเปิด MQTT ให้กับทุกคน changelog.md
ก่อนที่จะผลักดัน PR โปรดพิจารณาเพิ่มการทดสอบหน่วยและตรวจสอบให้แน่ใจว่า make check และ make test สะอาด
ตั้งค่า virtualenv:
 python3 -m venv virtualenv
. ./virtualenv/bin/activate
python3 ./setup.py develop
เรียกใช้เซิร์ฟเวอร์:
mqtt-panel ./config-demo.yaml
ด้วยจิตวิญญาณของแฮ็กเกอร์ของ Tech Model Railroad Club จาก Massachusetts Institute of Technology ซึ่งให้เราเล่นด้วย ใบอนุญาตคือ MIT


