blast_plus_docs
1.0.0
このリポジトリには、Docker画像のNCBI BLAST+コマンドラインアプリケーションのドキュメントが含まれています。 Google Cloud Platform(GCP)およびAmazon Web Services(AWS)でBlast Analysisを実行して、小さな基本的な例とより高度な生産レベルの例を使用して、Blast Analysisを実行する方法を示します。 Unix/LinuxコマンドとBlast+の基本的な知識は、このチュートリアルを完了するのに役立ちます。
runコマンドオプションrunコマンド構造
国立バイオテクノロジー情報センター(NCBI)基本的なローカルアライメント検索ツール(BLAST)は、シーケンス間の局所類似性の領域を見つけます。このプログラムは、ヌクレオチドまたはタンパク質シーケンスをデータベースの配列と比較し、一致の統計的有意性を計算します。 BLASTを使用して、シーケンス間の機能的および進化的関係を推測するだけでなく、遺伝子ファミリーのメンバーを特定するのに役立ちます。
2009年に導入されたBlast+は、BLASTコマンドラインアプリケーションの改良バージョンです。 Blast+の機能と機能の完全な説明については、Blast Command Line Applicationsユーザーマニュアルを参照してください。
クラウドコンピューティングは、オンデマンド、スケーラブル、および弾性計算リソースを使用して、潜在的なコスト削減を提供します。このリポジトリのさまざまなクラウドテクノロジーと利点の詳細な説明は範囲外ですが、次のセクションには、Google Cloudプラットフォーム(GCP)でBlast+ Docker画像の実行を開始するために必要な情報が含まれています。
Dockerは、ソフトウェアコンテナを使用して動作システムレベルの仮想化を実行するためのツールです。コンテナ化技術*では、画像は、アプリケーションと依存関係をカプセル化する分析環境のスナップショットです。基本的に命令のリストから構築されたファイルである画像は、保存して、他の人がプラットフォームとオペレーティングシステム全体で正確な分析環境を再現するために簡単に共有できます。コンテナは、画像のランタイムインスタンスです。コンテナ化を使用することにより、ユーザーは、Blast+などのUNIXベースのツールのコンパイル、構成、およびインストールで、しばしば複雑なステップをバイパスできます。携帯性に加えて、コンテナ化は、分析をより見つけやすく、アクセスしやすく、相互運用可能、再利用可能(公正)し、最終的に再現性を高めるための軽量のアプローチです。
*Dockerや特異点など、多くのコンテナ化ツールと標準があります。 Dockerのみに焦点を当てます。これは、この分野の多くの人によって事実上の基準と見なされています。
次のセクションには、Google仮想マシンを作成し、Dockerをインストールし、Dockerイメージを使用してBLAST+コマンドを実行する手順が含まれます。
このセクションでは、GoogleインスタンスのDocker環境でのBLAST分析のクイックランスルーを提供します。これは、解決策の原則を理解したい人の概要として意図されています。 Amazonインスタンスを使用している場合は、このドキュメントのAmazon Web Servicesセットアップセクションに移動してください。インタラクティブなシェル環境であるGoogle Cloud Shellがこの例で使用されるため、請求アカウントの作成や計算インスタンスの作成など、追加のセットアップを実行することなく、次の小さな例を実行できます。分析手順、代替コマンド、およびより高度なトピックのより詳細な説明については、このドキュメントの後のセクションで説明します。
要件:Googleアカウント
タスクの流れ: 
入力データ:
まず、別のブラウザウィンドウまたはタブで、https://console.cloud.google.com/でサインインします
Google Cloud Platformコンソールの右上隅にある[クラウドシェル]ボタンをアクティブにします。 
クラウドシェルセッションウィンドウが表示されます。 
次のステップは、クラウドシェルセッションで以下のコマンドをコピーアンドペストすることです。
注:githubでは、マウスを使用してコピーできます。ただし、コマンドシェルでは、キーボードを使用する必要があります。 WindowsまたはUnix/Linuxで、ショートカットControl+Cを使用してControl+Vて貼り付けます。 macosでは、 Command+Cを使用してコピーしてCommand+Vを貼り付けます。
クラウドシェルをスクロールするには、レンチアイコンを使用してTerminal settingsでスクロールバーを有効にします。 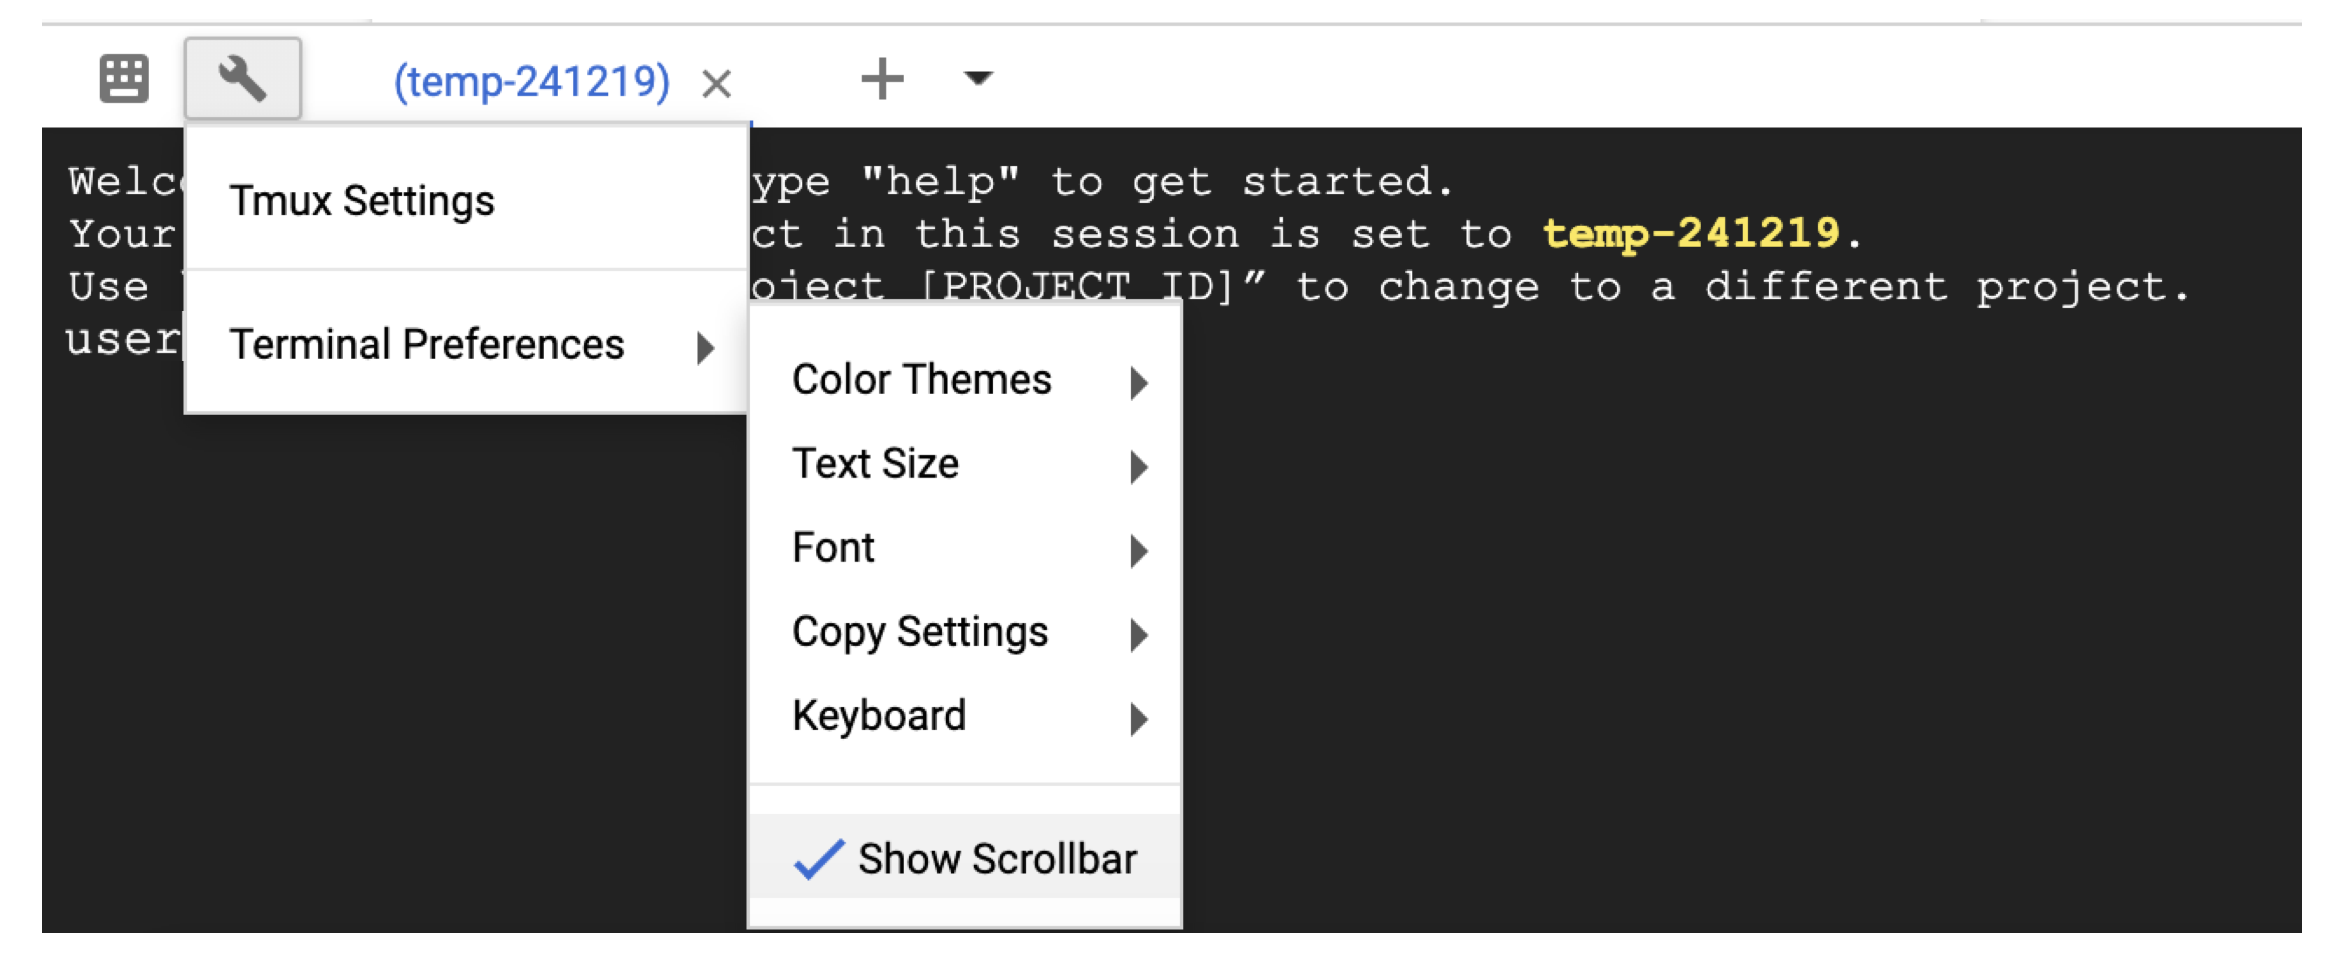
 # Time needed to complete this section: <10 minutes

# Step 1. Retrieve sequences
## Create directories for analysis
cd ; mkdir blastdb queries fasta results blastdb_custom

## Retrieve query sequence
docker run --rm ncbi/blast efetch -db protein -format fasta
    -id P01349 > queries/P01349.fsa

## Retrieve database sequences
docker run --rm ncbi/blast efetch -db protein -format fasta
    -id Q90523,P80049,P83981,P83982,P83983,P83977,P83984,P83985,P27950
    > fasta/nurse-shark-proteins.fsa

## Step 2. Make BLAST database
docker run --rm
    -v $HOME/blastdb_custom:/blast/blastdb_custom:rw
    -v $HOME/fasta:/blast/fasta:ro
    -w /blast/blastdb_custom
    ncbi/blast
    makeblastdb -in /blast/fasta/nurse-shark-proteins.fsa -dbtype prot
    -parse_seqids -out nurse-shark-proteins -title "Nurse shark proteins"
    -taxid 7801 -blastdb_version 5

## Step 3. Run BLAST+
docker run --rm
    -v $HOME/blastdb:/blast/blastdb:ro
    -v $HOME/blastdb_custom:/blast/blastdb_custom:ro
    -v $HOME/queries:/blast/queries:ro
    -v $HOME/results:/blast/results:rw
    ncbi/blast
    blastp -query /blast/queries/P01349.fsa -db nurse-shark-proteins

## Output on screen
## Scroll up to see the entire output
## Type "exit" to leave the Cloud Shell or continue to the next section
この時点で、画面に出力が表示されます。クエリを使用して、BLASTはタンパク質配列P80049.1を14.2のスコアと0.96の電子値との一致として識別しました。
より大きな分析のために、 -outフラグを使用して出力をファイルに保存することをお勧めします。たとえば、上記のステップ3の最後のコマンドへのappend -out /blast/results/blastp.outは、 more $HOME/results/blastp.outを使用して、この出力ファイルのコンテンツを表示します。
次のコードブロックに示すように、PDBに対してP01349.FSAをクエリすることもできます。
 ## Extend the example to query against the Protein Data Bank
## Time needed to complete this section: <10 minutes

## Confirm query
ls queries/P01349.fsa

## Download Protein Data Bank amino acid database (pdbaa)
docker run --rm
     -v $HOME/blastdb:/blast/blastdb:rw
     -w /blast/blastdb
     ncbi/blast
     update_blastdb.pl --source gcp pdbaa

## Run BLAST+
docker run --rm
     -v $HOME/blastdb:/blast/blastdb:ro
     -v $HOME/blastdb_custom:/blast/blastdb_custom:ro
     -v $HOME/queries:/blast/queries:ro
     -v $HOME/results:/blast/results:rw
     ncbi/blast
     blastp -query /blast/queries/P01349.fsa -db pdbaa

## Output on screen
## Scroll up to see the entire output
## Leave the Cloud Shell

exit
これで、簡単なタスクを完了し、Dockerの爆風+がどのように機能するかを見ました。生産スケールでDockerとBlast+について学ぶには、次のセクションに進んでください。
セクション2- Blast+ Docker画像を使用した段階的なガイドでは、前のセクションの同じ小さな例を使用して、代替アプローチ、追加の有用なDockerおよびBlast+コマンド、およびDockerコマンドオプションと構造について説明します。セクション3では、生産スケールでBlast+ Docker画像を実行する方法を示します。
まず、分析のためにGoogle Cloud Platform(GCP)仮想マシン(VM)をセットアップする必要があります。
GCPは現在、300ドルのクレジットを提供しており、新しいクラウドユーザーを奨励するために、アクティベーションから12か月の有効期限が切れています。次の手順では、このクレジットをアクティブ化する方法を示します。請求情報を求められますが、GCPは試用が終了したら自動請求しません。有料アカウントに手動でアップグレードすることを選択する必要があります。
サインインしたら、 [アクティブ化]をクリックして300ドルのクレジットをアクティブにします。 
たとえば、米国の国に入り、条件を読んで受け入れたことを示すボックスを確認してください。
「アカウントタイプ」の下で、「個人」を選択します。 (これはGoogleアカウントで事前に選択される可能性があります)
あなたの名前と住所を入力してください。
「支払い方法」の下で、「自動支払い」を選択します。 (これはGoogleアカウントで事前に選択される可能性があります)これは、請求のしきい値に達したとき、または30日ごとに最初に来る場合、サービスを使用した後に費用を支払うことを示しています。
「支払い方法」で、「クレジットカードまたはデビットカードの追加」を選択し、クレジットカード情報を入力します。トライアルが終了すると、自動的に請求されません。支払い方法が請求される前に、有料アカウントにアップグレードすることを選択する必要があります。
[無料トライアルを開始]をクリックして登録を終了します。このプロセスが完了したら、GCPウェルカム画面が表示されます。
この時点で、ウィンドウの右側にあるこのインスタンスのコスト見積もりが表示されます。 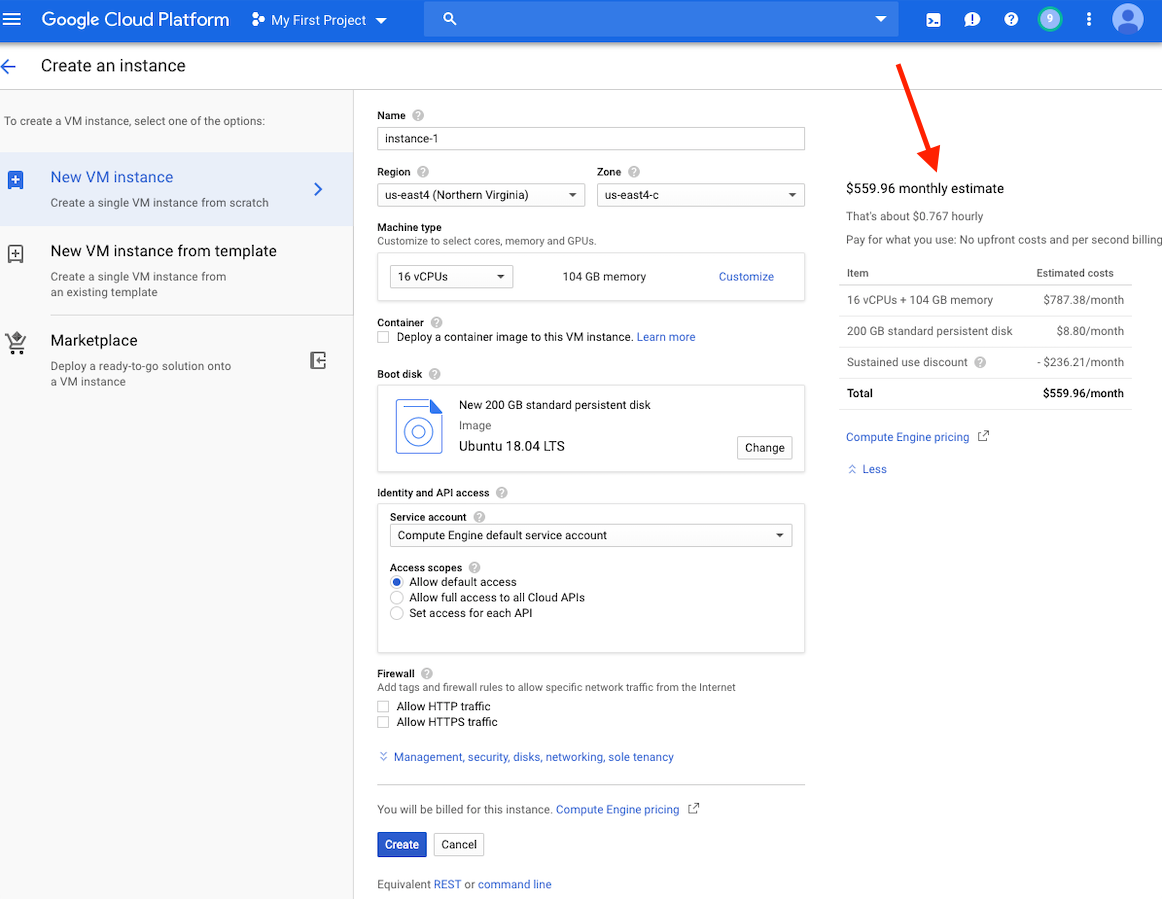
注:ストレージと同じ地域でVMを作成すると、パフォーマンスが向上します。 US-East4地域でVMを作成することをお勧めします。数時間かかりますが、24時間もかからない仕事がある場合は、先制的なVMを利用できる可能性があります。
GCPアカウントを作成してVMを起動するための詳細な手順は、こちらをご覧ください。
VMを作成したら、ローカルコンピューターからアクセスする必要があります。 VMを使用する方法に応じて、VMにアクセスする多くの方法があります。 GCPでは、最も簡単な方法は、ブラウザからSSHを使用することです。

これで、コマンドシェルが実行され、進む準備ができています。
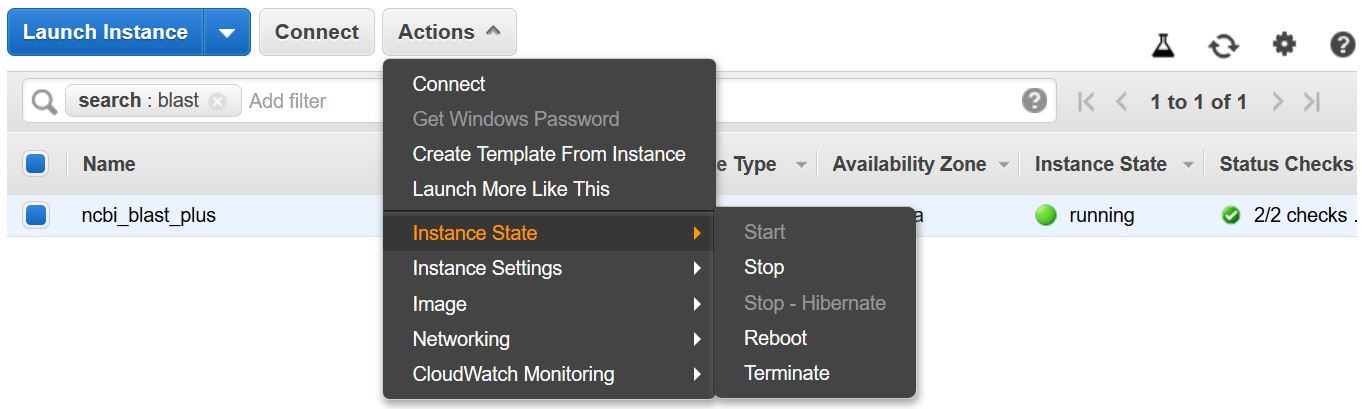
追加のコストが発生しないように、VMを停止または削除することを忘れないでください。
このセクションでは、Dockerのインストールをカバーし、さまざまなdocker runコマンドオプションについて説明し、Dockerコマンドの構造を調べます。セクション1の同じ小さな例を使用し、Blast+ Docker画像の実行における代替アプローチを調べます。ただし、Google Cloudシェルよりもパフォーマンスと機能が大きくなる実際のVMインスタンスを使用しています。
入力データ
生産システムでは、Dockerをアプリケーションとしてインストールする必要があります。
 ## Run these commands to install Docker and add non-root users to run Docker
sudo snap install docker
sudo apt update
sudo apt install -y docker.io
sudo usermod -aG docker $USER
exit
# exit and SSH back in for changes to take effect
Dockerの正しいインストールを確認するには、Command docker run hello-world 。正しくインストールされている場合は、「Hello from Docker!...」(https://docs.docker.com/samples/library/hello-world/)が表示されます。
このセクションはオプションです。
以下は、このチュートリアルで使用されているdocker runコマンドラインオプションのリストです。
| 名前、ショートハンド(利用可能な場合) | 説明 |
|---|---|
--rm | 容器が出るときに自動的に取り外します |
--volume 、 -v | ボリュームをマウントします |
--workdir 、 -w | コンテナ内の作業ディレクトリ |
このセクションはオプションです。
このチュートリアルでは、dockerコマンドの構造を理解することは便利です。次のコマンドは3つの部分で構成されています。
docker run --rm ncbi/blast
    -v $HOME/blastdb_custom:/blast/blastdb_custom:rw
    -v $HOME/fasta:/blast/fasta:ro
    -w /blast/blastdb_custom
    makeblastdb -in /blast/fasta/nurse-shark-proteins.fsa -dbtype prot
    -parse_seqids -out nurse-shark-proteins -title "Nurse shark proteins"
    -taxid 7801 -blastdb_version 5
コマンドdocker run --rm ncbi/blastは、Docker Image ncbi/blastを実行し、実行が完了したらコンテナを取り外す命令です。
コマンドの2番目の部分では、クエリシーケンスデータにコンテナでアクセスできます。 Docker Bind Mountsは-vを使用してコンテナ内のディレクトリにローカルディレクトリをマウントし、アクセス許可RW(読み取りと書き込み)またはRO(読み取り専用)を提供します。たとえば、被験者シーケンスがローカルホストの$ HOME/FASTAディレクトリに保存されていると仮定すると、次のパラメーターを使用して、そのディレクトリをContainer In/Blast/Fasta内で読み取り専用ディレクトリ-v $HOME/fasta:/blast/fasta:roとしてアクセスできるようにすることができます。 -v $HOME/fasta:/blast/fasta:ro 。 -w /blast/blastdb_customフラグは、コンテナ内に作業ディレクトリを設定します。
コマンドの3番目の部分は、Blast+コマンドです。この場合、MakeBlastDBを実行してBLASTデータベースファイルを作成しています。
docker run -it ncbi/blast /bin/bashを使用して、この画像のインタラクティブバッシュセッションを開始できます。 Blast+ Docker画像の場合、実行可能ファイルはフォルダー /Blast /Binおよび /root /edirectにあり、変数$パスに追加されます。
docker runコマンドの追加ドキュメントについては、ドキュメントを参照してください。
このセクションはオプションです。
| Dockerコマンド | 説明 |
|---|---|
docker ps -a | コンテナのリストを表示します |
docker rm $(docker ps -q -f status=exited) | 少なくとも1つの出口容器がある場合、すべての出口容器を削除します |
docker rm <CONTAINER_ID> | 容器を取り外します |
docker images | 画像のリストを表示します |
docker rmi <REPOSITORY (IMAGE_NAME)> | 画像を削除します |
このセクションはオプションです。
このDockerイメージを使用すると、Blast+を孤立した容器で実行して、Blastの結果の再現性を促進できます。このDocker画像のユーザーとして、Blastデータベースとクエリシーケンスを提供して、爆破を実行すると、コンテナの外側の場所を提供して結果を保存することが期待されます。以下は、Blast+が使用するディレクトリのリストです。ステップ2で作成します。
| ディレクトリ | 目的 | メモ |
|---|---|---|
$HOME/blastdb | NCBIが提供するBLASTデータベースを保存します | 単一の絶対パスに設定すると、代わりに$BLASTDB環境変数を使用できます(環境変数によるBLASTの構成を参照してください。) |
$HOME/queries | ユーザーが提供するクエリシーケンスを保存する | |
$HOME/fasta | ユーザーが提供するFASTAシーケンスを保存して、BLASTデータベースを作成します | |
$HOME/results | ストアは結果を爆発させます | rw許可を備えたマウント |
$HOME/blastdb_custom | ユーザーが提供するブラストデータベースを保存します |
このセクションはオプションです。
次のコマンドには、最新のBLASTバージョンが表示されます。
docker run --rm ncbi/blast blastn -version
画像名( ncbi/blast )にタグを追加すると、BLAST+の別のバージョンを使用できます(サポートされているバージョンについては、「サポートされているタグとそれぞれのリリースノート」セクションを参照)。
さまざまなバージョンのBlast+が異なるDocker画像に存在します。次のコマンドは、Blast+バージョン2.9.0 Docker Imageのダウンロードを開始します。
 docker run --rm ncbi/blast:2.9.0 blastn -version
## Display a list of images
docker images
たとえば、最新バージョンの代わりにBlast+バージョン2.9.0 Docker画像を使用するには、コマンドの最初の部分を置き換えます
docker run --rm ncbi/blast docker run --rm ncbi/blast:2.9.0
このセクションはオプションです。
この例では、クエリとデータベースのシーケンスを取得することから始めてから、カスタムブラストデータベースを作成します。
 # Start in a directory where you want to perform the analysis
## Create directories for analysis
cd ; mkdir blastdb queries fasta results blastdb_custom

## Retrieve query sequences
docker run --rm ncbi/blast efetch -db protein -format fasta
    -id P01349 > queries/P01349.fsa

## Retrieve database sequences
docker run --rm ncbi/blast efetch -db protein -format fasta
    -id Q90523,P80049,P83981,P83982,P83983,P83977,P83984,P83985,P27950
    > fasta/nurse-shark-proteins.fsa

## Make BLAST database
docker run --rm
    -v $HOME/blastdb_custom:/blast/blastdb_custom:rw
    -v $HOME/fasta:/blast/fasta:ro
    -w /blast/blastdb_custom
    ncbi/blast
    makeblastdb -in /blast/fasta/nurse-shark-proteins.fsa -dbtype prot
    -parse_seqids -out nurse-shark-proteins -title "Nurse shark proteins"
    -taxid 7801 -blastdb_version 5
上記の新しく作成されたBlastデータベースを確認するには、次のコマンドを実行して、データベースのシーケンスのアクセッション、シーケンス長、および共通名を表示できます。
 docker run --rm
    -v $HOME/blastdb:/blast/blastdb:ro
    -v $HOME/blastdb_custom:/blast/blastdb_custom:ro
    ncbi/blast
    blastdbcmd -entry all -db nurse-shark-proteins -outfmt "%a %l %T"
別の方法として、NCBIまたはNCBI Googleストレージバケットから事前にフォーマットされたBLASTデータベースをダウンロードすることもできます。
docker run --rm ncbi/blast update_blastdb.pl --showall pretty --source gcp
update_blastdb.plの詳細な説明については、ドキュメントを参照してください。デフォルトでは、 update_blastdb.pl 、サポートされているクラウドプロバイダーを使用していない場合、または接続されている場合、またはNCBIに接続されている場合、クラウドからダウンロードします。
このセクションはオプションです。
docker run --rm ncbi/blast update_blastdb.pl --showall --source ncbi
このセクションはオプションです。
以下のコマンドは、コンテナに/blast/blastdbとしてローカルマシンに$HOME/blastdbパスをマウントし、 blastdbcmdこの場所で利用可能なblastデータベースを示しています。
 ## Download Protein Data Bank amino acid database (pdbaa)
docker run --rm
     -v $HOME/blastdb:/blast/blastdb:rw
     -w /blast/blastdb
     ncbi/blast
     update_blastdb.pl pdbaa

## Display database(s) in $HOME/blastdb
docker run --rm
    -v $HOME/blastdb:/blast/blastdb:ro
    ncbi/blast
    blastdbcmd -list /blast/blastdb -remove_redundant_dbs
出力/blast/blastdb/pdbaa Proteinが表示されるはずです。
 ## For the custom BLAST database used in this example -
docker run --rm
    -v $HOME/blastdb_custom:/blast/blastdb_custom:ro
    ncbi/blast
    blastdbcmd -list /blast/blastdb_custom -remove_redundant_dbs
出力/blast/blastdb_custom/nurse-shark-proteins Proteinが表示されるはずです。
Dockerコンテナで爆発を実行するときは、 docker runコマンドに指定されたマウントに注意して、入力と出力にアクセスできるようにします。以下の例では、最初の2つのマウントがBlastデータベースにアクセスできるようにし、3番目のマウントはクエリシーケンスへのアクセスを提供し、4番目のマウントは結果を保存するディレクトリを提供します。 (注:roおよび:rwオプション。これは、それぞれ読み取り専用および読み取りワイトとしてディレクトリをマウントします。)
 docker run --rm
    -v $HOME/blastdb:/blast/blastdb:ro
    -v $HOME/blastdb_custom:/blast/blastdb_custom:ro
    -v $HOME/queries:/blast/queries:ro
    -v $HOME/results:/blast/results:rw
    ncbi/blast
    blastp -query /blast/queries/P01349.fsa -db nurse-shark-proteins
    -out /blast/results/blastp.out
この時点で、出力ファイル$HOME/results/blastp.outが表示されます。クエリを使用して、BLASTはタンパク質配列P80049.1を14.2のスコアと0.96の電子値との一致として識別しました。この出力ファイルのコンテンツを表示するには、コマンドmore $HOME/results/blastp.outを使用します。
追加のコストが発生しないように、VMを停止または削除することを忘れないでください。以下に示すように、GCPコンソールでこれを行うことができます。 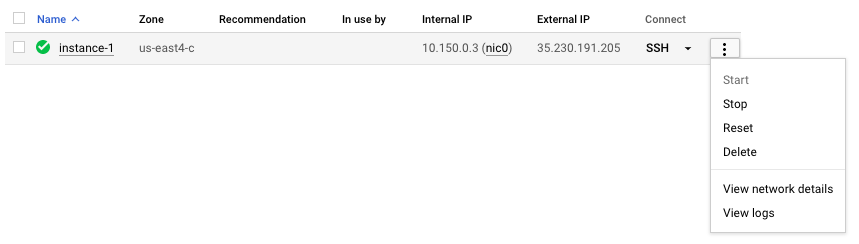
クラウドコンピューティングの約束の1つはスケーラビリティです。このセクションでは、Google Cloud Platformの制作スケールでBlast+ Dockerイメージを使用する方法を示します。この出版物で説明されているアプローチと同様のBLAST分析を実行し、ヌクレオチド収集(NT)データベースとの細菌16S-23Sシーケンスからのde novoアラインドコンティグを比較します。
スケーラビリティをテストするために、さまざまなサイズの入力を使用して、ヌクレオチドコレクションデータベースをダウンロードし、Blast+ Docker画像の最新バージョンを使用してBLAST検索を実行します。予想される結果は、次の表にまとめられています。
入力ファイル:出版物のde novoアラインドコンティグを含む28のサンプル(マルチファスタファイル)。
(入力ファイルをダウンロードして作成する手順については、以下のコードブロックに記載されています。)
データベース:事前にフォーマットされたBLASTヌクレオチドコレクションデータベース、バージョン5(NT):68.7217 GB(2019年5月から)
| 入力ファイル名 | ファイルコンテンツ | ファイルサイズ | シーケンスの数 | ヌクレオチドの数 | 予想される出力サイズ | |
|---|---|---|---|---|---|---|
| 分析1 | query1.fa | サンプル1のみ | 59 kb | 121 | 51,119 | 3.1 GB |
| 分析2 | query5.fa | サンプル1-5のみ | 422 kb | 717 | 375,154 | 10.4 GB |
| 分析3 | query.fa | 28のサンプルすべて | 2.322 MB | 3798 | 2,069,892 | 47.8 GB |
| VMタイプ/ゾーン | CPU | メモリ(GB) | 1時間ごとのコスト* | NTをダウンロード(Min) | 分析1(分) | 分析2(最小) | 分析3(最小) | 総コスト** |
|---|---|---|---|---|---|---|---|---|
| N1-standard-8 US-EAST4C | 8 | 30 | 0.312ドル | 9 | 22 | - | - | - |
| N1-Standard-16 US-EAST4C | 16 | 60 | 0.611ドル | 9 | 14 | 53 | 205 | 2.86ドル |
| N1-HIGHMEM-16 US-EAST4C | 16 | 104 | 0.767ドル | 9 | 9 | 30 | 143 | 2.44ドル |
| N1-HIGHMEM-16 US-WEST2A | 16 | 104 | 0.809ドル | 11 | 9 | 30 | 147 | 2.60ドル |
| N1-HIGHMEM-16 US-WEST1B | 16 | 104 | 0.674ドル | 11 | 9 | 30 | 147 | 2.17ドル |
| ブラストウェブサイト(ブラストン) | - | - | - | - | 検索は、使用に関する現在の制限を超えています | 検索は、使用に関する現在の制限を超えています | 検索は、使用に関する現在の制限を超えています | - |
すべてのGCPインスタンスは、200 GBの永続的な標準ディスクで構成されています。
*VMが作成され、変更される場合にGoogle Cloud Platform(2019年5月)から1時間ごとのコストが提供されました。
**総コストは、1時間ごとのコストと総時間を使用してNTおよび実行分析1、分析2、および分析3をダウンロードして推定されました。推定値は比較にのみ使用されます。あなたのコストは異なる場合があり、監視および管理する責任です。
マシンの種類、地域、ゾーンの詳細、および計算コストについては、GCPを参照してください。
-taskパラメーターを指定せずにblastnバイナリを実行すると、Megablastアルゴリズムが呼び出されることに注意してください。
 ## Install Docker if not already done
## This section assumes using recommended hardware requirements below
## 16 CPUs, 104 GB memory and 200 GB persistent hard disk

## Modify the number of CPUs (-num_threads) in Step 3 if another type of VM is used.

## Step 1. Prepare for analysis
## Create directories
cd ; mkdir -p blastdb queries fasta results blastdb_custom

## Import and process input sequences
sudo apt install unzip
wget https://ndownloader.figshare.com/articles/6865397?private_link=729b346eda670e9daba4 -O fa.zip
unzip fa.zip -d fa

### Create three input query files
### All 28 samples
cat fa/*.fa > query.fa

### Sample 1
cat fa/'Sample_1 (paired) trimmed (paired) assembly.fa' > query1.fa

### Sample 1 to Sample 5
cat fa/'Sample_1 (paired) trimmed (paired) assembly.fa'
    fa/'Sample_2 (paired) trimmed (paired) assembly.fa'
    fa/'Sample_3 (paired) trimmed (paired) assembly.fa'
    fa/'Sample_4 (paired) trimmed (paired) assembly.fa'
    fa/'Sample_5 (paired) trimmed (paired) assembly.fa' > query5.fa

### Copy query sequences to $HOME/queries folder
cp query* $HOME/queries/.

## Step 2. Display BLAST databases on the GCP
docker run --rm ncbi/blast update_blastdb.pl --showall pretty --source gcp

## Download nt (nucleotide collection version 5) database
## This step takes approximately 10 min.  The following command runs in the background.
docker run --rm
  -v $HOME/blastdb:/blast/blastdb:rw
  -w /blast/blastdb
  ncbi/blast
  update_blastdb.pl --source gcp nt &

## At this point, confirm query/database have been properly provisioned before proceeding

## Check the size of the directory containing the BLAST database
## nt should be around 68 GB    (this was in May 2019)
du -sk $HOME/blastdb

## Check for queries, there should be three files - query.fa, query1.fa and query5.fa
ls -al $HOME/queries

## From this point forward, it may be easier if you run these steps in a script.
## Simply copy and paste all the commands below into a file named script.sh
## Then run the script in the background `nohup bash script.sh > script.out &`

## Step 3. Run BLAST
## Run BLAST using query1.fa (Sample 1)
## This command will take approximately 9 minutes to complete.
## Expected output size: 3.1 GB
docker run --rm
  -v $HOME/blastdb:/blast/blastdb:ro -v $HOME/blastdb_custom:/blast/blastdb_custom:ro
  -v $HOME/queries:/blast/queries:ro
  -v $HOME/results:/blast/results:rw
  ncbi/blast
  blastn -query /blast/queries/query1.fa -db nt -num_threads 16
  -out /blast/results/blastn.query1.denovo16s.out

## Run BLAST using query5.fa (Samples 1-5)
## This command will take approximately 30 minutes to complete.
## Expected output size: 10.4 GB
docker run --rm
  -v $HOME/blastdb:/blast/blastdb:ro -v $HOME/blastdb_custom:/blast/blastdb_custom:ro
  -v $HOME/queries:/blast/queries:ro
  -v $HOME/results:/blast/results:rw
  ncbi/blast
  blastn -query /blast/queries/query5.fa -db nt -num_threads 16
  -out /blast/results/blastn.query5.denovo16s.out

## Run BLAST using query.fa (All 28 samples)
## This command will take approximately 147 minutes to complete.
## Expected output size: 47.8 GB
docker run --rm
  -v $HOME/blastdb:/blast/blastdb:ro -v $HOME/blastdb_custom:/blast/blastdb_custom:ro
  -v $HOME/queries:/blast/queries:ro
  -v $HOME/results:/blast/results:rw
  ncbi/blast
  blastn -query /blast/queries/query.fa -db nt -num_threads 16
  -out /blast/results/blastn.query.denovo16s.out

## Stdout and stderr will be in script.out
## BLAST output will be in $HOME/results
チュートリアル全体を完了しました。この時点で、さらなる分析のためにダウンロードしたデータが必要ない場合は、追加のコストが発生するのを防ぐためにVMを削除してください。
インスタンスを削除するには、セクションの指示に従ってGCPインスタンスを停止します。
詳細については、インスタンスライフサイクルに関するGoogle Cloud Platformのドキュメントを参照してください。
これらの例を実行するには、Amazon Web Services(AWS)アカウントが必要です。まだ持っていない場合は、各サービスの指定された制限までAWSサービスを無料で探索して試してみる機能を提供するアカウントを作成できます。開始するには、無料のティアサイトにアクセスするには、有効なクレジットカードが必要ですが、無料層内で計算しても請求されません。無料のティア製品を選択するときは、それが製品カテゴリ計算にあることを確認してください。
これらの命令は、Dockerとその依存関係を含むAmazonマシン画像(AMI)に基づいてEC2 VMを作成します。
VMを作成すると、SSHを使用してローカルコンピューターからアクセスできます。キーペア / .PEMファイルは、資格情報として機能します。
SSH接続を確立する方法はいくつかあります。 AWSコンソールのEC2インスタンスリストから、 [接続]を選択し、 [スタンドアロンSSHクライアントの接続メソッドの命令]に従ってください。
Linux VMに接続するための詳細な指示は、こちらをご覧ください。

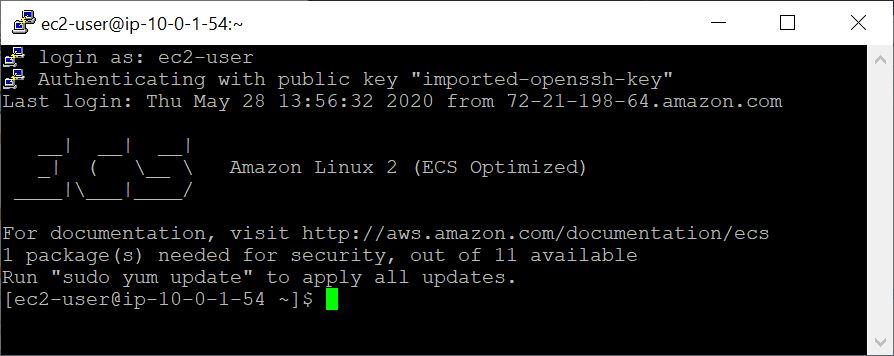
SSHコマンドラインのルートではなく、ユーザー名としてEC2ユーザーを指定するか、ログインするように求められている場合は、 EC2ユーザーをユーザー名として指定します。
この例では、クエリとデータベースのシーケンスを取得することから始めてから、カスタムブラストデータベースを作成します。
 ## Retrieve sequences
## Create directories for analysis
cd $HOME; sudo mkdir bin blastdb queries fasta results blastdb_custom; sudo chown ec2-user:ec2-user *

## Retrieve query sequence
docker run --rm ncbi/blast efetch -db protein -format fasta
    -id P01349 > queries/P01349.fsa

## Retrieve database sequences
docker run --rm ncbi/blast efetch -db protein -format fasta
    -id Q90523,P80049,P83981,P83982,P83983,P83977,P83984,P83985,P27950
    > fasta/nurse-shark-proteins.fsa

## Make BLAST database
docker run --rm
    -v $HOME/blastdb_custom:/blast/blastdb_custom:rw
    -v $HOME/fasta:/blast/fasta:ro
    -w /blast/blastdb_custom
    ncbi/blast
    makeblastdb -in /blast/fasta/nurse-shark-proteins.fsa -dbtype prot
    -parse_seqids -out nurse-shark-proteins -title "Nurse shark proteins"
    -taxid 7801 -blastdb_version 5
上記の新しく作成されたBlastデータベースを確認するには、次のコマンドを実行して、データベースのシーケンスのアクセッション、シーケンス長、および共通名を表示できます。
 ## Verify BLAST DB
docker run --rm
    -v $HOME/blastdb:/blast/blastdb:ro
    -v $HOME/blastdb_custom:/blast/blastdb_custom:ro
    ncbi/blast
    blastdbcmd -entry all -db nurse-shark-proteins -outfmt "%a %l %T"
Dockerコンテナで爆発を実行するときは、 docker runコマンドに指定されたマウント( -vオプション)に注意して、入力と出力にアクセスできるようにします。以下の例では、最初の2つのマウントがBlastデータベースにアクセスできるようにし、3番目のマウントはクエリシーケンスへのアクセスを提供し、4番目のマウントは結果を保存するディレクトリを提供します。 (注:roおよび:rwオプション。これは、それぞれ読み取り専用および読み取りワイトとしてディレクトリをマウントします。)
 ## Run BLAST+
docker run --rm
    -v $HOME/blastdb:/blast/blastdb:ro
    -v $HOME/blastdb_custom:/blast/blastdb_custom:ro
    -v $HOME/queries:/blast/queries:ro
    -v $HOME/results:/blast/results:rw
    ncbi/blast
    blastp -query /blast/queries/P01349.fsa -db nurse-shark-proteins
	-out /blast/results/blastp.out
この時点で、出力ファイル$HOME/results/blastp.outが表示されます。クエリを使用して、BLASTはタンパク質配列P80049.1を14.2のスコアと0.96の電子値との一致として識別しました。この出力ファイルのコンテンツを表示するには、コマンドmore $HOME/results/blastp.outを使用します。
docker run --rm ncbi/blast update_blastdb.pl --showall pretty --source aws
予想される出力は、名前、説明、サイズ、および最後に更新された日付を含む、BLAST DBSのリストです。
update_blastdb.plの詳細な説明については、ドキュメントを参照してください。デフォルトでは、 update_blastdb.pl 、サポートされているクラウドプロバイダーを使用していない場合、または接続されている場合、またはNCBIに接続されている場合、クラウドからダウンロードします。
docker run --rm ncbi/blast update_blastdb.pl --showall --source ncbi
予想される出力は、Blast DBSの名前のリストです。
追加のコストが発生しないように、VMを停止または終了することを忘れないでください。以下に示すように、AWSコンソールのEC2インスタンスリストからこれを行うことができます。
この例では、マルチコアホストが必要です。そのため、この例を実行することにより、EC2計算料が実現されます。使用されるインスタンスタイプの現在のレート-T2.large-は0.093ドル/時間です。
これらの命令は、Dockerとその依存関係を含むAmazonマシン画像(AMI)に基づいてEC2 VMを作成します。
VMを作成すると、SSHを使用してローカルコンピューターからアクセスできます。キーペア / .PEMファイルは、資格情報として機能します。
SSH接続を確立する方法はいくつかあります。 AWSコンソールのEC2インスタンスリストから、 [接続]を選択し、 [スタンドアロンSSHクライアントの接続メソッドの命令]に従ってください。
Linux VMに接続するための詳細な指示は、こちらをご覧ください。

SSHコマンドラインのルートではなく、ユーザー名としてEC2ユーザーを指定するか、ログインするように求められている場合は、 EC2ユーザーをユーザー名として指定します。
 ## Create directories for analysis
cd $HOME; sudo mkdir bin blastdb queries fasta results blastdb_custom; sudo chown ec2-user:ec2-user *

## Retrieve query sequence
docker run --rm ncbi/blast efetch -db protein -format fasta
    -id P01349 > queries/P01349.fsa
下のコマンドは( -vオプションを使用)、ローカルマシンの$HOME/blastdbパスAs /blast/blastdbコンテナにマウントされ、 blastdbcmd 、この場所で利用可能なBLASTデータベースを示しています。
 ## Download Protein Data Bank amino acid database (pdbaa)
docker run --rm
     -v $HOME/blastdb:/blast/blastdb:rw
     -w /blast/blastdb
     ncbi/blast
     update_blastdb.pl pdbaa

## Display database(s) in $HOME/blastdb
docker run --rm
    -v $HOME/blastdb:/blast/blastdb:ro
    ncbi/blast
    blastdbcmd -list /blast/blastdb -remove_redundant_dbs
出力/blast/blastdb/pdbaa Proteinが表示されるはずです。
 ## Run BLAST+
docker run --rm
     -v $HOME/blastdb:/blast/blastdb:ro
     -v $HOME/blastdb_custom:/blast/blastdb_custom:ro
     -v $HOME/queries:/blast/queries:ro
     -v $HOME/results:/blast/results:rw
     ncbi/blast
     blastp -query /blast/queries/P01349.fsa -db pdbaa
	 -out /blast/results/blastp_pdbaa.out
この時点で、出力ファイル$HOME/results/blastp_pdbaa.outが表示されます。この出力ファイルのコンテンツを表示するには、コマンドmore $HOME/results/blastp_pdbaa.outを使用します。
ローカルコンピューターとLinuxインスタンス間でファイルを転送する1つの方法は、Secure Copy Protocol(SCP)を使用することです。
LinuxインスタンスのAmazon EC2ユーザーガイドのSCPを使用してLinuxからファイルをLinuxインスタンスに転送するセクションは、このプロセスの詳細な指示を提供します。
NCBIは、AWS、GCP、およびNCBI FTPサイトで同じデータベースをホストしています。以下の表には、2022年11月現在のデータベースのリストがあります。
コマンドで現在のリストを取得することもできます。
Docker run -RM NCBI/BLAST UPDATE_BLASTDB.PL - SHOWALL PRETIE
または
update_blastdb.pl - showall pretty#blast+ packageをダウンロードした後。
上記のように、update_blastdb.plを使用してこれらのデータベースをダウンロードすることもできます。適切なリソースを自動的に選択します(たとえば、そのプロバイダー内にいる場合はGCP)。
これらのデータベースは、GCPおよびAWSの弾性ブラストで検索することもできます。
クラウドプロバイダーの外側のAWSまたはGCPでデータベースにアクセスすると、アカウントに出口料金が発生する可能性があります。クラウドプロバイダーにいない場合は、NCBI FTPサイトのデータベースを使用する必要があります。
| 名前 | タイプ | タイトル |
|---|---|---|
| 16S_RIBOSOMAL_RNA | DNA | 16SリボソームRNA(細菌と古細菌型株) |
| 18S_FUNGAL_シーケンス | DNA | 菌類のタイプと参照材料からの18SリボソームRNA配列(SSU) |
| 28S_FUNGAL_シーケンス | DNA | 真菌の種類と参照材料からの28SリボソームRNA配列(LSU) |
| ベタコロナウイルス | DNA | ベタコロナウイルス |
| GCF_000001405.38_TOP_LEVEL | DNA | HOMO SAPIENS GRCH38.P12 [GCF_000001405.38]染色体と未配置および非局在の足場 |
| GCF_000001635.26_TOP_LEVEL | DNA | Mus Musculus GRCM38.P6 [GCF_000001635.26]染色体と非配置および非局在の足場 |
| ITS_REFSEQ_FUNGI | DNA | 菌類の種類と参照資料からの内部転写スペーサー領域(ITS) |
| ITS_EUKARYOTE_シーケンス | DNA | その真核生物の爆発 |
| LSU_EUKARYOTE_RRNA | DNA | 真核生物のための大きなサブユニットリボソーム核酸 |
| lsu_prokaryote_rrna | DNA | 原核生物のための大きなサブユニットリボソーム核酸 |
| SSU_EUKARYOTE_RRNA | DNA | 真核生物のための小さなサブユニットリボソーム核酸 |
| env_nt | DNA | 環境サンプル |
| nt | DNA | ヌクレオチド収集(NT) |
| patnt | DNA | Genbankの特許部門に由来するヌクレオチド配列 |
| pdbnt | DNA | PDBヌクレオチドデータベース |
| ref_euk_rep_genomes | DNA | Refseq真核生物代表ゲノムデータベース |
| ref_prok_rep_genomes | DNA | RefSeq Prokaryote代表ゲノム(RefSeqアセンブリを含む) |
| ref_viroids_rep_genomes | DNA | Refseq Viroids代表ゲノム |
| ref_viruses_rep_genomes | DNA | RefSEQウイルス代表ゲノム |
| refseq_rna | DNA | NCBI転写参照シーケンス |
| refseq_select_rna | DNA | REFSEQ RNAシーケンスを選択します |
| TSA_NT | DNA | トランスクリプトームショットガンアセンブリ(TSA)シーケンス |
| env_nr | タンパク質 | WGSメタゲノムプロジェクトのタンパク質 |
| ランドマーク | タンパク質 | SmartBlastのランドマークデータベース |
| nr | タンパク質 | すべての非冗長GenBank CDS翻訳+PDB+SWISSPROT+PIR+PRF WGSプロジェクトの環境サンプルを除外する |
| PDBAA | タンパク質 | PDBタンパク質データベース |
| パタ | タンパク質 | Genbankの特許部門に由来するタンパク質配列 |
| refseq_potein | タンパク質 | NCBIタンパク質参照配列 |
| refseq_select_prot | タンパク質 | RefSeq選択タンパク質を選択します |
| SwissProt | タンパク質 | 非冗長uniprotkb/swissprotシーケンス |
| TSA_NR | タンパク質 | トランスクリプトームショットガンアセンブリ(TSA)シーケンス |
| CDD | タンパク質 | 保存されたドメインデータベース(CDD)は、位置固有のスコアマトリックスとして再現された、よく目立たない複数のシーケンスアライメントモデルのコレクションです |
NCBIは、AWS、GCP、およびNCBI FTPサイトで利用可能なBLASTデータベースにメタデータを提供します。
クラウドプロバイダーの外側のAWSまたはGCPでデータベースにアクセスすると、アカウントに出口料金が発生する可能性があります。クラウドプロバイダーにいない場合は、NCBI FTPサイトのデータベースを使用する必要があります。
AWSとGCPでは、ファイルはデータベースを備えた日付に依存するサブディレクトリにあります。最新の有効なサブディレクトリを見つけるには、最初にs3://ncbi-blast-databases/latest-dir (aws)またはgs://blast-db/latest-dir (gcp)を読みます。 latest-dirを指定するDate Stamp(2020-09-29-01-05-01など)のテキストファイルです。適切なディレクトリは、BLASTデータベースのAWSまたはGCPベースURI(例: s3://ncbi-blast-databases/ for aws)とlatest-dirファイルのテキストになります。 AWSのURIの例は、 s3://ncbi-blast-databases/2020-09-29-01-05-01です。 GCP URIは似ています。
メタデータファイルからの抜粋を以下に示します。ほとんどのフィールドには明らかな意味があります。ファイルは、Blastデータベースを含みます。 bytes-totalフィールドは、バイト単位の総計データベースサイズを表し、必要なディスクスペースの量を指定することを目的としています。
以下の例はAWSからのものですが、GCP上のメタデータファイルには同じ形式があります。 Databases on the FTP site are in gzipped tarfiles, one per volume of the BLAST database, so those are listed rather than the individual files.
 "16S_ribosomal_RNA": {
    "version": "1.2",
    "dbname": "16S_ribosomal_RNA",
    "dbtype": "Nucleotide",
    "db-version": 5,
    "description": "16S ribosomal RNA (Bacteria and Archaea type strains)",
    "number-of-letters": 32435109,
    "number-of-sequences": 22311,
    "last-updated": "2022-03-07T11:23:00",
    "number-of-volumes": 1,
    "bytes-total": 14917073,
    "bytes-to-cache": 8495841,
    "files": [
      "s3://ncbi-blast-databases/2020-09-26-01-05-01/16S_ribosomal_RNA.ndb",
      "s3://ncbi-blast-databases/2020-09-26-01-05-01/16S_ribosomal_RNA.nog",
      "s3://ncbi-blast-databases/2020-09-26-01-05-01/16S_ribosomal_RNA.nni",
      "s3://ncbi-blast-databases/2020-09-26-01-05-01/16S_ribosomal_RNA.nnd",
      "s3://ncbi-blast-databases/2020-09-26-01-05-01/16S_ribosomal_RNA.nsq",
      "s3://ncbi-blast-databases/2020-09-26-01-05-01/16S_ribosomal_RNA.nin",
      "s3://ncbi-blast-databases/2020-09-26-01-05-01/16S_ribosomal_RNA.ntf",
      "s3://ncbi-blast-databases/2020-09-26-01-05-01/16S_ribosomal_RNA.not",
      "s3://ncbi-blast-databases/2020-09-26-01-05-01/16S_ribosomal_RNA.nhr",
      "s3://ncbi-blast-databases/2020-09-26-01-05-01/16S_ribosomal_RNA.nos",
      "s3://ncbi-blast-databases/2020-09-26-01-05-01/16S_ribosomal_RNA.nto",
      "s3://ncbi-blast-databases/2020-09-26-01-05-01/taxdb.btd",
      "s3://ncbi-blast-databases/2020-09-26-01-05-01/taxdb.bti"
    ]
  }
or email us.
National Center for Biotechnology Information (NCBI)
National Library of Medicine (NLM)
National Institutes of Health (NIH)
View refer to the license and copyright information for the software contained in this image.
As with all Docker images, these likely also contain other software which may be under other licenses (such as bash, etc., from the base distribution, along with any direct or indirect dependencies of the primary software being contained).
As with any pre-built image usage, it is the image user's responsibility to ensure that any use of this image complies with any relevant licenses for all software contained within.
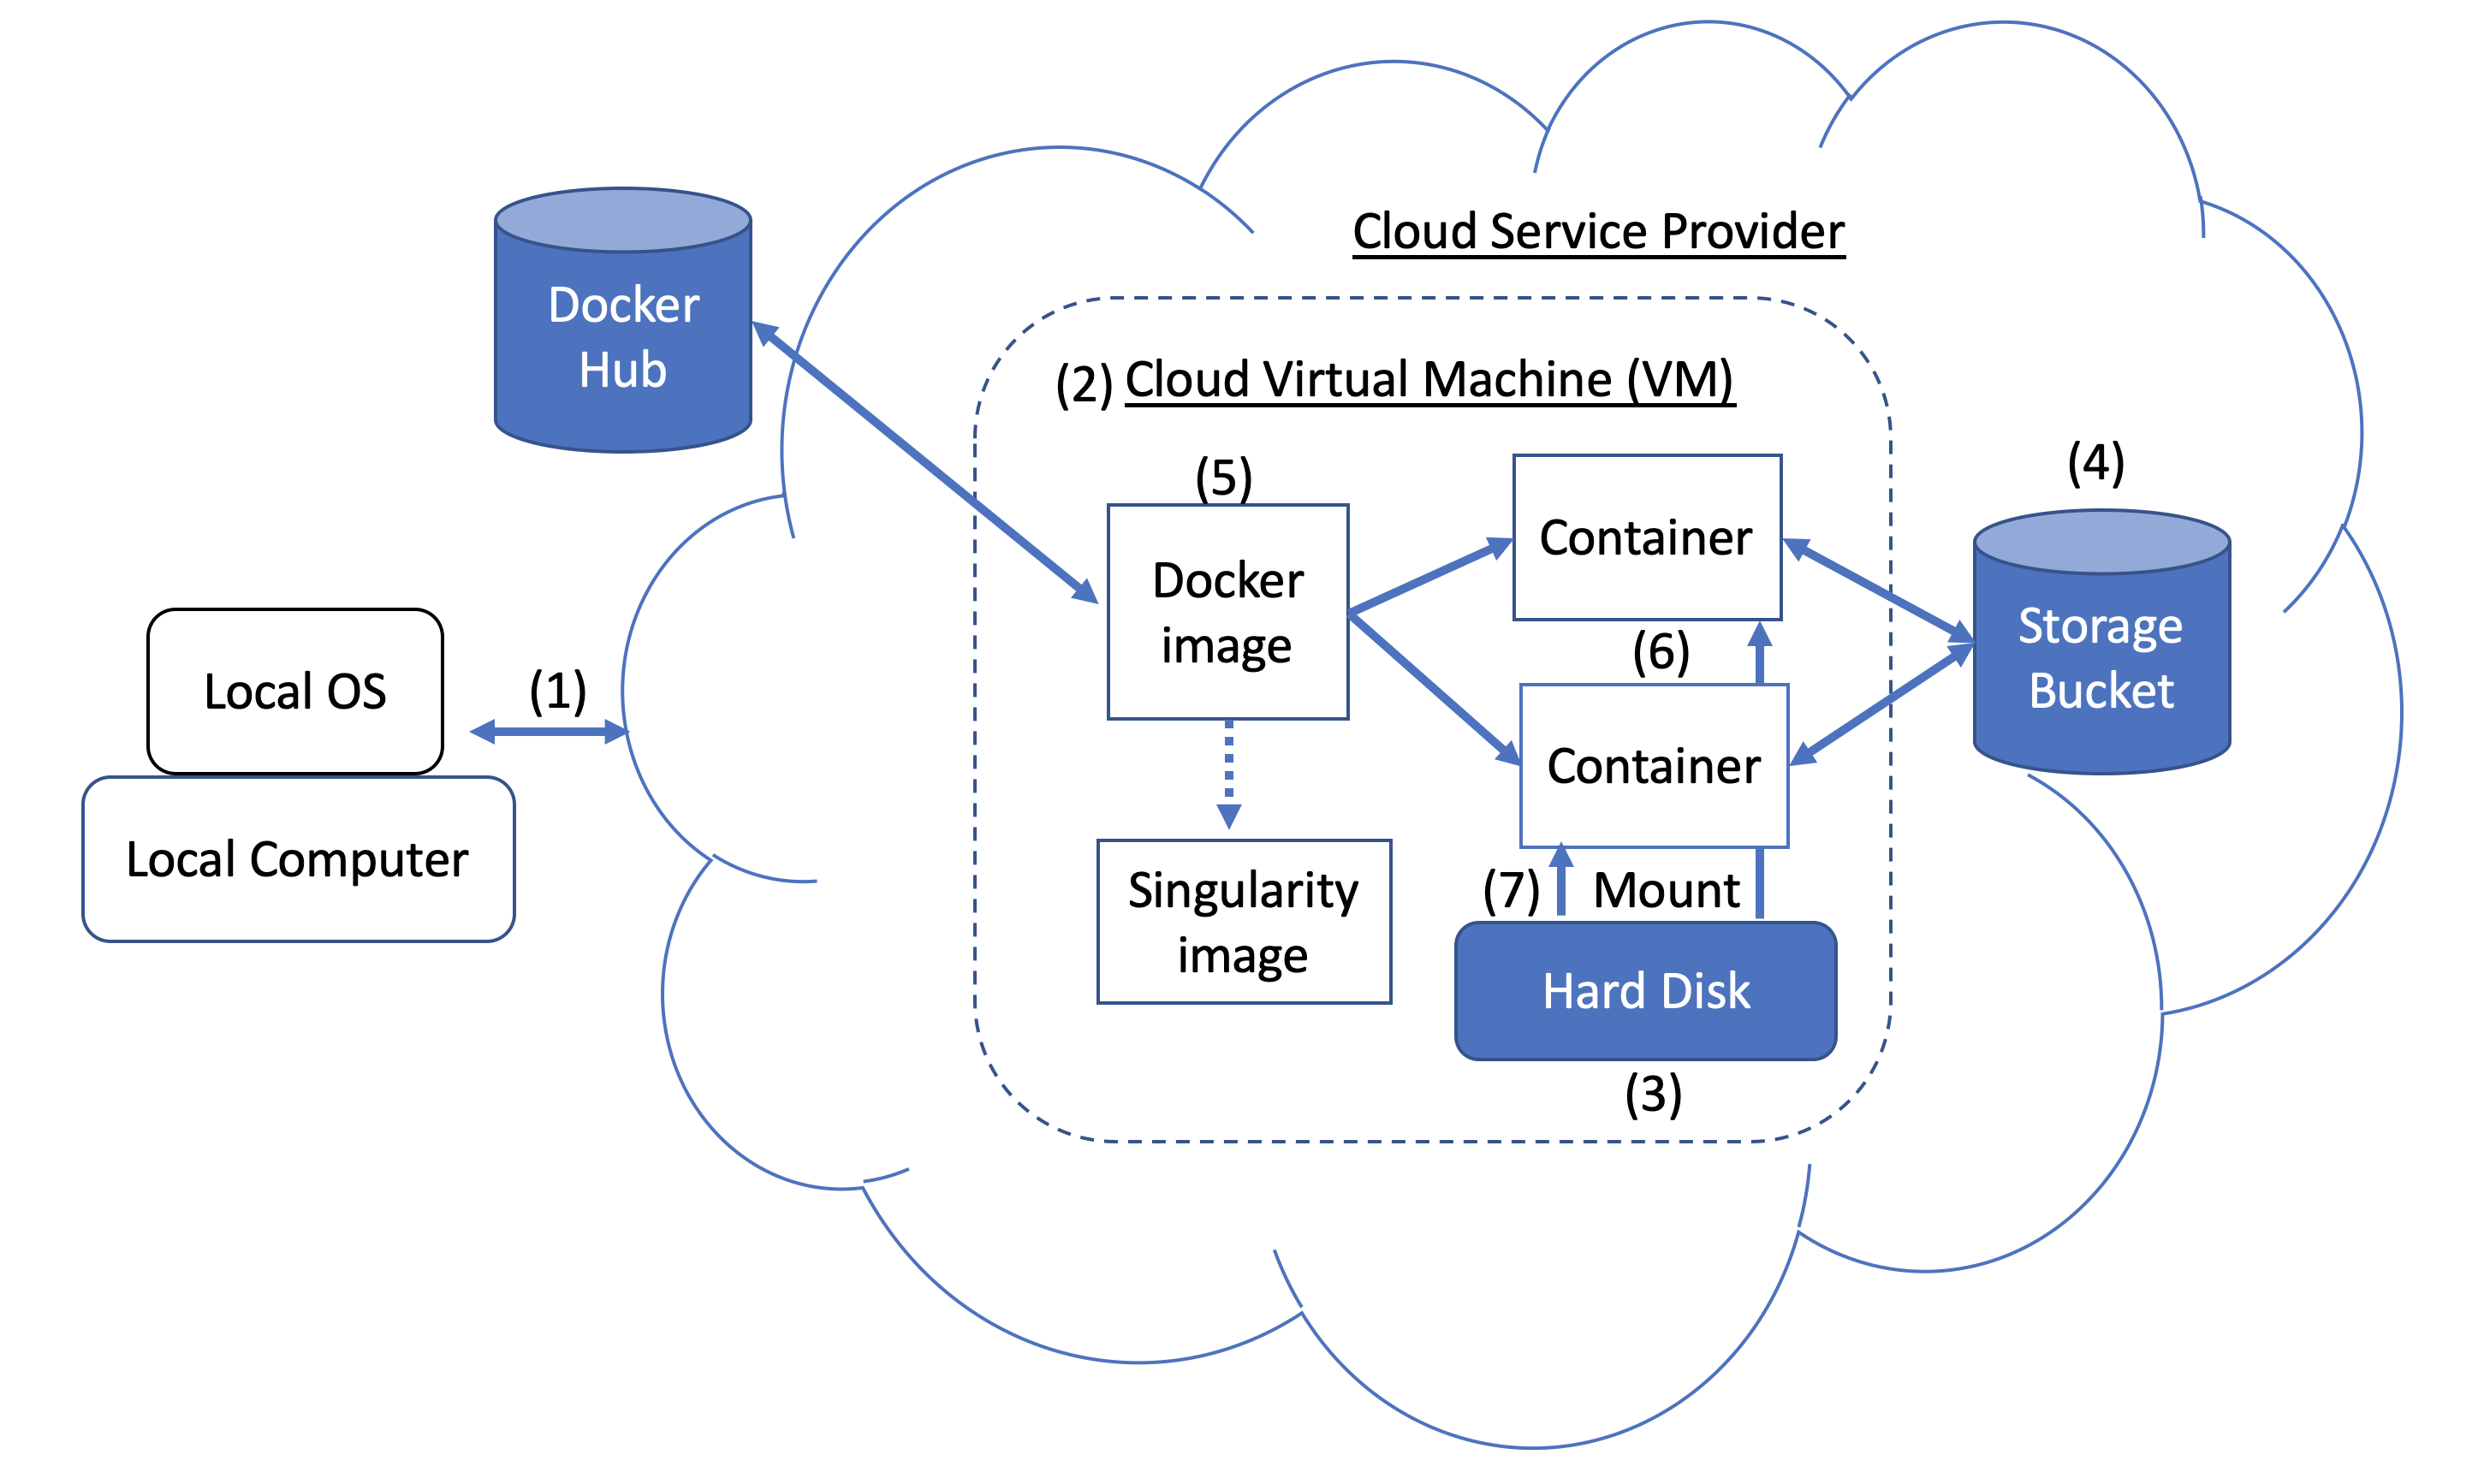 Figure 1. Docker and Cloud Computing Concept. Users can access compute resources provided by cloud service providers (CSPs), such as the Google Cloud Platform, using SSH tunneling (1). When you create a VM (2), a hard disk (also called a boot/persistent disk) (3) is attached to that VM. With the right permissions, VMs can also access other storage buckets (4) or other data repositories in the public domain. Once inside a VM with Docker installed, you can run a Docker image (5), such as NCBI's BLAST image. An image can be used to create multiple running instances or containers (6). Each container is in an isolated environment. In order to make data accessible inside the container, you need to use Docker bind mounts (7) described in this tutorial.
A Docker image can be used to create a Singularity image. Please refer to Singularity's documentation for more detail.
As an alternative to what is described above, you can also run BLAST interactively inside a container.
When to use : This is useful for running a few (eg, fewer than 5-10) BLAST searches on small BLAST databases where you expect the search to complete in seconds/minutes.
 docker run --rm -it
    -v $HOME/blastdb:/blast/blastdb:ro -v $HOME/blastdb_custom:/blast/blastdb_custom:ro
    -v $HOME/queries:/blast/queries:ro
    -v $HOME/results:/blast/results:rw
    ncbi/blast
    /bin/bash

# Once you are inside the container (note the root prompt), run the following BLAST commands.
blastp -query /blast/queries/P01349.fsa -db nurse-shark-proteins
    -out /blast/results/blastp.out

# To view output, run the following command
more /blast/results/blastp.out

# Leave container
exit
In addition, you can run BLAST in detached mode by running a container in the background.
When to use : This is a more practical approach if you have many (eg, 10 or more) BLAST searches to run or you expect the search to take a long time to execute. In this case it may be better to start the BLAST container in detached mode and execute commands on it.
NOTE : Be sure to mount all required directories, as these need to be specified when the container is started.
 # Start a container named 'blast' in detached mode
docker run --rm -dit --name blast
    -v $HOME/blastdb:/blast/blastdb:ro -v $HOME/blastdb_custom:/blast/blastdb_custom:ro
    -v $HOME/queries:/blast/queries:ro
    -v $HOME/results:/blast/results:rw
    ncbi/blast
    sleep infinity

# Check the container is running in the background
docker ps -a
docker ps --filter "status=running"
Once the container is confirmed to be running in detached mode, run the following BLAST command.
 docker exec blast blastp -query /blast/queries/P01349.fsa
    -db nurse-shark-proteins -out /blast/results/blastp.out

# View output
more $HOME/results/blastp.out

# stop the container
docker stop blast
If you run into issues with docker stop blast command, reset the VM from the GCP Console or restart the SSH session.
To copy the file $HOME/script.out in the home directory on a local machine to the home directory on a GCP VM named instance-1 in project My First Project using GCP Cloud SDK.
GCP documentation
First install GCP Cloud SDK command line tools for your operating system.
 # First, set up gcloud tools
# From local machine's terminal

gcloud init

# Enter a configuration name
# Select the sign-in email account
# Select a project, for example “my-first-project”
# Select a compute engine zone, for example, “us-east4-c”

# To copy the file $HOME/script.out to the home directory of GCP instance-1
# Instance name can be found in your Google Cloud Console -> Compute Engine -> VM instances

gcloud compute scp $HOME/script.out instance-1:~

# Optional - to transfer the file from the GCP instance to a local machine's home directory

gcloud compute scp instance-1:~/script.out $HOME/.


