YOLO v5
1.0.0
? ? Now YOLOv5 has been updated to version 6.0, but its training method is the same as this Repo. You only need to install the corresponding Python environment according to the corresponding version. The construction of its dataset, configuration file modification, training method, etc. are completely consistent with this Repo!
? ? We provide YOLOv5 TensorRT calls and INT8 quantized C++ and Python code (the TensorRT acceleration method is different from the TensorRT calls provided by this Repo). Big guys in need can leave a message in issues!
Xu Jing
Due to the adjustment of the backbone and some parameters of the official new version of YOLO v5, many friends have downloaded the latest official pre-trained model and are unavailable. Here we provide the Baidu Cloud Disk download address of the original YOLO v5 pre-trained model.
Link: https://pan.baidu.com/s/1SDwp6I_MnRLK45QdB3-yNw Extraction code: 423j
YOLOv4 has not yet subsided, YOLOv5 has been released!
On June 9, Ultralytics opened the source of YOLOv5, less than 50 days after the last YOLOv4 was released. And this time, YOLOv5 is completely implemented based on PyTorch!
The main contributor to YOLO v5 is the author of the mosaic data enhancement highlighted in YOLO v4

This project describes how to train YOLO v5 based on your own dataset
However, there are some differences between the information provided by YOLO v4 and the official ones:
Install the necessary python package and configure related environments
 # python3.6
# torch==1.3.0
# torchvision==0.4.1

# git clone yolo v5 repo
git clone https://github.com/ultralytics/yolov5 # clone repo
# 下载官方的样例数据(这一步可以省略)
python3 -c "from yolov5.utils.google_utils import gdrive_download; gdrive_download('1n_oKgR81BJtqk75b00eAjdv03qVCQn2f','coco128.zip')" # download dataset
cd yolov5
# 安装必要的package
pip3 install -U -r requirements.txt
dataset.yaml of the dataset data/coco128.yaml comes from the first 128 training images of the COCO train2017 dataset. You can modify the yaml file of your own dataset based on this yaml
# train and val datasets (image directory or *.txt file with image paths)
train: ./datasets/score/images/train/
val: ./datasets/score/images/val/
# number of classes
nc: 3
# class names
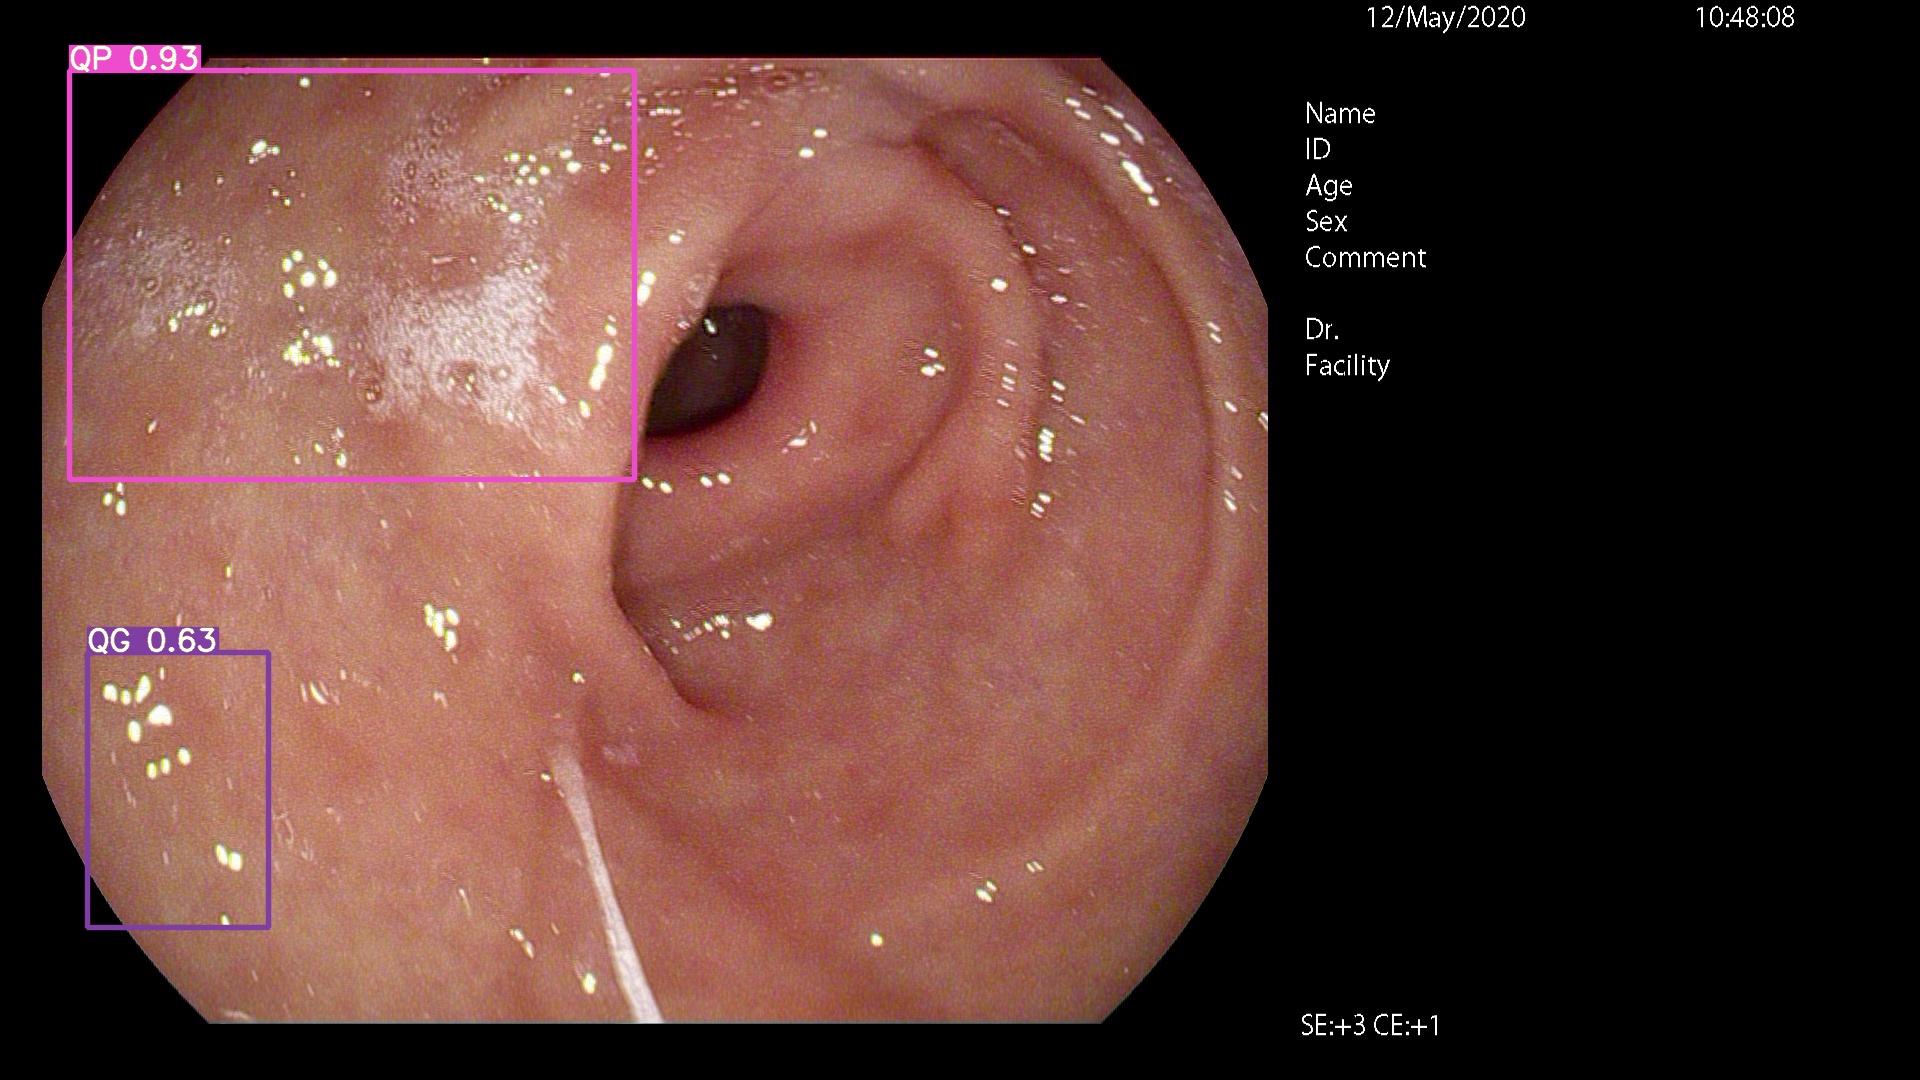
names: ['QP', 'NY', 'QG']
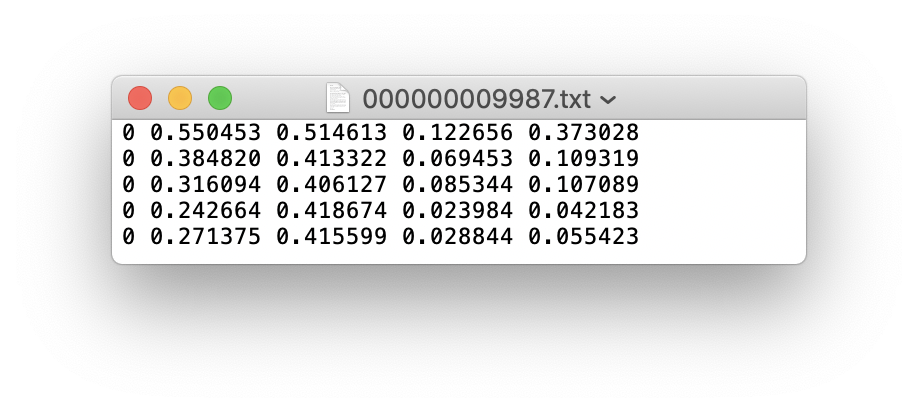
You can use LabelImg, Labme, Labelbox, and CVAT to label data. For target detection, you need to label bounding box. Then you need to convert the annotation to the same annotation form as darknet format , and each image generates a *.txt annotation file (if the image has no annotation target, you do not need to create a *.txt file). The *.txt file created follows the following rules:
class x_center y_center width height def convert ( size , box ):
'''
将标注的xml文件标注转换为darknet形的坐标
'''
dw = 1. / ( size [ 0 ])
dh = 1. / ( size [ 1 ])
x = ( box [ 0 ] + box [ 1 ]) / 2.0 - 1
y = ( box [ 2 ] + box [ 3 ]) / 2.0 - 1
w = box [ 1 ] - box [ 0 ]
h = box [ 3 ] - box [ 2 ]
x = x * dw
w = w * dw
y = y * dh
h = h * dh
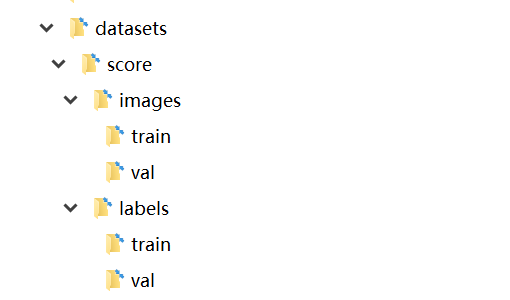
return ( x , y , w , h ) Each annotation *.txt file is stored in a file directory similar to the image. You only need to replace /images/*.jpg with /lables/*.txt (this code internal processing is like this when loading data. You can modify it to the VOC data format for loading)
For example:
 datasets/score/images/train/000000109622.jpg  # image
datasets/score/labels/train/000000109622.txt  # label
If a label file contains 5 person categories (person is the first category in the coco dataset, so the index is 0):
Store the images and labels folders of the training set train and verification set val as follows
At this point, the data preparation phase has been completed. During the process, we assume that the algorithm engineer's data cleaning and data set division process have been completed by itself.
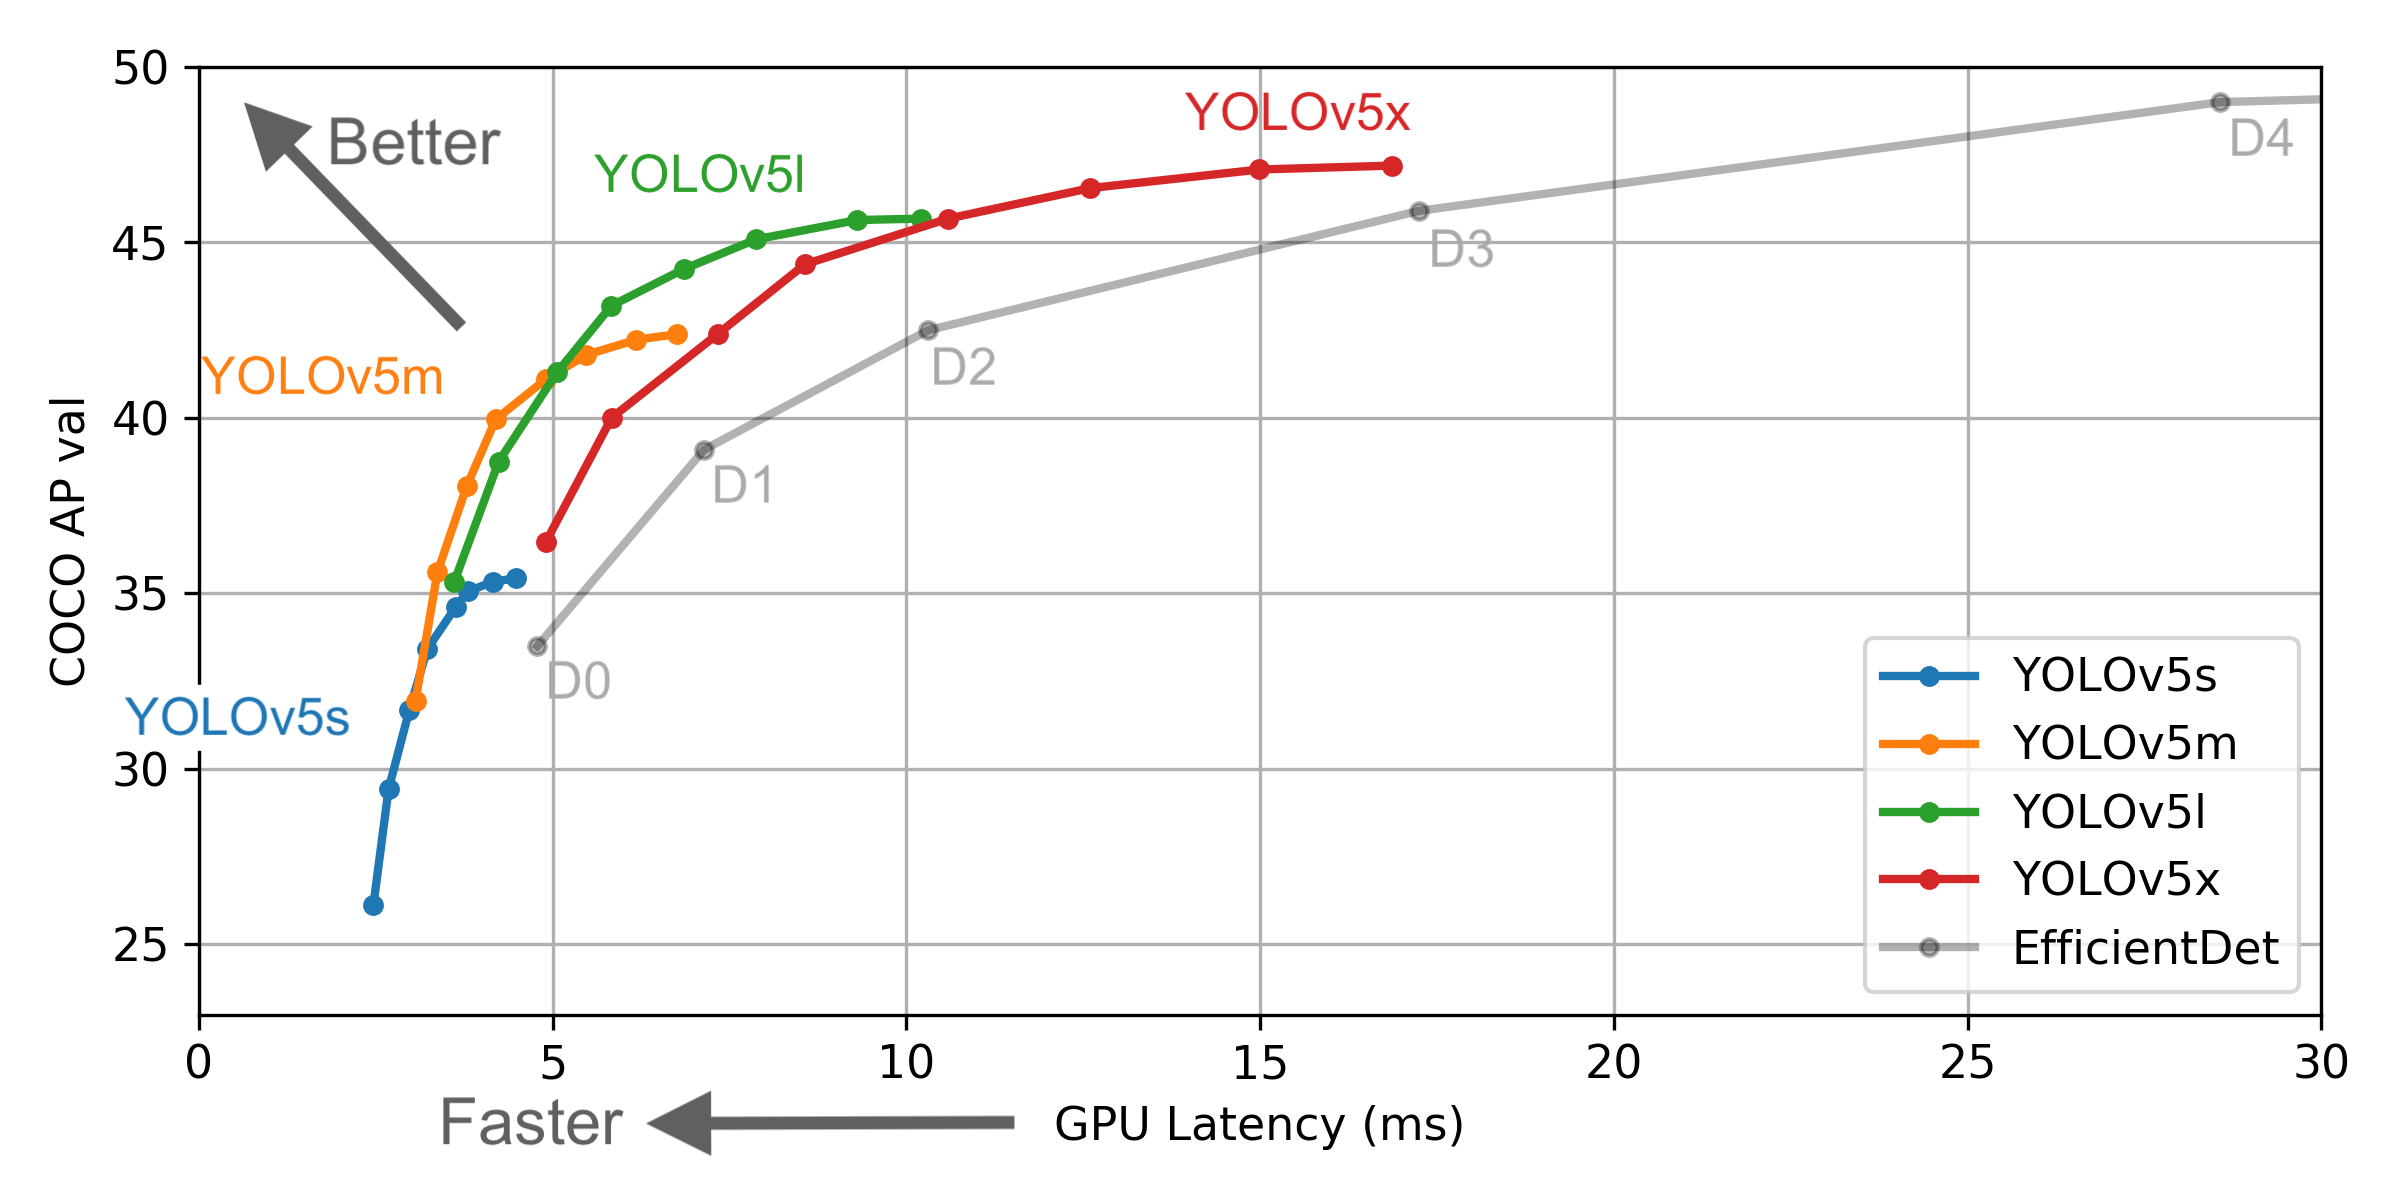
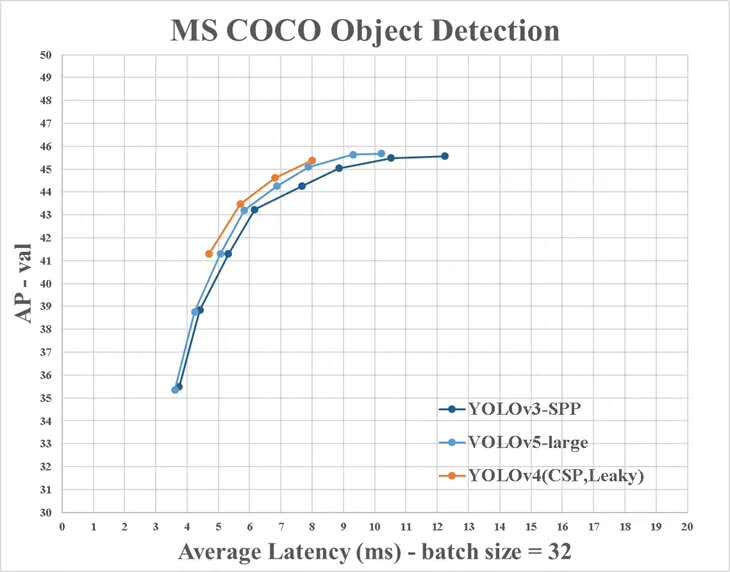
Select a model that needs to be trained in the project ./models folder. Here we select yolov5x.yaml, the largest model for training. Refer to the table in the official README to understand the size and inference speed of different models. If you have selected a model, you need to modify the yaml file corresponding to the model
 # parameters
nc : 3  # number of classes   <------------------  UPDATE to match your dataset
depth_multiple : 1.33  # model depth multiple
width_multiple : 1.25  # layer channel multiple

# anchors
anchors :
  - [10,13, 16,30, 33,23]  # P3/8
  - [30,61, 62,45, 59,119]  # P4/16
  - [116,90, 156,198, 373,326]  # P5/32

# yolov5 backbone
backbone :
  # [from, number, module, args]
  [[-1, 1, Focus, [64, 3]],  # 1-P1/2
   [-1, 1, Conv, [128, 3, 2]],  # 2-P2/4
   [-1, 3, Bottleneck, [128]],
   [-1, 1, Conv, [256, 3, 2]],  # 4-P3/8
   [-1, 9, BottleneckCSP, [256]],
   [-1, 1, Conv, [512, 3, 2]],  # 6-P4/16
   [-1, 9, BottleneckCSP, [512]],
   [-1, 1, Conv, [1024, 3, 2]], # 8-P5/32
   [-1, 1, SPP, [1024, [5, 9, 13]]],
   [-1, 6, BottleneckCSP, [1024]],  # 10
  ]

# yolov5 head
head :
  [[-1, 3, BottleneckCSP, [1024, False]],  # 11
   [-1, 1, nn.Conv2d, [na * (nc + 5), 1, 1, 0]],  # 12 (P5/32-large)

   [-2, 1, nn.Upsample, [None, 2, 'nearest']],
   [[-1, 6], 1, Concat, [1]],  # cat backbone P4
   [-1, 1, Conv, [512, 1, 1]],
   [-1, 3, BottleneckCSP, [512, False]],
   [-1, 1, nn.Conv2d, [na * (nc + 5), 1, 1, 0]],  # 17 (P4/16-medium)

   [-2, 1, nn.Upsample, [None, 2, 'nearest']],
   [[-1, 4], 1, Concat, [1]],  # cat backbone P3
   [-1, 1, Conv, [256, 1, 1]],
   [-1, 3, BottleneckCSP, [256, False]],
   [-1, 1, nn.Conv2d, [na * (nc + 5), 1, 1, 0]],  # 22 (P3/8-small)

   [[], 1, Detect, [nc, anchors]],  # Detect(P3, P4, P5)
  ]
 # Train yolov5x on score for 300 epochs

$ python3 train.py --img-size 640 --batch-size 16 --epochs 300 --data ./data/score.yaml --cfg ./models/score/yolov5x.yaml --weights weights/yolov5x.pt
After starting training, check train*.jpg image to view training data, labels and data enhancements. If your image displays labels or data enhancements are incorrect, you should check if there is any problem with the construction process of your dataset.
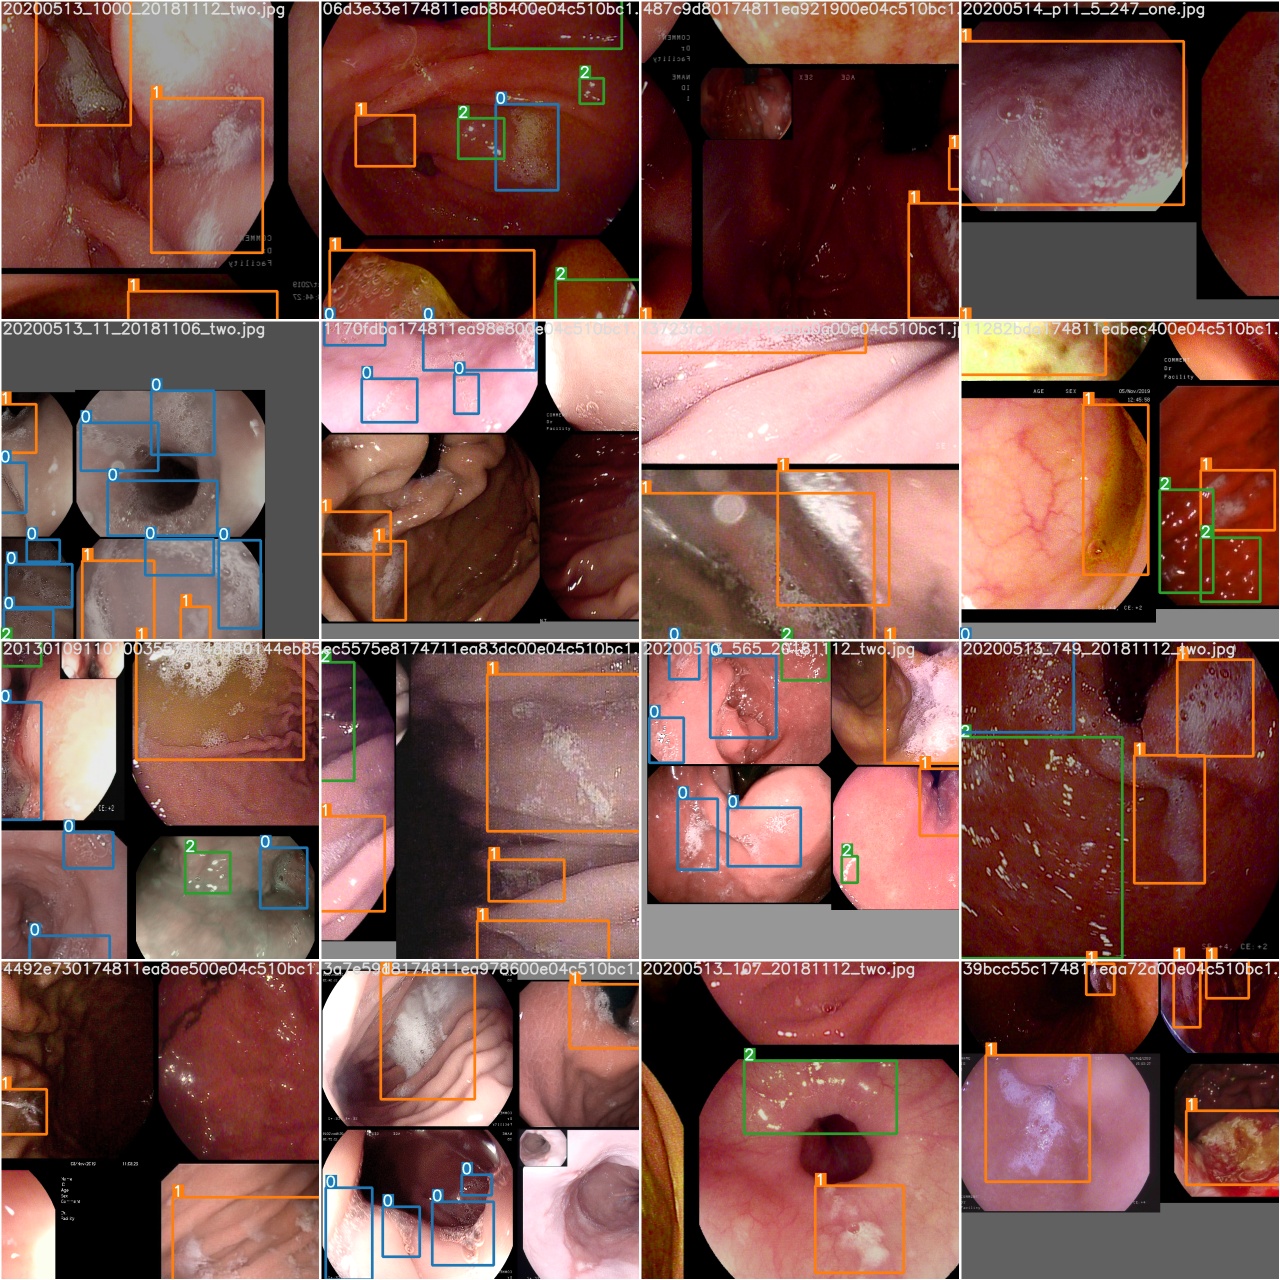
After a training epoch is completed, check test_batch0_gt.jpg to see the labels of batch 0 ground truth
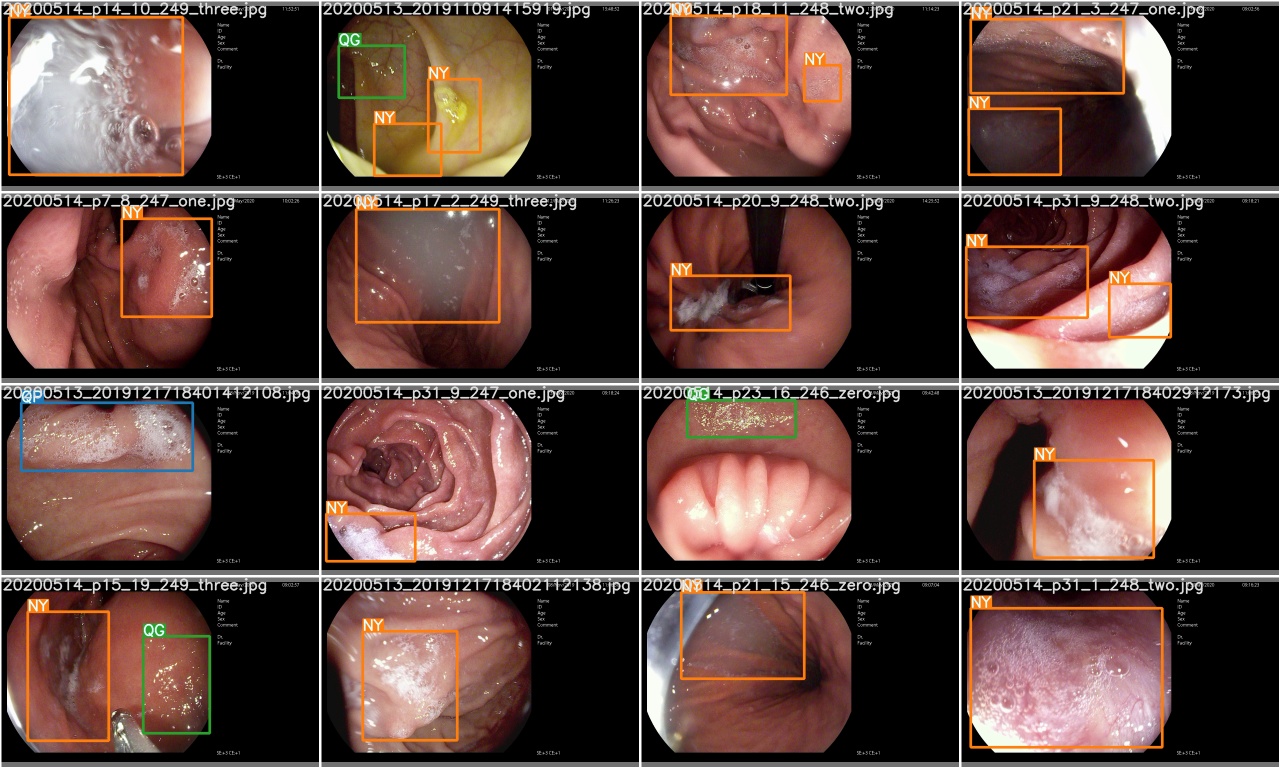
Check test_batch0_pred.jpg to see the prediction of test batch 0

The training losses and evaluation metrics are saved in the Tensorboard and results.txt log files. results.txt will be visualized as results.png after training is finished
 > >> from utils . utils import plot_results
> >> plot_results ()
# 如果你是用远程连接请安装配置Xming: https://blog.csdn.net/akuoma/article/details/82182913 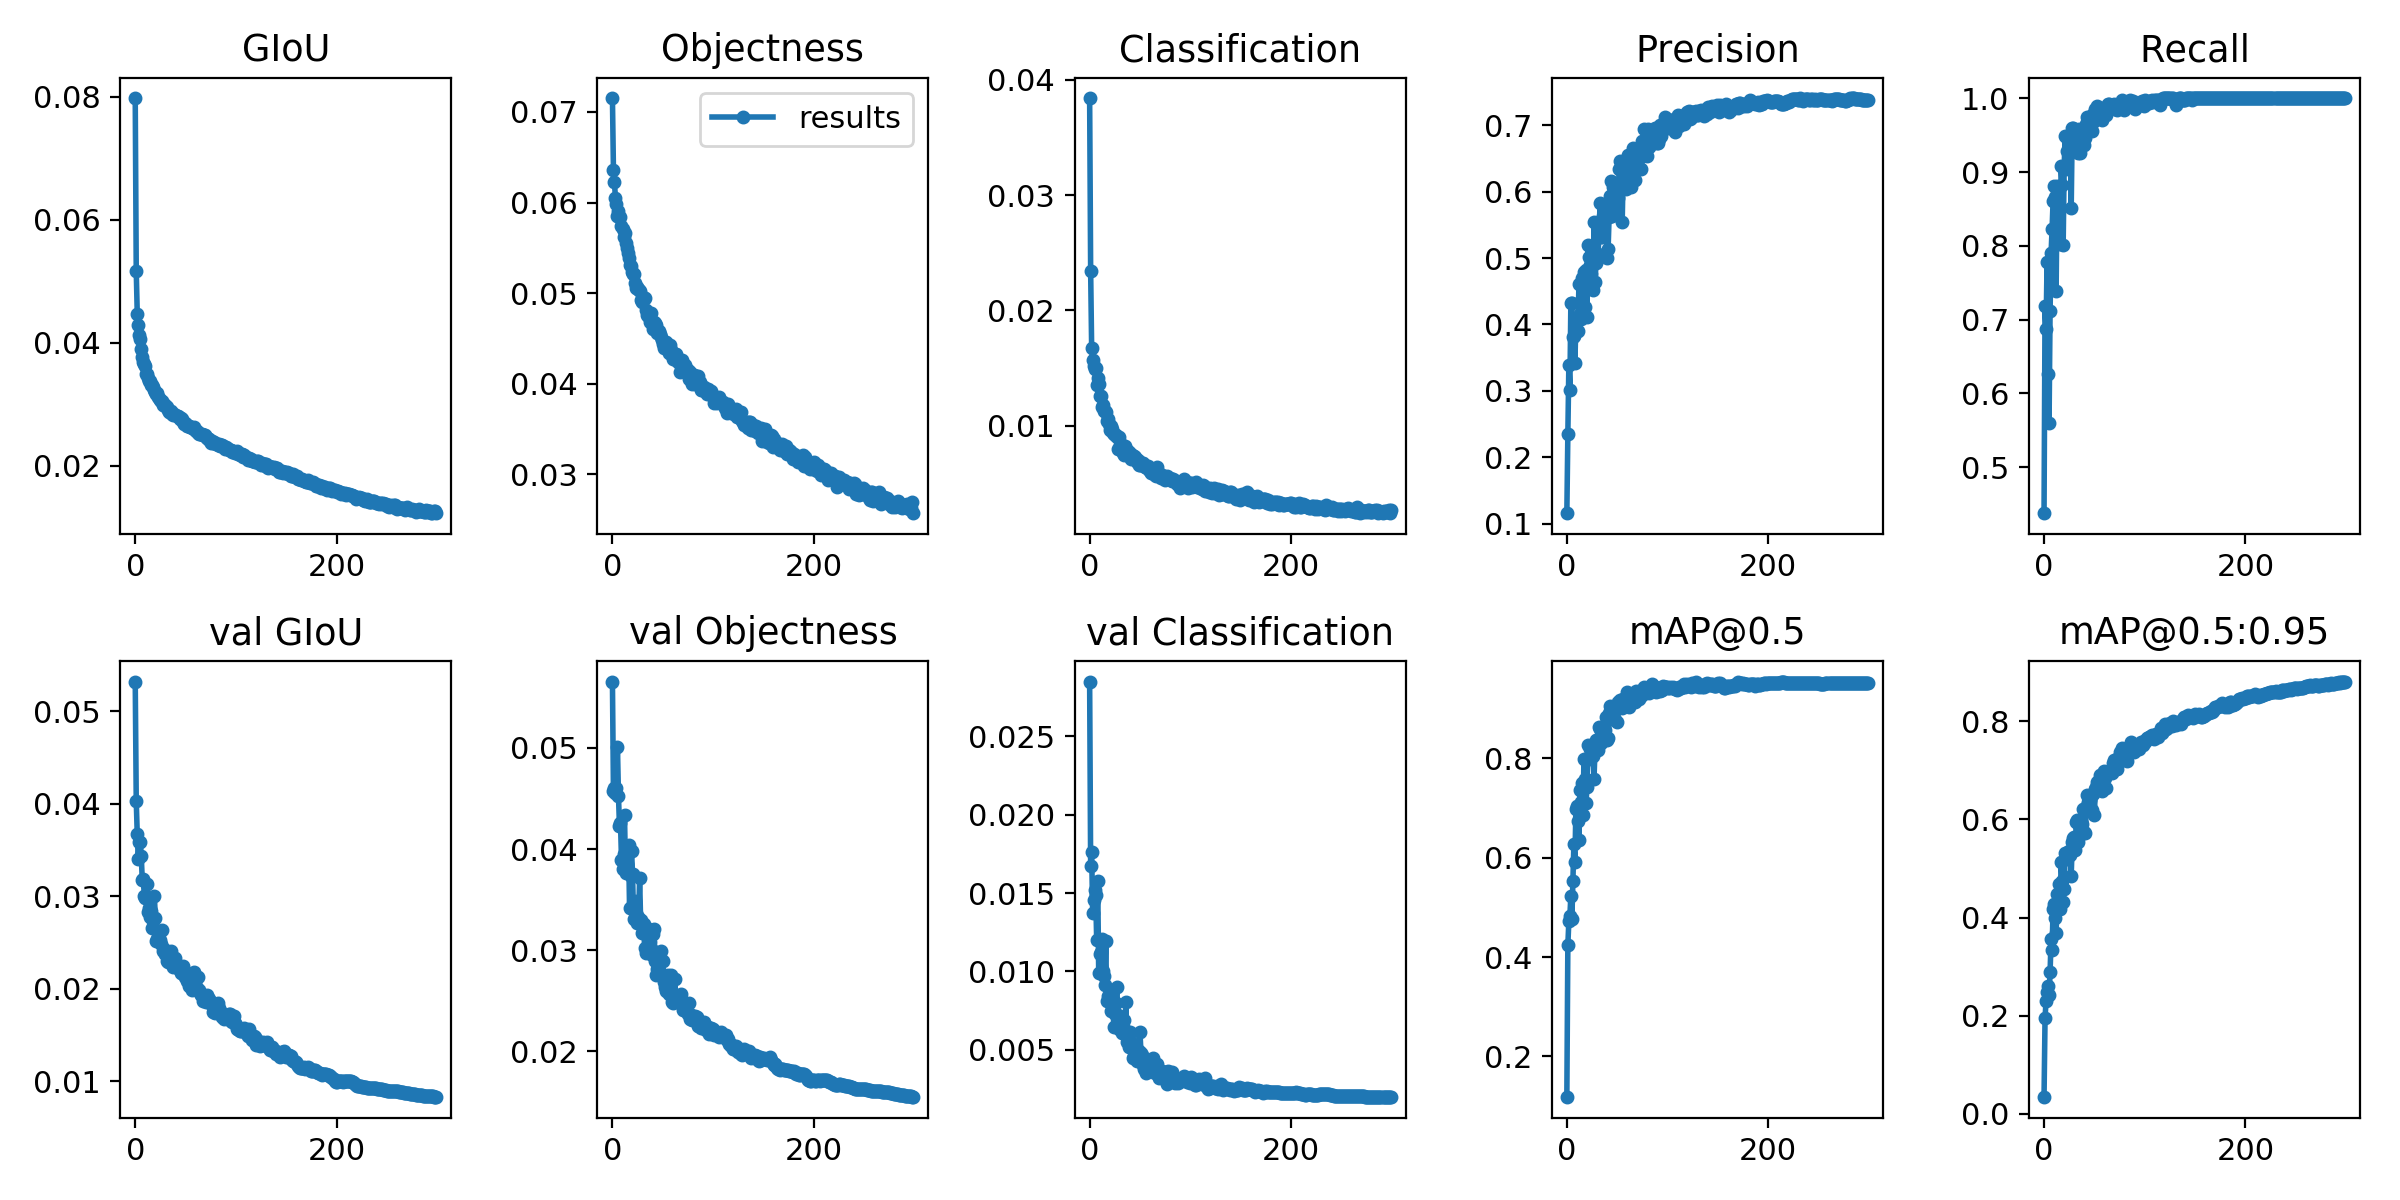
$ python3 detect . py - - source file . jpg  # image
                            file . mp4  # video
                            . / dir  # directory
                            0  # webcam
                            rtsp : // 170.93 . 143.139 / rtplive / 470011e600 ef003a004ee33696235daa  # rtsp stream
                            http : // 112.50 . 243.8 / PLTV / 88888888 / 224 / 3221225900 / 1. m3u8  # http stream
# inference /home/myuser/xujing/EfficientDet-Pytorch/dataset/test/ 文件夹下的图像
$ python3 detect . py - - source / home / myuser / xujing / EfficientDet - Pytorch / dataset / test / - - weights weights / best . pt - - conf 0.1
$ python3 detect . py - - source . / inference / images / - - weights weights / yolov5x . pt - - conf 0.5
# inference 视频
$ python3 detect . py - - source test . mp4 - - weights weights / yolov5x . pt - - conf 0.4 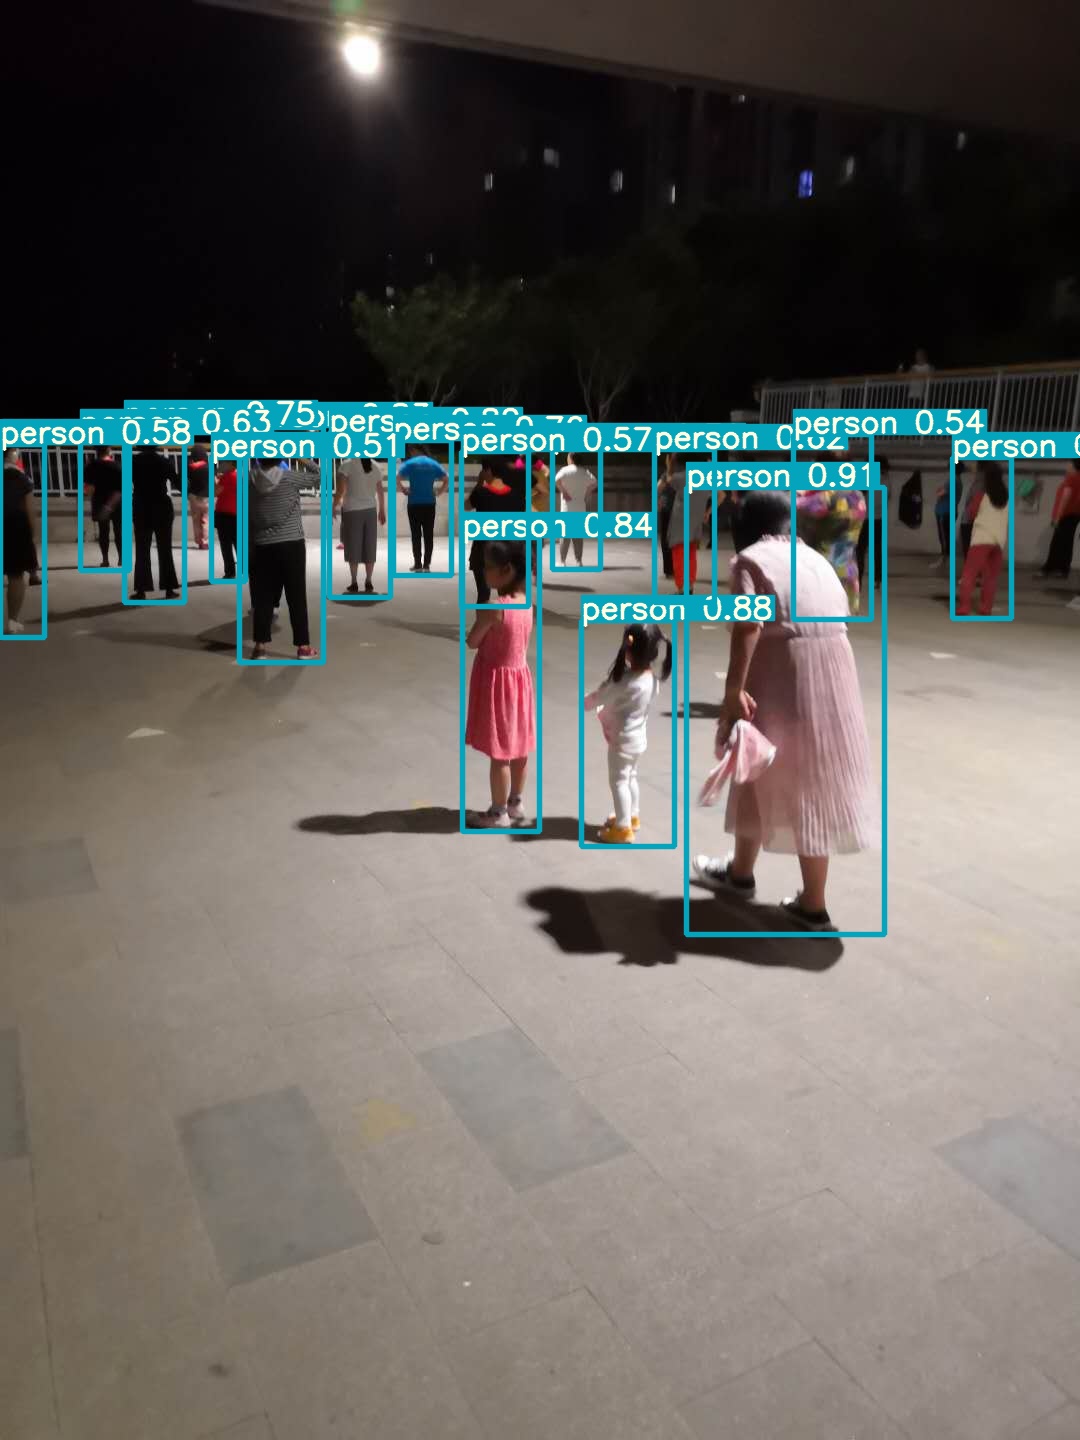
Please come here
Reference
[1].https://github.com/ultralytics/yolov5
[2].https://github.com/ultralytics/yolov5/wiki/Train-Custom-Data


