pytorch 3dunet
vent stride_shape override in prediction
PyTorch implementation of 3D U-Net and its variants:
UNet3D Standard 3D U-Net based on 3D U-Net: Learning Dense Volumetric Segmentation from Sparse Annotation
ResidualUNet3D Residual 3D U-Net based on Superhuman Accuracy on the SNEMI3D Connectomics Challenge
ResidualUNetSE3D Similar to ResidualUNet3D with the addition of Squeeze and Excitation blocks based on Deep Learning Semantic Segmentation for High-Resolution Medical Volumes. Original squeeze and excite paper: Squeeze-and-Excitation Networks
The code allows for training the U-Net for both: semantic segmentation (binary and multi-class) and regression problems (e.g. de-noising, learning deconvolutions).
2D U-Net is also supported, see 2DUnet_confocal or 2DUnet_dsb2018 for example configuration.
Just make sure to keep the singleton z-dimension in your H5 dataset (i.e. (1, Y, X) instead of (Y, X)) , because data loading / data augmentation requires tensors of rank 3.
The 2D U-Net itself uses the standard 2D convolutional layers instead of 3D convolutions with kernel size (1, 3, 3) for performance reasons.
The input data should be stored in HDF5 files. The HDF5 files for training should contain two datasets: raw and label. Optionally, when training with PixelWiseCrossEntropyLoss one should provide weight dataset.
The raw dataset should contain the input data, while the label dataset the ground truth labels. The optional weight dataset should contain the values for weighting the loss function in different regions of the input and should be of the same size as label dataset.
The format of the raw/label datasets depends on whether the problem is 2D or 3D and whether the data is single-channel or multi-channel, see the table below:
| 2D | 3D | |
|---|---|---|
| single-channel | (1, Y, X) | (Z, Y, X) |
| multi-channel | (C, 1, Y, X) | (C, Z, Y, X) |
pytorch-3dunet is a cross-platform package and runs on Windows and OS X as well.
pytorch-3dunet package is via conda/mamba:conda install -c conda-forge mamba
mamba create -n pytorch-3dunet -c pytorch -c nvidia -c conda-forge pytorch pytorch-cuda=12.1 pytorch-3dunet
conda activate pytorch-3dunet
After installation the following commands are accessible within the conda environment:
train3dunet for training the network and predict3dunet for prediction (see below).
python setup.py install
Make sure that the installed pytorch is compatible with your CUDA version, otherwise the training/prediction will fail to run on GPU.
Given that pytorch-3dunet package was installed via conda as described above, one can train the network by simply invoking:
train3dunet --config <CONFIG>
where CONFIG is the path to a YAML configuration file, which specifies all aspects of the training procedure.
In order to train on your own data just provide the paths to your HDF5 training and validation datasets in the config.
One can monitor the training progress with Tensorboard tensorboard --logdir <checkpoint_dir>/logs/ (you need tensorflow installed in your conda env), where checkpoint_dir is the path to the checkpoint directory specified in the config.
BCEWithLogitsLoss, DiceLoss, BCEDiceLoss, GeneralizedDiceLoss:
The target data has to be 4D (one target binary mask per channel).
When training with WeightedCrossEntropyLoss, CrossEntropyLoss, PixelWiseCrossEntropyLoss the target dataset has to be 3D, see also pytorch documentation for CE loss: https://pytorch.org/docs/master/generated/torch.nn.CrossEntropyLoss.htmlfinal_sigmoid in the model config section applies only to the inference time (validation, test):
BCEWithLogitsLoss, DiceLoss, BCEDiceLoss, GeneralizedDiceLoss set final_sigmoid=TrueWeightedCrossEntropyLoss, CrossEntropyLoss, PixelWiseCrossEntropyLoss) set final_sigmoid=False so that Softmax normalization is applied to the output.Given that pytorch-3dunet package was installed via conda as described above, one can run the prediction via:
predict3dunet --config <CONFIG>
In order to predict on your own data, just provide the path to your model as well as paths to HDF5 test files (see example test_config_segmentation.yaml).
LazyHDF5Dataset and LazyPredictor in the config. This will save memory by loading data on the fly at the cost of slower prediction time. See test_config_lazy for an example config.save_segmentation: true in the predictor section of the config (see test_config_multiclass).By default, if multiple GPUs are available training/prediction will be run on all the GPUs using DataParallel.
If training/prediction on all available GPUs is not desirable, restrict the number of GPUs using CUDA_VISIBLE_DEVICES, e.g.
CUDA_VISIBLE_DEVICES=0,1 train3dunet --config <CONFIG>or
CUDA_VISIBLE_DEVICES=0,1 predict3dunet --config <CONFIG>BCEWithLogitsLoss (binary cross-entropy)DiceLoss (standard DiceLoss defined as 1 - DiceCoefficient used for binary semantic segmentation; when more than 2 classes are present in the ground truth, it computes the DiceLoss per channel and averages the values)BCEDiceLoss (Linear combination of BCE and Dice losses, i.e. alpha * BCE + beta * Dice, alpha, beta can be specified in the loss section of the config)CrossEntropyLoss (one can specify class weights via the weight: [w_1, ..., w_k] in the loss section of the config)PixelWiseCrossEntropyLoss (one can specify per-pixel weights in order to give more gradient to the important/under-represented regions in the ground truth; weight dataset has to be provided in the H5 files for training and validation; see sample config in train_config.ymlWeightedCrossEntropyLoss (see 'Weighted cross-entropy (WCE)' in the below paper for a detailed explanation)GeneralizedDiceLoss (see 'Generalized Dice Loss (GDL)' in the below paper for a detailed explanation) Note: use this loss function only if the labels in the training dataset are very imbalanced e.g. one class having at least 3 orders of magnitude more voxels than the others. Otherwise, use standard DiceLoss.For a detailed explanation of some of the supported loss functions see: Generalised Dice overlap as a deep learning loss function for highly unbalanced segmentations.
MSELoss (mean squared error loss)L1Loss (mean absolute error loss)SmoothL1Loss (less sensitive to outliers than MSELoss)WeightedSmoothL1Loss (extension of the SmoothL1Loss which allows to weight the voxel values above/below a given threshold differently)MeanIoU (mean intersection over union)DiceCoefficient (computes per channel Dice Coefficient and returns the average)
If a 3D U-Net was trained to predict cell boundaries, one can use the following semantic instance segmentation metrics
(the metrics below are computed by running connected components on threshold boundary map and comparing the resulted instances to the ground truth instance segmentation):BoundaryAveragePrecision (Average Precision applied to the boundary probability maps: thresholds the output from the network, runs connected components to get the segmentation and computes AP between the resulting segmentation and the ground truth)AdaptedRandError (see http://brainiac2.mit.edu/SNEMI3D/evaluation for a detailed explanation)AveragePrecision (see https://www.kaggle.com/stkbailey/step-by-step-explanation-of-scoring-metric)If not specified MeanIoU will be used by default.
PSNR (peak signal to noise ratio)MSE (mean squared error)Training/predictions configs can be found in 3DUnet_lightsheet_boundary. Pre-trained model weights available here. In order to use the pre-trained model on your own data:
best_checkpoint.pytorch from the above linkpredict3dunet --config test_config.ymlpre_trained attribute in the YAML config to point to the best_checkpoint.pytorch pathThe data used for training can be downloaded from the following OSF project:
Sample z-slice predictions on the test set (top: raw input , bottom: boundary predictions):
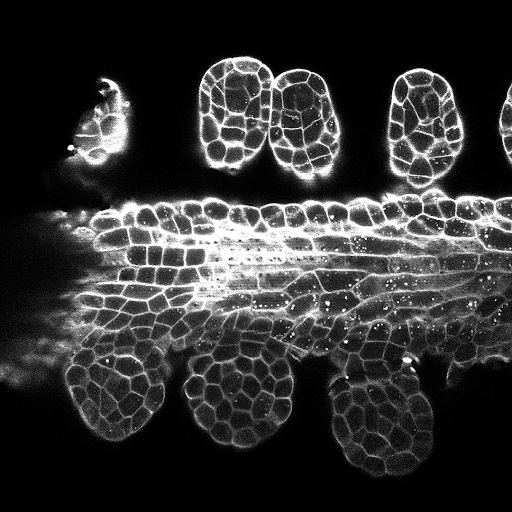
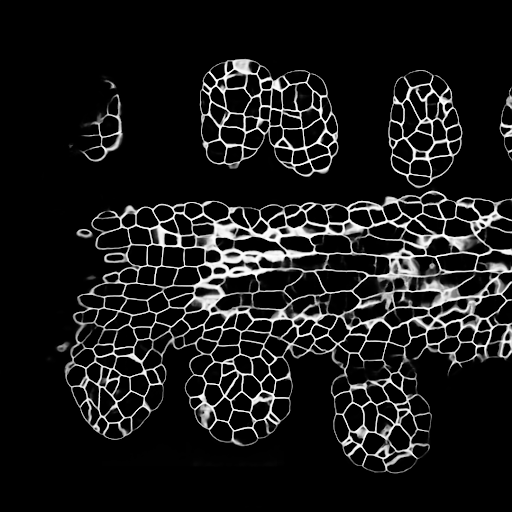
Training/predictions configs can be found in 3DUnet_confocal_boundary. Pre-trained model weights available here. In order to use the pre-trained model on your own data:
best_checkpoint.pytorch from the above linkpredict3dunet --config test_config.ymlpre_trained attribute in the YAML config to point to the best_checkpoint.pytorch pathThe data used for training can be downloaded from the following OSF project:
Sample z-slice predictions on the test set (top: raw input , bottom: boundary predictions):
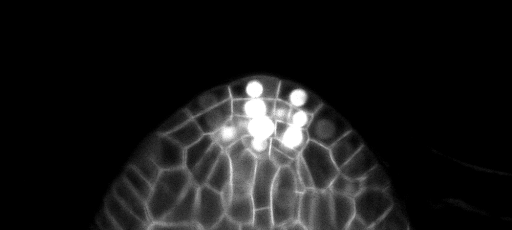
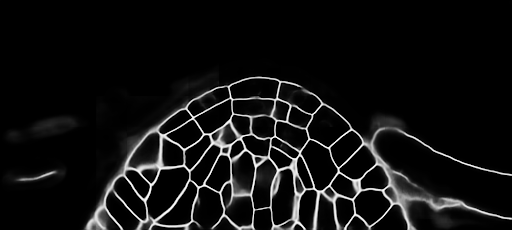
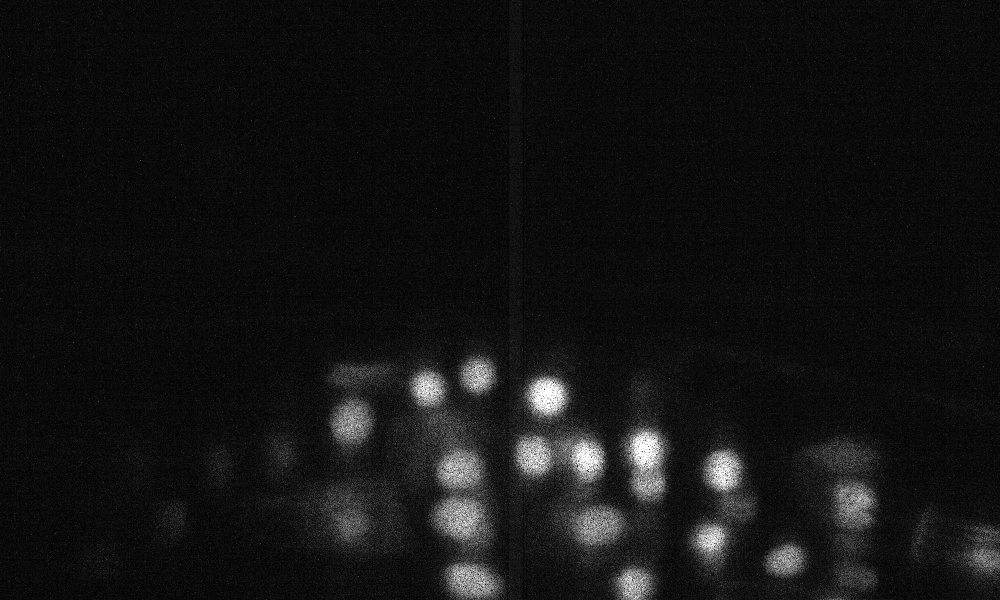
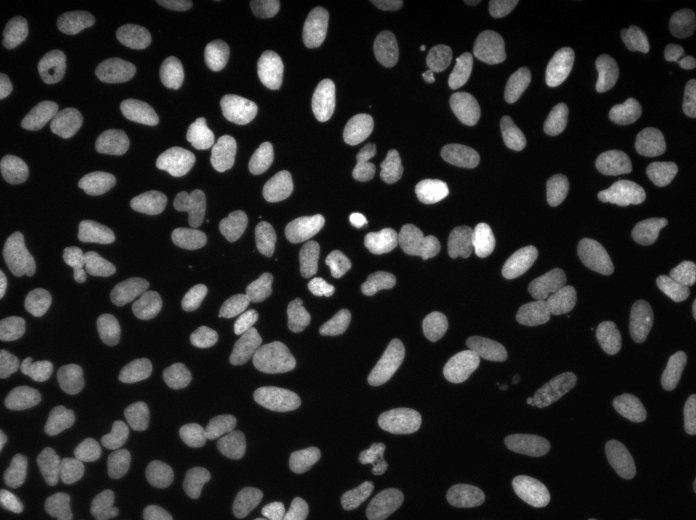
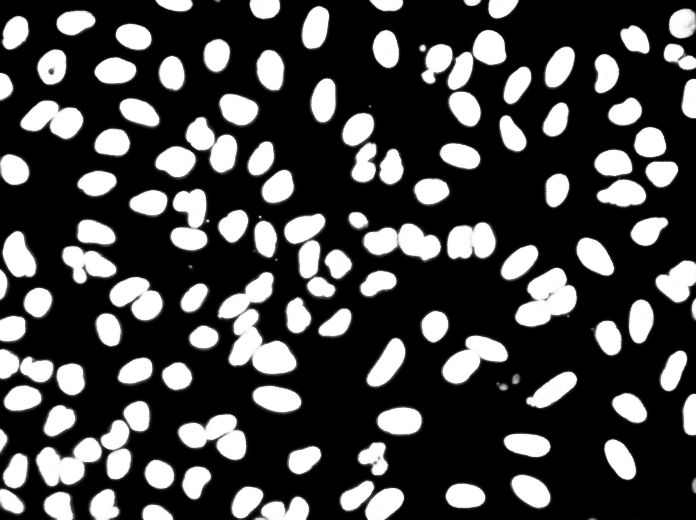
Training/predictions configs can be found in 3DUnet_lightsheet_nuclei. Pre-trained model weights available here. In order to use the pre-trained model on your own data:
best_checkpoint.pytorch from the above linkpredict3dunet --config test_config.ymlpre_trained attribute in the YAML config to point to the best_checkpoint.pytorch pathThe training and validation sets can be downloaded from the following OSF project: https://osf.io/thxzn/
Sample z-slice predictions on the test set (top: raw input, bottom: nuclei predictions):

The data can be downloaded from: https://www.kaggle.com/c/data-science-bowl-2018/data
Training/predictions configs can be found in 2DUnet_dsb2018.
Sample predictions on the test image (top: raw input, bottom: nuclei predictions):
If you want to contribute back, please make a pull request.
If you use this code for your research, please cite as:
@article {10.7554/eLife.57613,
article_type = {journal},
title = {Accurate and versatile 3D segmentation of plant tissues at cellular resolution},
author = {Wolny, Adrian and Cerrone, Lorenzo and Vijayan, Athul and Tofanelli, Rachele and Barro, Amaya Vilches and Louveaux, Marion and Wenzl, Christian and Strauss, Sören and Wilson-Sánchez, David and Lymbouridou, Rena and Steigleder, Susanne S and Pape, Constantin and Bailoni, Alberto and Duran-Nebreda, Salva and Bassel, George W and Lohmann, Jan U and Tsiantis, Miltos and Hamprecht, Fred A and Schneitz, Kay and Maizel, Alexis and Kreshuk, Anna},
editor = {Hardtke, Christian S and Bergmann, Dominique C and Bergmann, Dominique C and Graeff, Moritz},
volume = 9,
year = 2020,
month = {jul},
pub_date = {2020-07-29},
pages = {e57613},
citation = {eLife 2020;9:e57613},
doi = {10.7554/eLife.57613},
url = {https://doi.org/10.7554/eLife.57613},
keywords = {instance segmentation, cell segmentation, deep learning, image analysis},
journal = {eLife},
issn = {2050-084X},
publisher = {eLife Sciences Publications, Ltd},
}


