ml workspace
0.13.2

用於機器學習的多合一基於網絡的開發環境
入門•功能和屏幕截圖•支持•報告錯誤•常見問題解答•已知問題•貢獻
ML工作區是一種基於Web的多合一IDE,專門用於機器學習和數據科學。部署並讓您在幾分鐘之內開始使用自己的機器上的ML解決方案,這是簡單的。該工作空間是針對具有各種流行數據科學庫(例如Tensorflow,Pytorch,Keras,Sklearn)和Dev Tools(例如,Jupyter,VS代碼,Tensorboard)完美配置,優化和集成的開發人員的終極工具。
工作空間需要在計算機上安裝Docker (安裝指南)。
部署單個工作空間實例很簡單:
docker run -p 8080:8080 mltooling/ml-workspace:0.13.2瞧,那很容易!現在,Docker將將最新的工作區圖像拉到您的計算機上。這可能需要幾分鐘,具體取決於您的互聯網速度。啟動工作空間後,您可以通過http:// localhost:8080訪問它。
如果在另一台機器或其他端口上啟動,請確保使用機器的IP/DNS和/或暴露端口。
要部署一個實例以進行生產用法,我們建議至少應用以下選項:
docker run -d
    -p 8080:8080
    --name " ml-workspace "
    -v " ${PWD} :/workspace "
    --env AUTHENTICATE_VIA_JUPYTER= " mytoken "
    --shm-size 512m
    --restart always
    mltooling/ml-workspace:0.13.2
This command runs the container in background ( -d ), mounts your current working directory into the /workspace folder ( -v ), secures the workspace via a provided token ( --env AUTHENTICATE_VIA_JUPYTER ), provides 512MB of shared memory ( --shm-size ) to prevent unexpected crashes (see known issues section), and keeps the container running even on system restarts ( --restart always ).您可以在此處找到Docker運行的其他選項,以及下面的“ Workspace配置”選項。
該工作區提供了各種配置選項,可以通過設置環境變量(通過Docker Run選項: --env )使用。
| 多變的 | 描述 | 預設 |
|---|---|---|
| workspace_base_url | Jupyter和所有其他工具都可以從中觸及的基本URL。 | / |
| workspace_ssl_enabled | 啟用或禁用SSL。設置為true時,必須將任何證書(CERT.CRT)安裝到/resources/ssl ,或者,如果沒有,則容器會生成自簽名的證書。 | 錯誤的 |
| workspace_auth_user | 基本驗證用戶名。要啟用基本驗證,需要設置用戶和密碼。我們建議使用AUTHENTICATE_VIA_JUPYTER來確保工作區。 | |
| workspace_auth_password | 基本驗證用戶密碼。要啟用基本驗證,需要設置用戶和密碼。我們建議使用AUTHENTICATE_VIA_JUPYTER來確保工作區。 | |
| Workspace_port | 配置工作區代理的主要容器內部端口。對於大多數情況,不應更改此配置,應使用Docker的端口配置代替工作區,應從其他端口訪問。 | 8080 |
| config_backup_enabled | 自動備份並將用戶配置恢復到持久/workspace文件夾,例如.ssh,.jupyter或.gitConfig來自用戶主目錄的gitConfig。 | 真的 |
| shared_links_enabled | 啟用或禁用通過外部鏈接共享資源的功能。這用於啟用文件共享,訪問工作區內端口以及簡單的基於命令的SSH設置。所有共享鏈接均通過令牌保護。但是,存在某些風險,因為分享後不能輕易地無效,並且不會過期。 | 真的 |
| include_tutorials | 如果為true ,則在容器啟動的/workspace文件夾中添加了一些教程和簡介筆記本,但僅當文件夾為空時。 | 真的 |
| max_num_threads | 使用各種普通庫(MKL,OpenBlas,opm,numba,...)時,用於計算的線程數量。您還可以使用auto使用自動,使工作空間基於可用的CPU資源動態確定線程的數量。用戶可以從工作區內覆蓋此配置。通常,最好將其設置為或低於工作區可用的CPU數量。 | 汽車 |
| Jupyter配置: | ||
| shutdown_inactive_kernels | 給定超時後自動關閉非活動核(以清理內存或GPU資源)。值可以是以秒為單位的超時,也可以設置為true ,默認值為48h。 | 錯誤的 |
| authenticate_via_jupyter | 如果為true ,所有HTTP請求將針對Jupyter服務器進行身份驗證,這意味著使用Jupyter配置的身份驗證方法也將用於所有其他工具。這可以用false停用。任何其他值都將激活此身份驗證,並通過筆記本電腦應用程序應用於jupyter的token配置。 | 錯誤的 |
| Notebook_args | 通過命令行args添加和覆蓋jupyter配置選項。有關所有選項,請參閱此概述。 | |
要堅持數據,您需要將捲安裝到/workspace (通過Docker Run選項: -v )。
容器中的默認工作目錄為/workspace ,這也是Jupyter實例的根目錄。 /workspace目錄旨在用於所有重要的工作工件。服務器其他目錄(例如/root )內的數據可能會在容器重新啟動時丟失。
我們強烈建議通過以下兩個選項之一啟用身份驗證。對於這兩個選項,將需要用戶進行身份驗證以訪問任何預安裝的工具。
身份驗證僅適用於通過主工作區端口訪問的所有工具(默認:
8080)。這適用於所有預裝的工具和訪問端口功能。如果您曝光了另一個容器的另一個端口,請確保還可以通過身份驗證確保它!
通過AUTHENTICATE_VIA_JUPYTER變量基於jupyter的身份驗證實現來激活基於令牌的身份驗證:
docker run -p 8080:8080 --env AUTHENTICATE_VIA_JUPYTER= " mytoken " mltooling/ml-workspace:0.13.2您也可以使用<generated>讓Jupyter生成一個隨機令牌,該令牌在容器日誌上打印出來。 true的值不會設置任何令牌,而是激活工作區中任何工具的每個請求,如果用戶被認證,將使用Jupyter實例檢查。這用於諸如JupyterHub之類的工具,該工具配置了自己的身份驗證方式。
通過WORKSPACE_AUTH_USER和WORKSPACE_AUTH_PASSWORD active of基本身份驗證:
docker run -p 8080:8080 --env WORKSPACE_AUTH_USER= " user " --env WORKSPACE_AUTH_PASSWORD= " pwd " mltooling/ml-workspace:0.13.2基本身份驗證是通過NGINX代理配置的,並且與其他選項相比,可能更具性能,因為使用AUTHENTICATE_VIA_JUPYTER ,如果使用用戶(基於請求cookies),則對工作區中任何工具的每個請求都會通過Jupyter實例進行檢查。
我們建議啟用SSL,以便可以通過HTTP(加密通信)訪問工作空間。可以通過WORKSPACE_SSL_ENABLED變量激活SSL加密。
設置為true時,必須將cert.crt和cert.key文件安裝到/resources/ssl ,或者如果不存在證書文件,則容器會生成自簽名的證書。例如,如果本地系統上的/path/with/certificate/files包含主機域的有效證書( cert.crt和cert.key文件),則可以從工作區中使用,如下所示:
docker run
    -p 8080:8080
    --env WORKSPACE_SSL_ENABLED= " true "
    -v /path/with/certificate/files:/resources/ssl:ro
    mltooling/ml-workspace:0.13.2
如果您想在公共領域託管工作空間,我們建議使用讓我們加密為您的域獲得可信賴的證書。要使用工作區的生成證書(例如,通過certbot工具), privkey.pem對應於cert.key文件和fullchain.pem到cert.crt文件。
當您啟用SSL支持時,必須通過
https://訪問工作空間,而不是通過普通的http://訪問。
默認情況下,工作區容器沒有資源約束,可以使用與主機的內核調度程序允許的盡可能多的給定資源。 Docker提供了通過設置Docker Run命令的運行時配置標誌來控制容器可以使用多少內存或CPU的方法。
工作區需要至少2個CPU和500MB才能穩定運行並可用。
例如,以下命令將工作區限制在最多使用8個CPU,16 GB的內存和1 GB共享內存(請參閱已知問題):
docker run -p 8080:8080 --cpus=8 --memory=16g --shm-size=1G mltooling/ml-workspace:0.13.2有關資源約束的更多選項和文檔,請參閱《官方Docker指南》。
如果需要代理,則可以通過HTTP_PROXY , HTTPS_PROXY和NO_PROXY環境變量傳遞代理配置。
除了主要mltooling/ml-workspace Workspace )外,我們還提供其他圖像口味,以擴展功能或最小化圖像大小以支持各種用例。
最小風味( mltooling/ml-workspace-minimal )是我們最小的圖像,它包含功能部分中描述的大多數工具和功能,而沒有大多數Python庫,這些庫是我們主要圖像中預裝的。用戶可以在運行時手動安裝任何Python庫或排除工具。
docker run -p 8080:8080 mltooling/ml-workspace-minimal:0.13.2 R風味( mltooling/ml-workspace-r )基於我們的默認工作區圖像,並使用R-InterPreter,R-Jupyter內核,RSTUDIO Server(通過Open Tool -> RStudio訪問)和R r EcoSystem的各種受歡迎的包裝。
docker run -p 8080:8080 mltooling/ml-workspace-r:0.12.1火花風味( mltooling/ml-workspace-spark )基於我們的R-Fravor Workspace圖像,並使用Spark Runtime,Spark-Jupyter內核,Zeppelin Notebook(通過Open Tool -> Zeppelin訪問),Pyspark,Pyspark,Pyspark,Pyspark,Hadoop,Java Kernel,Java Kernel和幾個clibraries&Jup&Jup&Jup&Jupytersensions。
docker run -p 8080:8080 mltooling/ml-workspace-spark:0.12.1目前,GPU風味僅支持CUDA 11.2。將來可能會添加對其他CUDA版本的支持。
GPU風味( mltooling/ml-workspace-gpu )基於我們的默認工作空間圖像,並使用CUDA 10.1和各種機器學習庫的GPU就緒版本(例如,Tensorflow,Pytorch,Pytorch,CNTK,JAX)擴展。該GPU圖像對系統具有以下其他要求:
>=460.32.03 (說明)。docker run -p 8080:8080 --gpus all mltooling/ml-workspace-gpu:0.13.2docker run -p 8080:8080 --runtime nvidia --env NVIDIA_VISIBLE_DEVICES= " all " mltooling/ml-workspace-gpu:0.13.2GPU風味還帶有一些其他配置選項,如下所述:
| 多變的 | 描述 | 預設 |
|---|---|---|
| nvidia_visible_devices | 控制哪些GPU可以在工作區內訪問。默認情況下,在工作區內可以訪問主機的所有GPU。您可以使用all , none ,也可以指定設備ID的逗號分隔列表(例如, 0,1 )。您可以通過在主機計算機上運行nvidia-smi來找出可用設備ID的列表。 | 全部 |
| cuda_visible_devices | 控制在工作區內運行的GPU CUDA應用程序將看到哪些GPU。默認情況下,可以看到工作空間可以訪問的所有GPU。要限制應用程序,請根據工作區中的可用設備(運行nvidia-smi )提供內部設備ID(例如0,2 )的內部設備ID(例如0,2)的列表。與NVIDIA_VISIBLE_DEVICES相比,Workspace用戶將通過從工作區內覆蓋此配置來訪問其他GPU。 | |
| tf_force_gpu_allow_growth | 默認情況下,大多數GPU內存將通過TensorFlow圖的首次執行來分配。雖然這種行為對於生產管道來說是可取的,但對於交互式使用而言,這種行為不太理想。使用true來啟用動態GPU內存分配或false ,以指示TensorFlow在執行時分配所有內存。 | 真的 |
該工作空間被設計為單用戶開發環境。對於多用戶設置,我們建議部署? ML集線器。 ML HUB基於JupyterHub,其任務要為多個用戶產生,管理和代理工作區實例。
ML集線器使在單個服務器(通過Docker)或群集(通過Kubernetes)上設置多用戶環境變得容易,並支持各種用法方案和身份驗證提供商。您可以通過以下方式嘗試ML Hub:
docker run -p 8080:8080 -v /var/run/docker.sock:/var/run/docker.sock mltooling/ml-hub:latest有關ML集線器的更多信息和文檔,請查看GitHub網站。
該項目由本傑明·拉特林(BenjaminRäthlein),盧卡斯·馬蘇奇(Lukas Masuch)和揚·卡爾坎(Jan Kalkan)維護。請了解,我們將無法通過電子郵件提供個人支持。我們還認為,如果公開共享幫助,那麼幫助更多的人可以從中受益。
| 類型 | 渠道 |
|---|---|
| 錯誤報告 | |
| ?功能請求 | |
| 使用問題 | |
| ?公告 | |
| ❓其他請求 |
jupyter•桌面GUI•VS代碼•Jupyterlab•GIT集成•文件共享•訪問端口•張量•擴展性•可擴展性•硬件監視•SSH訪問•遠程開發•作業執行
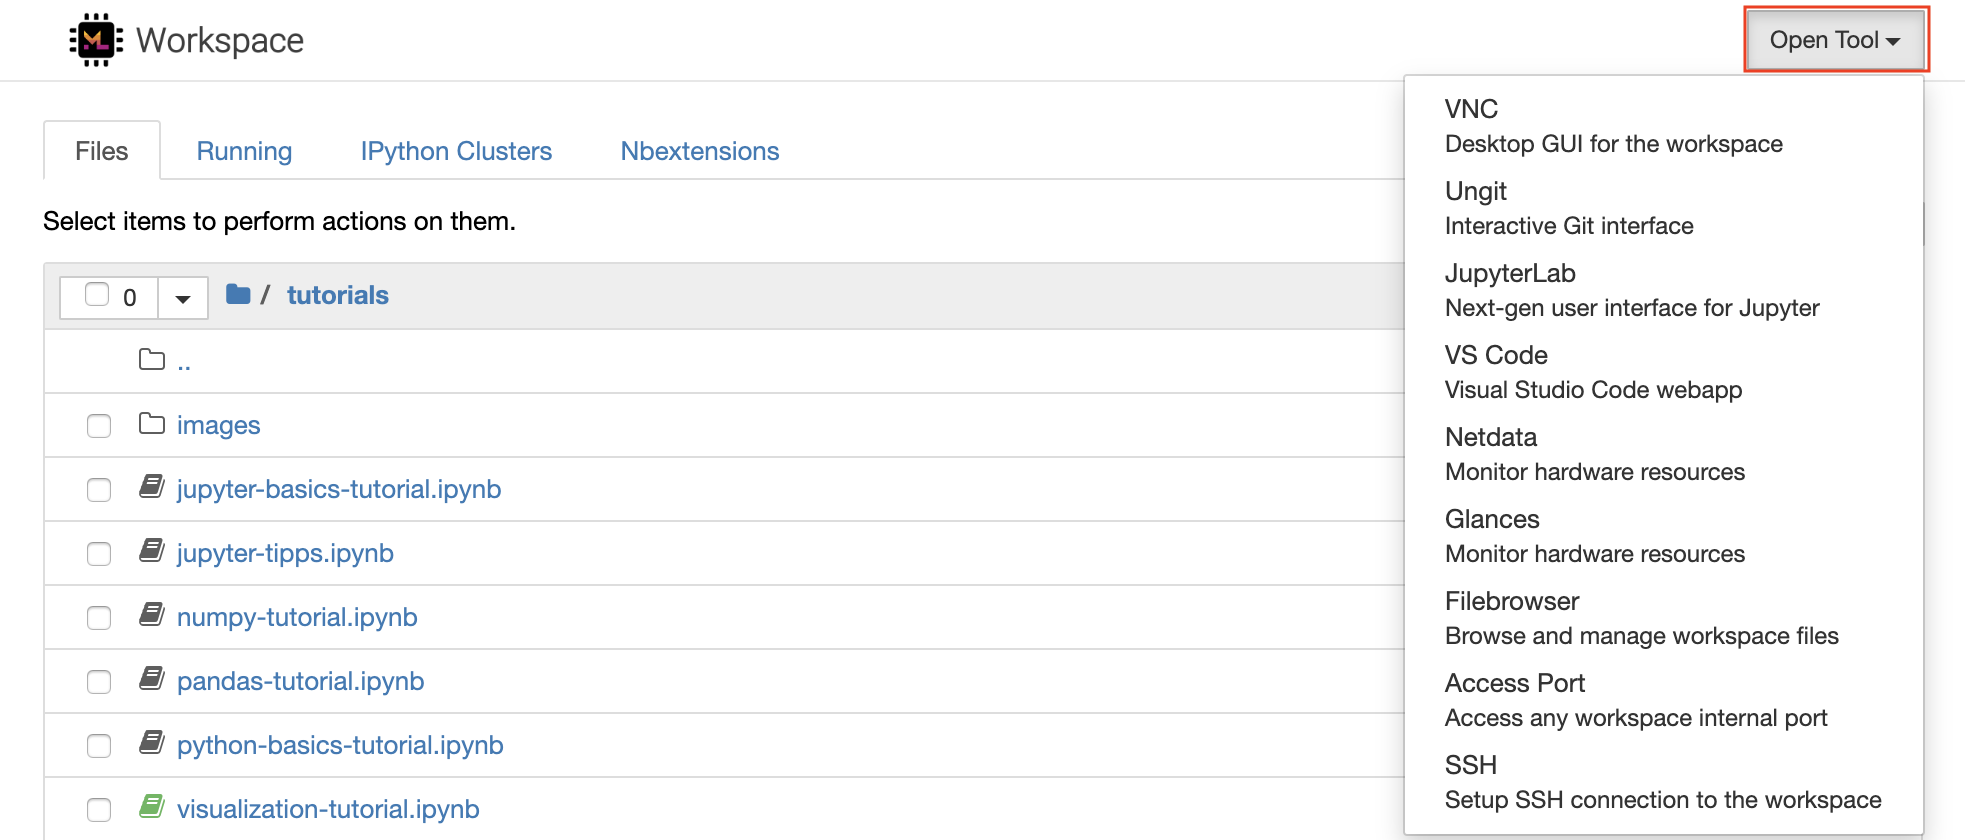
該工作空間配備了一流的開源開發工具,可幫助機器學習工作流程。這些工具中的許多工具都可以從Jupyter(工作區的主要應用程序)的Open Tool菜單啟動:
在您的工作區內,您擁有完整的root&sudo特權,可以通過終端安裝所需的任何庫或工具(例如,
pip,apt-get,conda或npm)。您可以找到更多的方法來擴展“可擴展性”部分中的工作空間
Jupyter Notebook是一個基於Web的交互式環境,用於編寫和運行代碼。 Jupyter的主要構件是文件瀏覽器,筆記本編輯器和內核。文件瀏覽器為/workspace目錄中的所有筆記本,文件和文件夾提供了交互式文件管理器。
可以通過單擊列表頂部的New下拉截止按鈕並選擇所需的語言內核來創建新的筆記本。
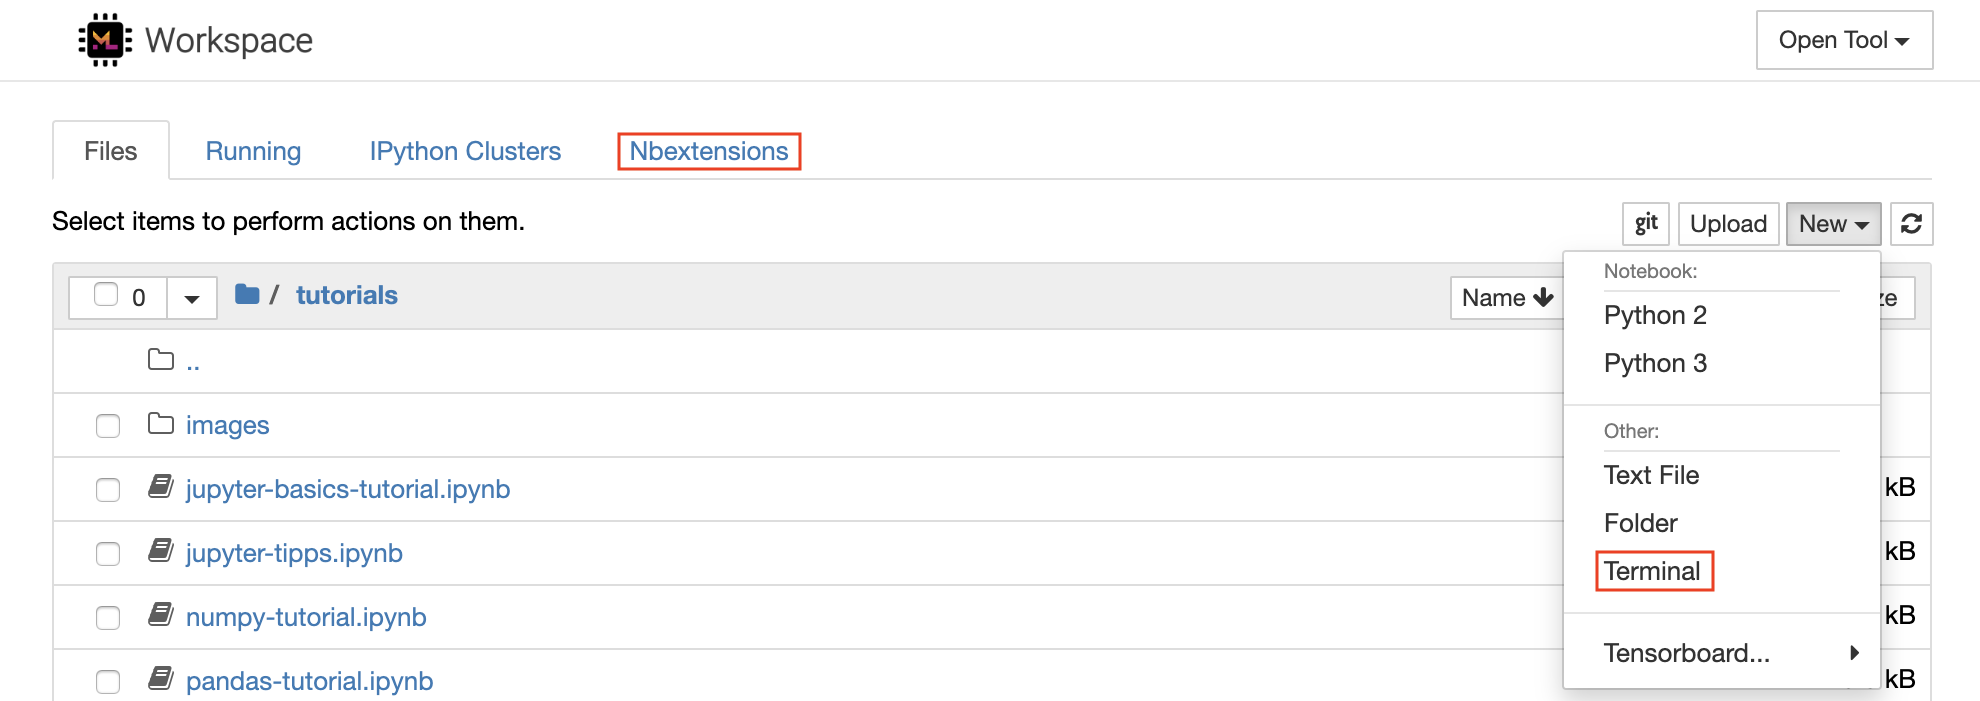
您也可以通過在文件瀏覽器中選擇
New -> Terminal來產生交互式終端實例。
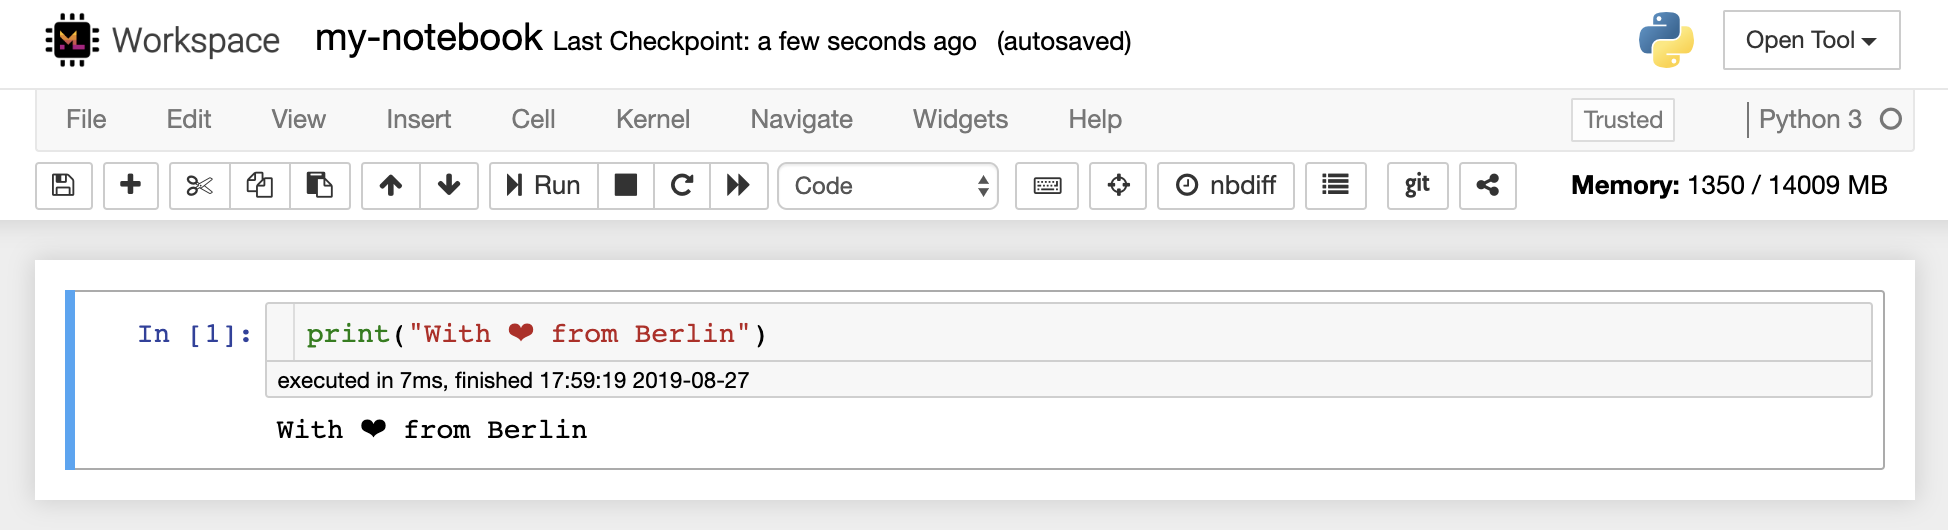
筆記本編輯器使用戶能夠發表文檔,其中包括實時代碼,Markdown文本,Shell命令,乳膠方程,交互式小部件,圖,圖和圖像。這些筆記本文檔提供了一個完整且獨立的計算記錄,該記錄可以轉換為各種格式並與他人共享。
該工作區具有激活的各種第三方jupyter擴展。您可以在nbextensions configurator中配置這些擴展程序:文件瀏覽器上的
nbextensions選項卡
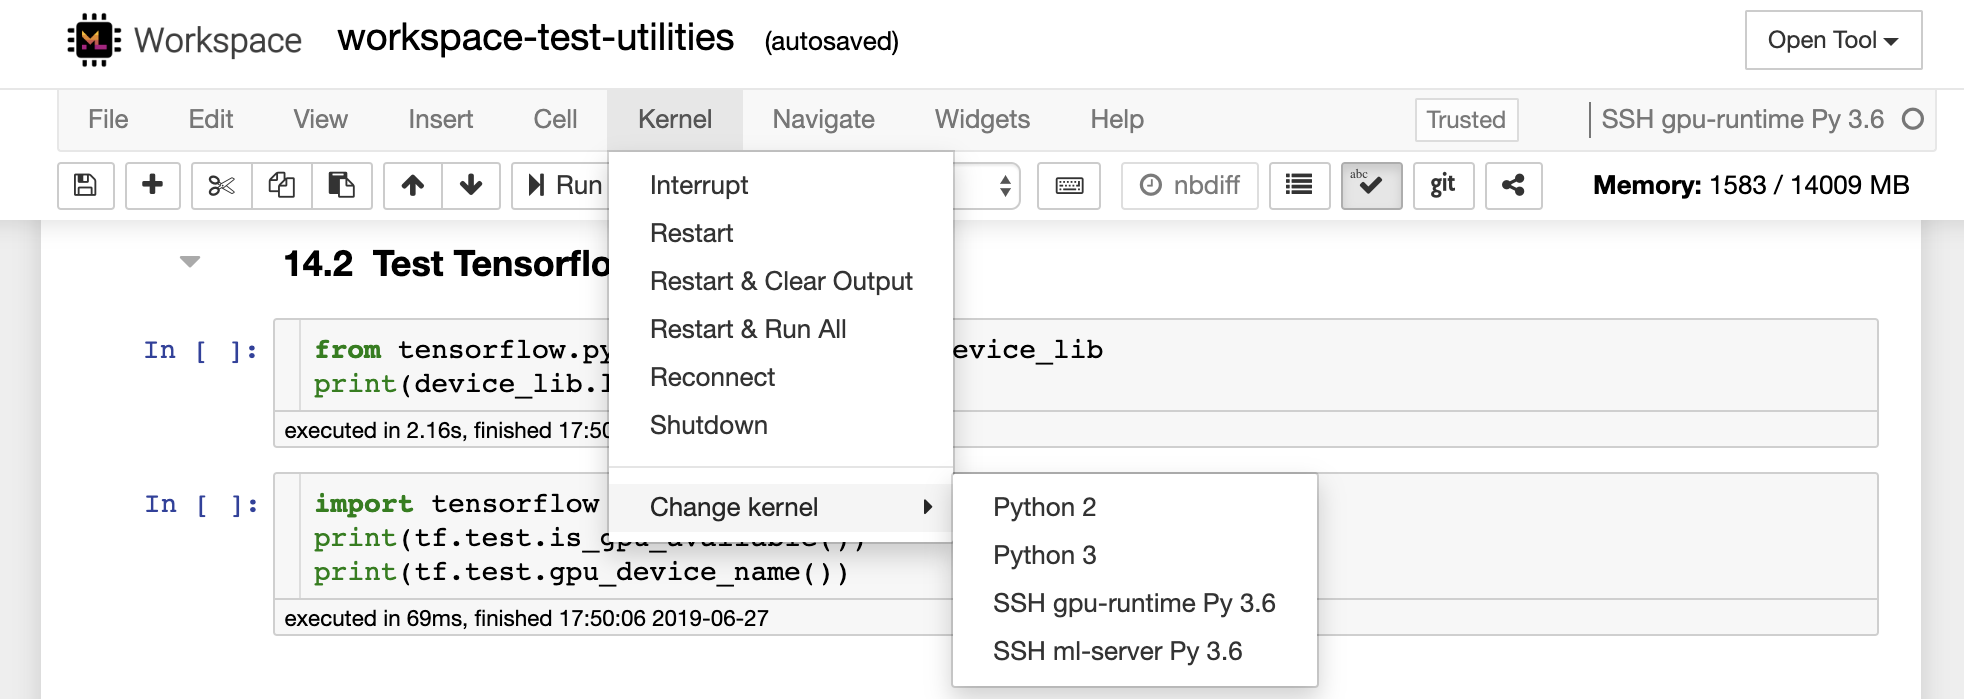
該筆記本允許代碼以多種不同的編程語言運行。對於用戶打開的每個筆記本文檔,Web應用程序啟動了一個運行該筆記本代碼並返回輸出的內核。該工作區具有預裝的Python 3內核。可以安裝其他內核,以訪問其他語言(例如,R,Scala,GO)或其他計算資源(例如,GPU,CPU,內存)。
Python 2被剝奪,我們不建議使用它。但是,您仍然可以通過此命令安裝Python 2.7內核:
/bin/bash /resources/tools/python-27.sh
該工作區可通過Novnc提供基於HTTP的VNC訪問工作區的訪問。因此,您可以使用功能齊全的桌面GUI訪問和工作。要訪問此桌面GUI,請轉到Open Tool ,選擇VNC ,然後單擊Connect按鈕。在要求您提供密碼的情況下,請使用vncpassword 。
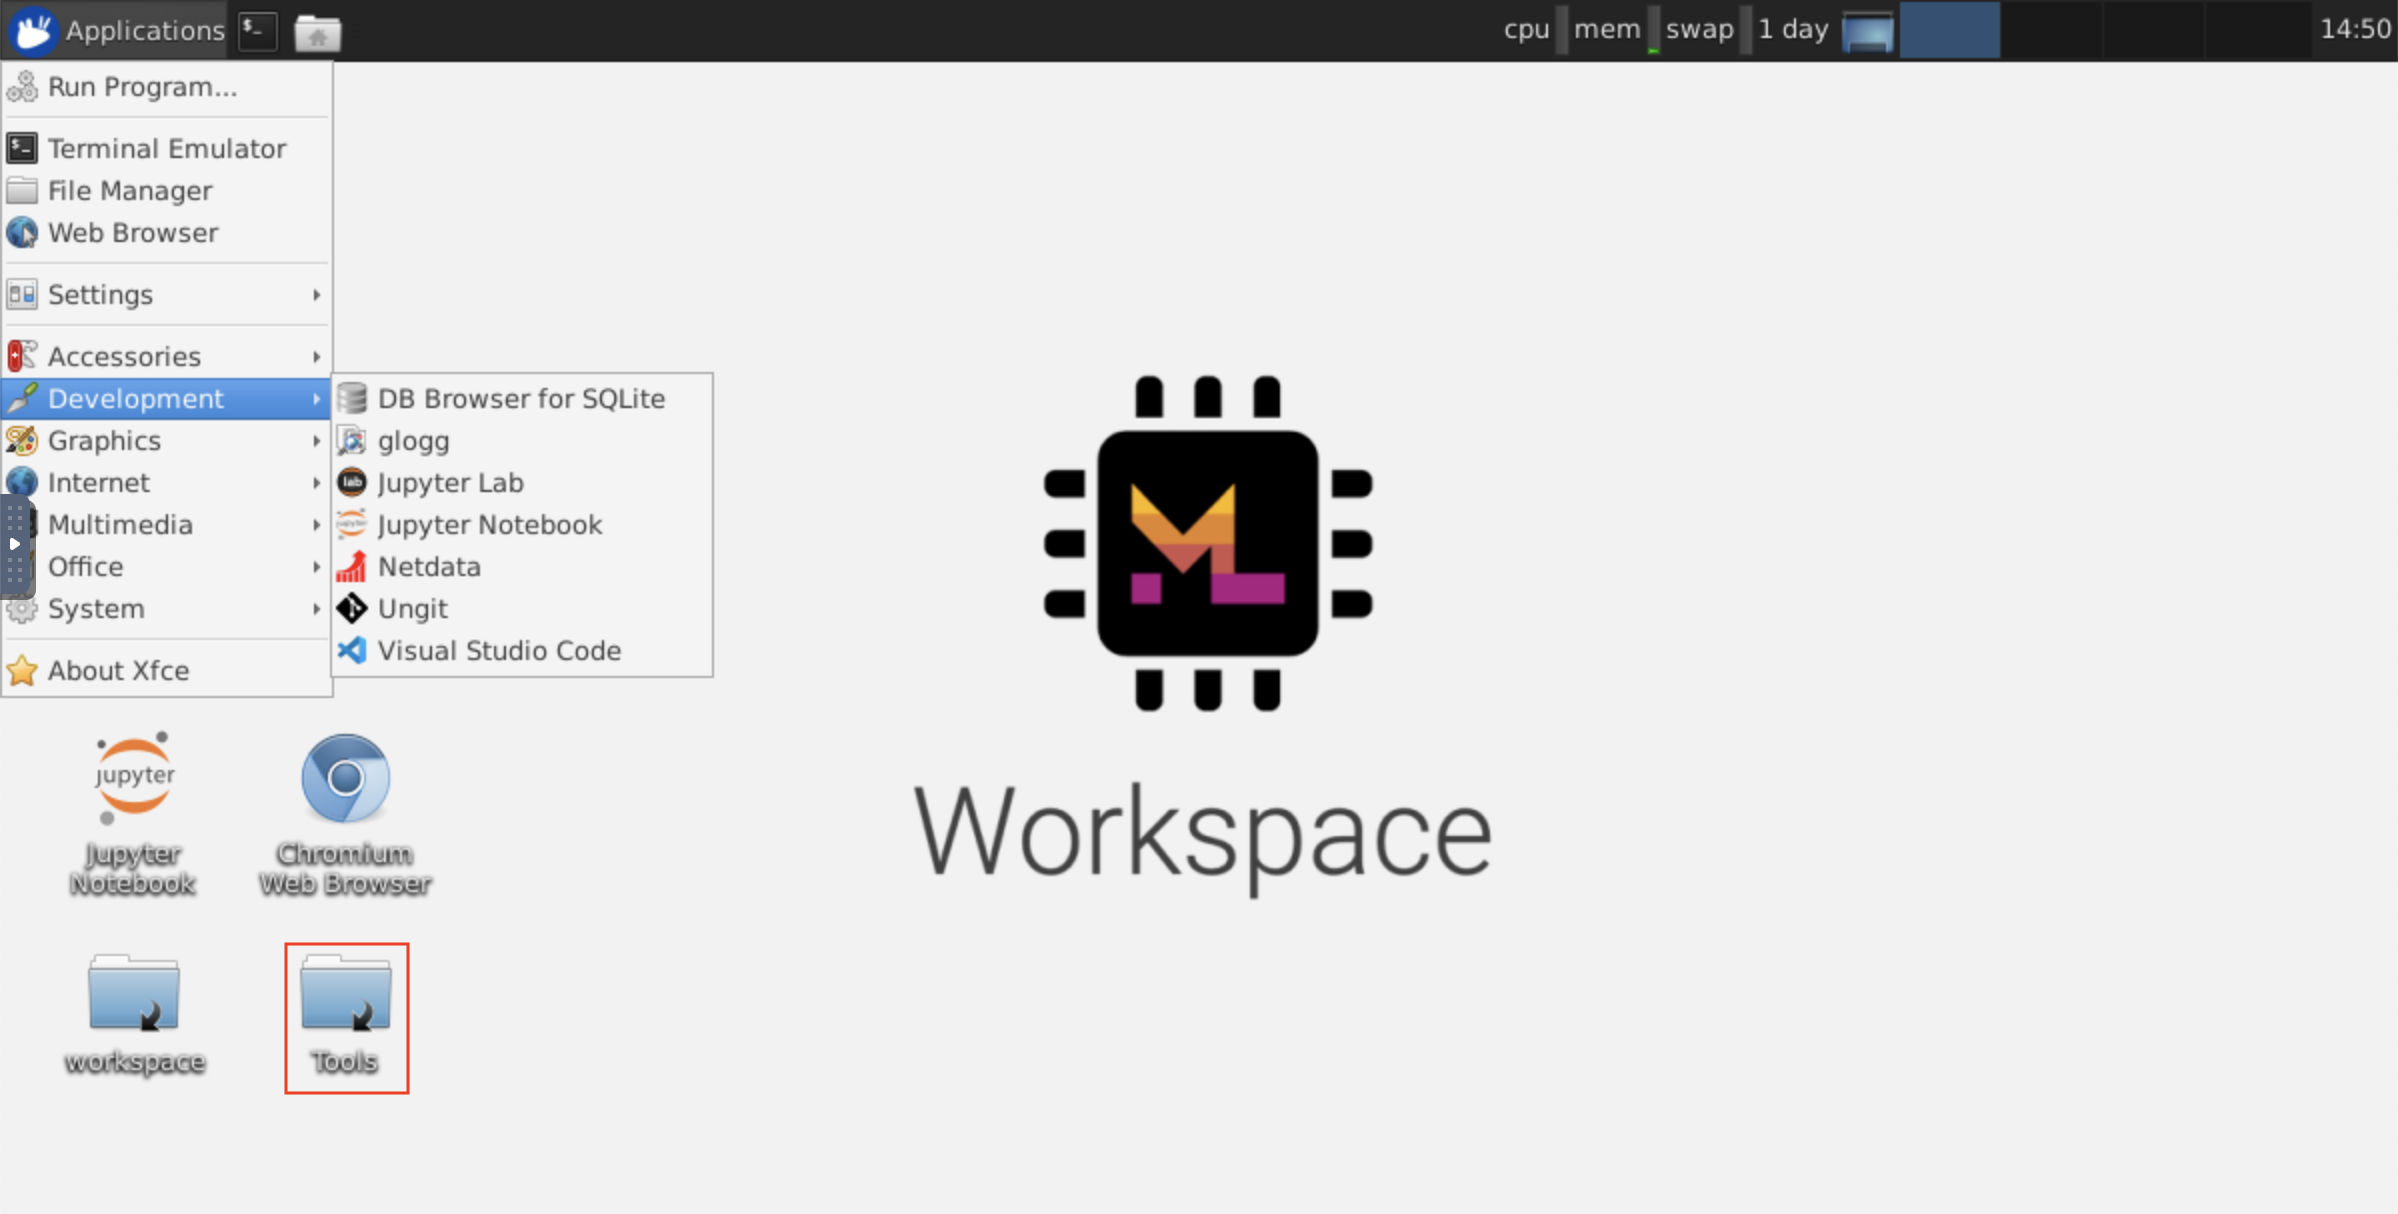
連接後,您將看到一個桌面GUI,它允許您安裝和使用成熟的Web瀏覽器或任何其他可用於Ubuntu的工具。在台式機上的Tools文件夾中,您將找到一個安裝腳本的集合,使安裝一些最常用的開發工具(例如Atom,Pycharm,R-Runtime,R-Studio或Postman)變得直接(只需雙擊腳本)。
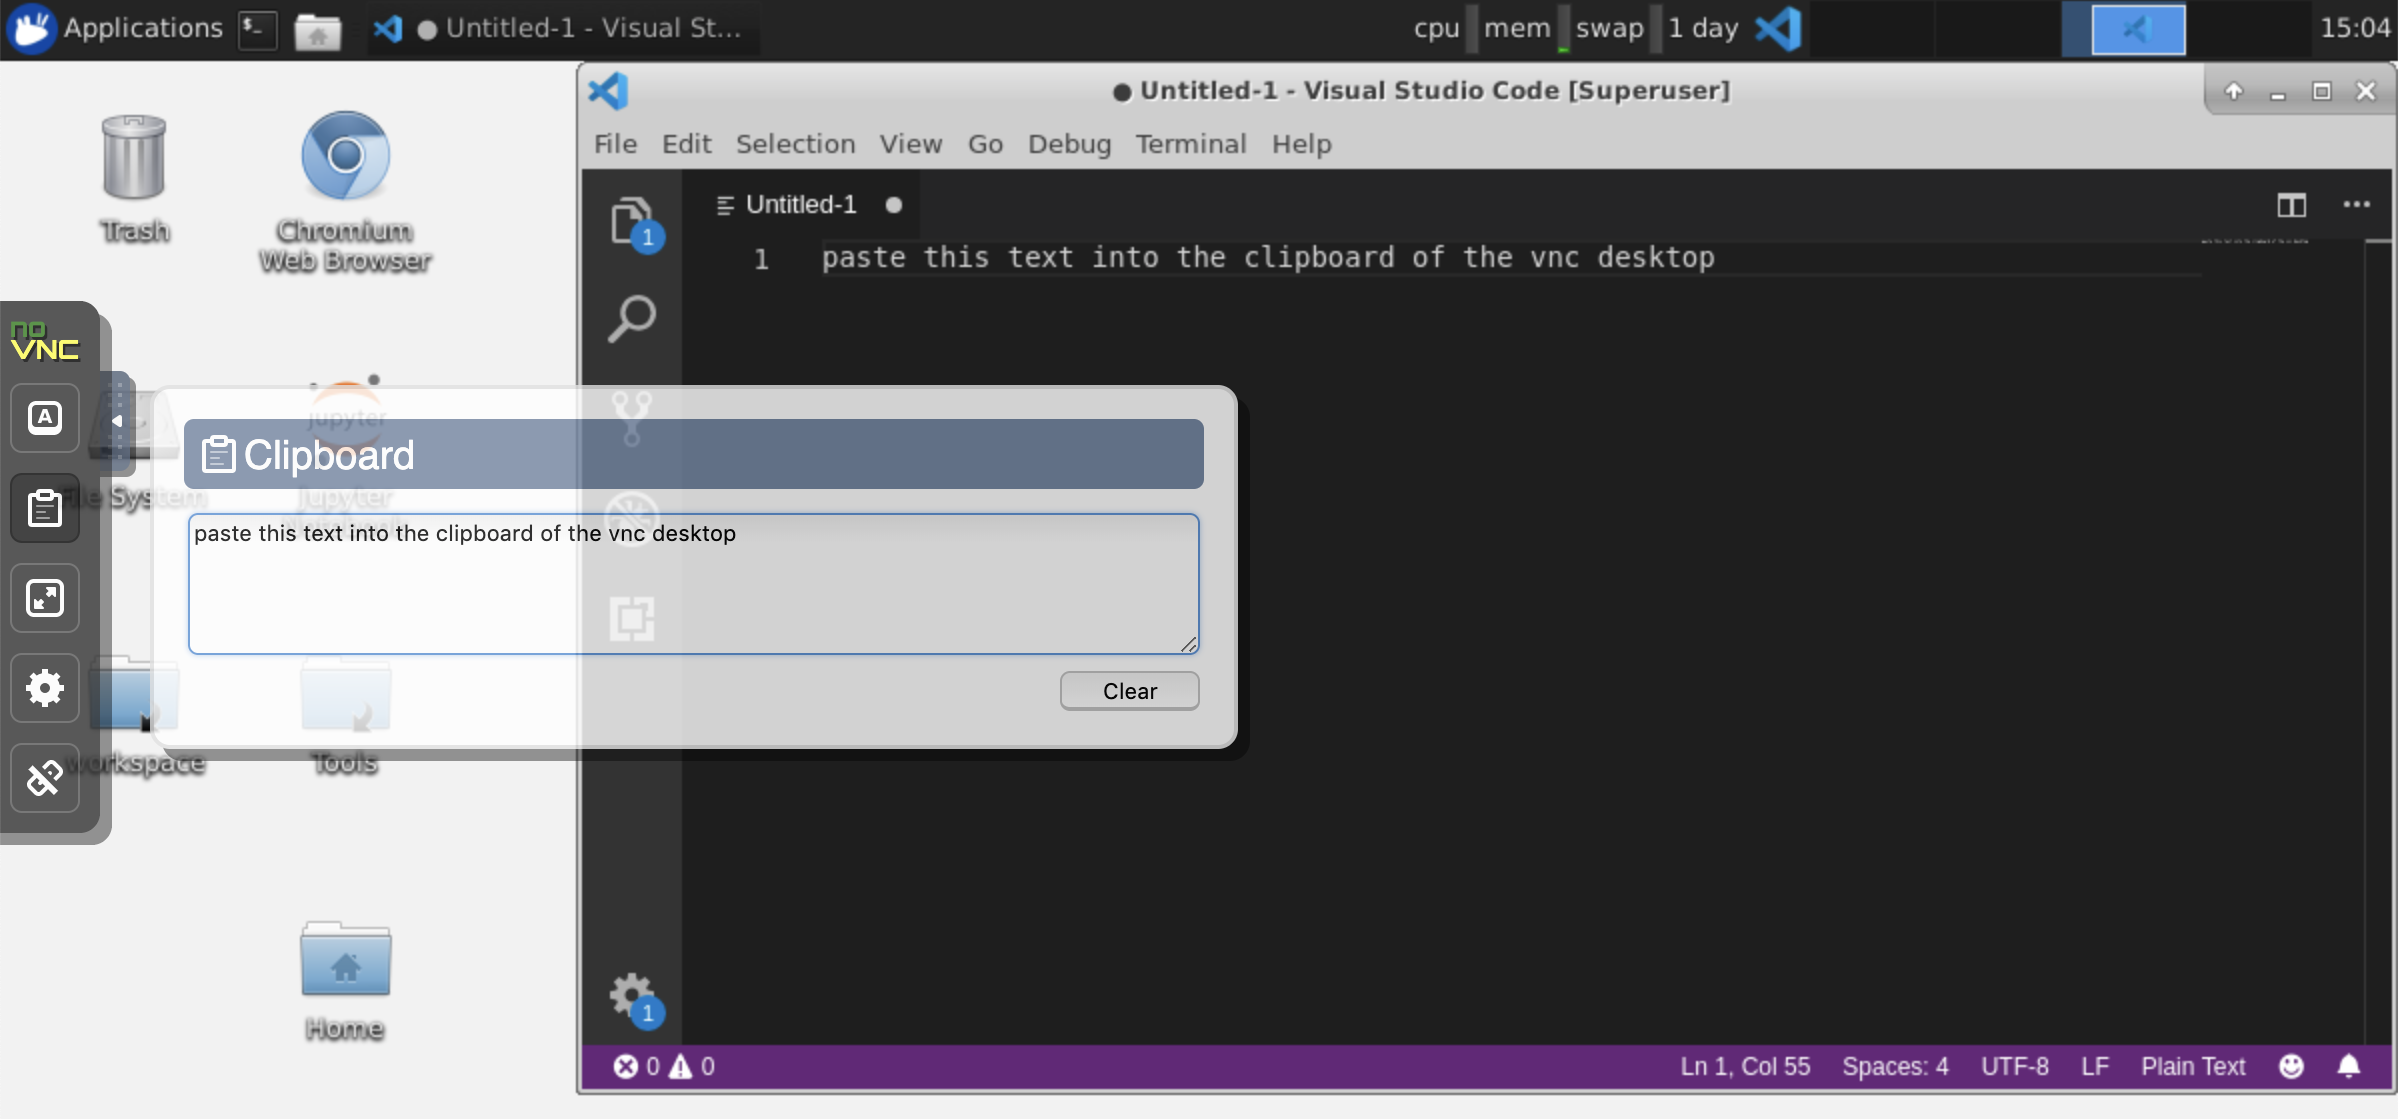
剪貼板:如果要在計算機和工作空間之間共享剪貼板,則可以使用副本 - 疊加功能,如下所述:
長期運行的任務:使用桌面GUI進行長期運行的Jupyter執行。通過從工作空間桌面GUI的瀏覽器中運行筆記本,即使您已將瀏覽器與筆記本電腦斷開連接,所有輸出也將同步到筆記本電腦。
Visual Studio Open Tool -> VS Code )是一種開源輕巧但功能強大的代碼編輯器,內置了對各種語言和豐富的擴展生態系統的支持。它將源代碼編輯器的簡單性與強大的開發人員工具(例如Intellisense代碼完成和調試)結合在一起。 Workspace將VS代碼集成為基於Web的應用程序,可通過基於Awesome Code-Server項目的瀏覽器訪問。它允許您自定義自己喜歡的每個功能,並安裝任意數量的第三方擴展名。
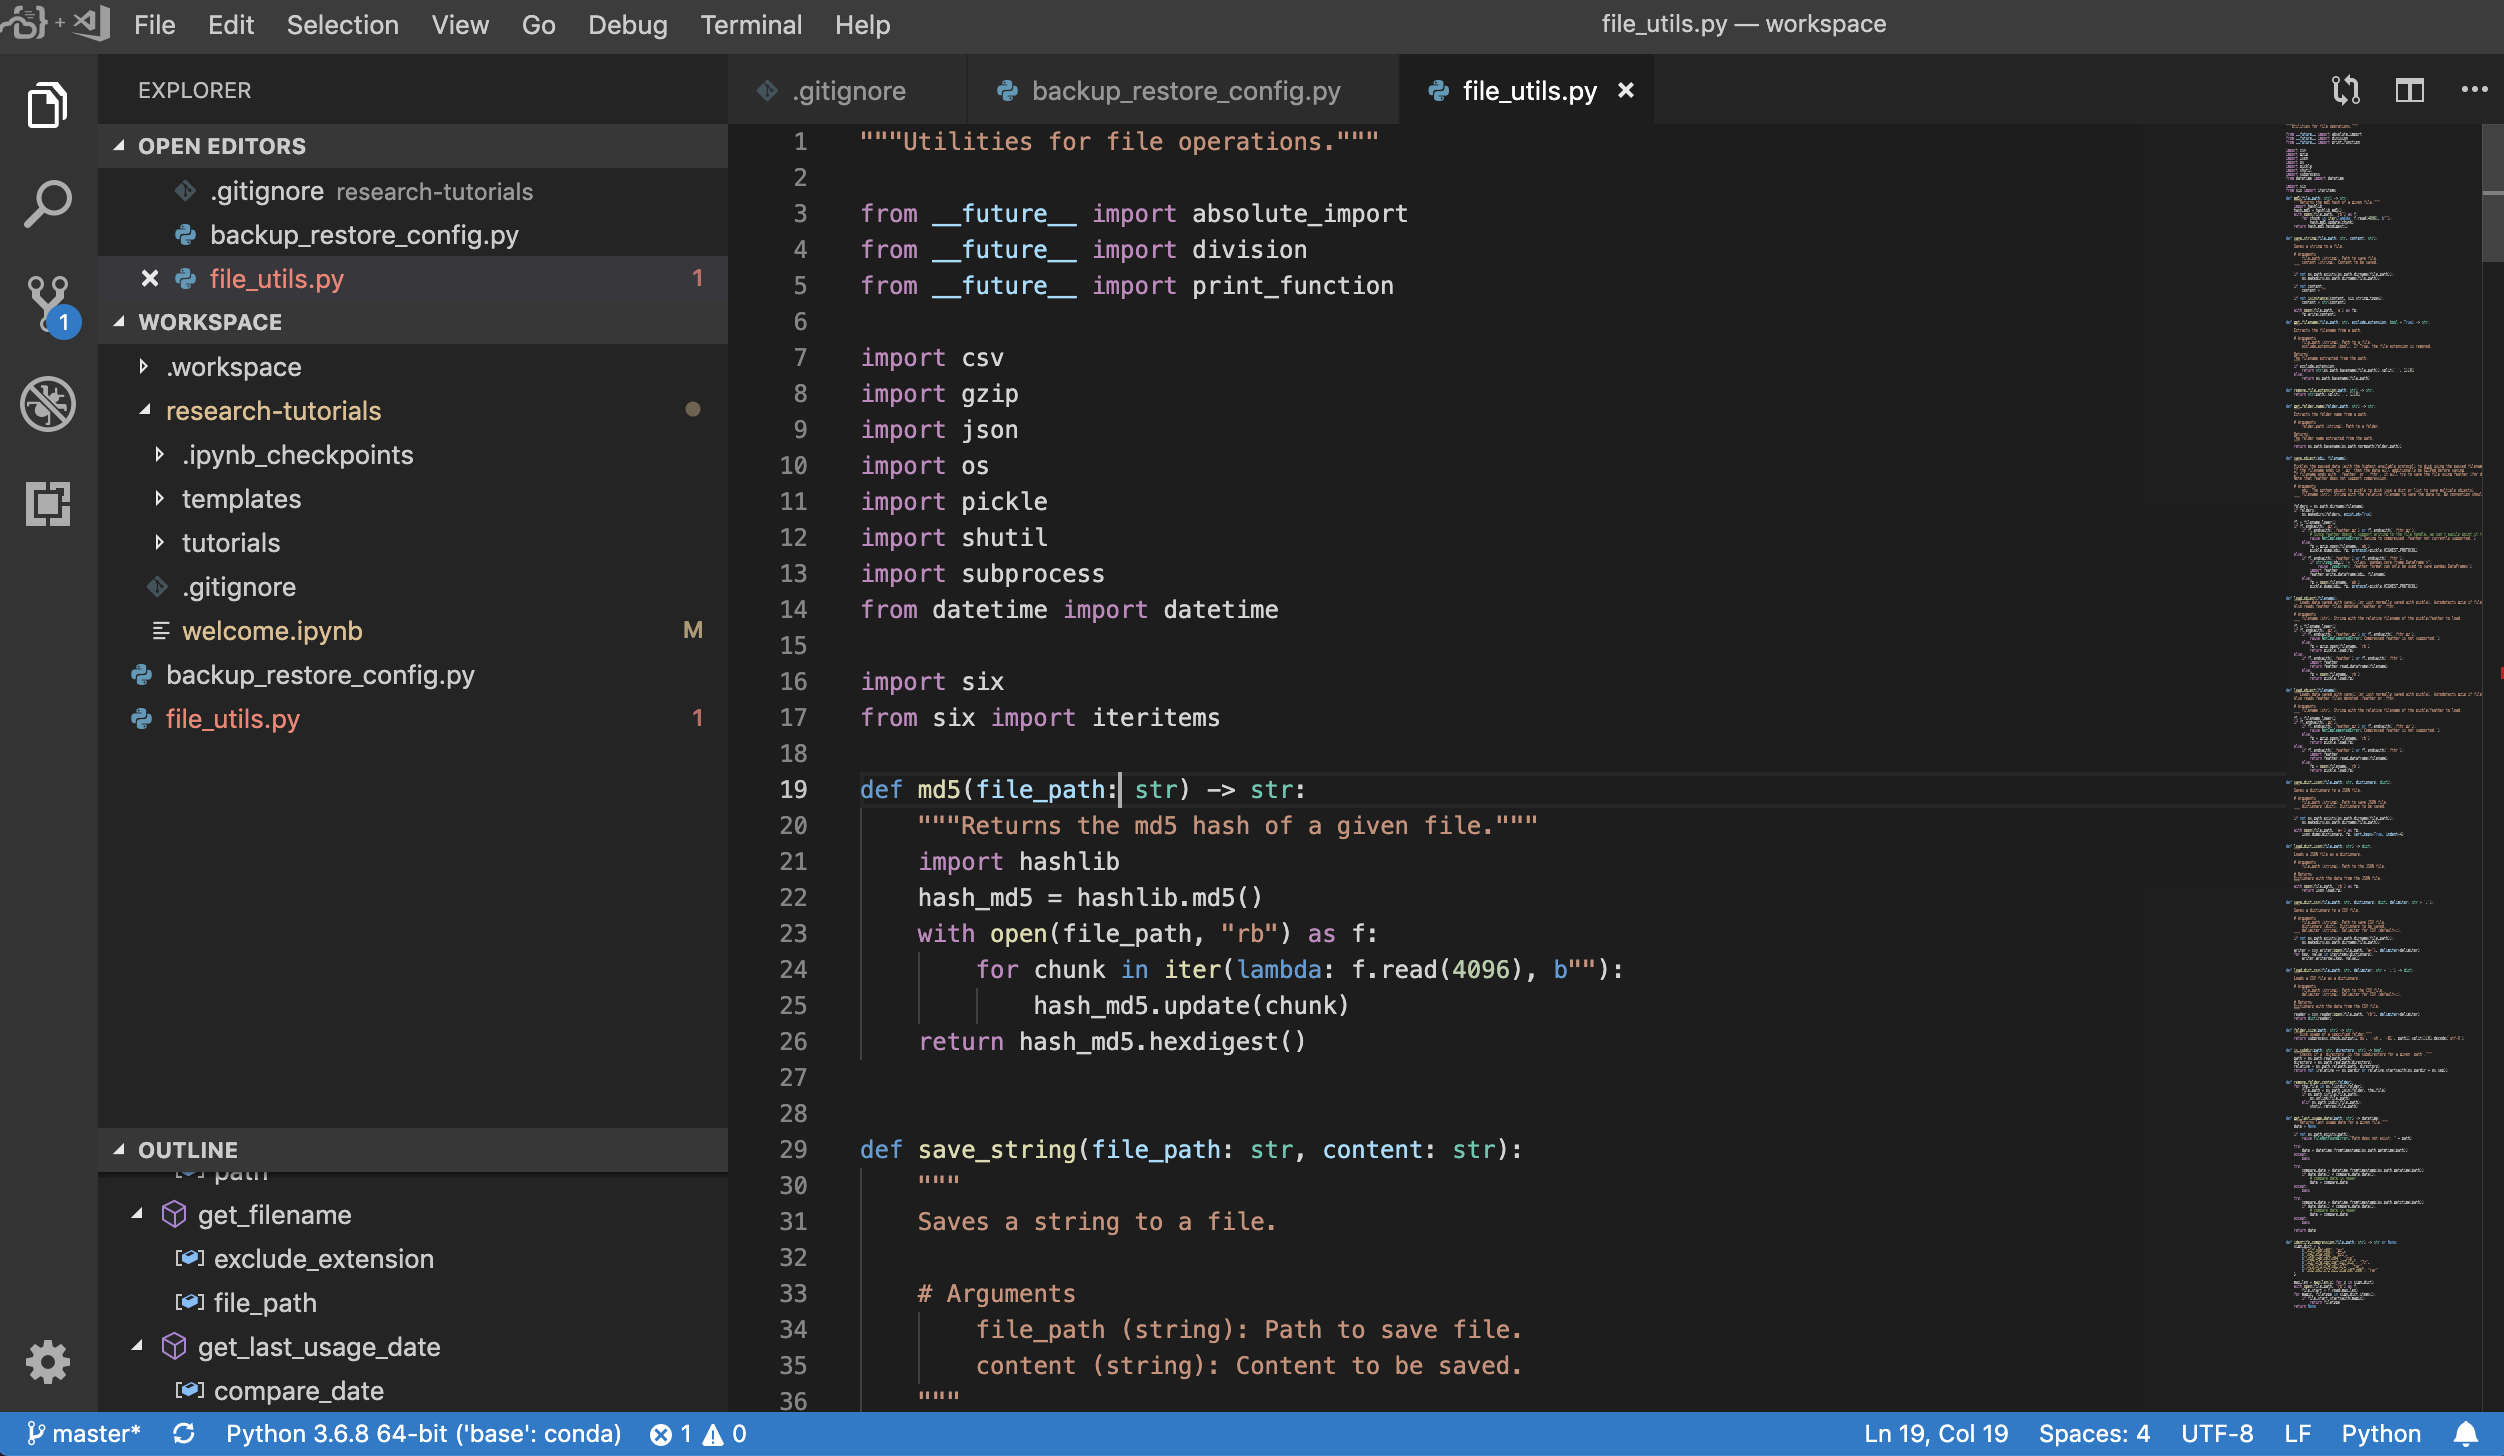
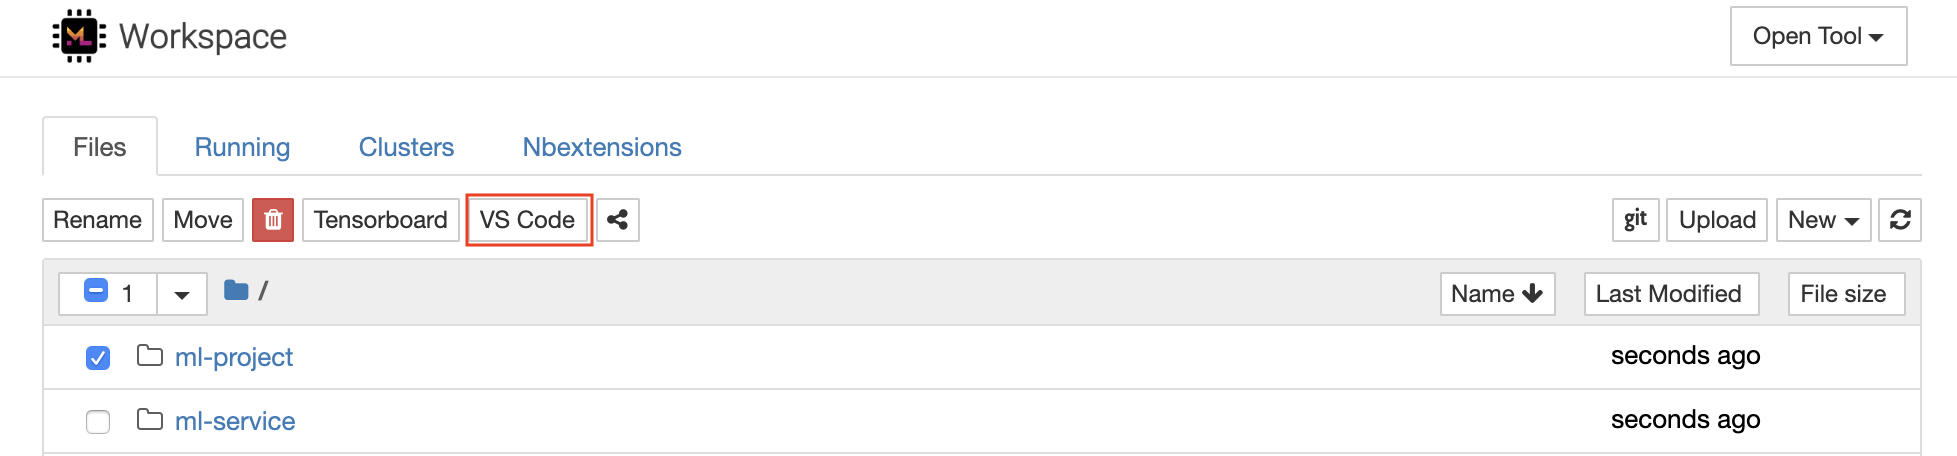
工作區還提供了VS代碼集成到Jupyter中,允許您為任何選定的文件夾打開VS代碼實例,如下所示:
Jupyterlab( Open Tool -> JupyterLab )是項目jupyter的下一代用戶界面。它在靈活且功能強大的用戶界面中提供了經典Jupyter筆記本電腦(筆記本,終端,文本編輯器,富含輸出等)的所有熟悉的構建塊。此Jupyterlab實例預裝了一些有用的擴展程序,例如Jupyterlab-toc,Jupyterlab-Git和Juptyterlab-Tensorboard。
版本控制是生產協作的關鍵方面。為了使此過程盡可能流暢,我們已經集成了一個定制的jupyter擴展程序,專門推動單個筆記本(一個基於Web的GIT客戶端(UNGIT)),這是一種打開和編輯純文本文檔(例如, .py , .md )作為筆記本(Notebooks(JupyText))的工具,以及筆記本手冊Merging工具(NBDIME)。此外,Jupyterlab和VS代碼還提供基於GUI的GIT客戶端。
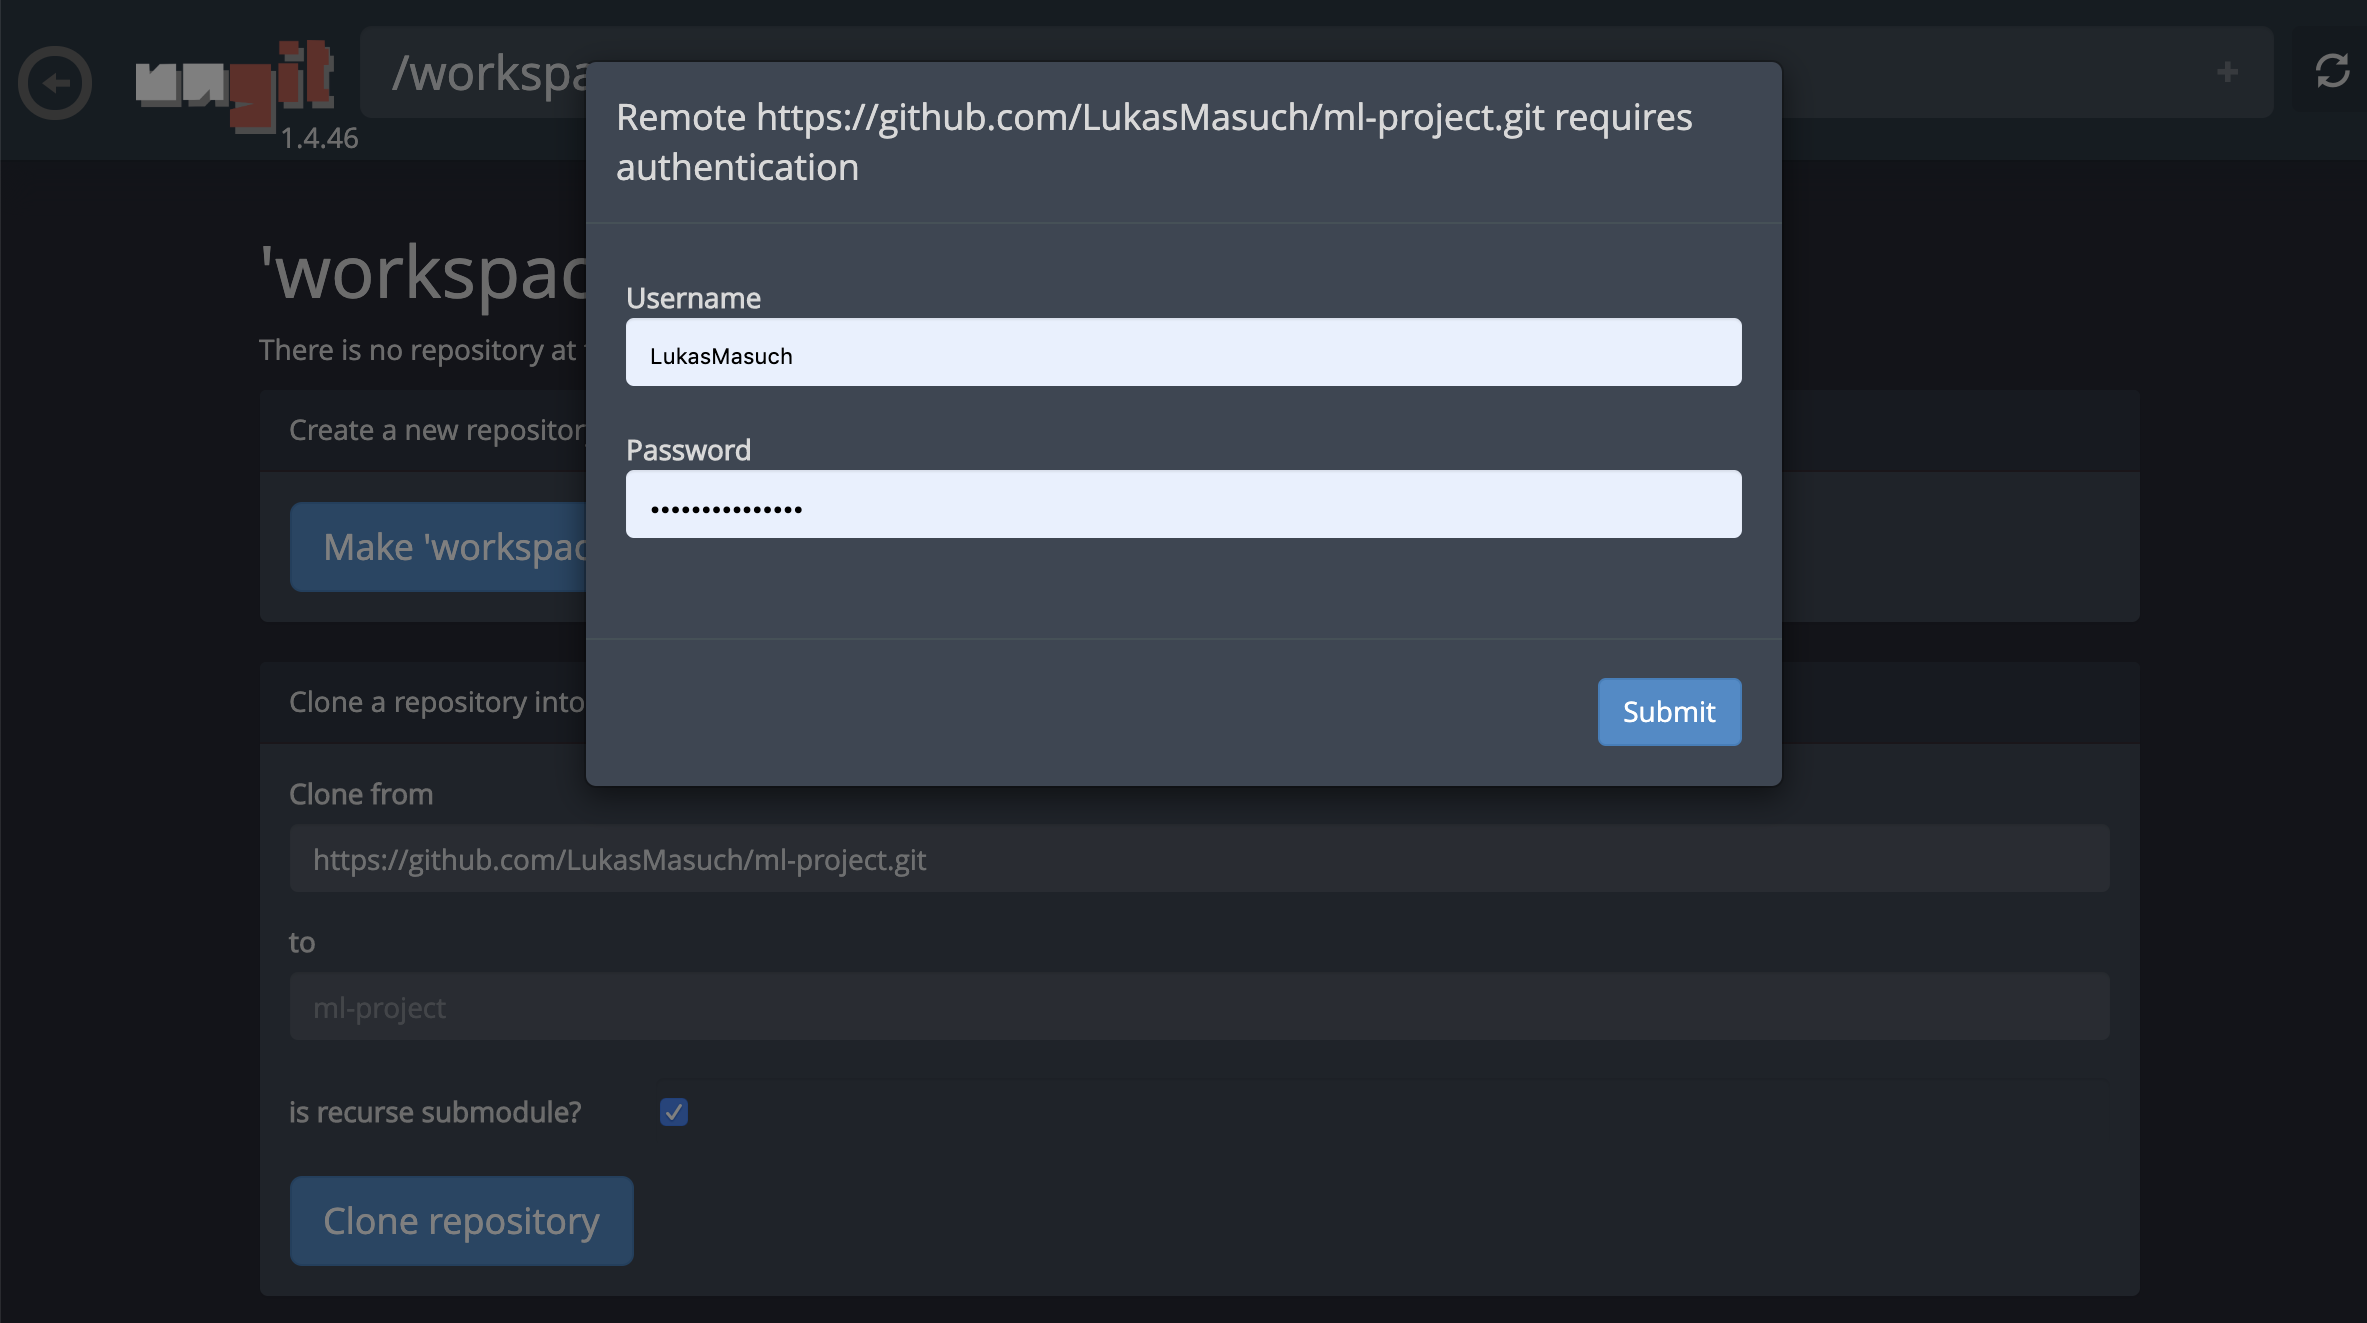
對於通過https克隆存儲庫,我們建議導航到所需的根文件夾,然後單擊git按鈕,如下所示:

這可能會要求一些必需的設置,隨後,開設了一個基於Web的GIT客戶端,具有乾淨,直觀的UI,使您可以同步您的代碼工件。在Ungit中,您可以克隆任何存儲庫。如果需要身份驗證,您將被要求提供您的憑據。
要提交並將單個筆記本電腦推向遠程GIT存儲庫,我們建議將集成到Jupyter的GIT插件使用,如下所示:
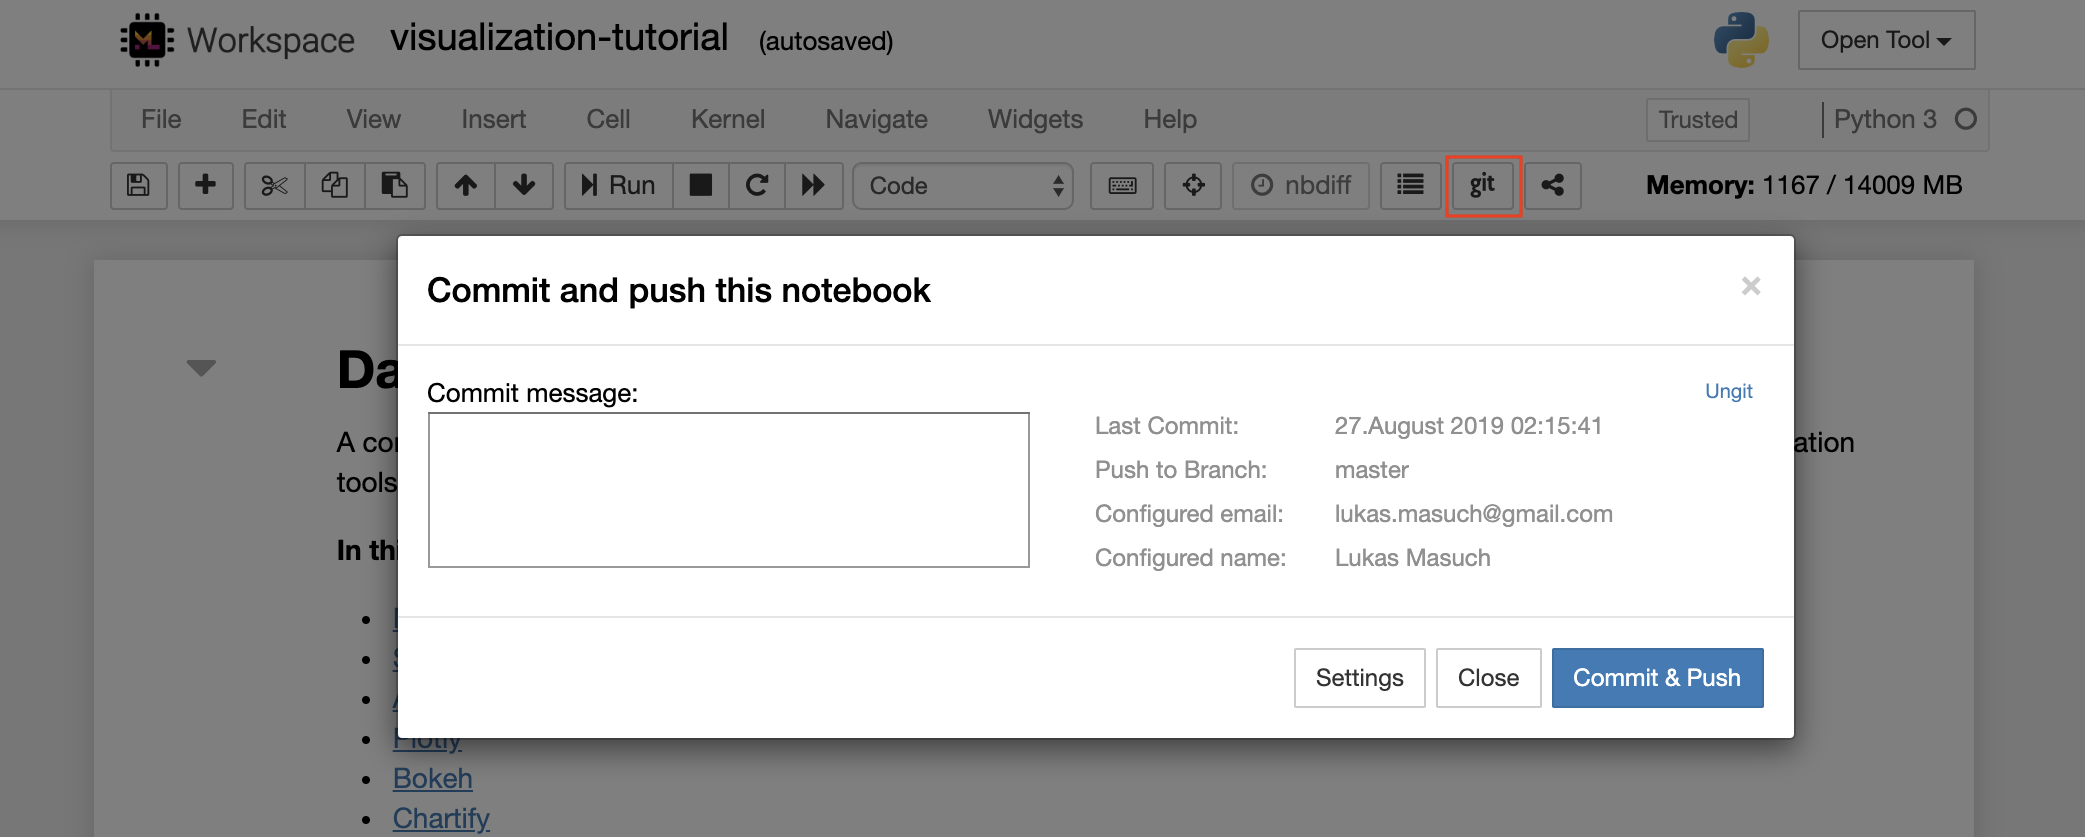
對於更高級的GIT操作,我們建議使用Ungit。使用Ungit,您可以執行大多數常見的GIT操作,例如推,拉,合併,分支,標籤,結帳等等。
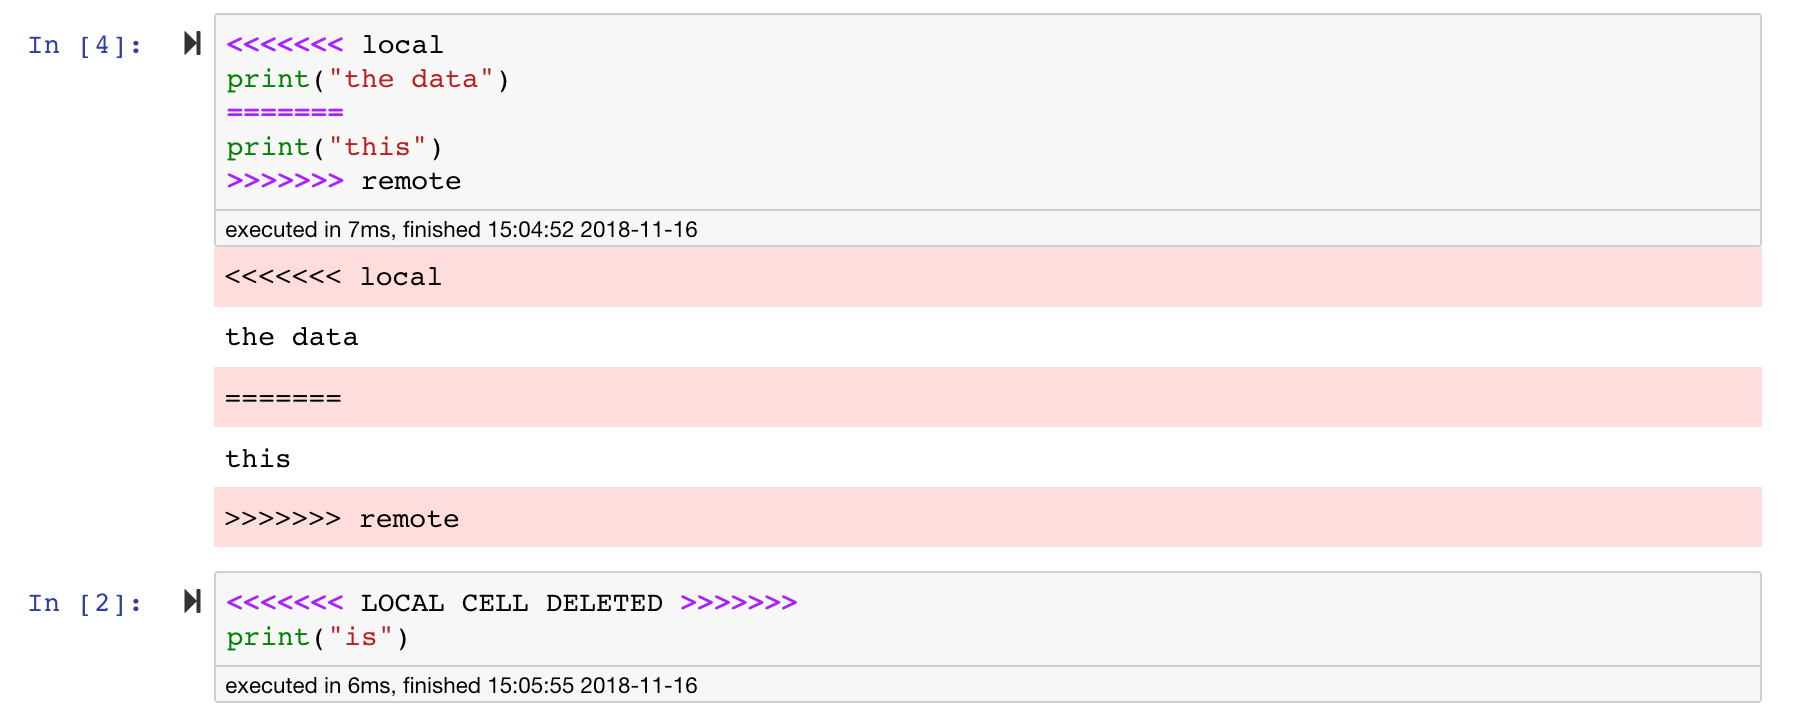
Jupyter筆記本非常好,但是它們通常是巨大的文件,具有非常特定的JSON文件格式。為了通過git啟用無縫的差異和合併,該工作空間已與nbdime預裝。 NBDIME了解筆記本文檔的結構,因此,在擴散和合併筆記本電腦時會自動做出明智的決策。在您有合併衝突的情況下,NBDime將確保筆記本仍然由Jupyter讀取,如下所示:
此外,工作空間還安裝了jupytext,jupytext是一個jupyter插件,將筆記本讀寫為純文本文件。這使您可以打開,編輯和運行腳本或Markdown文件(例如, .py , .md )作為Jupyter中的筆記本。在下面的屏幕截圖中,我們通過Jupyter打開了一個Markdown文件:
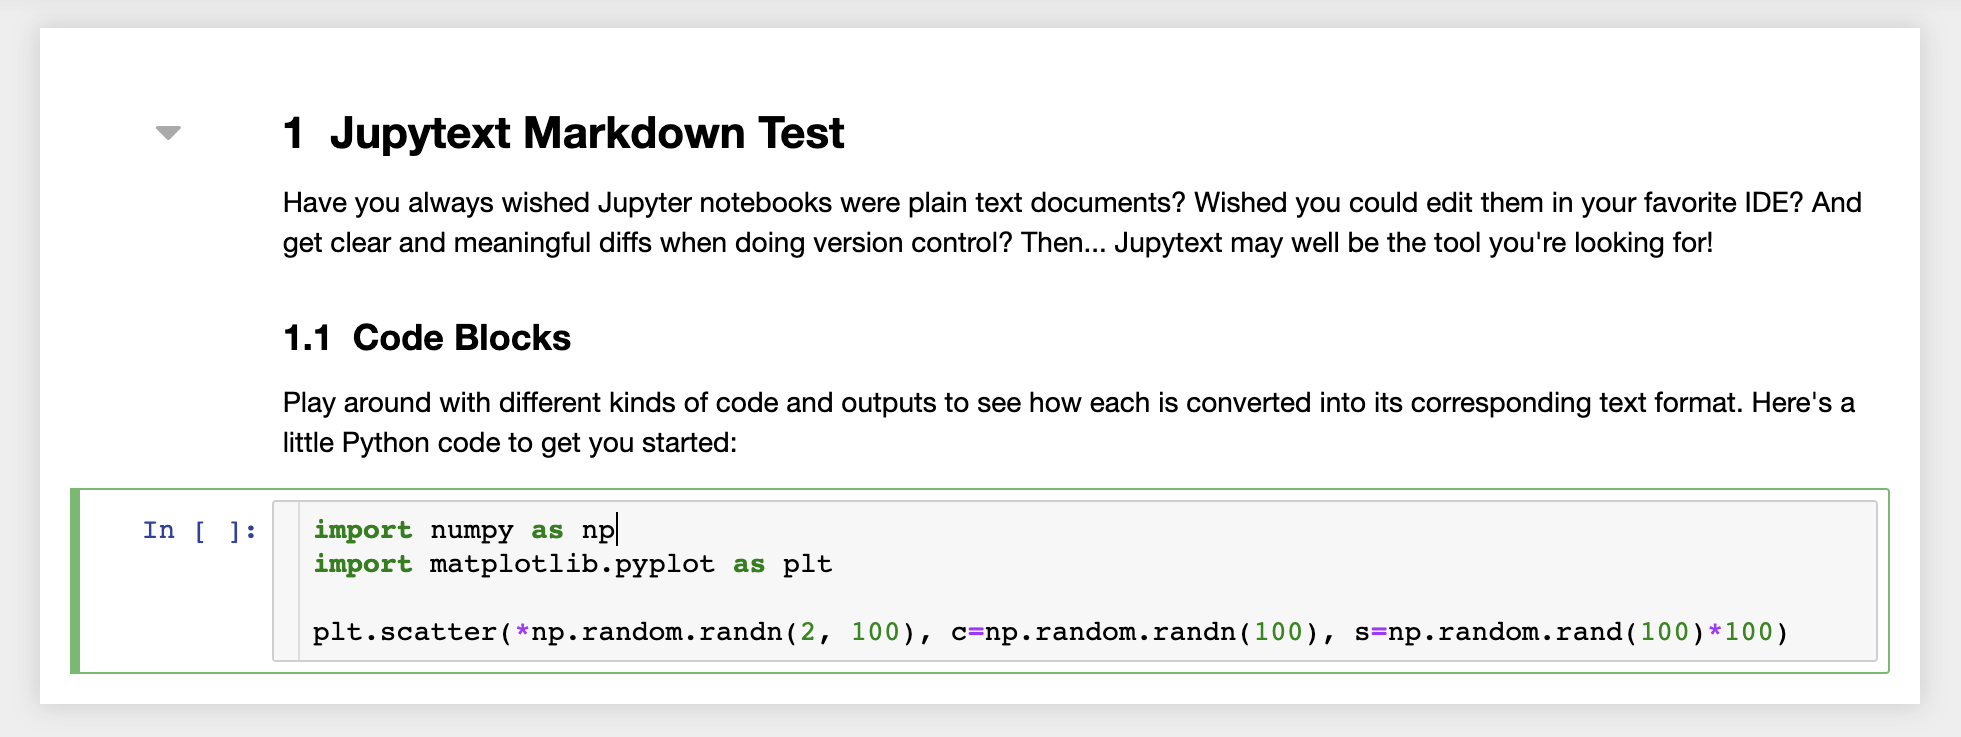
結合GIT,JupyText可以實現明確的差異歷史記錄和易於合併版本衝突。有了這兩個工具,與git一起在jupyter筆記本上進行協作變得很簡單。
工作區具有通過受令牌保護的鏈接與任何人共享任何文件或文件夾的功能。要通過鏈接共享數據,請從jupyter目錄樹中選擇任何文件或文件夾,然後單擊“共享”按鈕,如以下屏幕截圖所示:
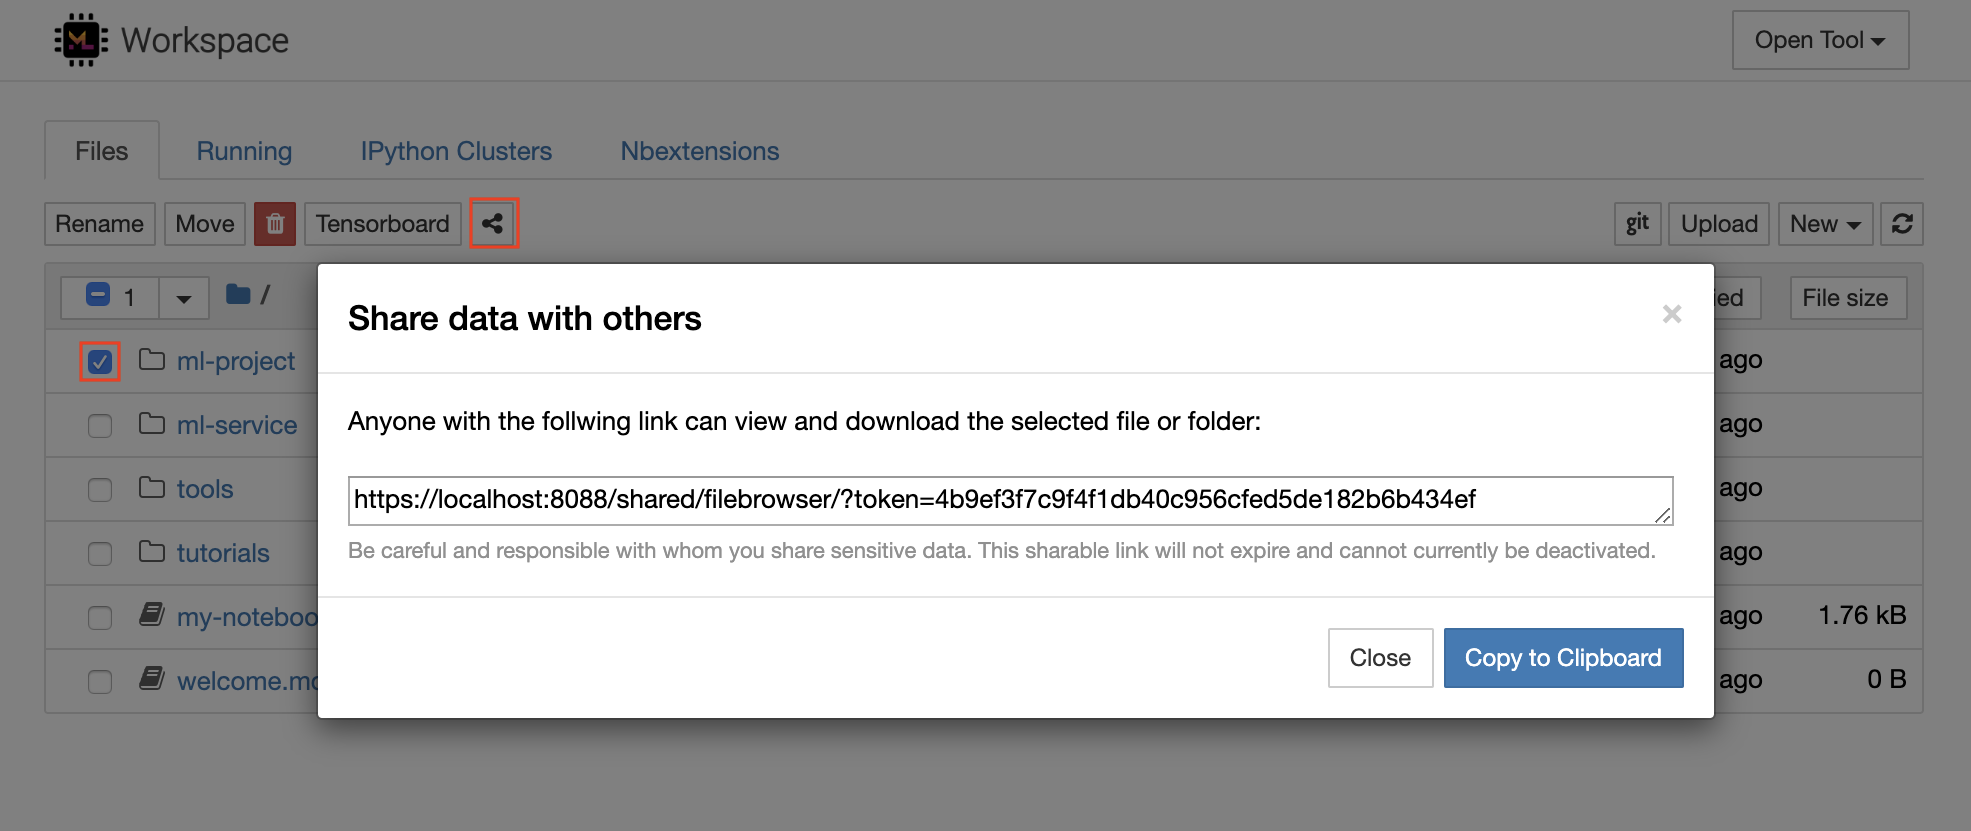
這將生成一個通過令牌保護的唯一鏈接,該鏈接可以使任何具有鏈接訪問查看的人並通過FileBrowser UI下載所選數據:
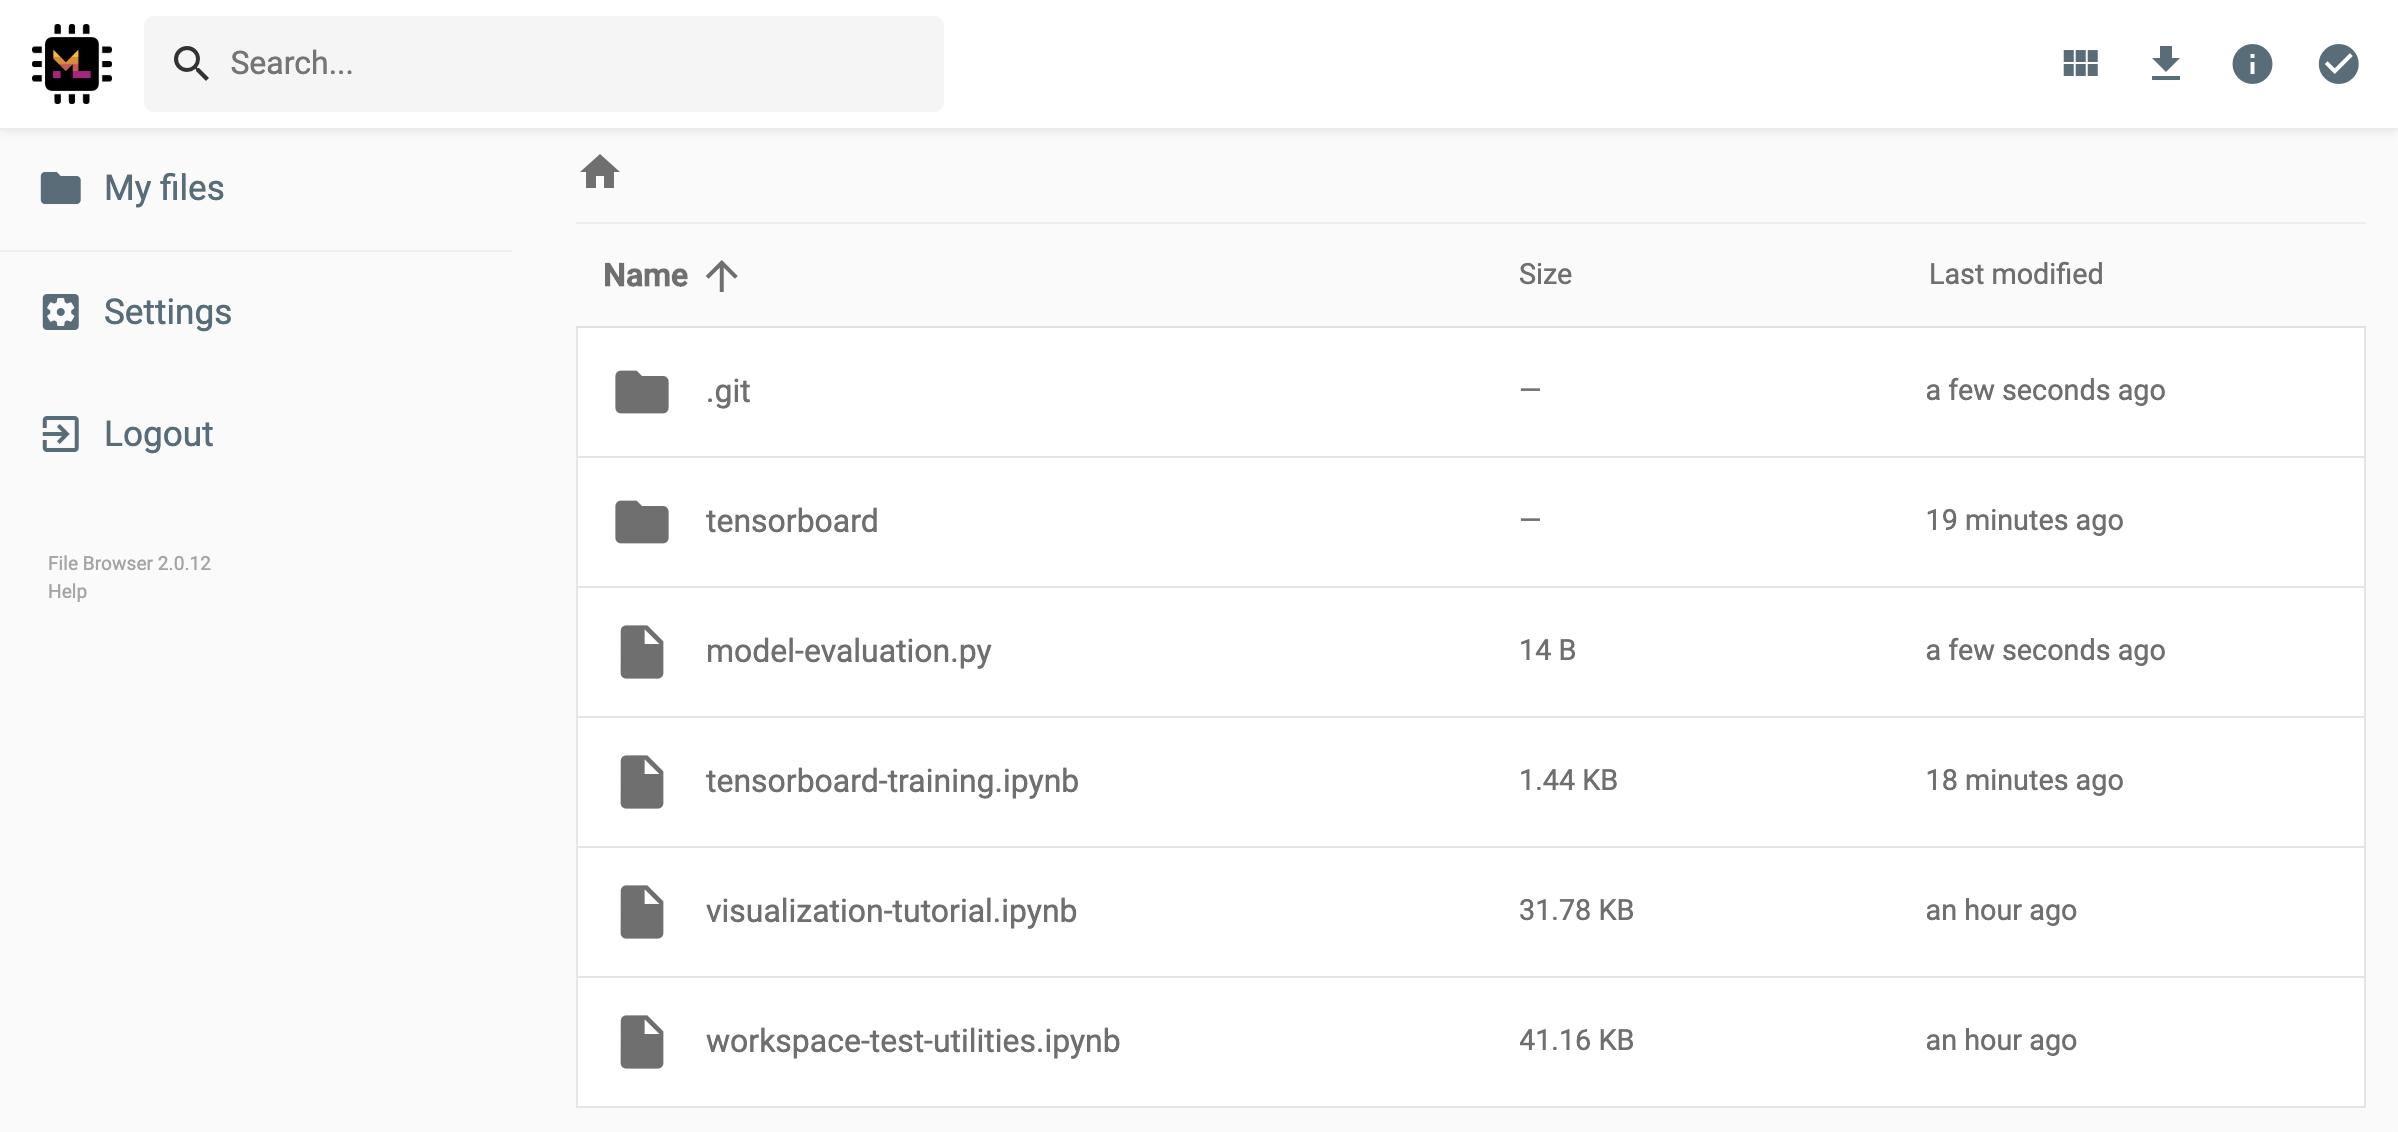
要停用或管理(例如,提供編輯權限)共享鏈接,請通過Open Tool -> Filebrowser打開FileBrowser,然後選擇Settings->User Management 。
通過選擇Open Tool -> Access Port可以安全地訪問任何工作區內部端口。借助此功能,您可以使用瀏覽器直接訪問在工作區內運行的REST API或Web應用程序。該功能使開發人員可以直接從工作區構建,運行,測試和調試REST API或WEB應用程序。
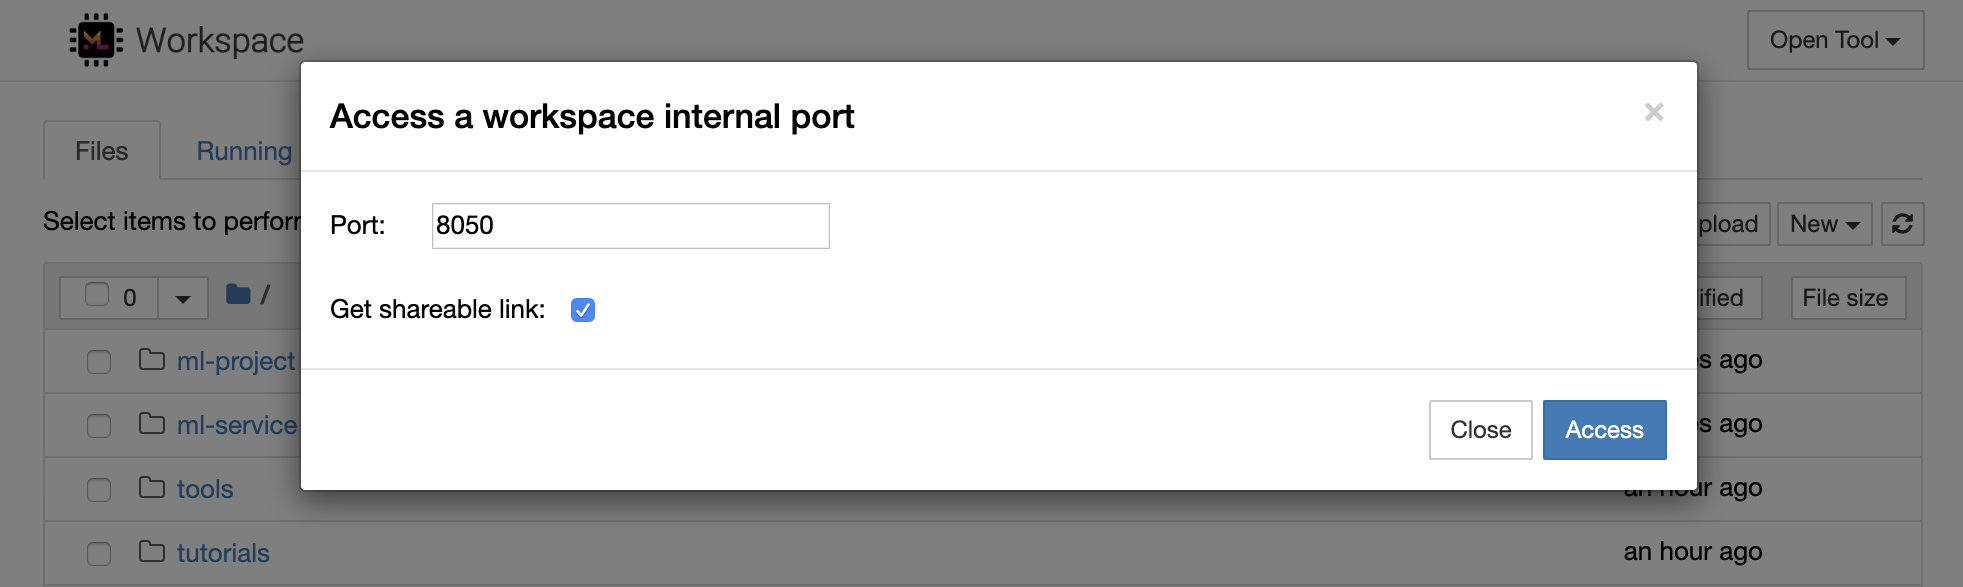
如果要使用HTTP客戶端或共享對給定端口的訪問,則可以選擇Get shareable link選項。這會生成一個令牌安全的鏈接,任何訪問該鏈接的人都可以使用該鏈接來訪問指定的端口。
HTTP應用需要從相對URL路徑或配置基本路徑(
/tools/PORT/)解決。這種方式可訪問的工具由工作區的身份驗證系統確保!如果您決定自己發布容器的任何其他端口,而不是使用此功能使工具可訪問,請確保通過身份驗證機制確保它保護它!
python -m http.server 1234在端口1234上啟動HTTP服務器Open Tool -> Access Port ,輸入端口1234 ,然後選擇Get shareable link選項。Access ,您將看到Python的http.server提供的內容。SSH提供了一套強大的功能,使您能夠對開發任務提高效率。您可以通過選擇Open Tool -> SSH來輕鬆地將安全且無密碼的SSH連接設置為工作區。這將生成一個安全的設置命令,該命令可以在任何Linux或Mac機器上運行,以配置無密碼和安全的SSH連接到工作區。另外,您還可以下載設置腳本並運行它(而不是使用命令)。
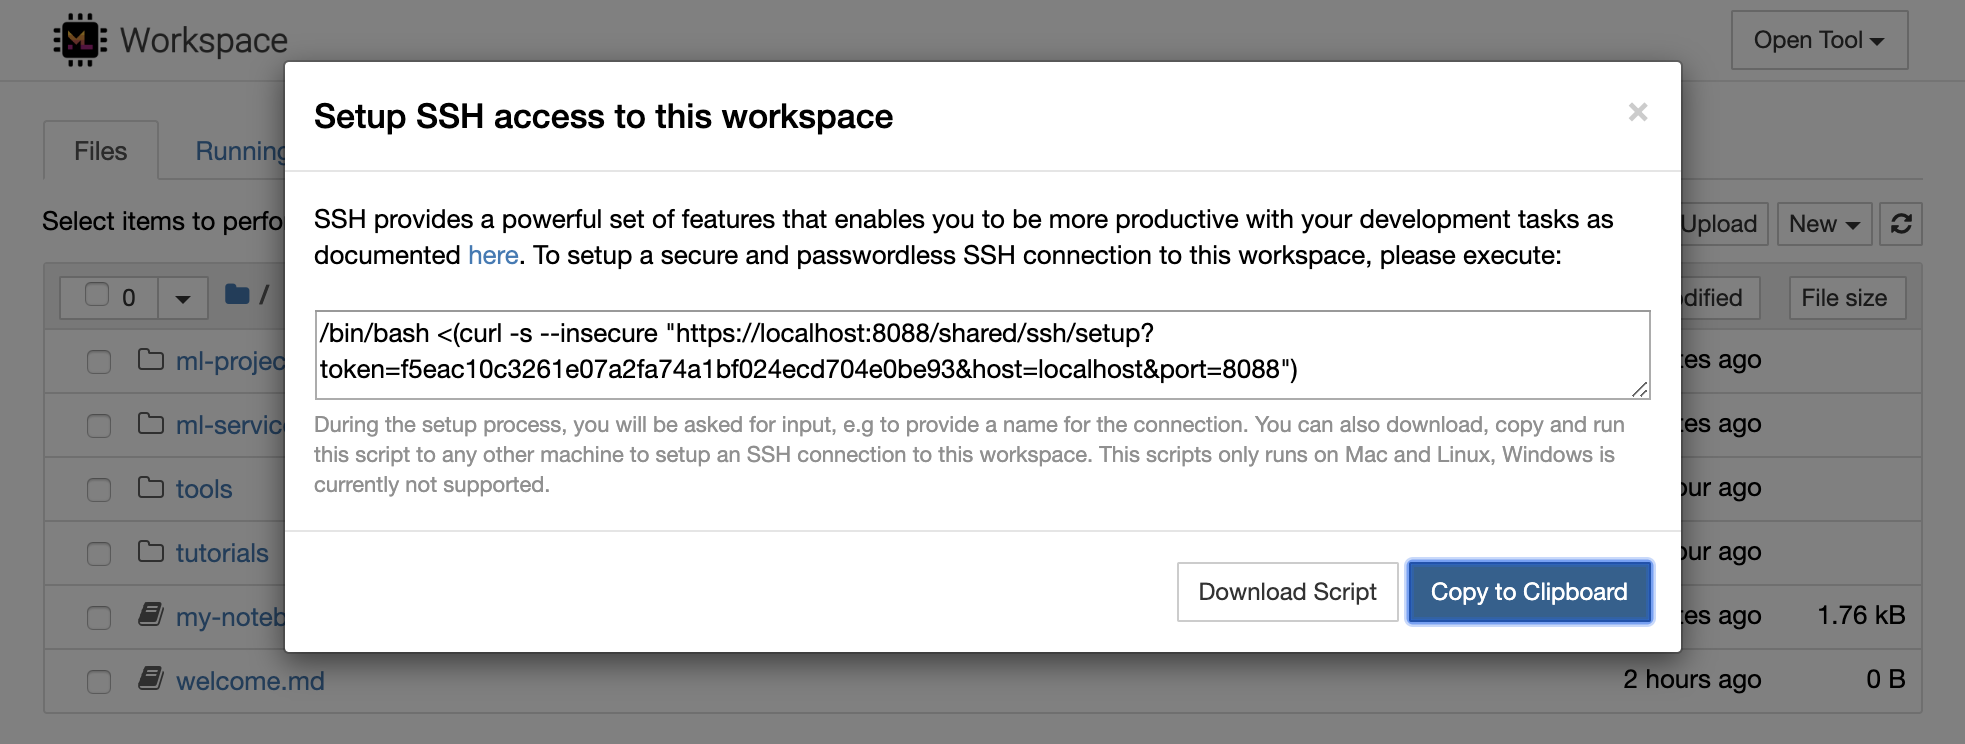
該設置腳本僅在Mac和Linux上運行。 Windows當前不支持。
只需在計算機上運行設置命令或腳本,從您要設置與工作區的連接並輸入連接的名稱(例如, my-workspace )。在此過程中,您可能還會要求您提供一些其他輸入,例如,如果安裝了remote_ikernel ,則安裝遠程內核。無密碼的SSH連接成功設置並進行了測試後,您可以通過簡單地執行ssh my-workspace安全地連接到工作區。
除了能夠在遠程計算機上執行命令的能力外,SSH還提供了各種其他功能,這些功能可以改善您的開發工作流程,如以下各節所述。
SSH連接可用於從遠程計算機到本地計算機的隧道應用程序端口,反之亦然。例如5901您可以5000執行:
ssh -nNT -L 5000:localhost:5901 my-workspace要將應用程序端口從您的本地計算機公開到工作區,請使用
-R選項(而不是-L)。
建立隧道後,您可以在本地計算機上使用自己喜歡的VNC查看器,並連接到vnc://localhost:5000 (默認密碼: vncpassword )。為了使隧道連接更具耐藥性和可靠性,我們建議使用摩托什自動重新啟動SSH隧道,以免連接死亡:
autossh -M 0 -f -nNT -L 5000:localhost:5901 my-workspace當您在工作區內啟動任何基於服務器的工具時,端口隧道非常有用。在默認設置中,工作區具有各種已經在不同端口上運行的工具,例如:
8080 :主工作區端口,可訪問所有集成工具。8090 :Jupyter服務器。8054 :VS代碼服務器。5901 :VNC服務器。22 :SSH服務器。您可以在主管配置中找到有關所有工具的端口信息。
有關港口隧道/轉發的更多信息,我們建議本指南。
SCP允許通過SSH連接將文件和目錄牢固地複製到不同機器之間的,從不同的機器之間複製。例如,要將本地文件( ./local-file.txt )複製到工作區內的/workspace文件夾中,請執行:
scp ./local-file.txt my-workspace:/workspace要將/workspace目錄從my-workspace複製到本地計算機的工作目錄,請執行:
scp -r my-workspace:/workspace .有關SCP的更多信息,我們建議本指南。
Rsync是一種實用程序,可通過比較文件的修改時間和大小來有效地在不同機器之間(例如,通過SSH連接)之間傳輸和同步文件。 RSYNC命令將確定每次運行時都需要更新哪些文件,這比使用SCP或SFTP之類的內容更有效,更方便。例如,將本地文件夾( ./local-project-folder/ )的所有內容同步到工作空間內的/workspace/remote-project-folder/ folder中,請執行:
rsync -rlptzvP --delete --exclude= " .git " " ./local-project-folder/ " " my-workspace:/workspace/remote-project-folder/ "如果您在工作空間上的文件夾內有一些更改,則可以通過更改源和目標參數來將這些更改同步到本地文件夾:
rsync -rlptzvP --delete --exclude= " .git " " my-workspace:/workspace/remote-project-folder/ " " ./local-project-folder/ "每次您要同步文件的最新副本時,都可以重新運行這些命令。 RSYNC將確保僅轉移更新。
您可以在此人頁面上找到有關Rsync的更多信息。
除了複製和同步數據外,SSH連接還可以用於通過SSHFS將目錄從遠程計算機安裝到本地文件系統中。例如,將my-workspace的/workspace目錄安裝到本地路徑(例如/local/folder/path )中,請執行:
sshfs -o reconnect my-workspace:/workspace /local/folder/path安裝遠程目錄後,您可以與任何本地目錄和文件相同的方式與遠程文件系統進行交互。
有關SSHFS的更多信息,我們建議本指南。
該工作空間可以集成並用作遠程運行時(也稱為遠程內核/機器/解釋器),用於各種流行的開發工具和IDE,例如Jupyter,VS Code,Pycharm,Colab或Atom氫。因此,您可以將運行的本地計算機上的喜歡的開發工具連接到遠程計算機以執行代碼。這使遠程託管計算資源具有本地質量的開發體驗。
這些集成通常需要從本地計算機到工作區的無密碼SSH連接。要設置SSH連接,請按照SSH訪問部分中說明的步驟操作。
可以使用遠程_ikernel工具將工作區添加到jupyter實例中作為遠程內核。如果您已經在本地計算機上安裝了遠程_ikernel( pip install remote_ikernel ),則工作區的SSH設置腳本將自動為您提供設置遠程內核連接的選項。
在遠程計算機上運行內核時,筆記本本身將保存到本地文件系統上,但是內核只能訪問運行內核的遠程計算機的文件系統。如果需要同步數據,則可以使用SSH訪問部分中的RSYNC,SCP或SSHFS。
如果您想手動設置和管理遠程內核,請使用遠程_ikernel命令行工具,如下所示:
 # Change my-workspace with the name of a workspace SSH connection
remote_ikernel manage --add
    --interface=ssh
    --kernel_cmd= " ipython kernel -f {connection_file} "
    --name= " ml-server (Python) "
    --host= " my-workspace "
您可以使用remote_ikernel命令行功能列表( remote_ikernel manage --show remote_ikernel manage --delete <REMOTE_KERNEL_NAME> )遠程內核連接。
Visual Studio Code Remote -SSH擴展程序允許您在任何具有SSH訪問的遠程機器上打開一個遠程文件夾,並像該文件夾在自己的機器上一樣使用。連接到遠程計算機後,您可以在遠程文件系統上的任何地方與文件和文件夾進行交互,並充分利用VS Code的功能集(Intellisense,調試和擴展支持)。通過工作區SSH設置腳本配置的無密碼SSH連接的發現和處理框架內的開箱即用。啟用您的本地VS代碼應用程序連接到工作區:
您可以在本指南中找到有關遠程SSH擴展的其他功能和信息。
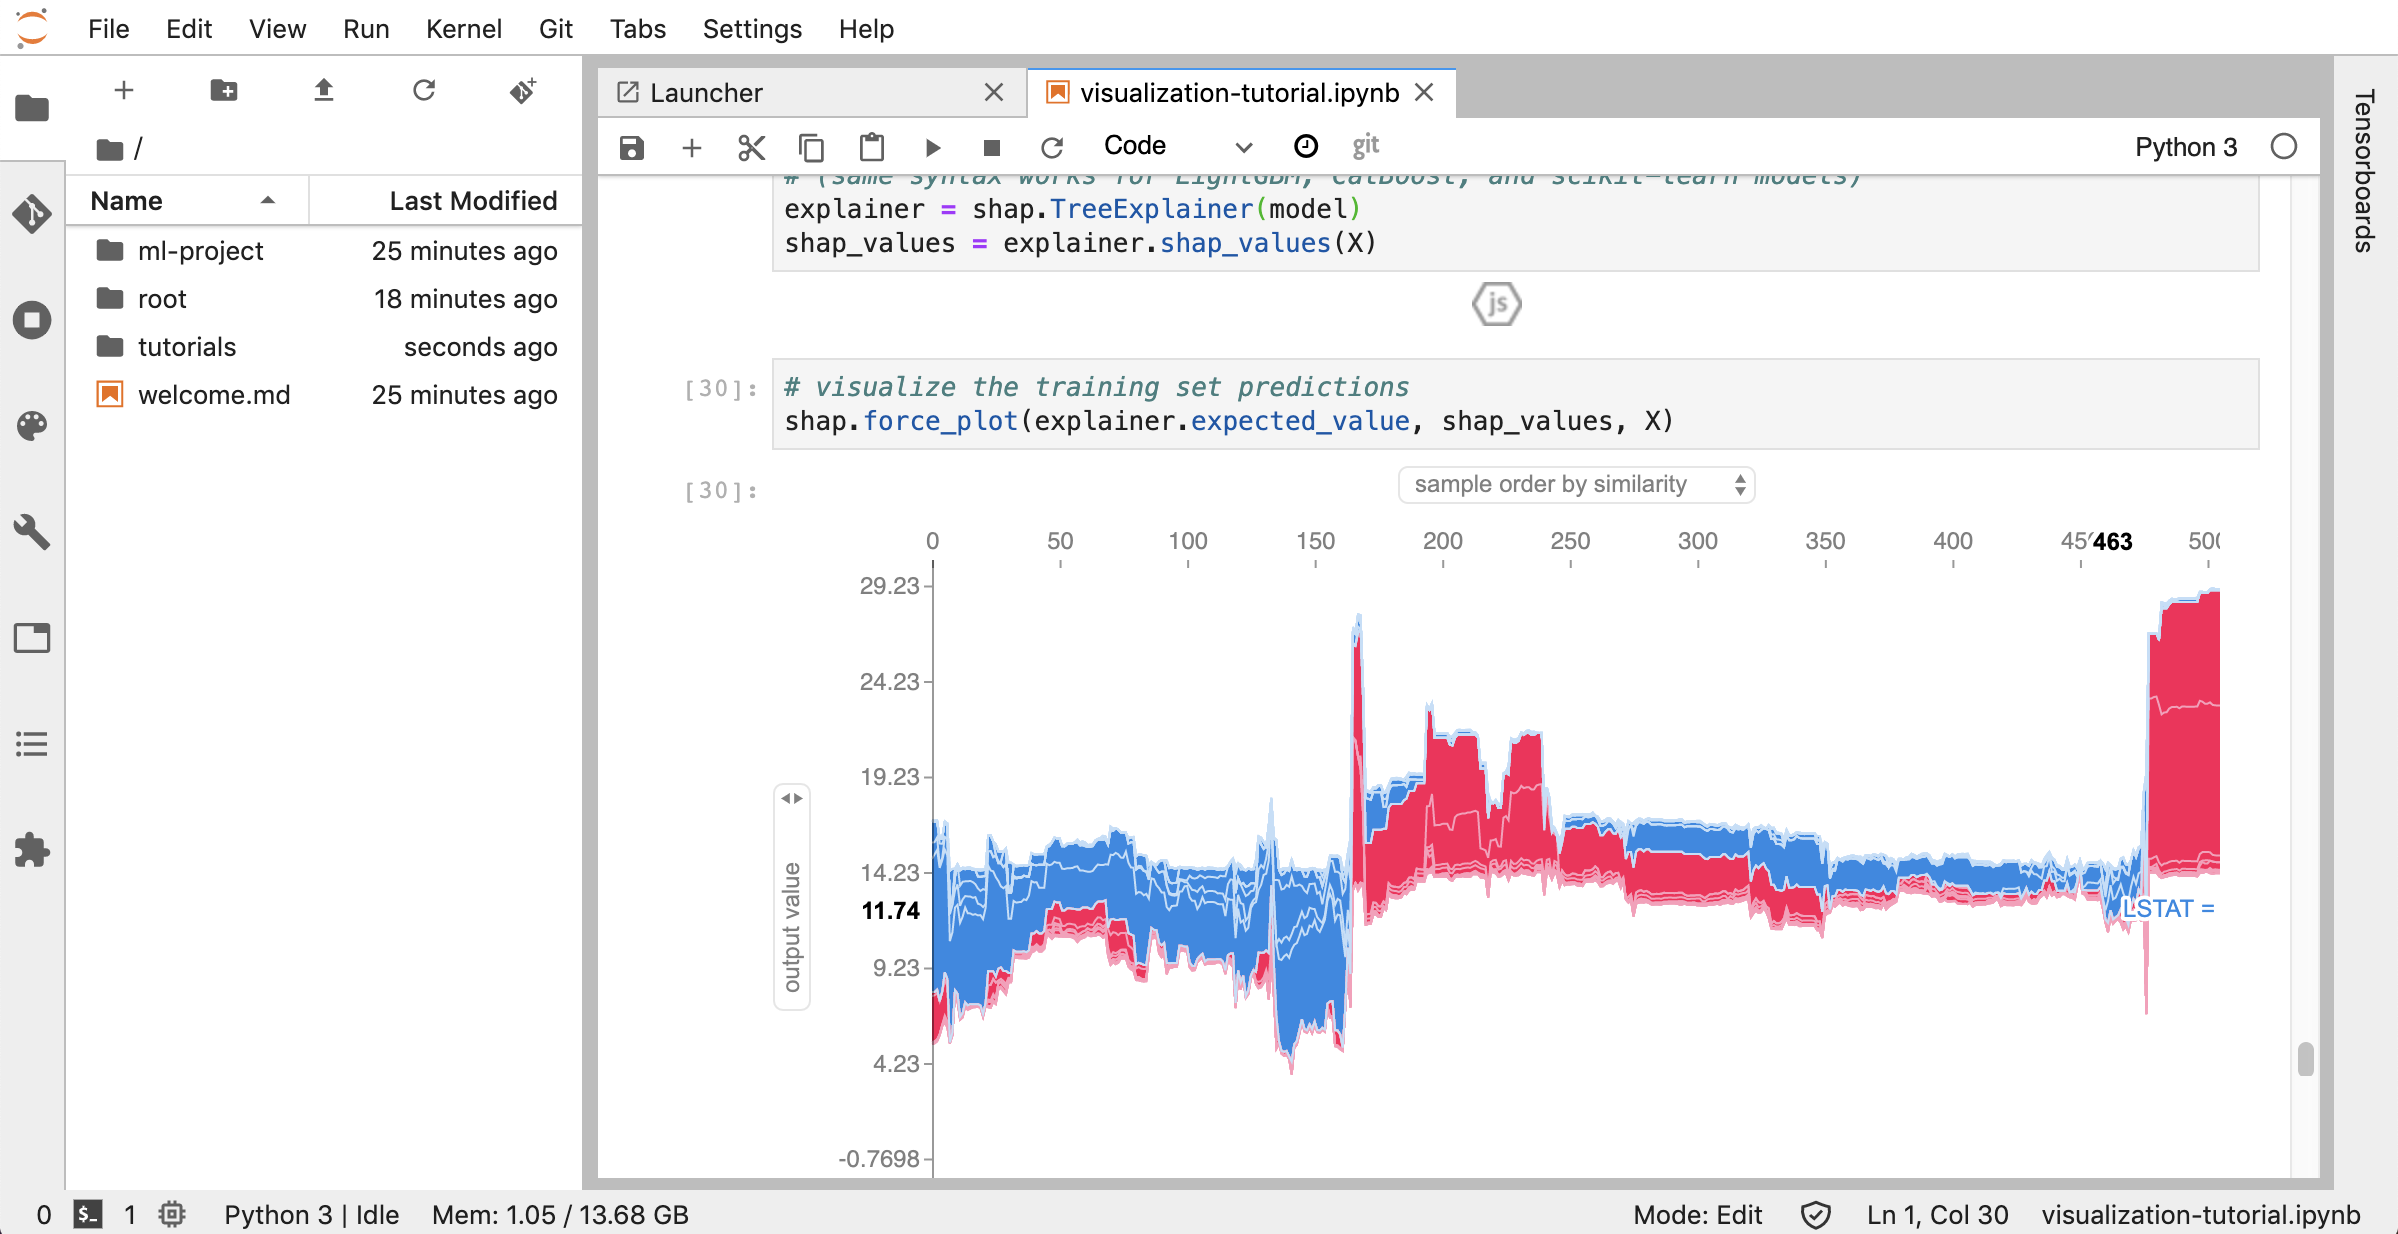
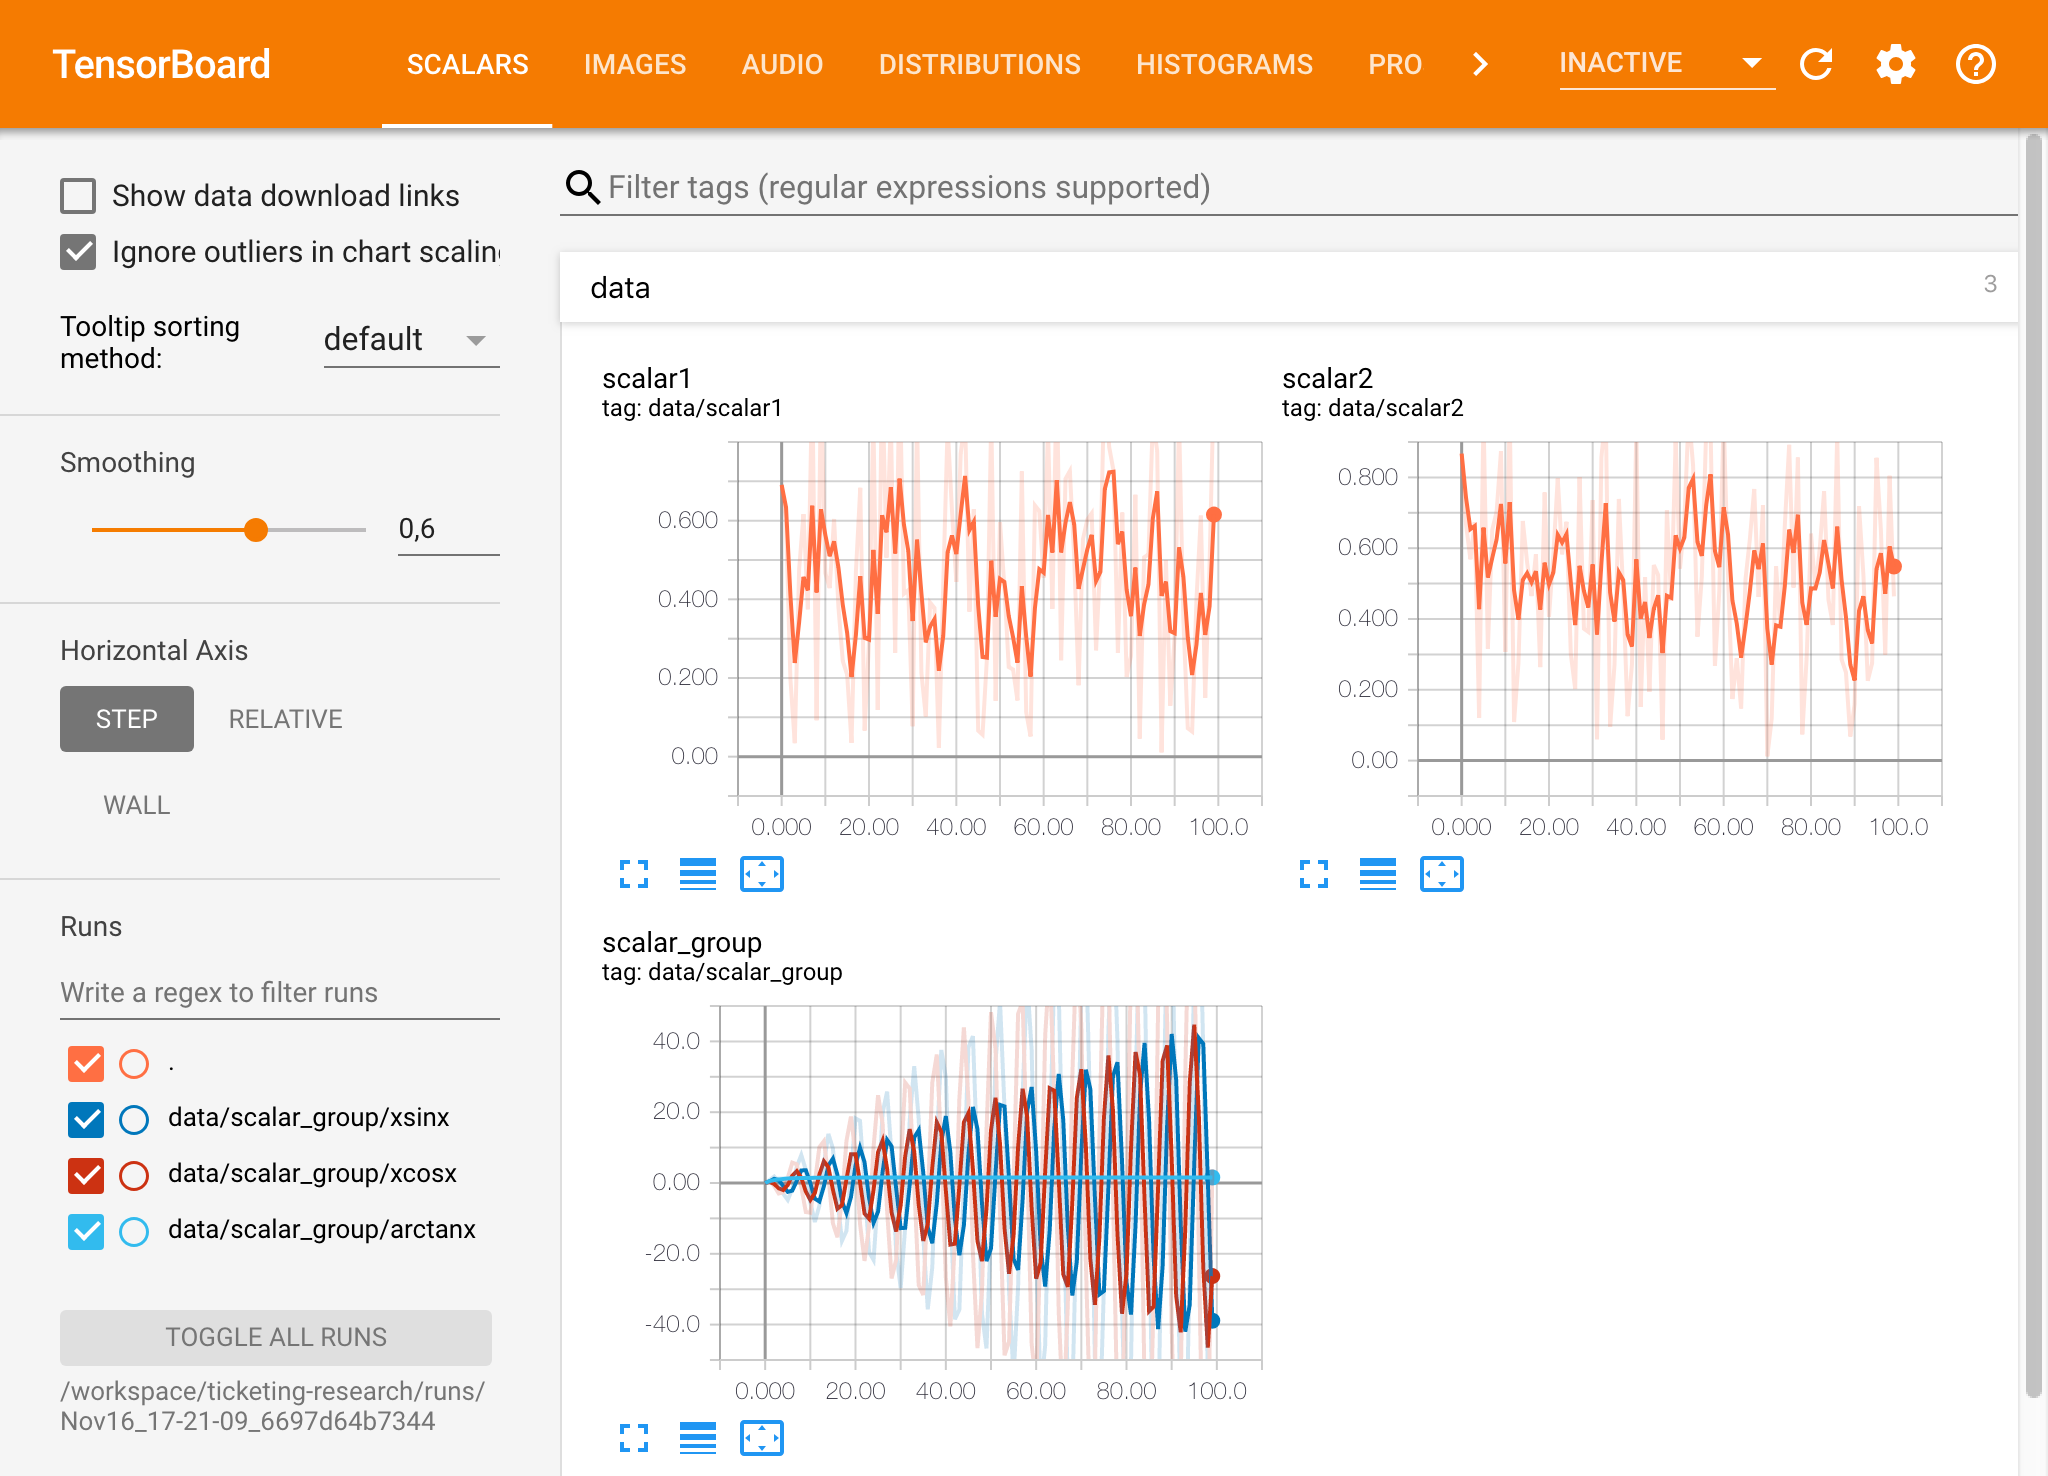
Tensorboard提供了一套可視化工具,以使其更易於理解,調試和優化您的實驗運行。它包括標量,直方圖,模型結構,嵌入以及文本和圖像可視化的記錄功能。該工作區已預安裝了jupyter_tensorboard擴展名,該擴展將張量板集成到jupyter接口與功能性以啟動,管理和停止實例。您可以為有效日誌目錄打開新實例,如下所示:
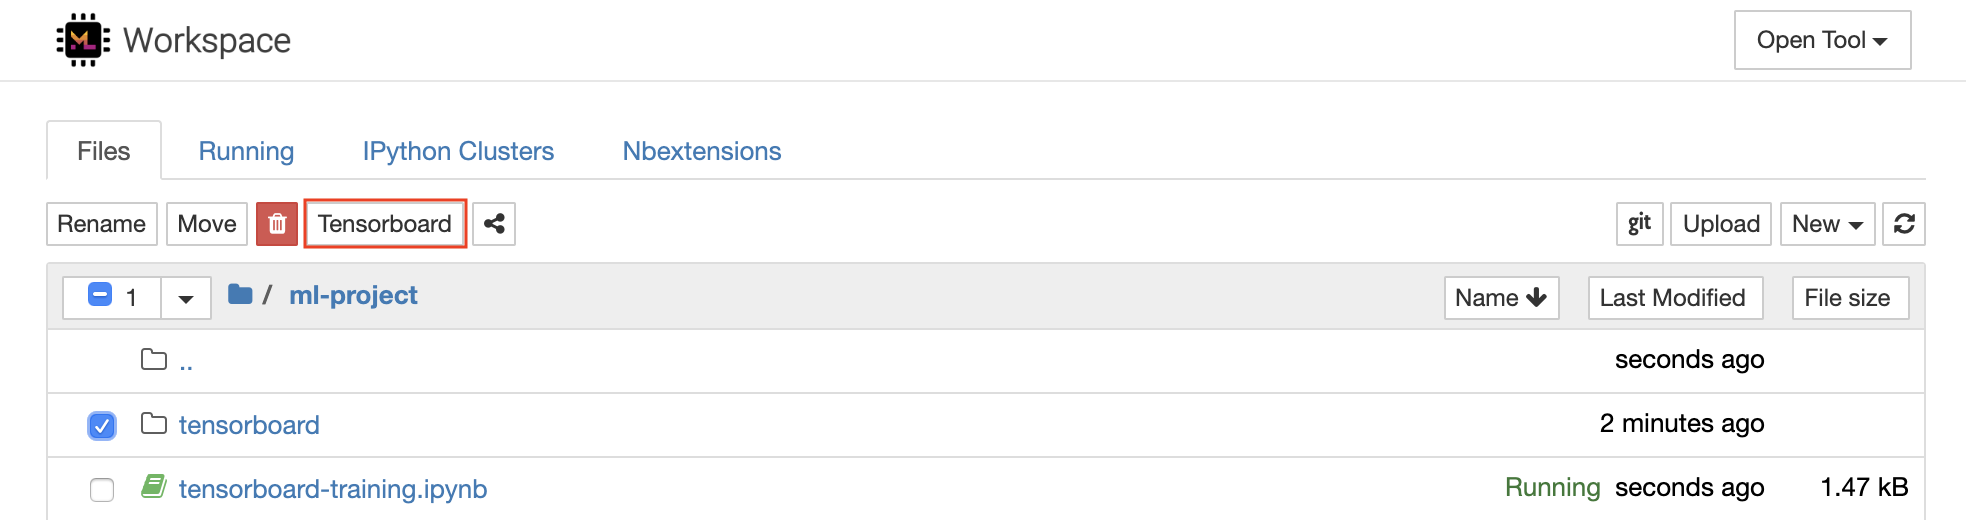
如果您在有效的日誌目錄中打開了張板實例,則將看到已記錄數據的可視化量:
張板可以與除張量之外的許多其他ML框架結合使用。通過使用TensorBoardX庫,您可以基本上從任何基於Python的庫中登錄。另外,如下所述,Pytorch具有直接的張板集成。
如果您希望直接在筆記本中查看張板,則可以使用以下Jupyter Magic :
 %load_ext tensorboard
%tensorboard --logdir /workspace/path/to/logs
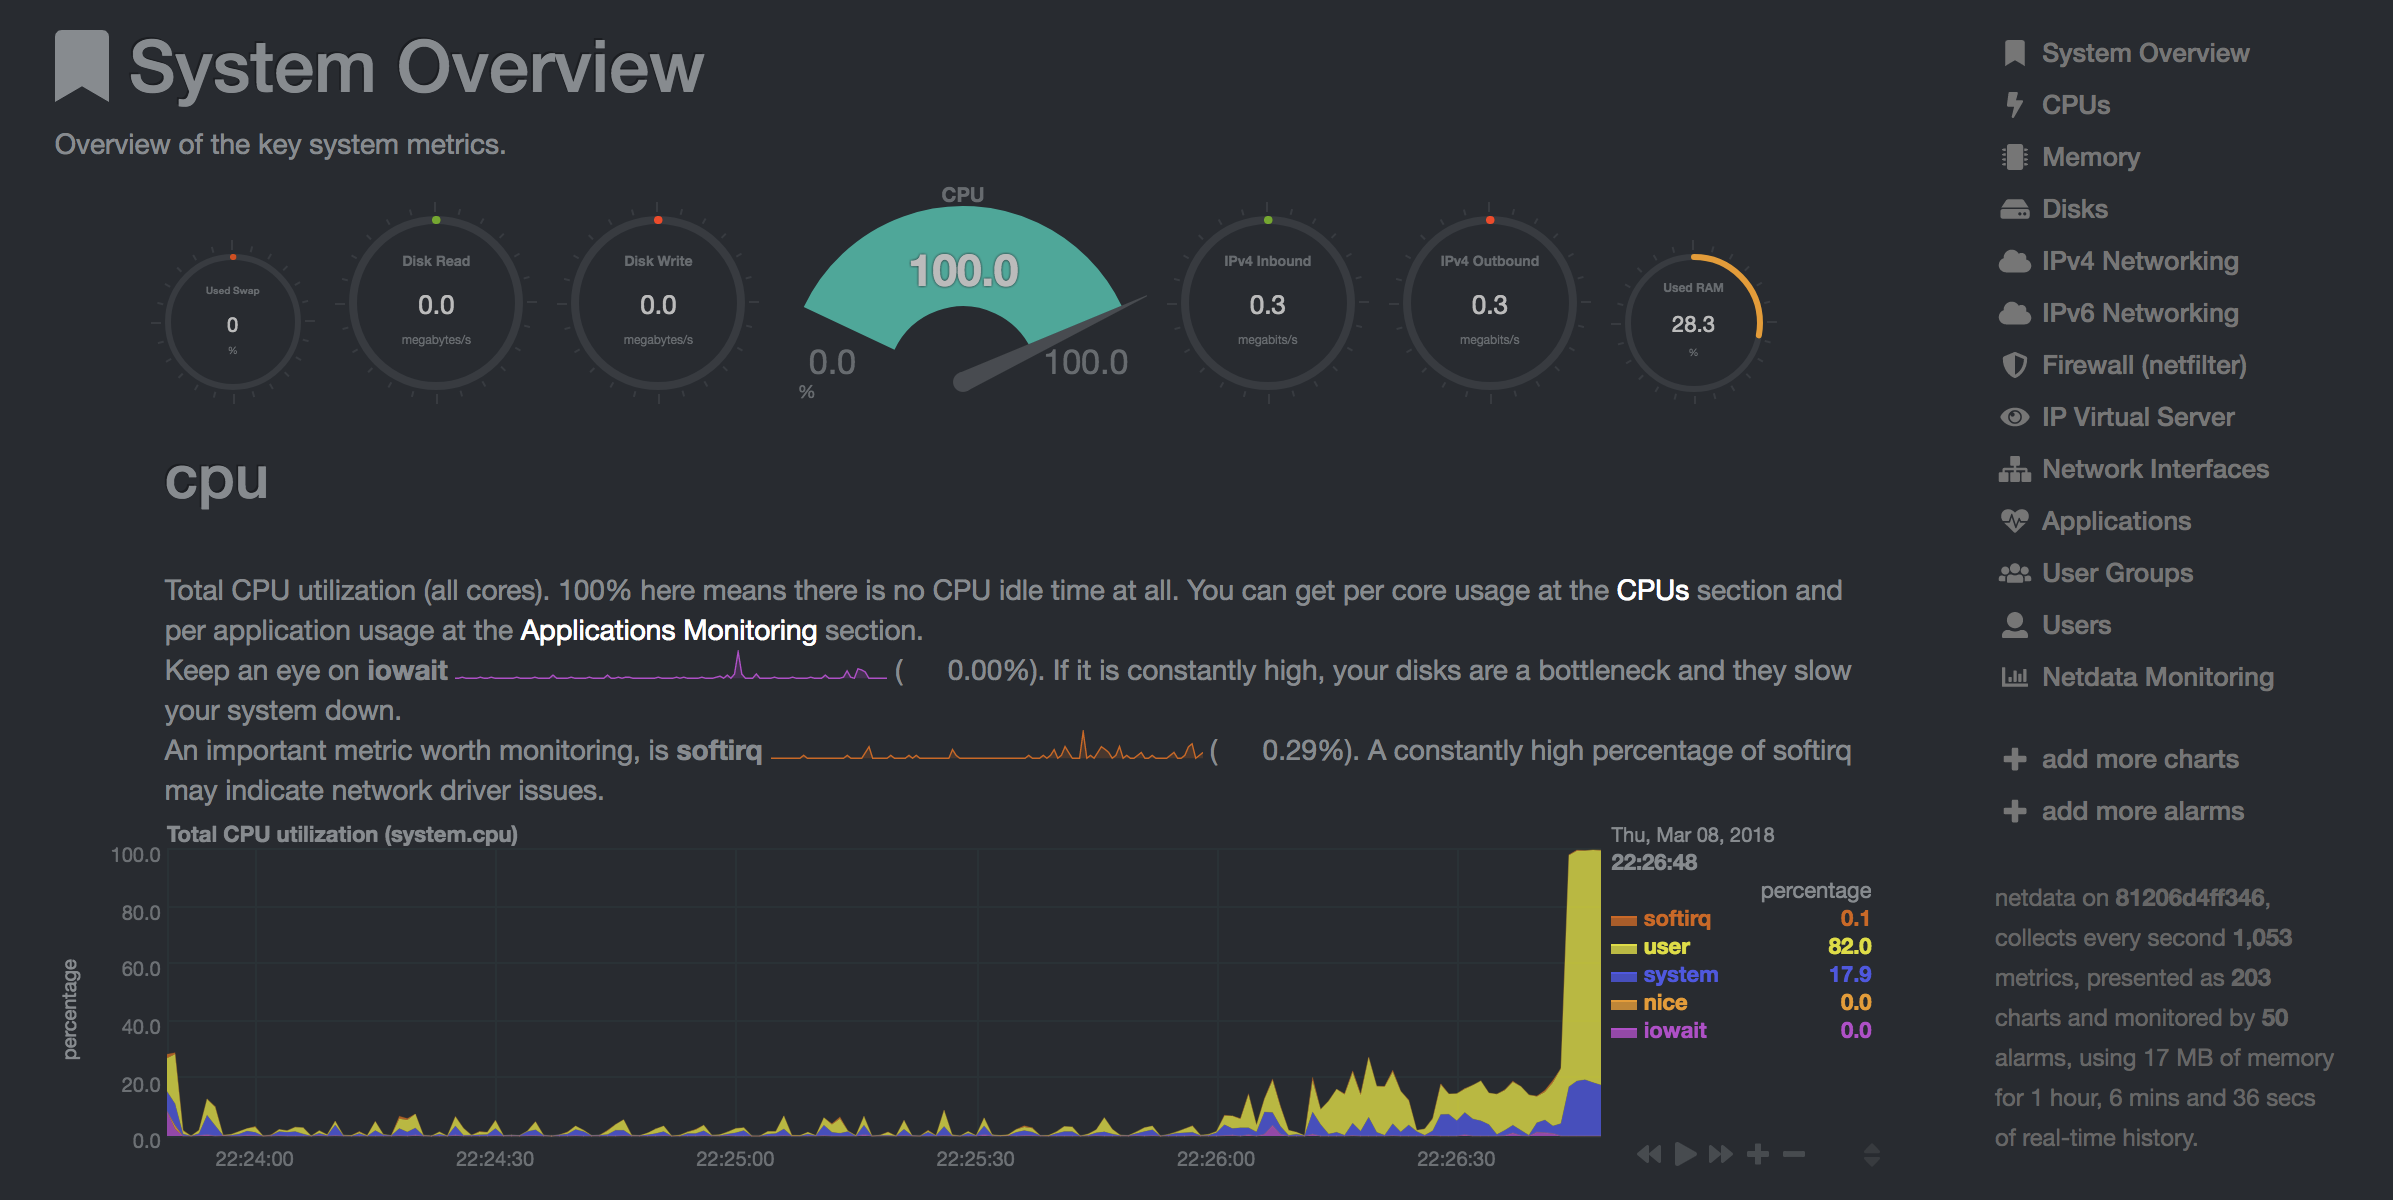
工作區提供了兩種預裝的基於Web的工具,可在模型培訓和其他實驗任務中幫助開發人員,以了解系統上發生的一切並找出性能瓶頸。
NetData( Open Tool -> Netdata )是一種實時硬件和性能監視儀表板,可視化Linux系統上的過程和服務。它監視有關CPU,GPU,內存,磁盤,網絡,進程等的指標。
Glances( Open Tool -> Glances )也是一個基於Web的硬件監視儀表板,可以用作NetData的替代方案。
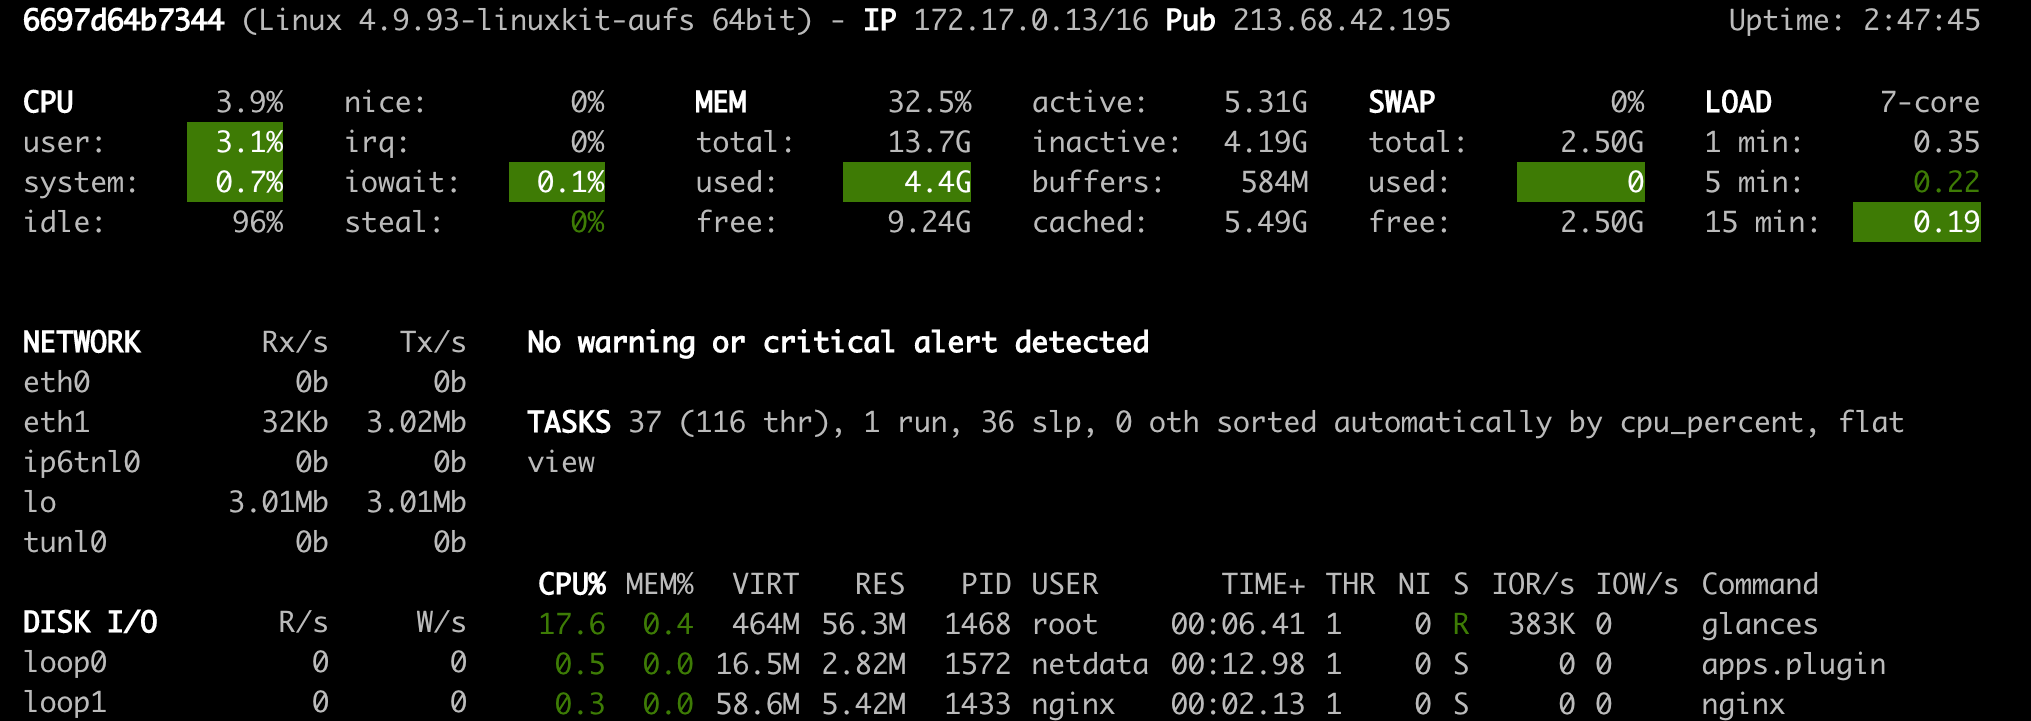
Netdata和Glances將向您顯示工作區容器正在運行的整個計算機的硬件統計信息。
作業被定義為任何運行一定時間完成的計算任務,例如模型培訓或數據管道。
工作區映像也可以用於執行任意Python代碼,而無需啟動任何預安裝的工具。 This provides a seamless way to productize your ML projects since the code that has been developed interactively within the workspace will have the same environment and configuration when run as a job via the same workspace image.
To run Python code as a job, you need to provide a path or URL to a code directory (or script) via EXECUTE_CODE . The code can be either already mounted into the workspace container or downloaded from a version control system (eg, git or svn) as described in the following sections. The selected code path needs to be python executable. In case the selected code is a directory (eg, whenever you download the code from a VCS) you need to put a __main__.py file at the root of this directory. The __main__.py needs to contain the code that starts your job.
You can execute code directly from Git, Mercurial, Subversion, or Bazaar by using the pip-vcs format as described in this guide. For example, to execute code from a subdirectory of a git repository, just run:
docker run --env EXECUTE_CODE= " git+https://github.com/ml-tooling/ml-workspace.git#subdirectory=resources/tests/ml-job " mltooling/ml-workspace:0.13.2For additional information on how to specify branches, commits, or tags please refer to this guide.
In the following example, we mount and execute the current working directory (expected to contain our code) into the /workspace/ml-job/ directory of the workspace:
docker run -v " ${PWD} :/workspace/ml-job/ " --env EXECUTE_CODE= " /workspace/ml-job/ " mltooling/ml-workspace:0.13.2In the case that the pre-installed workspace libraries are not compatible with your code, you can install or change dependencies by just adding one or multiple of the following files to your code directory:
requirements.txt : pip requirements format for pip-installable dependencies.environment.yml : conda environment file to create a separate Python environment.setup.sh : A shell script executed via /bin/bash . The execution order is 1. environment.yml -> 2. setup.sh -> 3. requirements.txt
You can test your job code within the workspace (started normally with interactive tools) by executing the following python script:
python /resources/scripts/execute_code.py /path/to/your/jobIt is also possible to embed your code directly into a custom job image, as shown below:
 FROM mltooling/ml-workspace:0.13.2

# Add job code to image
COPY ml-job /workspace/ml-job
ENV EXECUTE_CODE=/workspace/ml-job

# Install requirements only
RUN python /resources/scripts/execute_code.py --requirements-only

# Execute only the code at container startup
CMD [ "python" , "/resources/docker-entrypoint.py" , "--code-only" ]The workspace is pre-installed with many popular interpreters, data science libraries, and ubuntu packages:
conda , pip , apt-get , npm , yarn , sdk , poetry , gdebi ...The full list of installed tools can be found within the Dockerfile.
For every minor version release, we run vulnerability, virus, and security checks within the workspace using safety, clamav, trivy, and snyk via docker scan to make sure that the workspace environment is as secure as possible. We are committed to fix and prevent all high- or critical-severity vulnerabilities. You can find some up-to-date reports here.
The workspace provides a high degree of extensibility. Within the workspace, you have full root & sudo privileges to install any library or tool you need via terminal (eg, pip , apt-get , conda , or npm ). You can open a terminal by one of the following ways:
New -> TerminalApplications -> Terminal EmulatorFile -> New -> TerminalTerminal -> New Terminal Additionally, pre-installed tools such as Jupyter, JupyterLab, and Visual Studio Code each provide their own rich ecosystem of extensions. The workspace also contains a collection of installer scripts for many commonly used development tools or libraries (eg, PyCharm , Zeppelin , RStudio , Starspace ). You can find and execute all tool installers via Open Tool -> Install Tool . Those scripts can be also executed from the Desktop VNC (double-click on the script within the Tools folder on the Desktop VNC).
For example, to install the Apache Zeppelin notebook server, simply execute:
/resources/tools/zeppelin.sh --port=1234 After installation, refresh the Jupyter website and the Zeppelin tool will be available under Open Tool -> Zeppelin . Other tools might only be available within the Desktop VNC (eg, atom or pycharm ) or do not provide any UI (eg, starspace , docker-client ).
As an alternative to extending the workspace at runtime, you can also customize the workspace Docker image to create your own flavor as explained in the FAQ section.
The workspace can be extended in many ways at runtime, as explained here. However, if you like to customize the workspace image with your own software or configuration, you can do that via a Dockerfile as shown below:
 # Extend from any of the workspace versions/flavors
FROM mltooling/ml-workspace:0.13.2

# Run you customizations, e.g.
RUN
    # Install r-runtime, r-kernel, and r-studio web server from provided install scripts
    /bin/bash $RESOURCES_PATH/tools/r-runtime.sh --install &&
    /bin/bash $RESOURCES_PATH/tools/r-studio-server.sh --install &&
    # Cleanup Layer - removes unneccessary cache files
    clean-layer.sh
Finally, use docker build to build your customized Docker image.
For a more comprehensive Dockerfile example, take a look at the Dockerfile of the R-flavor.
To update a running workspace instance to a more recent version, the running Docker container needs to be replaced with a new container based on the updated workspace image.
All data within the workspace that is not persisted to a mounted volume will be lost during this update process. As mentioned in the persist data section, a volume is expected to be mounted into the /workspace folder. All tools within the workspace are configured to make use of the /workspace folder as the root directory for all source code and data artifacts. During an update, data within other directories will be removed, including installed/updated libraries or certain machine configurations. We have integrated a backup and restore feature ( CONFIG_BACKUP_ENABLED ) for various selected configuration files/folders, such as the user's Jupyter/VS-Code configuration, ~/.gitconfig , and ~/.ssh .
If the workspace is deployed via Docker (Kubernetes will have a different update process), you need to remove the existing container (via docker rm ) and start a new one (via docker run ) with the newer workspace image. Make sure to use the same configuration, volume, name, and port. For example, a workspace (image version 0.8.7 ) was started with this command:
 docker run -d
    -p 8080:8080
    --name "ml-workspace"
    -v "/path/on/host:/workspace"
    --env AUTHENTICATE_VIA_JUPYTER="mytoken"
    --restart always
    mltooling/ml-workspace:0.8.7
and needs to be updated to version 0.9.1 , you need to:
docker stop "ml-workspace" && docker rm "ml-workspace"docker run -d -p 8080:8080 --name "ml-workspace" -v "/path/on/host:/workspace" --env AUTHENTICATE_VIA_JUPYTER="mytoken" --restart always mltooling/ml-workspace:0.9.1 If you want to directly connect to the workspace via a VNC client (not using the noVNC webapp), you might be interested in changing certain VNC server configurations. To configure the VNC server, you can provide/overwrite the following environment variables at container start (via docker run option: --env ):
| 多變的 | 描述 | 預設 |
|---|---|---|
| VNC_PW | Password of VNC connection. This password only needs to be secure if the VNC server is directly exposed. If it is used via noVNC, it is already protected based on the configured authentication mechanism. | vncpassword |
| VNC_RESOLUTION | Default desktop resolution of VNC connection. When using noVNC, the resolution will be dynamically adapted to the window size. | 1600x900 |
| VNC_COL_DEPTH | Default color depth of VNC connection. | 24 |
Unfortunately, we currently do not support using a non-root user within the workspace. We plan to provide this capability and already started with some refactoring to allow this configuration. However, this still requires a lot more work, refactoring, and testing from our side.
Using root-user (or users with sudo permission) within containers is generally not recommended since, in case of system/kernel vulnerabilities, a user might be able to break out of the container and be able to access the host system. Since it is not very common to have such problematic kernel vulnerabilities, the risk of a severe attack is quite minimal. As explained in the official Docker documentation, containers (even with root users) are generally quite secure in preventing a breakout to the host. And compared to many other container use-cases, we actually want to provide the flexibility to the user to have control and system-level installation permissions within the workspace container.
The workspace comes preinstalled with various common tools to create isolated Python environments (virtual environments). The following sections provide a quick-intro on how to use these tools within the workspace. You can find information on when to use which tool here. Please refer to the documentation of the given tool for additional usage information.
venv (recommended):
To create a virtual environment via venv, execute the following commands:
 # Create environment in the working directory
python -m venv my-venv
# Activate environment in shell
source ./my-venv/bin/activate
# Optional: Create Jupyter kernel for this environment
pip install ipykernel
python -m ipykernel install --user --name=my-venv --display-name= " my-venv ( $( python --version ) ) "
# Optional: Close enviornment session
deactivate
pipenv (recommended):
To create a virtual environment via pipenv, execute the following commands:
 # Create environment in the working directory
pipenv install
# Activate environment session in shell
pipenv shell
# Optional: Create Jupyter kernel for this environment
pipenv install ipykernel
python -m ipykernel install --user --name=my-pipenv --display-name= " my-pipenv ( $( python --version ) ) "
# Optional: Close environment session
exit
virtualenv :
To create a virtual environment via virtualenv, execute the following commands:
 # Create environment in the working directory
virtualenv my-virtualenv
# Activate environment session in shell
source ./my-virtualenv/bin/activate
# Optional: Create Jupyter kernel for this environment
pip install ipykernel
python -m ipykernel install --user --name=my-virtualenv --display-name= " my-virtualenv ( $( python --version ) ) "
# Optional: Close environment session
deactivate
conda :
To create a virtual environment via conda, execute the following commands:
 # Create environment (globally)
conda create -n my-conda-env
# Activate environment session in shell
conda activate my-conda-env
# Optional: Create Jupyter kernel for this environment
python -m ipykernel install --user --name=my-conda-env --display-name= " my-conda-env ( $( python --version ) ) "
# Optional: Close environment session
conda deactivate
Tip: Shell Commands in Jupyter Notebooks:
If you install and use a virtual environment via a dedicated Jupyter Kernel and use shell commands within Jupyter (eg !pip install matplotlib ), the wrong python/pip version will be used. To use the python/pip version of the selected kernel, do the following instead:
 import sys
!{ sys . executable } - m pip install matplotlibThe workspace provides three easy options to install different Python versions alongside the main Python instance: pyenv, pipenv (recommended), conda.
pipenv (recommended):
To install a different python version (eg 3.7.8 ) within the workspace via pipenv, execute the following commands:
 # Install python vers
pipenv install --python=3.7.8
# Activate environment session in shell
pipenv shell
# Check python installation
python --version
# Optional: Create Jupyter kernel for this environment
pipenv install ipykernel
python -m ipykernel install --user --name=my-pipenv --display-name= " my-pipenv ( $( python --version ) ) "
# Optional: Close environment session
exit
pyenv :
To install a different python version (eg 3.7.8 ) within the workspace via pyenv, execute the following commands:
 # Install python version
pyenv install 3.7.8
# Make globally accessible
pyenv global 3.7.8
# Activate python version in shell
pyenv shell 3.7.8
# Check python installation
python3.7 --version
# Optional: Create Jupyter kernel for this python version
python3.7 -m pip install ipykernel
python3.7 -m ipykernel install --user --name=my-pyenv-3.7.8 --display-name= " my-pyenv (Python 3.7.8) "
conda :
To install a different python version (eg 3.7.8 ) within the workspace via conda, execute the following commands:
 # Create environment with python version
conda create -n my-conda-3.7 python=3.7.8
# Activate environment session in shell
conda activate my-conda-3.7
# Check python installation
python --version
# Optional: Create Jupyter kernel for this python version
pip install ipykernel
python -m ipykernel install --user --name=my-conda-3.7 --display-name= " my-conda ( $( python --version ) ) "
# Optional: Close environment session
conda deactivate
Tip: Shell Commands in Jupyter Notebooks:
If you install and use another Python version via a dedicated Jupyter Kernel and use shell commands within Jupyter (eg !pip install matplotlib ), the wrong python/pip version will be used. To use the python/pip version of the selected kernel, do the following instead:
 import sys
!{ sys . executable } - m pip install matplotlib Certain desktop tools (eg, recent versions of Firefox) or libraries (eg, Pytorch - see Issues: 1, 2) might crash if the shared memory size ( /dev/shm ) is too small. The default shared memory size of Docker is 64MB, which might not be enough for a few tools. You can provide a higher shared memory size via the shm-size docker run option:
docker run --shm-size=2G mltooling/ml-workspace:0.13.2 In general, the performance of running code within Docker is nearly identical compared to running it directly on the machine. However, in case you have limited the container's CPU quota (as explained in this section), the container can still see the full count of CPU cores available on the machine and there is no technical way to prevent this. Many libraries and tools will use the full CPU count (eg, via os.cpu_count() ) to set the number of threads used for multiprocessing/-threading. This might cause the program to start more threads/processes than it can efficiently handle with the available CPU quota, which can tremendously slow down the overall performance. Therefore, it is important to set the available CPU count or the maximum number of threads explicitly to the configured CPU quota. The workspace provides capabilities to detect the number of available CPUs automatically, which are used to configure a variety of common libraries via environment variables such as OMP_NUM_THREADS or MKL_NUM_THREADS . It is also possible to explicitly set the number of available CPUs at container startup via the MAX_NUM_THREADS environment variable (see configuration section). The same environment variable can also be used to get the number of available CPUs at runtime.
Even though the automatic configuration capabilities of the workspace will fix a variety of inefficiencies, we still recommend configuring the number of available CPUs with all libraries explicitly.例如:
 import os
MAX_NUM_THREADS = int ( os . getenv ( "MAX_NUM_THREADS" ))

# Set in pytorch
import torch
torch . set_num_threads ( MAX_NUM_THREADS )

# Set in tensorflow
import tensorflow as tf
config = tf . ConfigProto (
    device_count = { "CPU" : MAX_NUM_THREADS },
    inter_op_parallelism_threads = MAX_NUM_THREADS ,
    intra_op_parallelism_threads = MAX_NUM_THREADS ,
)
tf_session = tf . Session ( config = config )

# Set session for keras
import keras . backend as K
K . set_session ( tf_session )

# Set in sklearn estimator
from sklearn . linear_model import LogisticRegression
LogisticRegression ( n_jobs = MAX_NUM_THREADS ). fit ( X , y )

# Set for multiprocessing pool
from multiprocessing import Pool

with Pool ( MAX_NUM_THREADS ) as pool :
results = pool . map ( lst )If you encounter the following error within the container logs when starting the workspace, it will most likely not be possible to run the workspace on your hardware:
exited: nginx (terminated by SIGILL (core dumped); not expected)
The OpenResty/Nginx binary package used within the workspace requires to run on a CPU with SSE4.2 support (see this issue). Unfortunately, some older CPUs do not have support for SSE4.2 and, therefore, will not be able to run the workspace container. On Linux, you can check if your CPU supports SSE4.2 when looking into the cat /proc/cpuinfo flags section. If you encounter this problem, feel free to notify us by commenting on the following issue: #30.
Requirements : Docker and Act are required to be installed on your machine to execute the build process.
To simplify the process of building this project from scratch, we provide build-scripts - based on universal-build - that run all necessary steps (build, test, and release) within a containerized environment. To build and test your changes, execute the following command in the project root folder:
act -b -j buildUnder the hood it uses the build.py files in this repo based on the universal-build library. So, if you want to build it locally, you can also execute this command in the project root folder to build the docker container:
python build.py --makeFor additional script options:
python build.py --helpRefer to our contribution guides for more detailed information on our build scripts and development process.
Licensed Apache 2.0 . Created and maintained with ❤️ by developers from Berlin.


