ml workspace
0.13.2

機械学習のためのオールインワンのWebベースの開発環境
開始•機能とスクリーンショット•サポート•バグのレポート•FAQ•既知の問題•貢献
MLワークスペースは、機械学習とデータサイエンスに特化したオールインワンのWebベースのIDEです。展開するのは簡単で、数分以内に自分のマシンにMLソリューションを生産的に構築するために始めます。このワークスペースは、さまざまな人気のあるデータサイエンスライブラリ(Tensorflow、Pytorch、Keras、Sklearn)およびDev Tools(jupyter、vs code、tensorboardなど)が完全に構成、最適化、統合された開発者向けの究極のツールです。
ワークスペースでは、 Dockerをマシンにインストールする必要があります(インストールガイド)。
単一のワークスペースインスタンスを展開することは、次のように簡単です。
docker run -p 8080:8080 mltooling/ml-workspace:0.13.2ボイラ、それは簡単でした!これで、Dockerは最新のワークスペース画像をマシンに引きます。インターネットの速度に応じて、これには数分かかる場合があります。ワークスペースが開始されたら、http:// localhost:8080からアクセスできます。
別のマシンまたは別のポートで開始した場合は、マシンのIP/DNSおよび/または露出したポートを必ず使用してください。
生産的な使用のために単一のインスタンスを展開するには、少なくとも次のオプションを適用することをお勧めします。
docker run -d
    -p 8080:8080
    --name " ml-workspace "
    -v " ${PWD} :/workspace "
    --env AUTHENTICATE_VIA_JUPYTER= " mytoken "
    --shm-size 512m
    --restart always
    mltooling/ml-workspace:0.13.2
このコマンドは、コンテナをバックグラウンド( -d )で実行し、現在の作業ディレクトリを/workspaceフォルダー( -v )にマウントし、提供されたトークン( --env AUTHENTICATE_VIA_JUPYTER )を介してワークスペースを保護し、512MBの共有メモリ( --shm-size )を提供して、予期しないクラッシュを防止します(既知の問題--restart always )。 Docker実行の追加オプションは、以下のセクションにあるWorkspace構成オプションとワークスペースの構成オプションを見つけることができます。
ワークスペースには、環境変数を設定することで使用できるさまざまな構成オプションが提供されます(Docker Run Option: --env )。
| 変数 | 説明 | デフォルト |
|---|---|---|
| workspace_base_url | Jupyterおよびその他のすべてのツールが到達可能になるベースURL。 | / |
| workspace_ssl_enabled | SSLを有効または無効にします。 TRUEに設定する場合、どちらの証明書(CERT.CRT)を/resources/sslにマウントする必要があります。 | 間違い |
| workspace_auth_user | 基本的な認証ユーザー名。基本的な認証を有効にするには、ユーザーとパスワードの両方を設定する必要があります。ワークスペースを保護するために、 AUTHENTICATE_VIA_JUPYTER使用することをお勧めします。 | |
| workspace_auth_password | 基本的な認証ユーザーパスワード。基本的な認証を有効にするには、ユーザーとパスワードの両方を設定する必要があります。ワークスペースを保護するために、 AUTHENTICATE_VIA_JUPYTER使用することをお勧めします。 | |
| workspace_port | ワークスペースプロキシのメインコンテナ内部ポートを構成します。ほとんどのシナリオでは、この構成は変更されないでください。ワークスペースの代わりに、Docker経由のポート構成を使用する必要があります。 | 8080 |
| config_backup_enabled | ユーザーホームディレクトリの.ssh、.jupyter、または.gitconfigなど、ユーザー構成を永続的な/workspaceフォルダーに自動的にバックアップして復元します。 | 真実 |
| shared_links_enabled | 外部リンクを介してリソースを共有する機能を有効または無効にします。これは、ファイル共有、ワークスペース内部ポートへのアクセス、および簡単なコマンドベースのSSHセットアップを有効にするために使用されます。すべての共有リンクは、トークンを介して保護されています。ただし、トークンは共有後に簡単に無効にできず、期限切れにならないため、特定のリスクがあります。 | 真実 |
| include_tutorials | trueの場合、チュートリアルとはじめにノートブックの選択が、コンテナ起動の/workspaceフォルダーに追加されますが、フォルダーが空の場合のみです。 | 真実 |
| max_num_threads | さまざまな一般的なライブラリ(MKL、Openblas、OMP、Numba、...)を使用する場合の計算に使用されるスレッドの数。 autoを使用して、Workspaceが利用可能なCPUリソースに基づいてスレッドの数を動的に決定できるようにすることもできます。この構成は、ワークスペース内からユーザーが上書きすることができます。一般的に、ワークスペースで利用可能なCPUの数以下に設定するのは良いことです。 | 自動 |
| jupyter構成: | ||
| shutdown_inactive_kernels | 特定のタイムアウト後に非アクティブカーネルを自動的にシャットダウンします(メモリまたはGPUリソースをクリーンアップするため)。値は、秒単位のタイムアウトになるか、デフォルト値が48時間でtrueに設定できます。 | 間違い |
| Authenticate_via_jupyter | trueの場合、すべてのHTTPリクエストはJupyterサーバーに対して認証されます。つまり、Jupyterで構成された認証方法は、他のすべてのツールにも使用されます。これはfalseで無効にすることができます。他の値はこの認証をアクティブにし、notebookapp.token jupyterの構成を介してトークンとして適用されます。 | 間違い |
| Notebook_args | コマンドラインargsを介してJupyter構成オプションを追加および上書きします。すべてのオプションについては、この概要を参照してください。 | |
データを保持するには、ボリュームを/workspaceにマウントする必要があります(Docker Run Option: -v )。
コンテナ内のデフォルトの作業ディレクトリは/workspaceであり、これはjupyterインスタンスのルートディレクトリでもあります。 /workspaceディレクトリは、すべての重要な作業アーティファクトに使用することを目的としています。サーバーの他のディレクトリ内のデータ(例: /root )は、コンテナの再起動で紛失する可能性があります。
次の2つのオプションのいずれかを介して認証を有効にすることを強くお勧めします。両方のオプションについて、ユーザーは、事前にインストールされたツールにアクセスするために認証する必要があります。
認証は、メインワークスペースポート(デフォルト:
8080)からアクセスされるすべてのツールに対してのみ機能します。これは、すべてのプリインストールされたツールとアクセスポート機能で機能します。コンテナの別のポートを露出させる場合は、認証で保護してください。
AUTHENTICATE_VIA_JUPYTER変数を介してJupyterの認証実装に基づいて、トークンベースの認証をアクティブにします。
docker run -p 8080:8080 --env AUTHENTICATE_VIA_JUPYTER= " mytoken " mltooling/ml-workspace:0.13.2 <generated>を使用して、Jupyterにコンテナログに印刷されたランダムトークンを生成することもできます。 trueの値はトークンを設定しませんが、ユーザーが認証されている場合、ワークスペース内のすべてのリクエストがJupyterインスタンスで確認されることをアクティブにします。これは、Jupyterhubのようなツールに使用されます。これは、独自の認証方法を構成しています。
WORKSPACE_AUTH_USERおよびWORKSPACE_AUTH_PASSWORD変数を介して基本認証をアクティブにします。
docker run -p 8080:8080 --env WORKSPACE_AUTH_USER= " user " --env WORKSPACE_AUTH_PASSWORD= " pwd " mltooling/ml-workspace:0.13.2基本認証はnginxプロキシを介して構成されており、 AUTHENTICATE_VIA_JUPYTERを使用すると、ワークスペース内の任意のツールへのすべてのリクエストがjupyterインスタンスを介して(リクエストCookieに基づいて)認証されているかどうかを確認するため、他のオプションと比較してよりパフォーマンスが発生する可能性があります。
WorkspaceにHTTPS(暗号化された通信)を介してアクセスできるようにSSLを有効にすることをお勧めします。 SSL暗号化は、 WORKSPACE_SSL_ENABLED変数を介してアクティブにできます。
trueに設定すると、 cert.crtおよびcert.keyファイルを/resources/sslにマウントする必要があります。または、証明書ファイルが存在しない場合、コンテナは自己署名証明書を生成します。たとえば、ローカルシステム上の/path/with/certificate/filesホストドメイン( cert.crtおよびcert.keyファイル)の有効な証明書が含まれている場合、以下に示すようにワークスペースから使用できます。
docker run
    -p 8080:8080
    --env WORKSPACE_SSL_ENABLED= " true "
    -v /path/with/certificate/files:/resources/ssl:ro
    mltooling/ml-workspace:0.13.2
パブリックドメインでワークスペースをホストする場合は、ドメインの信頼できる証明書を取得するためにLet's Encryptを使用することをお勧めします。 Workspaceに生成された証明書(certbotツールなど) cert.crt使用するには、 privkey.pemはcert.keyファイルとfullchain.pemに対応します。
SSLサポートを有効にする場合、Plain
http://https://://を介してワークスペースにアクセスする必要があります。
デフォルトでは、ワークスペースコンテナにはリソースの制約がなく、ホストのカーネルスケジューラが許可するのと同じくらい多くのリソースを使用できます。 Dockerは、Docker Runコマンドのランタイム構成フラグを設定することにより、メモリまたはコンテナが使用できるCPUの量を制御する方法を提供します。
ワークスペースでは、安定して使用可能になるには、少なくとも2つのCPUと500MBが必要です。
たとえば、次のコマンドは、ワークスペースが最大8 cpu、16 GBのメモリ、1 GBの共有メモリのみを使用することを制限します(既知の問題を参照)。
docker run -p 8080:8080 --cpus=8 --memory=16g --shm-size=1G mltooling/ml-workspace:0.13.2リソースの制約に関するその他のオプションとドキュメントについては、公式Dockerガイドを参照してください。
プロキシが必要な場合は、 HTTP_PROXY 、 HTTPS_PROXY 、およびNO_PROXY環境変数を介してプロキシ構成を渡すことができます。
メインワークスペースの画像( mltooling/ml-workspace )に加えて、さまざまなユースケースをサポートするために機能を拡張するか、画像サイズを最小化する他の画像フレーバーを提供します。
最小限のフレーバー( mltooling/ml-workspace-minimal )は、メイン画像にプリインストールされているPythonライブラリのほとんどがない機能セクションで説明されているほとんどのツールと機能を含む最小画像です。 Pythonライブラリまたは除外されたツールは、ランタイム中にユーザーが手動でインストールできます。
docker run -p 8080:8080 mltooling/ml-workspace-minimal:0.13.2 Rフレーバー( mltooling/ml-workspace-r )は、デフォルトのワークスペース画像に基づいており、Rインタープレーター、R-Jupyter Kernel、RStudio Server( Open Tool -> RStudioを介したアクセス)、およびRエコシステムからのさまざまな人気パッケージで拡張します。
docker run -p 8080:8080 mltooling/ml-workspace-r:0.12.1 Spark Flavor( mltooling/ml-workspace-spark )は、R-Flavor Workspaceイメージに基づいており、Spark Runtime、Spark-Jupyter Kernel、Zeppelin Notebook( Open Tool -> Zeppelinを介したアクセス)、Pyspark、Hadoop、Java Kernel、およびいくつかの追加の図書館&Jupyter extensionsで拡張します。
docker run -p 8080:8080 mltooling/ml-workspace-spark:0.12.1現在、GPU-FlavorはCUDA 11.2のみをサポートしています。他のCUDAバージョンのサポートが将来追加される可能性があります。
GPUフレーバー( mltooling/ml-workspace-gpu )は、デフォルトのワークスペース画像に基づいており、さまざまな機械学習ライブラリ(Tensorflow、Pytorch、CNTK、JAXなど)のCUDA 10.1およびGPU対応バージョンで拡張します。このGPU画像には、システムに次の追加要件があります。
>=460.32.03 (指示)。docker run -p 8080:8080 --gpus all mltooling/ml-workspace-gpu:0.13.2docker run -p 8080:8080 --runtime nvidia --env NVIDIA_VISIBLE_DEVICES= " all " mltooling/ml-workspace-gpu:0.13.2GPUフレーバーには、以下で説明するように、いくつかの追加の構成オプションも付属しています。
| 変数 | 説明 | デフォルト |
|---|---|---|
| nvidia_visible_devices | ワークスペース内でどのGPUがアクセスできるかを制御します。デフォルトでは、ホストからのすべてのGPUはワークスペース内でアクセスできます。 all 、 none 、またはデバイスIDのコンマ区切りリストを指定することもできます(例: 0,1 )。ホストマシンでnvidia-smiを実行することにより、利用可能なデバイスIDのリストを見つけることができます。 | 全て |
| cuda_visible_devices | ワークスペース内で実行されるGPUS CUDAアプリケーションが表示されるコントロールを制御します。デフォルトでは、ワークスペースにアクセスできるすべてのGPUが表示されます。アプリケーションを制限するには、ワークスペース内の利用可能なデバイス( nvidia-smiを実行)に基づいて、内部デバイスID(例えば0,2 )のコンマ区切りリストを提供します。 NVIDIA_VISIBLE_DEVICESと比較して、ワークスペースユーザーは、ワークスペース内からこの構成を上書きすることで他のGPUにアクセスできます。 | |
| tf_force_gpu_allow_growth | デフォルトでは、GPUメモリの大部分は、Tensorflowグラフの最初の実行によって割り当てられます。この動作は生産パイプラインに望ましい場合がありますが、インタラクティブな使用にはあまり望ましくありません。 trueを使用して動的なGPUメモリ割り当てまたはfalseを有効にして、実行時にすべてのメモリを割り当てるようにtensorflowに指示します。 | 真実 |
ワークスペースは、シングルユーザー開発環境として設計されています。マルチユーザーのセットアップには、展開することをお勧めします。 MLハブ。 ML Hubは、複数のユーザー向けにワークスペースインスタンスをスポーン、管理、プロキシインスタンスにするタスクを備えたJupyterhubに基づいています。
ML Hubを使用すると、単一のサーバー(Docker経由)またはクラスター(Kubernetes経由)でマルチユーザー環境を簡単に設定し、さまざまな使用シナリオと認証プロバイダーをサポートします。 MLハブを使用して試してみることができます。
docker run -p 8080:8080 -v /var/run/docker.sock:/var/run/docker.sock mltooling/ml-hub:latestMLハブの詳細とドキュメントについては、GitHubサイトをご覧ください。
このプロジェクトは、BenjaminRäthlein、Lukas Masuch、およびJan Kalkanによって維持されています。電子メールで個別のサポートを提供できないことを理解してください。また、より多くの人々がそれから利益を得ることができるように、それが公に共有されている場合、ヘルプははるかに価値があると考えています。
| タイプ | チャネル |
|---|---|
| バグレポート | |
| ?機能リクエスト | |
| ? 使用状況の質問 | |
| ?発表 | |
| ❓その他のリクエスト |
jupyter•デスクトップGUI•vsコード•jupyterlab•git統合•ファイル共有•アクセスポート•テンソルボード•拡張性•ハードウェア監視•SSHアクセス•リモート開発•ジョブの実行
ワークスペースには、機械学習ワークフローを支援するためのクラス最高のオープンソース開発ツールの選択が装備されています。これらのツールの多くは、JupyterのOpen Toolメニュー(ワークスペースの主なアプリケーション)から開始できます。
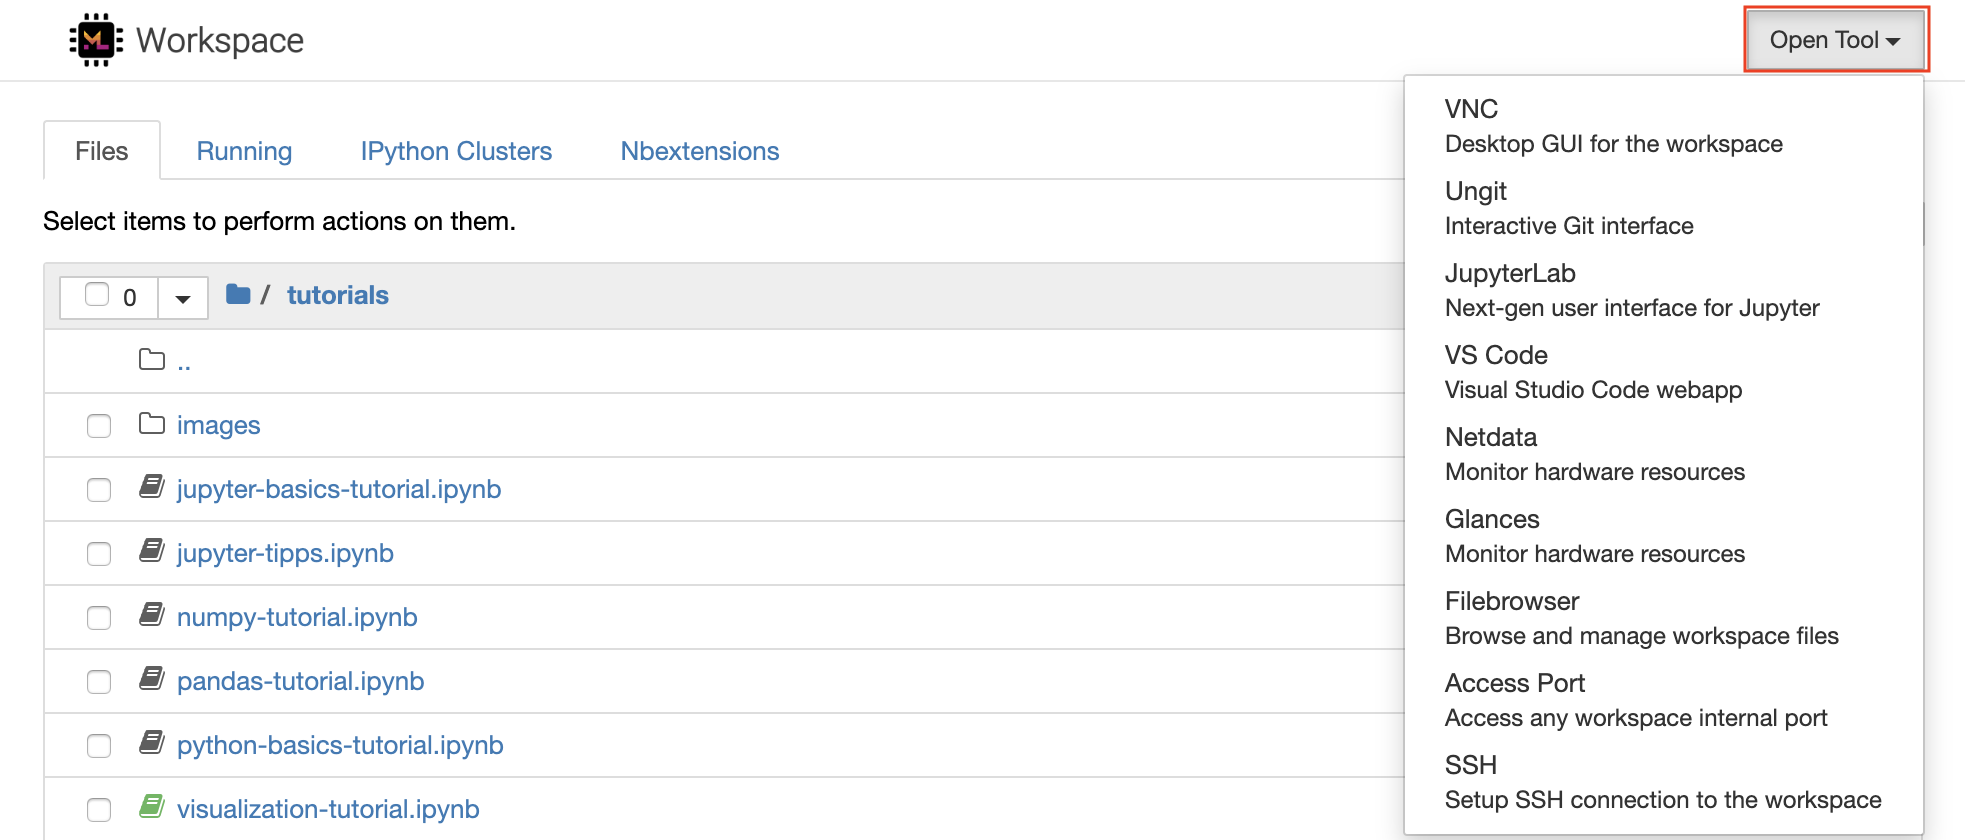
ワークスペース内には、ターミナルを介して必要なライブラリまたはツール(
pip、apt-get、conda、またはnpm)をインストールするための完全なルートとSUDOの特権があります。拡張性セクション内でワークスペースを拡張する方法をさらに見つけることができます
Jupyterノートブックは、コードを作成および実行するためのWebベースのインタラクティブな環境です。 Jupyterのメインビルディングブロックは、ファイルブラウザー、ノートブックエディター、およびカーネルです。ファイルブラウザーは、 /workspaceディレクトリのすべてのノートブック、ファイル、およびフォルダーのインタラクティブなファイルマネージャーを提供します。
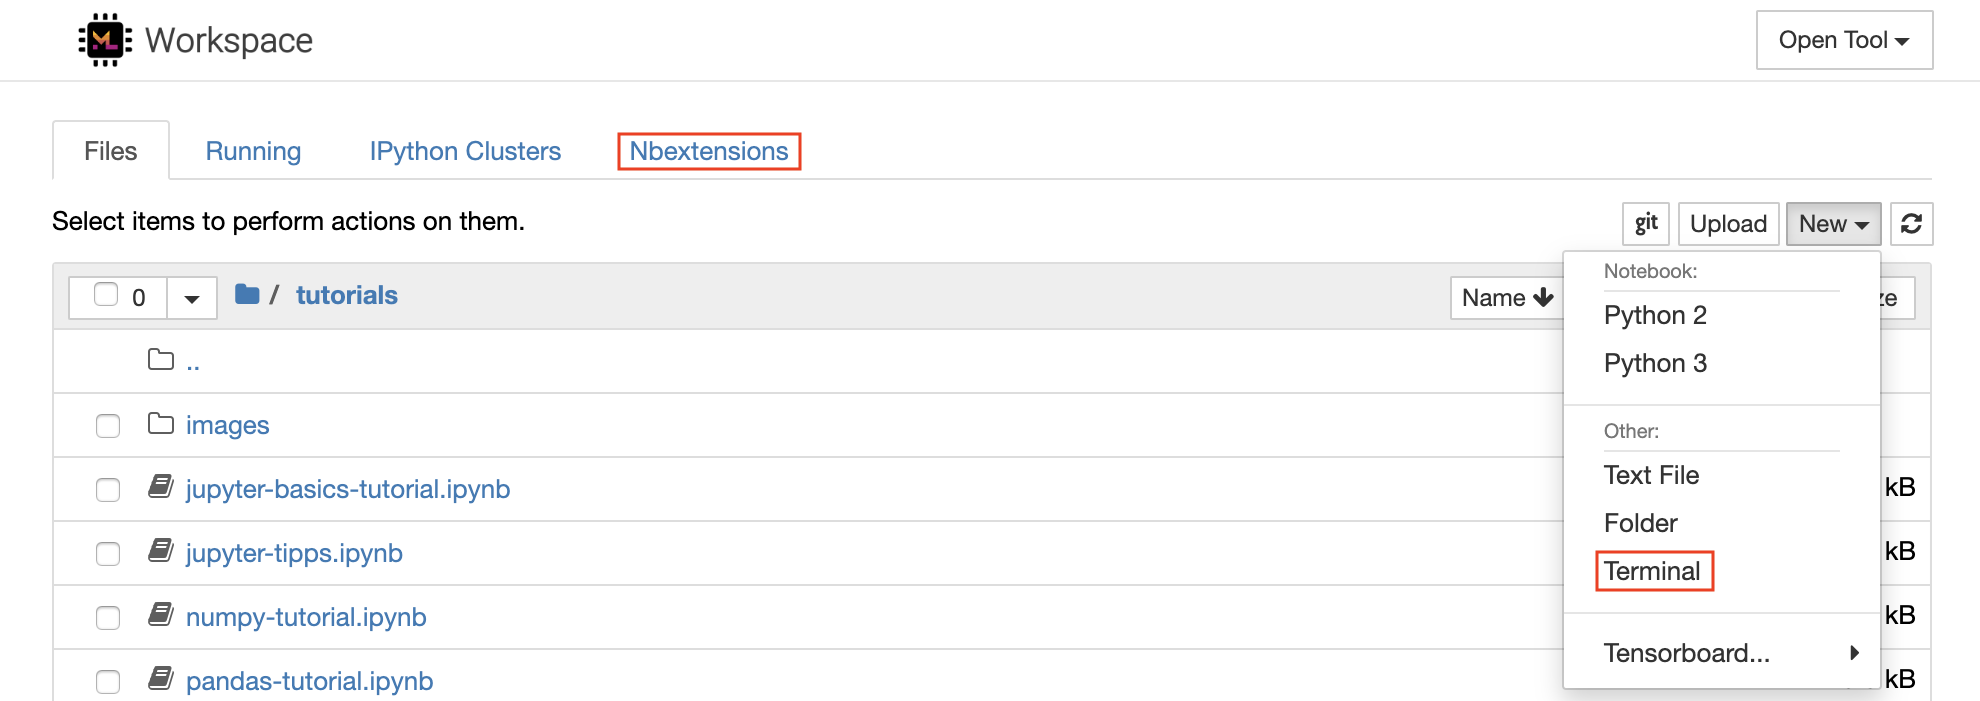
リストの上部にあるNewドロップダウンボタンをクリックし、目的の言語カーネルを選択して、新しいノートブックを作成できます。
ファイルブラウザーで
New -> Terminal選択することで、インタラクティブ端末インスタンスをスポーンすることもできます。
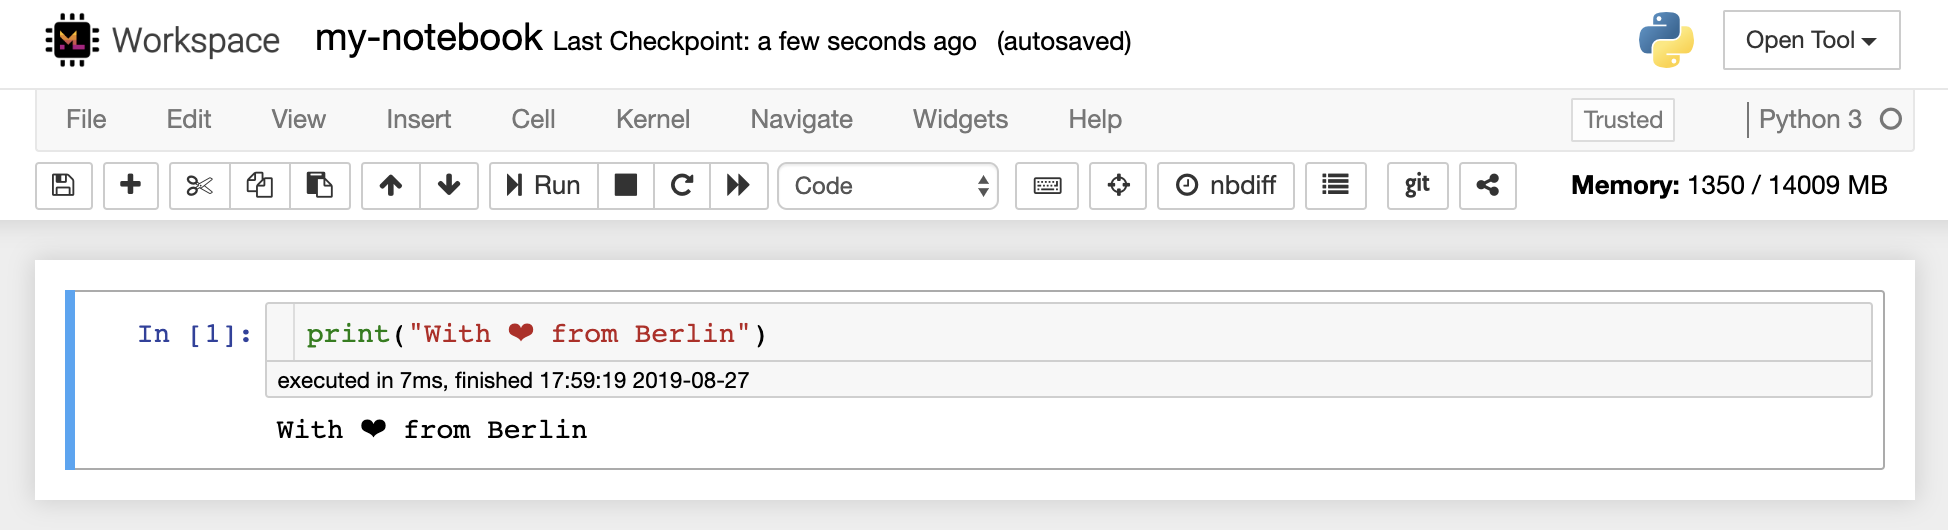
ノートブックエディターを使用すると、ユーザーはライブコード、マークダウンテキスト、シェルコマンド、ラテックス方程式、インタラクティブウィジェット、プロット、画像を含むドキュメントを作成できます。これらのノートブックドキュメントは、さまざまな形式に変換され、他の人と共有できる計算の完全かつ自己完結型の記録を提供します。
このワークスペースには、さまざまなサードパーティのJupyter拡張機能がアクティブになっています。これらの拡張機能をnbextensions configurator:
nbextensions] [ファイルブラウザー]で構成できます
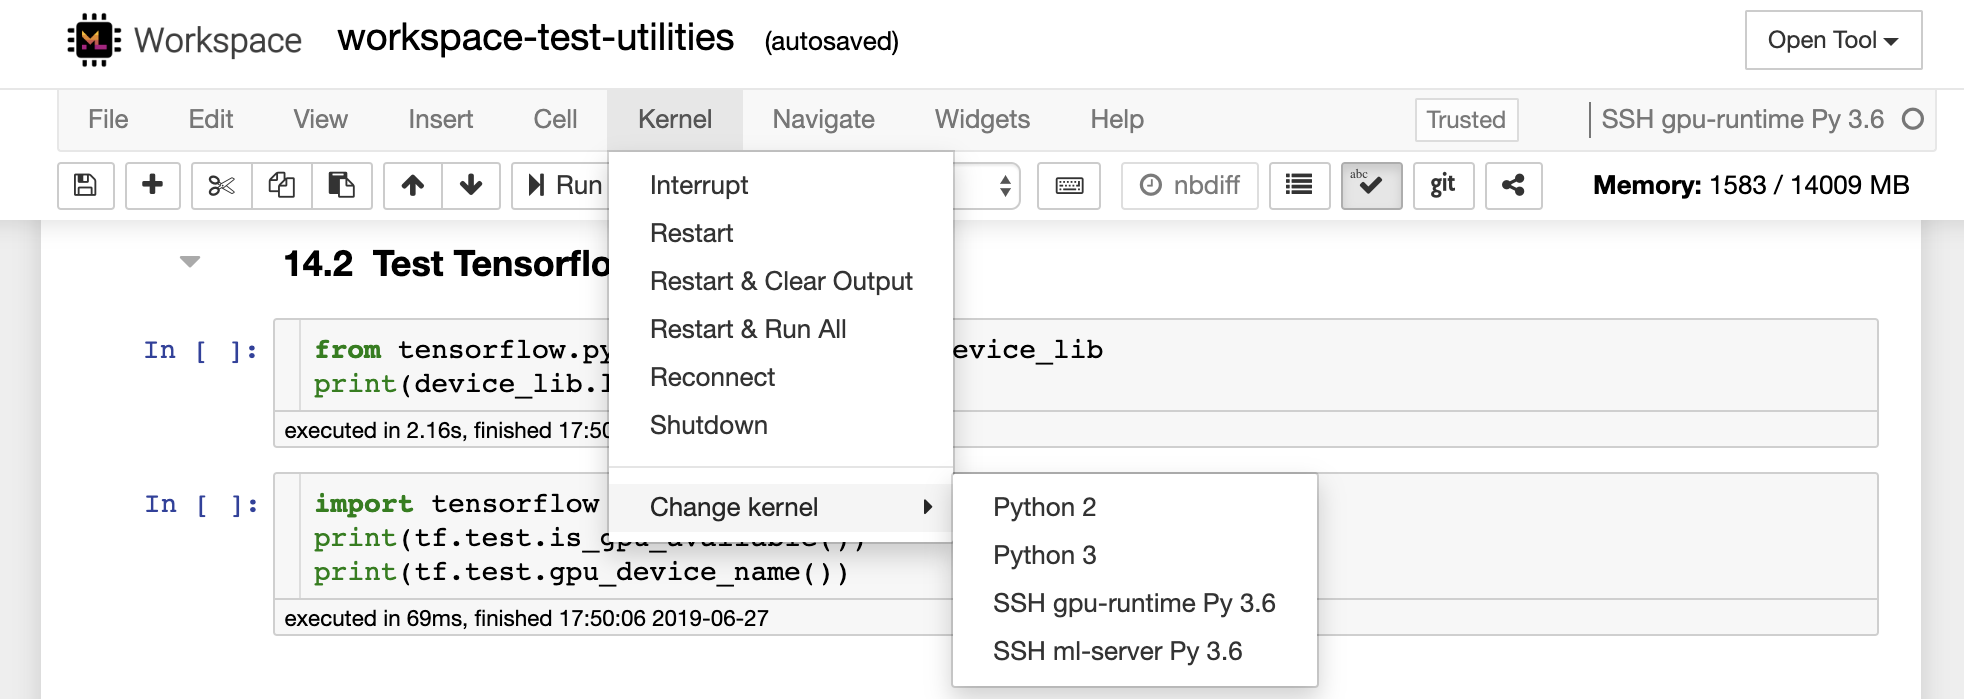
ノートブックを使用すると、コードをさまざまなプログラミング言語で実行できます。ユーザーが開いているノートブック文書ごとに、Webアプリケーションは、そのノートブックのコードを実行して出力を返すカーネルを起動します。このワークスペースには、Python 3カーネルがプリインストールされています。追加のカーネルをインストールして、他の言語(R、Scala、Goなど)または追加のコンピューティングリソース(GPU、CPU、メモリなど)にアクセスできます。
Python 2は奪われており、使用することをお勧めしません。ただし、このコマンドを介してPython 2.7カーネルをインストールできます:
/bin/bash /resources/tools/python-27.sh
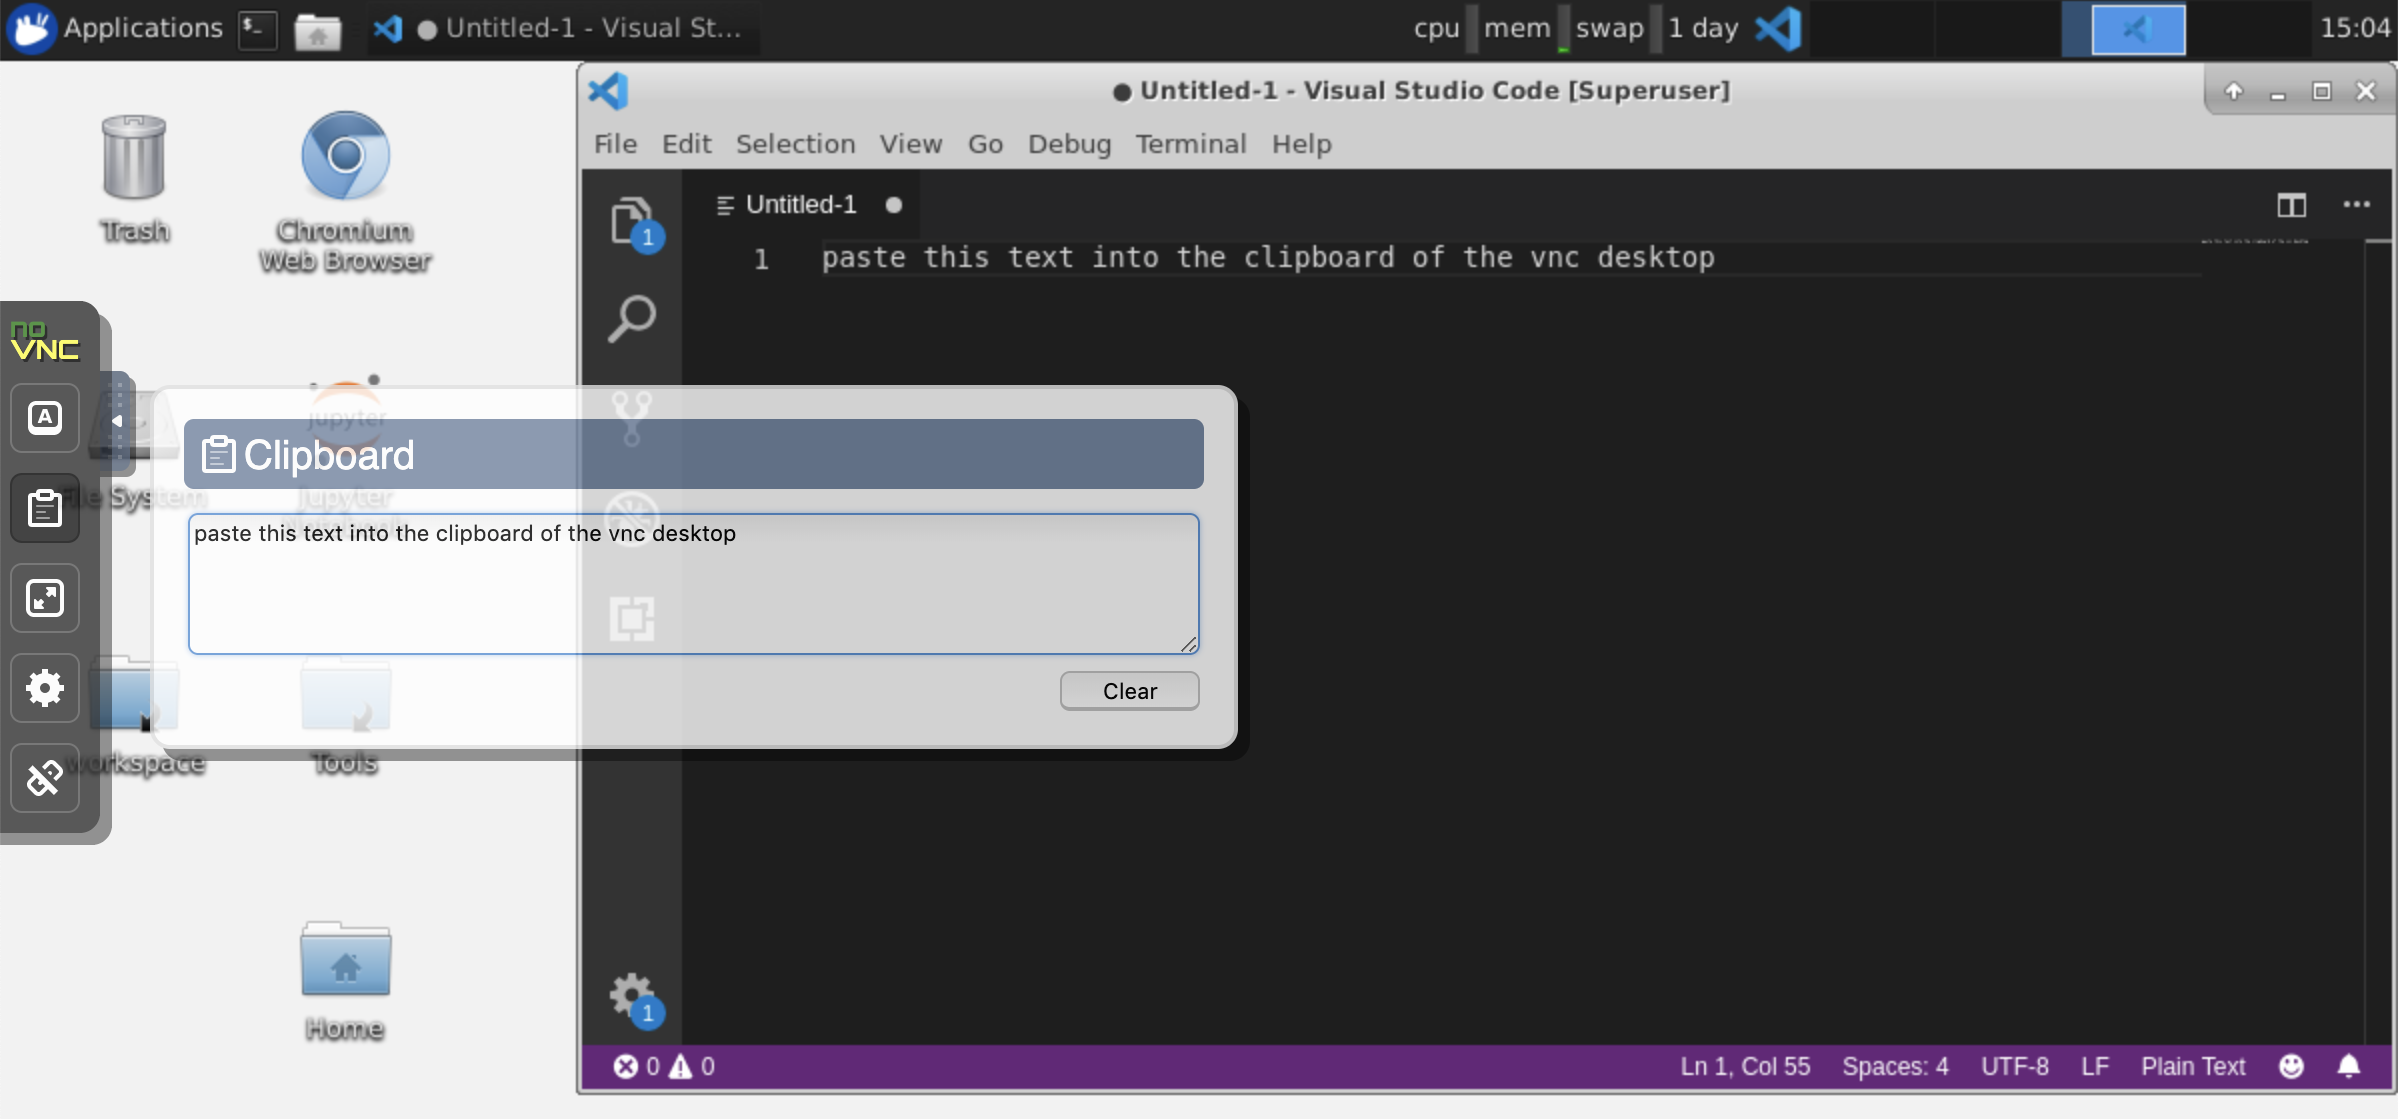
このワークスペースは、NOVNCを介してワークスペースへのHTTPベースのVNCアクセスを提供します。これにより、完全に機能したデスクトップGUIを使用して、ワークスペース内でアクセスして作業できます。このデスクトップGUIにアクセスするには、 Open Tool 、 VNCを選択し、 Connectボタンをクリックします。パスワードを求められている場合は、 vncpasswordを使用してください。
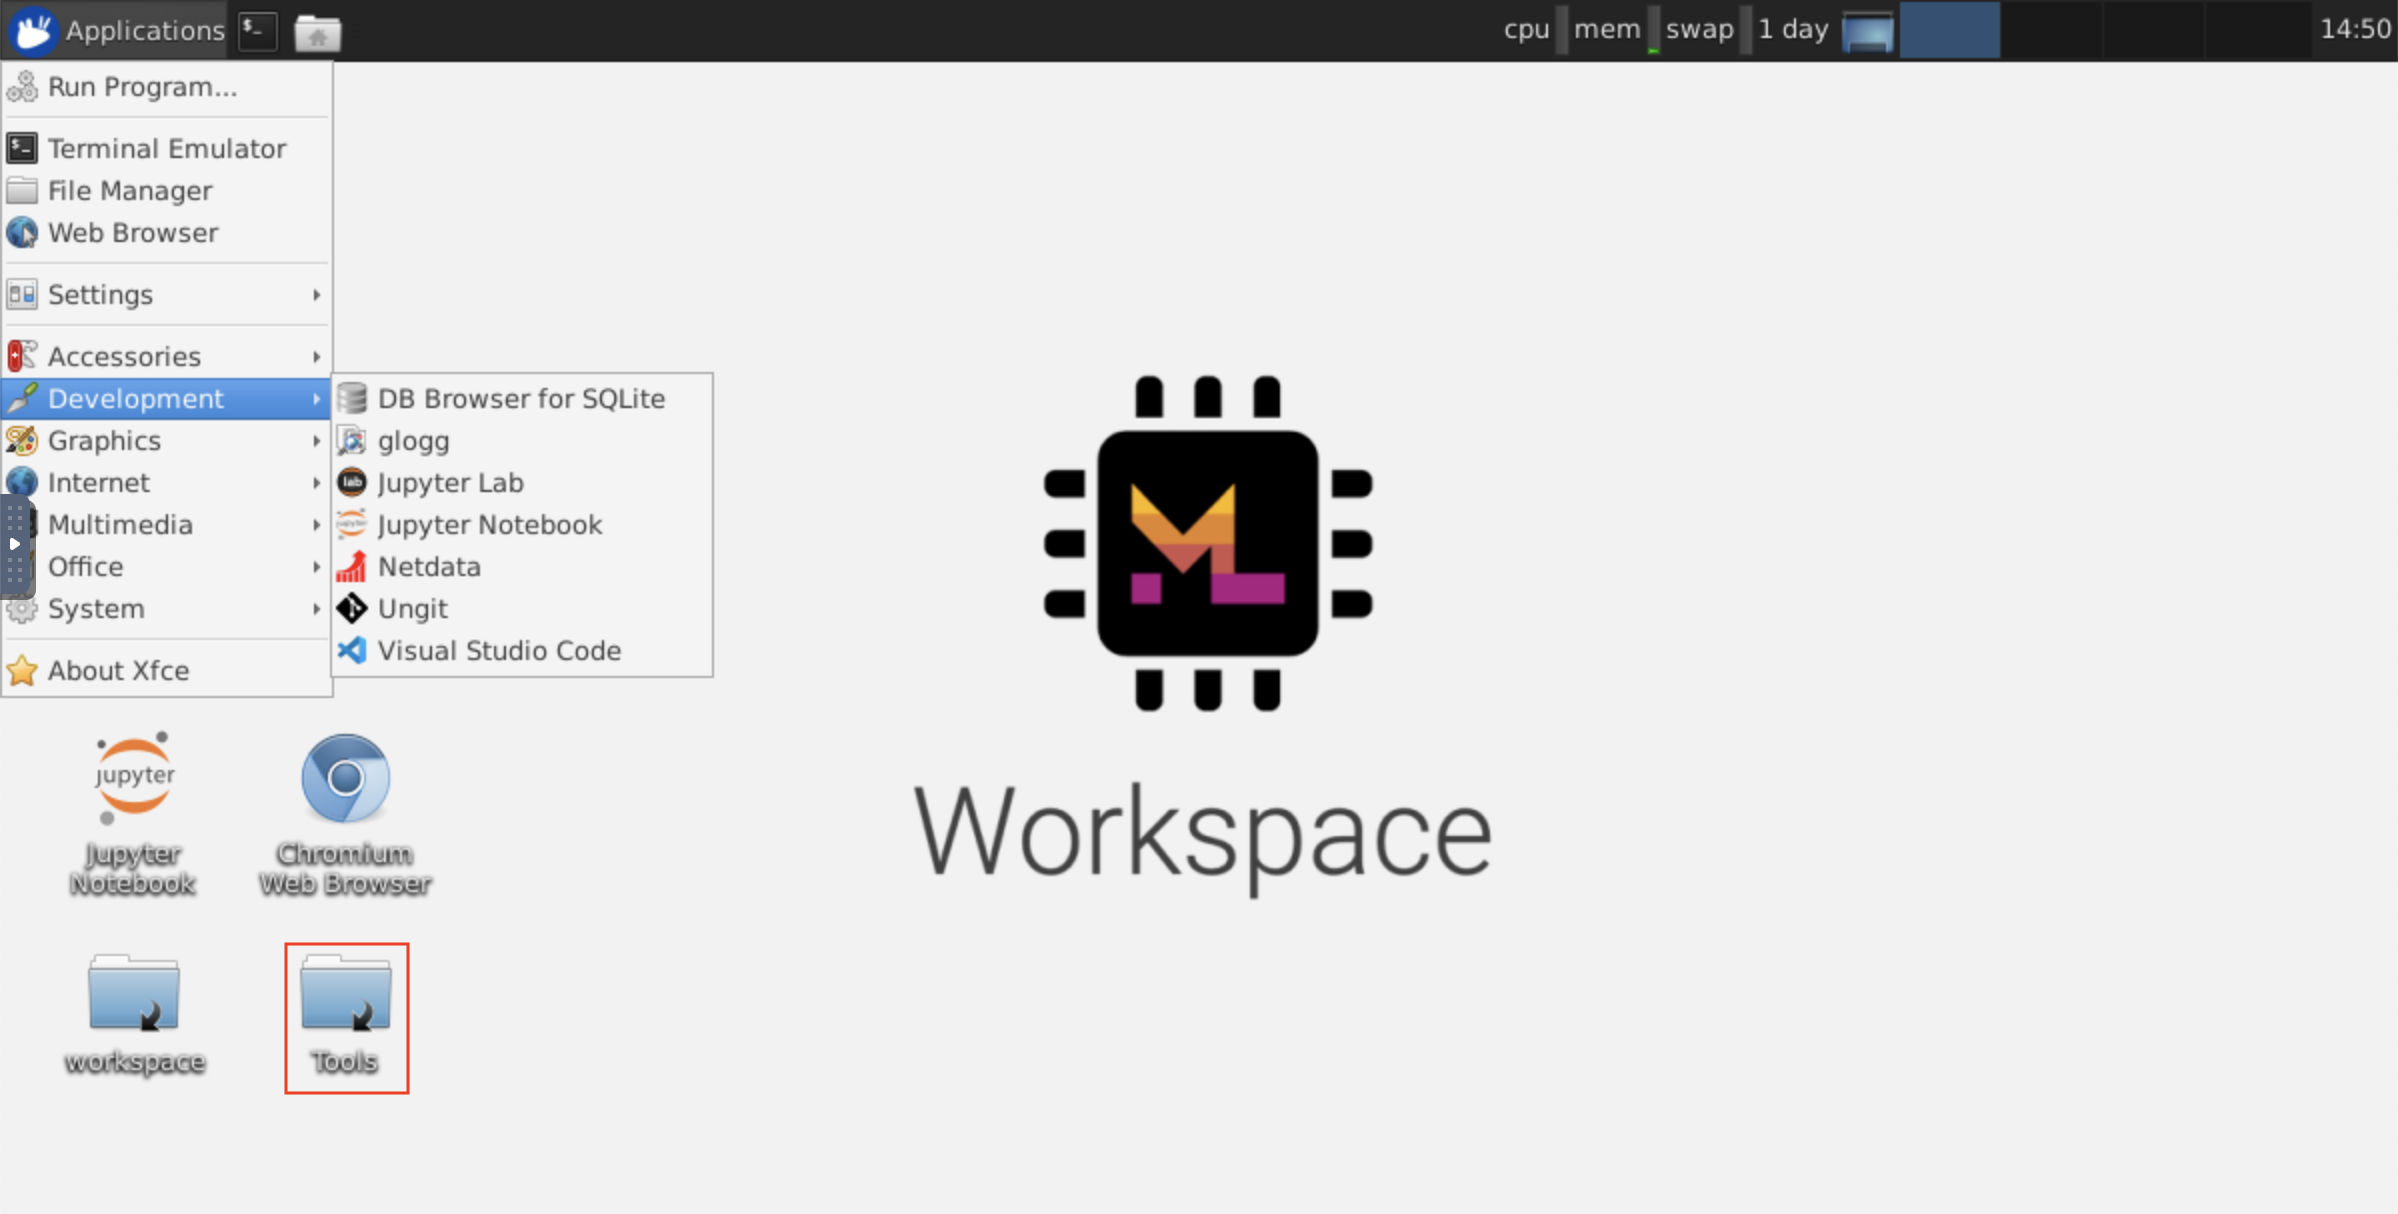
接続すると、本格的なWebブラウザーまたはUbuntuで利用できるその他のツールをインストールして使用できるデスクトップGUIが表示されます。デスクトップ上のToolsフォルダー内には、Atom、Pycharm、R-Runtime、R-Studio、Postmanなどの最も一般的に使用される開発ツールのいくつかをインストールするのを簡単にインストールするインストールスクリプトのコレクションがあります(スクリプトをダブルクリックするだけです)。
クリップボード:マシンとワークスペースの間でクリップボードを共有する場合は、以下に説明するコピーパステの機能を使用できます。
長期にわたるタスク:長期にわたるJupyter実行にデスクトップGUIを使用します。ワークスペースデスクトップGUIのブラウザからノートブックを実行することにより、ノートブックからブラウザを切断した場合でも、すべての出力がノートブックに同期されます。
Visual Studio Code( Open Tool -> VS Code )は、さまざまな言語と拡張の豊富なエコシステムをサポートするオープンソースの軽量であるが強力なコードエディターです。 IntelliSenseコードの完了やデバッグなど、ソースコードエディターのシンプルさと強力な開発者ツールを組み合わせています。 Workspaceは、VSコードを、Awesome Code-ServerプロジェクトでブラウザーベースにしてアクセスできるWebベースのアプリケーションとして統合しています。これにより、すべての機能を好みに合わせてカスタマイズし、任意の数のサードパーティ拡張機能をインストールできます。
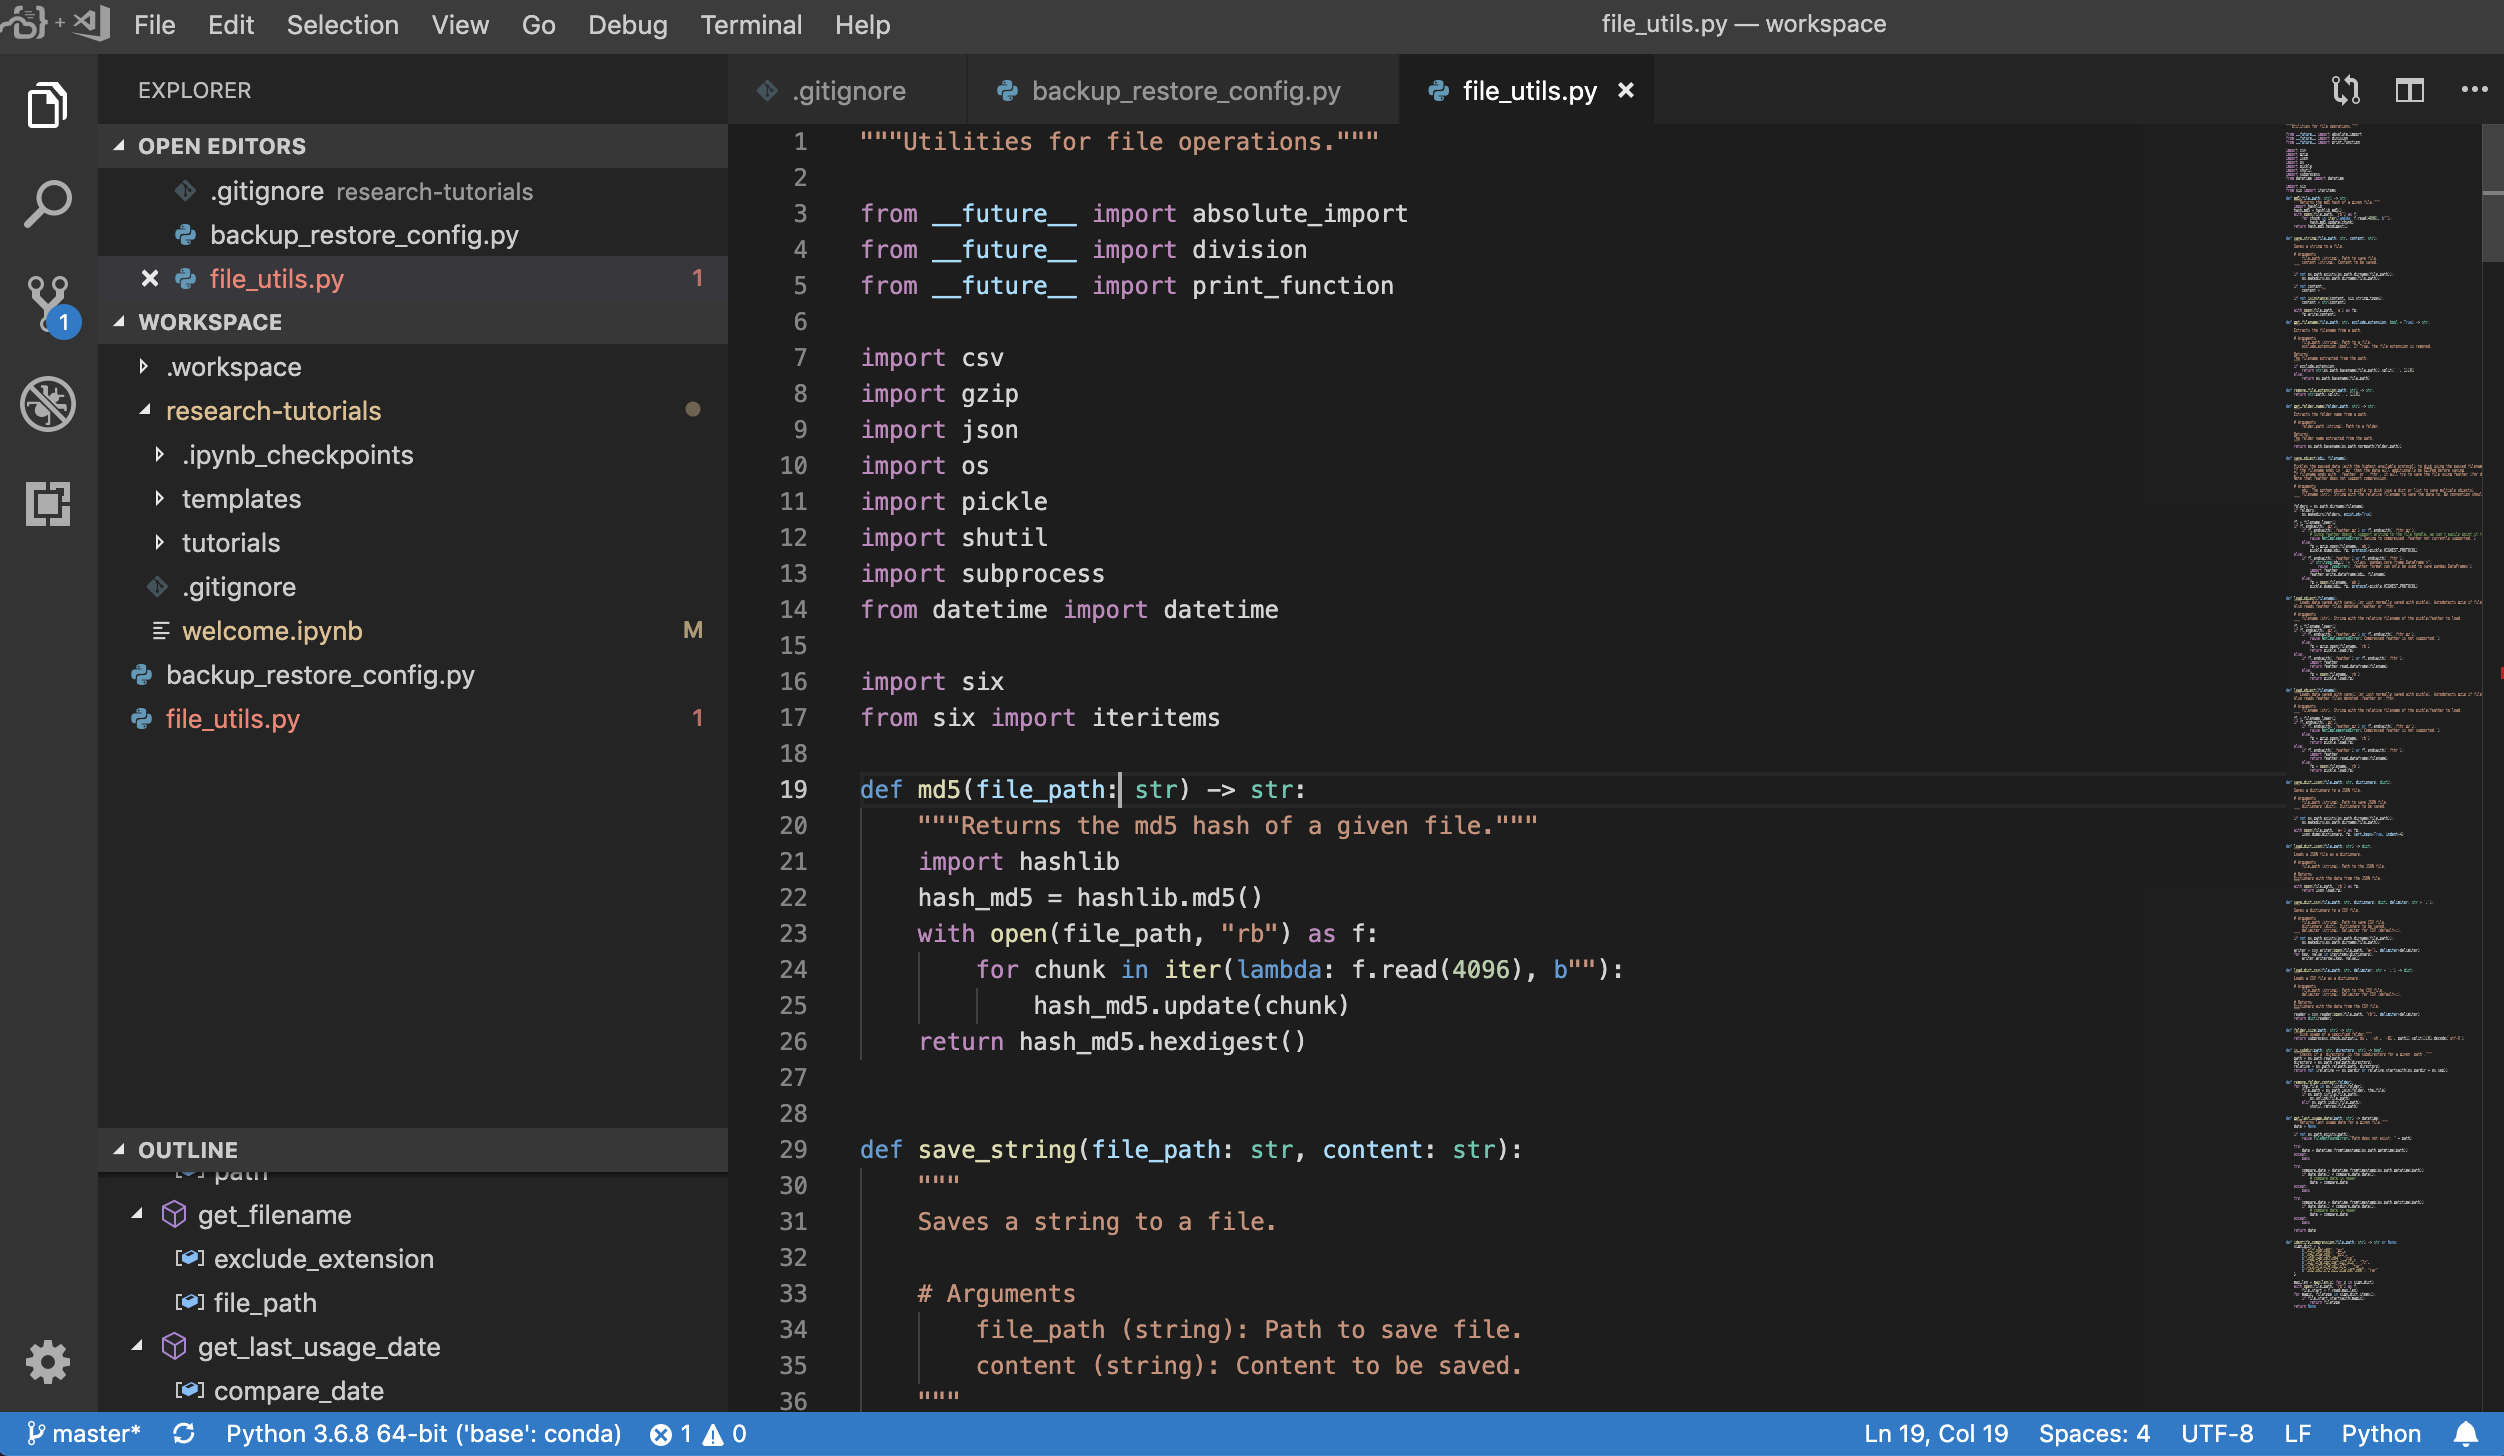
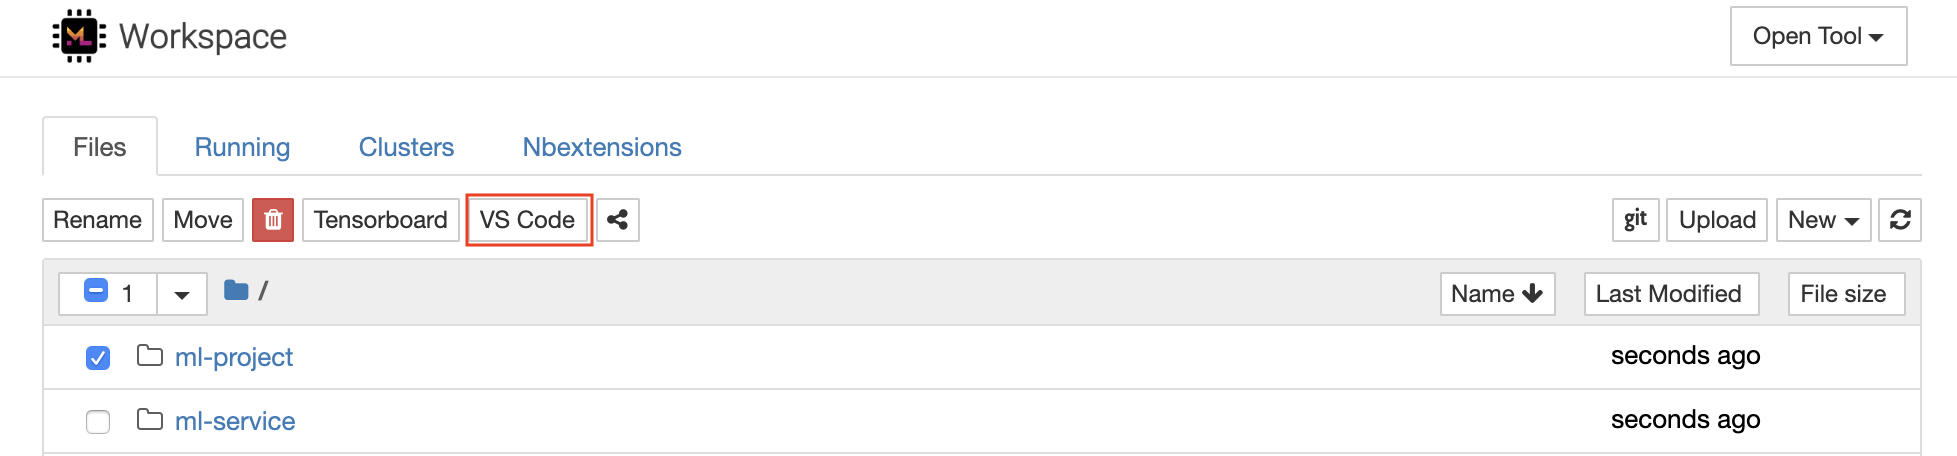
ワークスペースは、以下に示すように、選択したフォルダーのVSコードインスタンスを開くことができるJupyterへのVSコード統合も提供します。
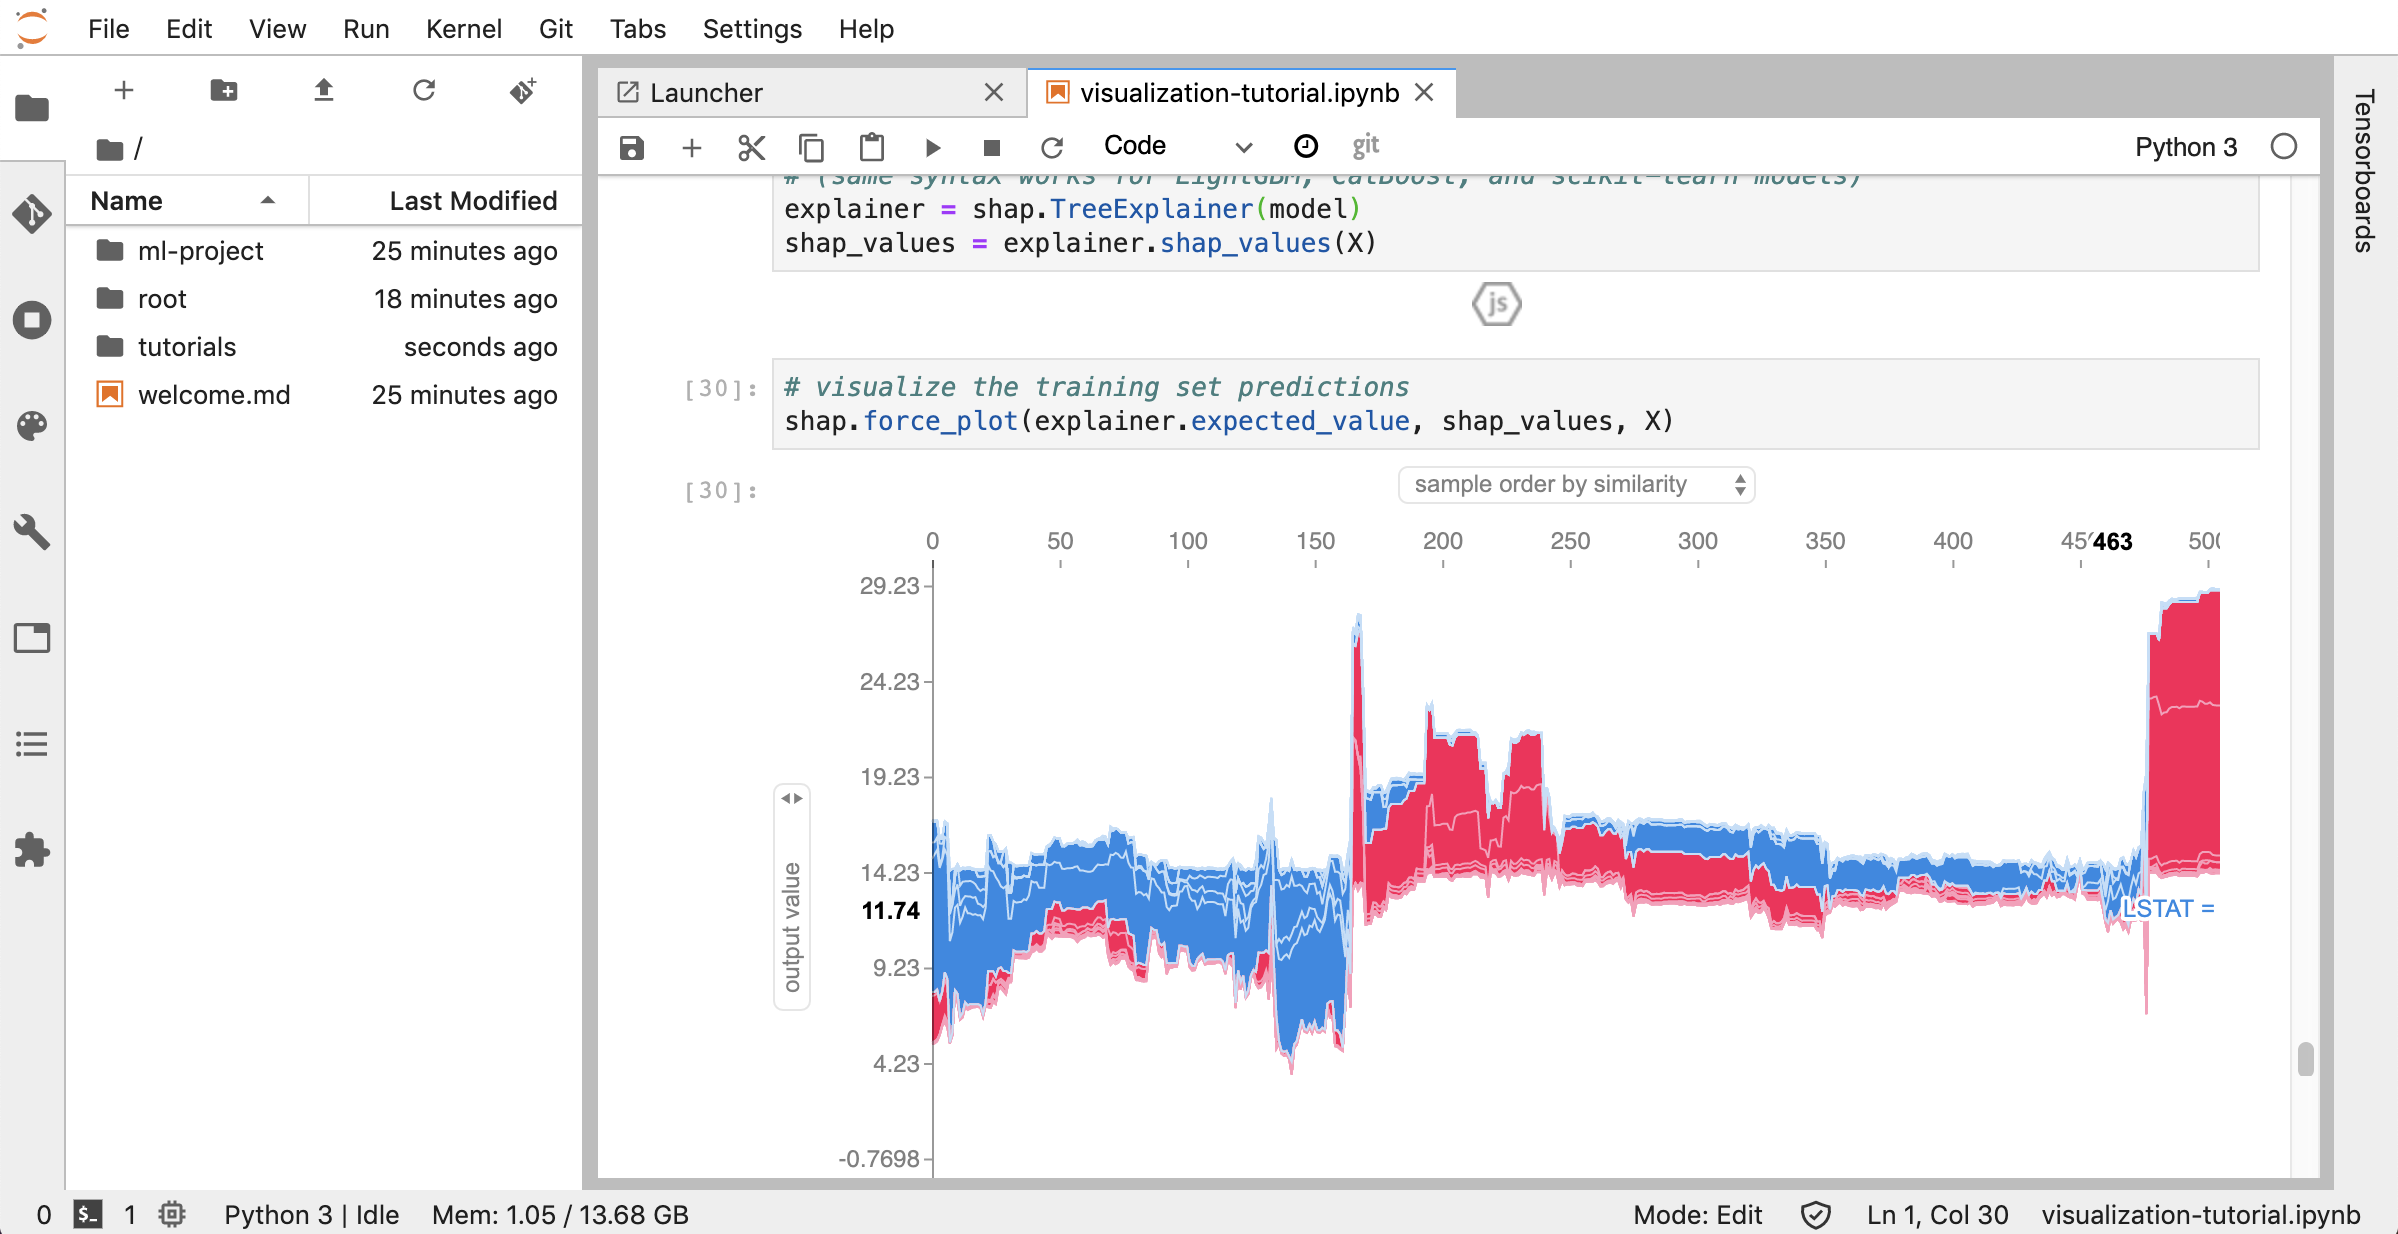
JupyterLab( Open Tool -> JupyterLab )は、Project Jupyterの次世代ユーザーインターフェイスです。柔軟で強力なユーザーインターフェイスで、古典的なJupyterノートブック(ノートブック、ターミナル、テキストエディター、ファイルブラウザー、リッチ出力など)のすべてのおなじみのビルディングブロックを提供します。このJupyterLabインスタンスには、JupyterLab-Toc、Jupyterlab-Git、Juptyterlab-Tensorboardなどのいくつかの役立つ拡張機能が事前にインストールされています。
バージョン制御は、生産的なコラボレーションの重要な側面です。このプロセスを可能な限りスムーズにするために、単一のノートブック、本格的なWebベースのGitクライアント( .py )のプッシュに特化したカスタム.mdのJupyter拡張機能を統合しました。さらに、JupyterLabとVSコードは、GUIベースのGITクライアントも提供します。
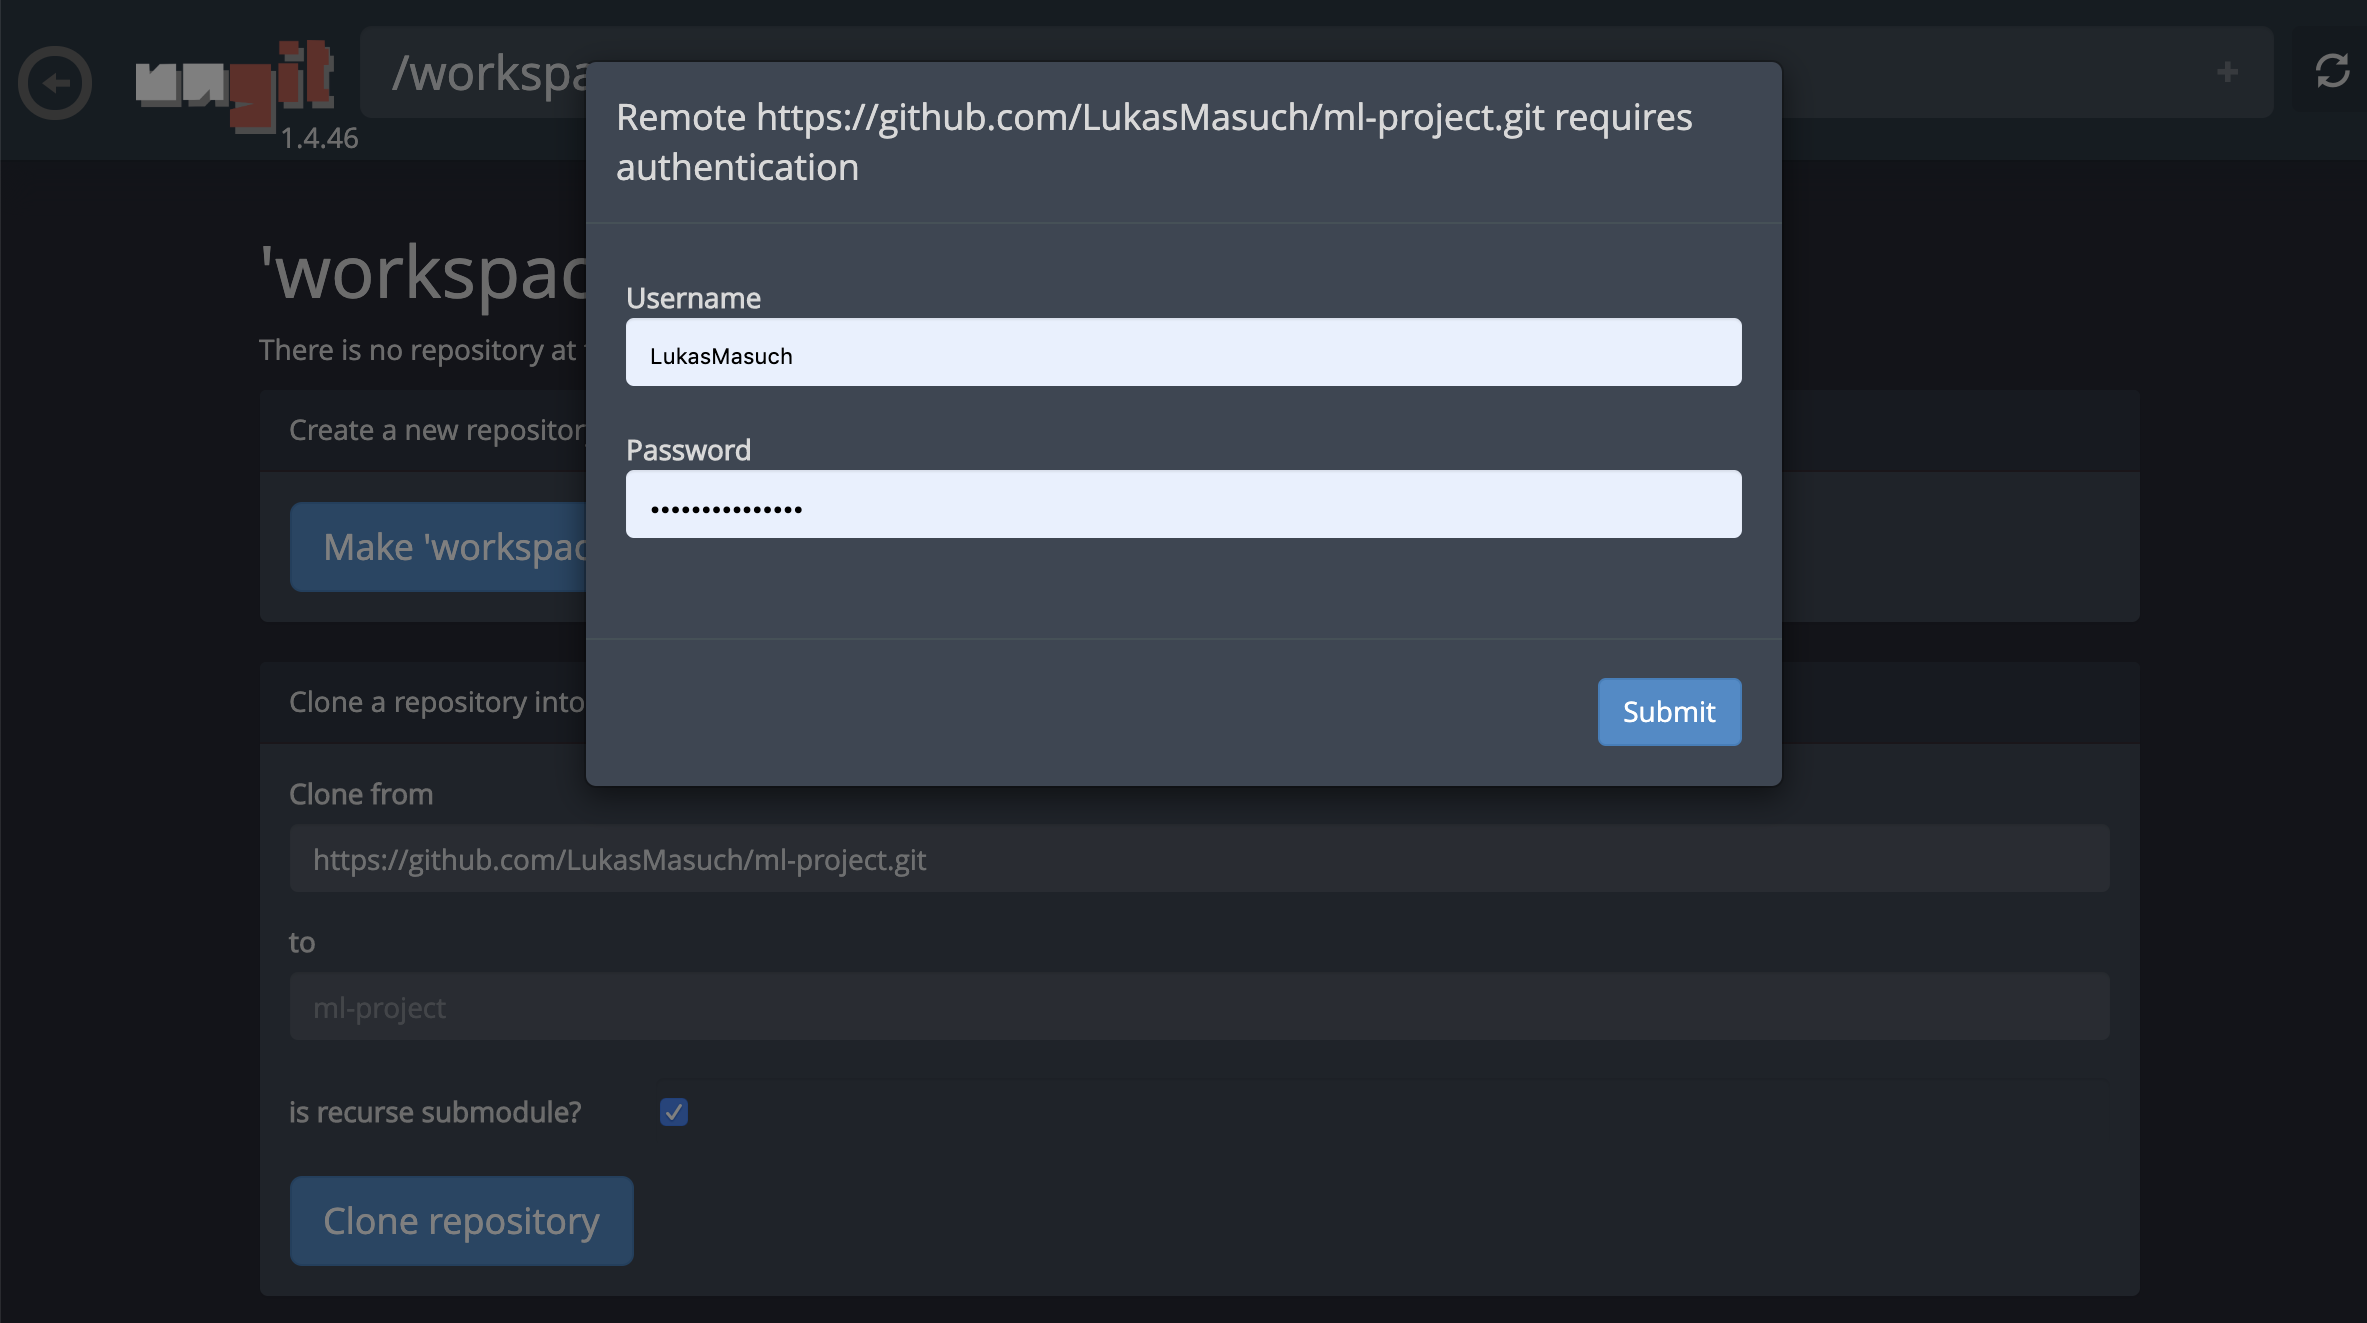
httpsを介してリポジトリをクローニングするには、目的のルートフォルダーに移動し、以下に示すようにgitボタンをクリックすることをお勧めします。

これにより、必要な設定が必要になる場合があり、その後、コードアーティファクトの同期に便利なクリーンで直感的なUIを備えたWebベースのGitクライアントを開きます。 UNGIT内では、任意のリポジトリをクローンできます。認証が必要な場合は、資格情報を求められます。
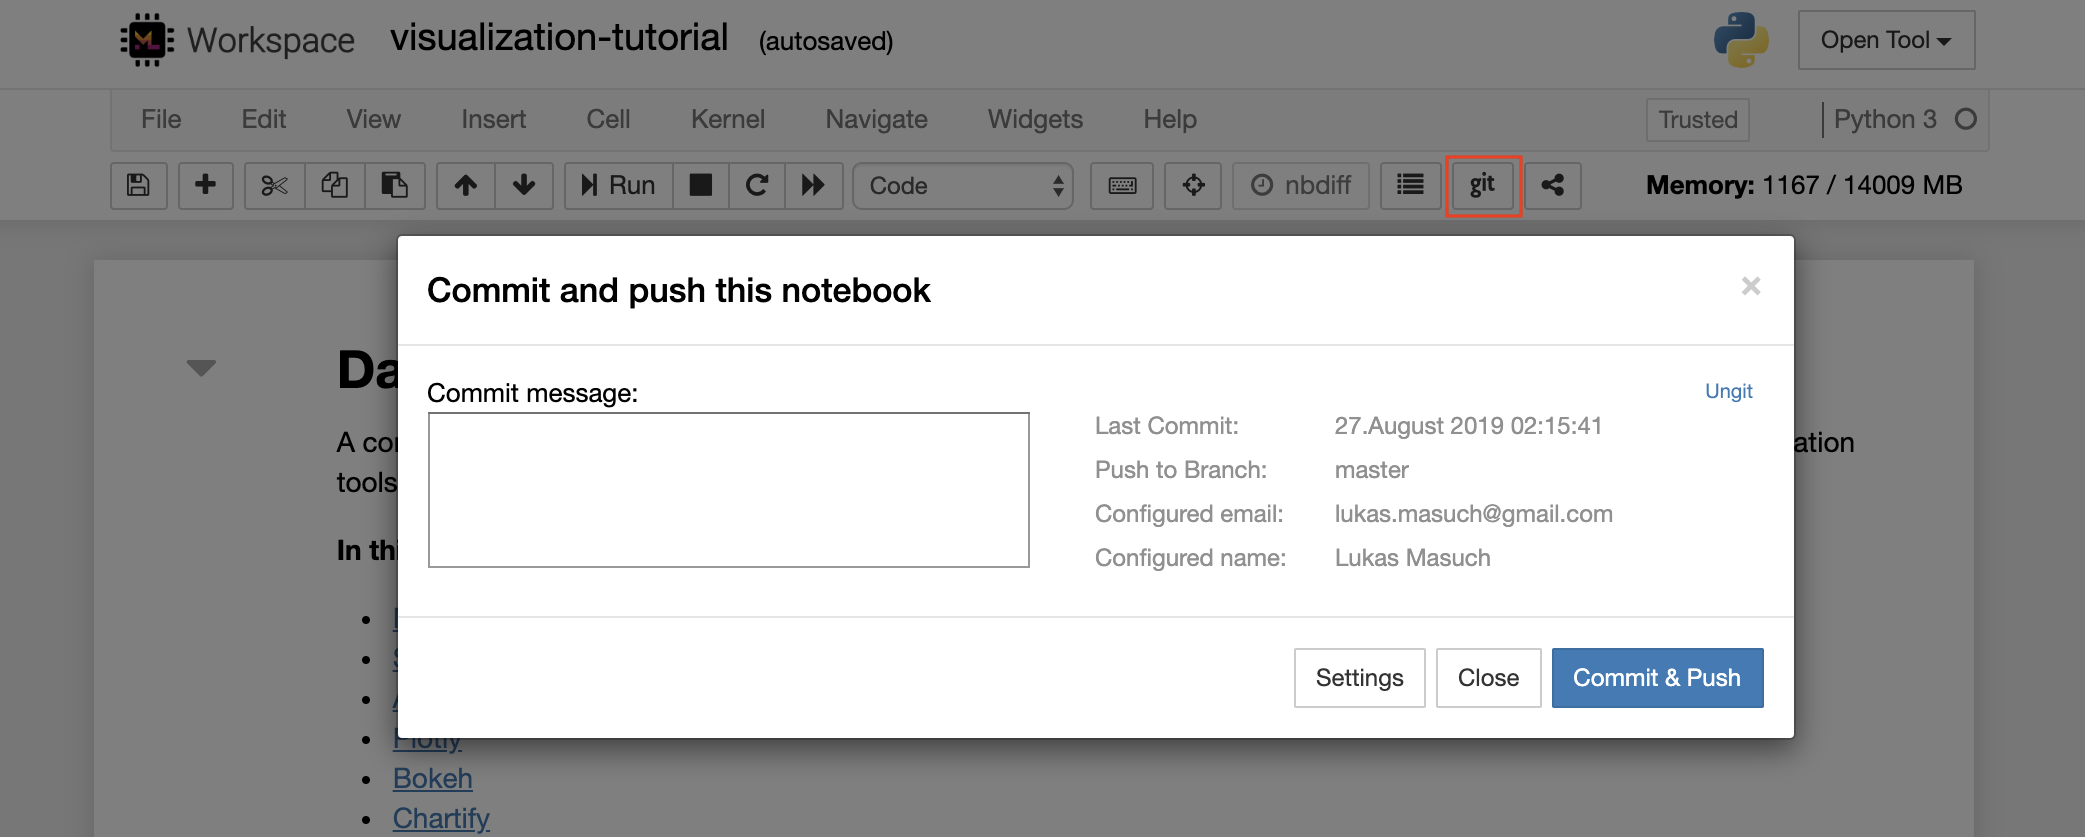
以下に示すように、1つのノートブックをリモートGitリポジトリにコミットしてプッシュするには、Jupyterに統合されたGitプラグインを使用することをお勧めします。
より高度なGIT操作については、UNGITを使用することをお勧めします。 UNGITを使用すると、プッシュ、プル、マージ、ブランチ、タグ、チェックアウトなど、ほとんどの一般的なGITアクションを実行できます。
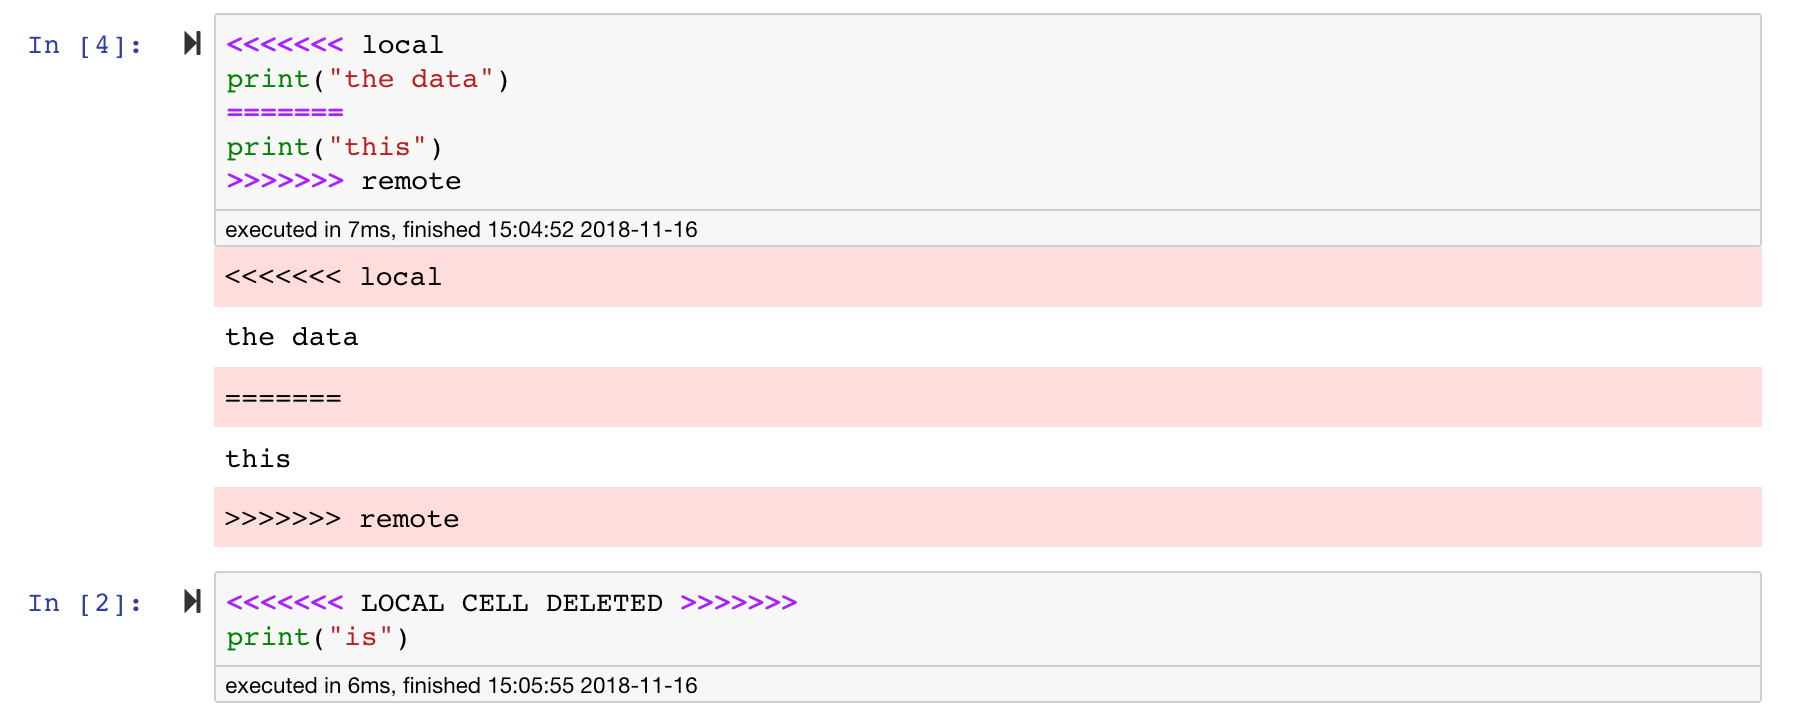
Jupyterノートブックは素晴らしいですが、非常に具体的なJSONファイル形式を備えた巨大なファイルです。 Seamless DiffingとMergingを介してシームレスに拡張できるようにするために、このワークスペースはNBDIMEでプリインストールされます。 NBDIMEはノートブックドキュメントの構造を理解しているため、ノートブックを拡散およびマージするときに自動的にインテリジェントな決定を下します。競合がマージされている場合、NBDIMEは、以下に示すように、ノートブックがJupyterによってまだ読み取られていることを確認します。
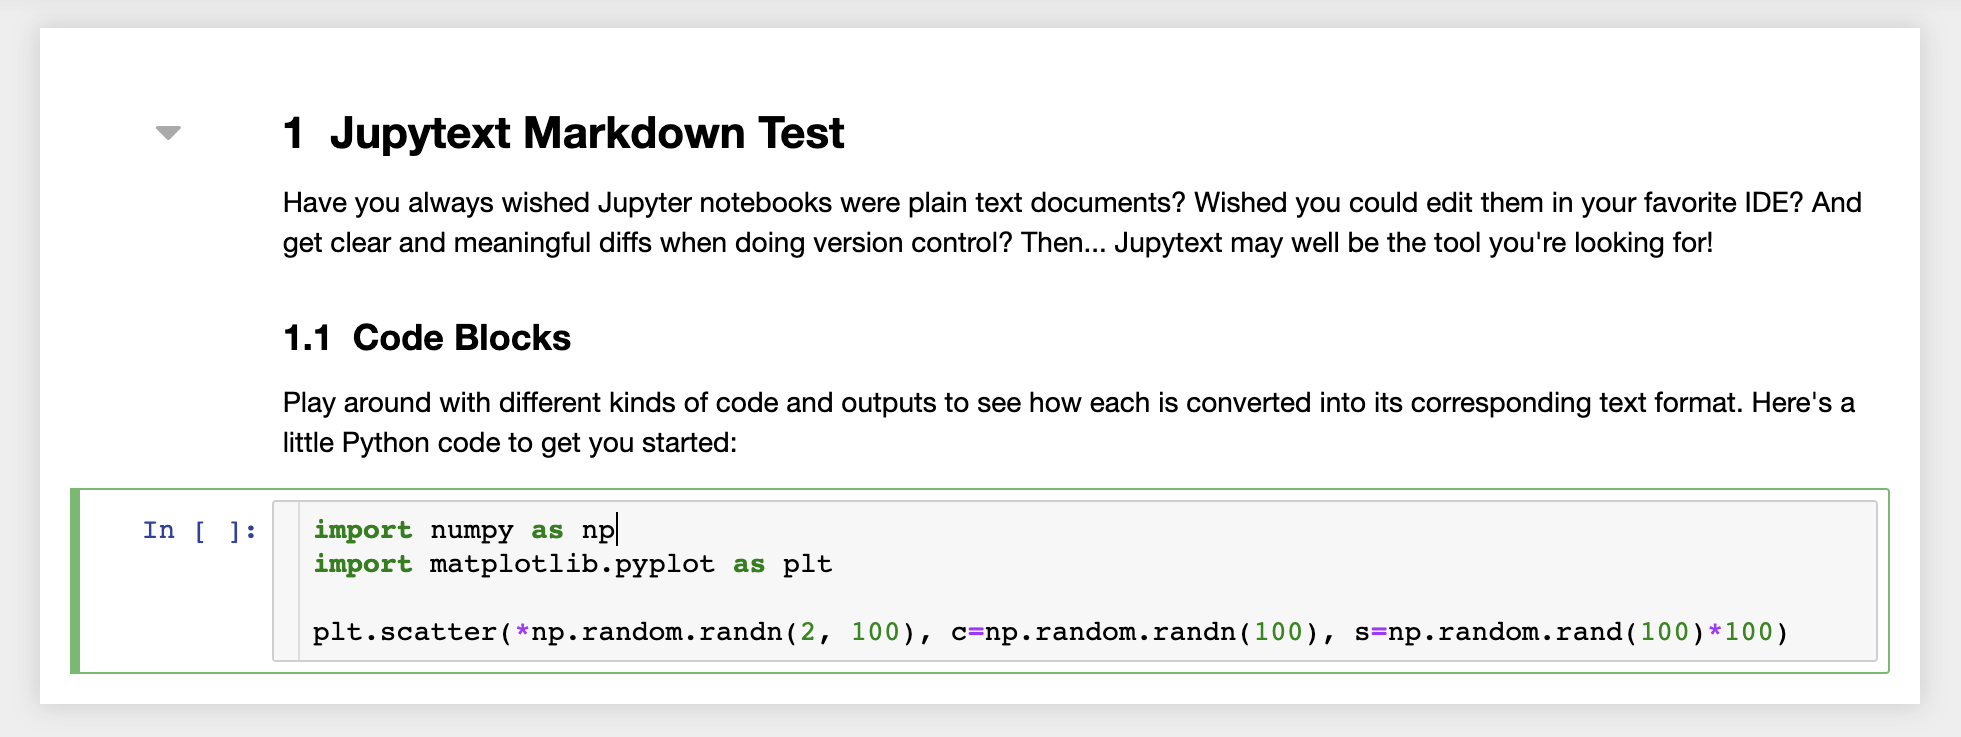
さらに、ワークスペースには、ノートブックをプレーンテキストファイルとして読み取り、書き込むJupyterプラグインであるJupyTextがプリインストールされています。これにより、jupyter内のノートブックとしてスクリプトまたはマークダウンファイル( .py 、 .mdなど)を開き、編集し、実行できます。次のスクリーンショットでは、jupyterを介してマークダウンファイルを開きました。
GITと組み合わせて、JupyTextは明確な差分履歴とバージョンの競合の簡単なマージを可能にします。これらの両方のツールを使用すると、GitでJupyterノートブックでコラボレーションすることが簡単になります。
ワークスペースには、トークンで保護されたリンクを介して、ファイルまたはフォルダーを誰とでも共有する機能があります。リンクを介してデータを共有するには、jupyterディレクトリツリーからファイルまたはフォルダーを選択し、次のスクリーンショットに示すように[共有]ボタンをクリックします。
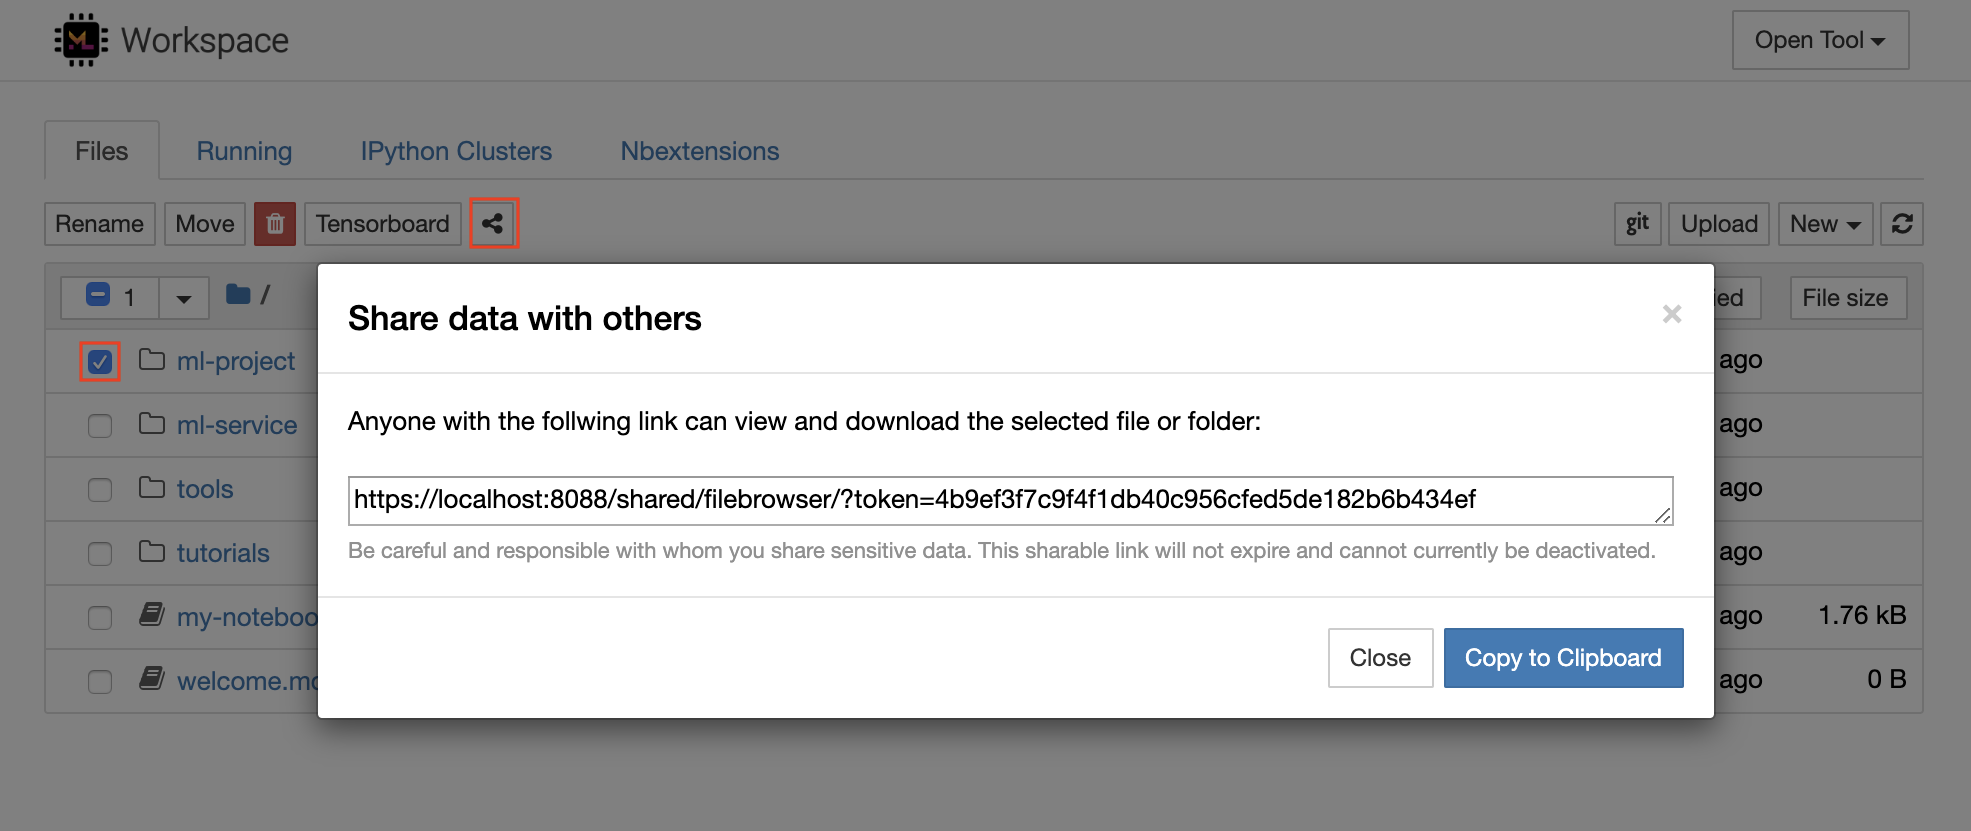
これにより、リンクアクセスを備えた人に表示されるトークンを介して保護された一意のリンクが生成され、FileBrowser UIを介して選択したデータを表示およびダウンロードできます。
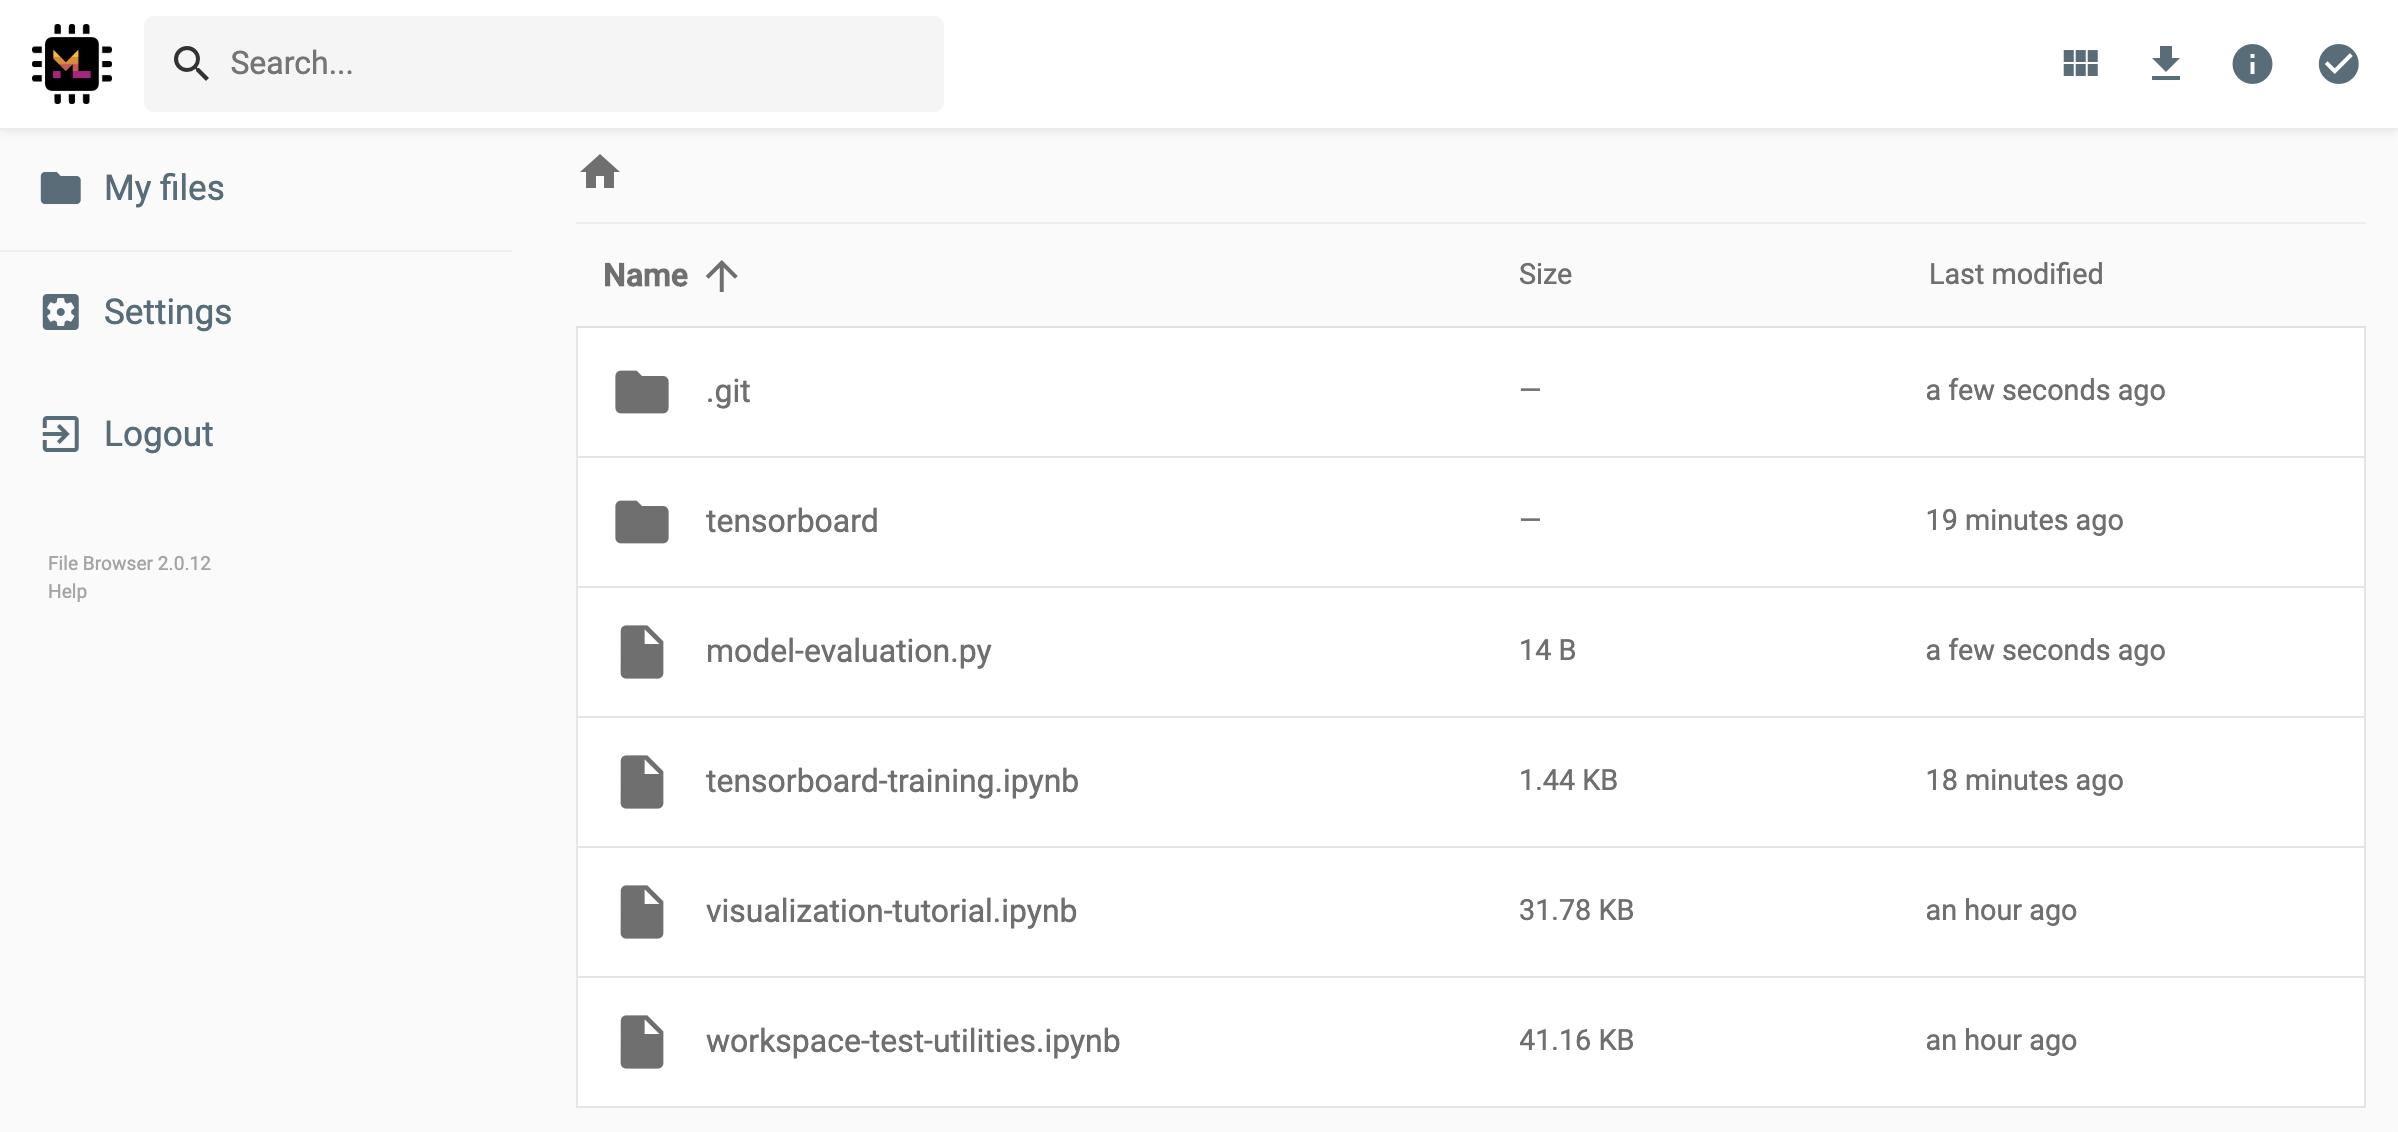
共有リンクを非アクティブ化または管理する(編集許可を提供する)共有リンク、 Open Tool -> Filebrowser fileBrowserを介してFileBrowserを開き、 Settings->User Managementを選択します。
Open Tool -> Access Portを選択して、ワークスペース内部ポートを安全にアクセスすることができます。この機能を使用すると、ブラウザでワークスペース内で直接実行されているREST APIまたはWebアプリケーションにアクセスできます。この機能により、開発者はワークスペースから直接REST APIまたはWebアプリケーションを構築、実行、テスト、デバッグできます。
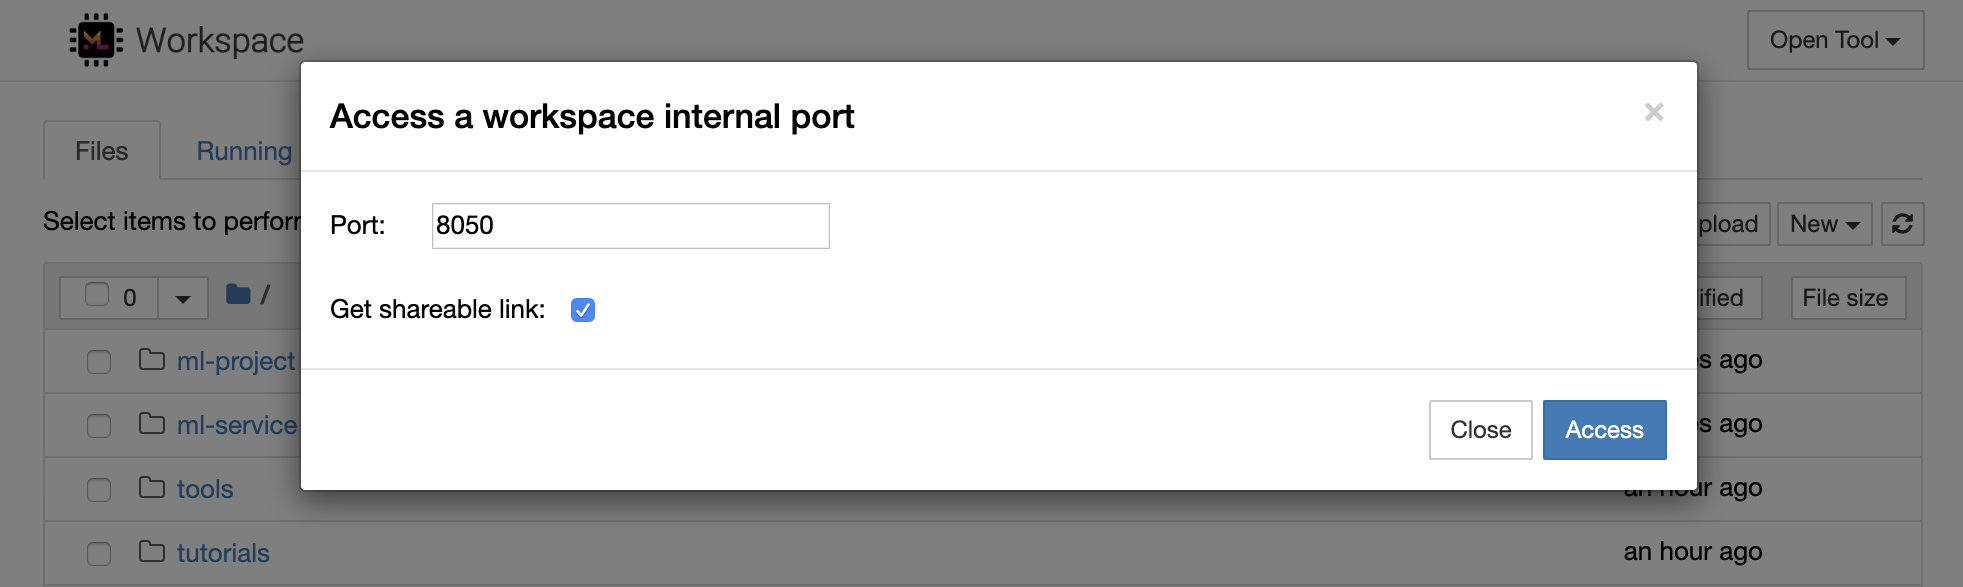
HTTPクライアントを使用するか、特定のポートへのアクセスを共有する場合は、 Get shareable linkオプションを選択できます。これにより、リンクにアクセスできる人なら誰でも、指定されたポートにアクセスするために使用できるトークン担保リンクが生成されます。
HTTPアプリは、相対的なURLパスから解決するか、ベースパス(
/tools/PORT/)を構成する必要があります。この方法でアクセスできるツールは、ワークスペースの認証システムによって保護されています!この機能を使用してツールにアクセスできるようにする代わりに、コンテナの他のポートを自分で公開することにした場合は、認証メカニズムを介して保護するようにしてください。
1234でHTTPサーバーを起動します: python -m http.server 1234Open Tool -> Access Port 、入力ポート1234を選択し、 Get shareable linkオプションを選択します。Accessをクリックすると、Pythonのhttp.serverが提供するコンテンツが表示されます。SSHは、開発タスクにより生産性を高めることができる強力な一連の機能を提供します。 Open Tool -> SSH選択することにより、ワークスペースへの安全でパスワードのないSSH接続を簡単に設定できます。これにより、任意のLinuxまたはMacマシンで実行して、ワークスペースへのパスワードレスおよびセキュアなSSH接続を構成できるセキュアセットアップコマンドが生成されます。または、セットアップスクリプトをダウンロードして実行することもできます(コマンドを使用する代わりに)。
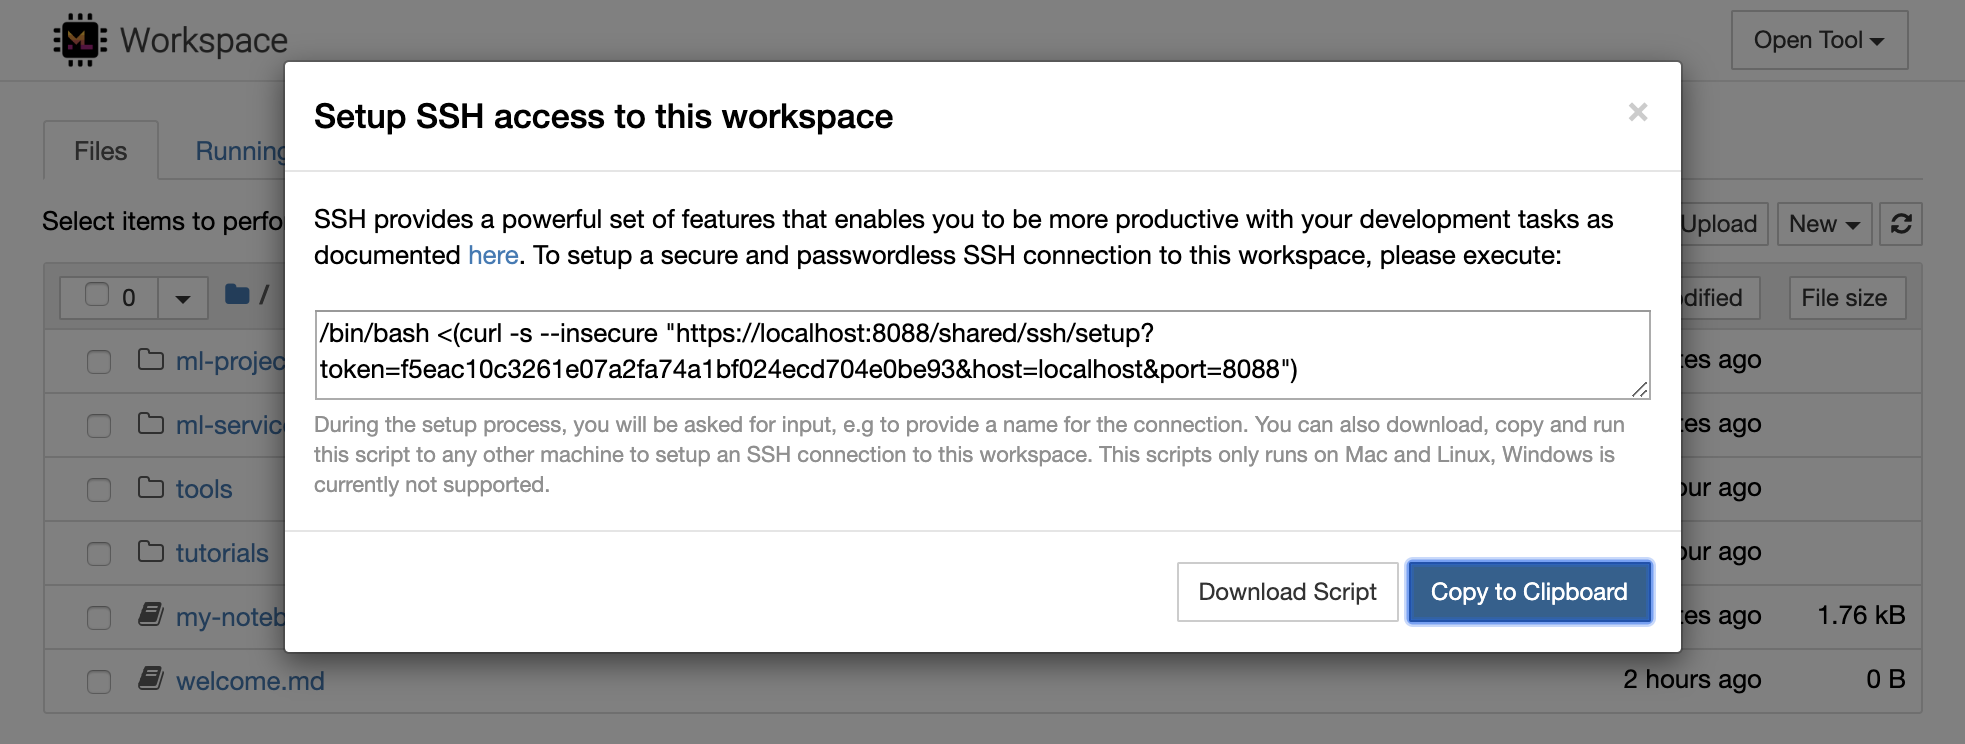
セットアップスクリプトは、MacとLinuxでのみ実行されます。現在、Windowsはサポートされていません。
ワークスペースへの接続をセットアップし、接続の名前を入力する場所( my-workspaceなど)を入力する場所で、マシンでセットアップコマンドまたはスクリプトを実行するだけです。また、 remote_ikernelがインストールされている場合、リモートカーネルをインストールするためのプロセス中に追加の入力を求められる場合があります。パスワードレスSSH接続が正常にセットアップされ、テストされたら、 ssh my-workspaceを実行するだけでワークスペースに安全に接続できます。
リモートマシンでコマンドを実行する機能に加えて、SSHは次のセクションで説明されているように開発ワークフローを改善できる他のさまざまな機能も提供します。
SSH接続は、リモートマシンからローカルマシンへのアプリケーションポートのトンネリングに使用できます。たとえば、Workspace内部ポート5901 (VNCサーバー)を、実行して、ポート5000のローカルマシンに公開できます。
ssh -nNT -L 5000:localhost:5901 my-workspaceアプリケーションポートをローカルマシンからワークスペースに公開するには、
-Rオプション(-Lの代わりに)を使用します。
トンネルが確立された後、お気に入りのVNCビューアーをローカルマシンで使用し、 vnc://localhost:5000 (デフォルトのパスワード: vncpassword )に接続できます。トンネル接続をより耐性と信頼性を高めるには、Autosshを使用して、接続が死んだ場合にSSHトンネルを自動的に再起動することをお勧めします。
autossh -M 0 -f -nNT -L 5000:localhost:5901 my-workspaceポートトンネリングは、別のマシンにアクセスできるようにしたいワークスペース内でサーバーベースのツールを開始した場合に非常に便利です。デフォルト設定では、ワークスペースには、以下などのさまざまなポートで既に実行されているさまざまなツールがあります。
8080 :すべての統合ツールにアクセスできるメインワークスペースポート。8090 :Jupyterサーバー。8054 :VSコードサーバー。5901 :VNCサーバー。22 :SSHサーバー。スーパーバイザー構成のすべてのツールに関するポート情報を見つけることができます。
ポートトンネル/転送の詳細については、このガイドをお勧めします。
SCPを使用すると、ファイルとディレクトリを、SSH接続を介して、異なるマシンから、または異なるマシン間で安全にコピーできます。たとえば、ローカルファイル( ./local-file.txt )をワークスペース内の/workspaceフォルダーにコピーするには、次のことを実行します。
scp ./local-file.txt my-workspace:/workspace /workspace my-workspaceからローカルマシンの作業ディレクトリに /workspaceディレクトリをコピーするには、次のことを実行します。
scp -r my-workspace:/workspace .SCPの詳細については、このガイドをお勧めします。
RSYNCは、ファイルの変更時間とサイズを比較することにより、異なるマシン間でファイルを効率的に転送および同期するためのユーティリティ(SSH接続を介して)です。 RSYNCコマンドは、実行されるたびに更新する必要があるファイルを決定します。これは、SCPやSFTPのようなものを使用するよりもはるかに効率的で便利です。たとえば、ローカルフォルダーのすべてのコンテンツ( ./local-project-folder/ )を/workspace/remote-project-folder/フォルダーにワークスペース内に同期するには、次のことを実行します。
rsync -rlptzvP --delete --exclude= " .git " " ./local-project-folder/ " " my-workspace:/workspace/remote-project-folder/ "ワークスペースのフォルダー内にいくつかの変更がある場合は、ソースと宛先の引数を変更して、これらの変更をローカルフォルダーに戻すことができます。
rsync -rlptzvP --delete --exclude= " .git " " my-workspace:/workspace/remote-project-folder/ " " ./local-project-folder/ "ファイルの最新のコピーを同期するたびに、これらのコマンドを再実行できます。 RSYNCは、更新のみが転送されることを確認します。
RSYNCの詳細については、このManページでご覧いただけます。
データのコピーと同期に加えて、SSH接続を使用して、リモートマシンからSSHFSを介してローカルファイルシステムにディレクトリをマウントすることもできます。たとえば、 my-workspaceの/workspaceディレクトリをローカルパス(EG /local/folder/path )にマウントするには、次のことを実行します。
sshfs -o reconnect my-workspace:/workspace /local/folder/pathリモートディレクトリがマウントされたら、ローカルディレクトリやファイルと同じようにリモートファイルシステムと対話できます。
SSHFSの詳細については、このガイドをお勧めします。
ワークスペースは、Jupyter、vs Code、Pycharm、Colab、またはAtomの水素など、さまざまな人気の開発ツールやIDEのリモートランタイム(リモートカーネル/マシン/インタープリターとも呼ばれる)として統合および使用できます。これにより、ローカルマシンで実行されているお気に入りの開発ツールをコード実行のためにリモートマシンに接続できます。これにより、リモートホストのコンピューティングリソースを使用したローカル品質の開発エクスペリエンスが可能になります。
これらの統合では、通常、ローカルマシンからワークスペースへのパスワードレスSSH接続が必要です。 SSH接続を設定するには、SSHアクセスセクションで説明されている手順に従ってください。
Workspaceは、Remote_ikernelツールを使用して、リモートカーネルとしてJupyterインスタンスに追加できます。ローカルマシンにremote_ikernel( pip install remote_ikernel )をインストールした場合、ワークスペースのSSHセットアップスクリプトは、リモートカーネル接続をセットアップするオプションを自動的に提供します。
リモートマシンでカーネルを実行すると、ノートブック自体がローカルファイルシステムに保存されますが、カーネルはカーネルを実行するリモートマシンのファイルシステムにのみアクセスできます。データを同期する必要がある場合は、SSHアクセスセクションで説明されているように、RSYNC、SCP、またはSSHFSを使用できます。
以下に示すように、リモートカーネルを手動でセットアップおよび管理する場合は、remote_ikernelコマンドラインツールを使用します。
 # Change my-workspace with the name of a workspace SSH connection
remote_ikernel manage --add
    --interface=ssh
    --kernel_cmd= " ipython kernel -f {connection_file} "
    --name= " ml-server (Python) "
    --host= " my-workspace "
remote_ikernelコマンドライン機能を使用して、 remote_ikernel manage --show )またはdelete( remote_ikernel manage --delete <REMOTE_KERNEL_NAME> )リモートカーネル接続をリストできます。
Visual Studio Code Remote -SSH拡張機能を使用すると、SSHアクセスを備えたリモートマシンにリモートフォルダーを開き、フォルダーが独自のマシン上にあった場合と同じように使用できます。リモートマシンに接続したら、リモートファイルシステム上のどこでもファイルやフォルダーと対話し、VSコードの機能セット(Intellisense、デバッグ、および拡張サポート)を最大限に活用できます。ワークスペースSSHセットアップスクリプトで構成されているように、パスワードレスSSH接続を備えた、すぐに使用できます。ローカルとコードアプリケーションがワークスペースに接続できるようにするには:
このガイドでは、リモートSSH拡張機能に関する追加機能と情報を見つけることができます。
Tensorboardは、実験の実行を容易にし、デバッグし、最適化できるようにするための一連の視覚化ツールを提供します。スカラー、ヒストグラム、モデル構造、埋め込み、テキスト&画像の視覚化のロギング機能が含まれています。ワークスペースには、テンソルボードをjuPyterインターフェイスに統合し、インスタンスを開始、管理、停止する機能とjupyterインターフェイスに統合するjupyter_tensorboard拡張機能が事前にインストールされています。以下に示すように、有効なログディレクトリの新しいインスタンスを開くことができます。
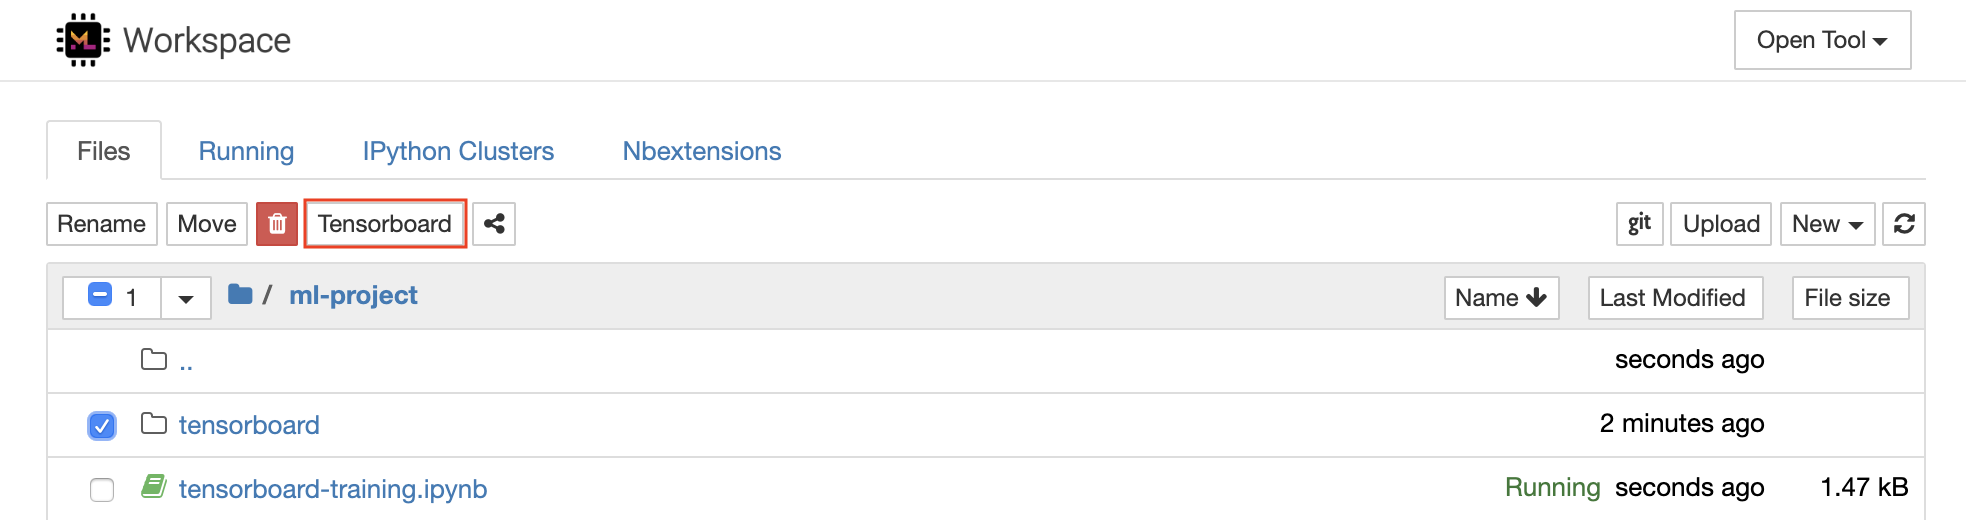
有効なログディレクトリでテンソルボードインスタンスを開いた場合、ログデータの視覚化が表示されます。
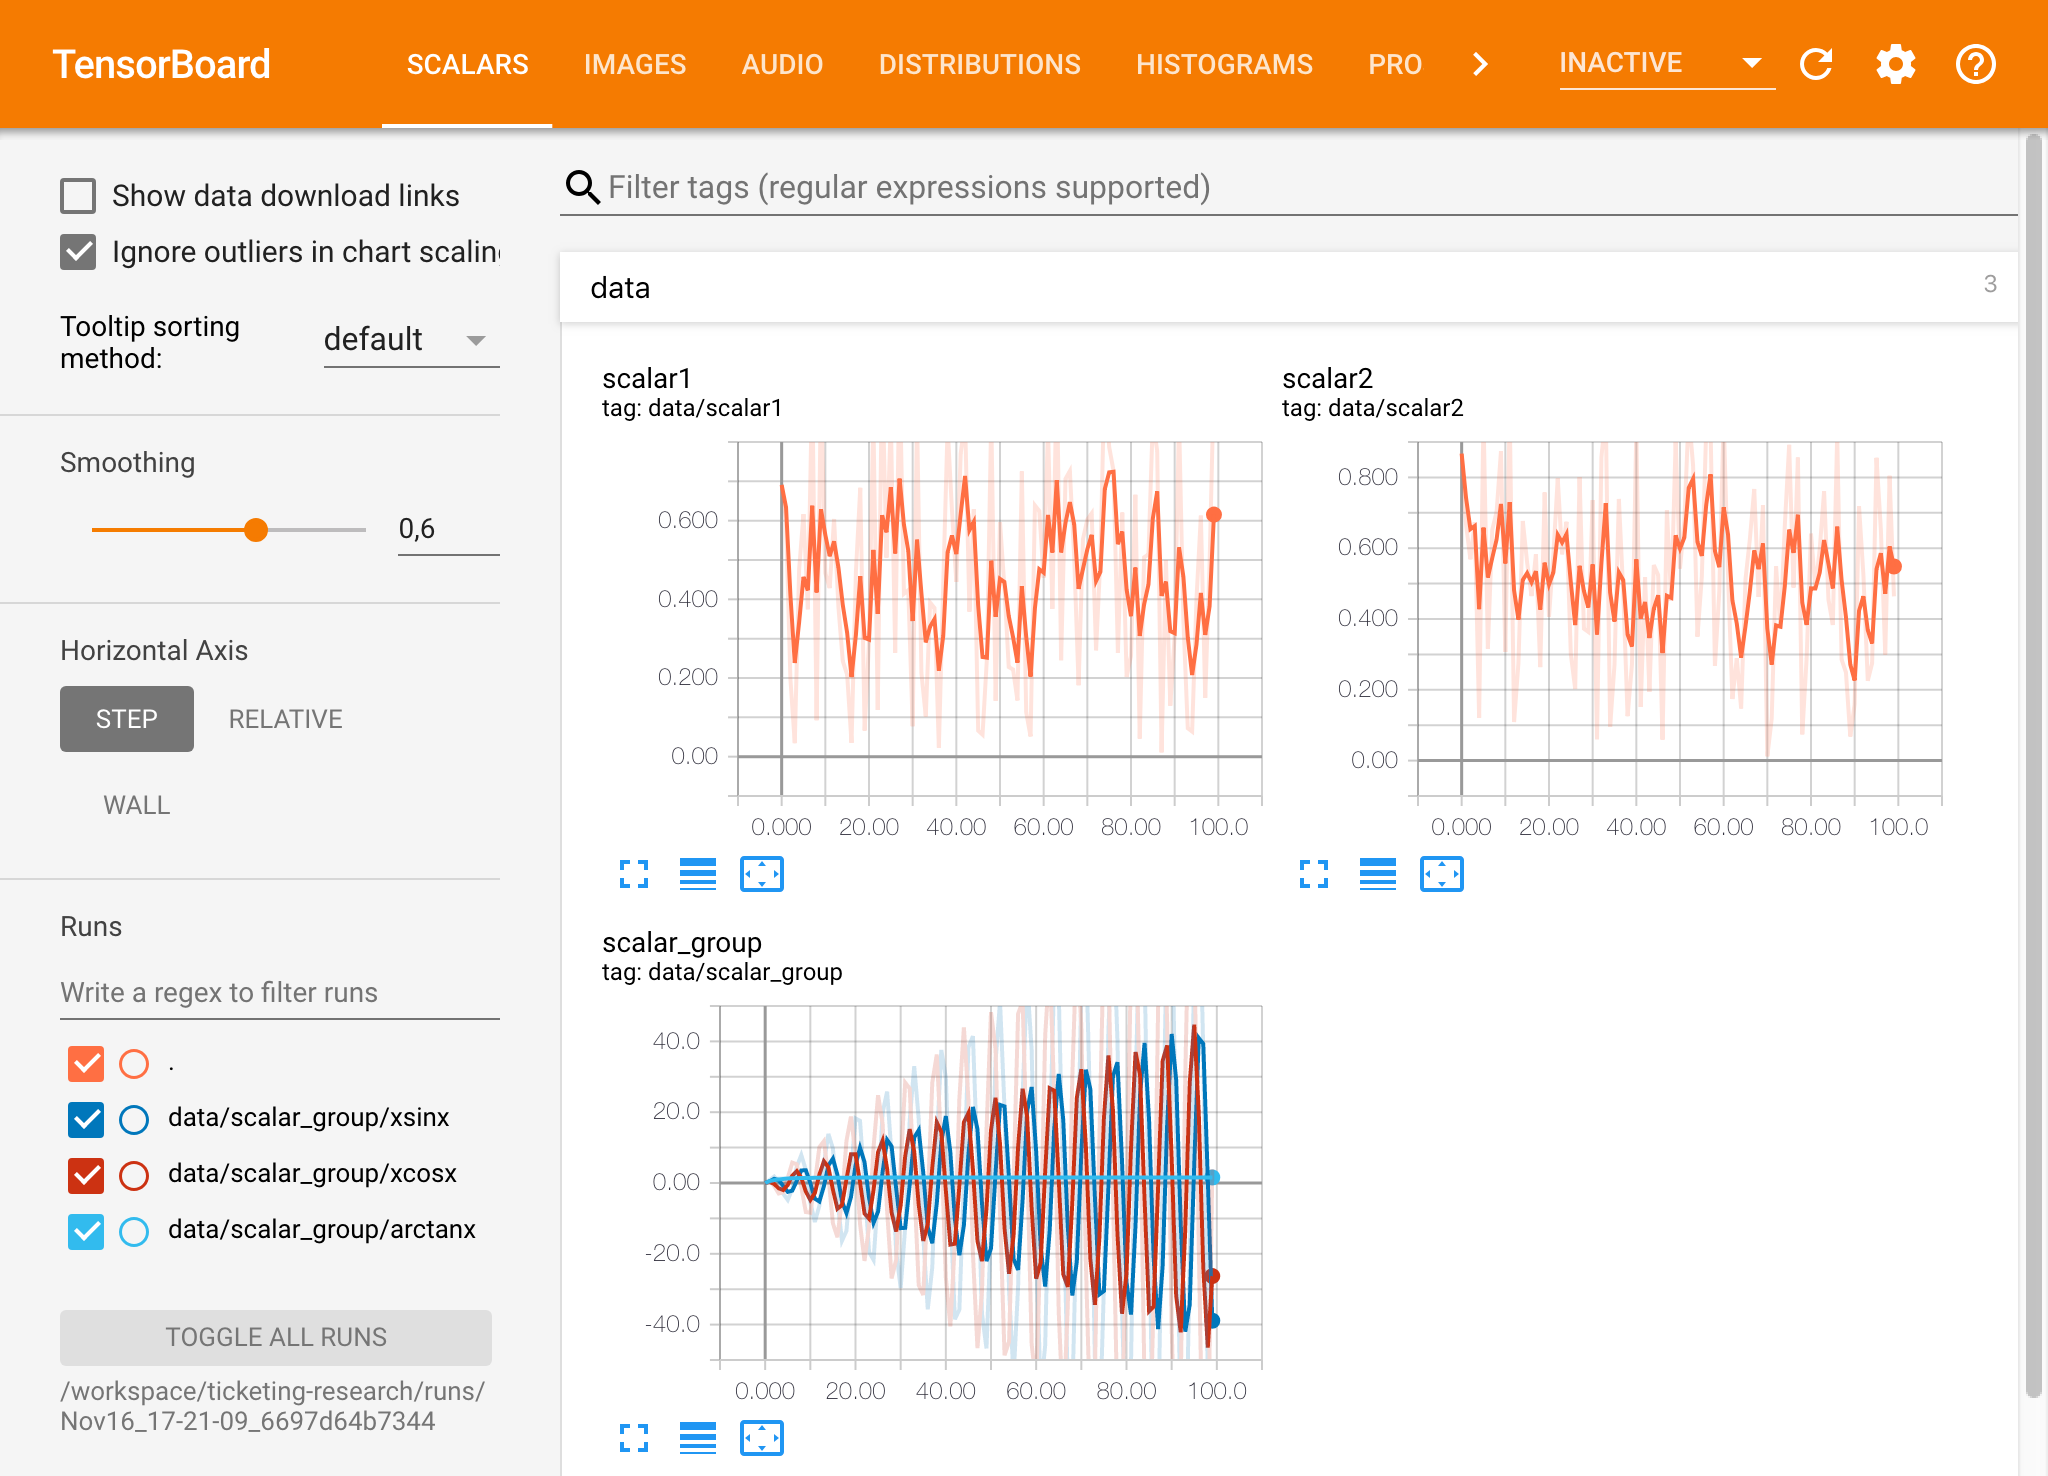
テンソルボードは、Tensorflow以外の他の多くのMLフレームワークと組み合わせて使用できます。 Tensorboardxライブラリを使用することにより、基本的にPythonベースのライブラリからログすることができます。また、Pytorchには、ここで説明するように、直接的なテンソルボード統合があります。
ノートブック内でテンソルボードを直接表示したい場合は、次のようなJupyter Magicを利用できます。
 %load_ext tensorboard
%tensorboard --logdir /workspace/path/to/logs
ワークスペースでは、モデルトレーニングやその他の実験タスク中に開発者がシステムで起こっているすべての洞察を得て、パフォーマンスボトルネックを把握できるように、2つの事前にインストールされたWebベースのツールを提供します。
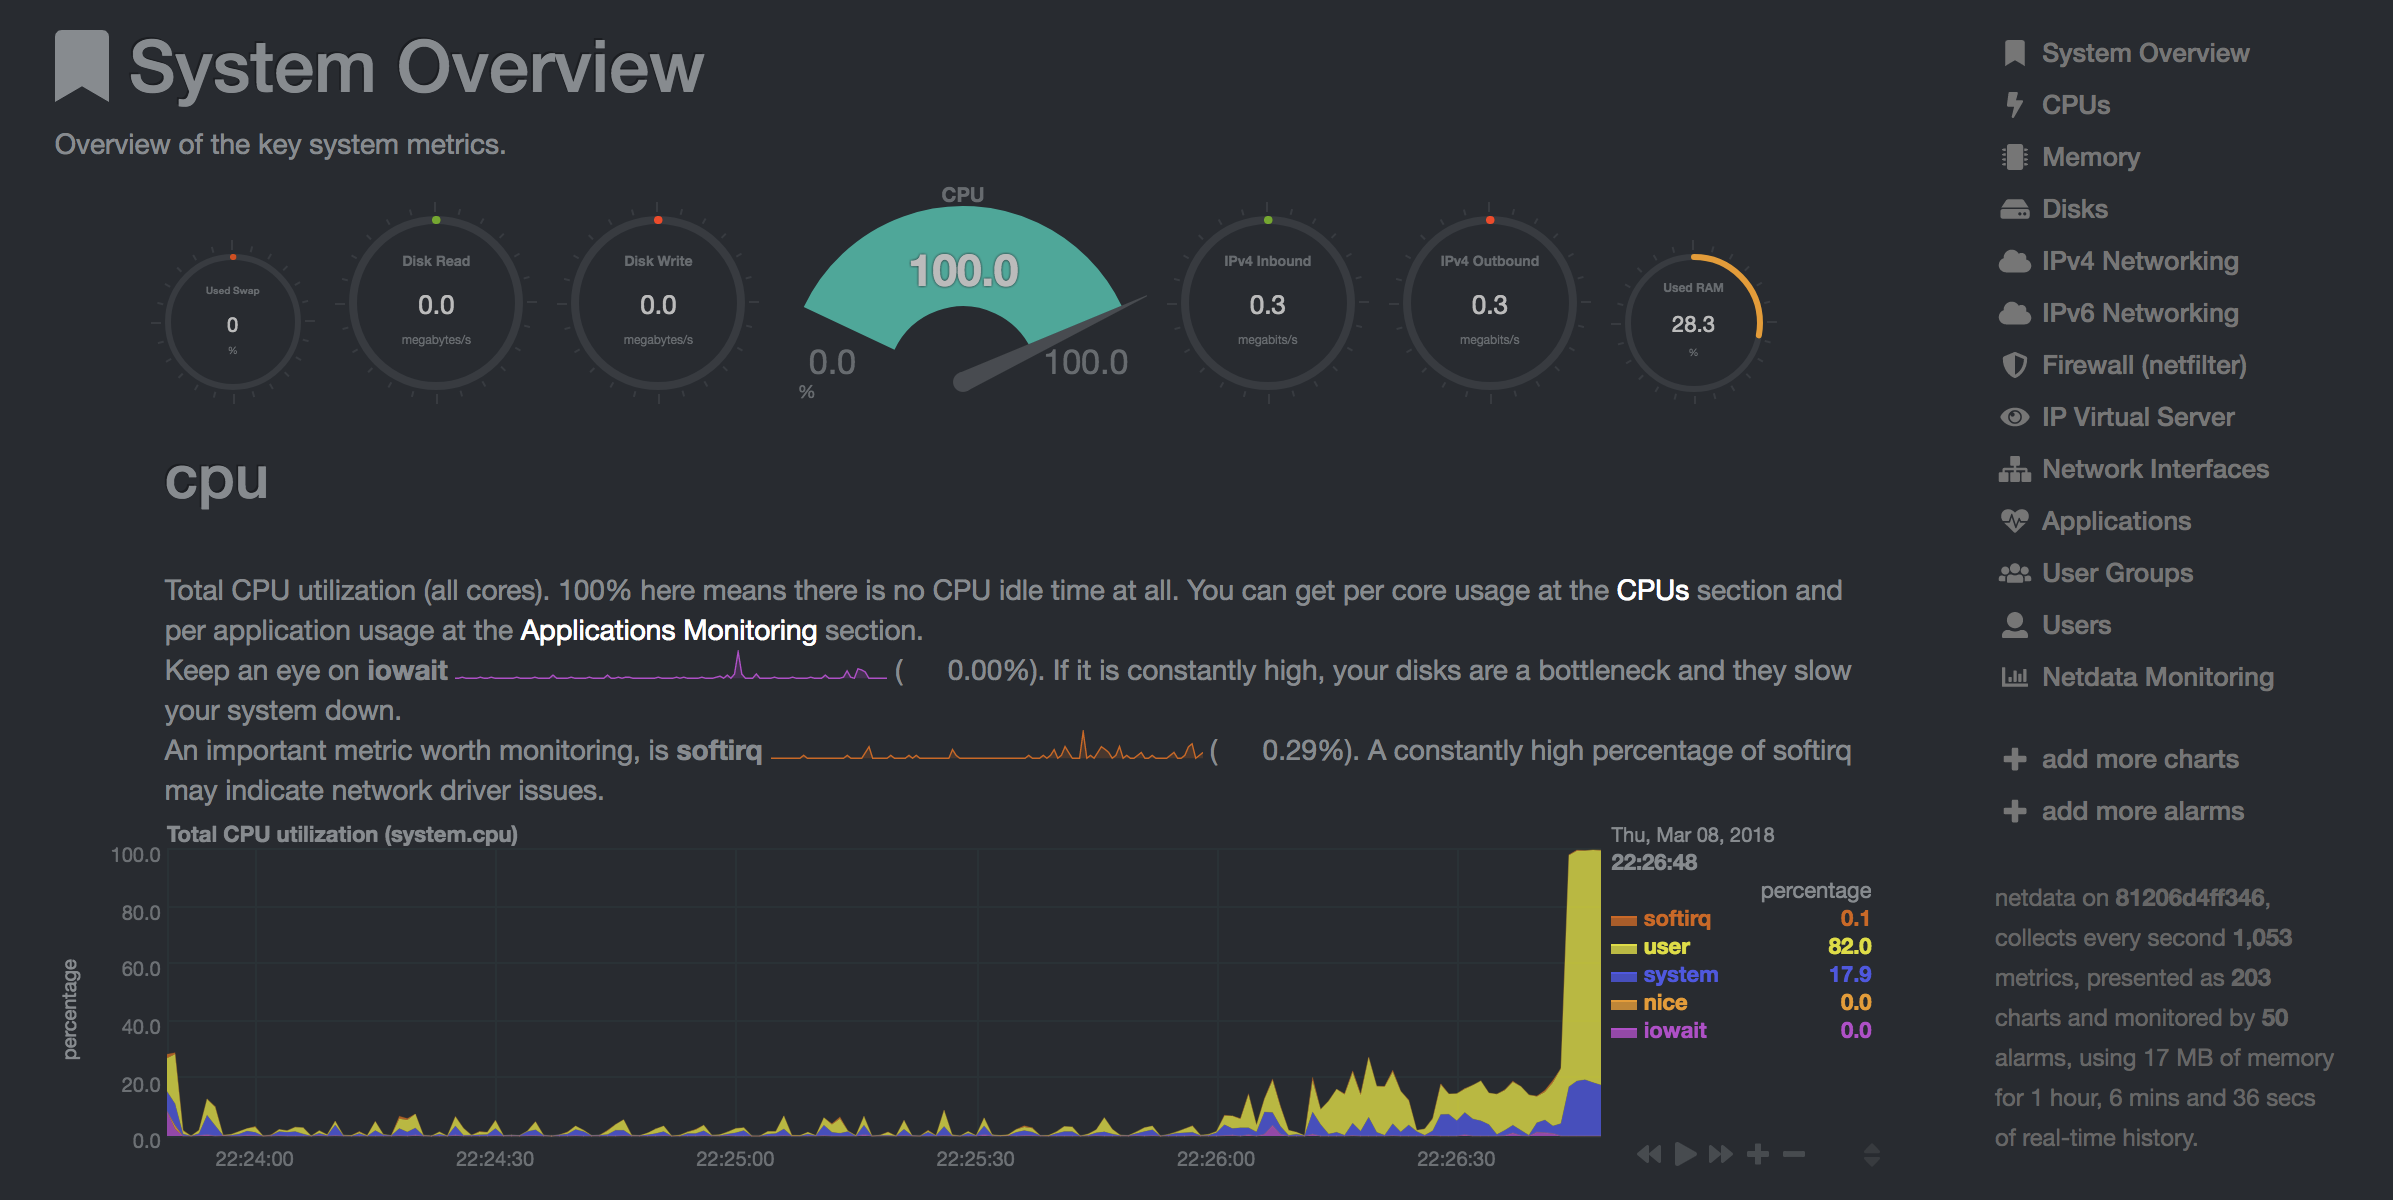
NetData( Open Tool -> Netdata )は、Linuxシステムのプロセスとサービスを視覚化するリアルタイムハードウェアおよびパフォーマンス監視ダッシュボードです。 CPU、GPU、メモリ、ディスク、ネットワーク、プロセスなどに関するメトリックを監視します。
Glances( Open Tool -> Glances )は、Webベースのハードウェア監視ダッシュボードでもあり、NetDataの代替として使用できます。
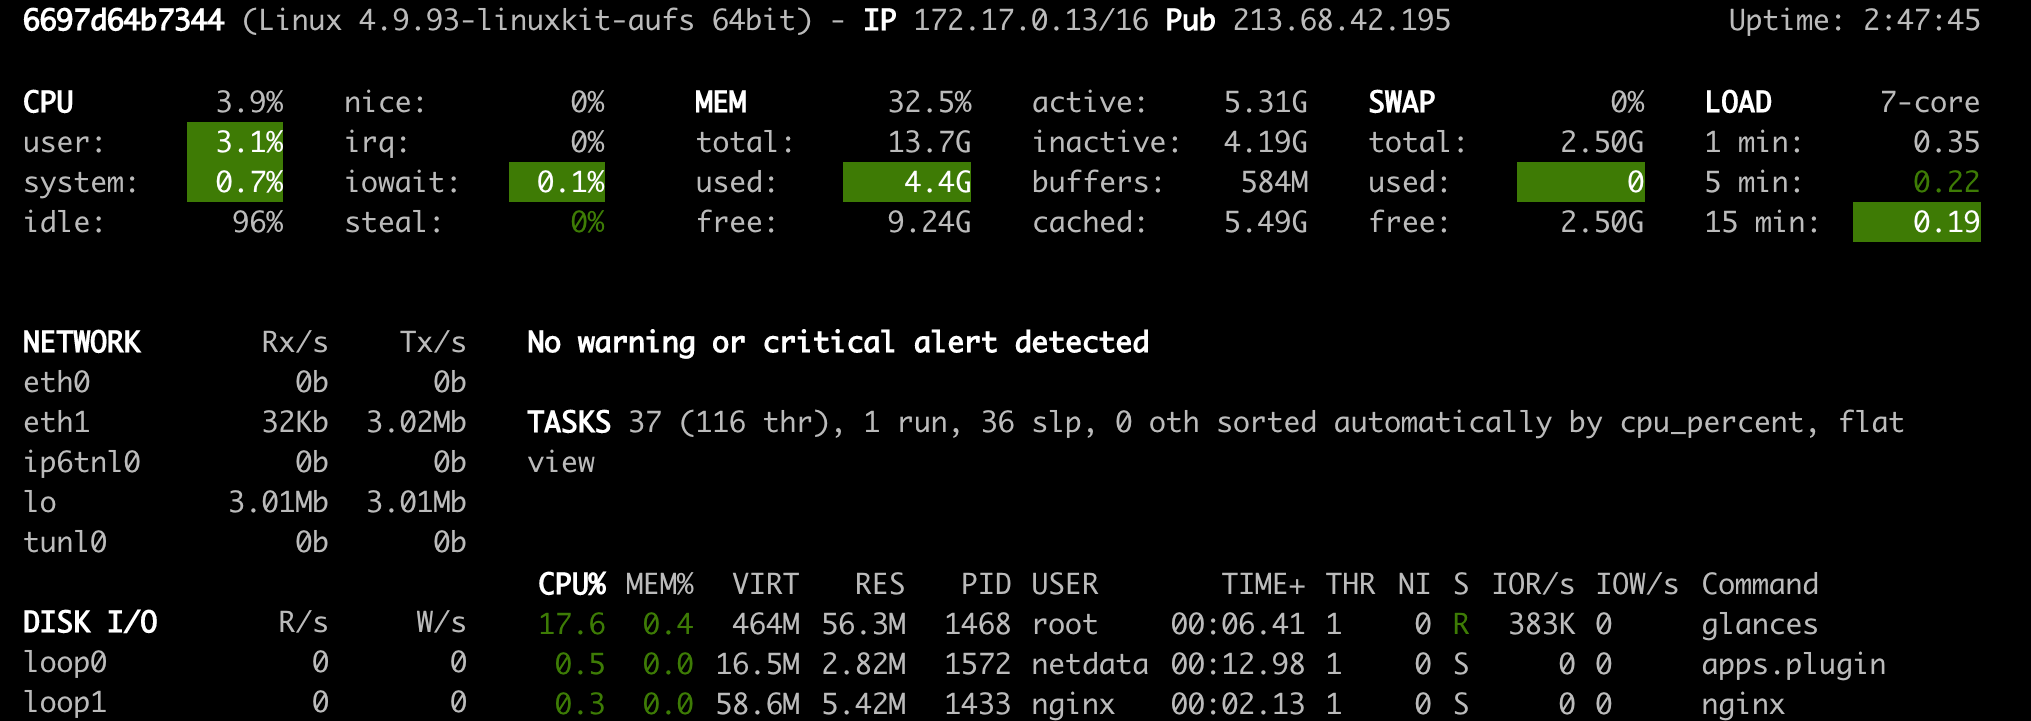
NetDataとGlancesは、ワークスペースコンテナが実行されているマシン全体のハードウェア統計を表示します。
ジョブは、モデルトレーニングやデータパイプラインなど、特定の時間を完了まで実行する計算タスクとして定義されます。
ワークスペース画像は、事前にインストールされたツールを起動せずに任意のPythonコードを実行するためにも使用できます。 This provides a seamless way to productize your ML projects since the code that has been developed interactively within the workspace will have the same environment and configuration when run as a job via the same workspace image.
To run Python code as a job, you need to provide a path or URL to a code directory (or script) via EXECUTE_CODE . The code can be either already mounted into the workspace container or downloaded from a version control system (eg, git or svn) as described in the following sections. The selected code path needs to be python executable. In case the selected code is a directory (eg, whenever you download the code from a VCS) you need to put a __main__.py file at the root of this directory. The __main__.py needs to contain the code that starts your job.
You can execute code directly from Git, Mercurial, Subversion, or Bazaar by using the pip-vcs format as described in this guide. For example, to execute code from a subdirectory of a git repository, just run:
docker run --env EXECUTE_CODE= " git+https://github.com/ml-tooling/ml-workspace.git#subdirectory=resources/tests/ml-job " mltooling/ml-workspace:0.13.2For additional information on how to specify branches, commits, or tags please refer to this guide.
In the following example, we mount and execute the current working directory (expected to contain our code) into the /workspace/ml-job/ directory of the workspace:
docker run -v " ${PWD} :/workspace/ml-job/ " --env EXECUTE_CODE= " /workspace/ml-job/ " mltooling/ml-workspace:0.13.2In the case that the pre-installed workspace libraries are not compatible with your code, you can install or change dependencies by just adding one or multiple of the following files to your code directory:
requirements.txt : pip requirements format for pip-installable dependencies.environment.yml : conda environment file to create a separate Python environment.setup.sh : A shell script executed via /bin/bash . The execution order is 1. environment.yml -> 2. setup.sh -> 3. requirements.txt
You can test your job code within the workspace (started normally with interactive tools) by executing the following python script:
python /resources/scripts/execute_code.py /path/to/your/jobIt is also possible to embed your code directly into a custom job image, as shown below:
 FROM mltooling/ml-workspace:0.13.2

# Add job code to image
COPY ml-job /workspace/ml-job
ENV EXECUTE_CODE=/workspace/ml-job

# Install requirements only
RUN python /resources/scripts/execute_code.py --requirements-only

# Execute only the code at container startup
CMD [ "python" , "/resources/docker-entrypoint.py" , "--code-only" ]The workspace is pre-installed with many popular interpreters, data science libraries, and ubuntu packages:
conda , pip , apt-get , npm , yarn , sdk , poetry , gdebi ...The full list of installed tools can be found within the Dockerfile.
For every minor version release, we run vulnerability, virus, and security checks within the workspace using safety, clamav, trivy, and snyk via docker scan to make sure that the workspace environment is as secure as possible. We are committed to fix and prevent all high- or critical-severity vulnerabilities. You can find some up-to-date reports here.
The workspace provides a high degree of extensibility. Within the workspace, you have full root & sudo privileges to install any library or tool you need via terminal (eg, pip , apt-get , conda , or npm ). You can open a terminal by one of the following ways:
New -> TerminalApplications -> Terminal EmulatorFile -> New -> TerminalTerminal -> New Terminal Additionally, pre-installed tools such as Jupyter, JupyterLab, and Visual Studio Code each provide their own rich ecosystem of extensions. The workspace also contains a collection of installer scripts for many commonly used development tools or libraries (eg, PyCharm , Zeppelin , RStudio , Starspace ). You can find and execute all tool installers via Open Tool -> Install Tool . Those scripts can be also executed from the Desktop VNC (double-click on the script within the Tools folder on the Desktop VNC).
For example, to install the Apache Zeppelin notebook server, simply execute:
/resources/tools/zeppelin.sh --port=1234 After installation, refresh the Jupyter website and the Zeppelin tool will be available under Open Tool -> Zeppelin . Other tools might only be available within the Desktop VNC (eg, atom or pycharm ) or do not provide any UI (eg, starspace , docker-client ).
As an alternative to extending the workspace at runtime, you can also customize the workspace Docker image to create your own flavor as explained in the FAQ section.
The workspace can be extended in many ways at runtime, as explained here. However, if you like to customize the workspace image with your own software or configuration, you can do that via a Dockerfile as shown below:
 # Extend from any of the workspace versions/flavors
FROM mltooling/ml-workspace:0.13.2

# Run you customizations, e.g.
RUN
    # Install r-runtime, r-kernel, and r-studio web server from provided install scripts
    /bin/bash $RESOURCES_PATH/tools/r-runtime.sh --install &&
    /bin/bash $RESOURCES_PATH/tools/r-studio-server.sh --install &&
    # Cleanup Layer - removes unneccessary cache files
    clean-layer.sh
Finally, use docker build to build your customized Docker image.
For a more comprehensive Dockerfile example, take a look at the Dockerfile of the R-flavor.
To update a running workspace instance to a more recent version, the running Docker container needs to be replaced with a new container based on the updated workspace image.
All data within the workspace that is not persisted to a mounted volume will be lost during this update process. As mentioned in the persist data section, a volume is expected to be mounted into the /workspace folder. All tools within the workspace are configured to make use of the /workspace folder as the root directory for all source code and data artifacts. During an update, data within other directories will be removed, including installed/updated libraries or certain machine configurations. We have integrated a backup and restore feature ( CONFIG_BACKUP_ENABLED ) for various selected configuration files/folders, such as the user's Jupyter/VS-Code configuration, ~/.gitconfig , and ~/.ssh .
If the workspace is deployed via Docker (Kubernetes will have a different update process), you need to remove the existing container (via docker rm ) and start a new one (via docker run ) with the newer workspace image. Make sure to use the same configuration, volume, name, and port. For example, a workspace (image version 0.8.7 ) was started with this command:
 docker run -d
    -p 8080:8080
    --name "ml-workspace"
    -v "/path/on/host:/workspace"
    --env AUTHENTICATE_VIA_JUPYTER="mytoken"
    --restart always
    mltooling/ml-workspace:0.8.7
and needs to be updated to version 0.9.1 , you need to:
docker stop "ml-workspace" && docker rm "ml-workspace"docker run -d -p 8080:8080 --name "ml-workspace" -v "/path/on/host:/workspace" --env AUTHENTICATE_VIA_JUPYTER="mytoken" --restart always mltooling/ml-workspace:0.9.1 If you want to directly connect to the workspace via a VNC client (not using the noVNC webapp), you might be interested in changing certain VNC server configurations. To configure the VNC server, you can provide/overwrite the following environment variables at container start (via docker run option: --env ):
| 変数 | 説明 | デフォルト |
|---|---|---|
| VNC_PW | Password of VNC connection. This password only needs to be secure if the VNC server is directly exposed. If it is used via noVNC, it is already protected based on the configured authentication mechanism. | vncpassword |
| VNC_RESOLUTION | Default desktop resolution of VNC connection. When using noVNC, the resolution will be dynamically adapted to the window size. | 1600x900 |
| VNC_COL_DEPTH | Default color depth of VNC connection. | 24 |
Unfortunately, we currently do not support using a non-root user within the workspace. We plan to provide this capability and already started with some refactoring to allow this configuration. However, this still requires a lot more work, refactoring, and testing from our side.
Using root-user (or users with sudo permission) within containers is generally not recommended since, in case of system/kernel vulnerabilities, a user might be able to break out of the container and be able to access the host system. Since it is not very common to have such problematic kernel vulnerabilities, the risk of a severe attack is quite minimal. As explained in the official Docker documentation, containers (even with root users) are generally quite secure in preventing a breakout to the host. And compared to many other container use-cases, we actually want to provide the flexibility to the user to have control and system-level installation permissions within the workspace container.
The workspace comes preinstalled with various common tools to create isolated Python environments (virtual environments). The following sections provide a quick-intro on how to use these tools within the workspace. You can find information on when to use which tool here. Please refer to the documentation of the given tool for additional usage information.
venv (recommended):
To create a virtual environment via venv, execute the following commands:
 # Create environment in the working directory
python -m venv my-venv
# Activate environment in shell
source ./my-venv/bin/activate
# Optional: Create Jupyter kernel for this environment
pip install ipykernel
python -m ipykernel install --user --name=my-venv --display-name= " my-venv ( $( python --version ) ) "
# Optional: Close enviornment session
deactivate
pipenv (recommended):
To create a virtual environment via pipenv, execute the following commands:
 # Create environment in the working directory
pipenv install
# Activate environment session in shell
pipenv shell
# Optional: Create Jupyter kernel for this environment
pipenv install ipykernel
python -m ipykernel install --user --name=my-pipenv --display-name= " my-pipenv ( $( python --version ) ) "
# Optional: Close environment session
exit
virtualenv :
To create a virtual environment via virtualenv, execute the following commands:
 # Create environment in the working directory
virtualenv my-virtualenv
# Activate environment session in shell
source ./my-virtualenv/bin/activate
# Optional: Create Jupyter kernel for this environment
pip install ipykernel
python -m ipykernel install --user --name=my-virtualenv --display-name= " my-virtualenv ( $( python --version ) ) "
# Optional: Close environment session
deactivate
conda :
To create a virtual environment via conda, execute the following commands:
 # Create environment (globally)
conda create -n my-conda-env
# Activate environment session in shell
conda activate my-conda-env
# Optional: Create Jupyter kernel for this environment
python -m ipykernel install --user --name=my-conda-env --display-name= " my-conda-env ( $( python --version ) ) "
# Optional: Close environment session
conda deactivate
Tip: Shell Commands in Jupyter Notebooks:
If you install and use a virtual environment via a dedicated Jupyter Kernel and use shell commands within Jupyter (eg !pip install matplotlib ), the wrong python/pip version will be used. To use the python/pip version of the selected kernel, do the following instead:
 import sys
!{ sys . executable } - m pip install matplotlibThe workspace provides three easy options to install different Python versions alongside the main Python instance: pyenv, pipenv (recommended), conda.
pipenv (recommended):
To install a different python version (eg 3.7.8 ) within the workspace via pipenv, execute the following commands:
 # Install python vers
pipenv install --python=3.7.8
# Activate environment session in shell
pipenv shell
# Check python installation
python --version
# Optional: Create Jupyter kernel for this environment
pipenv install ipykernel
python -m ipykernel install --user --name=my-pipenv --display-name= " my-pipenv ( $( python --version ) ) "
# Optional: Close environment session
exit
pyenv :
To install a different python version (eg 3.7.8 ) within the workspace via pyenv, execute the following commands:
 # Install python version
pyenv install 3.7.8
# Make globally accessible
pyenv global 3.7.8
# Activate python version in shell
pyenv shell 3.7.8
# Check python installation
python3.7 --version
# Optional: Create Jupyter kernel for this python version
python3.7 -m pip install ipykernel
python3.7 -m ipykernel install --user --name=my-pyenv-3.7.8 --display-name= " my-pyenv (Python 3.7.8) "
conda :
To install a different python version (eg 3.7.8 ) within the workspace via conda, execute the following commands:
 # Create environment with python version
conda create -n my-conda-3.7 python=3.7.8
# Activate environment session in shell
conda activate my-conda-3.7
# Check python installation
python --version
# Optional: Create Jupyter kernel for this python version
pip install ipykernel
python -m ipykernel install --user --name=my-conda-3.7 --display-name= " my-conda ( $( python --version ) ) "
# Optional: Close environment session
conda deactivate
Tip: Shell Commands in Jupyter Notebooks:
If you install and use another Python version via a dedicated Jupyter Kernel and use shell commands within Jupyter (eg !pip install matplotlib ), the wrong python/pip version will be used. To use the python/pip version of the selected kernel, do the following instead:
 import sys
!{ sys . executable } - m pip install matplotlib Certain desktop tools (eg, recent versions of Firefox) or libraries (eg, Pytorch - see Issues: 1, 2) might crash if the shared memory size ( /dev/shm ) is too small. The default shared memory size of Docker is 64MB, which might not be enough for a few tools. You can provide a higher shared memory size via the shm-size docker run option:
docker run --shm-size=2G mltooling/ml-workspace:0.13.2 In general, the performance of running code within Docker is nearly identical compared to running it directly on the machine. However, in case you have limited the container's CPU quota (as explained in this section), the container can still see the full count of CPU cores available on the machine and there is no technical way to prevent this. Many libraries and tools will use the full CPU count (eg, via os.cpu_count() ) to set the number of threads used for multiprocessing/-threading. This might cause the program to start more threads/processes than it can efficiently handle with the available CPU quota, which can tremendously slow down the overall performance. Therefore, it is important to set the available CPU count or the maximum number of threads explicitly to the configured CPU quota. The workspace provides capabilities to detect the number of available CPUs automatically, which are used to configure a variety of common libraries via environment variables such as OMP_NUM_THREADS or MKL_NUM_THREADS . It is also possible to explicitly set the number of available CPUs at container startup via the MAX_NUM_THREADS environment variable (see configuration section). The same environment variable can also be used to get the number of available CPUs at runtime.
Even though the automatic configuration capabilities of the workspace will fix a variety of inefficiencies, we still recommend configuring the number of available CPUs with all libraries explicitly.例えば:
 import os
MAX_NUM_THREADS = int ( os . getenv ( "MAX_NUM_THREADS" ))

# Set in pytorch
import torch
torch . set_num_threads ( MAX_NUM_THREADS )

# Set in tensorflow
import tensorflow as tf
config = tf . ConfigProto (
    device_count = { "CPU" : MAX_NUM_THREADS },
    inter_op_parallelism_threads = MAX_NUM_THREADS ,
    intra_op_parallelism_threads = MAX_NUM_THREADS ,
)
tf_session = tf . Session ( config = config )

# Set session for keras
import keras . backend as K
K . set_session ( tf_session )

# Set in sklearn estimator
from sklearn . linear_model import LogisticRegression
LogisticRegression ( n_jobs = MAX_NUM_THREADS ). fit ( X , y )

# Set for multiprocessing pool
from multiprocessing import Pool

with Pool ( MAX_NUM_THREADS ) as pool :
results = pool . map ( lst )If you encounter the following error within the container logs when starting the workspace, it will most likely not be possible to run the workspace on your hardware:
exited: nginx (terminated by SIGILL (core dumped); not expected)
The OpenResty/Nginx binary package used within the workspace requires to run on a CPU with SSE4.2 support (see this issue). Unfortunately, some older CPUs do not have support for SSE4.2 and, therefore, will not be able to run the workspace container. On Linux, you can check if your CPU supports SSE4.2 when looking into the cat /proc/cpuinfo flags section. If you encounter this problem, feel free to notify us by commenting on the following issue: #30.
Requirements : Docker and Act are required to be installed on your machine to execute the build process.
To simplify the process of building this project from scratch, we provide build-scripts - based on universal-build - that run all necessary steps (build, test, and release) within a containerized environment. To build and test your changes, execute the following command in the project root folder:
act -b -j buildUnder the hood it uses the build.py files in this repo based on the universal-build library. So, if you want to build it locally, you can also execute this command in the project root folder to build the docker container:
python build.py --makeFor additional script options:
python build.py --helpRefer to our contribution guides for more detailed information on our build scripts and development process.
Licensed Apache 2.0 . Created and maintained with ❤️ by developers from Berlin.


