ml workspace
0.13.2

기계 학습을위한 올인원 웹 기반 개발 환경
시작하기 • 기능 및 스크린 샷 • 지원 • 버그보고 • FAQ • 알려진 문제 • 기여
ML Workspace는 기계 학습 및 데이터 과학을위한 올인원 웹 기반 IDE입니다. 배포하는 것은 간단하고 자체 기계에 생산적으로 구축 된 ML 솔루션을 제작하기 위해 몇 분 안에 시작합니다. 이 작업 공간은 다양한 인기있는 데이터 과학 라이브러리 (예 : Tensorflow, Pytorch, Keras, Sklearn) 및 DEV 도구 (예 : Jupyter, vs Code, Tensorboard)가 완벽하게 구성되고 최적화되고 통합 된 개발자를위한 최고의 도구입니다.
작업 공간은 Docker를 컴퓨터에 설치해야합니다 (설치 안내서).
단일 작업 공간 인스턴스를 배포하는 것은 다음과 같이 간단합니다.
docker run -p 8080:8080 mltooling/ml-workspace:0.13.2Voilà, 그것은 쉬웠다! 이제 Docker는 최신 작업 공간 이미지를 컴퓨터로 가져옵니다. 인터넷 속도에 따라 몇 분이 걸릴 수 있습니다. 작업 공간이 시작되면 http : // localhost : 8080을 통해 액세스 할 수 있습니다.
다른 컴퓨터 또는 다른 포트에서 시작한 경우 기계의 IP/DNS 및/또는 노출 된 포트를 사용해야합니다.
생산적인 사용을 위해 단일 인스턴스를 배포하려면 다음 옵션을 최소한 적용하는 것이 좋습니다.
docker run -d
    -p 8080:8080
    --name " ml-workspace "
    -v " ${PWD} :/workspace "
    --env AUTHENTICATE_VIA_JUPYTER= " mytoken "
    --shm-size 512m
    --restart always
    mltooling/ml-workspace:0.13.2
이 명령은 컨테이너를 백그라운드 ( -d )에서 실행하고 현재 작업 디렉토리를 /workspace 폴더 ( -v )에 장착하고 제공된 토큰 ( --env AUTHENTICATE_VIA_JUPYTER )을 통해 작업 영역을 보장하고 512MB의 공유 메모리 ( --shm-size )를 제공하여 예상치 못한 충돌 (알려진 문제 섹션 참조)을 제공하고 시스템을 다시 시작합니다 ( -shortarts) ( --restart always -SHM -STARTS) ( -SHM 크기)를 제공합니다. Docker 실행에 대한 추가 옵션을 찾을 수 있으며 아래 섹션에서 작업 공간 구성 옵션을 찾을 수 있습니다.
작업 공간은 환경 변수를 설정하여 사용할 수있는 다양한 구성 옵션을 제공합니다 (Docker Run 옵션 : --env ).
| 변하기 쉬운 | 설명 | 기본 |
|---|---|---|
| workspace_base_url | Jupyter 및 기타 모든 도구가 도달 할 수있는 기본 URL. | / |
| workspace_ssl_enabled | SSL을 활성화 또는 비활성화합니다. True로 설정되면 인증서 (CERT.CRT)는 /resources/ssl 에 장착되어야하거나 그렇지 않은 경우 컨테이너가 자체 서명 된 인증서를 생성해야합니다. | 거짓 |
| workspace_auth_user | 기본 인증 사용자 이름. 기본 인증을 활성화하려면 사용자와 비밀번호를 모두 설정해야합니다. 작업 공간을 보호하려면 AUTHENTICATE_VIA_JUPYTER 사용하는 것이 좋습니다. | |
| workspace_auth_password | 기본 인증 사용자 비밀번호. 기본 인증을 활성화하려면 사용자와 비밀번호를 모두 설정해야합니다. 작업 공간을 보호하려면 AUTHENTICATE_VIA_JUPYTER 사용하는 것이 좋습니다. | |
| workspace_port | 작업 공간 프록시의 기본 컨테이너 내부 포트를 구성합니다. 대부분의 시나리오에서는이 구성을 변경하지 않아야하며 Docker를 통한 포트 구성은 작업 공간 대신 다른 포트에서 액세스 할 수 있어야합니다. | 8080 |
| config_backup_enabled | 사용자 구성을 자동으로 백업 및 복원하여 사용자 홈 디렉토리에서 .ssh, .jupyter 또는 .gitconfig와 같은 지속적인 /workspace 폴더로 사용자 구성을 복원합니다. | 진실 |
| shared_links_enabled | 외부 링크를 통해 리소스를 공유 할 수있는 기능을 활성화 또는 비활성화합니다. 이는 파일 공유, 작업 공간 내부 포트에 대한 액세스 및 쉬운 명령 기반 SSH 설정을 활성화하는 데 사용됩니다. 모든 공유 링크는 토큰을 통해 보호됩니다. 그러나 공유 후 토큰을 쉽게 무효화 할 수없고 만료되지 않기 때문에 특정 위험이 있습니다. | 진실 |
| include_tutorials | true 이라면 컨테이너 시작의 /workspace 폴더에 선택한 튜토리얼 및 소개 노트북이 추가되지만 폴더가 비어있는 경우에만 추가됩니다. | 진실 |
| max_num_threads | 다양한 공통 라이브러리 (MKL, OpenBlas, Omp, Numba, ...)를 사용할 때 계산에 사용되는 스레드 수. auto 사용하여 작업 공간이 사용 가능한 CPU 리소스를 기반으로 스레드 수를 동적으로 결정할 수 있습니다. 이 구성은 작업 공간 내에서 사용자가 덮어 쓰일 수 있습니다. 일반적으로 작업 공간에 사용 가능한 CPU 수 또는 아래에 설정하는 것이 좋습니다. | 자동 |
| Jupyter 구성 : | ||
| shutdown_inactive_kernels | 주어진 시간 초과 후 비활성 커널을 자동으로 종료합니다 (메모리 또는 GPU 리소스 정리). 값은 몇 초 만에 타임 아웃이거나 기본값이 48h로 true 로 설정할 수 있습니다. | 거짓 |
| Authenticate_via_Jupyter | true 이라면 모든 HTTP 요청은 Jupyter 서버에 대해 인증됩니다. 즉, Jupyter로 구성된 인증 메소드가 다른 모든 도구에도 사용됩니다. 이것은 false 으로 비활성화 될 수 있습니다. 다른 값은이 인증을 활성화하고 NotebookApp.token 구성을 통해 토큰으로 적용됩니다. | 거짓 |
| Notebook_args | 명령 줄 Args를 통해 Jupyter 구성 옵션을 추가하고 덮어 씁니다. 모든 옵션에 대해서는이 개요를 참조하십시오. | |
데이터를 지속하려면 부피를 /workspace 에 넣어야합니다 (Docker Run 옵션 : -v ).
컨테이너 내의 기본 작업 디렉토리는 /workspace 이며 Jupyter 인스턴스의 루트 디렉토리이기도합니다. /workspace 디렉토리는 모든 중요한 작업 인공물에 사용되도록 고안되었습니다. 서버의 다른 디렉토리 (예 : /root ) 내의 데이터는 컨테이너 재시작에서 손실 될 수 있습니다.
다음 두 가지 옵션 중 하나를 통해 인증을 활성화하는 것이 좋습니다. 두 옵션 모두 사용자는 사전 설치된 도구에 액세스하기 위해 인증해야합니다.
인증은 기본 작업 공간 포트 (기본값 :
8080)를 통해 액세스하는 모든 도구에 대해서만 작동합니다. 이것은 모든 사전 설치된 도구 및 액세스 포트 기능에 대해 작동합니다. 컨테이너의 다른 포트를 노출 시키면 인증을 통해 보안을 확보하십시오!
AUTHENTICATE_VIA_JUPYTER 변수를 통해 Jupyter의 인증 구현을 기반으로 토큰 기반 인증을 활성화하십시오.
docker run -p 8080:8080 --env AUTHENTICATE_VIA_JUPYTER= " mytoken " mltooling/ml-workspace:0.13.2 <generated> 사용하여 Jupyter가 컨테이너 로그에 인쇄 된 임의의 토큰을 생성하도록 할 수도 있습니다. true 의 값은 토큰을 설정하지 않지만 사용자가 인증 된 경우 작업 공간의 모든 요청이 Jupyter 인스턴스로 확인되도록 활성화합니다. 이것은 자체 인증 방식을 구성하는 Jupyterhub와 같은 도구에 사용됩니다.
WORKSPACE_AUTH_USER 및 WORKSPACE_AUTH_PASSWORD 변수를 통해 기본 인증을 활성화하십시오.
docker run -p 8080:8080 --env WORKSPACE_AUTH_USER= " user " --env WORKSPACE_AUTH_PASSWORD= " pwd " mltooling/ml-workspace:0.13.2 AUTHENTICATE_VIA_JUPYTER 인증은 nginx 프록시를 통해 구성되며 다른 옵션에 비해 더 성능이있을 수 있습니다.
HTTPS (암호화 된 통신)를 통해 작업 공간에 액세스 할 수 있도록 SSL을 활성화하는 것이 좋습니다. SSL 암호화는 WORKSPACE_SSL_ENABLED 변수를 통해 활성화 할 수 있습니다.
true 로 설정되면 cert.crt 및 cert.key 파일을 /resources/ssl 에 장착하거나 인증서 파일이 존재하지 않으면 컨테이너가 자체 서명 된 인증서를 생성해야합니다. 예를 들어, 로컬 시스템의 /path/with/certificate/files 호스트 도메인에 대한 유효한 인증서 ( cert.crt 및 cert.key 파일)가있는 경우 다음과 같이 작업 영역에서 사용할 수 있습니다.
docker run
    -p 8080:8080
    --env WORKSPACE_SSL_ENABLED= " true "
    -v /path/with/certificate/files:/resources/ssl:ro
    mltooling/ml-workspace:0.13.2
공개 도메인에서 작업 공간을 호스팅하려면 let 's Encrypt를 사용하여 도메인에 대한 신뢰할 수있는 인증서를 얻는 것이 좋습니다. 작업 영역에 생성 된 인증서 (예 : Certbot 도구를 통해) cert.crt 사용하려면 privkey.pem fullchain.pem cert.key 파일에 해당합니다.
SSL 지원을 활성화하면
https://가 아닌http://통해 작업 공간에 액세스해야합니다.
기본적으로 작업 공간 컨테이너에는 리소스 제약 조건이 없으며 호스트의 커널 스케줄러가 허용하는만큼 주어진 리소스를 사용할 수 있습니다. Docker는 Docker Run 명령의 런타임 구성 플래그를 설정하여 컨테이너가 사용할 메모리의 양 또는 CPU를 제어 할 수있는 방법을 제공합니다.
작업 공간에는 안정적인 실행을 수행하고 사용할 수 있도록 적어도 2 CPU 및 500MB가 필요합니다.
예를 들어, 다음 명령은 작업 공간이 최대 8 개의 CPU, 16GB의 메모리 및 1GB의 공유 메모리 만 사용하도록 제한합니다 (알려진 문제 참조).
docker run -p 8080:8080 --cpus=8 --memory=16g --shm-size=1G mltooling/ml-workspace:0.13.2리소스 제약 조건에 대한 자세한 옵션 및 문서는 공식 Docker 안내서를 참조하십시오.
프록시가 필요한 경우 HTTP_PROXY , HTTPS_PROXY 및 NO_PROXY 환경 변수를 통해 프록시 구성을 전달할 수 있습니다.
메인 작업 공간 이미지 ( mltooling/ml-workspace ) 외에도 기능을 확장하거나 이미지 크기를 최소화하여 다양한 사용 사례를 지원하는 다른 이미지 풍미를 제공합니다.
최소 향미 ( mltooling/ml-workspace-minimal )는 주요 이미지에 사전 설치된 대부분의 파이썬 라이브러리가없는 기능 섹션에 설명 된 대부분의 도구 및 기능을 포함하는 가장 작은 이미지입니다. 모든 파이썬 라이브러리 또는 제외 도구는 사용자가 런타임 중에 수동으로 설치할 수 있습니다.
docker run -p 8080:8080 mltooling/ml-workspace-minimal:0.13.2 R 향료 ( mltooling/ml-workspace-r )는 기본 작업 영역 이미지를 기반으로하며 R- 인터 프리터, R- 주피터 커널, rstudio 서버 ( Open Tool -> RStudio 통한 액세스) 및 R 생태계의 다양한 인기 패키지로 확장합니다.
docker run -p 8080:8080 mltooling/ml-workspace-r:0.12.1 Spark Flavor ( mltooling/ml-workspace-spark )는 R-Flavor Workspace 이미지를 기반으로하며 Spark Runtime, Spark-Jupyter Kernel, Zeppelin 노트북 ( Open Tool -> Zeppelin 통해 액세스), Pyspark, Hadoop, Java Kernel 및 추가 Libraries & Jupyter Extensions로 확장합니다.
docker run -p 8080:8080 mltooling/ml-workspace-spark:0.12.1현재 GPU- 맛은 CUDA 11.2 만 지원합니다. 다른 CUDA 버전에 대한 지원은 향후 추가 될 수 있습니다.
GPU 풍미 ( mltooling/ml-workspace-gpu )는 기본 작업 공간 이미지를 기반으로하며 Cuda 10.1 및 GPU 준비 버전의 다양한 머신 학습 라이브러리 (예 : Tensorflow, Pytorch, CNTK, JAX)로 확장합니다. 이 GPU 이미지에는 시스템에 대한 다음 추가 요구 사항이 있습니다.
>=460.32.03 (지침)이어야합니다.docker run -p 8080:8080 --gpus all mltooling/ml-workspace-gpu:0.13.2docker run -p 8080:8080 --runtime nvidia --env NVIDIA_VISIBLE_DEVICES= " all " mltooling/ml-workspace-gpu:0.13.2GPU 풍미에는 다음과 같은 몇 가지 추가 구성 옵션이 제공됩니다.
| 변하기 쉬운 | 설명 | 기본 |
|---|---|---|
| nvidia_visible_devices | 작업 공간 내부에서 어떤 GPU에 액세스 할 수 있는지 제어합니다. 기본적으로 호스트의 모든 GPU는 작업 공간 내에서 액세스 할 수 있습니다. all , none 사용하거나 쉼표로 구분 된 장치 ID 목록 (예 : 0,1 )을 지정할 수 있습니다. 호스트 시스템에서 nvidia-smi 실행하여 사용 가능한 장치 ID 목록을 찾을 수 있습니다. | 모두 |
| cuda_visible_devices | 작업 공간 내부에서 실행되는 GPU CUDA 애플리케이션을 제어합니다. 기본적으로 작업 공간에 액세스 할 수있는 모든 GPU가 표시됩니다. 응용 프로그램을 제한하려면 작업 영역 내에서 사용 가능한 장치 (실행 nvidia-smi )를 기반으로 쉼표로 구분 된 내부 장치 ID (예 : 0,2 )를 제공하십시오. NVIDIA_VISIBLE_DEVICES 와 비교할 때 Workspace 사용자는 작업 공간 내 에서이 구성을 덮어 쓰면 여전히 다른 GPU에 액세스 할 수 있습니다. | |
| tf_force_gpu_allow_growth | 기본적으로 GPU 메모리의 대부분은 Tensorflow 그래프의 첫 번째 실행에 의해 할당됩니다. 이 동작은 생산 파이프 라인에 바람직 할 수 있지만 대화식 사용이 덜 바람직합니다. true 사용하여 동적 GPU 메모리 할당 또는 false 활성화하려면 TensorFlow에 실행시 모든 메모리를 할당하도록 지시하십시오. | 진실 |
작업 공간은 단일 사용자 개발 환경으로 설계되었습니다. 다중 사용자 설정의 경우 배포하는 것이 좋습니다. ML 허브. ML Hub는 여러 사용자를위한 작업 공간 인스턴스를 스폰, 관리 및 프록시 작업 공간 인스턴스로 Jupyterhub를 기반으로합니다.
ML Hub를 사용하면 단일 서버 (Docker를 통해) 또는 클러스터 (Kubernetes를 통해)에서 다중 사용자 환경을 쉽게 설정하고 다양한 사용 시나리오 및 인증 제공 업체를 지원할 수 있습니다. 다음을 통해 ML 허브를 시도 할 수 있습니다.
docker run -p 8080:8080 -v /var/run/docker.sock:/var/run/docker.sock mltooling/ml-hub:latestML 허브에 대한 자세한 정보 및 문서를 보려면 Github 사이트를 살펴보십시오.
이 프로젝트는 Benjamin Räthlein, Lukas Masuch 및 Jan Kalkan에 의해 유지됩니다. 이메일을 통해 개별 지원을 제공 할 수 없다는 것을 이해하십시오. 또한 도움이 공개적으로 공유되면 더 많은 사람들이 혜택을받을 수 있도록 도움이 훨씬 더 가치가 있다고 생각합니다.
| 유형 | 채널 |
|---|---|
| 버그 보고서 | |
| ? 기능 요청 | |
| ? 사용 질문 | |
| ? 공지 사항 | |
| ❓ 기타 요청 |
JUPYTER • 데스크톱 GUI • 대 코드 • JupyterLab • GIT 통합 • 파일 공유 • 액세스 포트 • 텐서 보드 • 확장 가능성 • 하드웨어 모니터링 • SSH 액세스 • 원격 개발 • 작업 실행
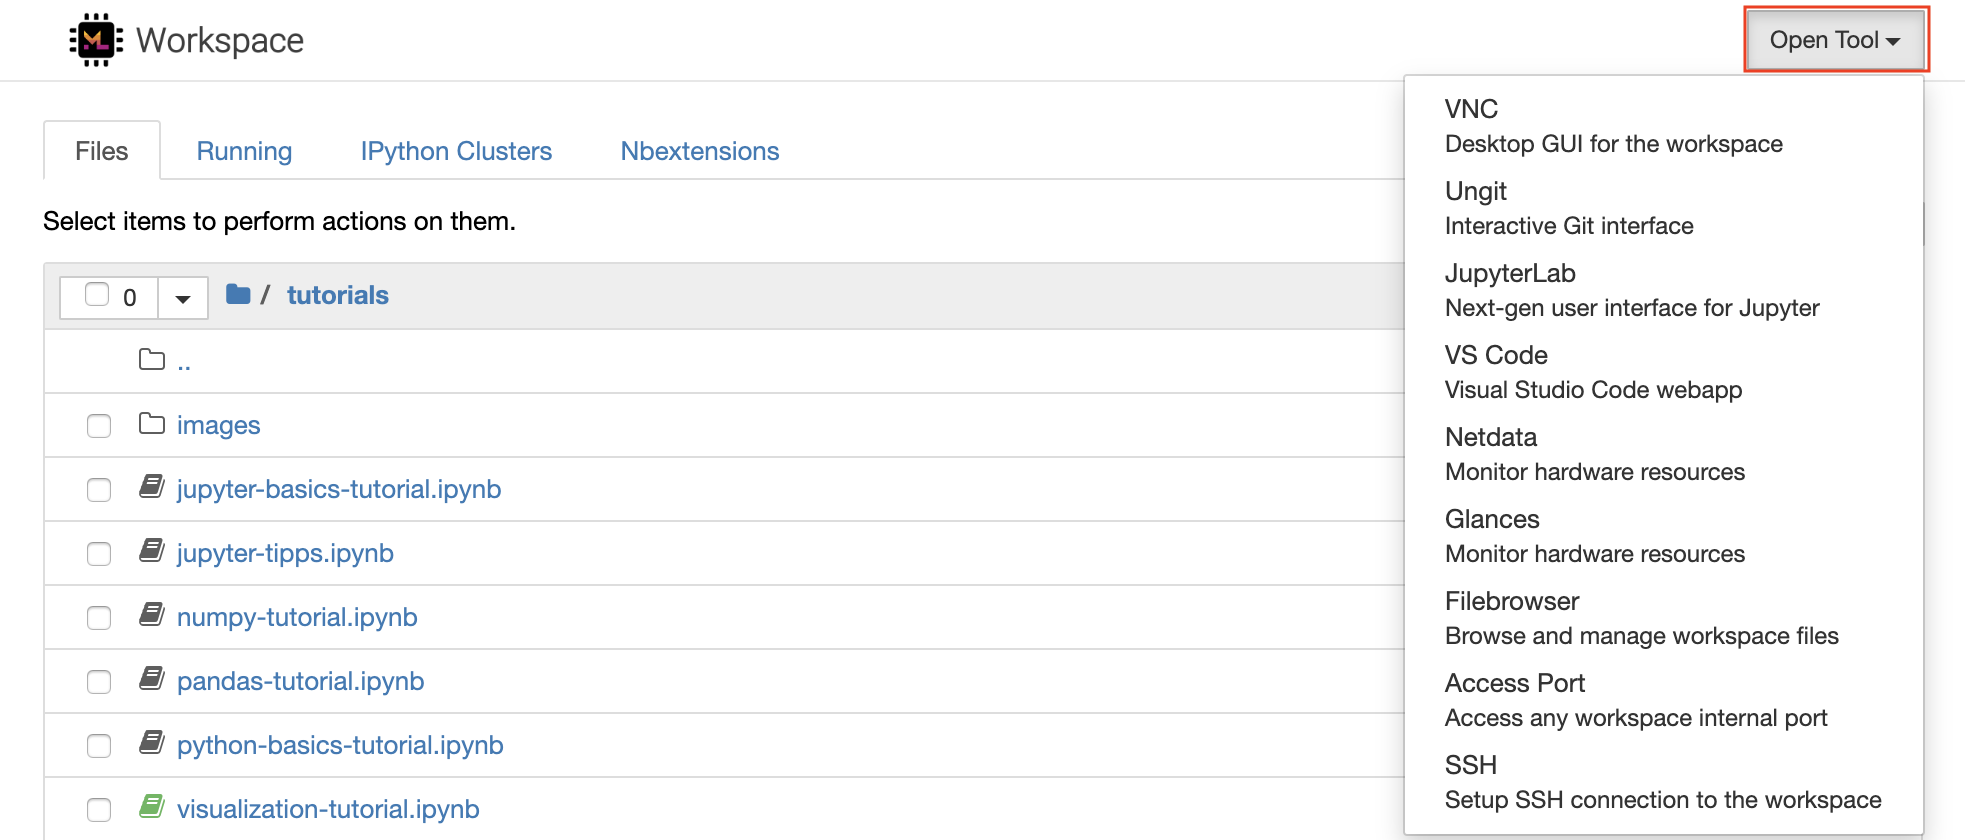
작업 공간에는 기계 학습 워크 플로에 도움이되는 수업 중 가장 오픈 소스 개발 도구가 장착되어 있습니다. 이러한 도구 중 다수는 Jupyter (작업 공간의 주요 응용 프로그램)의 Open Tool 메뉴에서 시작할 수 있습니다.
작업 공간 내에는 터미널 (예 :
pip,apt-get,conda또는npm)을 통해 필요한 라이브러리 또는 도구를 설치하는 전체 루트 및 Sudo 권한이 있습니다. Extensibility 섹션 내에서 작업 공간을 확장하는 더 많은 방법을 찾을 수 있습니다.
Jupyter Notebook은 코드 작성 및 실행을위한 웹 기반 대화식 환경입니다. Jupyter의 메인 빌딩 블록은 파일 브라우저, 노트북 편집기 및 커널입니다. 파일 브라우저는 /workspace 디렉토리의 모든 노트북, 파일 및 폴더에 대한 대화식 파일 관리자를 제공합니다.
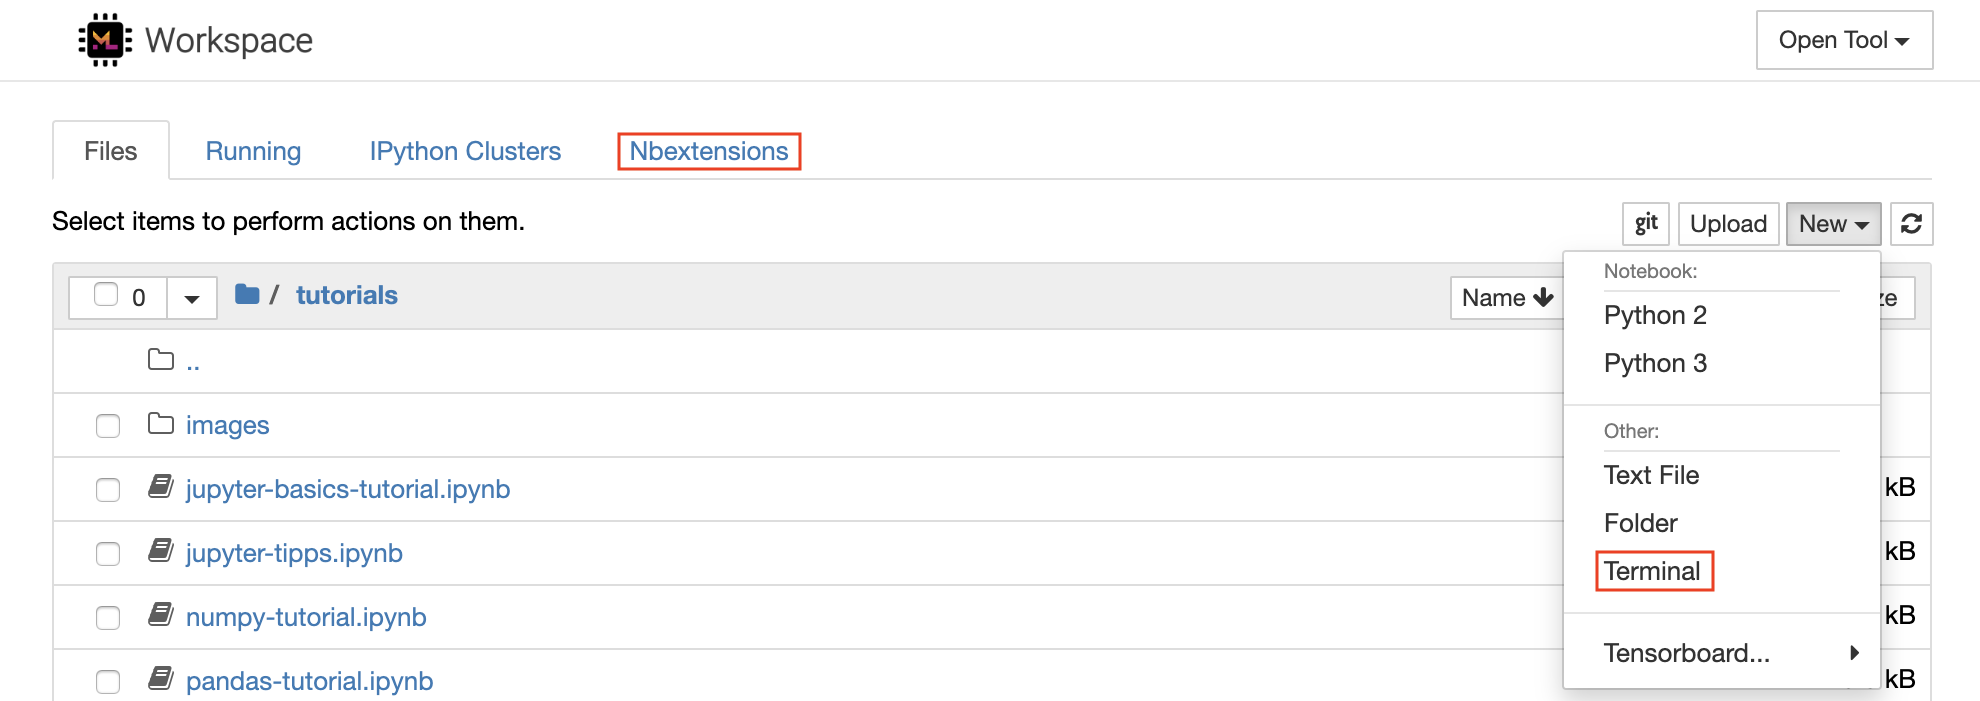
목록 상단의 New 드롭 다운 버튼을 클릭하고 원하는 언어 커널을 선택하여 새 노트북을 만들 수 있습니다.
파일 브라우저에서
New -> Terminal선택하여 대화식 터미널 인스턴스를 스폰 할 수 있습니다.
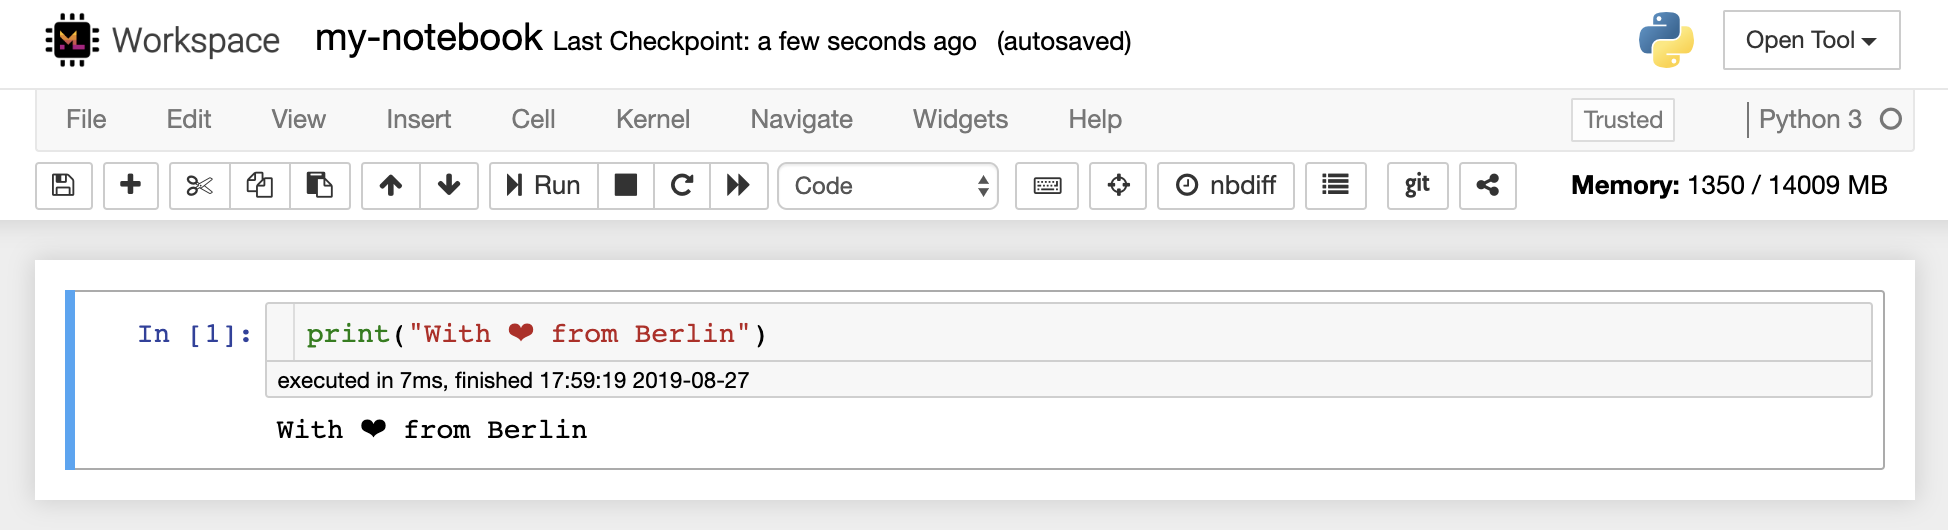
노트북 편집기를 사용하면 라이브 코드, 마크 다운 텍스트, 쉘 명령, 라텍스 방정식, 대화식 위젯, 플롯 및 이미지가 포함 된 문서를 작성할 수 있습니다. 이 노트북 문서는 다양한 형식으로 변환하고 다른 형식과 공유 할 수있는 계산에 대한 완전하고 독립적 인 기록을 제공합니다.
이 작업 공간에는 다양한 타사 Jupyter 확장이 활성화되어 있습니다. Nbextensions Configurator :
nbextensions탭에서 이러한 확장자를 구성 할 수 있습니다.
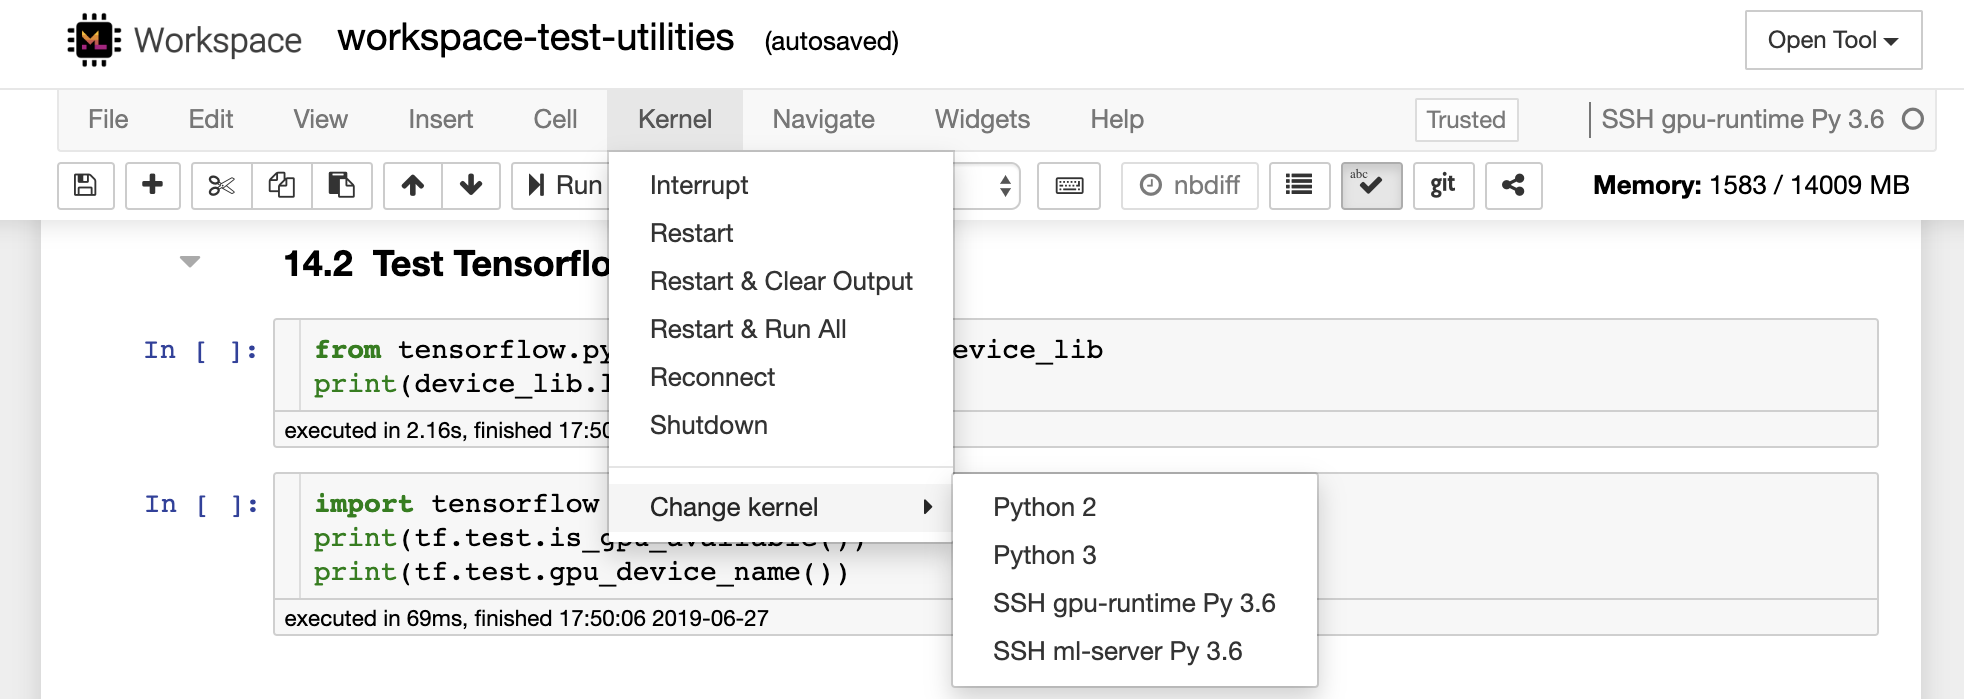
노트북을 사용하면 다양한 프로그래밍 언어로 코드를 실행할 수 있습니다. 사용자가 열리는 각 노트북 문서에 대해 웹 응용 프로그램은 해당 노트북의 코드를 실행하고 출력을 반환하는 커널을 시작합니다. 이 작업 공간에는 Python 3 커널이 사전 설치되어 있습니다. 다른 언어 (예 : R, Scala, Go) 또는 추가 컴퓨팅 리소스 (예 : GPU, CPU, 메모리)에 액세스하기 위해 추가 커널을 설치할 수 있습니다.
Python 2는 박수로 사용되며 사용하지 않는 것이 좋습니다. 그러나이 명령을 통해 여전히 Python 2.7 커널을 설치할 수 있습니다 :
/bin/bash /resources/tools/python-27.sh
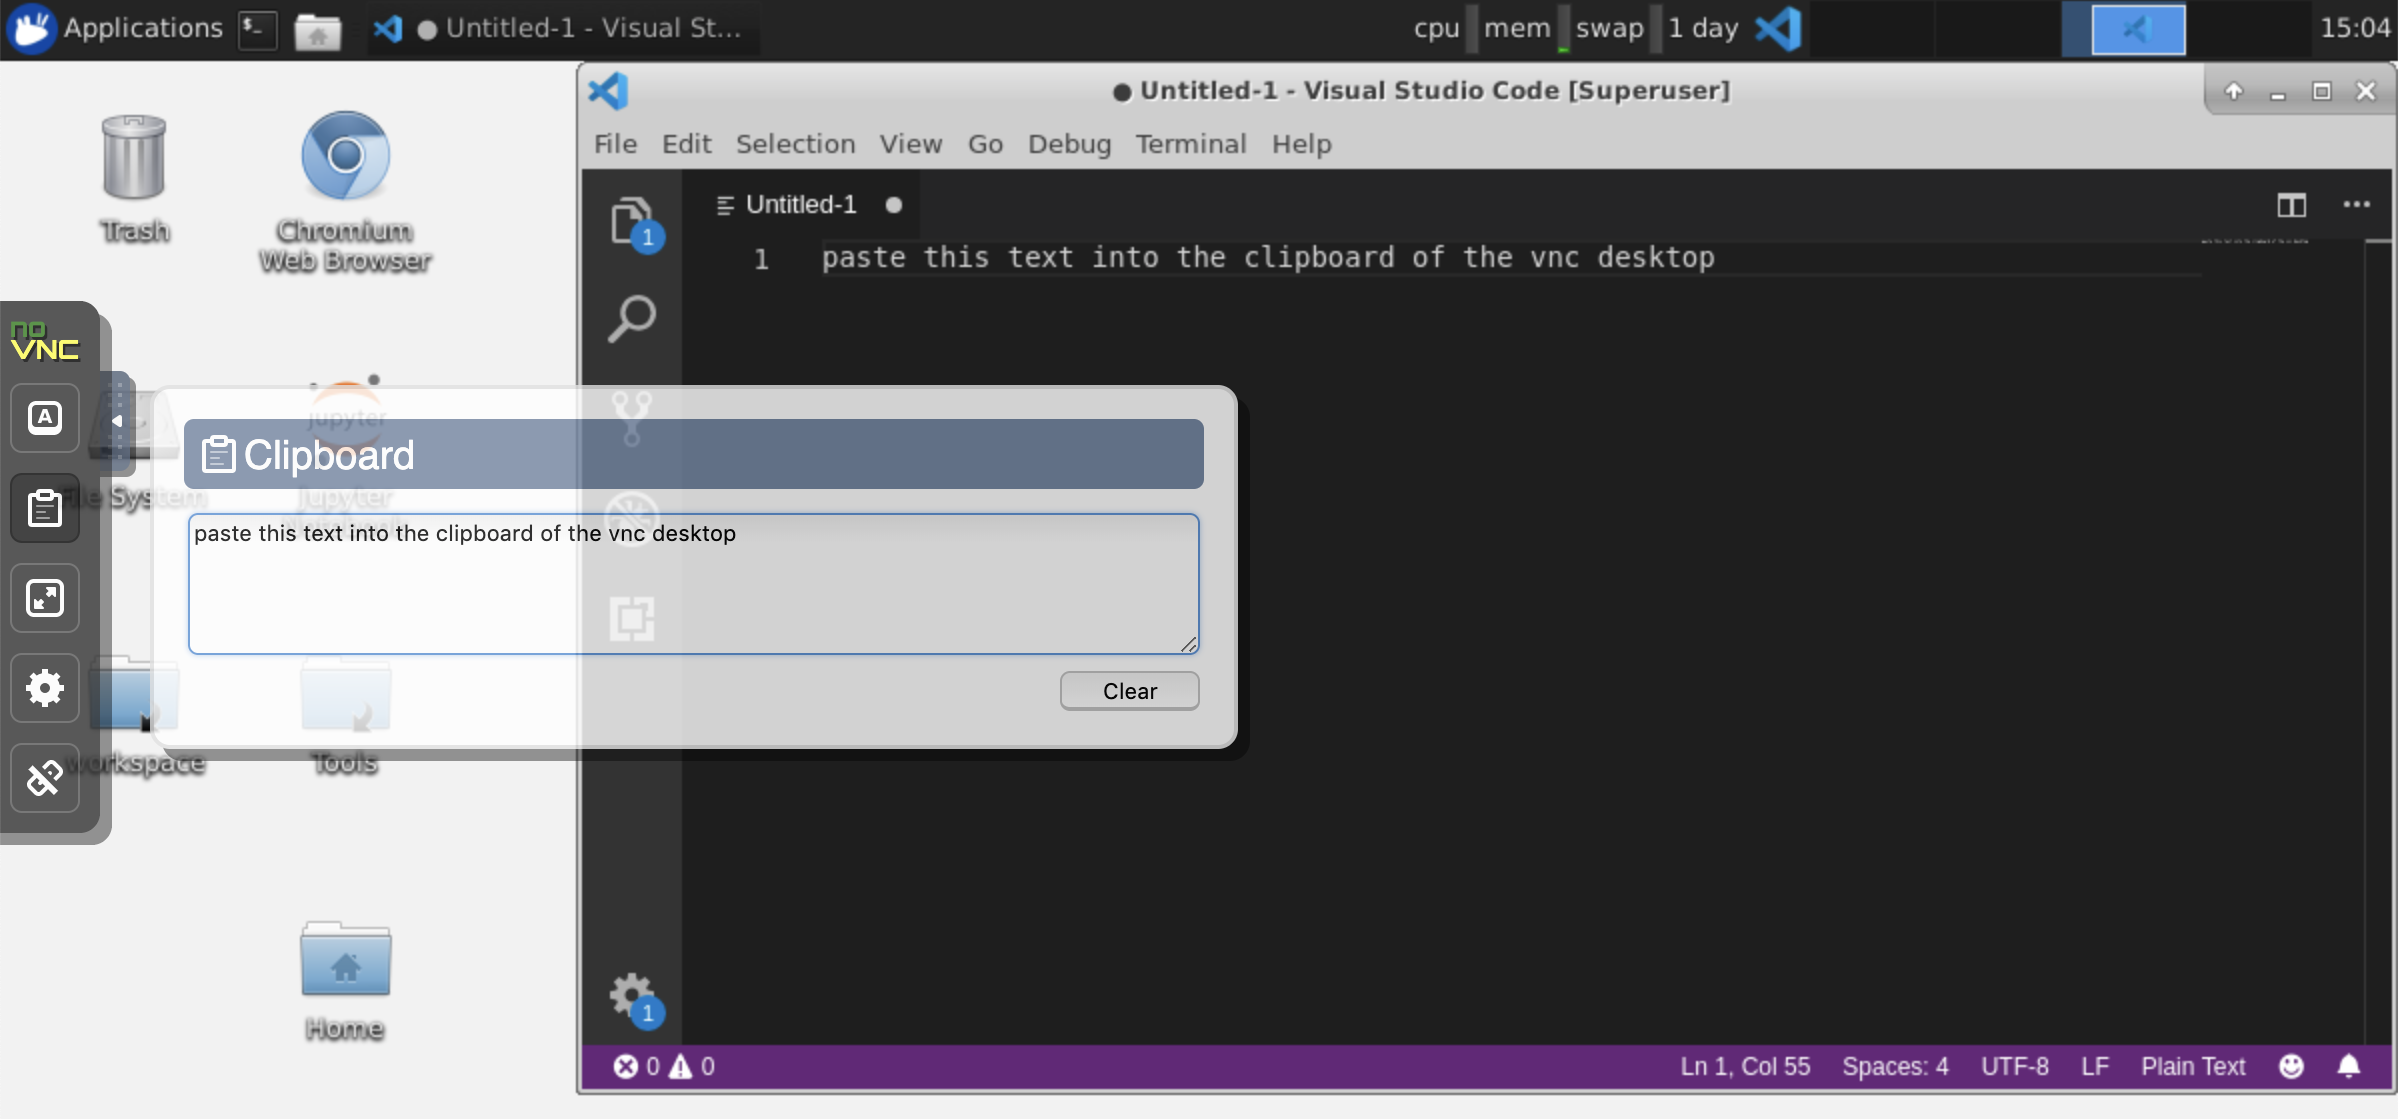
이 작업 공간은 NOVNC를 통해 작업 공간에 대한 HTTP 기반 VNC 액세스를 제공합니다. 따라서 완전 기능을 갖춘 데스크탑 GUI로 작업 공간 내에서 액세스하고 작업 할 수 있습니다. 이 데스크탑 GUI에 액세스하려면 Open Tool 로 이동하여 VNC 선택하고 Connect 버튼을 클릭하십시오. 비밀번호를 요청받은 경우 vncpassword 사용하십시오.
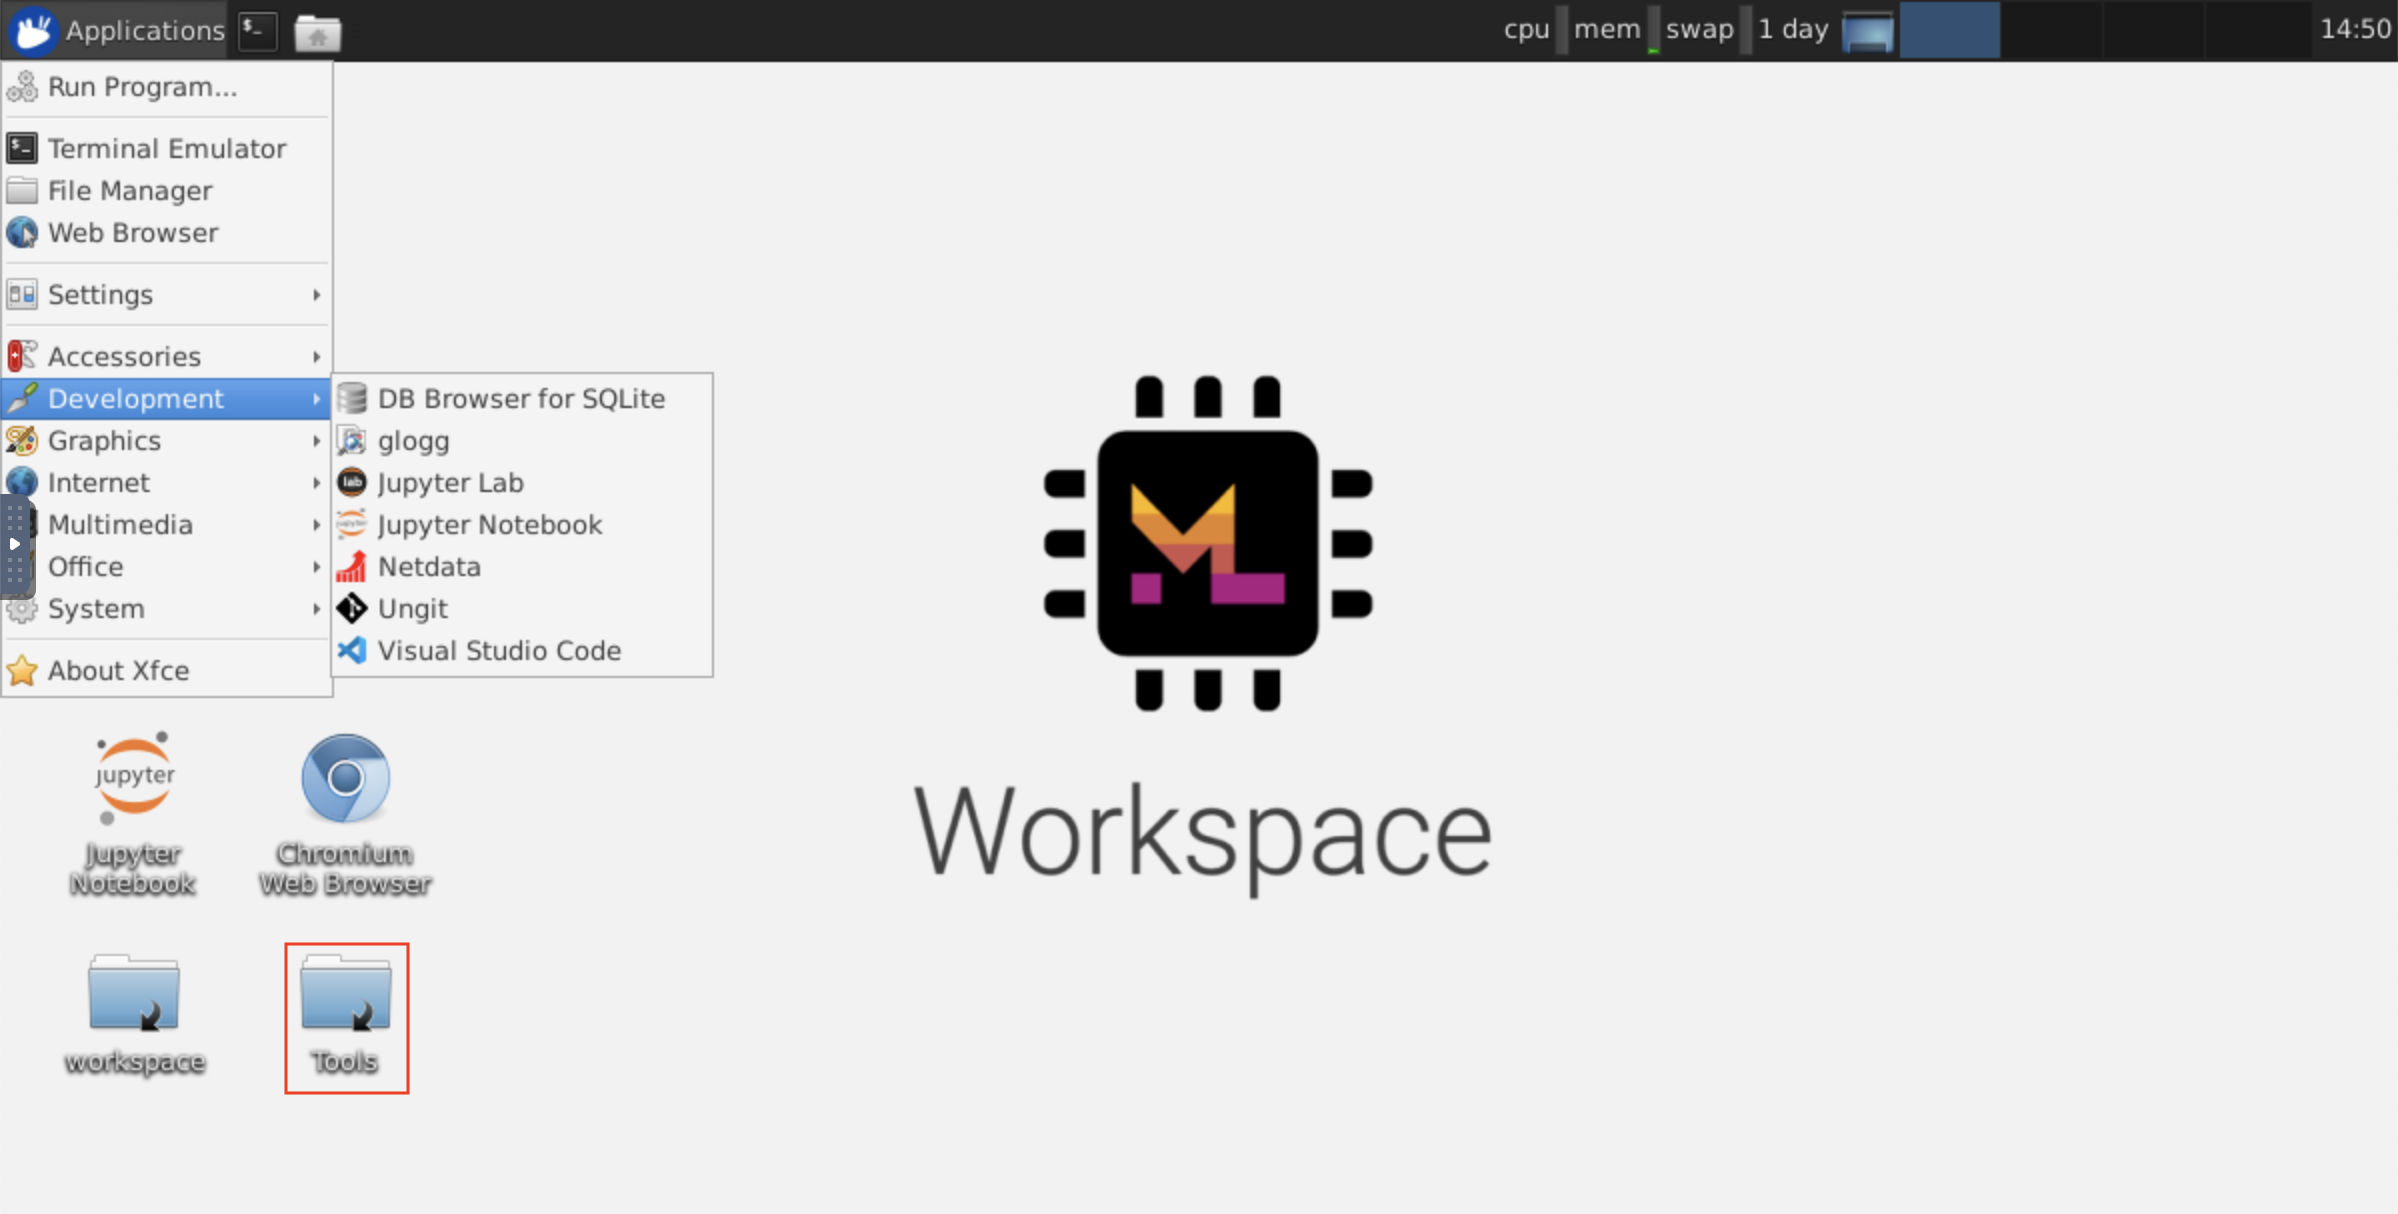
연결되면 본격적인 웹 브라우저 또는 Ubuntu에서 사용할 수있는 기타 도구를 설치하고 사용할 수있는 데스크탑 GUI가 표시됩니다. 데스크탑의 Tools 폴더 내에는 Atom, Pycharm, R-Runtime, R-Studio 또는 Postman과 같은 가장 일반적으로 사용되는 개발 도구를 설치하는 데있어 설치 스크립트 모음을 찾을 수 있습니다 (스크립트를 두 번 클릭).
클립 보드 : 컴퓨터와 작업 공간 사이에 클립 보드를 공유하려면 아래에 설명 된대로 복사-페이스트 기능을 사용할 수 있습니다.
장기 실행 작업 : 장기적인 Jupyter 실행을 위해 Desktop GUI를 사용하십시오. Workspace Desktop GUI 브라우저에서 노트북을 실행하면 노트북에서 브라우저를 연결 해제하더라도 모든 출력이 노트북과 동기화됩니다.
Visual Studio Code ( Open Tool -> VS Code )는 다양한 언어와 풍부한 확장 생태계를 지원하는 오픈 소스 경량이지만 강력한 코드 편집기입니다. 소스 코드 편집기의 단순성과 IntelliSense 코드 완료 및 디버깅과 같은 강력한 개발자 툴링과 결합됩니다. 작업 공간은 VS Code를 멋진 코드 서버 프로젝트의 브라우저 기반을 통해 액세스 할 수있는 웹 기반 애플리케이션으로 통합합니다. 원하는대로 모든 기능을 사용자 정의하고 여러 타사 확장자를 설치할 수 있습니다.
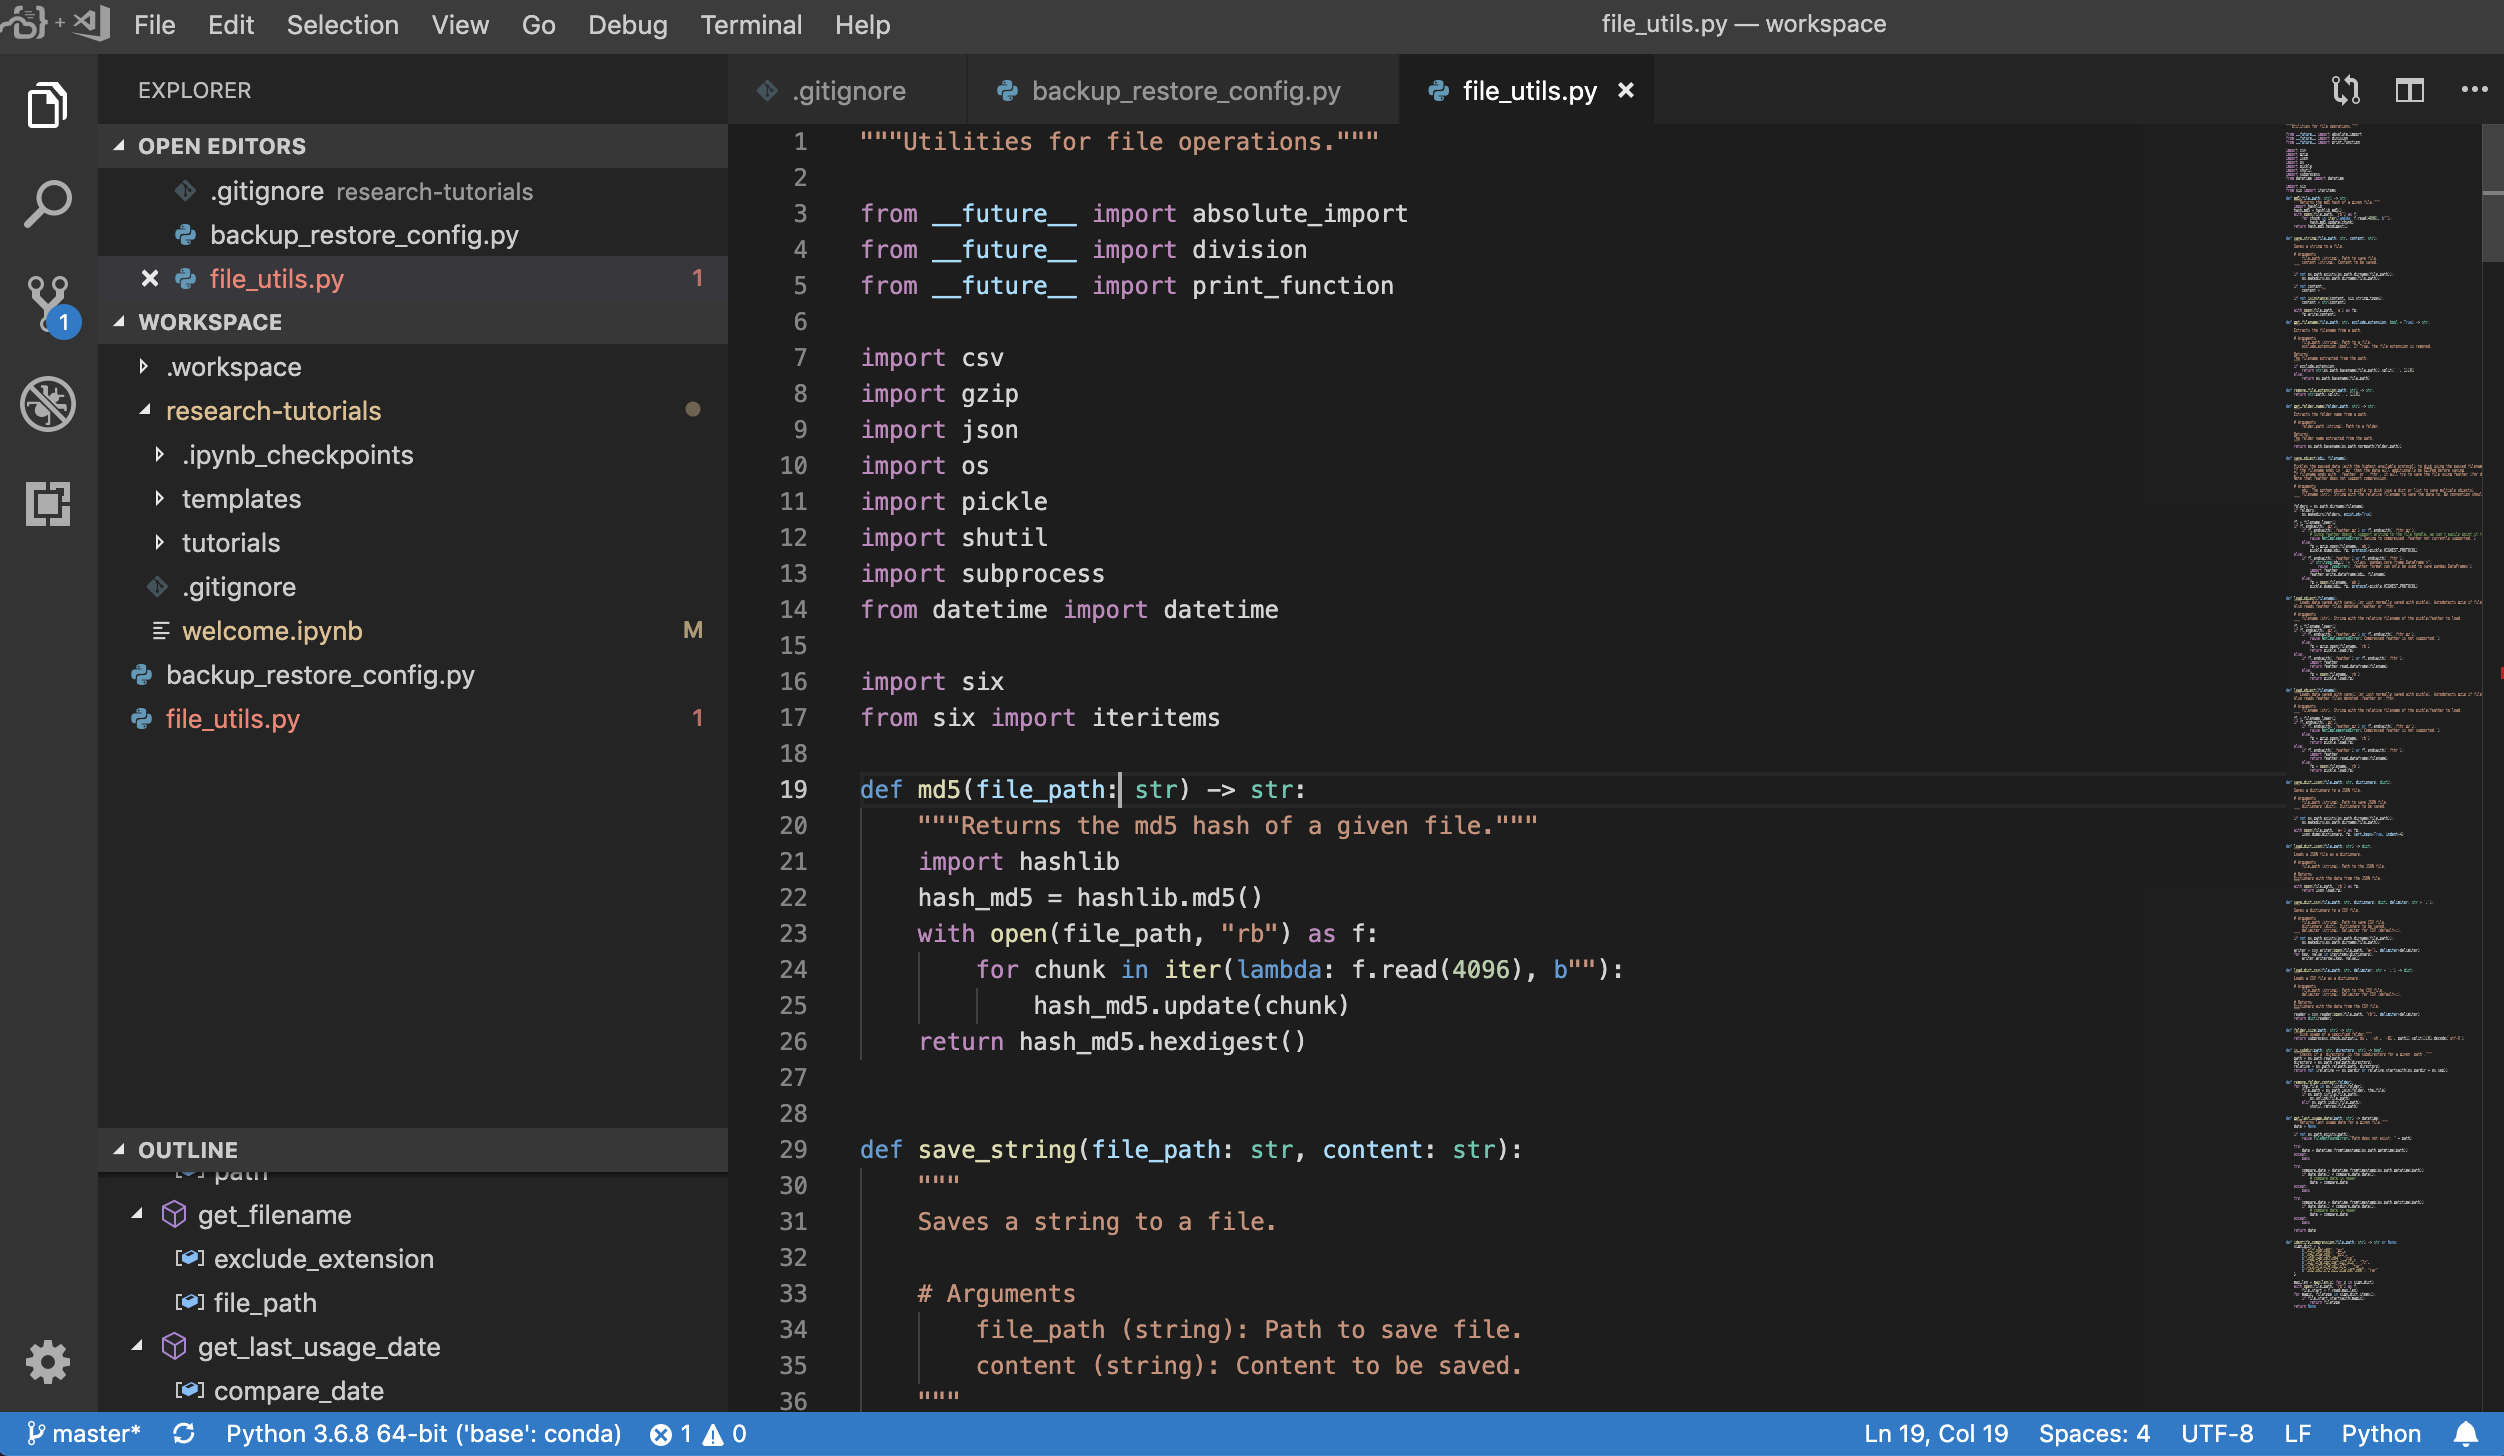
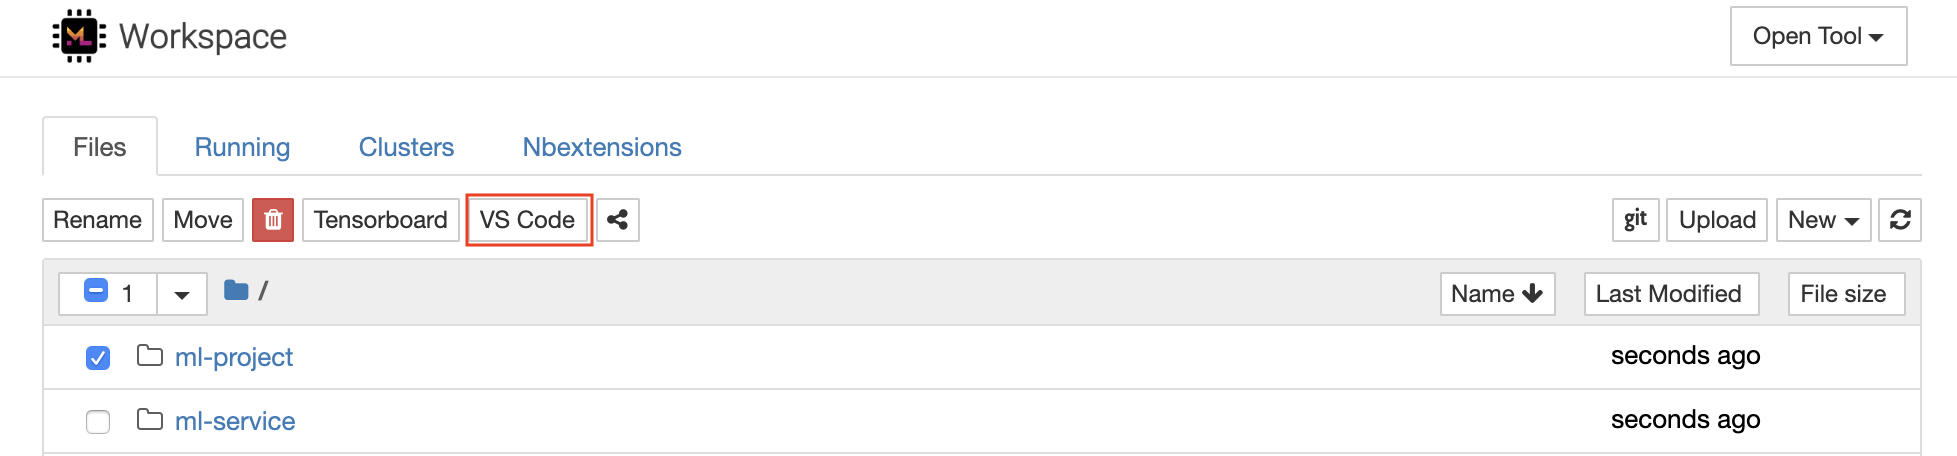
작업 공간은 또한 Jupyter에 VS 코드 통합을 제공하여 아래와 같이 선택한 폴더의 VS 코드 인스턴스를 열 수 있습니다.
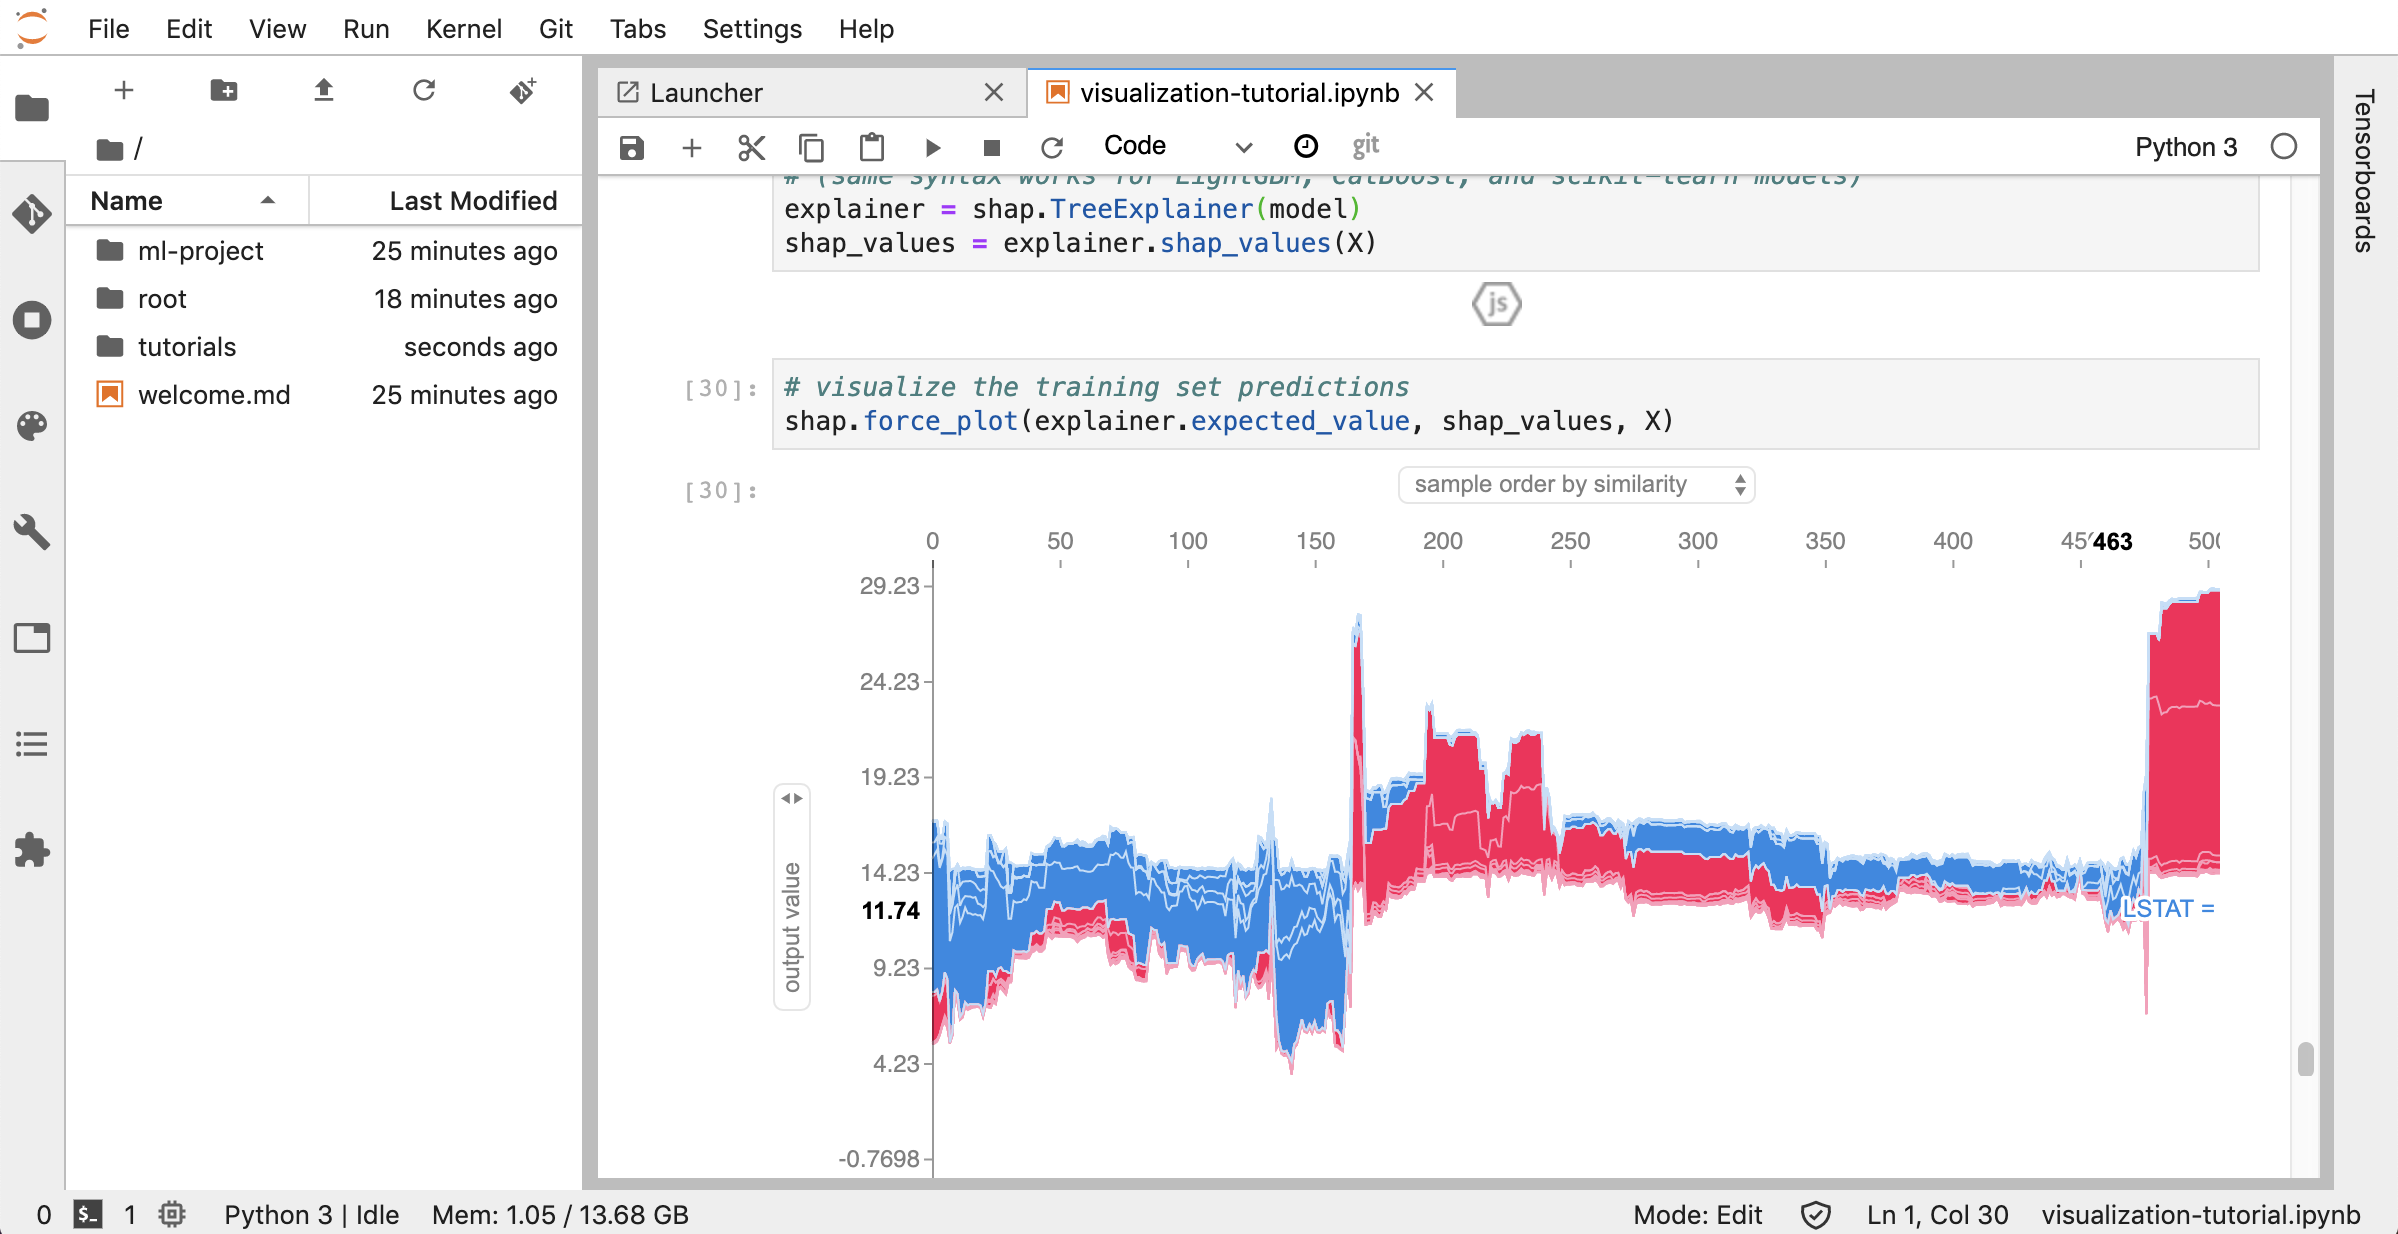
jupyterlab ( Open Tool -> JupyterLab )은 Project Jupyter의 차세대 사용자 인터페이스입니다. 유연하고 강력한 사용자 인터페이스에서 클래식 Jupyter Notebook (노트북, 터미널, 텍스트 편집기, 파일 브라우저, 리치 출력 등)의 모든 친숙한 빌딩 블록을 제공합니다. 이 jupyterlab 인스턴스에는 jupyterlab-toc, jupyterlab-git 및 juptyterlab-tensorboard와 같은 몇 가지 유용한 확장 기능이 사전 설치되어 있습니다.
버전 제어는 생산적인 협업의 중요한 측면입니다. 이 프로세스를 가능한 한 매끄럽게 만들기 위해 우리는 단일 노트북, 본격적인 웹 기반 GIT 클라이언트 (Ungit), 일반 교과서 문서 (예 : .py , .md )를 노트북 (jupytext) 및 노트북 합병 도구 (NBDime)로 개방하고 편집하는 도구 인 맞춤형 Jupyter Extension을 통합했습니다. 또한 Jupyterlab 및 vs Code는 GUI 기반 GIT 클라이언트도 제공합니다.
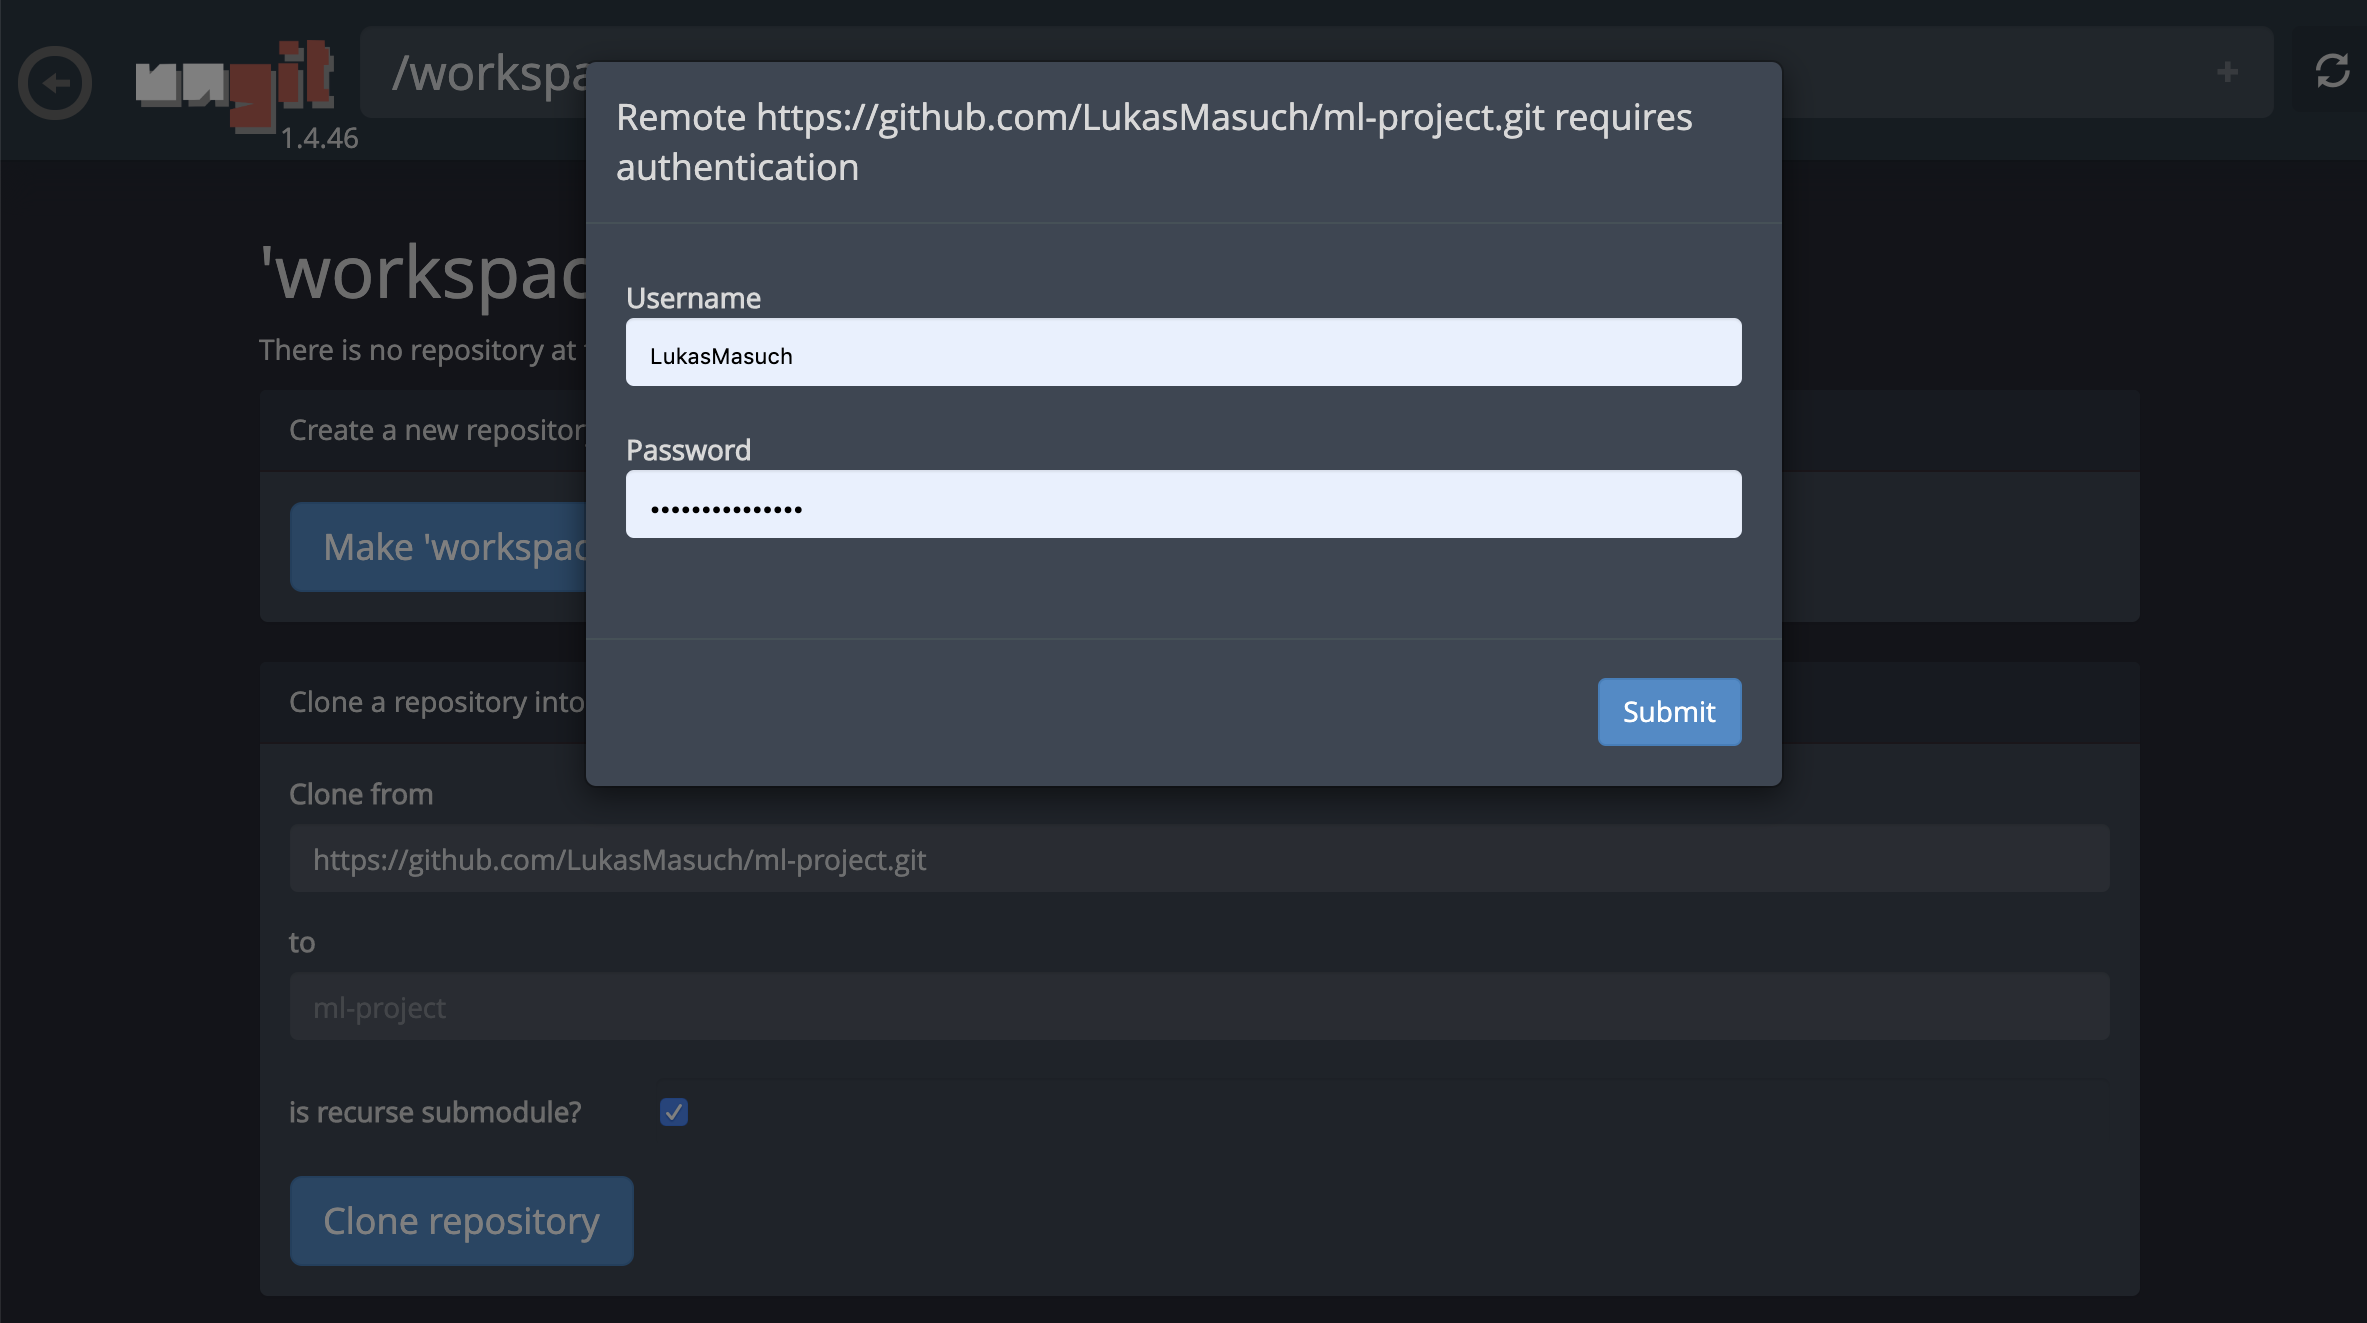
https 를 통한 리포지토리를 복제하려면 원하는 루트 폴더로 이동하고 다음과 같이 git 버튼을 클릭하는 것이 좋습니다.

이를 통해 필요한 설정을 요구할 수 있으며, 그 후에는 깨끗하고 직관적 인 UI가있는 웹 기반 GIT 클라이언트가 켜져 코드 아티팩트를 동기화하는 것이 편리합니다. Ungit 내에서 모든 저장소를 복제 할 수 있습니다. 인증이 필요한 경우 자격 증명을 요청 받게됩니다.
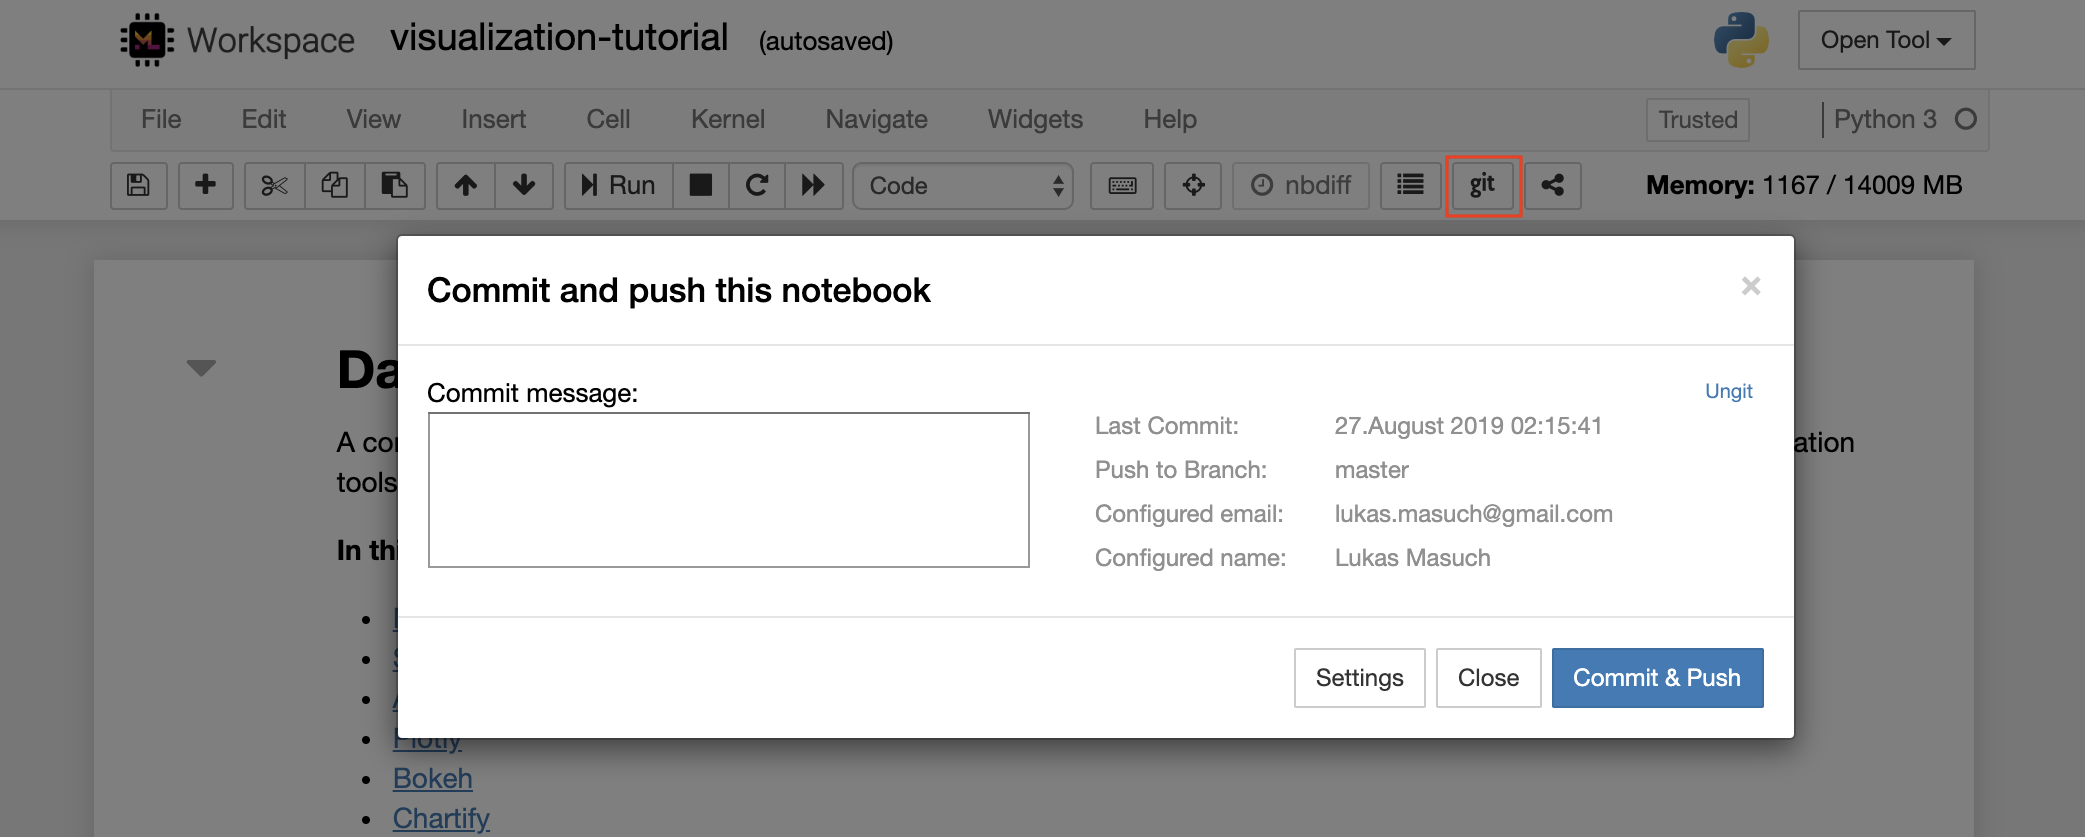
단일 노트북을 원격 git 저장소에 커밋하고 밀려면 다음과 같이 Jupyter에 통합 된 Git 플러그인을 사용하는 것이 좋습니다.
보다 고급 GIT 작업을 위해서는 Ungit을 사용하는 것이 좋습니다. Ungit을 사용하면 Push, Pull, Merge, Branch, Tag, Checkout 등과 같은 대부분의 일반적인 GIT 작업을 수행 할 수 있습니다.
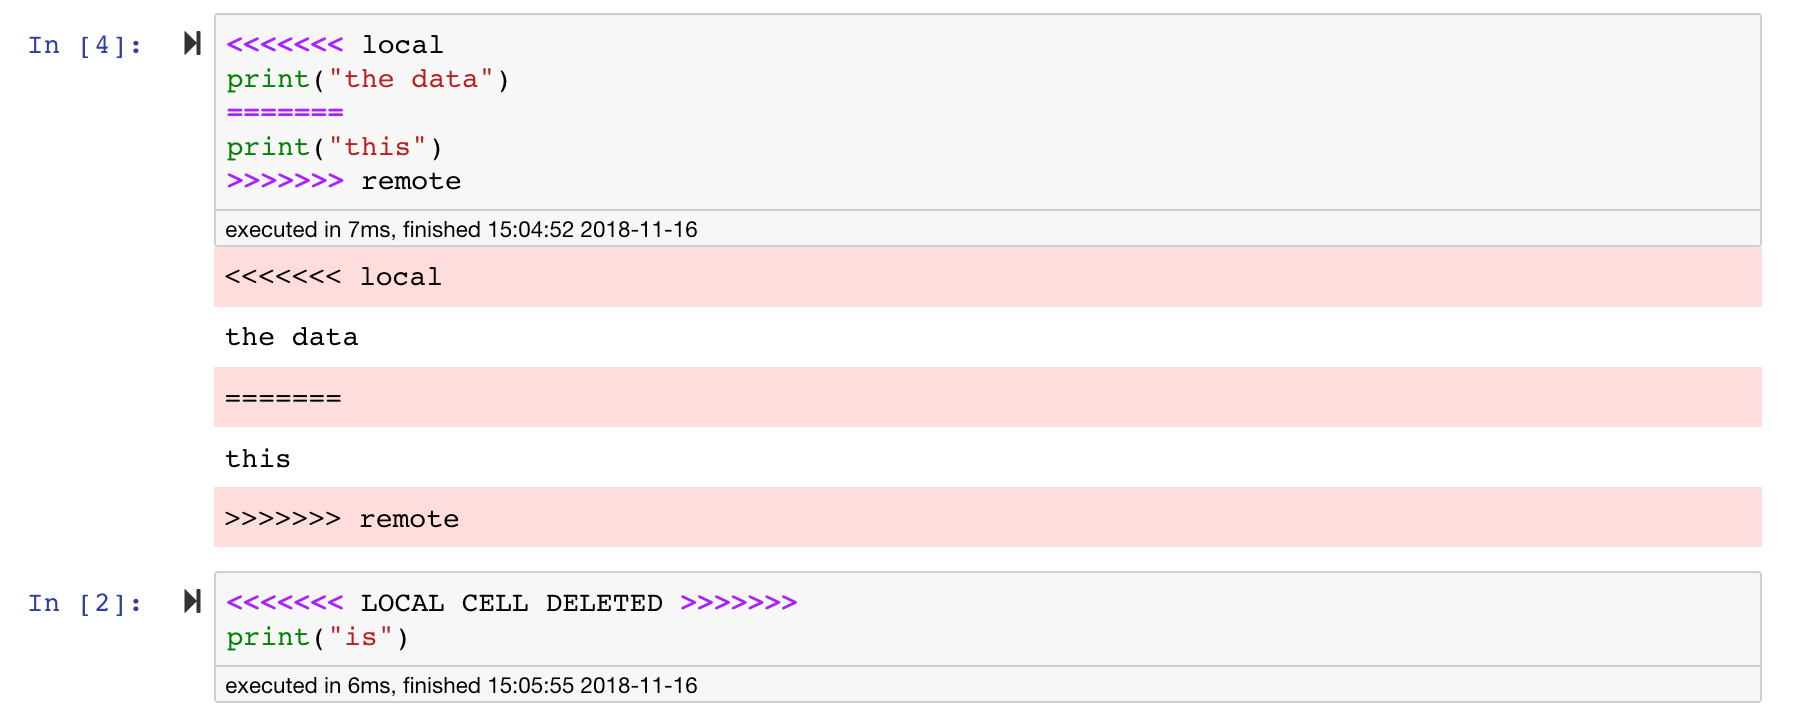
Jupyter 노트북은 훌륭하지만 종종 매우 구체적인 JSON 파일 형식의 거대한 파일입니다. GIT를 통한 원활한 차이 및 병합을 가능하게하려면이 작업 공간에는 nbdime이 사전 설치됩니다. NBDIME는 노트북 문서의 구조를 이해하므로 노트북을 차단하고 병합 할 때 자동으로 지능적인 결정을 내립니다. 합병 충돌이있는 경우 NBDIME은 다음과 같이 Jupyter가 노트북을 여전히 읽을 수 있는지 확인합니다.
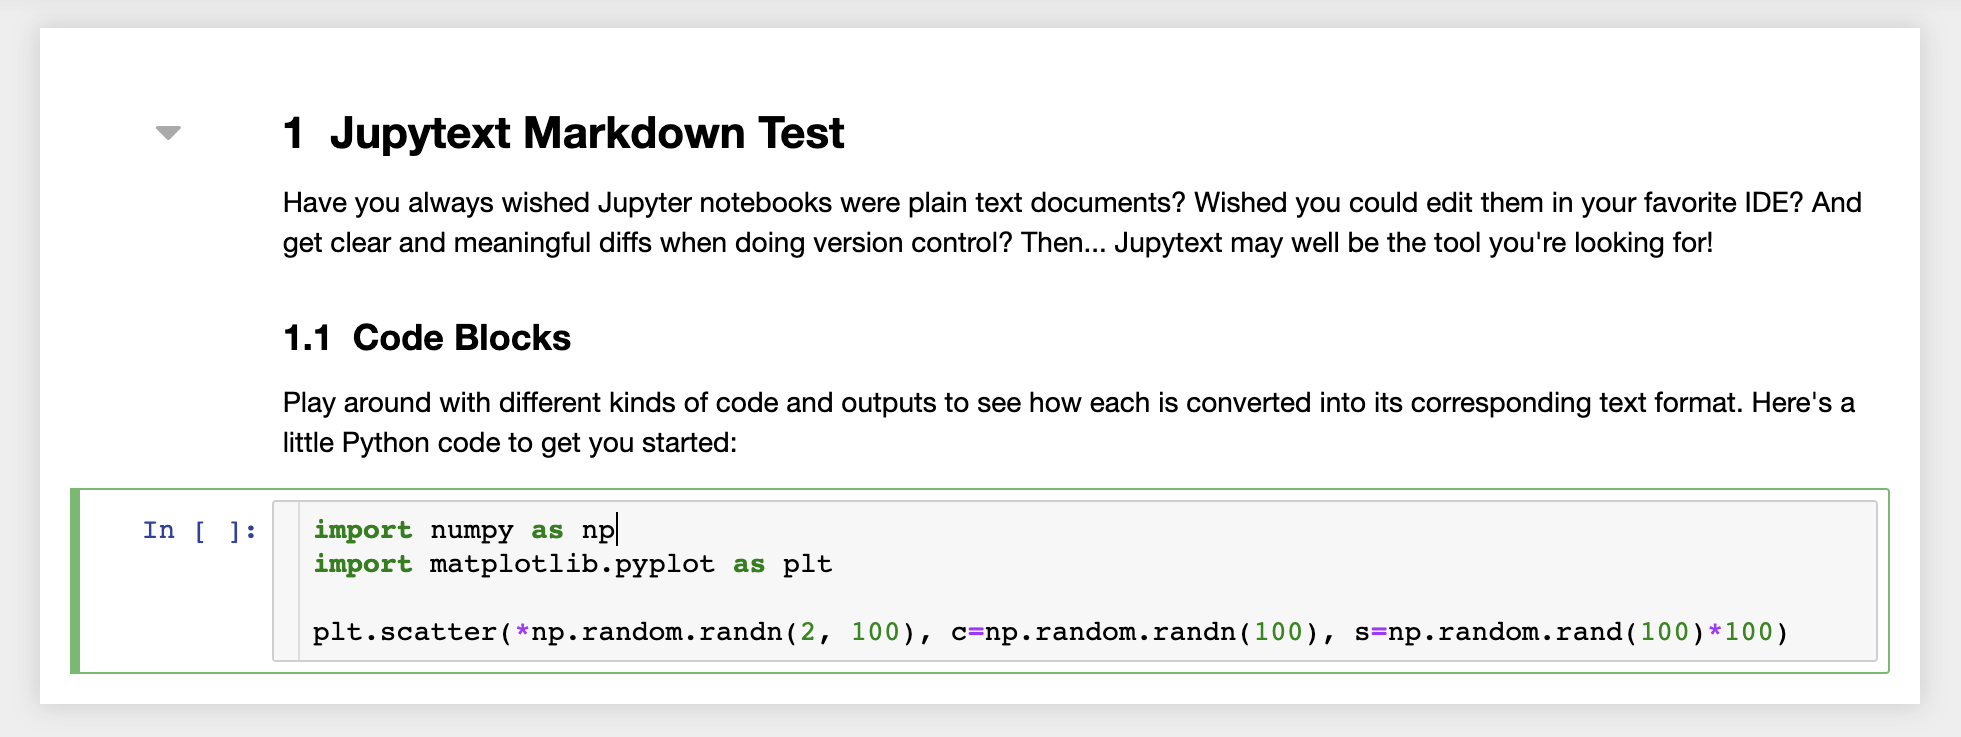
또한 작업 공간에는 일반 텍스트 파일로 노트북을 읽고 쓰는 Jupyter 플러그인 인 JupyText가 사전 설치되어 있습니다. 이를 통해 스크립트 또는 마크 다운 파일 (예 : .py , .md) (예 : .py, .md )을 Jupyter 내의 노트북으로 열고 편집하고 실행할 수 있습니다. 다음 스크린 샷에서 Jupyter를 통해 Markdown 파일을 열었습니다.
git과 함께 JupyText는 명확한 차이 기록과 버전 충돌을 쉽게 병합 할 수 있습니다. 이 두 도구를 모두 사용하면 Jupyter 노트북과 협력하는 것이 간단 해집니다.
작업 공간에는 토큰 보호 링크를 통해 모든 파일 또는 폴더를 누구와도 공유 할 수있는 기능이 있습니다. 링크를 통해 데이터를 공유하려면 Jupyter 디렉토리 트리에서 파일 또는 폴더를 선택하고 다음 스크린 샷에 표시된대로 공유 버튼을 클릭하십시오.
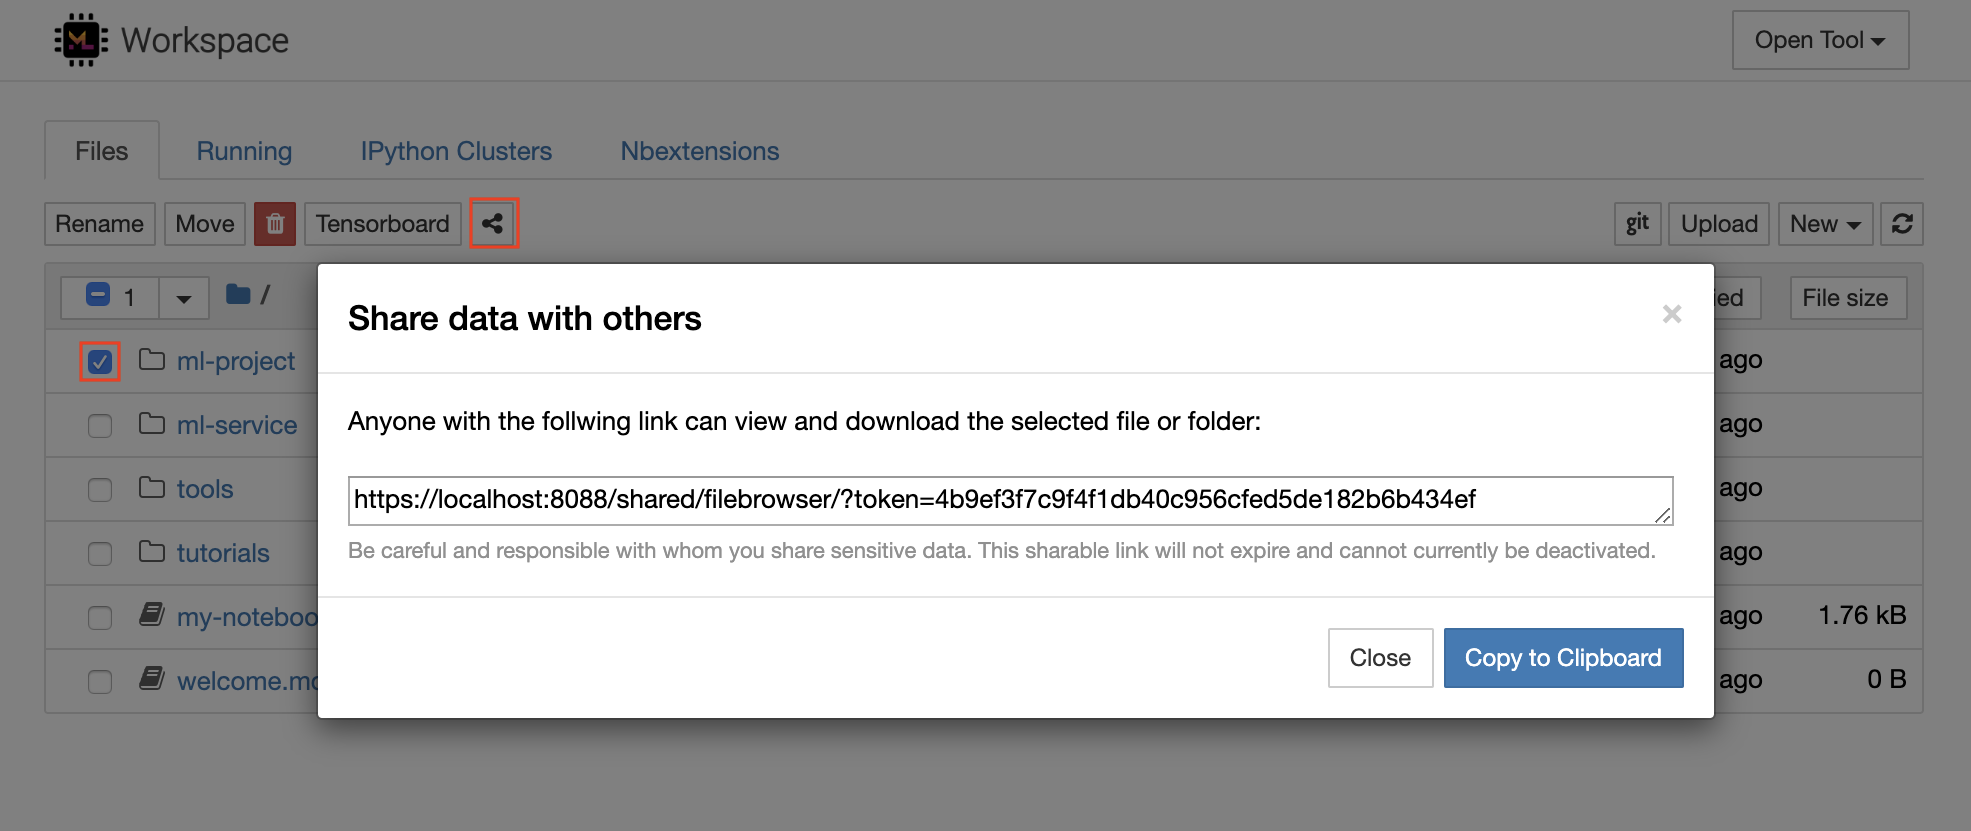
이렇게하면 FileBrowser UI를 통해 선택한 데이터를보고 다운로드 할 수있는 링크 액세스 권한을 가진 사람에게 제공되는 토큰을 통해 보호 된 고유 한 링크가 생성됩니다.
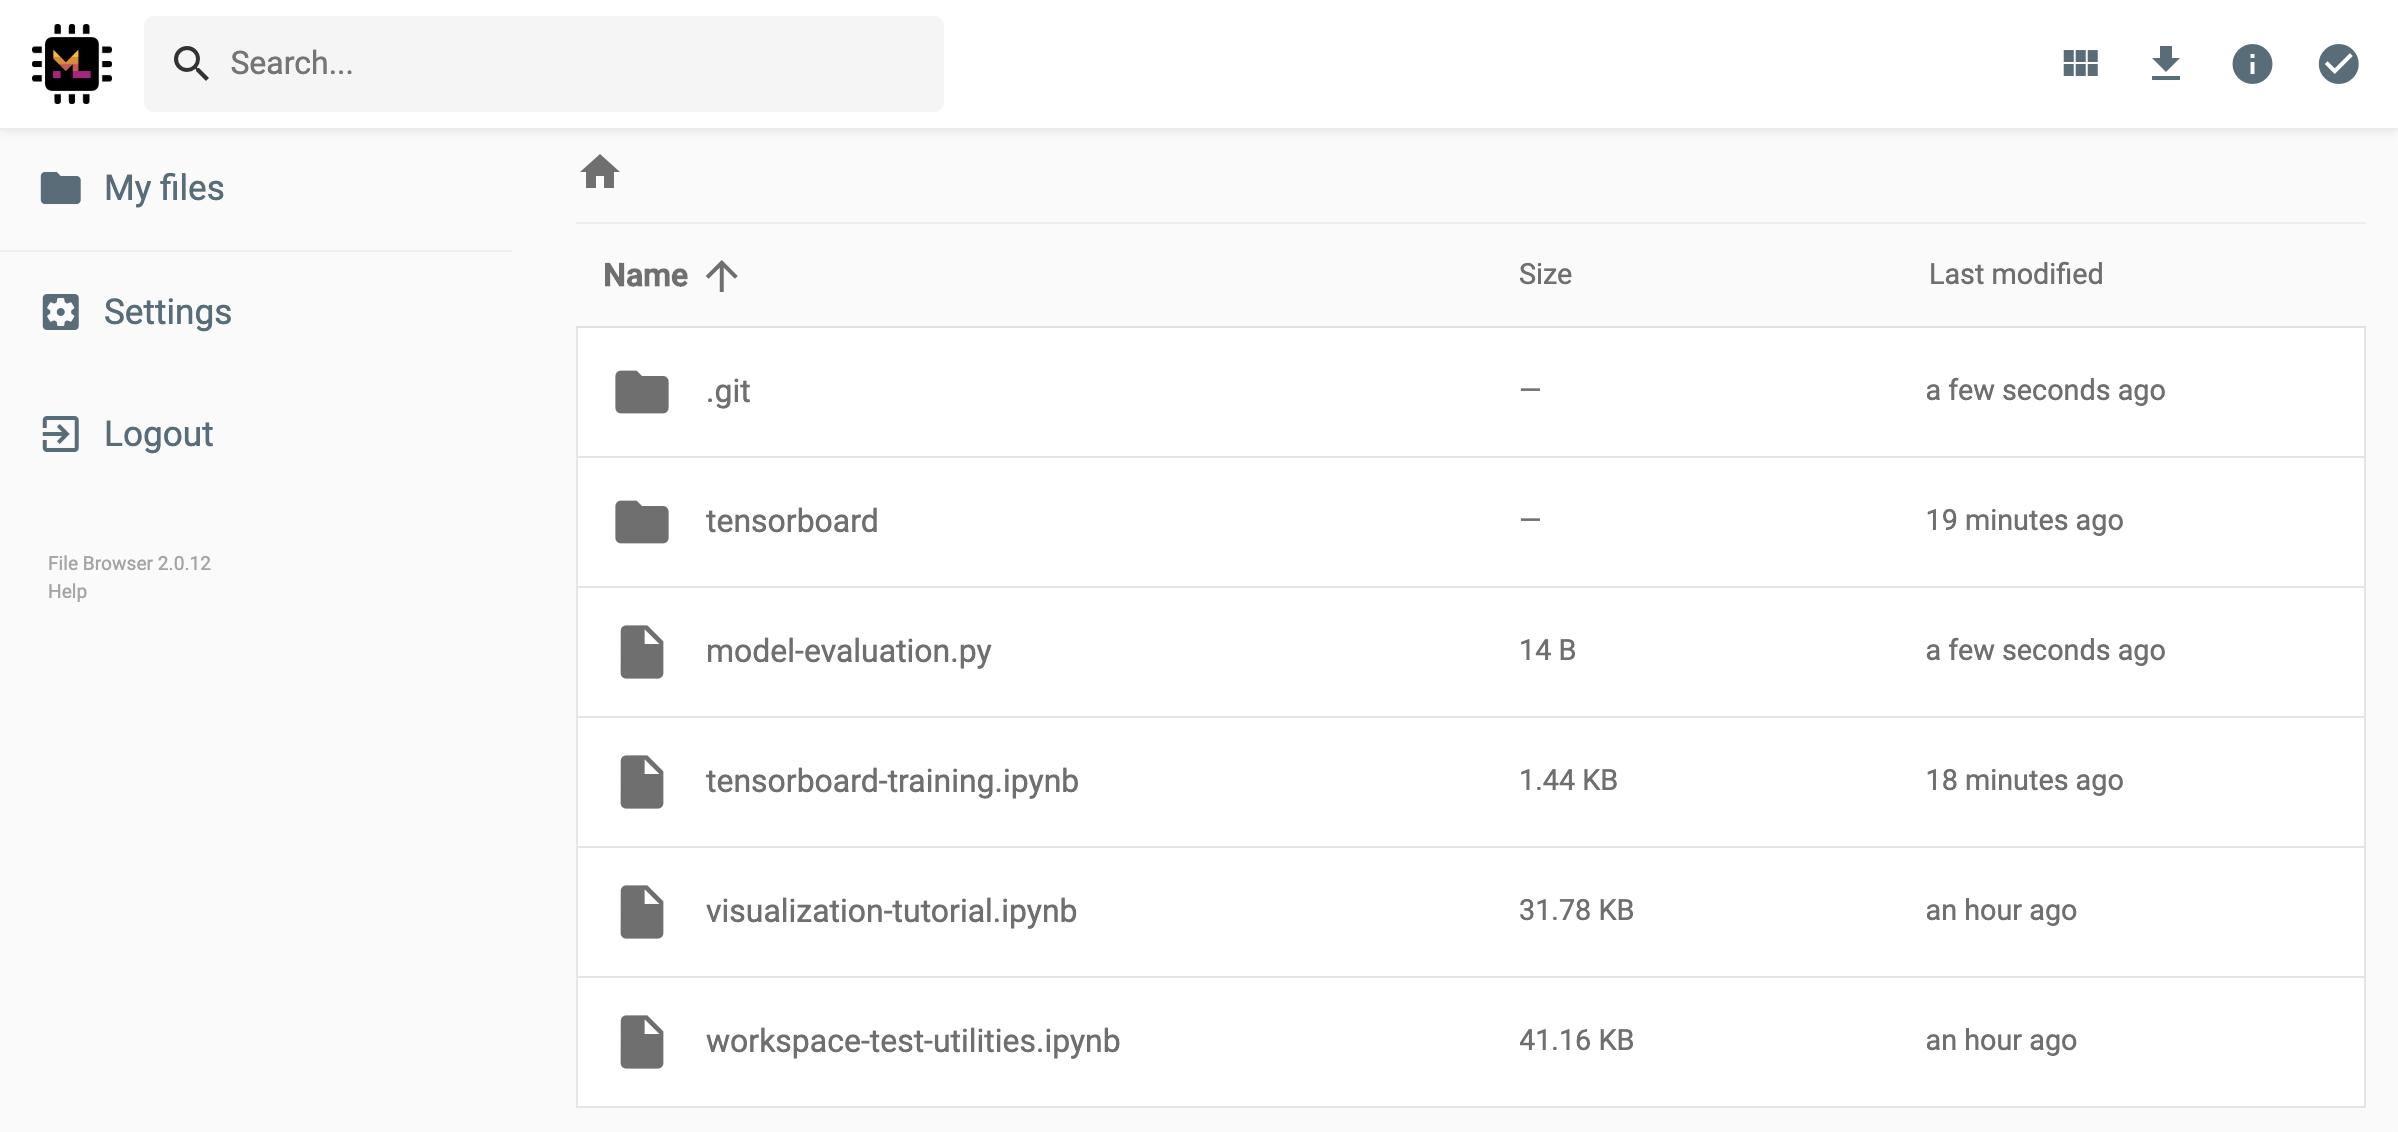
공유 링크를 비활성화하거나 관리 (예 : 편집 권한 제공) 공유 링크를 제공하고 Open Tool -> Filebrowser 통해 파일 브라우저를 열고 Settings->User Management 선택하십시오.
Open Tool -> Access Port 선택하여 모든 작업 공간 내부 포트에 안전하게 액세스 할 수 있습니다. 이 기능을 사용하면 브라우저와 함께 작업 공간 내부에서 실행되는 REST API 또는 웹 응용 프로그램에 액세스 할 수 있습니다. 이 기능을 통해 개발자는 작업 영역에서 직접 REST API 또는 웹 응용 프로그램을 구축, 실행, 테스트 및 디버그 할 수 있습니다.
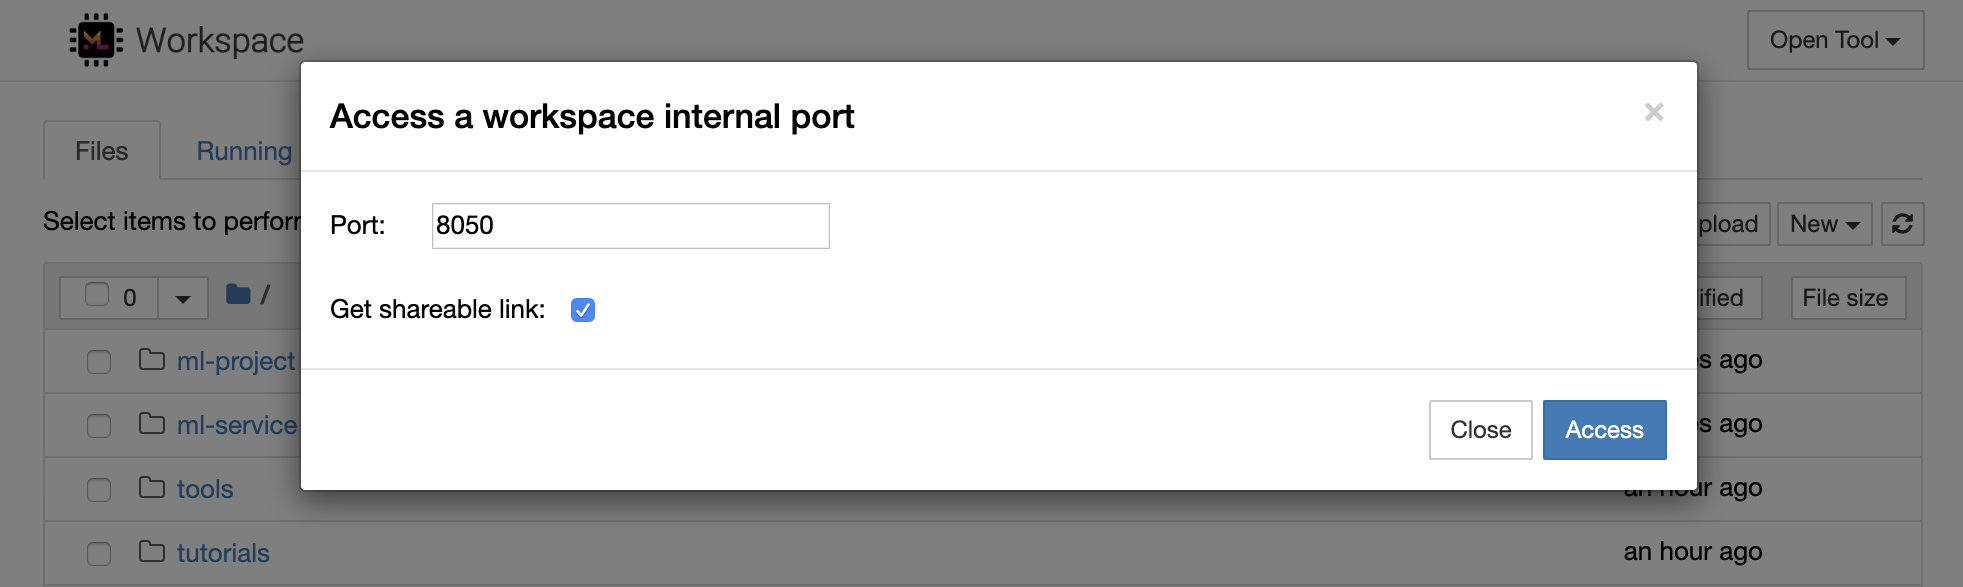
HTTP 클라이언트를 사용하거나 주어진 포트에 대한 액세스를 공유하려면 Get shareable link 옵션을 선택할 수 있습니다. 링크에 액세스 할 수있는 사람은 지정된 포트에 액세스하는 데 사용할 수있는 토큰 안전 링크가 생성됩니다.
HTTP 앱은 상대 URL 경로에서 해결하거나 기본 경로 (
/tools/PORT/)를 구성해야합니다. 이 방법으로 액세스 할 수있는 도구는 작업 공간의 인증 시스템에 의해 보호됩니다! 이 기능을 사용하여 도구를 액세스 할 수 있도록 컨테이너의 다른 포트를 직접 게시하기로 결정한 경우 인증 메커니즘을 통해 보장하십시오!
1234 에서 HTTP 서버를 시작하십시오 : python -m http.server 1234Open Tool -> Access Port , 입력 포트 1234 선택하고 Get shareable link 옵션을 선택하십시오.Access 클릭하면 Python의 http.server 가 제공하는 콘텐츠가 표시됩니다. SSH는 개발 작업에보다 생산성을 높일 수있는 강력한 기능 세트를 제공합니다. Open Tool -> SSH 선택하여 작업 공간에 안전하고 비밀번호가없는 SSH 연결을 쉽게 설정할 수 있습니다. 이렇게하면 모든 Linux 또는 Mac 시스템에서 실행할 수있는 보안 설정 명령이 생성되어 작업 공간에 비밀번호가없는 SSH 연결을 구성하고 SSH 연결을 보안합니다. 또는 설정 스크립트를 다운로드하여 명령을 사용하는 대신 실행할 수도 있습니다.
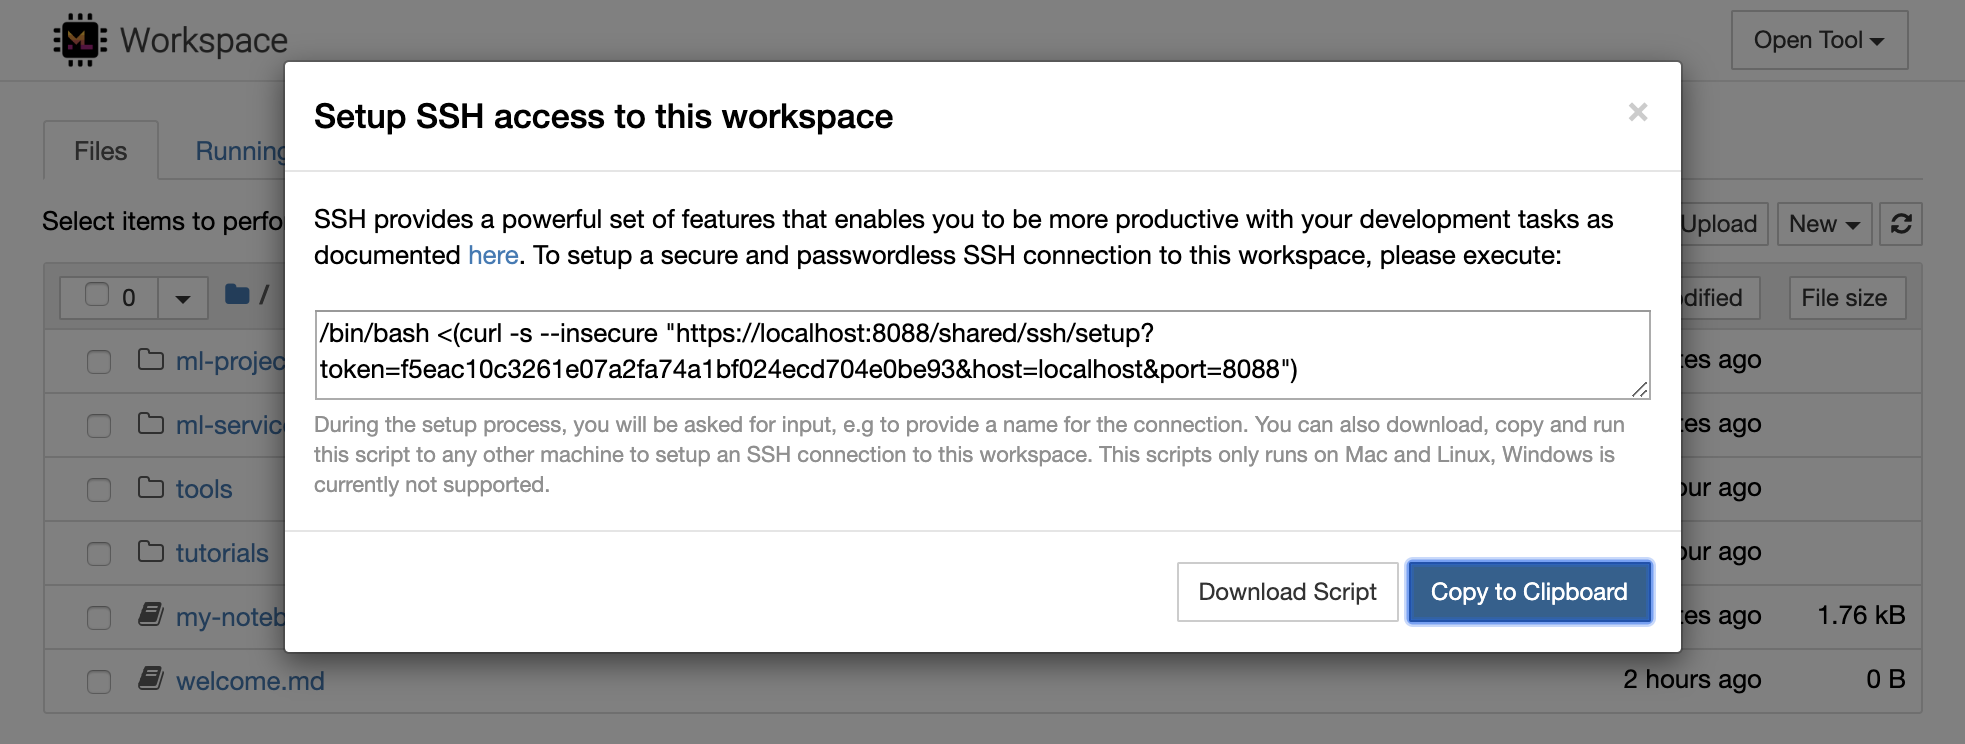
설정 스크립트는 Mac 및 Linux에서만 실행됩니다. Windows는 현재 지원되지 않습니다.
작업 공간에 연결을 설정하려는 위치에서 시스템에서 설정 명령 또는 스크립트를 실행하고 연결 이름 (예 : my-workspace )을 입력하십시오. remote_ikernel 이 설치된 경우 원격 커널을 설치하기 위해 프로세스 중에 추가 입력을 요청받을 수도 있습니다. 비밀번호없는 SSH 연결이 성공적으로 설정되고 테스트되면 ssh my-workspace 간단히 실행하여 작업 영역에 안전하게 연결할 수 있습니다.
SSH는 원격 컴퓨터에서 명령을 실행하는 기능 외에도 다음 섹션에서 설명한대로 개발 워크 플로를 향상시킬 수있는 다양한 기능을 제공합니다.
SSH 연결은 원격 기계에서 로컬 컴퓨터로의 애플리케이션 포트 터널링에 사용될 수 있습니다. 예를 들어, 작업 공간 내부 포트 5901 (VNC Server)을 PORT 5000 의 로컬 머신에 노출시킬 수 있습니다.
ssh -nNT -L 5000:localhost:5901 my-workspace로컬 컴퓨터에서 작업 공간에 응용 프로그램 포트를 노출하려면
-R옵션 (-L대신)을 사용하십시오.
터널이 설립되면 로컬 컴퓨터에서 좋아하는 VNC 뷰어를 사용하여 vnc://localhost:5000 (기본 비밀번호 : vncpassword )에 연결할 수 있습니다. 터널 연결을보다 저항력 있고 신뢰할 수 있도록하려면 Autossh를 사용하여 연결이 죽을 경우 SSH 터널을 자동으로 다시 시작하는 것이 좋습니다.
autossh -M 0 -f -nNT -L 5000:localhost:5901 my-workspace포트 터널링은 다른 컴퓨터에 액세스 할 수 있도록 작업 공간 내에서 서버 기반 도구를 시작했을 때 매우 유용합니다. 기본 설정에서 작업 공간에는 다음과 같은 다른 포트에서 이미 실행되는 다양한 도구가 있습니다.
8080 : 모든 통합 도구에 액세스 할 수있는 메인 작업 공간 포트.8090 : Jupyter 서버.8054 : 대 코드 서버.5901 : VNC 서버.22 : SSH 서버.감독자 구성의 모든 도구에 대한 포트 정보를 찾을 수 있습니다.
포트 터널링/전달에 대한 자세한 내용은이 안내서를 권장합니다.
SCP를 사용하면 SSH 연결을 통해 파일과 디렉토리를 다른 컴퓨터로 단단히 복사 할 수 있습니다. 예를 들어, 로컬 파일 ( ./local-file.txt )을 작업 영역 안의 /workspace 폴더에 복사하려면
scp ./local-file.txt my-workspace:/workspace /workspace 디렉토리를 my-workspace 에서 로컬 컴퓨터의 작업 디렉토리로 복사하려면 다음을 수행하십시오.
scp -r my-workspace:/workspace .SCP에 대한 자세한 내용은이 안내서를 권장합니다.
RSYNC는 파일의 수정 시간과 크기를 비교하여 다른 컴퓨터 (예 : SSH 연결을 통해)간에 파일을 효율적으로 전송하고 동기화하는 유틸리티입니다. RSYNC 명령은 실행할 때마다 업데이트해야 할 파일을 결정합니다. 이는 SCP 또는 SFTP와 같은 것을 사용하는 것보다 훨씬 효율적이고 편리합니다. 예를 들어, 로컬 폴더 ( ./local-project-folder/ )의 모든 내용을 작업 영역 내부의 /workspace/remote-project-folder/ 폴더에 동기화하려면 다음과 같습니다.
rsync -rlptzvP --delete --exclude= " .git " " ./local-project-folder/ " " my-workspace:/workspace/remote-project-folder/ "작업 공간의 폴더 내부에 변경 사항이 있으면 소스 및 대상 인수를 변경하여 해당 변경 사항을 로컬 폴더로 다시 동기화 할 수 있습니다.
rsync -rlptzvP --delete --exclude= " .git " " my-workspace:/workspace/remote-project-folder/ " " ./local-project-folder/ "파일의 최신 사본을 동기화 할 때 마다이 명령을 다시 실행할 수 있습니다. RSYNC는 업데이트 만 전송되도록합니다.
이 사람 페이지에서 RSYNC에 대한 자세한 정보를 찾을 수 있습니다.
데이터를 복사하고 동기화하는 것 외에도 SSH 연결을 사용하여 SSHF를 통해 원격 시스템에서 디렉토리를 로컬 파일 시스템으로 마운트하는 데 사용될 수 있습니다. 예를 들어, my-workspace 의 /workspace 디렉토리를 로컬 경로 (예 : /local/folder/path )에 장착하려면 다음을 수행합니다.
sshfs -o reconnect my-workspace:/workspace /local/folder/path원격 디렉토리가 장착되면 로컬 디렉토리 및 파일과 동일한 방식으로 원격 파일 시스템과 상호 작용할 수 있습니다.
SSHFS에 대한 자세한 내용은이 안내서를 권장합니다.
작업 공간은 Jupyter, vs Code, Pycharm, Colab 또는 Atom Hydrogen과 같은 다양한 인기있는 개발 도구 및 IDE를위한 원격 런타임 (원격 커널/머신/통역사라고도 함)으로 통합되어 사용할 수 있습니다. 따라서 로컬 컴퓨터에서 실행되는 좋아하는 개발 도구를 코드 실행을 위해 원격 시스템에 연결할 수 있습니다. 이를 통해 원격 호스팅 컴퓨팅 리소스를 사용한 로컬 품질 개발 경험이 가능합니다.
이러한 통합은 일반적으로 로컬 컴퓨터에서 작업 공간으로의 비밀번호없는 SSH 연결이 필요합니다. SSH 연결을 설정하려면 SSH 액세스 섹션에 설명 된 단계를 따르십시오.
remote_ikernel 도구를 사용하여 작업 공간을 원격 커널로 Jupyter 인스턴스에 추가 할 수 있습니다. 로컬 컴퓨터에 remote_ikernel ( pip install remote_ikernel )을 설치 한 경우 작업 영역의 SSH 설정 스크립트는 자동으로 원격 커널 연결을 설정하는 옵션을 제공합니다.
원격 기계에서 커널을 실행할 때 노트북 자체는 로컬 파일 시스템에 저장되지만 커널은 커널을 실행하는 원격 시스템의 파일 시스템에만 액세스 할 수 있습니다. 데이터를 동기화 해야하는 경우 SSH 액세스 섹션에 설명 된대로 RSYNC, SCP 또는 SSHF를 사용할 수 있습니다.
원격 커널을 수동으로 설정하고 관리하려는 경우 다음과 같이 Remote_ikernel 명령 줄 도구를 사용하십시오.
 # Change my-workspace with the name of a workspace SSH connection
remote_ikernel manage --add
    --interface=ssh
    --kernel_cmd= " ipython kernel -f {connection_file} "
    --name= " ml-server (Python) "
    --host= " my-workspace "
remote_ikernel 명령 줄 함수를 사용하여 List ( remote_ikernel manage --show ) 또는 delete ( remote_ikernel manage --delete <REMOTE_KERNEL_NAME> ) 원격 커널 연결을 할 수 있습니다.
Visual Studio Code Remote -SSH Extension을 사용하면 SSH 액세스가있는 원격 컴퓨터에서 원격 폴더를 열고 폴더가 자신의 컴퓨터에있는 경우와 마찬가지로 작업 할 수 있습니다. 원격 컴퓨터에 연결되면 원격 파일 시스템의 어느 곳에서나 파일 및 폴더와 상호 작용하고 VS Code 기능 세트 (Intellisense, Debugging 및 Extension Support)를 최대한 활용할 수 있습니다. Workspace SSH 설정 스크립트로 구성된 비밀번호없는 SSH 연결을 사용하여 발견 및 작업이 있습니다. 로컬 대 코드 애플리케이션이 작업 공간에 연결할 수 있도록 :
이 안내서에서 원격 SSH 확장에 대한 추가 기능과 정보를 찾을 수 있습니다.
Tensorboard는 실험 실행을보다 쉽게 이해, 디버그 및 최적화 할 수 있도록 다양한 시각화 도구를 제공합니다. 스칼라, 히스토그램, 모델 구조, 임베딩 및 텍스트 및 이미지 시각화에 대한 로깅 기능이 포함됩니다. 작업 공간에는 Tensorboard를 기능과 함께 Jupyter 인터페이스에 통합하여 인스턴스를 시작, 관리 및 중지하는 jupyter_tensorboard 확장자가 사전 설치되어 있습니다. 다음과 같이 유효한 로그 디렉토리의 새 인스턴스를 열 수 있습니다.
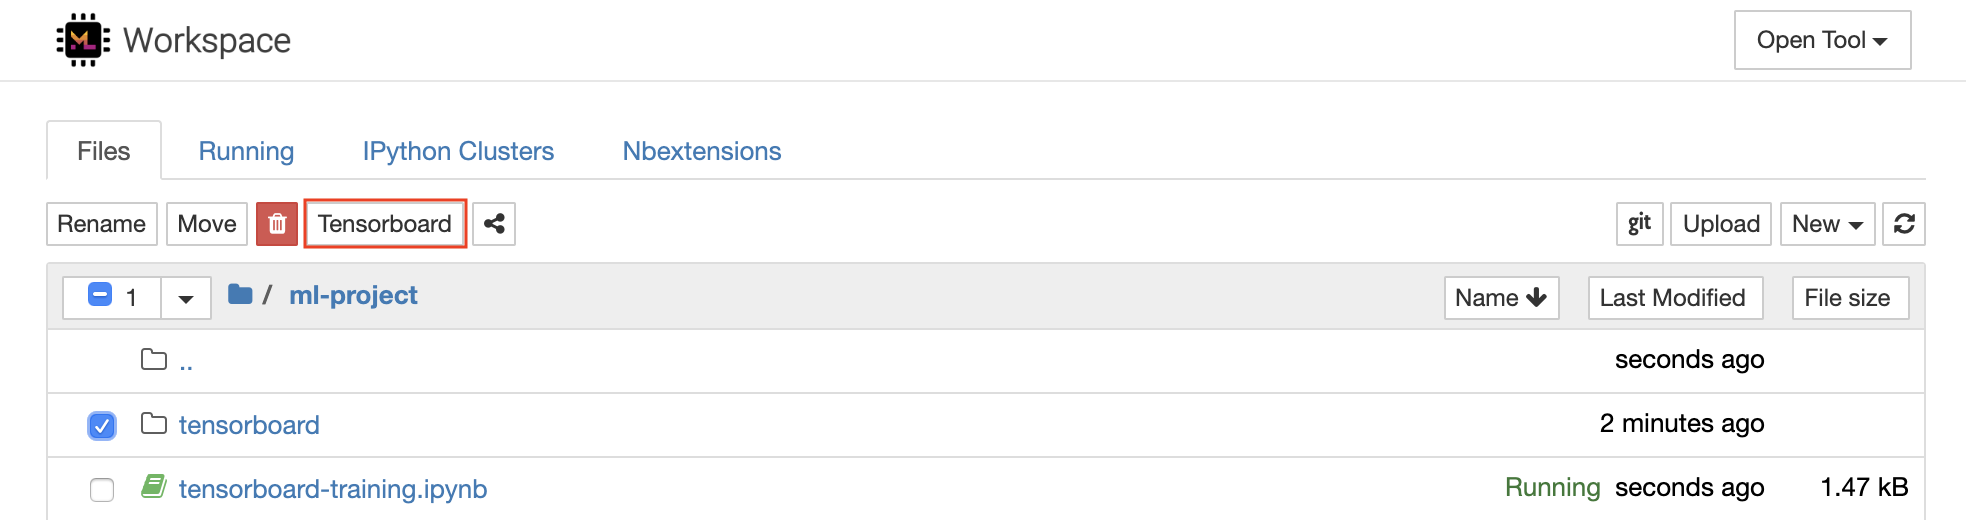
유효한 로그 디렉토리에서 Tensorboard 인스턴스를 열면 기록 된 데이터의 시각화가 표시됩니다.
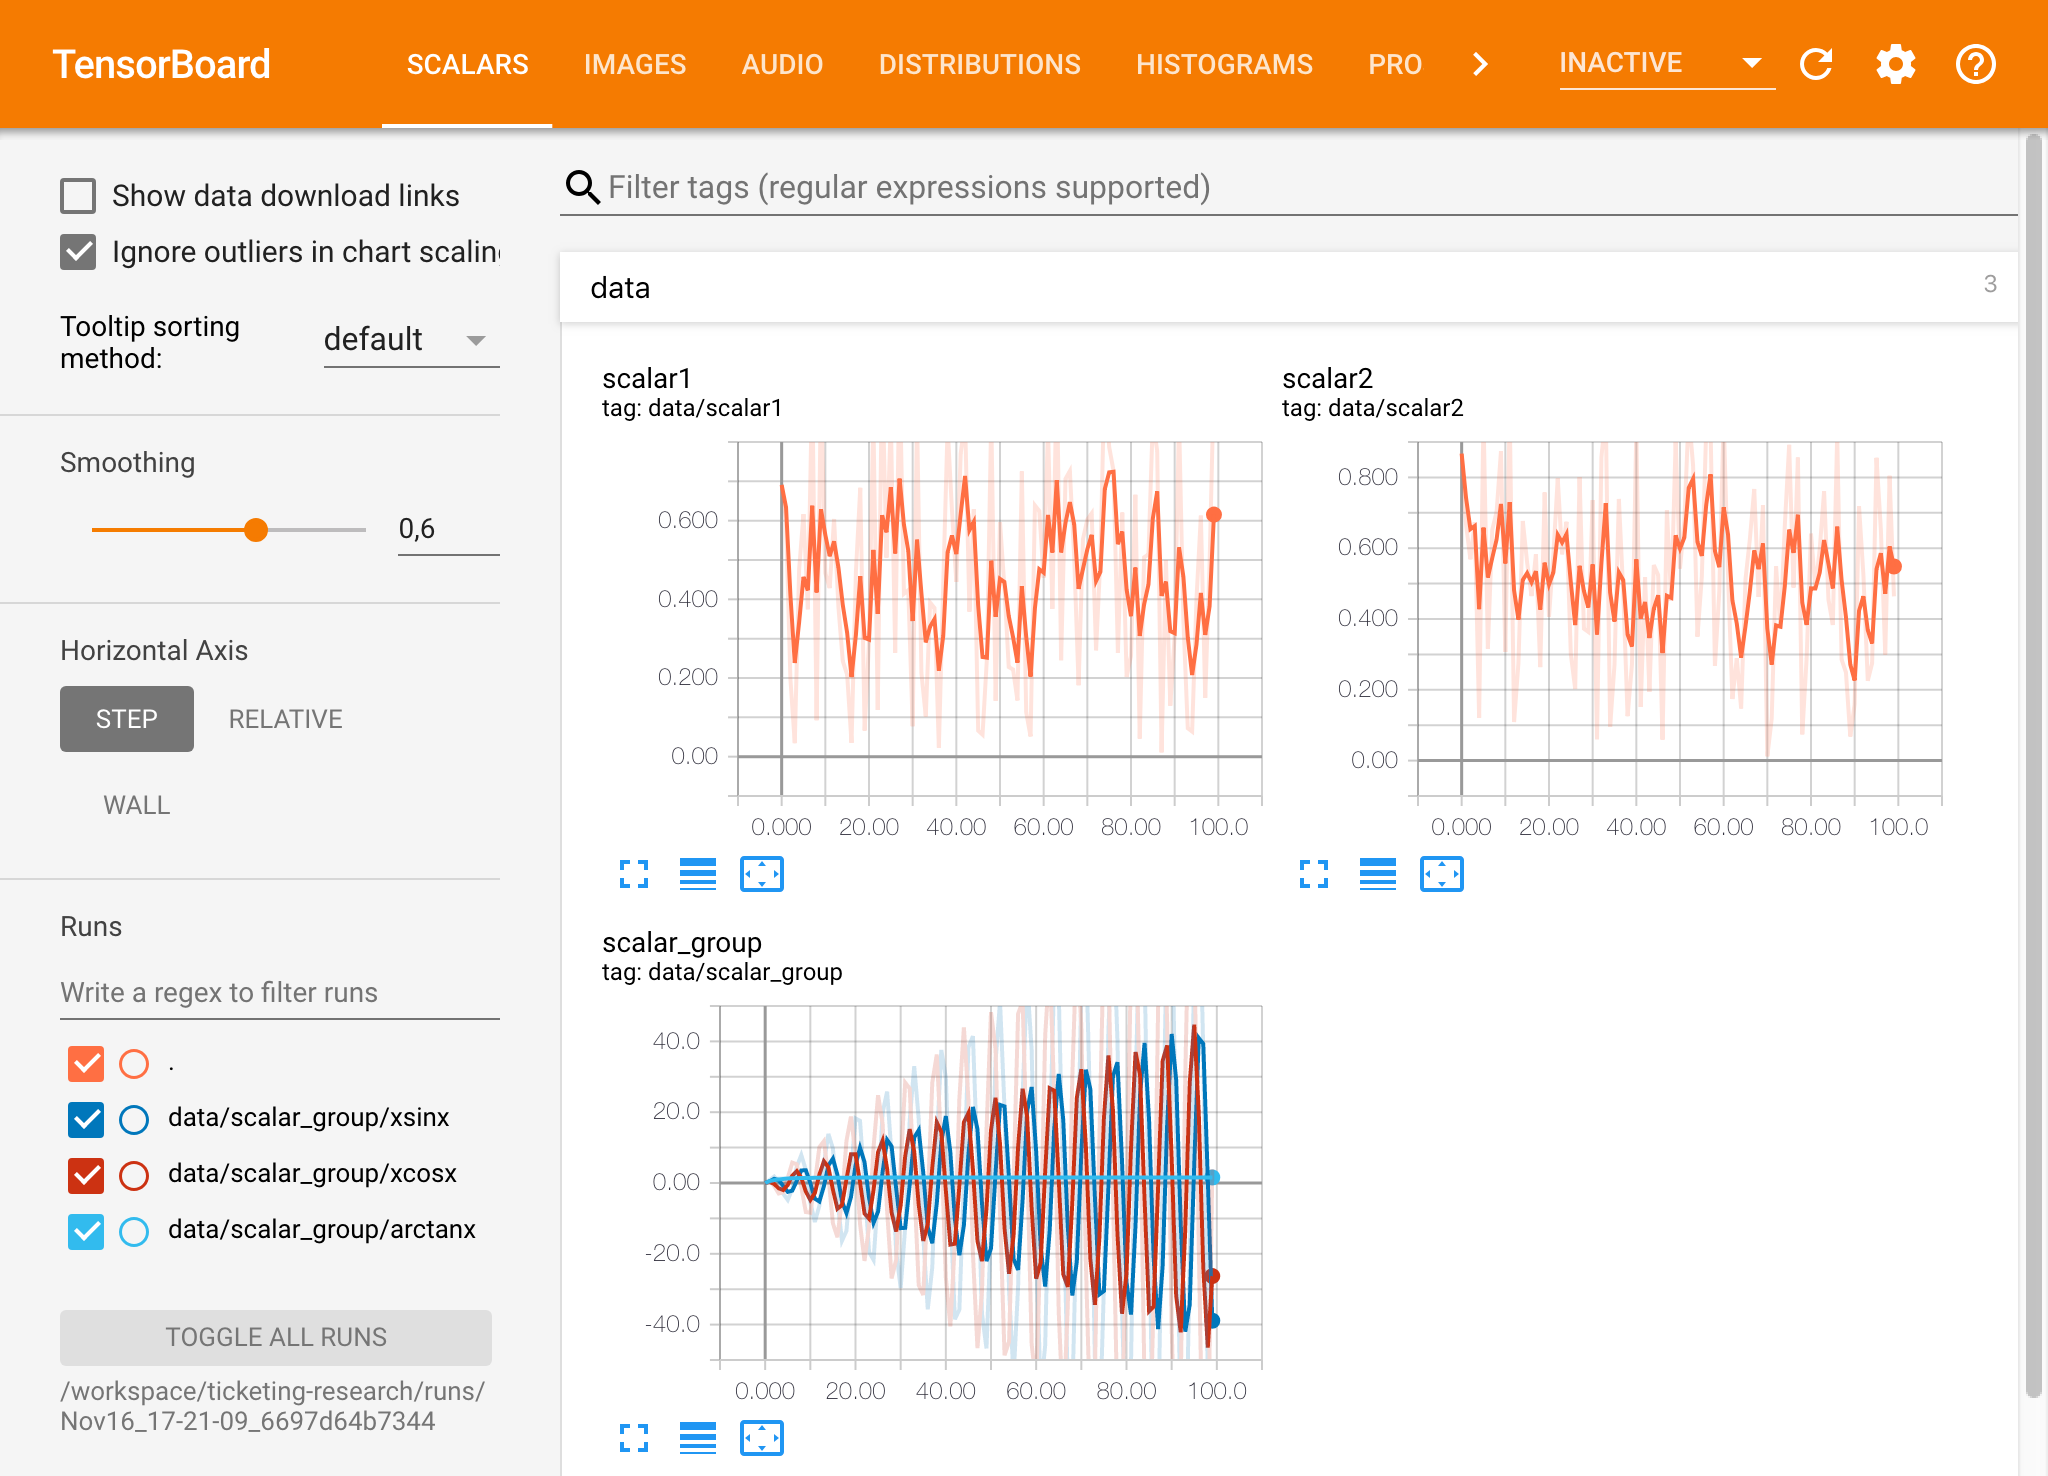
Tensorboard는 Tensorflow 외에 다른 많은 ML 프레임 워크와 함께 사용할 수 있습니다. Tensorboardx 라이브러리를 사용하면 모든 Python 기반 라이브러리에서 기본적으로 로그인 할 수 있습니다. 또한 Pytorch는 여기에 설명 된대로 직접 텐서 보드 통합을 가지고 있습니다.
노트북 내에서 직접 텐서 보드를보고 싶다면 Jupyter Magic을 다음을 사용할 수 있습니다.
 %load_ext tensorboard
%tensorboard --logdir /workspace/path/to/logs
이 작업 공간은 모델 교육 및 기타 실험 작업 중 개발자가 시스템에서 발생하는 모든 일에 대한 통찰력을 얻고 성능 병목 현상을 파악할 수 있도록 사전 설치된 웹 기반 도구를 제공합니다.
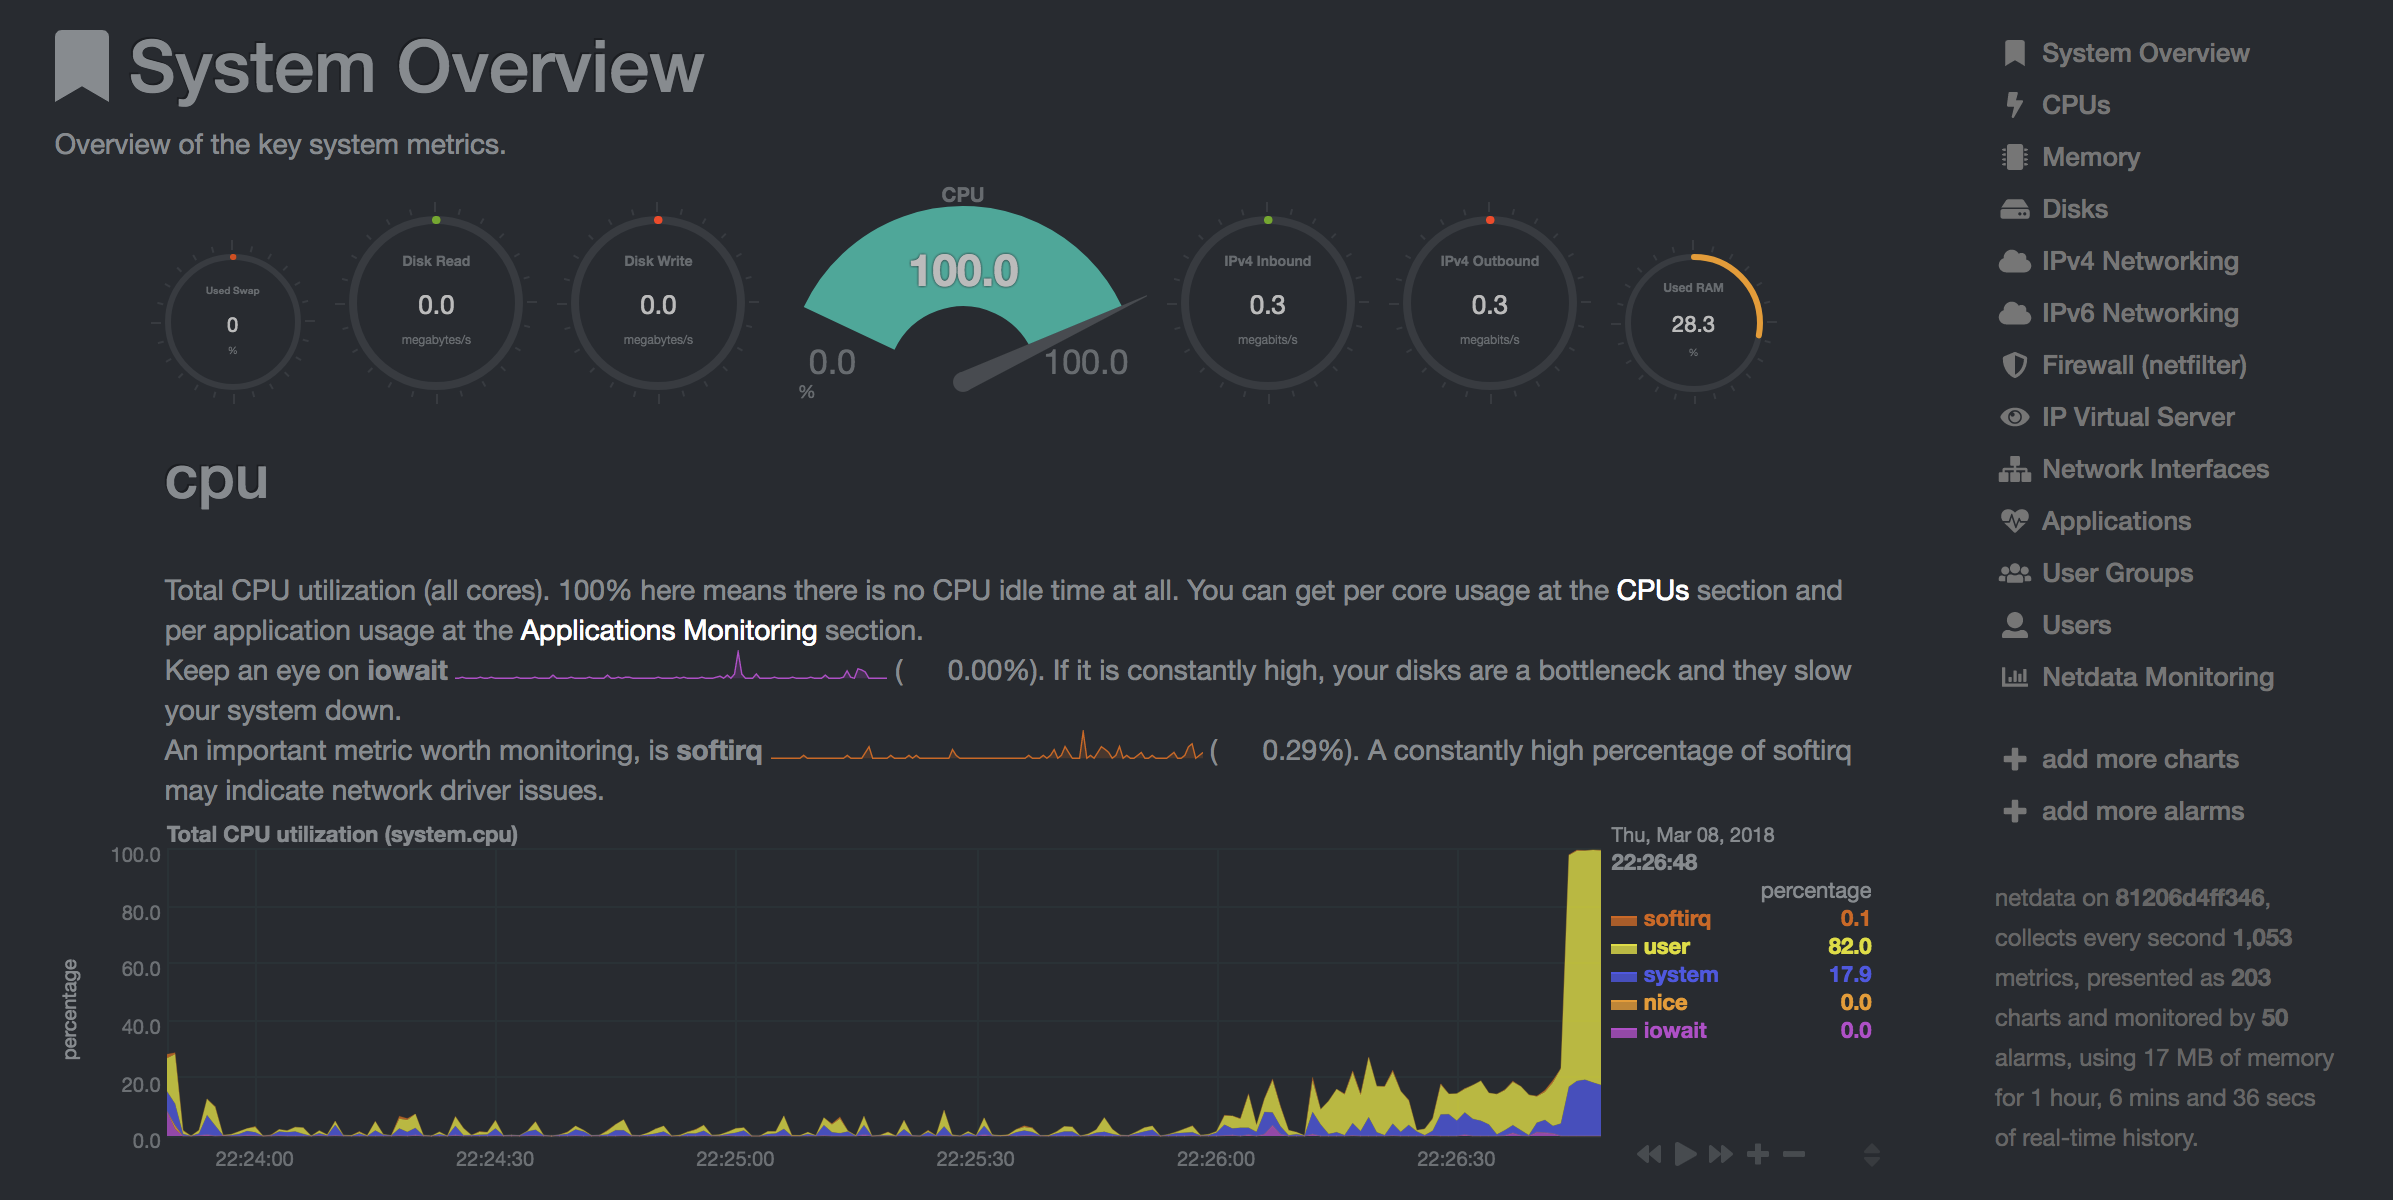
NetData ( Open Tool -> Netdata )는 Linux 시스템의 프로세스 및 서비스를 시각화하는 실시간 하드웨어 및 성능 모니터링 대시 보드입니다. CPU, GPU, 메모리, 디스크, 네트워크, 프로세스 등에 대한 메트릭을 모니터링합니다.
Glances ( Open Tool -> Glances )는 웹 기반 하드웨어 모니터링 대시 보드이며 NetData의 대안으로 사용할 수 있습니다.
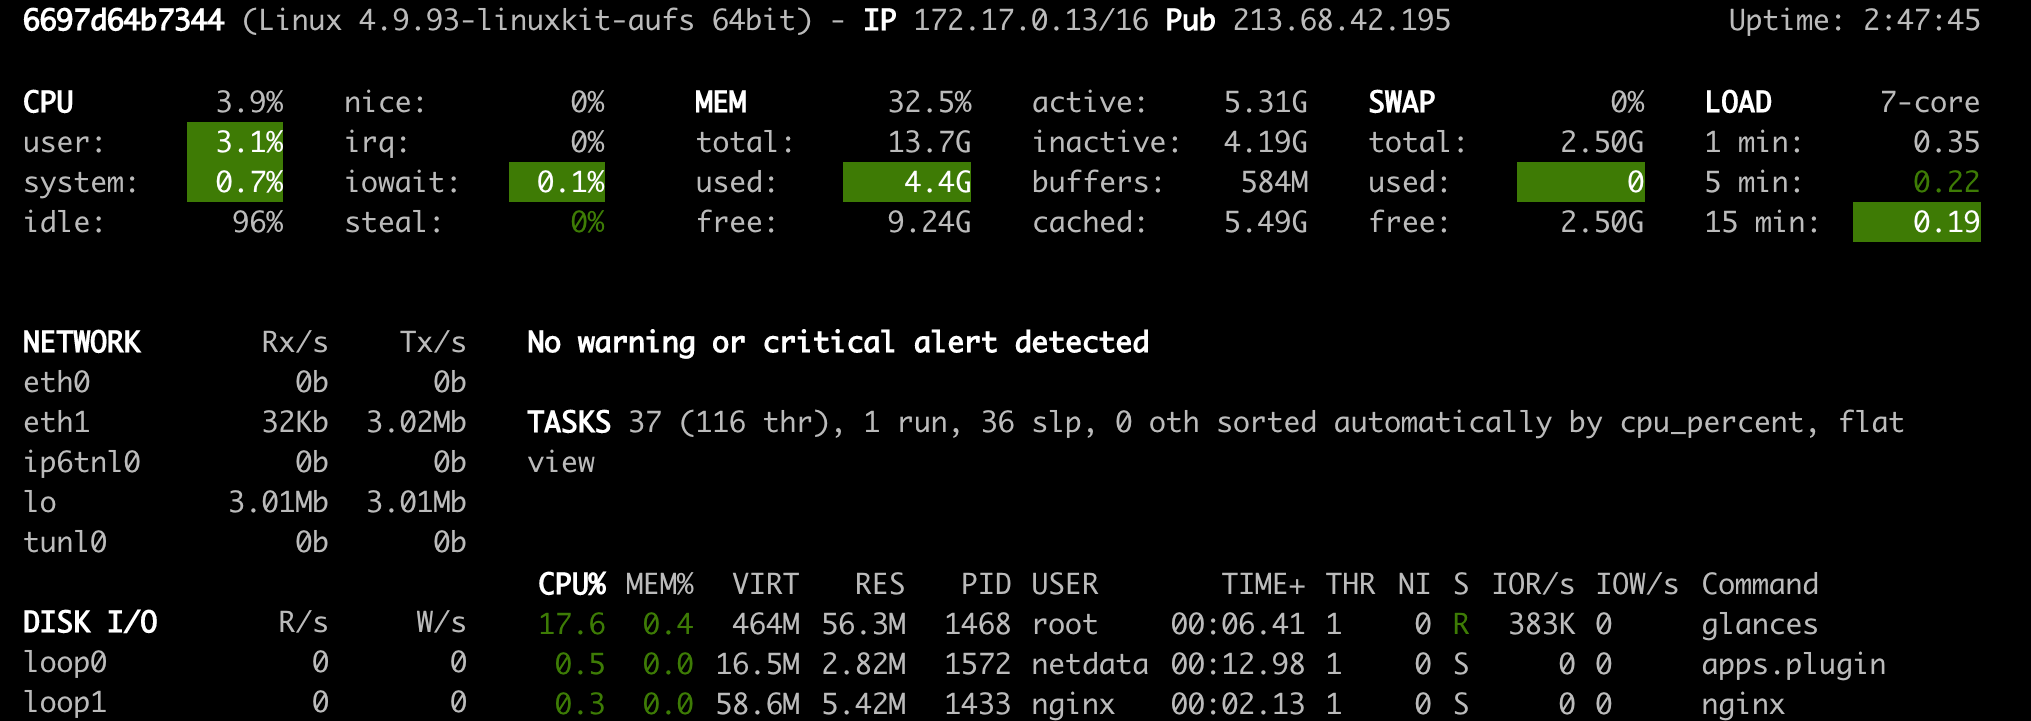
NetData 및 Glances는 작업 공간 컨테이너가 실행중인 전체 시스템의 하드웨어 통계를 보여줍니다.
작업은 모델 교육 또는 데이터 파이프 라인과 같은 특정 시간 동안 완료되는 계산 작업으로 정의됩니다.
작업 공간 이미지는 사전 설치된 도구를 시작하지 않고 임의의 Python 코드를 실행하는 데 사용될 수도 있습니다. This provides a seamless way to productize your ML projects since the code that has been developed interactively within the workspace will have the same environment and configuration when run as a job via the same workspace image.
To run Python code as a job, you need to provide a path or URL to a code directory (or script) via EXECUTE_CODE . The code can be either already mounted into the workspace container or downloaded from a version control system (eg, git or svn) as described in the following sections. The selected code path needs to be python executable. In case the selected code is a directory (eg, whenever you download the code from a VCS) you need to put a __main__.py file at the root of this directory. The __main__.py needs to contain the code that starts your job.
You can execute code directly from Git, Mercurial, Subversion, or Bazaar by using the pip-vcs format as described in this guide. For example, to execute code from a subdirectory of a git repository, just run:
docker run --env EXECUTE_CODE= " git+https://github.com/ml-tooling/ml-workspace.git#subdirectory=resources/tests/ml-job " mltooling/ml-workspace:0.13.2For additional information on how to specify branches, commits, or tags please refer to this guide.
In the following example, we mount and execute the current working directory (expected to contain our code) into the /workspace/ml-job/ directory of the workspace:
docker run -v " ${PWD} :/workspace/ml-job/ " --env EXECUTE_CODE= " /workspace/ml-job/ " mltooling/ml-workspace:0.13.2In the case that the pre-installed workspace libraries are not compatible with your code, you can install or change dependencies by just adding one or multiple of the following files to your code directory:
requirements.txt : pip requirements format for pip-installable dependencies.environment.yml : conda environment file to create a separate Python environment.setup.sh : A shell script executed via /bin/bash . The execution order is 1. environment.yml -> 2. setup.sh -> 3. requirements.txt
You can test your job code within the workspace (started normally with interactive tools) by executing the following python script:
python /resources/scripts/execute_code.py /path/to/your/jobIt is also possible to embed your code directly into a custom job image, as shown below:
 FROM mltooling/ml-workspace:0.13.2

# Add job code to image
COPY ml-job /workspace/ml-job
ENV EXECUTE_CODE=/workspace/ml-job

# Install requirements only
RUN python /resources/scripts/execute_code.py --requirements-only

# Execute only the code at container startup
CMD [ "python" , "/resources/docker-entrypoint.py" , "--code-only" ]The workspace is pre-installed with many popular interpreters, data science libraries, and ubuntu packages:
conda , pip , apt-get , npm , yarn , sdk , poetry , gdebi ...The full list of installed tools can be found within the Dockerfile.
For every minor version release, we run vulnerability, virus, and security checks within the workspace using safety, clamav, trivy, and snyk via docker scan to make sure that the workspace environment is as secure as possible. We are committed to fix and prevent all high- or critical-severity vulnerabilities. You can find some up-to-date reports here.
The workspace provides a high degree of extensibility. Within the workspace, you have full root & sudo privileges to install any library or tool you need via terminal (eg, pip , apt-get , conda , or npm ). You can open a terminal by one of the following ways:
New -> TerminalApplications -> Terminal EmulatorFile -> New -> TerminalTerminal -> New Terminal Additionally, pre-installed tools such as Jupyter, JupyterLab, and Visual Studio Code each provide their own rich ecosystem of extensions. The workspace also contains a collection of installer scripts for many commonly used development tools or libraries (eg, PyCharm , Zeppelin , RStudio , Starspace ). You can find and execute all tool installers via Open Tool -> Install Tool . Those scripts can be also executed from the Desktop VNC (double-click on the script within the Tools folder on the Desktop VNC).
For example, to install the Apache Zeppelin notebook server, simply execute:
/resources/tools/zeppelin.sh --port=1234 After installation, refresh the Jupyter website and the Zeppelin tool will be available under Open Tool -> Zeppelin . Other tools might only be available within the Desktop VNC (eg, atom or pycharm ) or do not provide any UI (eg, starspace , docker-client ).
As an alternative to extending the workspace at runtime, you can also customize the workspace Docker image to create your own flavor as explained in the FAQ section.
The workspace can be extended in many ways at runtime, as explained here. However, if you like to customize the workspace image with your own software or configuration, you can do that via a Dockerfile as shown below:
 # Extend from any of the workspace versions/flavors
FROM mltooling/ml-workspace:0.13.2

# Run you customizations, e.g.
RUN
    # Install r-runtime, r-kernel, and r-studio web server from provided install scripts
    /bin/bash $RESOURCES_PATH/tools/r-runtime.sh --install &&
    /bin/bash $RESOURCES_PATH/tools/r-studio-server.sh --install &&
    # Cleanup Layer - removes unneccessary cache files
    clean-layer.sh
Finally, use docker build to build your customized Docker image.
For a more comprehensive Dockerfile example, take a look at the Dockerfile of the R-flavor.
To update a running workspace instance to a more recent version, the running Docker container needs to be replaced with a new container based on the updated workspace image.
All data within the workspace that is not persisted to a mounted volume will be lost during this update process. As mentioned in the persist data section, a volume is expected to be mounted into the /workspace folder. All tools within the workspace are configured to make use of the /workspace folder as the root directory for all source code and data artifacts. During an update, data within other directories will be removed, including installed/updated libraries or certain machine configurations. We have integrated a backup and restore feature ( CONFIG_BACKUP_ENABLED ) for various selected configuration files/folders, such as the user's Jupyter/VS-Code configuration, ~/.gitconfig , and ~/.ssh .
If the workspace is deployed via Docker (Kubernetes will have a different update process), you need to remove the existing container (via docker rm ) and start a new one (via docker run ) with the newer workspace image. Make sure to use the same configuration, volume, name, and port. For example, a workspace (image version 0.8.7 ) was started with this command:
 docker run -d
    -p 8080:8080
    --name "ml-workspace"
    -v "/path/on/host:/workspace"
    --env AUTHENTICATE_VIA_JUPYTER="mytoken"
    --restart always
    mltooling/ml-workspace:0.8.7
and needs to be updated to version 0.9.1 , you need to:
docker stop "ml-workspace" && docker rm "ml-workspace"docker run -d -p 8080:8080 --name "ml-workspace" -v "/path/on/host:/workspace" --env AUTHENTICATE_VIA_JUPYTER="mytoken" --restart always mltooling/ml-workspace:0.9.1 If you want to directly connect to the workspace via a VNC client (not using the noVNC webapp), you might be interested in changing certain VNC server configurations. To configure the VNC server, you can provide/overwrite the following environment variables at container start (via docker run option: --env ):
| 변하기 쉬운 | 설명 | 기본 |
|---|---|---|
| VNC_PW | Password of VNC connection. This password only needs to be secure if the VNC server is directly exposed. If it is used via noVNC, it is already protected based on the configured authentication mechanism. | vncpassword |
| VNC_RESOLUTION | Default desktop resolution of VNC connection. When using noVNC, the resolution will be dynamically adapted to the window size. | 1600x900 |
| VNC_COL_DEPTH | Default color depth of VNC connection. | 24 |
Unfortunately, we currently do not support using a non-root user within the workspace. We plan to provide this capability and already started with some refactoring to allow this configuration. However, this still requires a lot more work, refactoring, and testing from our side.
Using root-user (or users with sudo permission) within containers is generally not recommended since, in case of system/kernel vulnerabilities, a user might be able to break out of the container and be able to access the host system. Since it is not very common to have such problematic kernel vulnerabilities, the risk of a severe attack is quite minimal. As explained in the official Docker documentation, containers (even with root users) are generally quite secure in preventing a breakout to the host. And compared to many other container use-cases, we actually want to provide the flexibility to the user to have control and system-level installation permissions within the workspace container.
The workspace comes preinstalled with various common tools to create isolated Python environments (virtual environments). The following sections provide a quick-intro on how to use these tools within the workspace. You can find information on when to use which tool here. Please refer to the documentation of the given tool for additional usage information.
venv (recommended):
To create a virtual environment via venv, execute the following commands:
 # Create environment in the working directory
python -m venv my-venv
# Activate environment in shell
source ./my-venv/bin/activate
# Optional: Create Jupyter kernel for this environment
pip install ipykernel
python -m ipykernel install --user --name=my-venv --display-name= " my-venv ( $( python --version ) ) "
# Optional: Close enviornment session
deactivate
pipenv (recommended):
To create a virtual environment via pipenv, execute the following commands:
 # Create environment in the working directory
pipenv install
# Activate environment session in shell
pipenv shell
# Optional: Create Jupyter kernel for this environment
pipenv install ipykernel
python -m ipykernel install --user --name=my-pipenv --display-name= " my-pipenv ( $( python --version ) ) "
# Optional: Close environment session
exit
virtualenv :
To create a virtual environment via virtualenv, execute the following commands:
 # Create environment in the working directory
virtualenv my-virtualenv
# Activate environment session in shell
source ./my-virtualenv/bin/activate
# Optional: Create Jupyter kernel for this environment
pip install ipykernel
python -m ipykernel install --user --name=my-virtualenv --display-name= " my-virtualenv ( $( python --version ) ) "
# Optional: Close environment session
deactivate
conda :
To create a virtual environment via conda, execute the following commands:
 # Create environment (globally)
conda create -n my-conda-env
# Activate environment session in shell
conda activate my-conda-env
# Optional: Create Jupyter kernel for this environment
python -m ipykernel install --user --name=my-conda-env --display-name= " my-conda-env ( $( python --version ) ) "
# Optional: Close environment session
conda deactivate
Tip: Shell Commands in Jupyter Notebooks:
If you install and use a virtual environment via a dedicated Jupyter Kernel and use shell commands within Jupyter (eg !pip install matplotlib ), the wrong python/pip version will be used. To use the python/pip version of the selected kernel, do the following instead:
 import sys
!{ sys . executable } - m pip install matplotlibThe workspace provides three easy options to install different Python versions alongside the main Python instance: pyenv, pipenv (recommended), conda.
pipenv (recommended):
To install a different python version (eg 3.7.8 ) within the workspace via pipenv, execute the following commands:
 # Install python vers
pipenv install --python=3.7.8
# Activate environment session in shell
pipenv shell
# Check python installation
python --version
# Optional: Create Jupyter kernel for this environment
pipenv install ipykernel
python -m ipykernel install --user --name=my-pipenv --display-name= " my-pipenv ( $( python --version ) ) "
# Optional: Close environment session
exit
pyenv :
To install a different python version (eg 3.7.8 ) within the workspace via pyenv, execute the following commands:
 # Install python version
pyenv install 3.7.8
# Make globally accessible
pyenv global 3.7.8
# Activate python version in shell
pyenv shell 3.7.8
# Check python installation
python3.7 --version
# Optional: Create Jupyter kernel for this python version
python3.7 -m pip install ipykernel
python3.7 -m ipykernel install --user --name=my-pyenv-3.7.8 --display-name= " my-pyenv (Python 3.7.8) "
conda :
To install a different python version (eg 3.7.8 ) within the workspace via conda, execute the following commands:
 # Create environment with python version
conda create -n my-conda-3.7 python=3.7.8
# Activate environment session in shell
conda activate my-conda-3.7
# Check python installation
python --version
# Optional: Create Jupyter kernel for this python version
pip install ipykernel
python -m ipykernel install --user --name=my-conda-3.7 --display-name= " my-conda ( $( python --version ) ) "
# Optional: Close environment session
conda deactivate
Tip: Shell Commands in Jupyter Notebooks:
If you install and use another Python version via a dedicated Jupyter Kernel and use shell commands within Jupyter (eg !pip install matplotlib ), the wrong python/pip version will be used. To use the python/pip version of the selected kernel, do the following instead:
 import sys
!{ sys . executable } - m pip install matplotlib Certain desktop tools (eg, recent versions of Firefox) or libraries (eg, Pytorch - see Issues: 1, 2) might crash if the shared memory size ( /dev/shm ) is too small. The default shared memory size of Docker is 64MB, which might not be enough for a few tools. You can provide a higher shared memory size via the shm-size docker run option:
docker run --shm-size=2G mltooling/ml-workspace:0.13.2 In general, the performance of running code within Docker is nearly identical compared to running it directly on the machine. However, in case you have limited the container's CPU quota (as explained in this section), the container can still see the full count of CPU cores available on the machine and there is no technical way to prevent this. Many libraries and tools will use the full CPU count (eg, via os.cpu_count() ) to set the number of threads used for multiprocessing/-threading. This might cause the program to start more threads/processes than it can efficiently handle with the available CPU quota, which can tremendously slow down the overall performance. Therefore, it is important to set the available CPU count or the maximum number of threads explicitly to the configured CPU quota. The workspace provides capabilities to detect the number of available CPUs automatically, which are used to configure a variety of common libraries via environment variables such as OMP_NUM_THREADS or MKL_NUM_THREADS . It is also possible to explicitly set the number of available CPUs at container startup via the MAX_NUM_THREADS environment variable (see configuration section). The same environment variable can also be used to get the number of available CPUs at runtime.
Even though the automatic configuration capabilities of the workspace will fix a variety of inefficiencies, we still recommend configuring the number of available CPUs with all libraries explicitly. 예를 들어:
 import os
MAX_NUM_THREADS = int ( os . getenv ( "MAX_NUM_THREADS" ))

# Set in pytorch
import torch
torch . set_num_threads ( MAX_NUM_THREADS )

# Set in tensorflow
import tensorflow as tf
config = tf . ConfigProto (
    device_count = { "CPU" : MAX_NUM_THREADS },
    inter_op_parallelism_threads = MAX_NUM_THREADS ,
    intra_op_parallelism_threads = MAX_NUM_THREADS ,
)
tf_session = tf . Session ( config = config )

# Set session for keras
import keras . backend as K
K . set_session ( tf_session )

# Set in sklearn estimator
from sklearn . linear_model import LogisticRegression
LogisticRegression ( n_jobs = MAX_NUM_THREADS ). fit ( X , y )

# Set for multiprocessing pool
from multiprocessing import Pool

with Pool ( MAX_NUM_THREADS ) as pool :
results = pool . map ( lst )If you encounter the following error within the container logs when starting the workspace, it will most likely not be possible to run the workspace on your hardware:
exited: nginx (terminated by SIGILL (core dumped); not expected)
The OpenResty/Nginx binary package used within the workspace requires to run on a CPU with SSE4.2 support (see this issue). Unfortunately, some older CPUs do not have support for SSE4.2 and, therefore, will not be able to run the workspace container. On Linux, you can check if your CPU supports SSE4.2 when looking into the cat /proc/cpuinfo flags section. If you encounter this problem, feel free to notify us by commenting on the following issue: #30.
Requirements : Docker and Act are required to be installed on your machine to execute the build process.
To simplify the process of building this project from scratch, we provide build-scripts - based on universal-build - that run all necessary steps (build, test, and release) within a containerized environment. To build and test your changes, execute the following command in the project root folder:
act -b -j buildUnder the hood it uses the build.py files in this repo based on the universal-build library. So, if you want to build it locally, you can also execute this command in the project root folder to build the docker container:
python build.py --makeFor additional script options:
python build.py --helpRefer to our contribution guides for more detailed information on our build scripts and development process.
Licensed Apache 2.0 . Created and maintained with ❤️ by developers from Berlin.


