ml workspace
0.13.2

用于机器学习的多合一基于网络的开发环境
入门•功能和屏幕截图•支持•报告错误•常见问题解答•已知问题•贡献
ML工作区是一种基于Web的多合一IDE,专门用于机器学习和数据科学。部署并让您在几分钟之内开始使用自己的机器上的ML解决方案,这是简单的。该工作空间是针对具有各种流行数据科学库(例如Tensorflow,Pytorch,Keras,Sklearn)和Dev Tools(例如,Jupyter,VS代码,Tensorboard)完美配置,优化和集成的开发人员的终极工具。
工作空间需要在计算机上安装Docker (安装指南)。
部署单个工作空间实例很简单:
docker run -p 8080:8080 mltooling/ml-workspace:0.13.2瞧,那很容易!现在,Docker将将最新的工作区图像拉到您的计算机上。这可能需要几分钟,具体取决于您的互联网速度。启动工作空间后,您可以通过http:// localhost:8080访问它。
如果在另一台机器或其他端口上启动,请确保使用机器的IP/DNS和/或暴露端口。
要部署一个实例以进行生产用法,我们建议至少应用以下选项:
docker run -d
    -p 8080:8080
    --name " ml-workspace "
    -v " ${PWD} :/workspace "
    --env AUTHENTICATE_VIA_JUPYTER= " mytoken "
    --shm-size 512m
    --restart always
    mltooling/ml-workspace:0.13.2
This command runs the container in background ( -d ), mounts your current working directory into the /workspace folder ( -v ), secures the workspace via a provided token ( --env AUTHENTICATE_VIA_JUPYTER ), provides 512MB of shared memory ( --shm-size ) to prevent unexpected crashes (see known issues section), and keeps the container running even on system restarts ( --restart always ).您可以在此处找到Docker运行的其他选项,以及下面的“ Workspace配置”选项。
该工作区提供了各种配置选项,可以通过设置环境变量(通过Docker Run选项: --env )使用。
| 多变的 | 描述 | 默认 |
|---|---|---|
| workspace_base_url | Jupyter和所有其他工具都可以从中触及的基本URL。 | / |
| workspace_ssl_enabled | 启用或禁用SSL。设置为true时,必须将任何证书(CERT.CRT)安装到/resources/ssl ,或者,如果没有,则容器会生成自签名的证书。 | 错误的 |
| workspace_auth_user | 基本验证用户名。要启用基本验证,需要设置用户和密码。我们建议使用AUTHENTICATE_VIA_JUPYTER来确保工作区。 | |
| workspace_auth_password | 基本验证用户密码。要启用基本验证,需要设置用户和密码。我们建议使用AUTHENTICATE_VIA_JUPYTER来确保工作区。 | |
| Workspace_port | 配置工作区代理的主要容器内部端口。对于大多数情况,不应更改此配置,应使用Docker的端口配置代替工作区,应从其他端口访问。 | 8080 |
| config_backup_enabled | 自动备份并将用户配置恢复到持久/workspace文件夹,例如.ssh,.jupyter或.gitConfig来自用户主目录的gitConfig。 | 真的 |
| shared_links_enabled | 启用或禁用通过外部链接共享资源的功能。这用于启用文件共享,访问工作区内端口以及简单的基于命令的SSH设置。所有共享链接均通过令牌保护。但是,存在某些风险,因为分享后不能轻易地无效,并且不会过期。 | 真的 |
| include_tutorials | 如果为true ,则在容器启动的/workspace文件夹中添加了一些教程和简介笔记本,但仅当文件夹为空时。 | 真的 |
| max_num_threads | 使用各种普通库(MKL,OpenBlas,opm,numba,...)时,用于计算的线程数量。您还可以使用auto使用自动,使工作空间基于可用的CPU资源动态确定线程的数量。用户可以从工作区内覆盖此配置。通常,最好将其设置为或低于工作区可用的CPU数量。 | 汽车 |
| Jupyter配置: | ||
| shutdown_inactive_kernels | 给定超时后自动关闭非活动核(以清理内存或GPU资源)。值可以是以秒为单位的超时,也可以设置为true ,默认值为48h。 | 错误的 |
| authenticate_via_jupyter | 如果为true ,所有HTTP请求将针对Jupyter服务器进行身份验证,这意味着使用Jupyter配置的身份验证方法也将用于所有其他工具。这可以用false停用。任何其他值都将激活此身份验证,并通过笔记本电脑应用程序应用于jupyter的token配置。 | 错误的 |
| Notebook_args | 通过命令行args添加和覆盖jupyter配置选项。有关所有选项,请参阅此概述。 | |
要坚持数据,您需要将卷安装到/workspace (通过Docker Run选项: -v )。
容器中的默认工作目录为/workspace ,这也是Jupyter实例的根目录。 /workspace目录旨在用于所有重要的工作工件。服务器其他目录(例如/root )内的数据可能会在容器重新启动时丢失。
我们强烈建议通过以下两个选项之一启用身份验证。对于这两个选项,将需要用户进行身份验证以访问任何预安装的工具。
身份验证仅适用于通过主工作区端口访问的所有工具(默认:
8080)。这适用于所有预装的工具和访问端口功能。如果您曝光了另一个容器的另一个端口,请确保还可以通过身份验证确保它!
通过AUTHENTICATE_VIA_JUPYTER变量基于jupyter的身份验证实现来激活基于令牌的身份验证:
docker run -p 8080:8080 --env AUTHENTICATE_VIA_JUPYTER= " mytoken " mltooling/ml-workspace:0.13.2您也可以使用<generated>让Jupyter生成一个随机令牌,该令牌在容器日志上打印出来。 true的值不会设置任何令牌,而是激活工作区中任何工具的每个请求,如果用户被认证,将使用Jupyter实例检查。这用于诸如JupyterHub之类的工具,该工具配置了自己的身份验证方式。
通过WORKSPACE_AUTH_USER和WORKSPACE_AUTH_PASSWORD active of基本身份验证:
docker run -p 8080:8080 --env WORKSPACE_AUTH_USER= " user " --env WORKSPACE_AUTH_PASSWORD= " pwd " mltooling/ml-workspace:0.13.2基本身份验证是通过NGINX代理配置的,并且与其他选项相比,可能更具性能,因为使用AUTHENTICATE_VIA_JUPYTER ,如果使用用户(基于请求cookies),则对工作区中任何工具的每个请求都会通过Jupyter实例进行检查。
我们建议启用SSL,以便可以通过HTTP(加密通信)访问工作空间。可以通过WORKSPACE_SSL_ENABLED变量激活SSL加密。
设置为true时,必须将cert.crt和cert.key文件安装到/resources/ssl ,或者如果不存在证书文件,则容器会生成自签名的证书。例如,如果本地系统上的/path/with/certificate/files包含主机域的有效证书( cert.crt和cert.key文件),则可以从工作区中使用,如下所示:
docker run
    -p 8080:8080
    --env WORKSPACE_SSL_ENABLED= " true "
    -v /path/with/certificate/files:/resources/ssl:ro
    mltooling/ml-workspace:0.13.2
如果您想在公共领域托管工作空间,我们建议使用让我们加密为您的域获得可信赖的证书。要使用工作区的生成证书(例如,通过certbot工具), privkey.pem对应于cert.key文件和fullchain.pem到cert.crt文件。
当您启用SSL支持时,必须通过
https://访问工作空间,而不是通过普通的http://访问。
默认情况下,工作区容器没有资源约束,可以使用与主机的内核调度程序允许的尽可能多的给定资源。 Docker提供了通过设置Docker Run命令的运行时配置标志来控制容器可以使用多少内存或CPU的方法。
工作区需要至少2个CPU和500MB才能稳定运行并可用。
例如,以下命令将工作区限制在最多使用8个CPU,16 GB的内存和1 GB共享内存(请参阅已知问题):
docker run -p 8080:8080 --cpus=8 --memory=16g --shm-size=1G mltooling/ml-workspace:0.13.2有关资源约束的更多选项和文档,请参阅《官方Docker指南》。
如果需要代理,则可以通过HTTP_PROXY , HTTPS_PROXY和NO_PROXY环境变量传递代理配置。
除了主要工作区图像( mltooling/ml-workspace )外,我们还提供其他图像口味,以扩展功能或最小化图像大小以支持各种用例。
最小风味( mltooling/ml-workspace-minimal )是我们最小的图像,它包含功能部分中描述的大多数工具和功能,而没有大多数Python库,这些库是我们主要图像中预装的。用户可以在运行时手动安装任何Python库或排除工具。
docker run -p 8080:8080 mltooling/ml-workspace-minimal:0.13.2 R风味( mltooling/ml-workspace-r )基于我们的默认工作区图像,并使用R-InterPreter,R-Jupyter内核,RSTUDIO Server(通过Open Tool -> RStudio访问)和R r EcoSystem的各种受欢迎的包装。
docker run -p 8080:8080 mltooling/ml-workspace-r:0.12.1火花风味( mltooling/ml-workspace-spark )基于我们的R-Fravor Workspace图像,并使用Spark Runtime,Spark-Jupyter内核,Zeppelin Notebook(通过Open Tool -> Zeppelin访问),Pyspark,Pyspark,Pyspark,Pyspark,Hadoop,Java Kernel,Java Kernel和几个clibraries&Jup&Jup&Jup&Jupytersensions。
docker run -p 8080:8080 mltooling/ml-workspace-spark:0.12.1目前,GPU风味仅支持CUDA 11.2。将来可能会添加对其他CUDA版本的支持。
GPU风味( mltooling/ml-workspace-gpu )基于我们的默认工作空间图像,并使用CUDA 10.1和各种机器学习库的GPU就绪版本(例如,Tensorflow,Pytorch,Pytorch,CNTK,JAX)扩展。该GPU图像对系统具有以下其他要求:
>=460.32.03 (说明)。docker run -p 8080:8080 --gpus all mltooling/ml-workspace-gpu:0.13.2docker run -p 8080:8080 --runtime nvidia --env NVIDIA_VISIBLE_DEVICES= " all " mltooling/ml-workspace-gpu:0.13.2GPU风味还带有一些其他配置选项,如下所述:
| 多变的 | 描述 | 默认 |
|---|---|---|
| nvidia_visible_devices | 控制哪些GPU可以在工作区内访问。默认情况下,在工作区内可以访问主机的所有GPU。您可以使用all , none ,也可以指定设备ID的逗号分隔列表(例如, 0,1 )。您可以通过在主机计算机上运行nvidia-smi来找出可用设备ID的列表。 | 全部 |
| cuda_visible_devices | 控制在工作区内运行的GPU CUDA应用程序将看到哪些GPU。默认情况下,可以看到工作空间可以访问的所有GPU。要限制应用程序,请根据工作区中的可用设备(运行nvidia-smi )提供内部设备ID(例如0,2 )的内部设备ID(例如0,2)的列表。与NVIDIA_VISIBLE_DEVICES相比,Workspace用户将通过从工作区内覆盖此配置来访问其他GPU。 | |
| tf_force_gpu_allow_growth | 默认情况下,大多数GPU内存将通过TensorFlow图的首次执行来分配。虽然这种行为对于生产管道来说是可取的,但对于交互式使用而言,这种行为不太理想。使用true来启用动态GPU内存分配或false ,以指示TensorFlow在执行时分配所有内存。 | 真的 |
该工作空间被设计为单用户开发环境。对于多用户设置,我们建议部署? ML集线器。 ML HUB基于JupyterHub,其任务要为多个用户产生,管理和代理工作区实例。
ML集线器使在单个服务器(通过Docker)或群集(通过Kubernetes)上设置多用户环境变得容易,并支持各种用法方案和身份验证提供商。您可以通过以下方式尝试ML Hub:
docker run -p 8080:8080 -v /var/run/docker.sock:/var/run/docker.sock mltooling/ml-hub:latest有关ML集线器的更多信息和文档,请查看GitHub网站。
该项目由本杰明·拉特林(BenjaminRäthlein),卢卡斯·马苏奇(Lukas Masuch)和扬·卡尔坎(Jan Kalkan)维护。请了解,我们将无法通过电子邮件提供个人支持。我们还认为,如果公开共享帮助,那么帮助更多的人可以从中受益。
| 类型 | 渠道 |
|---|---|
| 错误报告 | |
| ?功能请求 | |
| 使用问题 | |
| ?公告 | |
| ❓其他请求 |
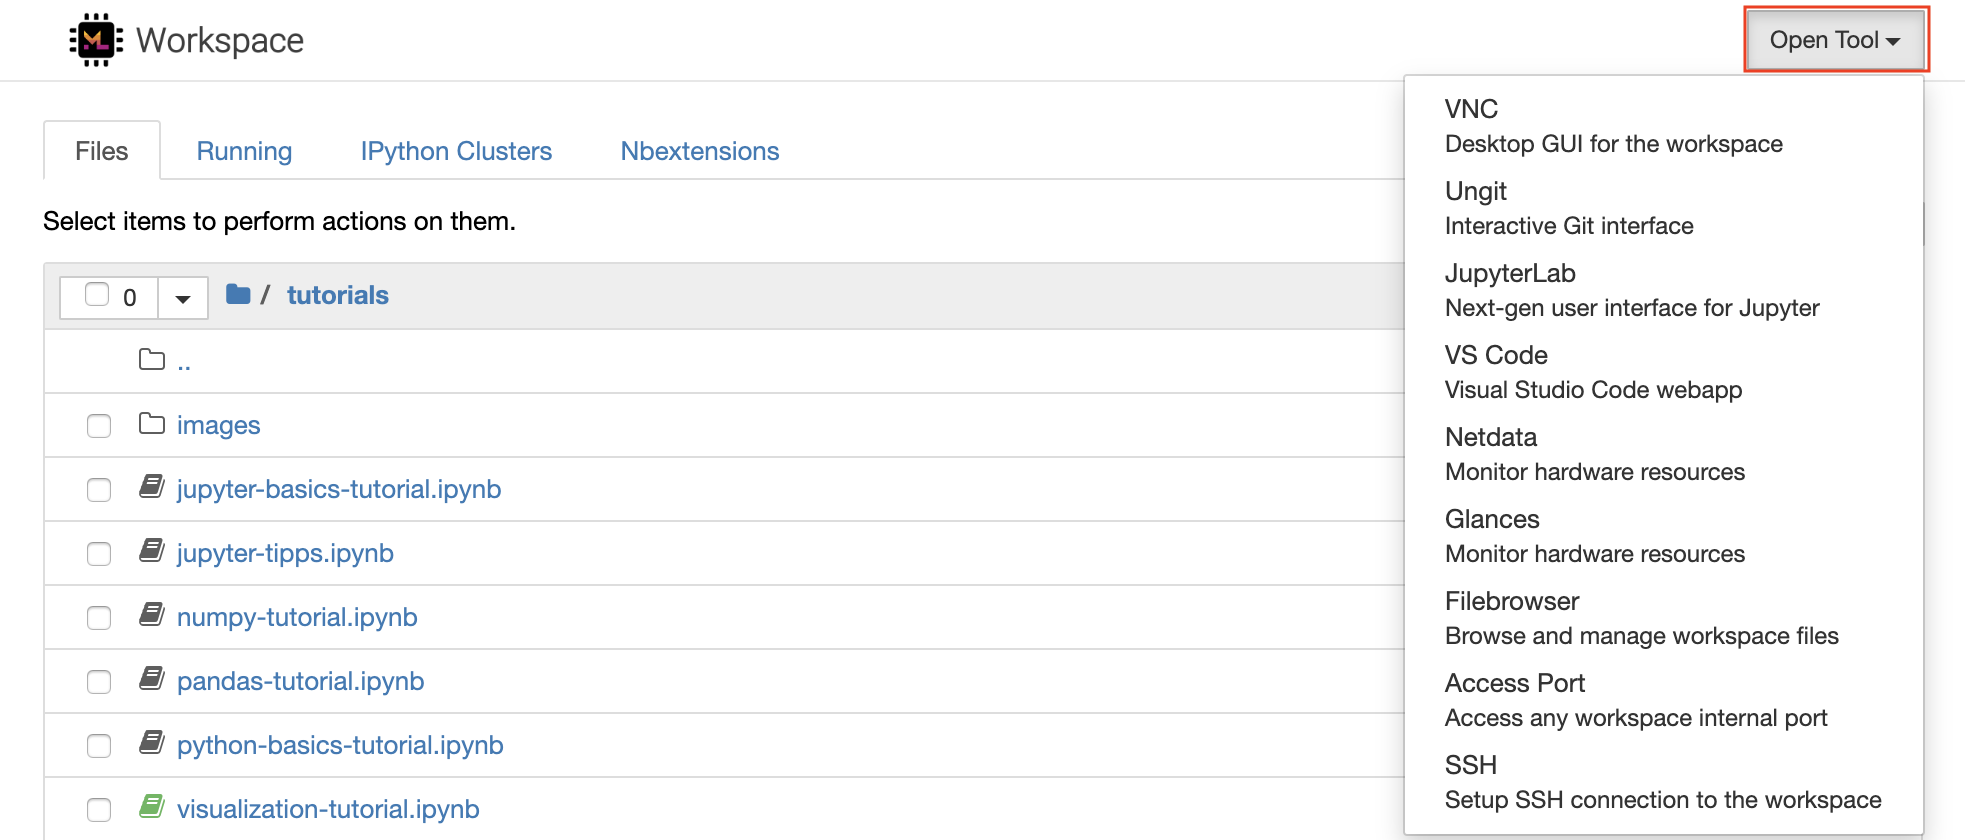
jupyter•桌面GUI•VS代码•Jupyterlab•GIT集成•文件共享•访问端口•张量•扩展性•可扩展性•硬件监视•SSH访问•远程开发•作业执行
该工作空间配备了一流的开源开发工具,可帮助机器学习工作流程。这些工具中的许多工具都可以从Jupyter(工作区的主要应用程序)的Open Tool菜单启动:
在您的工作区内,您拥有完整的root&sudo特权,可以通过终端安装所需的任何库或工具(例如,
pip,apt-get,conda或npm)。您可以找到更多的方法来扩展“可扩展性”部分中的工作空间
Jupyter Notebook是一个基于Web的交互式环境,用于编写和运行代码。 Jupyter的主要构件是文件浏览器,笔记本编辑器和内核。文件浏览器为/workspace目录中的所有笔记本,文件和文件夹提供了交互式文件管理器。
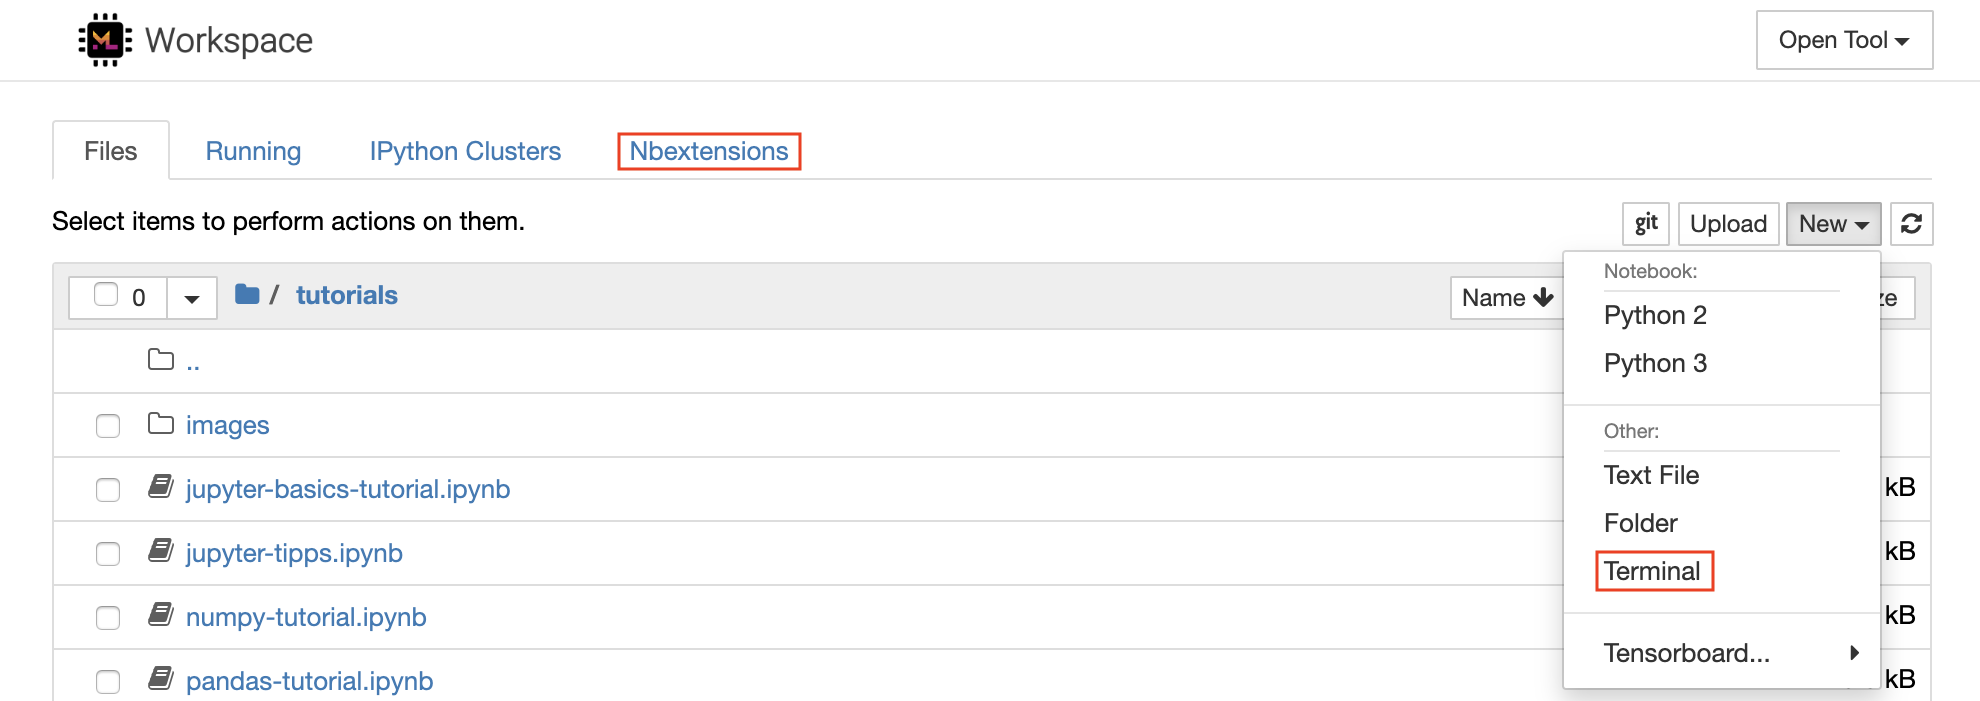
可以通过单击列表顶部的New下拉截止按钮并选择所需的语言内核来创建新的笔记本。
您也可以通过在文件浏览器中选择
New -> Terminal来产生交互式终端实例。
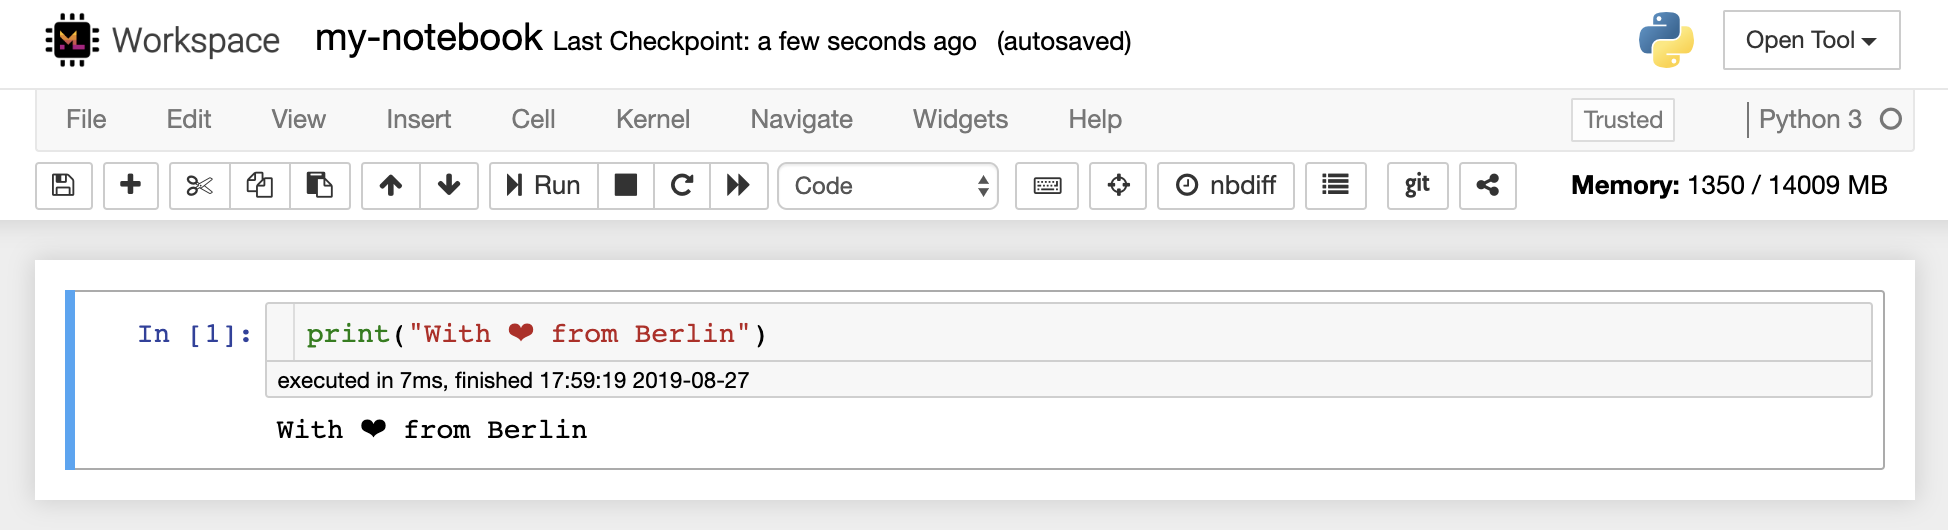
笔记本编辑器使用户能够发表文档,其中包括实时代码,Markdown文本,Shell命令,乳胶方程,交互式小部件,图,图和图像。这些笔记本文档提供了一个完整且独立的计算记录,该记录可以转换为各种格式并与他人共享。
该工作区具有激活的各种第三方jupyter扩展。您可以在nbextensions configurator中配置这些扩展程序:文件浏览器上的
nbextensions选项卡
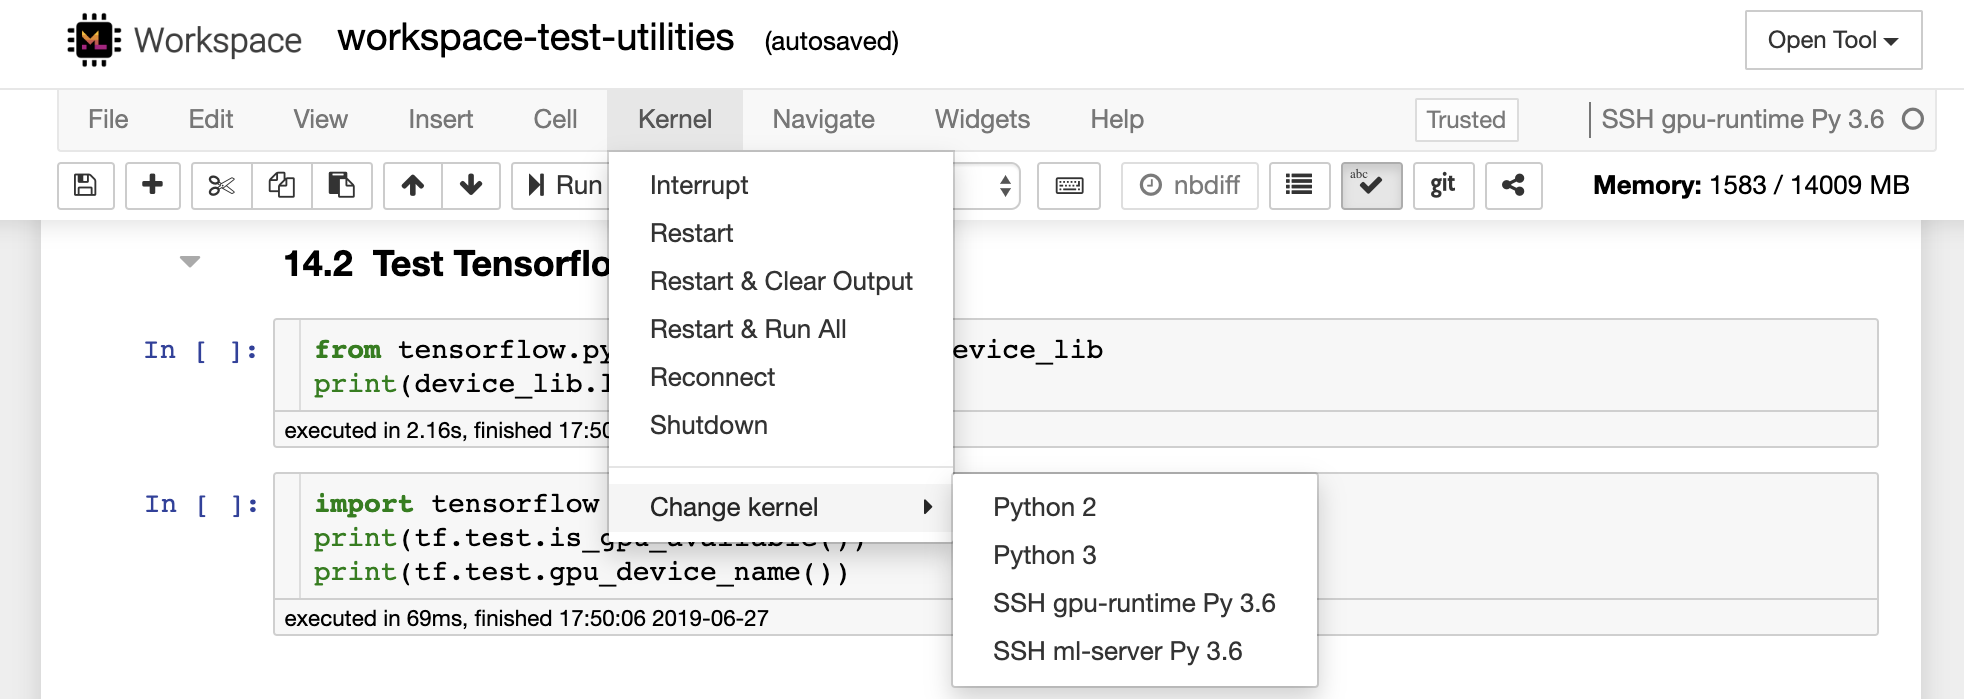
该笔记本允许代码以多种不同的编程语言运行。对于用户打开的每个笔记本文档,Web应用程序启动了一个运行该笔记本代码并返回输出的内核。该工作区具有预装的Python 3内核。可以安装其他内核,以访问其他语言(例如,R,Scala,GO)或其他计算资源(例如,GPU,CPU,内存)。
Python 2被剥夺,我们不建议使用它。但是,您仍然可以通过此命令安装Python 2.7内核:
/bin/bash /resources/tools/python-27.sh
该工作区可通过NOVNC提供基于HTTP的VNC访问工作区的访问。因此,您可以使用功能齐全的桌面GUI访问和工作。要访问此桌面GUI,请转到Open Tool ,选择VNC ,然后单击Connect按钮。在要求您提供密码的情况下,请使用vncpassword 。
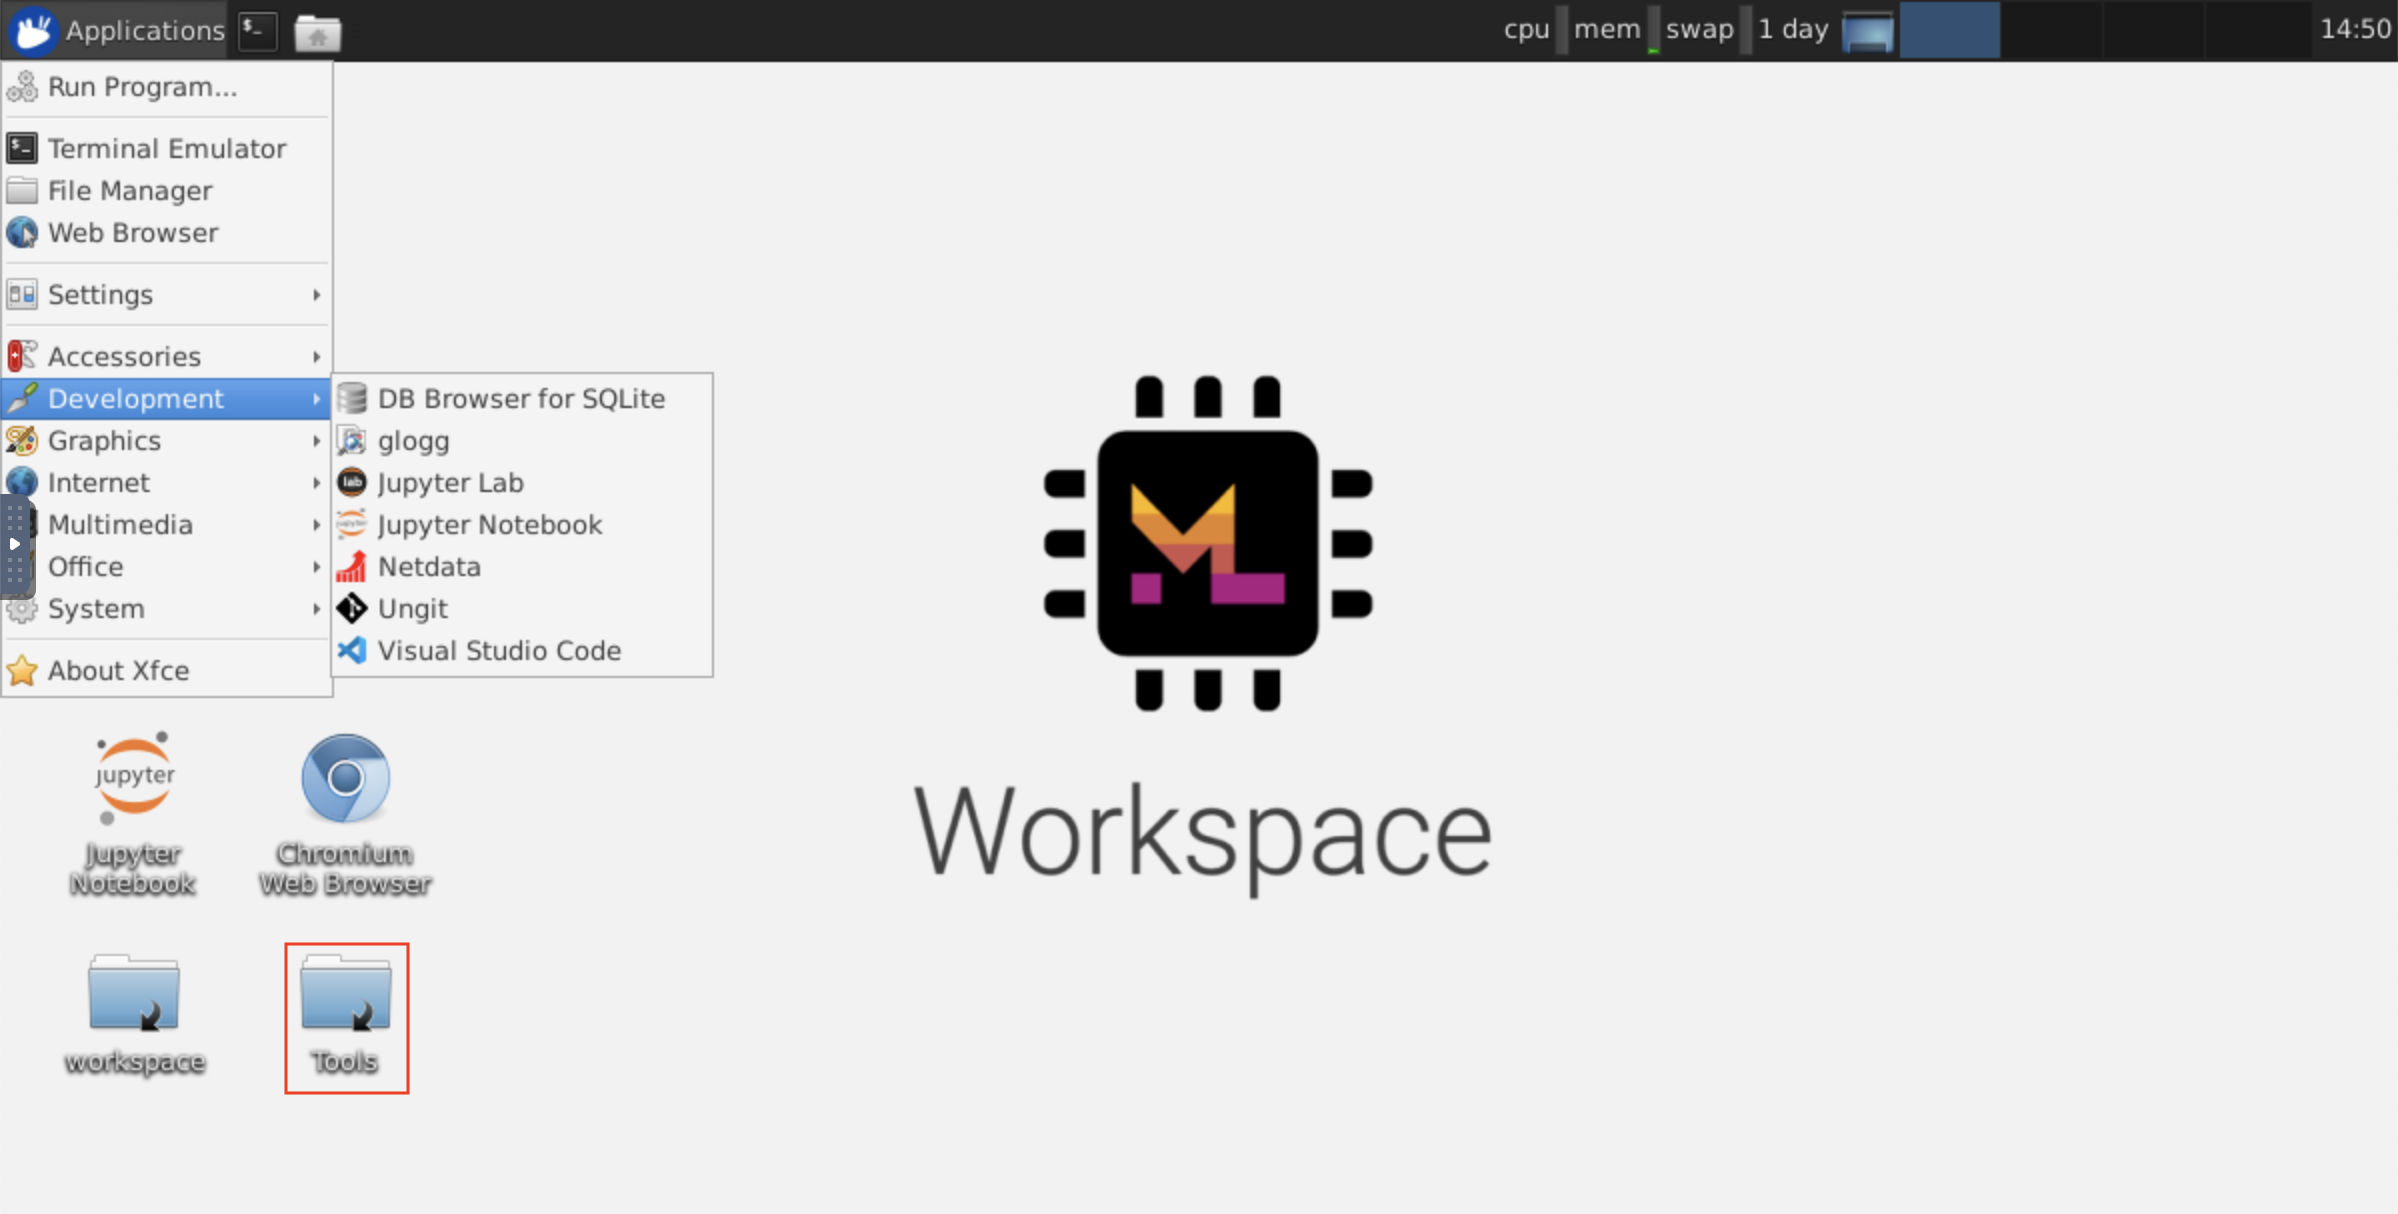
连接后,您将看到一个桌面GUI,它允许您安装和使用成熟的Web浏览器或任何其他可用于Ubuntu的工具。在台式机上的Tools文件夹中,您将找到一个安装脚本的集合,使安装一些最常用的开发工具(例如Atom,Pycharm,R-Runtime,R-Studio或Postman)变得直接(只需双击脚本)。
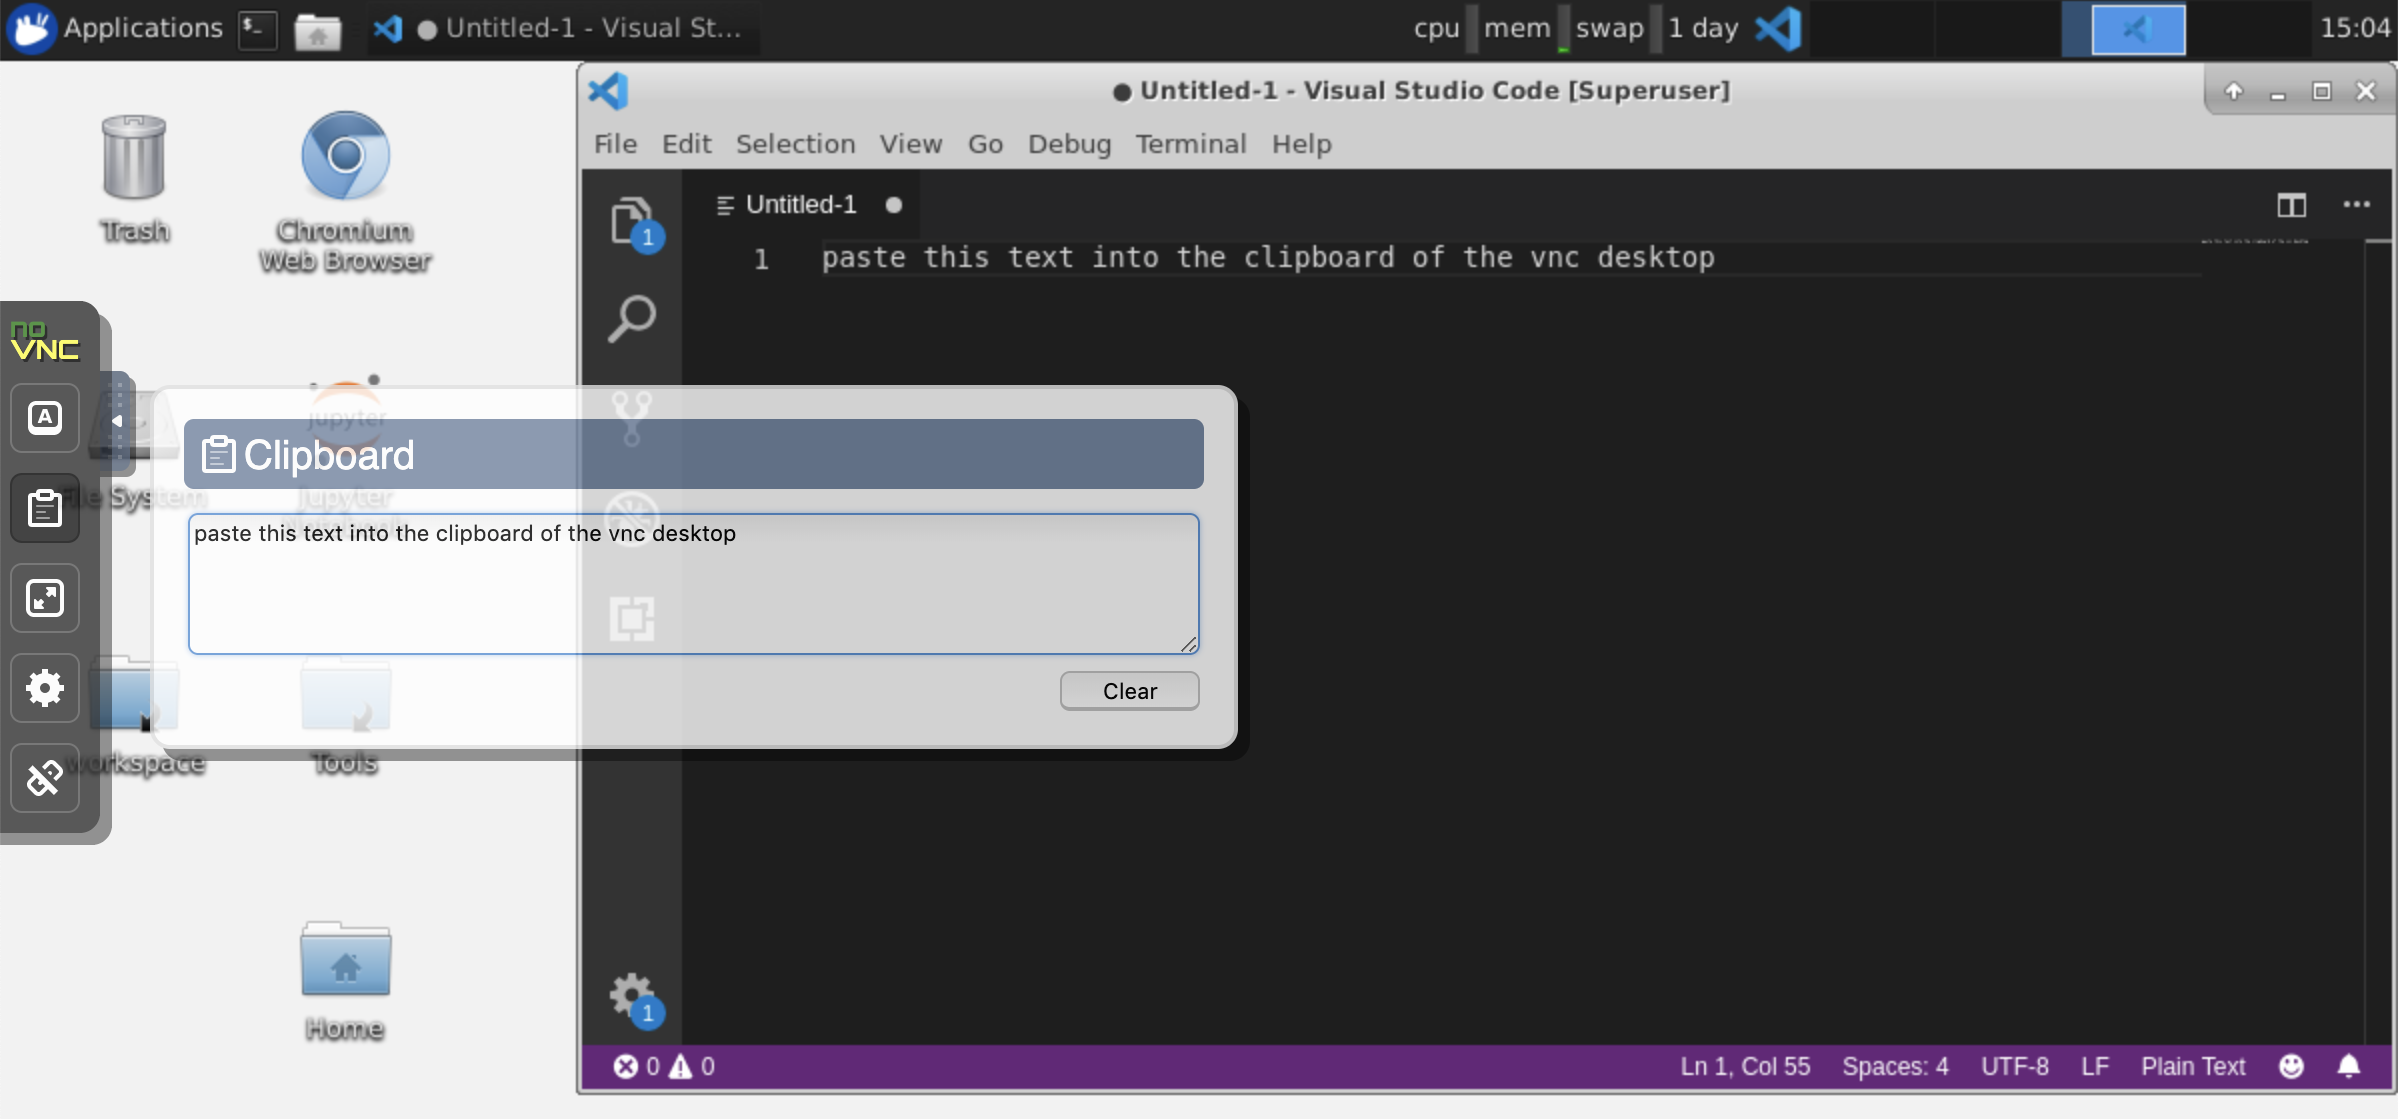
剪贴板:如果要在计算机和工作空间之间共享剪贴板,则可以使用副本 - 叠加功能,如下所述:
长期运行的任务:使用桌面GUI进行长期运行的Jupyter执行。通过从工作空间桌面GUI的浏览器中运行笔记本,即使您已将浏览器与笔记本电脑断开连接,所有输出也将同步到笔记本电脑。
Visual Studio Code( Open Tool -> VS Code )是一种开源轻巧但功能强大的代码编辑器,内置了对各种语言和丰富的扩展生态系统的支持。它将源代码编辑器的简单性与强大的开发人员工具(例如Intellisense代码完成和调试)结合在一起。 Workspace将VS代码集成为基于Web的应用程序,可通过基于Awesome Code-Server项目的浏览器访问。它允许您自定义自己喜欢的每个功能,并安装任意数量的第三方扩展名。
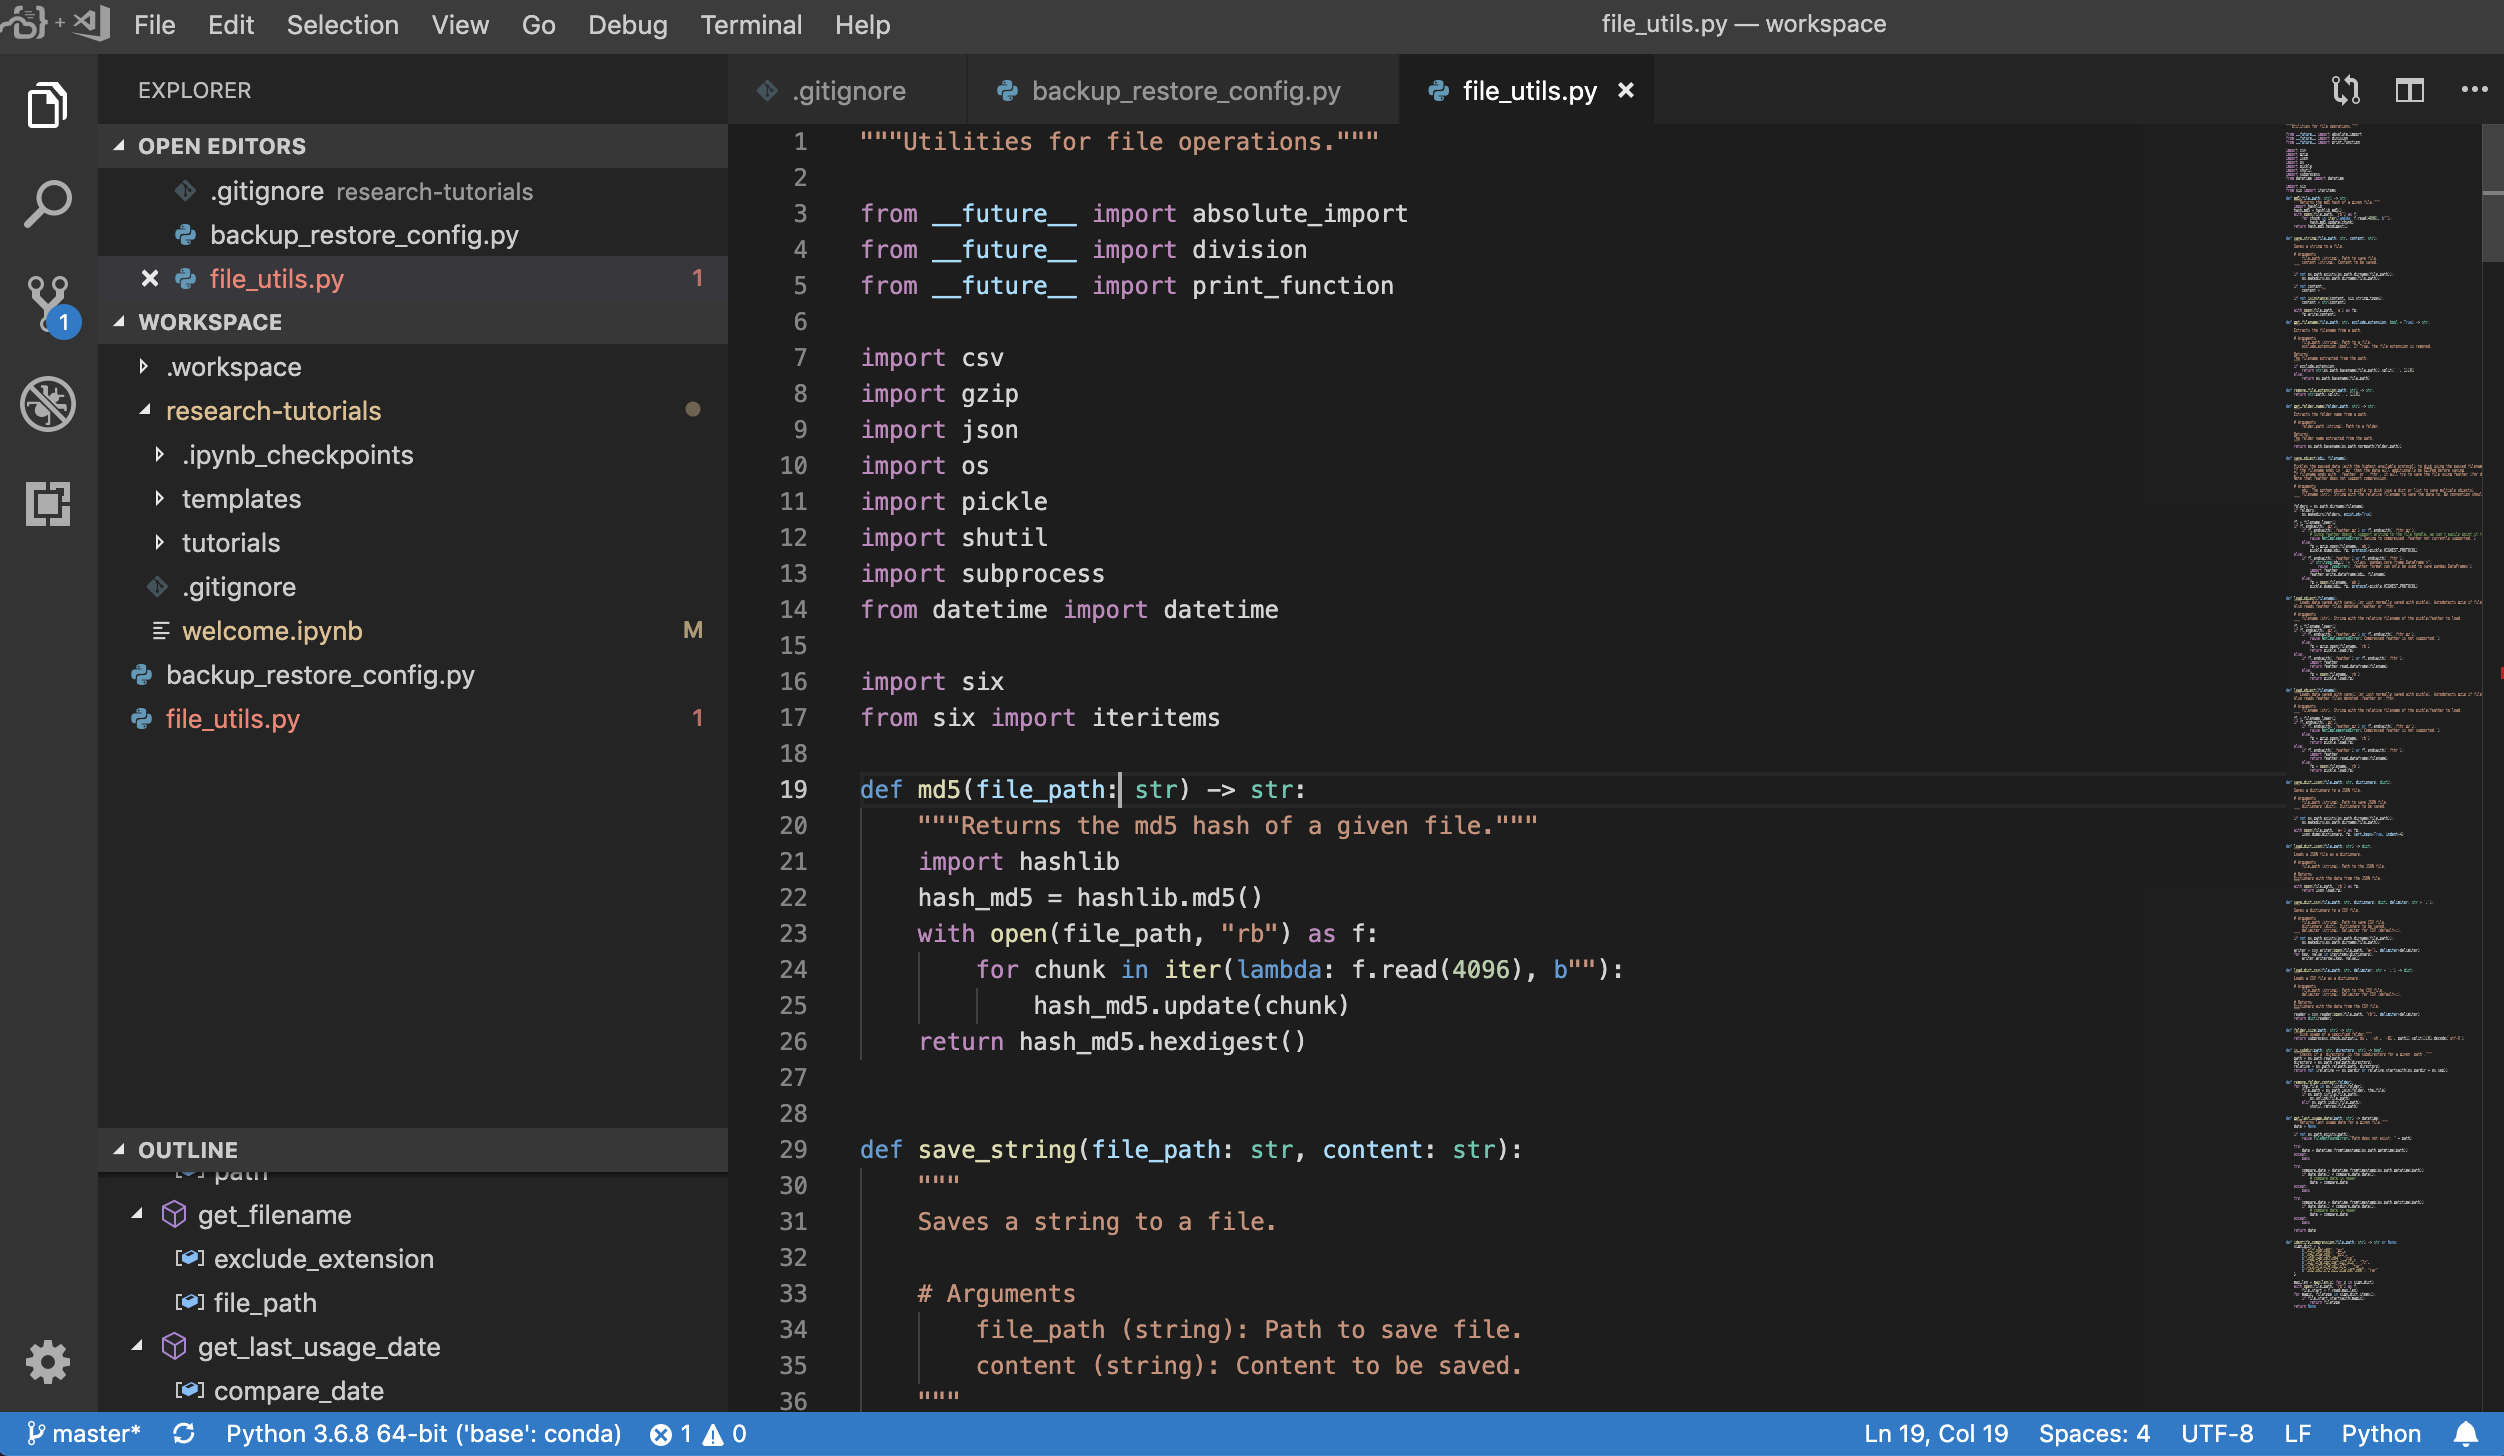
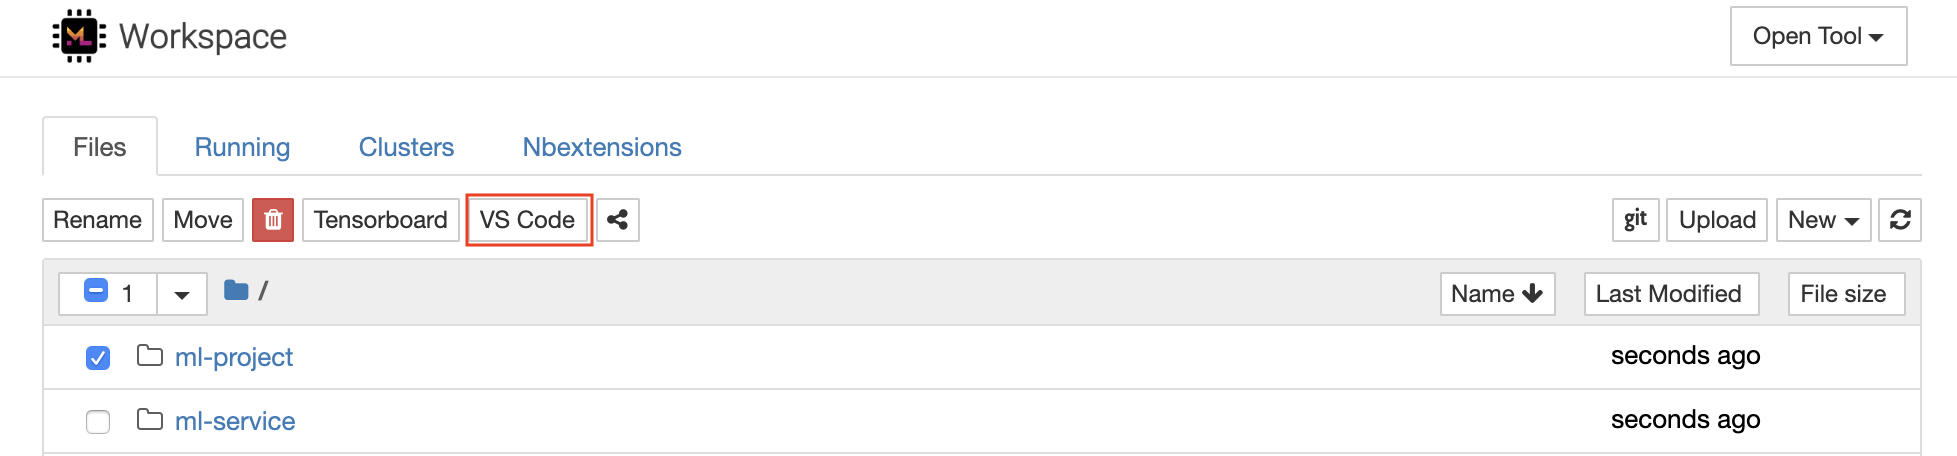
工作区还提供了VS代码集成到Jupyter中,允许您为任何选定的文件夹打开VS代码实例,如下所示:
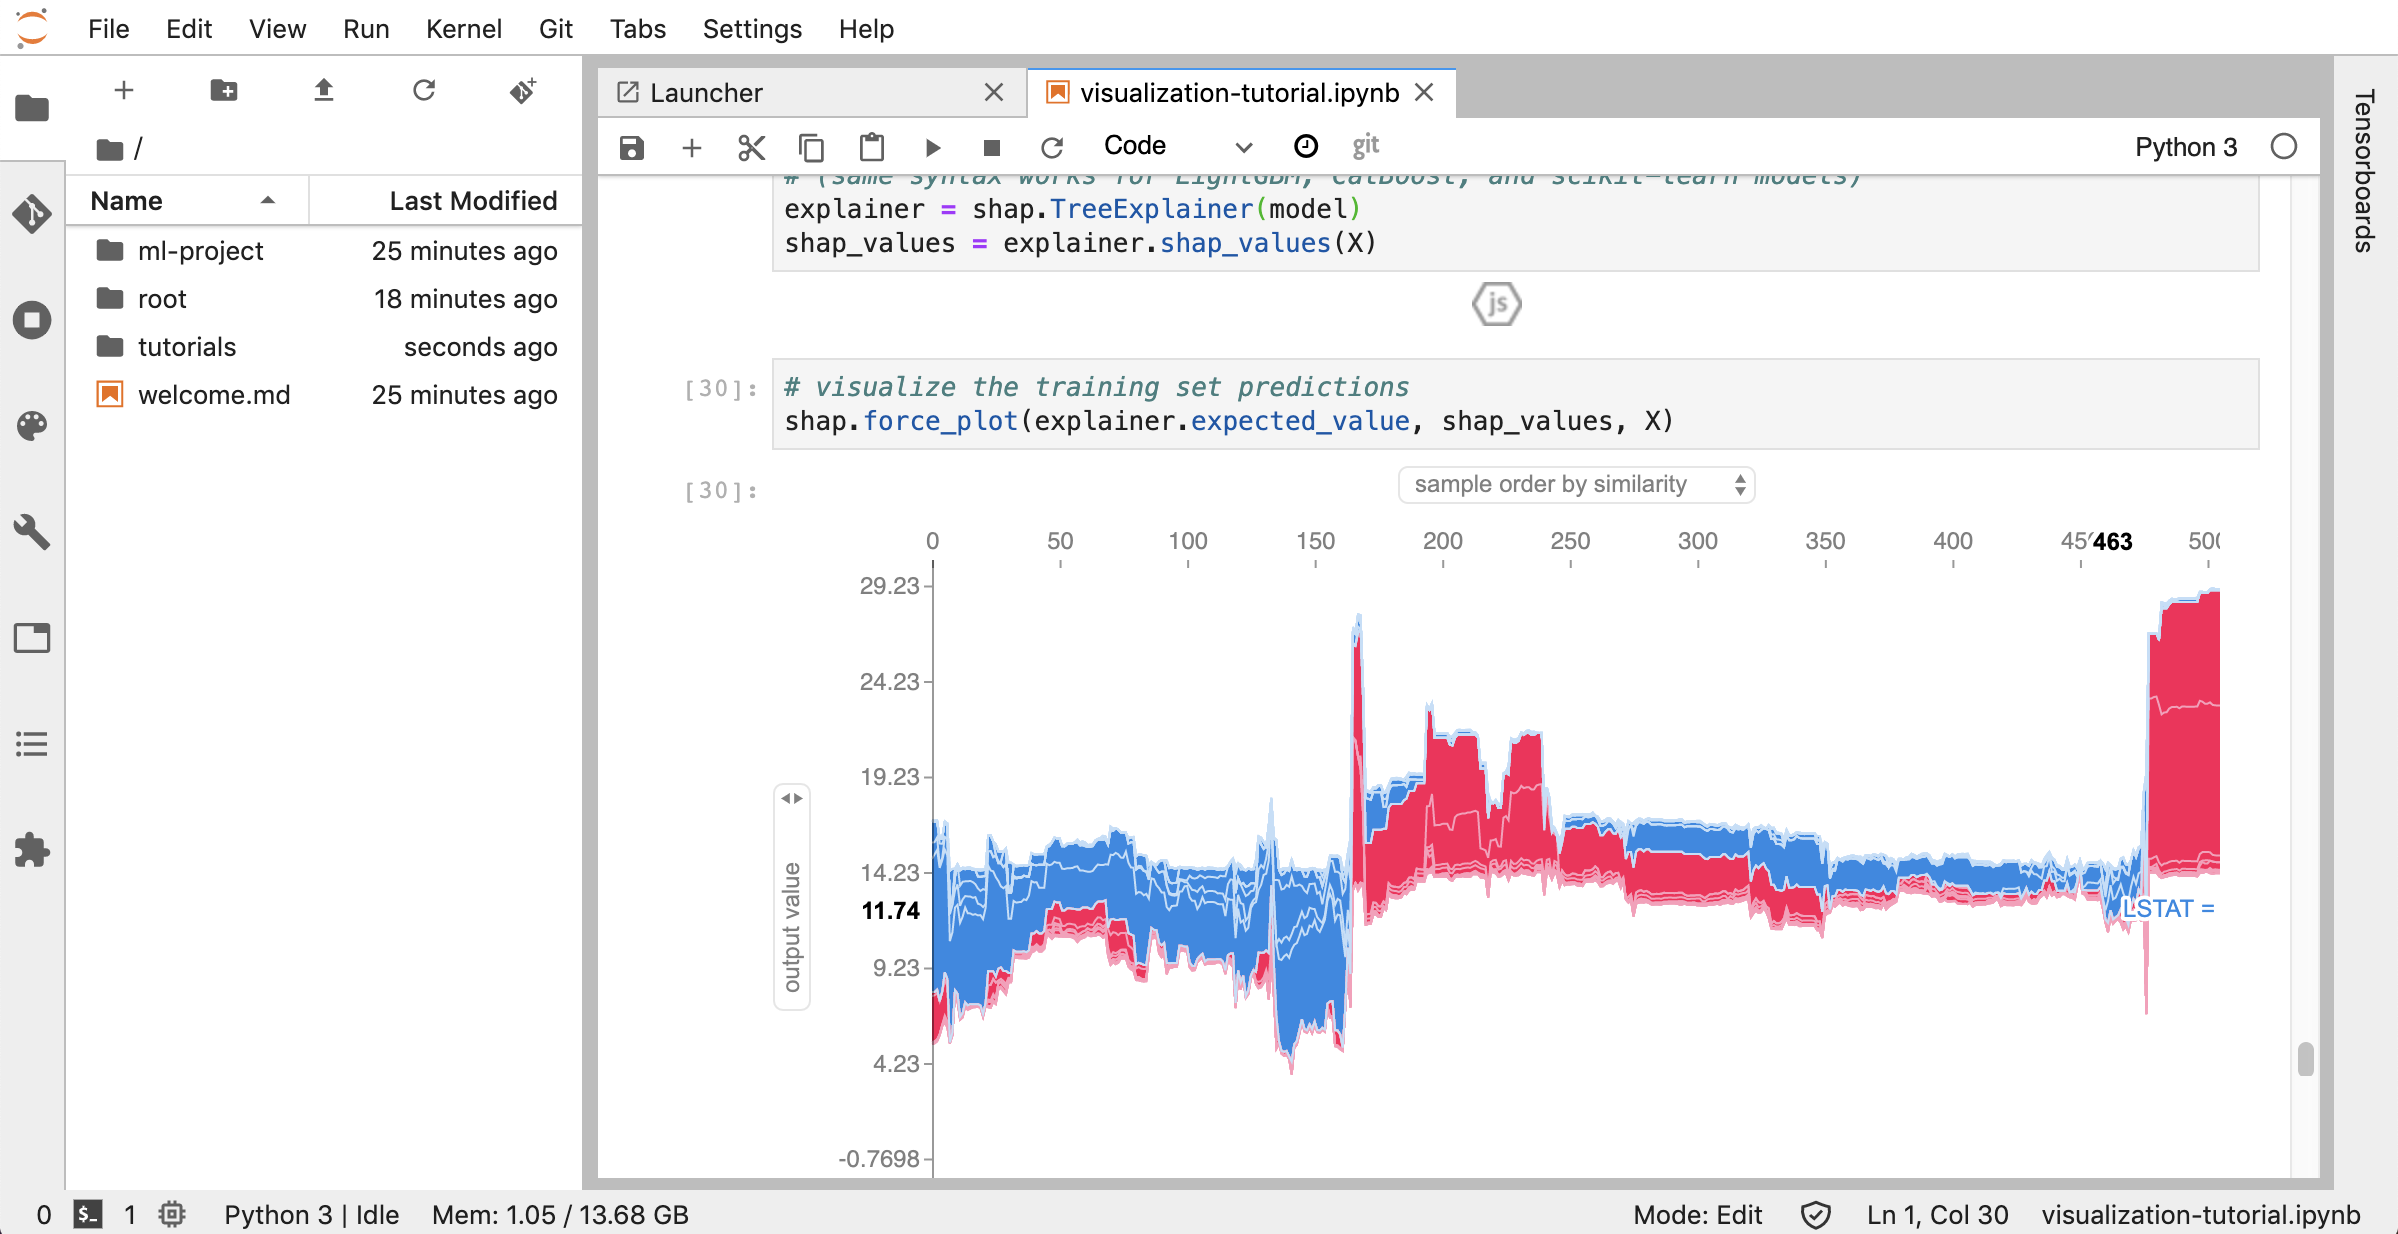
Jupyterlab( Open Tool -> JupyterLab )是项目jupyter的下一代用户界面。它在灵活且功能强大的用户界面中提供了经典Jupyter笔记本电脑(笔记本,终端,文本编辑器,富含输出等)的所有熟悉的构建块。此Jupyterlab实例预装了一些有用的扩展程序,例如Jupyterlab-toc,Jupyterlab-Git和Juptyterlab-Tensorboard。
版本控制是生产协作的关键方面。为了使此过程尽可能流畅,我们已经集成了一个定制的jupyter扩展程序,专门推动单个笔记本(一个基于Web的GIT客户端(UNGIT)),这是一种打开和编辑纯文本文档(例如, .py , .md )作为笔记本(Notebooks(JupyText))的工具,以及笔记本手册Merging工具(NBDIME)。此外,Jupyterlab和VS代码还提供基于GUI的GIT客户端。
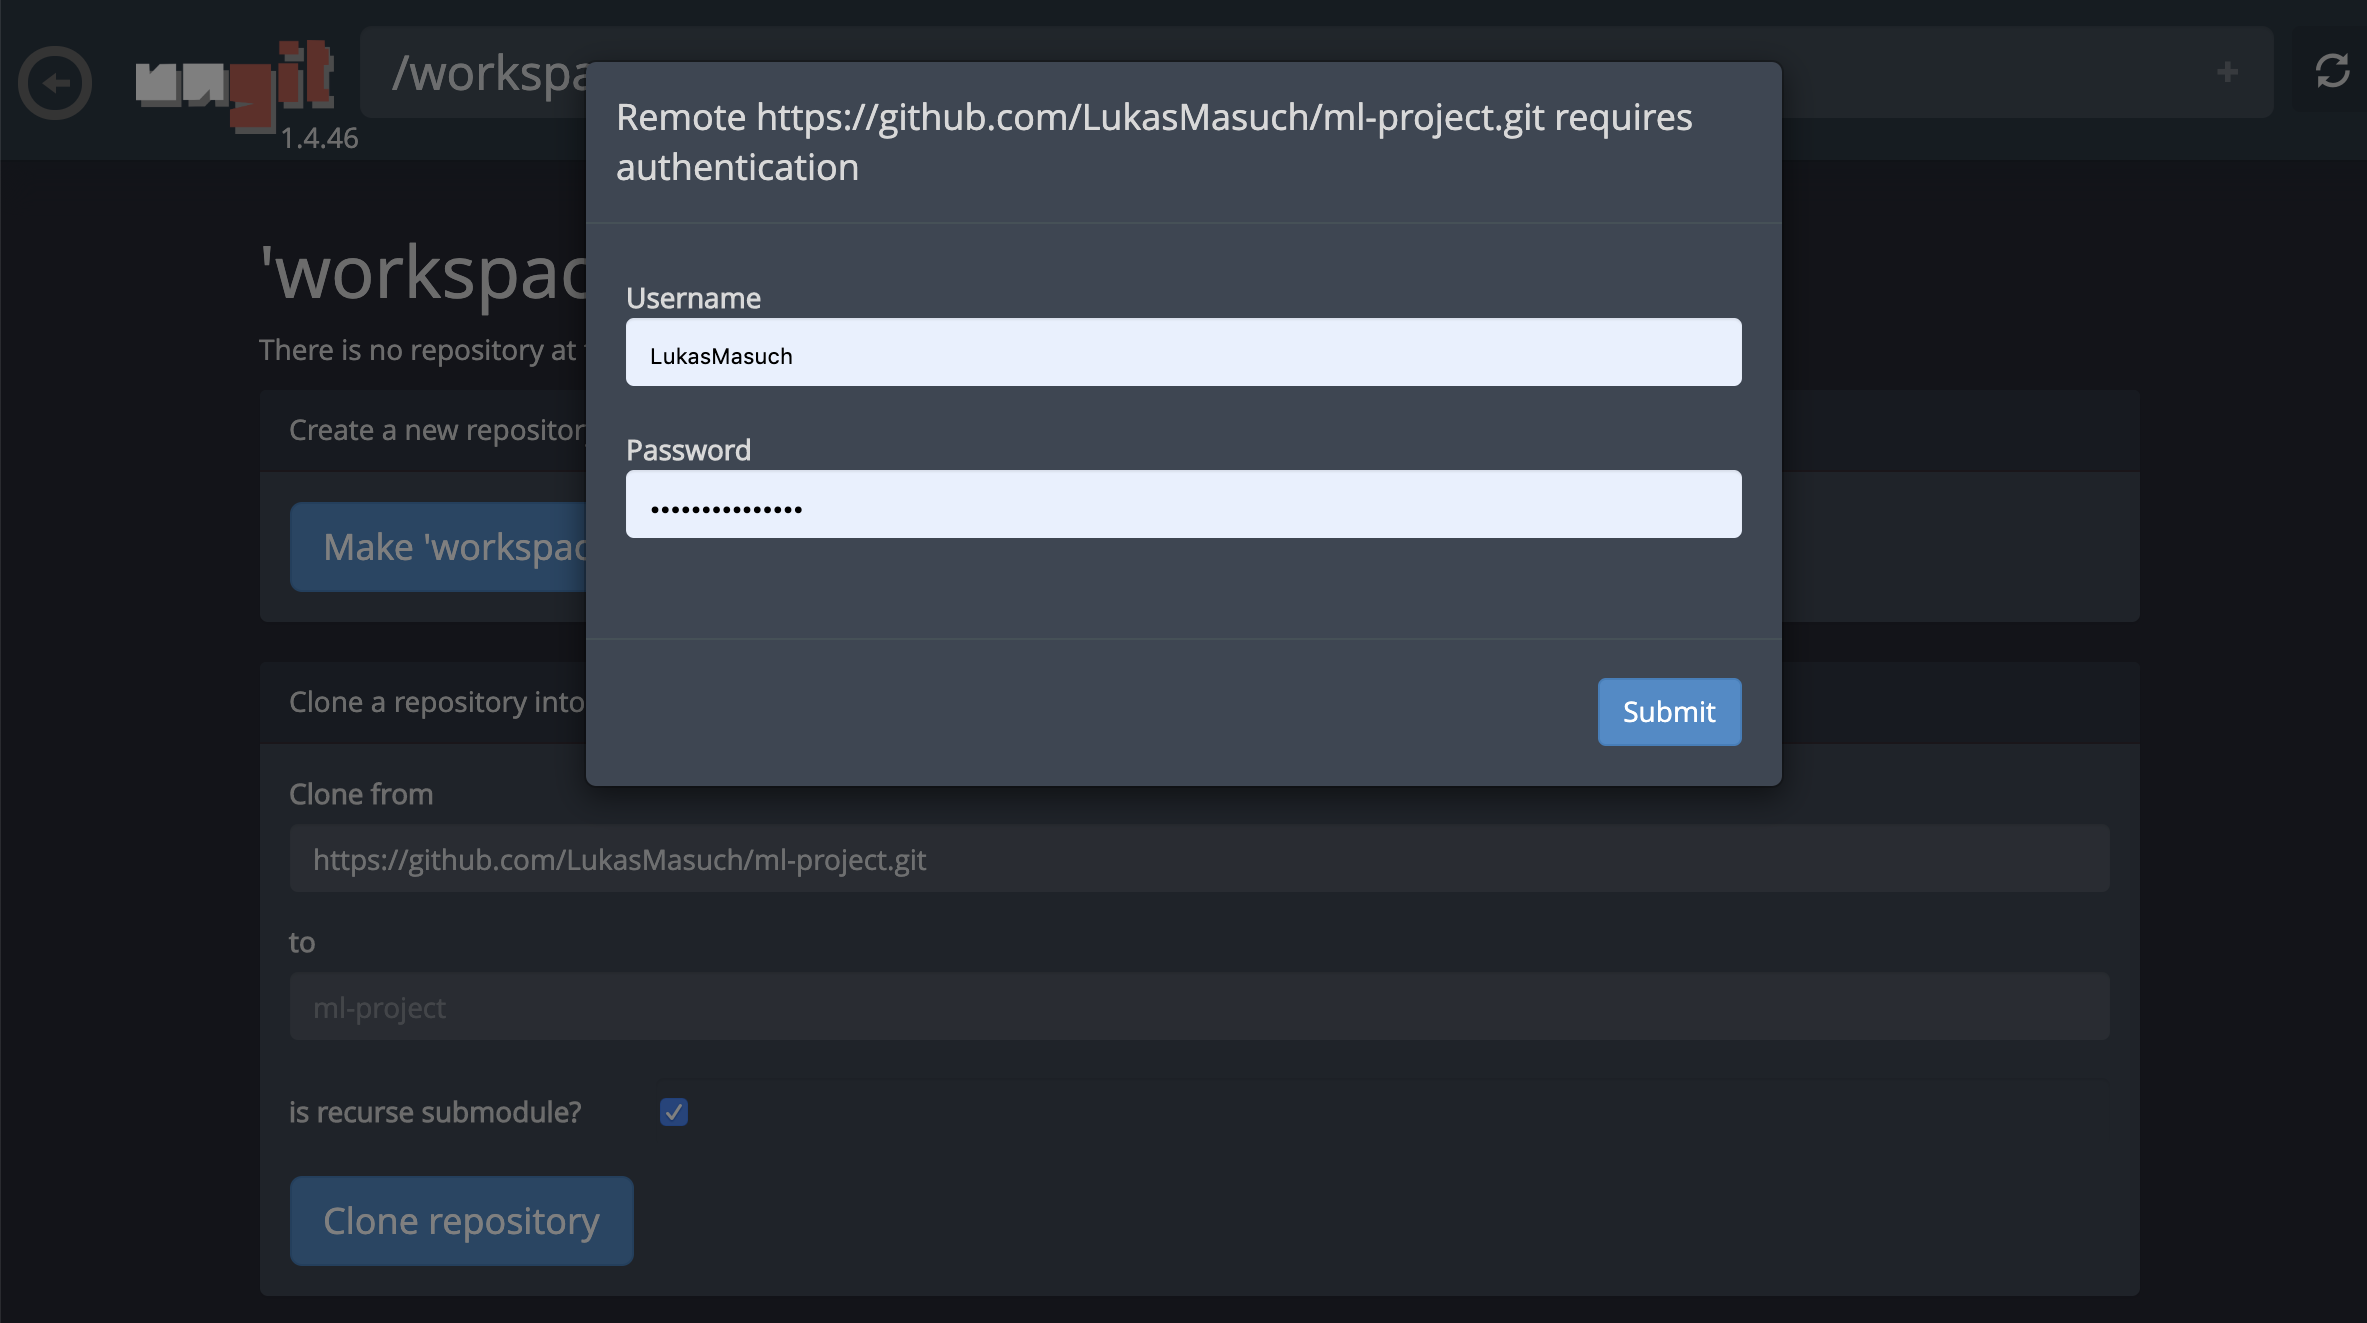
对于通过https克隆存储库,我们建议导航到所需的根文件夹,然后单击git按钮,如下所示:

这可能会要求一些必需的设置,随后,开设了一个基于Web的GIT客户端,具有干净,直观的UI,使您可以同步您的代码工件。在Ungit中,您可以克隆任何存储库。如果需要身份验证,您将被要求提供您的凭据。
要提交并将单个笔记本电脑推向远程GIT存储库,我们建议将集成到Jupyter的GIT插件使用,如下所示:
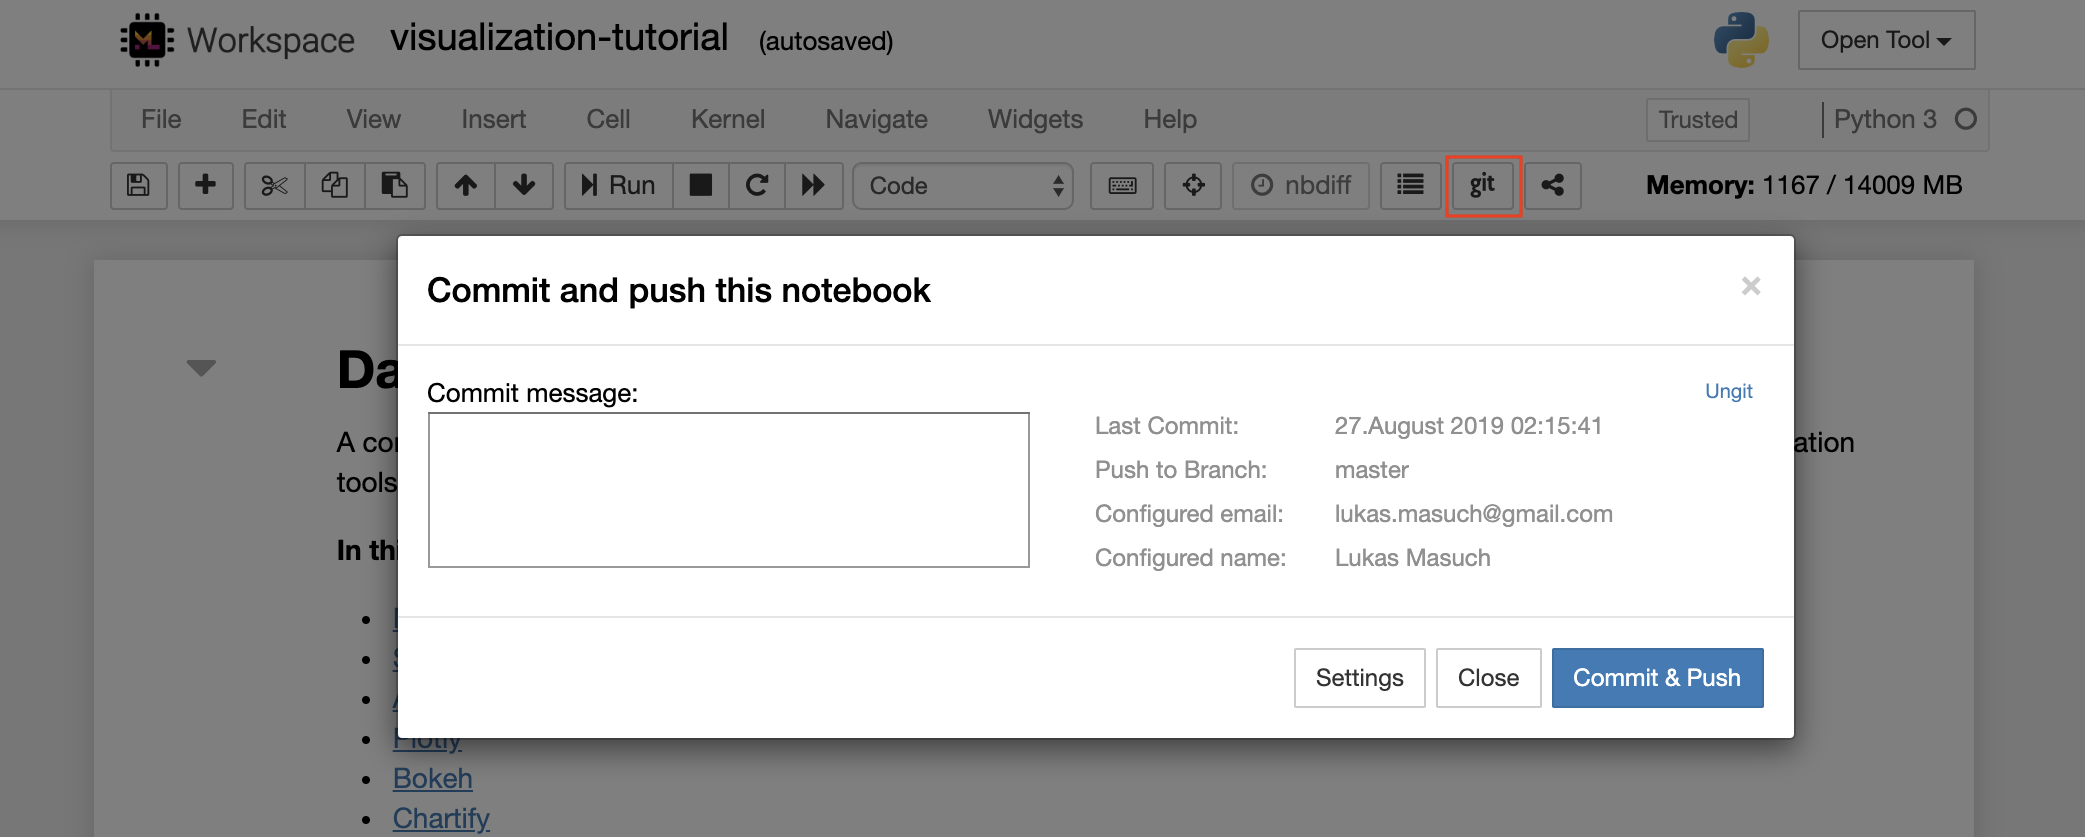
对于更高级的GIT操作,我们建议使用Ungit。使用Ungit,您可以执行大多数常见的GIT操作,例如推,拉,合并,分支,标签,结帐等等。
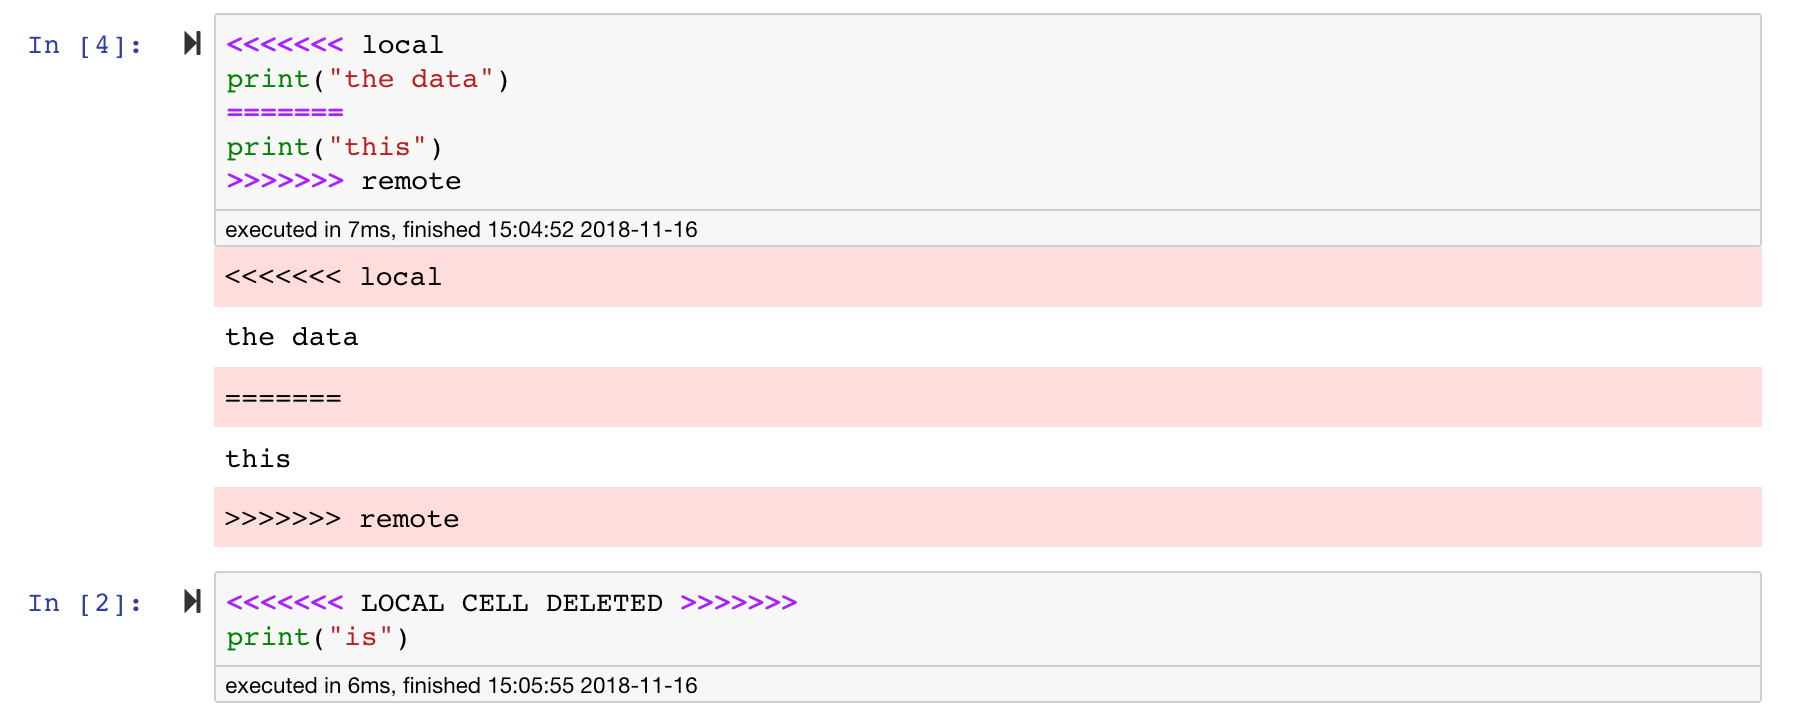
Jupyter笔记本非常好,但是它们通常是巨大的文件,具有非常特定的JSON文件格式。为了通过git启用无缝的差异和合并,该工作空间已与nbdime预装。 NBDIME了解笔记本文档的结构,因此,在扩散和合并笔记本电脑时会自动做出明智的决策。在您有合并冲突的情况下,NBDime将确保笔记本仍然由Jupyter读取,如下所示:
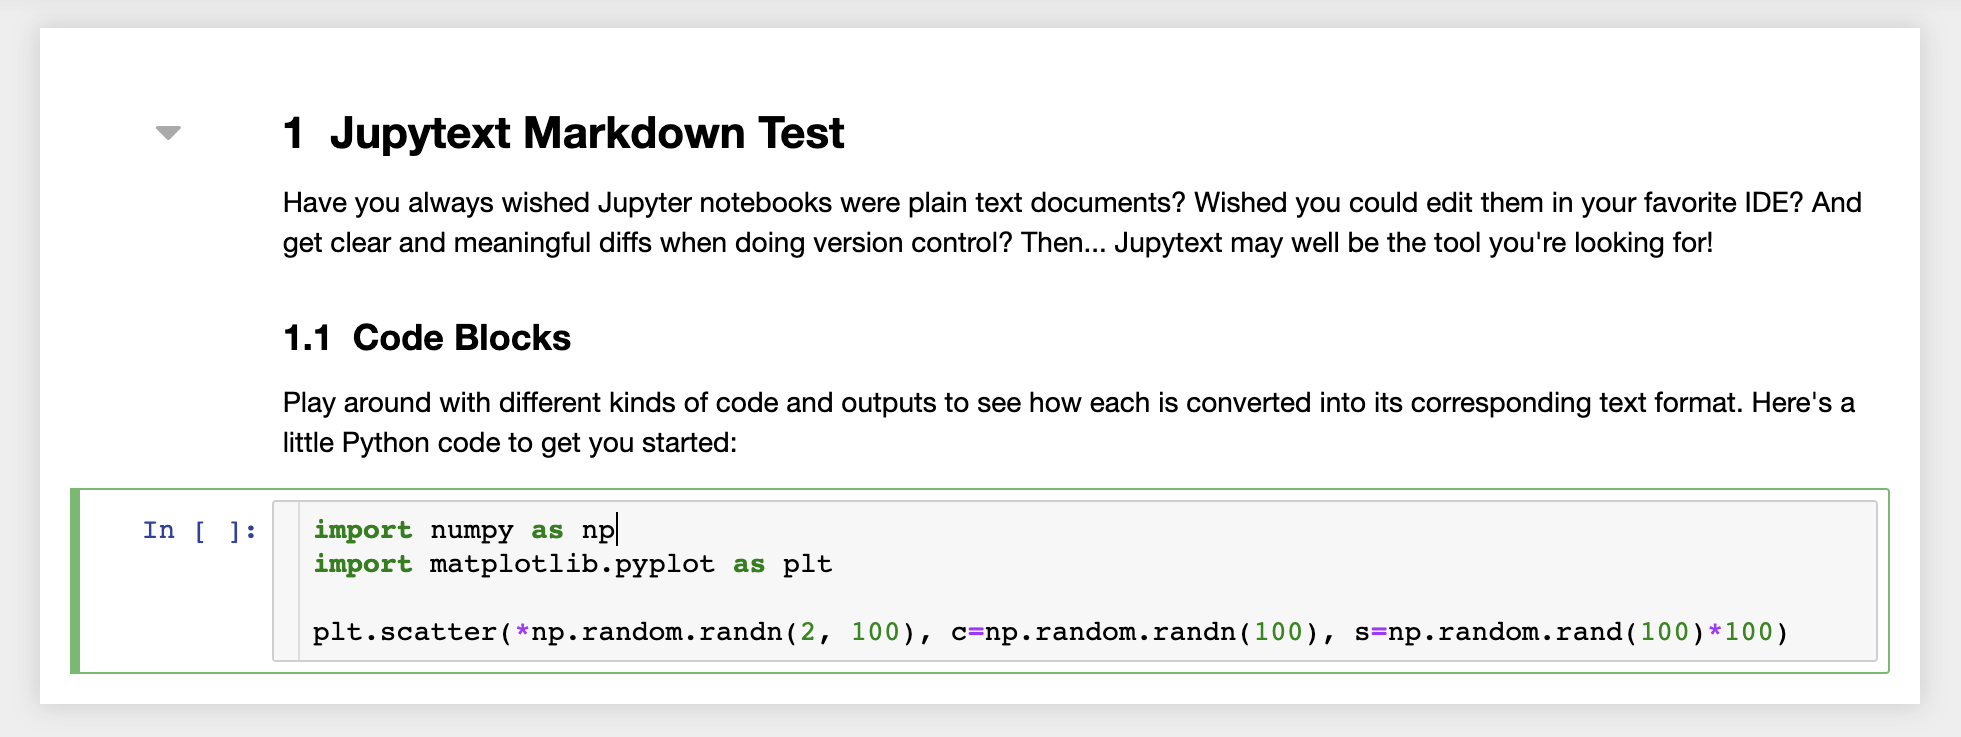
此外,工作空间还安装了jupytext,jupytext是一个jupyter插件,将笔记本读写为纯文本文件。这使您可以打开,编辑和运行脚本或Markdown文件(例如, .py , .md )作为Jupyter中的笔记本。在下面的屏幕截图中,我们通过Jupyter打开了一个Markdown文件:
结合GIT,JupyText可以实现明确的差异历史记录和易于合并版本冲突。有了这两个工具,与git一起在jupyter笔记本上进行协作变得很简单。
工作区具有通过受令牌保护的链接与任何人共享任何文件或文件夹的功能。要通过链接共享数据,请从jupyter目录树中选择任何文件或文件夹,然后单击“共享”按钮,如以下屏幕截图所示:
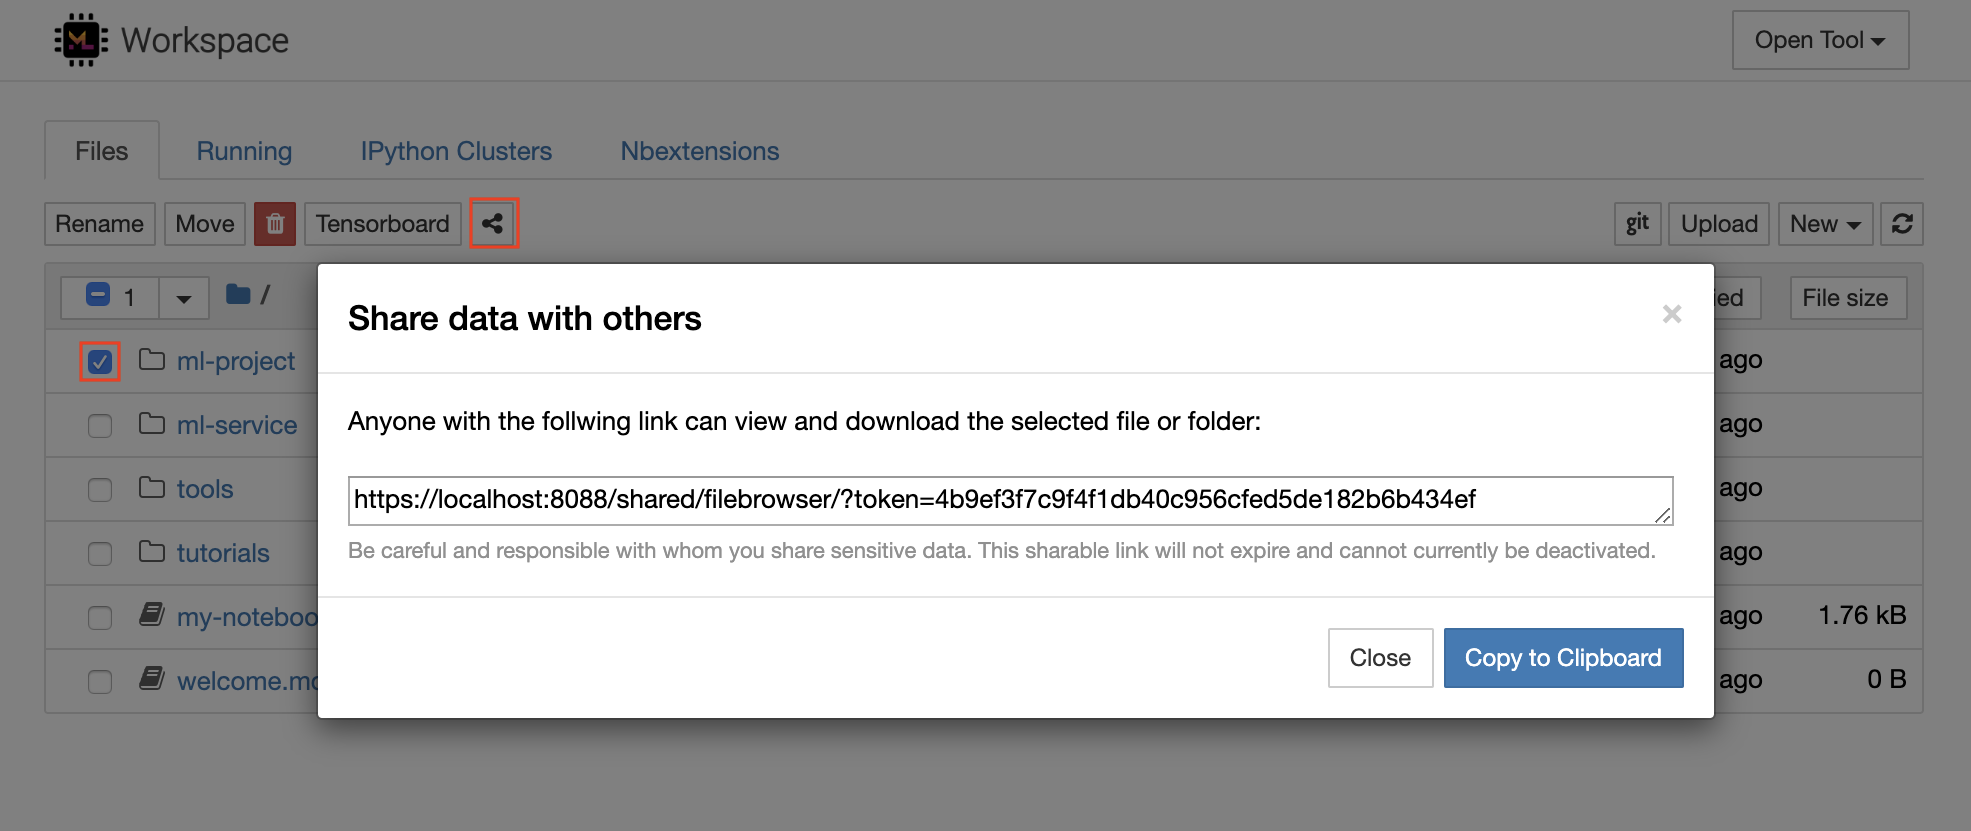
这将生成一个通过令牌保护的唯一链接,该链接可以使任何具有链接访问查看的人并通过FileBrowser UI下载所选数据:
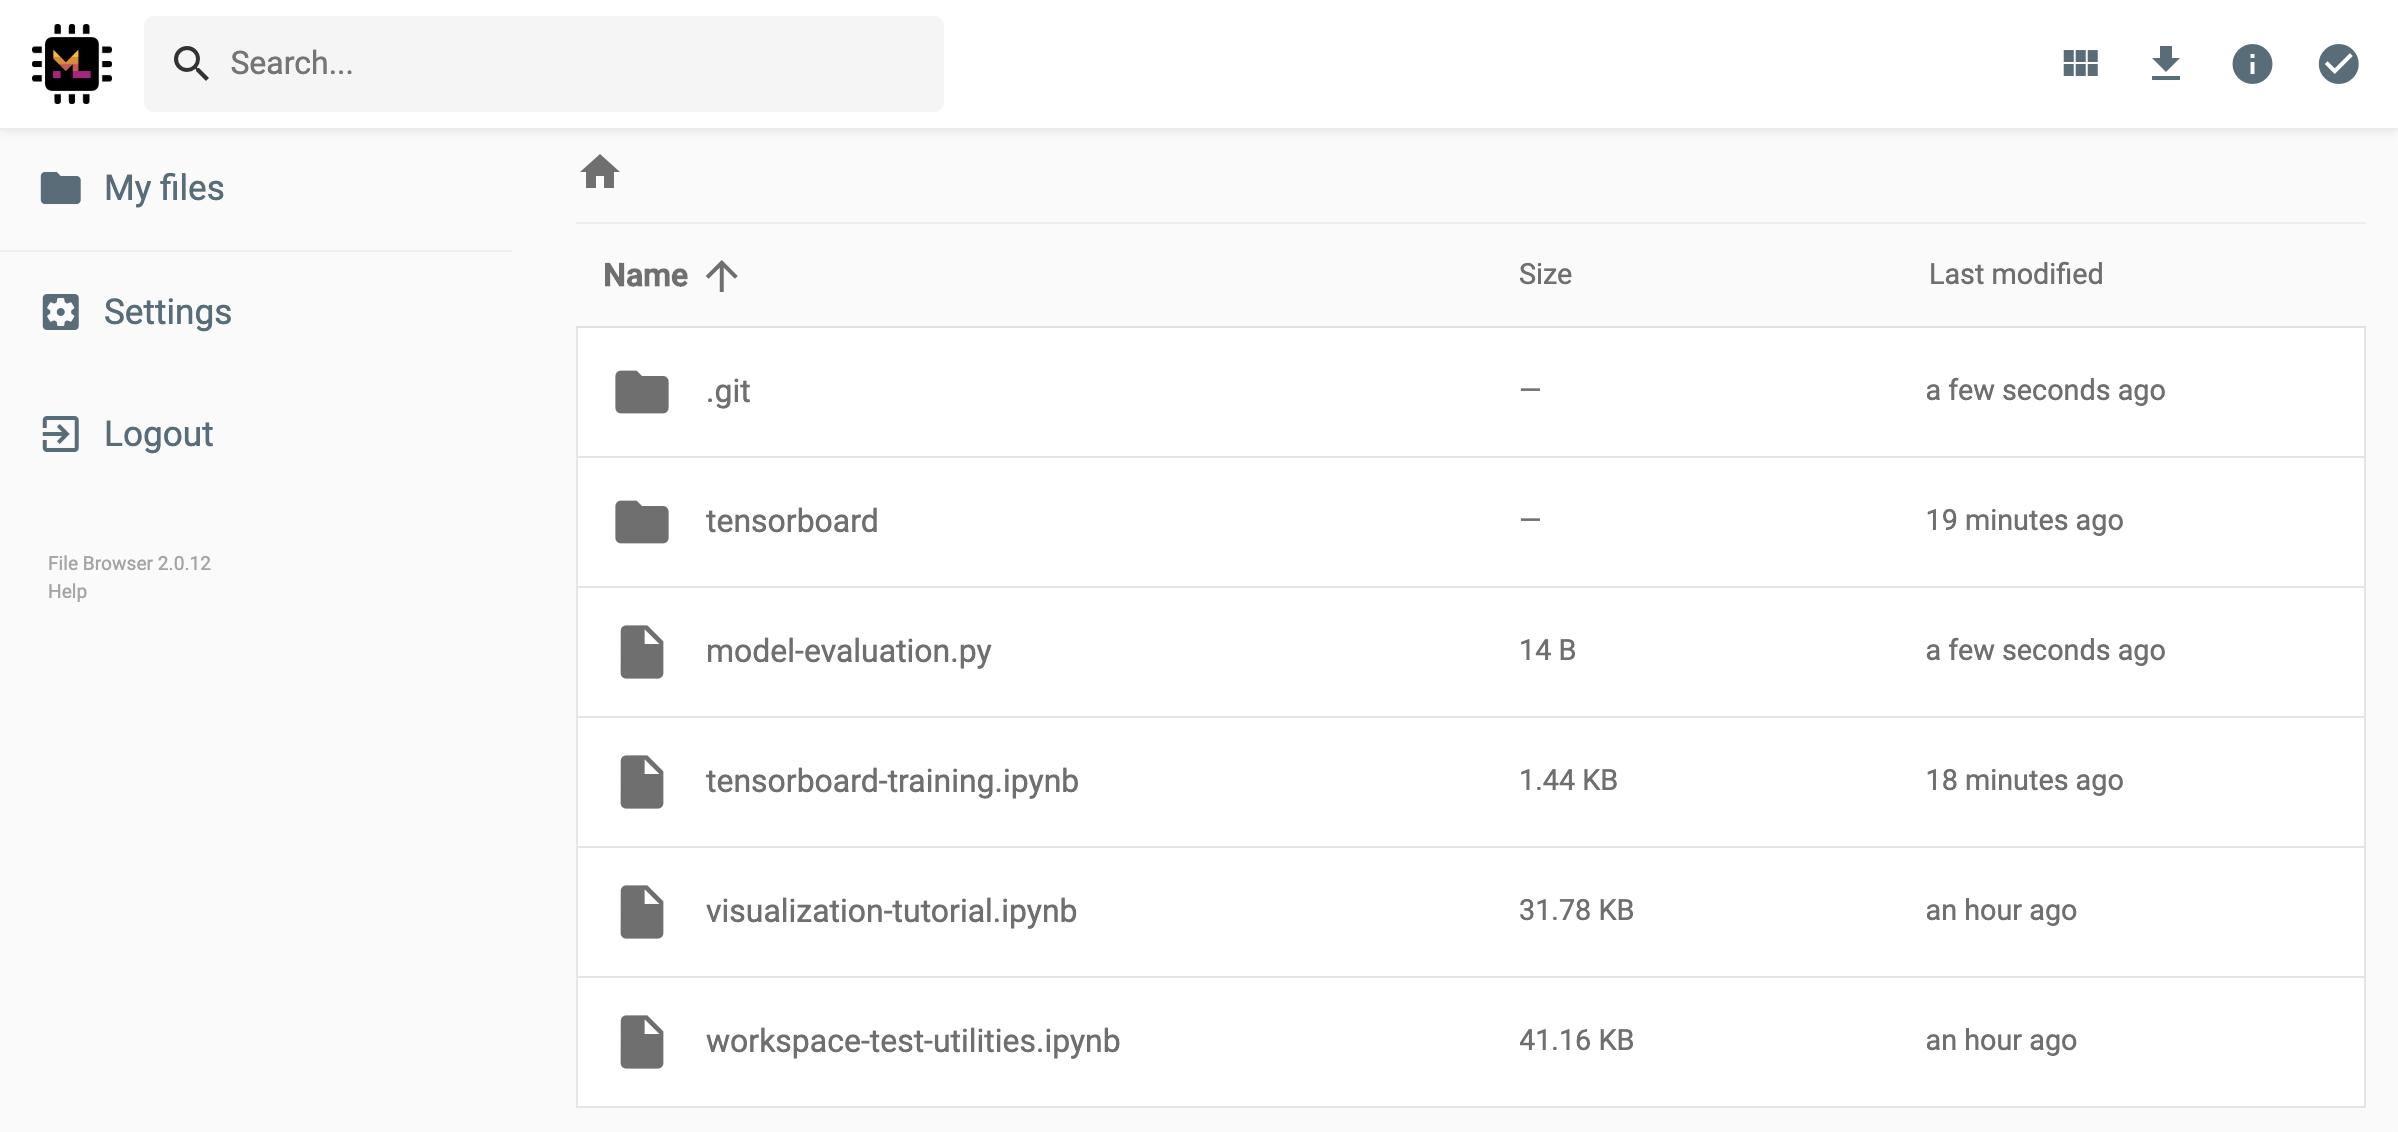
要停用或管理(例如,提供编辑权限)共享链接,请通过Open Tool -> Filebrowser打开FileBrowser,然后选择Settings->User Management 。
通过选择Open Tool -> Access Port可以安全地访问任何工作区内部端口。借助此功能,您可以使用浏览器直接访问在工作区内运行的REST API或Web应用程序。该功能使开发人员可以直接从工作区构建,运行,测试和调试REST API或WEB应用程序。
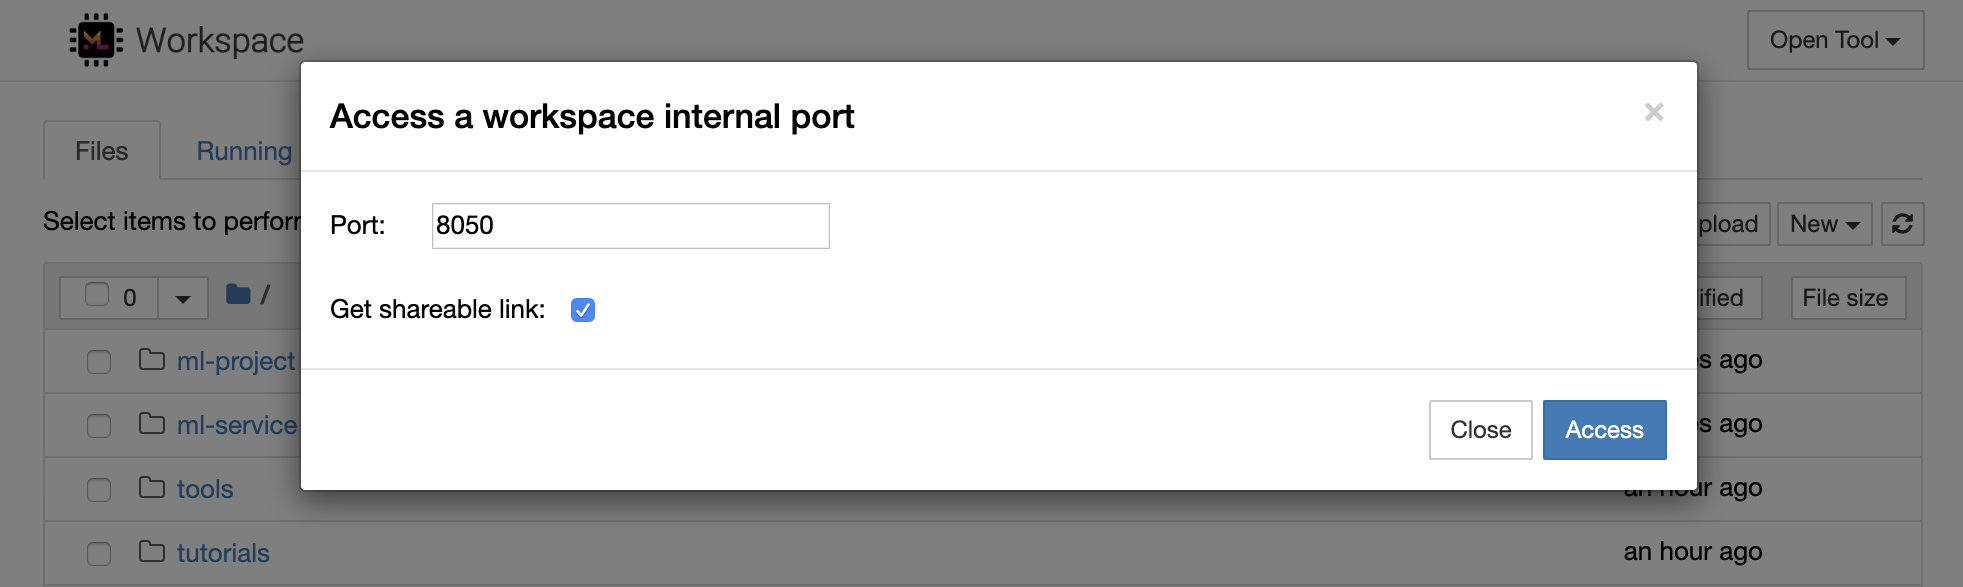
如果要使用HTTP客户端或共享对给定端口的访问,则可以选择Get shareable link选项。这会生成一个令牌安全的链接,任何访问该链接的人都可以使用该链接来访问指定的端口。
HTTP应用需要从相对URL路径或配置基本路径(
/tools/PORT/)解决。这种方式可访问的工具由工作区的身份验证系统确保!如果您决定自己发布容器的任何其他端口,而不是使用此功能使工具可访问,请确保通过身份验证机制确保它保护它!
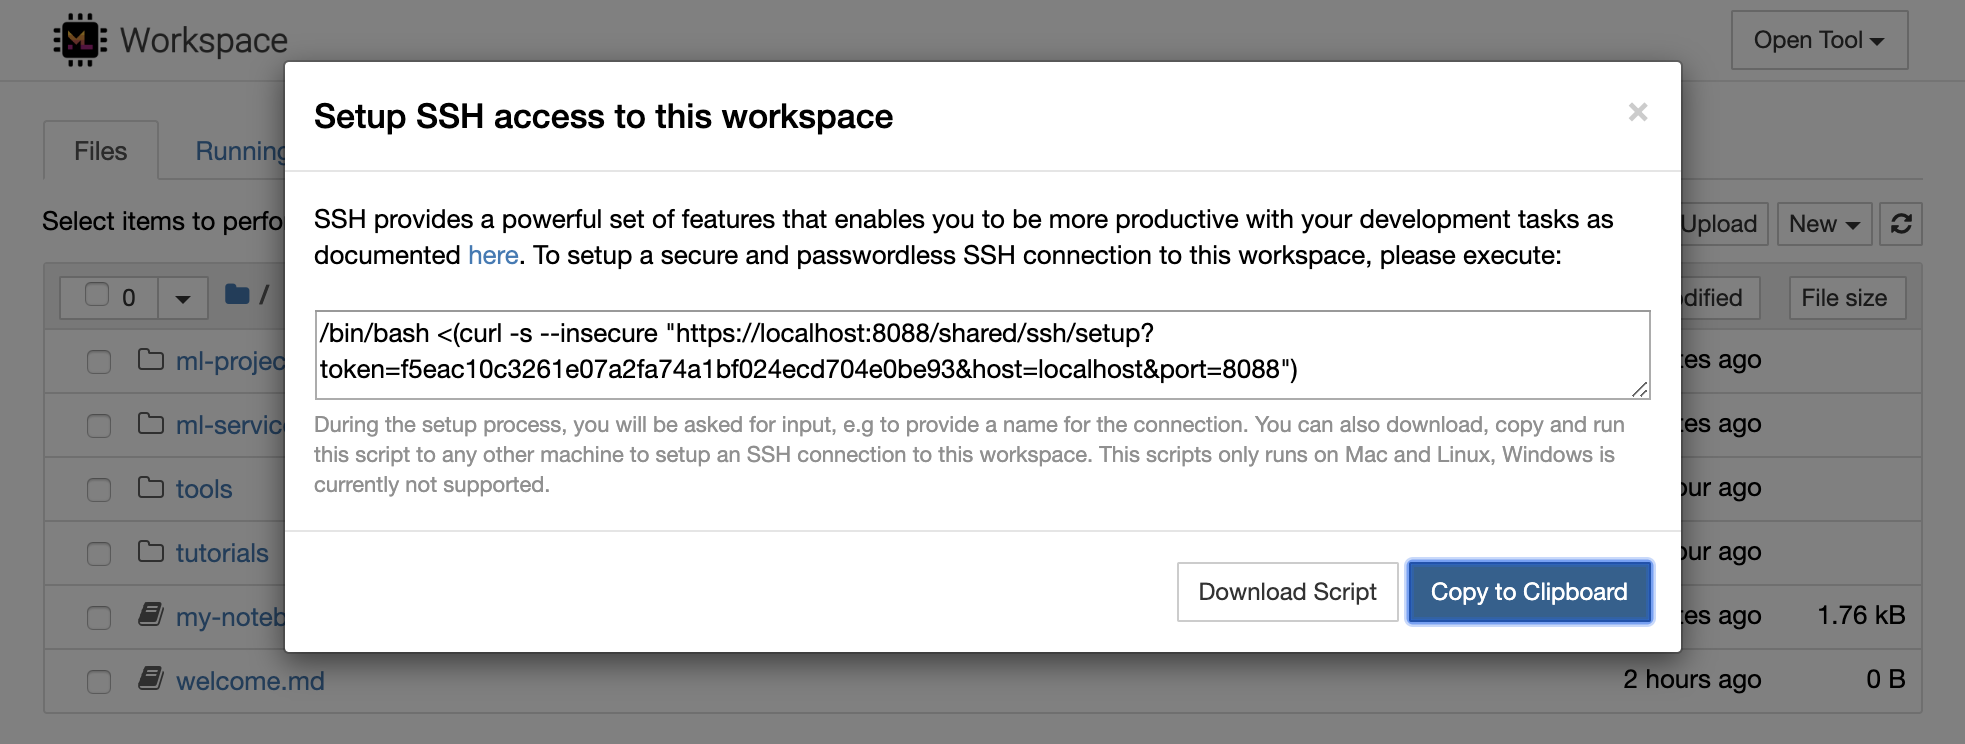
python -m http.server 1234在端口1234上启动HTTP服务器Open Tool -> Access Port ,输入端口1234 ,然后选择Get shareable link选项。Access ,您将看到Python的http.server提供的内容。SSH提供了一套强大的功能,使您能够对开发任务提高效率。您可以通过选择Open Tool -> SSH来轻松地将安全且无密码的SSH连接设置为工作区。这将生成一个安全的设置命令,该命令可以在任何Linux或Mac机器上运行,以配置无密码和安全的SSH连接到工作区。另外,您还可以下载设置脚本并运行它(而不是使用命令)。
该设置脚本仅在Mac和Linux上运行。 Windows当前不支持。
只需在计算机上运行设置命令或脚本,从您要设置与工作区的连接并输入连接的名称(例如, my-workspace )。在此过程中,您可能还会要求您提供一些其他输入,例如,如果安装了remote_ikernel ,则安装远程内核。无密码的SSH连接成功设置并进行了测试后,您可以通过简单地执行ssh my-workspace安全地连接到工作区。
除了能够在远程计算机上执行命令的能力外,SSH还提供了各种其他功能,这些功能可以改善您的开发工作流程,如以下各节所述。
SSH连接可用于从远程计算机到本地计算机的隧道应用程序端口,反之亦然。例如5901您可以5000执行:
ssh -nNT -L 5000:localhost:5901 my-workspace要将应用程序端口从您的本地计算机公开到工作区,请使用
-R选项(而不是-L)。
建立隧道后,您可以在本地计算机上使用自己喜欢的VNC查看器,并连接到vnc://localhost:5000 (默认密码: vncpassword )。为了使隧道连接更具耐药性和可靠性,我们建议使用摩托什自动重新启动SSH隧道,以免连接死亡:
autossh -M 0 -f -nNT -L 5000:localhost:5901 my-workspace当您在工作区内启动任何基于服务器的工具时,端口隧道非常有用。在默认设置中,工作区具有各种已经在不同端口上运行的工具,例如:
8080 :主工作区端口,可访问所有集成工具。8090 :Jupyter服务器。8054 :VS代码服务器。5901 :VNC服务器。22 :SSH服务器。您可以在主管配置中找到有关所有工具的端口信息。
有关港口隧道/转发的更多信息,我们建议本指南。
SCP允许通过SSH连接将文件和目录牢固地复制到不同机器之间的,从不同的机器之间复制。例如,要将本地文件( ./local-file.txt )复制到工作区内的/workspace文件夹中,请执行:
scp ./local-file.txt my-workspace:/workspace要将/workspace目录从my-workspace复制到本地计算机的工作目录,请执行:
scp -r my-workspace:/workspace .有关SCP的更多信息,我们建议本指南。
Rsync是一种实用程序,可通过比较文件的修改时间和大小来有效地在不同机器之间(例如,通过SSH连接)之间传输和同步文件。 RSYNC命令将确定每次运行时都需要更新哪些文件,这比使用SCP或SFTP之类的内容更有效,更方便。例如,将本地文件夹( ./local-project-folder/ )的所有内容同步到工作空间内的/workspace/remote-project-folder/ folder中,请执行:
rsync -rlptzvP --delete --exclude= " .git " " ./local-project-folder/ " " my-workspace:/workspace/remote-project-folder/ "如果您在工作空间上的文件夹内有一些更改,则可以通过更改源和目标参数来将这些更改同步到本地文件夹:
rsync -rlptzvP --delete --exclude= " .git " " my-workspace:/workspace/remote-project-folder/ " " ./local-project-folder/ "每次您要同步文件的最新副本时,都可以重新运行这些命令。 RSYNC将确保仅转移更新。
您可以在此人页面上找到有关Rsync的更多信息。
除了复制和同步数据外,SSH连接还可以用于通过SSHFS将目录从远程计算机安装到本地文件系统中。例如,将my-workspace的/workspace目录安装到本地路径(例如/local/folder/path )中,请执行:
sshfs -o reconnect my-workspace:/workspace /local/folder/path安装远程目录后,您可以与任何本地目录和文件相同的方式与远程文件系统进行交互。
有关SSHFS的更多信息,我们建议本指南。
该工作空间可以集成并用作远程运行时(也称为远程内核/机器/解释器),用于各种流行的开发工具和IDE,例如Jupyter,VS Code,Pycharm,Colab或Atom氢。因此,您可以将运行的本地计算机上的喜欢的开发工具连接到远程计算机以执行代码。这使远程托管计算资源具有本地质量的开发体验。
这些集成通常需要从本地计算机到工作区的无密码SSH连接。要设置SSH连接,请按照SSH访问部分中说明的步骤操作。
可以使用远程_ikernel工具将工作区添加到jupyter实例中作为远程内核。如果您已经在本地计算机上安装了远程_ikernel( pip install remote_ikernel ),则工作区的SSH设置脚本将自动为您提供设置远程内核连接的选项。
在远程计算机上运行内核时,笔记本本身将保存到本地文件系统上,但是内核只能访问运行内核的远程计算机的文件系统。如果需要同步数据,则可以使用SSH访问部分中的RSYNC,SCP或SSHFS。
如果您想手动设置和管理远程内核,请使用远程_ikernel命令行工具,如下所示:
 # Change my-workspace with the name of a workspace SSH connection
remote_ikernel manage --add
    --interface=ssh
    --kernel_cmd= " ipython kernel -f {connection_file} "
    --name= " ml-server (Python) "
    --host= " my-workspace "
您可以使用remote_ikernel命令行功能列表( remote_ikernel manage --show )或删除( remote_ikernel manage --delete <REMOTE_KERNEL_NAME> )远程内核连接。
Visual Studio Code Remote -SSH扩展程序允许您在任何具有SSH访问的远程机器上打开一个远程文件夹,并像文件夹在自己的计算机上一样使用它。连接到远程计算机后,您可以在远程文件系统上的任何地方与文件和文件夹进行交互,并充分利用VS Code的功能集(Intellisense,调试和扩展支持)。通过工作区SSH设置脚本配置的无密码SSH连接的发现和处理框架内的开箱即用。启用您的本地VS代码应用程序连接到工作区:
您可以在本指南中找到有关远程SSH扩展的其他功能和信息。
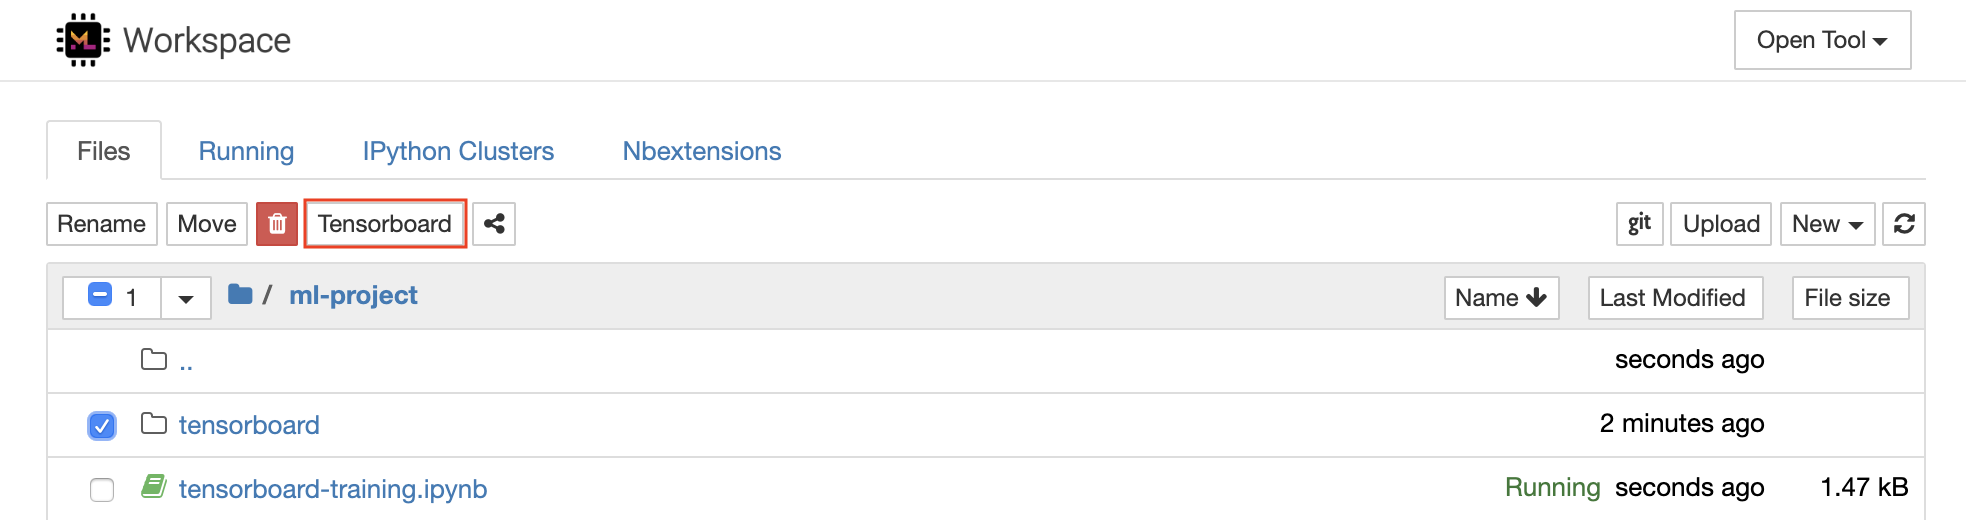
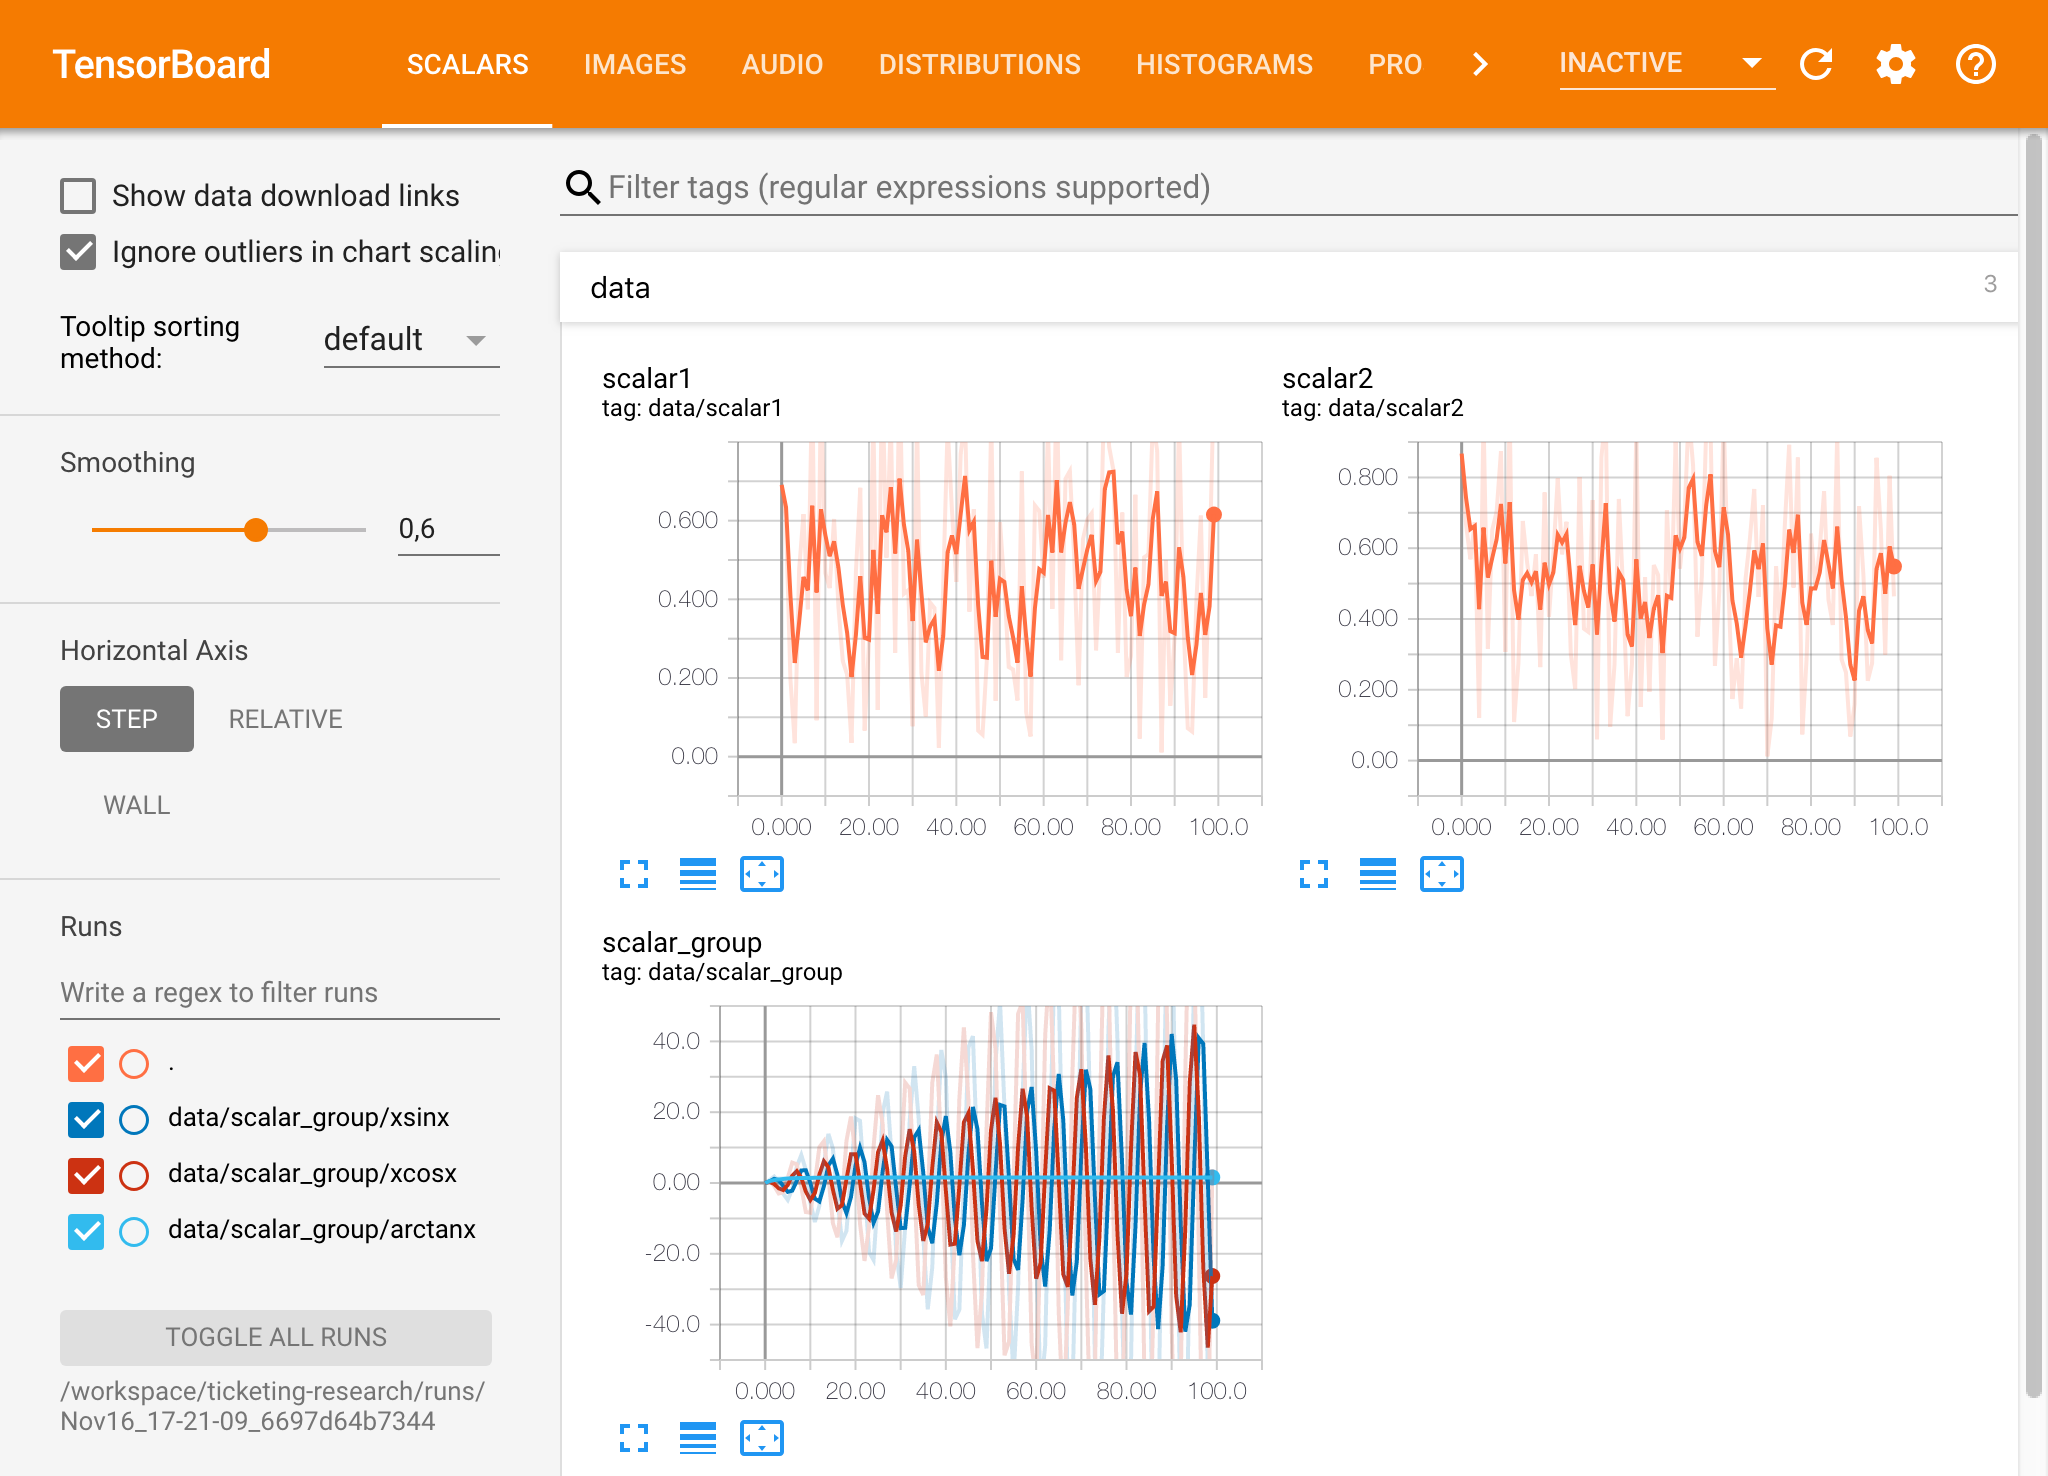
Tensorboard提供了一套可视化工具,以使其更易于理解,调试和优化您的实验运行。它包括标量,直方图,模型结构,嵌入以及文本和图像可视化的记录功能。该工作区已预安装了jupyter_tensorboard扩展名,该扩展将张量板集成到jupyter接口与功能性以启动,管理和停止实例。您可以为有效日志目录打开新实例,如下所示:
如果您在有效的日志目录中打开了张板实例,则将看到已记录数据的可视化量:
张板可以与除张量之外的许多其他ML框架结合使用。通过使用TensorBoardX库,您可以基本上从任何基于Python的库中登录。另外,如下所述,Pytorch具有直接的张板集成。
如果您希望直接在笔记本中查看张板,则可以使用以下Jupyter Magic :
 %load_ext tensorboard
%tensorboard --logdir /workspace/path/to/logs
工作区提供了两种预装的基于Web的工具,可在模型培训和其他实验任务中帮助开发人员,以了解系统上发生的一切并找出性能瓶颈。
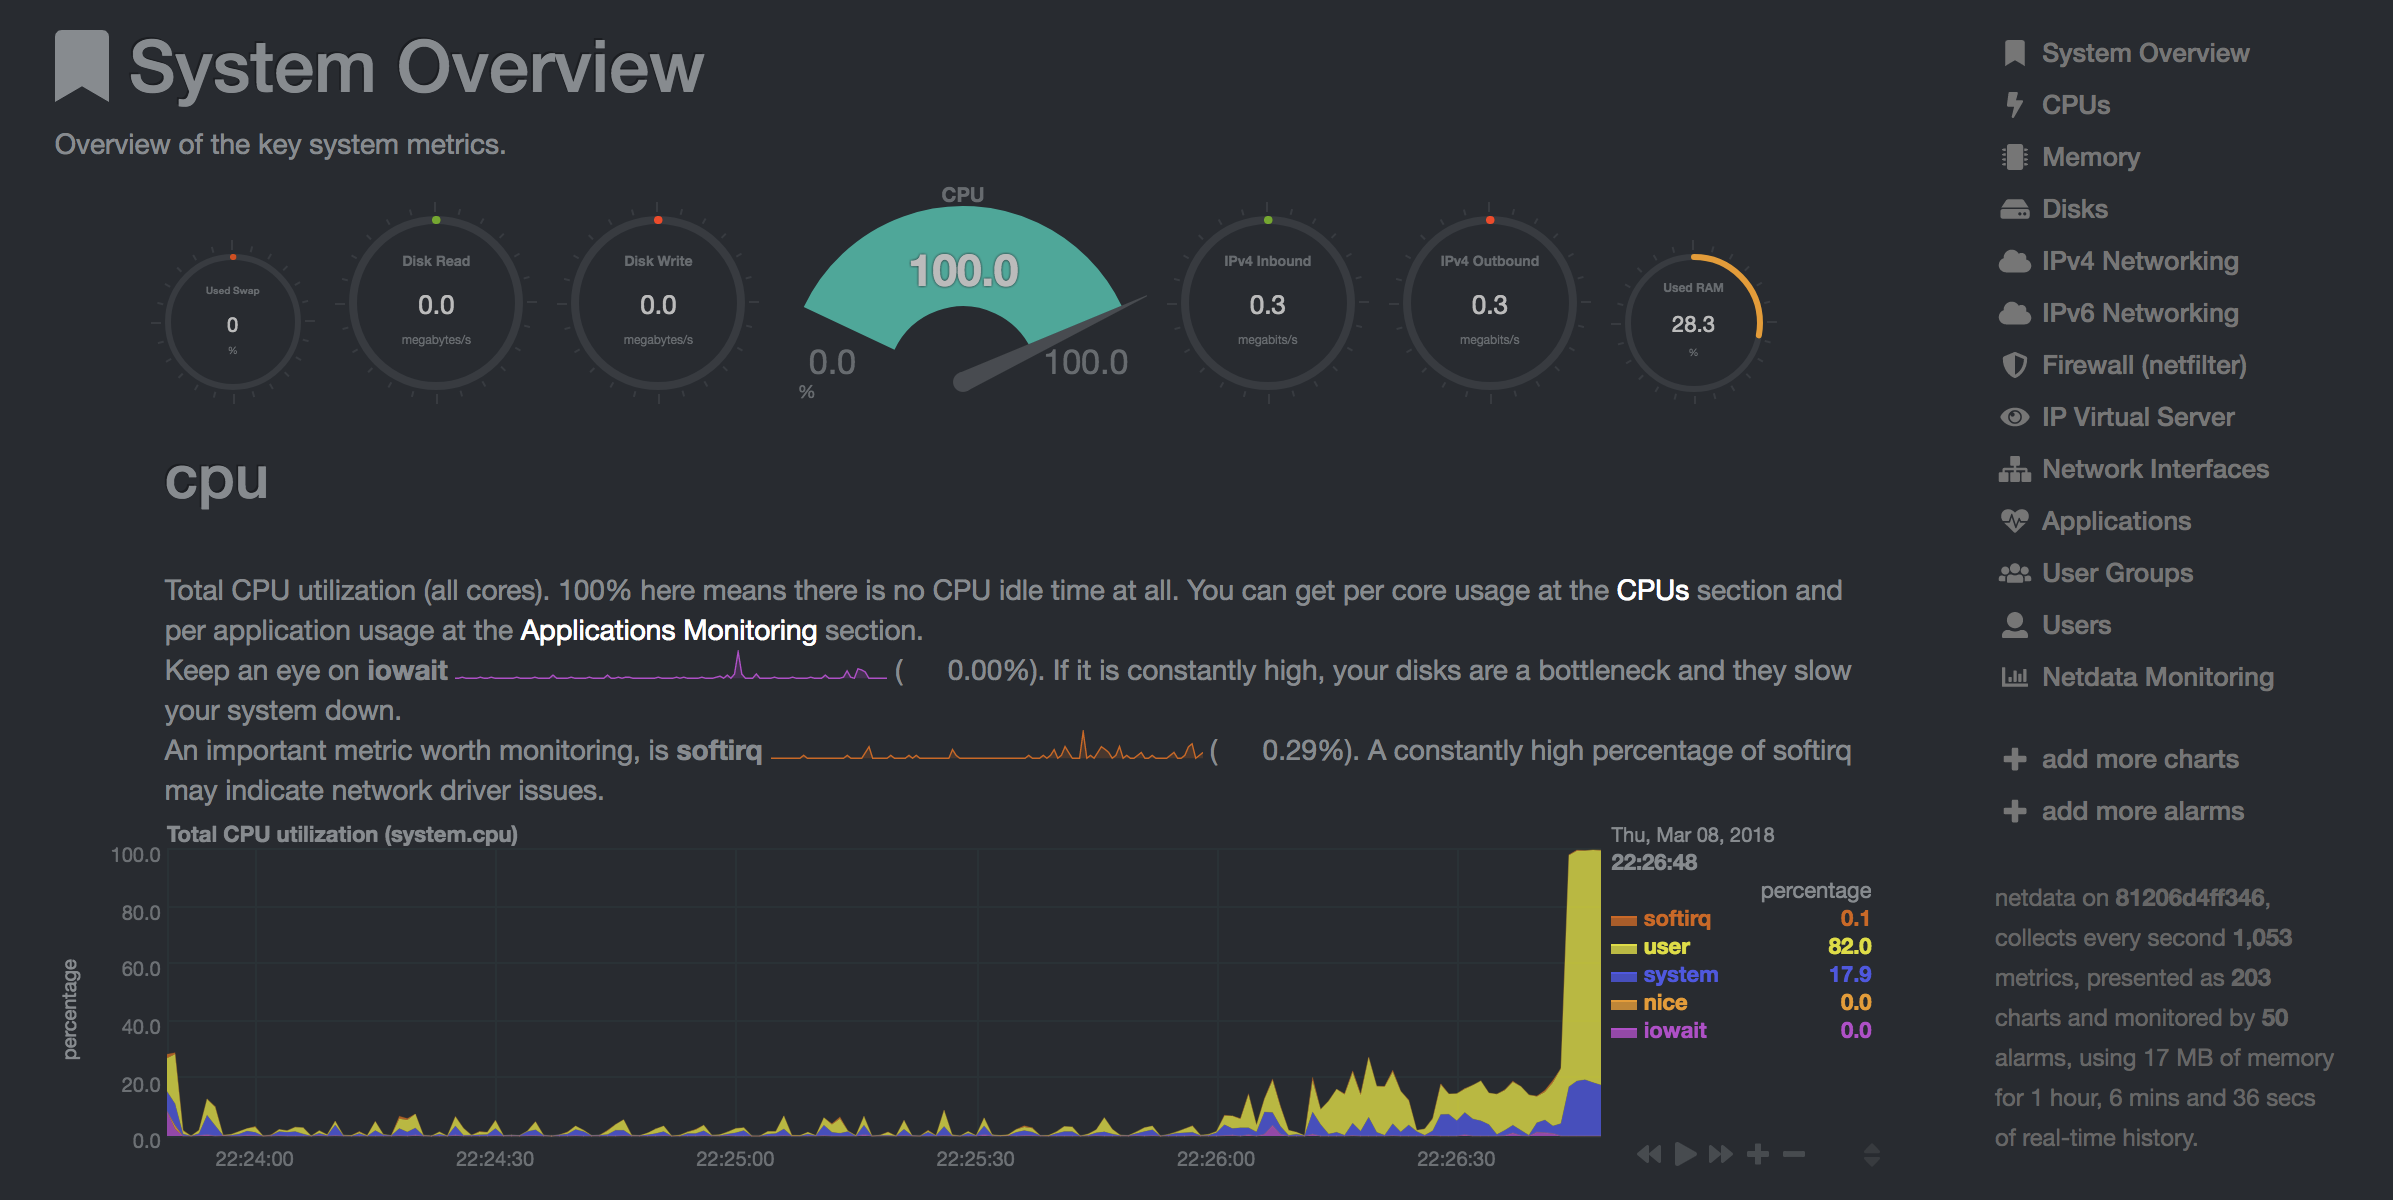
NetData( Open Tool -> Netdata )是一种实时硬件和性能监视仪表板,可视化Linux系统上的过程和服务。它监视有关CPU,GPU,内存,磁盘,网络,进程等的指标。
Glances( Open Tool -> Glances )也是一个基于Web的硬件监视仪表板,可以用作NetData的替代方案。
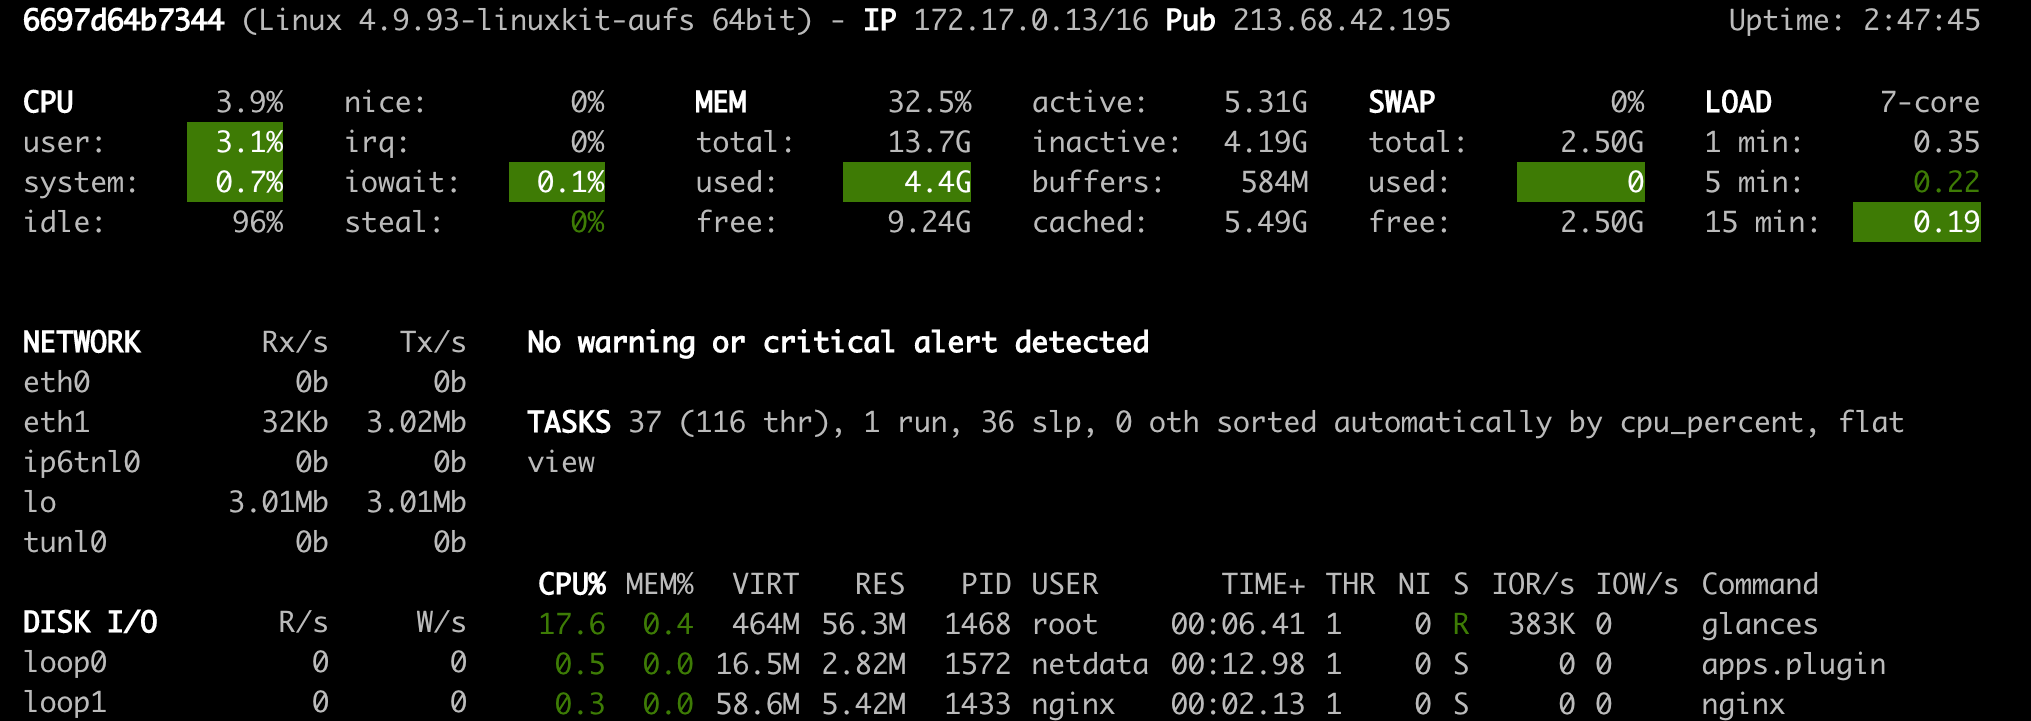
Netdata和Glances将向您显示工作区容器正在运行的整个计算机的硬件统计信息。
作业被定义为任何运行一定时间完成的计算任务,例如模型培训或数据管道。
工作区映像也可以用于执行任意Python代码,而无需启动任何预安装的工具。 This provides a seamless way to productize your ML projects since the code that has been developed interactively within the workspace will have the same environment and configuration when run as a job via the same workspace image.
To run Python code as a job, you need to provide a path or URL to a code directory (or script) via EXECUTE_CODE . The code can be either already mounted into the workspace container or downloaded from a version control system (eg, git or svn) as described in the following sections. The selected code path needs to be python executable. In case the selected code is a directory (eg, whenever you download the code from a VCS) you need to put a __main__.py file at the root of this directory. The __main__.py needs to contain the code that starts your job.
You can execute code directly from Git, Mercurial, Subversion, or Bazaar by using the pip-vcs format as described in this guide. For example, to execute code from a subdirectory of a git repository, just run:
docker run --env EXECUTE_CODE= " git+https://github.com/ml-tooling/ml-workspace.git#subdirectory=resources/tests/ml-job " mltooling/ml-workspace:0.13.2For additional information on how to specify branches, commits, or tags please refer to this guide.
In the following example, we mount and execute the current working directory (expected to contain our code) into the /workspace/ml-job/ directory of the workspace:
docker run -v " ${PWD} :/workspace/ml-job/ " --env EXECUTE_CODE= " /workspace/ml-job/ " mltooling/ml-workspace:0.13.2In the case that the pre-installed workspace libraries are not compatible with your code, you can install or change dependencies by just adding one or multiple of the following files to your code directory:
requirements.txt : pip requirements format for pip-installable dependencies.environment.yml : conda environment file to create a separate Python environment.setup.sh : A shell script executed via /bin/bash . The execution order is 1. environment.yml -> 2. setup.sh -> 3. requirements.txt
You can test your job code within the workspace (started normally with interactive tools) by executing the following python script:
python /resources/scripts/execute_code.py /path/to/your/jobIt is also possible to embed your code directly into a custom job image, as shown below:
 FROM mltooling/ml-workspace:0.13.2

# Add job code to image
COPY ml-job /workspace/ml-job
ENV EXECUTE_CODE=/workspace/ml-job

# Install requirements only
RUN python /resources/scripts/execute_code.py --requirements-only

# Execute only the code at container startup
CMD [ "python" , "/resources/docker-entrypoint.py" , "--code-only" ]The workspace is pre-installed with many popular interpreters, data science libraries, and ubuntu packages:
conda , pip , apt-get , npm , yarn , sdk , poetry , gdebi ...The full list of installed tools can be found within the Dockerfile.
For every minor version release, we run vulnerability, virus, and security checks within the workspace using safety, clamav, trivy, and snyk via docker scan to make sure that the workspace environment is as secure as possible. We are committed to fix and prevent all high- or critical-severity vulnerabilities. You can find some up-to-date reports here.
The workspace provides a high degree of extensibility. Within the workspace, you have full root & sudo privileges to install any library or tool you need via terminal (eg, pip , apt-get , conda , or npm ). You can open a terminal by one of the following ways:
New -> TerminalApplications -> Terminal EmulatorFile -> New -> TerminalTerminal -> New Terminal Additionally, pre-installed tools such as Jupyter, JupyterLab, and Visual Studio Code each provide their own rich ecosystem of extensions. The workspace also contains a collection of installer scripts for many commonly used development tools or libraries (eg, PyCharm , Zeppelin , RStudio , Starspace ). You can find and execute all tool installers via Open Tool -> Install Tool . Those scripts can be also executed from the Desktop VNC (double-click on the script within the Tools folder on the Desktop VNC).
For example, to install the Apache Zeppelin notebook server, simply execute:
/resources/tools/zeppelin.sh --port=1234 After installation, refresh the Jupyter website and the Zeppelin tool will be available under Open Tool -> Zeppelin . Other tools might only be available within the Desktop VNC (eg, atom or pycharm ) or do not provide any UI (eg, starspace , docker-client ).
As an alternative to extending the workspace at runtime, you can also customize the workspace Docker image to create your own flavor as explained in the FAQ section.
The workspace can be extended in many ways at runtime, as explained here. However, if you like to customize the workspace image with your own software or configuration, you can do that via a Dockerfile as shown below:
 # Extend from any of the workspace versions/flavors
FROM mltooling/ml-workspace:0.13.2

# Run you customizations, e.g.
RUN
    # Install r-runtime, r-kernel, and r-studio web server from provided install scripts
    /bin/bash $RESOURCES_PATH/tools/r-runtime.sh --install &&
    /bin/bash $RESOURCES_PATH/tools/r-studio-server.sh --install &&
    # Cleanup Layer - removes unneccessary cache files
    clean-layer.sh
Finally, use docker build to build your customized Docker image.
For a more comprehensive Dockerfile example, take a look at the Dockerfile of the R-flavor.
To update a running workspace instance to a more recent version, the running Docker container needs to be replaced with a new container based on the updated workspace image.
All data within the workspace that is not persisted to a mounted volume will be lost during this update process. As mentioned in the persist data section, a volume is expected to be mounted into the /workspace folder. All tools within the workspace are configured to make use of the /workspace folder as the root directory for all source code and data artifacts. During an update, data within other directories will be removed, including installed/updated libraries or certain machine configurations. We have integrated a backup and restore feature ( CONFIG_BACKUP_ENABLED ) for various selected configuration files/folders, such as the user's Jupyter/VS-Code configuration, ~/.gitconfig , and ~/.ssh .
If the workspace is deployed via Docker (Kubernetes will have a different update process), you need to remove the existing container (via docker rm ) and start a new one (via docker run ) with the newer workspace image. Make sure to use the same configuration, volume, name, and port. For example, a workspace (image version 0.8.7 ) was started with this command:
 docker run -d
    -p 8080:8080
    --name "ml-workspace"
    -v "/path/on/host:/workspace"
    --env AUTHENTICATE_VIA_JUPYTER="mytoken"
    --restart always
    mltooling/ml-workspace:0.8.7
and needs to be updated to version 0.9.1 , you need to:
docker stop "ml-workspace" && docker rm "ml-workspace"docker run -d -p 8080:8080 --name "ml-workspace" -v "/path/on/host:/workspace" --env AUTHENTICATE_VIA_JUPYTER="mytoken" --restart always mltooling/ml-workspace:0.9.1 If you want to directly connect to the workspace via a VNC client (not using the noVNC webapp), you might be interested in changing certain VNC server configurations. To configure the VNC server, you can provide/overwrite the following environment variables at container start (via docker run option: --env ):
| 多变的 | 描述 | 默认 |
|---|---|---|
| VNC_PW | Password of VNC connection. This password only needs to be secure if the VNC server is directly exposed. If it is used via noVNC, it is already protected based on the configured authentication mechanism. | vncpassword |
| VNC_RESOLUTION | Default desktop resolution of VNC connection. When using noVNC, the resolution will be dynamically adapted to the window size. | 1600x900 |
| VNC_COL_DEPTH | Default color depth of VNC connection. | 24 |
Unfortunately, we currently do not support using a non-root user within the workspace. We plan to provide this capability and already started with some refactoring to allow this configuration. However, this still requires a lot more work, refactoring, and testing from our side.
Using root-user (or users with sudo permission) within containers is generally not recommended since, in case of system/kernel vulnerabilities, a user might be able to break out of the container and be able to access the host system. Since it is not very common to have such problematic kernel vulnerabilities, the risk of a severe attack is quite minimal. As explained in the official Docker documentation, containers (even with root users) are generally quite secure in preventing a breakout to the host. And compared to many other container use-cases, we actually want to provide the flexibility to the user to have control and system-level installation permissions within the workspace container.
The workspace comes preinstalled with various common tools to create isolated Python environments (virtual environments). The following sections provide a quick-intro on how to use these tools within the workspace. You can find information on when to use which tool here. Please refer to the documentation of the given tool for additional usage information.
venv (recommended):
To create a virtual environment via venv, execute the following commands:
 # Create environment in the working directory
python -m venv my-venv
# Activate environment in shell
source ./my-venv/bin/activate
# Optional: Create Jupyter kernel for this environment
pip install ipykernel
python -m ipykernel install --user --name=my-venv --display-name= " my-venv ( $( python --version ) ) "
# Optional: Close enviornment session
deactivate
pipenv (recommended):
To create a virtual environment via pipenv, execute the following commands:
 # Create environment in the working directory
pipenv install
# Activate environment session in shell
pipenv shell
# Optional: Create Jupyter kernel for this environment
pipenv install ipykernel
python -m ipykernel install --user --name=my-pipenv --display-name= " my-pipenv ( $( python --version ) ) "
# Optional: Close environment session
exit
Virtualenv :
To create a virtual environment via virtualenv, execute the following commands:
 # Create environment in the working directory
virtualenv my-virtualenv
# Activate environment session in shell
source ./my-virtualenv/bin/activate
# Optional: Create Jupyter kernel for this environment
pip install ipykernel
python -m ipykernel install --user --name=my-virtualenv --display-name= " my-virtualenv ( $( python --version ) ) "
# Optional: Close environment session
deactivate
conda :
To create a virtual environment via conda, execute the following commands:
 # Create environment (globally)
conda create -n my-conda-env
# Activate environment session in shell
conda activate my-conda-env
# Optional: Create Jupyter kernel for this environment
python -m ipykernel install --user --name=my-conda-env --display-name= " my-conda-env ( $( python --version ) ) "
# Optional: Close environment session
conda deactivate
Tip: Shell Commands in Jupyter Notebooks:
If you install and use a virtual environment via a dedicated Jupyter Kernel and use shell commands within Jupyter (eg !pip install matplotlib ), the wrong python/pip version will be used. To use the python/pip version of the selected kernel, do the following instead:
 import sys
!{ sys . executable } - m pip install matplotlibThe workspace provides three easy options to install different Python versions alongside the main Python instance: pyenv, pipenv (recommended), conda.
pipenv (recommended):
To install a different python version (eg 3.7.8 ) within the workspace via pipenv, execute the following commands:
 # Install python vers
pipenv install --python=3.7.8
# Activate environment session in shell
pipenv shell
# Check python installation
python --version
# Optional: Create Jupyter kernel for this environment
pipenv install ipykernel
python -m ipykernel install --user --name=my-pipenv --display-name= " my-pipenv ( $( python --version ) ) "
# Optional: Close environment session
exit
pyenv :
To install a different python version (eg 3.7.8 ) within the workspace via pyenv, execute the following commands:
 # Install python version
pyenv install 3.7.8
# Make globally accessible
pyenv global 3.7.8
# Activate python version in shell
pyenv shell 3.7.8
# Check python installation
python3.7 --version
# Optional: Create Jupyter kernel for this python version
python3.7 -m pip install ipykernel
python3.7 -m ipykernel install --user --name=my-pyenv-3.7.8 --display-name= " my-pyenv (Python 3.7.8) "
conda :
To install a different python version (eg 3.7.8 ) within the workspace via conda, execute the following commands:
 # Create environment with python version
conda create -n my-conda-3.7 python=3.7.8
# Activate environment session in shell
conda activate my-conda-3.7
# Check python installation
python --version
# Optional: Create Jupyter kernel for this python version
pip install ipykernel
python -m ipykernel install --user --name=my-conda-3.7 --display-name= " my-conda ( $( python --version ) ) "
# Optional: Close environment session
conda deactivate
Tip: Shell Commands in Jupyter Notebooks:
If you install and use another Python version via a dedicated Jupyter Kernel and use shell commands within Jupyter (eg !pip install matplotlib ), the wrong python/pip version will be used. To use the python/pip version of the selected kernel, do the following instead:
 import sys
!{ sys . executable } - m pip install matplotlib Certain desktop tools (eg, recent versions of Firefox) or libraries (eg, Pytorch - see Issues: 1, 2) might crash if the shared memory size ( /dev/shm ) is too small. The default shared memory size of Docker is 64MB, which might not be enough for a few tools. You can provide a higher shared memory size via the shm-size docker run option:
docker run --shm-size=2G mltooling/ml-workspace:0.13.2 In general, the performance of running code within Docker is nearly identical compared to running it directly on the machine. However, in case you have limited the container's CPU quota (as explained in this section), the container can still see the full count of CPU cores available on the machine and there is no technical way to prevent this. Many libraries and tools will use the full CPU count (eg, via os.cpu_count() ) to set the number of threads used for multiprocessing/-threading. This might cause the program to start more threads/processes than it can efficiently handle with the available CPU quota, which can tremendously slow down the overall performance. Therefore, it is important to set the available CPU count or the maximum number of threads explicitly to the configured CPU quota. The workspace provides capabilities to detect the number of available CPUs automatically, which are used to configure a variety of common libraries via environment variables such as OMP_NUM_THREADS or MKL_NUM_THREADS . It is also possible to explicitly set the number of available CPUs at container startup via the MAX_NUM_THREADS environment variable (see configuration section). The same environment variable can also be used to get the number of available CPUs at runtime.
Even though the automatic configuration capabilities of the workspace will fix a variety of inefficiencies, we still recommend configuring the number of available CPUs with all libraries explicitly.例如:
 import os
MAX_NUM_THREADS = int ( os . getenv ( "MAX_NUM_THREADS" ))

# Set in pytorch
import torch
torch . set_num_threads ( MAX_NUM_THREADS )

# Set in tensorflow
import tensorflow as tf
config = tf . ConfigProto (
    device_count = { "CPU" : MAX_NUM_THREADS },
    inter_op_parallelism_threads = MAX_NUM_THREADS ,
    intra_op_parallelism_threads = MAX_NUM_THREADS ,
)
tf_session = tf . Session ( config = config )

# Set session for keras
import keras . backend as K
K . set_session ( tf_session )

# Set in sklearn estimator
from sklearn . linear_model import LogisticRegression
LogisticRegression ( n_jobs = MAX_NUM_THREADS ). fit ( X , y )

# Set for multiprocessing pool
from multiprocessing import Pool

with Pool ( MAX_NUM_THREADS ) as pool :
results = pool . map ( lst )If you encounter the following error within the container logs when starting the workspace, it will most likely not be possible to run the workspace on your hardware:
exited: nginx (terminated by SIGILL (core dumped); not expected)
The OpenResty/Nginx binary package used within the workspace requires to run on a CPU with SSE4.2 support (see this issue). Unfortunately, some older CPUs do not have support for SSE4.2 and, therefore, will not be able to run the workspace container. On Linux, you can check if your CPU supports SSE4.2 when looking into the cat /proc/cpuinfo flags section. If you encounter this problem, feel free to notify us by commenting on the following issue: #30.
Requirements : Docker and Act are required to be installed on your machine to execute the build process.
To simplify the process of building this project from scratch, we provide build-scripts - based on universal-build - that run all necessary steps (build, test, and release) within a containerized environment. To build and test your changes, execute the following command in the project root folder:
act -b -j buildUnder the hood it uses the build.py files in this repo based on the universal-build library. So, if you want to build it locally, you can also execute this command in the project root folder to build the docker container:
python build.py --makeFor additional script options:
python build.py --helpRefer to our contribution guides for more detailed information on our build scripts and development process.
Licensed Apache 2.0 . Created and maintained with ❤️ by developers from Berlin.


