L2M
1.0.0
Thomas Schmied 1 , Markus Hofmarcher 2 , Fabian Paischer 1 , Razvan Pacscanu 3,4 , Sepp Hochreiter 1,5
1 Ellis Unit Linz และ Lit AI Lab, สถาบันการเรียนรู้เครื่องจักร, Johannes Kepler University Linz, ออสเตรีย
2 JKU LIT SAL ESPML LAB, สถาบันการเรียนรู้เครื่อง, โยฮันเนสเคปเลอร์มหาวิทยาลัยลินซ์, ออสเตรีย
3 Google DeepMind
4 UCL
5 สถาบันวิจัยขั้นสูงด้านปัญญาประดิษฐ์ (IARAI), เวียนนา, ออสเตรีย
ที่เก็บนี้มีซอร์สโค้ดสำหรับ "การเรียนรู้ที่จะปรับโมเดลที่ผ่านการฝึกอบรมมาก่อนใน RL" ที่ได้รับการยอมรับที่ Neurips 2023 กระดาษมีให้ที่นี่
codebase นี้รองรับโมเดลการตัดสินใจของ Training Decision Transformer (DT) ออนไลน์หรือจากชุดข้อมูลออฟไลน์ในโดเมนต่อไปนี้:
codebase นี้อาศัยเฟรมเวิร์กโอเพนซอร์ซรวมถึง:
มีอะไรอยู่ในที่เก็บนี้?
 .
├── configs                    # Contains all .yaml config files for Hydra to configure agents, envs, etc.
│   ├── agent_params
│   ├── wandb_callback_params
│   ├── env_params
│   ├── eval_params
│   ├── run_params
│   └── config.yaml            # Main config file for Hydra - specifies log/data/model directories.
├── continual_world            # Submodule for Continual-World.
├── dmc2gym_custom             # Custom wrapper for DMControl.
├── figures
├── scripts                    # Scrips for running experiments on Slurm/PBS in multi-gpu/node setups.
├── src                        # Main source directory.
│   ├── algos                  # Contains agent/model/prompt classes.
│   ├── augmentations          # Image augmentations.
│   ├── buffers                # Contains replay trajectory buffers.
│   ├── callbacks              # Contains callbacks for training (e.g., WandB, evaluation, etc.).
│   ├── data                   # Contains data utilities (e.g., for downloading Atari)
│   ├── envs                   # Contains functionality for creating environments.
│   ├── exploration            # Contains exploration strategies.
│   ├── optimizers             # Contains (custom) optimizers.
│   ├── schedulers             # Contains learning rate schedulers.
│   ├── tokenizers_custom      # Contains custom tokenizers for discretizing states/actions.
│   ├── utils
│   └── __init__.py
├── LICENSE
├── README.md
├── environment.yaml
├── requirements.txt
└── main.py                     # Main entry point for training/evaluating agents.
การกำหนดค่าสภาพแวดล้อมและการพึ่งพามีอยู่ใน environment.yaml และ requirements.txt . txt
ก่อนอื่นสร้างสภาพแวดล้อม conda
 conda env create -f environment.yaml
conda activate mddt
จากนั้นติดตั้งข้อกำหนดที่เหลืออยู่ (ด้วย Mujoco ดาวน์โหลดแล้วหากไม่เห็นที่นี่):
pip install -r requirements.txt
เริ่มต้น Submodule continualworld และติดตั้ง:
 git submodule init
git submodule update
cd continualworld
pip install .
ติดตั้ง meta-world :
pip install git+https://github.com/rlworkgroup/metaworld.git@18118a28c06893da0f363786696cc792457b062b
ติดตั้ง DMC2GYM เวอร์ชันที่กำหนดเอง เวอร์ชันของเราทำให้ flatten_obs เป็นตัวเลือกและช่วยให้เราสามารถสร้างพื้นที่สังเกตการณ์เต็มรูปแบบของ DMControl envs ทั้งหมด
 cd dmc2gym_custom
pip install -e .
ดาวน์โหลด mujoco:
 mkdir ~/.mujoco
cd ~/.mujoco
wget https://www.roboti.us/download/mujoco200_linux.zip
unzip mujoco200_linux.zip
mv mujoco200_linux mujoco200
wget https://www.roboti.us/file/mjkey.txt
จากนั้นเพิ่มบรรทัดต่อไปนี้เป็น .bashrc :
export LD_LIBRARY_PATH=$LD_LIBRARY_PATH:~/.mujoco/mujoco200/bin
ปัญหาต่อไปนี้มีประโยชน์:
ก่อนอื่นติดตั้งแพ็คเกจต่อไปนี้:
 conda install -c conda-forge glew mesalib
conda install -c menpo glfw3 osmesa
pip install patchelf
สร้าง Symlink ด้วยตนเอง:
 cp /usr/lib64/libGL.so.1 $CONDA_PREFIX/lib
ln -s $CONDA_PREFIX/lib/libGL.so.1 $CONDA_PREFIX/lib/libGL.so
แล้วทำ:
 mkdir ~/rpm
cd ~/rpm
curl -o libgcrypt11.rpm ftp://ftp.pbone.net/mirror/ftp5.gwdg.de/pub/opensuse/repositories/home:/bosconovic:/branches:/home:/elimat:/lsi/openSUSE_Leap_15.1/x86_64/libgcrypt11-1.5.4-lp151.23.29.x86_64.rpm
rpm2cpio libgcrypt11.rpm | cpio -id
ในที่สุดส่งออกเส้นทางไปยังรอบ rpm (เพิ่มไปที่ ~/.bashrc ):
 export LD_LIBRARY_PATH=$LD_LIBRARY_PATH:~/rpm/usr/lib64
export LDFLAGS="-L/~/rpm/usr/lib64"
codebase นี้อาศัยไฮดราซึ่งกำหนดค่าการทดลองผ่านไฟล์ .yaml ไฮดราสร้างโครงสร้างโฟลเดอร์บันทึกโดยอัตโนมัติสำหรับการรันที่กำหนดตามที่ระบุไว้ในไฟล์ config.yaml ที่เกี่ยวข้อง
config.yaml เป็นจุดเริ่มต้นการกำหนดค่าหลักและมีพารามิเตอร์เริ่มต้น ไฟล์อ้างอิงไฟล์พารามิเตอร์เริ่มต้นที่เกี่ยวข้องภายใต้ defaults บล็อก นอกจากนี้ config.yaml มี 4 ค่าคงที่สำคัญที่กำหนดค่าเส้นทางไดเรกทอรี:
 LOG_DIR: ../logs
DATA_DIR: ../data
SSD_DATA_DIR: ../data
MODELS_DIR: ../models
ชุดข้อมูล genereated ถูกโฮสต์ผ่านเว็บเซิร์ฟเวอร์ของเรา ดาวน์โหลดชุดข้อมูล Meta-World และ DMControl ไปยัง DATA_DIR ที่ระบุ:
 # Meta-World
wget --recursive --no-parent --no-host-directories --cut-dirs=2 -R "index.html*" https://ml.jku.at/research/l2m/metaworld
# DMControl
wget --recursive --no-parent --no-host-directories --cut-dirs=2 -R "index.html*" https://ml.jku.at/research/l2m/dm_control_1M
ชุดข้อมูลยังมีอยู่ใน HuggingFace Hub ดาวน์โหลดโดยใช้ huggingface-cli :
 # Meta-World
huggingface-cli download ml-jku/meta-world --local-dir=./meta-world --repo-type dataset
# DMControl
huggingface-cli download ml-jku/dm_control --local-dir=./dm_control --repo-type dataset
เฟรมเวิร์กยังรองรับชุดข้อมูล Atari, D4RL และ Visual DMControl สำหรับ Atari และ Visual DMControl เราอ้างถึง readmes ที่เกี่ยวข้อง
ในต่อไปนี้เราให้ตัวอย่างตัวอย่างเกี่ยวกับวิธีเรียกใช้การทดลองในกระดาษ
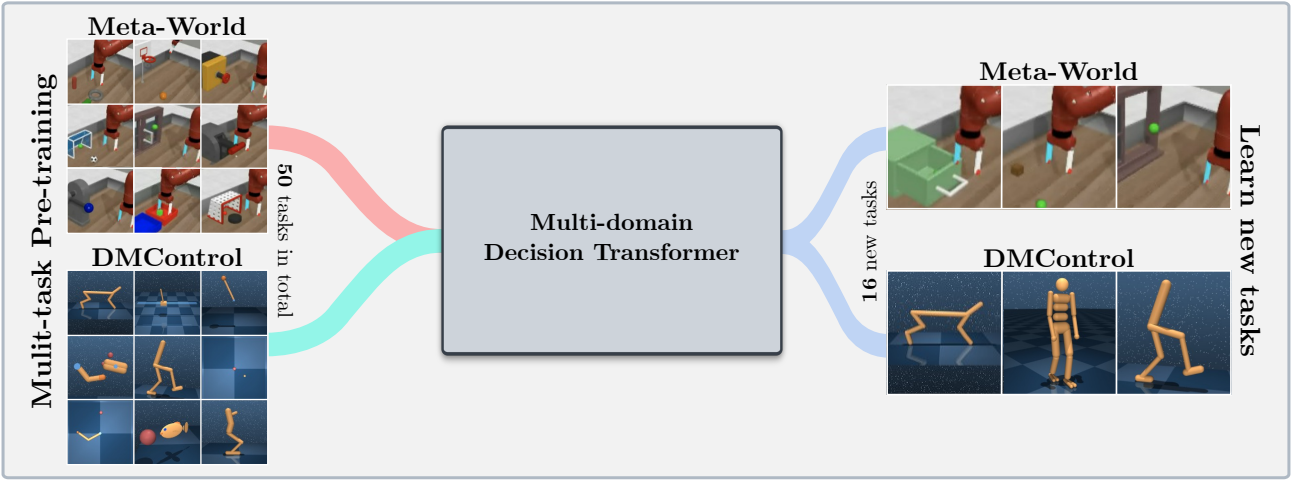
ในการฝึกอบรมโมเดลการตัดสินใจแบบหลายโดเมน 40 ม. (MDDT) บน MT40 + DMC10 ด้วย 3 เมล็ดใน GPU เดียววิ่ง:
python main.py -m experiment_name=pretrain seed=42,43,44 env_params=multi_domain_mtdmc run_params=pretrain eval_params=pretrain_disc agent_params=cdt_pretrain_disc agent_params.kind=MDDT agent_params/model_kwargs=multi_domain_mtdmc agent_params/data_paths=mt40v2_dmc10 +agent_params/replay_buffer_kwargs=multi_domain_mtdmc +agent_params.accumulation_steps=2
ในการปรับแต่งโมเดลที่ผ่านการฝึกอบรมล่วงหน้าโดยใช้ LORA ในงาน CW10 เดียวที่มี 3 เมล็ดวิ่ง:
python main.py -m experiment_name=cw10_lora seed=42,43,44 env_params=mt50_pretrain run_params=finetune eval_params=finetune agent_params=cdt_mpdt_disc agent_params/model_kwargs=mdmpdt_mtdmc agent_params/data_paths=cw10_v2_cwnet_2M +agent_params/replay_buffer_kwargs=mtdmc_ft agent_params/model_kwargs/prompt_kwargs=lora env_params.envid=hammer-v2 agent_params.data_paths.names='${env_params.envid}.pkl' env_params.eval_env_names=
ในการปรับแต่งโมเดลที่ผ่านการฝึกอบรมมาก่อนโดยใช้ L2M ในงาน CW10 ทั้งหมดในลักษณะที่เป็นลำดับด้วย 3 เมล็ดวิ่ง:
python main.py -m experiment_name=cw10_cl_l2m seed=42,43,44 env_params=multi_domain_ft env_params.eval_env_names=cw10_v2 run_params=finetune_coff eval_params=finetune_md_cl agent_params=cdt_mpdt_disc +agent_params.steps_per_task=100000 agent_params/model_kwargs=mdmpdt_mtdmc agent_params/data_paths=cw10_v2_cwnet_2M +agent_params/replay_buffer_kwargs=mtdmc_ft +agent_params.replay_buffer_kwargs.kind=continual agent_params/model_kwargs/prompt_kwargs=l2m_lora
สำหรับการฝึกอบรมหลาย GPU เราใช้ torchrun เครื่องมือขัดแย้งกับ hydra ดังนั้นปลั๊กอิน Launcher Hydra_Torchrun_launcher จึงถูกสร้างขึ้น
ในการเปิดใช้งานปลั๊กอินให้โคลน hydra Repo, CD ไปยัง contrib/hydra_torchrun_launcher และ PIP ติดตั้งปลั๊กอิน:
 git clone https://github.com/facebookresearch/hydra.git
cd hydra/contrib/hydra_torchrun_launcher
pip install -e .
ปลั๊กอินสามารถใช้ได้จาก commandline:
python main.py -m hydra/launcher=torchrun hydra.launcher.nproc_per_node=4 [...]
การรันการทดลองบนคลัสเตอร์ท้องถิ่นบนโหนดเดียวสามารถทำได้ผ่าน CUDA_VISIBLE_DEVICES เพื่อระบุ GPU ที่จะใช้:
CUDA_VISIBLE_DEVICES=0,1,2,3 python main.py -m hydra/launcher=torchrun hydra.launcher.nproc_per_node=4 [...]
บน Slurm การดำเนินการ torchrun บนโหนดเดียวทำงานเหมือนกัน เช่นการทำงานบน 2 GPU ในโหนดเดียว:
 #!/bin/bash
#SBATCH --account=X
#SBATCH --qos=X
#SBATCH --partition=X
#SBATCH --nodes=1
#SBATCH --gpus=2
#SBATCH --cpus-per-task=32

source activate mddt
python main.py -m hydra/launcher=torchrun hydra.launcher.nproc_per_node=2 [...]
ตัวอย่างสคริปต์สำหรับการฝึกอบรมหลาย GPU เกี่ยวกับ Slurm หรือ PBS มีอยู่ใน scripts
การทำงานบน Slurm/PBS ในการตั้งค่าแบบหลายโหนดต้องใช้ความระมัดระวังมากขึ้น ตัวอย่างสคริปต์มีให้ใน scripts
หากคุณพบว่าสิ่งนี้มีประโยชน์โปรดพิจารณาอ้างถึงผลงานของเรา:
 @article{schmied2024learning,
  title={Learning to Modulate pre-trained Models in RL},
  author={Schmied, Thomas and Hofmarcher, Markus and Paischer, Fabian and Pascanu, Razvan and Hochreiter, Sepp},
  journal={Advances in Neural Information Processing Systems},
  volume={36},
  year={2024}
}


